
EAAC200 - Alarm clock radio Electrohome - Free user manual and instructions
Find the device manual for free EAAC200 Electrohome in PDF.

| Product Type | Digital AM/FM Clock Radio |
| Brand | Electrohome |
| Model | EAAC200 |
| Power Supply | AC 120 V ~ 60 Hz |
| Backup Power | 2 AA batteries (not included) |
| Frequency Ranges | FM: 87.5-108 MHz; AM: 520-1710 kHz |
| Number of Alarms | 2 independent alarms |
| Main Functions | AM/FM radio, dual alarm, snooze, sleep timer, display dimming, 20-station memory (10 AM + 10 FM) |
| Display | LED with PM, alarm 1, alarm 2 indicators |
| Time Setting | Press and hold SET, use HR and MIN |
| Alarm Setting | ALARM 1 and ALARM 2 buttons, choose buzzer or radio |
| Sleep Timer | From 10 to 90 minutes in 10-minute increments |
| Snooze Function | 9-minute repeat |
| Display Dimmer | Multiple adjustable brightness levels |
| Antenna | FM antenna wire |
| Care and Cleaning | Dry, soft cloth, unplug before cleaning |
| Safety | Do not expose to water or heat sources, minimum 5 cm distance for ventilation |
| Package Contents | Clock radio, quick start guide, instruction manual |
| Warranty | 1 year parts and labor (terms apply) |
| Certifications | ETL US LISTED, FCC Part 15, NMB-003 Canada |
Frequently Asked Questions - EAAC200 Electrohome
User questions about EAAC200 Electrohome
0 question about this device. Answer the ones you know or ask your own.
Ask a new question about this device
Download the instructions for your Alarm clock radio in PDF format for free! Find your manual EAAC200 - Electrohome and take your electronic device back in hand. On this page are published all the documents necessary for the use of your device. EAAC200 by Electrohome.
USER MANUAL EAAC200 Electrohome
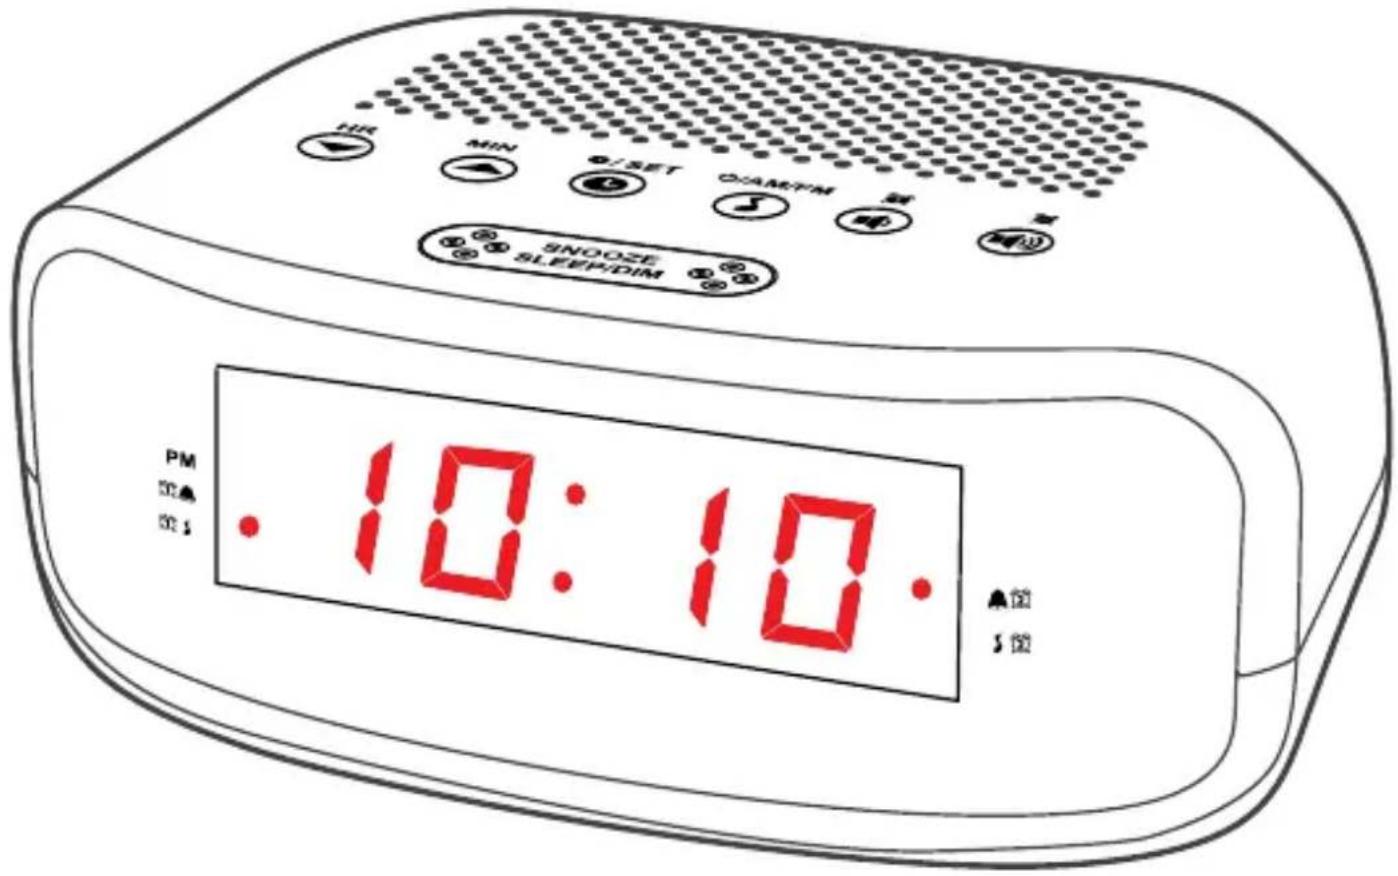
Digital AM/FM Clock Radio
with Dual Alarm
PLEASE READ THIS INSTRUCTION MANUAL BEFORE REQUIRING PRODUCT TO ENSURE PROPOSED. KEEP THIS MANUAL IN A SAFE PLACITOR FUTURE REFERENCE.
WARNING
To reduce the risk of fire or electric shock, do not expose this appliance to rain or moisture.
CAUTION
Use of controls or adjustments or performance of procedures other than those specified may result in hazardous radiation exposure.

natural_image
Black triangular warning symbol with a white lightning bolt inside, indicating electrical hazard (no text)

natural_image
Black triangular warning symbol with exclamation mark (no text or numbers)CAUTION - TO REDUCE THE RISK OF ELECTRIC SHOCK, DO NOT REMOVE COVER (OR BACK). NO USER-SERVICABLE PARTS INSIDE, REFER TO QUALIFIED USER PERSONNEL.
The lightning flash with arrowhead symbol, within an equilateral triangle, is intended to alert the user to the presence of uninsulated “dangerous voltage” within the product’s enclosure that may be of sufficient magnitude to constitute a risk of electric shock to persons.

The exclamation point within an equilateral triangle is intended to alert the user to the presence of important operating and maintenance (servicing) instructions in the literature accompanying the appliance.
WARNING
TO PREVENT ELECTRIC SHOCK; DO NOT USE THIS PLUG WITH AN EXTENSION CORD RECEPTACLE OR OTHER OUTLET UNLESS THE BLADES CAN BE FULLY INSERTED TO PREVENT BLADE EXPOSURES. TO PREVENT FIRE OR SHOCK HAZARD; DO NOT INSTALL THIS PRODUCT IN A CONFINED SPACE SUCH AS A BOOK CASE OR SIMILAR UNIT.
CAUTION: RETAIN THIS MANUAL FOR FUTURE REFERENCE
- Read these instructions.
- Keep these instructions.
- Read all warnings.
- Follow all instructions.
-
Do not use this product near water.
-
Clean only with a dry cloth.
- Do not block any ventilation openings. Install in accordance with the manufacturer's instructions.
- Do not install near any heat sources such as radiators, heat registers, stoves, or other apparatus (including amplifiers) that produce heat.
- Do not defeat the safety purpose of the polarized or grounding-type plug. A polarized plug has two blades with one wider than the other. A grounding type plug has two blades and a third grounding prong. The wide blade or the third prong is provided for your safety. If the provided plug does not fit into your outlet, consult an electrician for replacement of the obsolete outlet.
- Protect the power cord from being walked on or pinched particularly at plugs, convenience receptacles, and the point where they exit from the apparatus.
- Only use attachments/accessories specified by the manufacturer.
- Unplug this apparatus during lightning storms or when unused for long periods of time.
- Refer all servicing to qualified service personnel. Servicing is required when the apparatus has been damaged in any way, such as power-supply cord or plug is damaged, liquid has been spilled or objects have fallen into the apparatus, the apparatus has been exposed to rain or moisture, does not operate normally, or has been dropped.
- Apparatus shall not be exposed to dripping or splashing, and that not objects filled with liquids, such as vases, shall be placed on the apparatus.
- The batteries shall not be exposed to excessive heat such as sunshine, fire or the like.
- The MAINS plug is used as the disconnect device, which shall remain readily operable.
- The MAINS plug of apparatus should not be obstructed and should be easily accessed during intended use.
- The apparatus shall be connected to a MAINS socket outlet with a protective earthing connection.
- WARNING: To reduce the risk of fire or electric shock, do not expose this apparatus to rain or moisture.
- There should be a minimum distance of 5 cm around the apparatus for sufficient ventilation.
- The ventilation should not be impeded by covering the ventilation openings with items such as newspaper, table-cloths, curtains etc.
- No naked flame sources such as lighted candles should be placed on the apparatus.
-
Please use the apparatus in moderate climates.
-
Unwind and straighten the power cord before use.
- Damage Requiring Service
Unplug the power cord and refer servicing to qualified service professional under the following conditions:
A. If liquid has been spilled on or into the product.
B. If the product has been exposed to rain, water, or other liquids.
C. If the product does not operate normally by following the operating instructions, adjust only those controls that are covered by the operating instructions. Improper adjustment of other controls may result in damage and will often require extensive work by a qualified technician to restore the product to its normal operation.
D. If the product has been dropped or damaged in any way.
E. When the product exhibits a distinct change in performance. This may indicate a need for service.
- Servicing
Do not attempt to service this product yourself as opening or removing covers may expose you to dangerous voltages or other hazards. Refer all servicing to a qualified service professional.
- Replacement Parts
When replacement parts are required, be sure the service technician has used replacement parts specified by the manufacturer, or have the same characteristics as the original parts. Unauthorized substitutions may result in fire, electric shock, or other hazards.
- Safety Check
Upon completion of any service or repairs to this product, ask the service technician to perform safety checks to determine that the product is in proper operating condition.
FCC statement on regulation
This device complies with part 15 of the FCC Rules. Operation is subject to the following two conditions:
(1) This device may not cause harmful interference.
(2) This device must accept any interference received, including interference that may cause undesired operation.
Any changes or modifications not expressly approved by the party responsible for compliance could void the user's authority to operate the equipment.
NOTE: This equipment has been tested and found to comply with the limits for a Class B digital device, pursuant to part 15 of the FCC Rules. These limits are designed to provide reasonable protection against harmful interference in a residential installation. This equipment generates, uses and can radiate radio frequency energy and, if not installed and used in accordance with the instructions, may cause harmful interference to radio communications. However, there is no guarantee that interference will not occur in a particular installation. If this equipment does cause harmful interference to radio or television reception, which can be determined by turning the equipment off and on, the user is encouraged to try to correct the interference by one or more of the following measures:
• Reorient or relocate the receiving antenna.
- Increase the separation between the equipment and receiver.
- Connect the equipment into an outlet on a circuit different from that to which the receiver is connected.
- Consult the dealer or an experienced radio TV technician for help.
This class[B] digital apparatus complies with Canadian ICES-003.


Don't throw away the battery with general house waste, dispose of it correctly as chemical waste.
![Electrohome EAAC200 - This class[B] digital apparatus complies with Canadian ICES-003. - 3](/content/2026/04/644683/images/e6dae1b7986610da9543ef4ba338b11760699ae3272140677ff8229e47f7059b.jpg)
natural_image
Symbol of a trash bin crossed with a diagonal line and a solid black rectangle below (no text or labels)This marking indicates that this product should not be disposed with other household wastes throughout North America. To prevent possible harm to the environment or human health from uncontrolled waste disposal, recycle it responsibly to promote the sustainable reuse of material resources. To return your used device, please use the return and collection systems or contact the retailer where the product was purchased. They can take this product for environmental safe recycling.
ELECTROHOME

NEED HELP?
DO NOT RETURN THIS PRODUCT TO THE STORE
Please contact an ELECTROHOME® customer support representative first regarding any additional information on product features, specifications or assistance with setup.
Please contact us via one of the methods below:

Support:
www.electrohome.com/support
Online live web chat:
www.electrohome.com
TABLE OF CONTENTS
Warnings....2
Important Safety Information....3
Need Help? 6
What's Included 8
Product Information......8
Operating Instructions 11
Power Connection 11
Battery Backup....11
Setting the Time....12
Playing the Radio 12
To Set / Recall Radio Presets....13
Setting Alarm 1 13
Setting Alarm 2....14
Snooze Function....14
Sleep Timer 15
Dimmer Function 15
Troubleshooting 15
Care and Maintenance....16
Specifications....16
Electrohome Warranty 17
WHAT'S INCLUDED
• Digital AM/FM Clock Radio with Battery Backup* & Dual Alarm
- Quick Start Guide
• Instruction Manual
* 2 x AA batteries not included.
PRODUCT INFORMATION
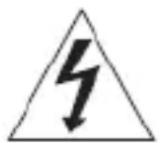
FRONT
- PM - Red LED dot appears to the right of PM indicating time is set to PM
- HOUR - Displays the hours
- MINUTE- Displays the minutes
-
- Radio Alarm 1 (Red LED dot appears to the right when set)
-
- Buyer Alarm 1 (Red LED dot appears to the right when set)
-
- Radio Alarm 2 (Red LED dot appears to the left when set)
-
- Boxer Alarm 2 (Red LED dot appears to the left when set)
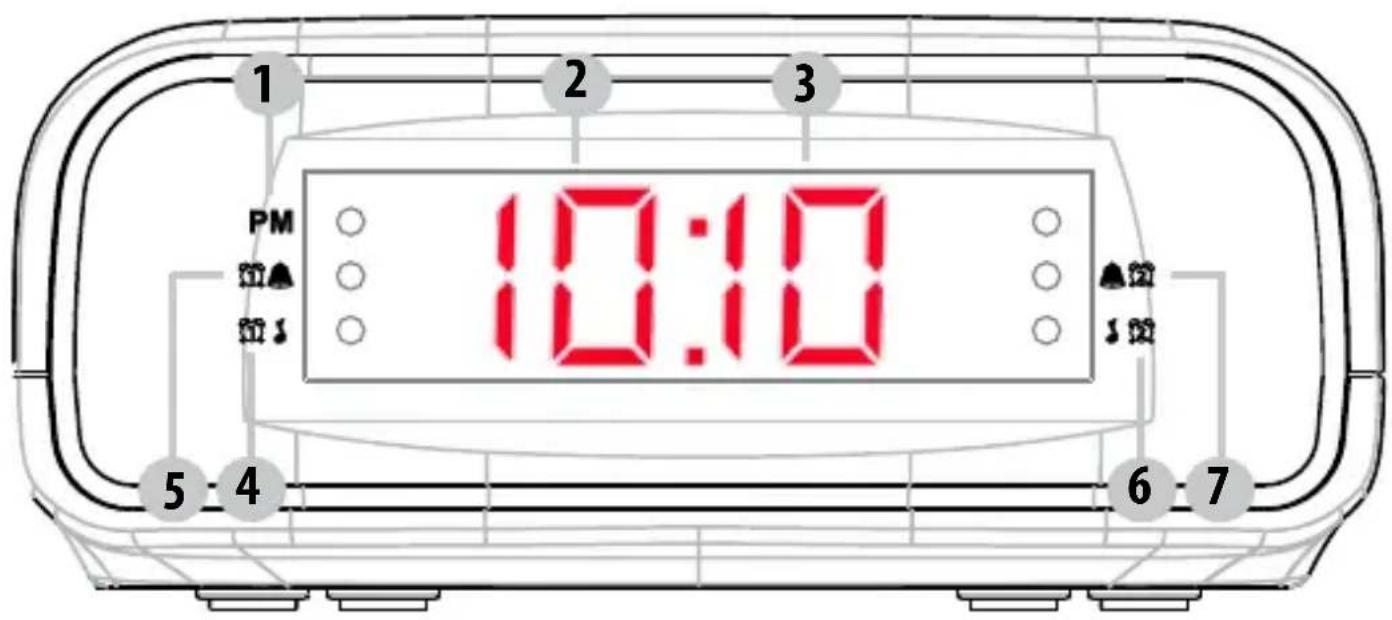
TOP
- HR - Set the Hour; Decreases radio frequency
- MIN - Set the Minutes; Increases radio frequency
-
- Charge the time or Preset radio stations
- -UAMUSION/OFF or select AM or FM radio
- -6t/LARM1; Decrease volume
- -5 t/LARM2 ; Increase volume
- SNOOZE/SLEEP/DIM - Pauses the alarm; Sets SLEEP timer; Increases or decreases the brightness of the LED display
BOTTOM
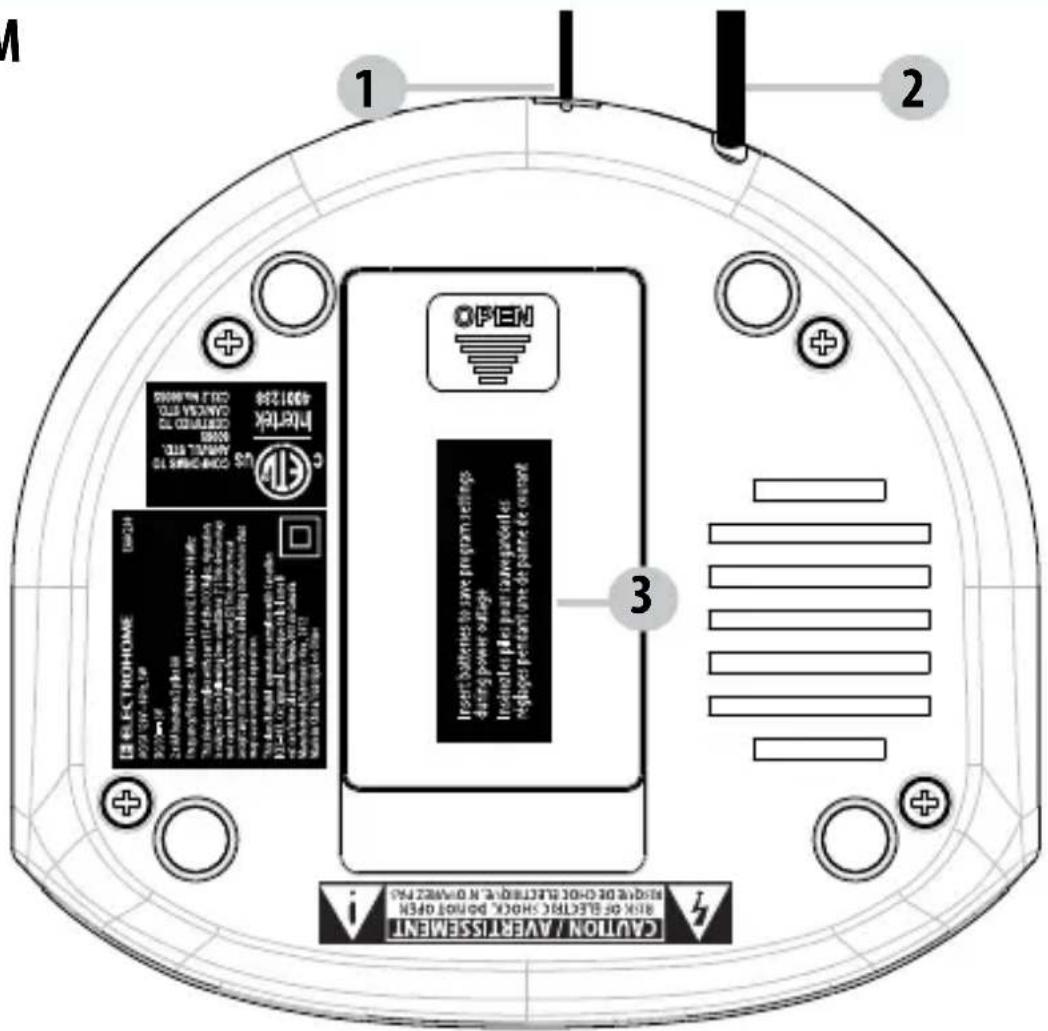
- FM Antenna
- Power cord
- Battery compartment
ATTENTION
• Do not plug or unplug the power cable if you have wet hands.
- If you are not planning to use the unit for an extended period of time, disconnect the power cable from the wall outlet.
• To avoid damage to the power cord and electric shock when disconnecting the power cord from the wall outlet, do not pull on the cord; pull firmly at the base of the plug.
POWER CONNECTION
- Plug the AC power cord into a household AC outlet.
- Clock display will flash 12:00 until set to correct time.
BATTERY BACKUP
This alarm clock is equipped with an optional battery backup feature. This will restore your alarm clock settings in the event of a power outage.
Installing the batteries (not included)
- Open the battery compartment on the bottom of the alarm clock by pushing on the latch and pulling the door open.
- Install 2 x AA batteries ensuring that the battery polarity corresponds to the polarity in the battery compartment.
- Close the battery compartment cover.
NOTE:
• Batteries must be installed by an adult.
• Use only the recommended size and type of battery specified.
- Please be sure to follow the correct polarity when installing the battery in the battery compartment. A reversed battery may cause damage to the alarm clock.
• DO NOT mix different types of batteries or mix new and used batteries.
- When not using the unit for a prolonged period of time, please remove the batteries to avoid possible damage caused by leaking batteries.
SETTING THE TIME
- Press and hold the Ⓛ/SET button, the time will start to flash.
- Press the HR ▼button to increase the HOUR.
- Press the MIN button to increase the MINUTES.
- Once time is set correctly, press the button SET
NOTE:
- For PM setting - Red LED dot appears to the right of PM indicating time is set to PM; no red dot for AM.
- Press the HR ▼/ MIN ▲button once to decrease / increase one number at a time.
- Press and hold the HR▼/ MIN ▲ button to quickly decrease / increase the numbers.
PLAYING THE RADIO
- Press the ⏻/AM/FM button once to turn radio ON.
- Press the but AM to select between FM and AM station.
- Press the button to decrease the volume.
- Press the bottom to increase the volume.
- Press the HR button to decrease the AM /FM frequency.
- Press the MIN button to increase the AM /FM frequency.
- Press and hold the but AMo-Twin radio OFF.
TO SET / RECALL THE RADIO PRESETS
You can preset and store the frequency of 20 radio stations in the memory; 10 AM stations and 10 FM stations.
- Press the ⏻/AM/FM button once to turn the radio ON.
- Press the ⏻/AM/FM button to toggle between the AM and FM radio bands.
- Set radio to desired station.
- Press and hold the buttons and PO1 will flash on the screen.
- Press the button confirm setting to P01 or wait 5 seconds for flashing to stop.
- Repeat the steps above to preset more radio stations.
- To recall a preset station, press the button to toggle through the current preset radio stations.
SETTING THE ALARM
You can preset and store two separate alarm settings. It allows you to set an alarm for yourself and a second as a backup, or use the second independently timed alarm for a partner.
SETTING ALARM 1
- Please ensure the radio is OFF.
- Press the 📄 button once to view current alarm setting then press and hold the 🔊 button to set ALARM 1. The alarm time will flash on the display.
- Press the HR button to increase the HOUR.
- Press the MIN button to increase the MINUTES.
- Once alarm time is set, press the butoset to confirm setting.
• To toggle between Buzzer and Radio alarm mode, press the button until the desired option is highlighted on the LED display.
• Radio Alarm 1 (Red LED dot appears to the right when set)
• 1. Pizzer Alarm 1 (Red LED dot appears to the right when set)
SETTING ALARM 2
- Please ensure the radio is OFF.
- Press the 📋 🎨 to view current alarm setting then press and hold the 🔊️ button to set ALARM 2. The alarm time will flash on the display.
- Press the HR button to increase the HOUR.
- Press the MIN button to increase the MINUTES.
- Once alarm time is set, press the butosence to confirm setting.
• To toggle between Buzzer and Radio alarm mode, press the button until the desired option is highlighted on the LED display.
• Radio Alarm 2 (Red LED dot appears to the left when set)
- Buzzer Alarm 2 (Red LED dot appears to the left when set)
SNOOZE FUNCTION
- When the alarm (buzzer or radio) is triggered, press the SNOOZE/SLEEP/DIM button. The alarm will turn off for approximately 9 minutes.
- To cancel the SNOOZE function, press the ⏻/AM/FM button.
OPERATING INSTRUCTIONS
SLEEP TIMER
The sleep timer allows you to play music for a preset amount of time ranging from 90 minutes to 10 minutes. It is commonly used by people who prefer to go to sleep to music.
- Press the SNOOZE/SLEEP/DIM button. The display will show 90 minutes, your clock radio will turn off in 90 minutes.
- To change the number of minutes for the SLEEP timer, press the SNOOZE/SLEEP/DIM button until you see the desired number of minutes. The SLEEP timer decreases in increments of 10.
- To cancel the SLEEP timer, press the SNOOZE/SLEEP/DIM button until you see OFF in the display or press and hold the ⏻/AM/FM button.
DIMMER FUNCTION
You can adjust the brightness of the LED display making it brighter or dimmer when the radio is OFF. Press and hold the SNOOZE/SLEEP/DIM button to toggle between the 3 brightness settings.
TROUBLESHOOTING
If you experience a problem with this unit, check the chart below before calling for service.
| SYMPTOM POSSIBLE | CAUSE POSSIBLE SOLUTION | |
| GENERAL | ||
| Power does not come on. AC | cord not plugged in. Insert plug formly into AC outlet. | |
| RADIO | ||
| No Sound. Power is not on. | Press /AM/FM to turn the unit on. | |
| VOLUME control at minimum position. | Turn the VOLUME control up. | |
TROUBLESHOOTING
| RADIO | ||
| Noise or sound distorted on AM or FM. | AM-interference from traffic. Tune the radio for better AM reception. | |
| FM-antenna wire not extended. | Extend antenna wire. | |
| SYMPTOM POSSIBLE CAUSE POSSIBLE SOLUTION | ||
| CLOCK | ||
| Incorrect Time. Clock not set. | Set the clock. | |
| Batteries inserted incorrectly, not connected or dead. | Check batteries. | |
| Alarm does not turn on. Alarm is not set to turn on. | Press the button to set ALARM 1 or to set ALARM 2 | |
| Clock is not set. Set the clock. | ||
| Alarm time is not set. Set alarm time. | time. | |
CARE AND MAINTENANCE
Precautions
- Always turn the unit off after use.
- Keep the unit away from magnetic objects, water or heat sources.
- Use a clean soft cloth moistened with lukewarm water to clean the cabinet. Never use chemical cleaners that could damage the finish of the unit.
- Disconnect the unit from any power sources before cleaning.
SPECIFICATIONS
| Power Source AC 120V~60Hz | |
| Frequency Range FM: 87.5-108 MHz | AM: 520-1710 kHz |
| Battery Backup | YES, 2x AA (not included) |
ELECTROHOME® WARRANTY
Thank you for choosing ELECTROHOME® Consumer Electronics Products!
ELECTROHOME gives the following express warranty to the original consumer purchaser or gift recipient for this ELECTROHOME product, when shipped in its original container and sold or distributed by ELECTROHOME or by an Authorized ELECTROHOME Dealer: ELECTROHOME warrants that this product is free, under normal use and maintenance, from any defects in material and workmanship. If any such defects should be found in this product within the applicable warranty period, ELECTROHOME shall, at its option, repair or replace the product as specified herein. Replacement parts furnished in connection with this warranty shall be warranted for a period equal to the unexpired portion of the original equipment warranty.
This warranty shall not apply to:
A. Any defects caused or repairs required as a result of abusive operation, negligence, accident, improper installation or inappropriate use as outlined in the owner's manual.
B. Any ELECTROHOME product tampered with, modified, adjusted or repaired by any party other than ELECTROHOME or ELECTROHOME's Authorized Service Centres.
C. Damage caused or repairs required as a result of the use with items not specified or approved by ELECTROHOME, including but not limited to head cleaning tapes and chemical cleaning agents.
D. Any replacement of accessories, glassware, consumable or peripheral items required through normal use of the product including but not limited to earphones, remote controls, AC adapters, batteries, stylus, trays, filters, cables, paper, cabinet, cabinet parts, knobs, buttons, baskets, stands and shelves.
E. Any cosmetic damage to the surface or exterior that has been defaced or caused by normal wear and tear.
F. Any damage caused by external or environmental conditions, including but not limited to transmission line/power line voltage or liquid spillage.
G. Any product received without appropriate model, serial number and CSA /cUL /cULus /cETL /cETLus markings.
H. Any products used for rental or commercial purposes.
I. Any installation, setup and/or programming charges.
Should this ELECTROHOME product fail to operate during the warranty period, warranty service may be obtained upon delivery of the ELECTROHOME product together with proof of purchase and a copy of this LIMITED WARRANTY statement to an Authorized ELECTROHOME Service Centre. In-home warranty service may be provided at ELECTROHOME's discretion on any ELECTROHOME television with the screen size of 40" or larger. This warranty constitutes the entire express warranty granted by ELECTROHOME and no other dealer, service centre or their agent or employee is authorized to extend, enlarge or transfer this warranty on behalf of ELECTROHOME. To the extent the law permits, ELECTROHOME disclaims any and all liability for direct or indirect damages or losses or for any incidental, special or consequential damages or loss of profits resulting from a defect in material or workmanship relating to the product, including damages for the loss of time or use of this ELECTROHOME product or the loss of information. The purchaser will be responsible for any removal, reinstallation, transportation and insurance costs incurred. Correction of defects, in the manner and period of time described herein, constitute complete fulfillment of all obligations and responsibilities of ELECTROHOME Electronics to the purchaser with respect to the product and shall constitute full satisfaction of all claims, whether based on contract, negligence, strict liability or otherwise.
1 YEAR PARTS & LABOUR WARRANTY PERIODS - TO OBTAIN THE NAME AND ADDRESS OF THE NEAREST AUTHORIZED ELECTROHOME SERVICE CENTRE OR FOR MORE INFORMATION ON THIS WARRANTY
Contact ELECTROHOME Support :
• Support: www.electrohome.com/support
• Website: www.electrohome.com
• By mail: ELECTROHOME Customer Service, 4080 Montrose Road, Niagara Falls, ON L2H 1J9
ELECTROHOME is a registered trade-mark of Circus World Displays Limited. 03.2013
GARANTIE ELECTROHOME®
INFORMATIONS DU PRODUIT
AVANT

Somnolence (sleep) 16
Gradateur (dim)...... 16
Dépannage 17
NE RETOURNEZ PAS CE PRODUIT AU MAGASIN!
www.electrohome.com/support
natural_image
Simple line drawing of a trash bin with crossed x and y axes, no text or symbols presentnatural_image
Black triangular warning symbol with a lightning bolt inside, indicating electrical hazard (no text)

natural_image
Black triangular warning symbol with exclamation mark (no text or numbers)POUR RÉDUIRE LE RISQUE DE CHOC ÉLECTRIQUE, NE PAS RETIRER LE COUVERCLE (ENDOS). AUCUNE PIÈCE RÉPARABLE PAR L'UTILISATEUR. VEUILLEZ CONSULTER LE PERSONNEL DE SERVICE QUALIFIÉ.
ATTENTION: CONSERVEZ CE MANUEL POUR POUVOIR VOUS Y RÉFÉRER AU BESOIN
- Digital AM/FM Clock Radio
- WARNING
- CAUTION
- CAUTION: RETAIN THIS MANUAL FOR FUTURE REFERENCE
- FCC statement on regulation
- This class[B] digital apparatus complies with Canadian ICES-003.
- ELECTROHOME
- NEED HELP?
- DO NOT RETURN THIS PRODUCT TO THE STORE
- TABLE OF CONTENTS
- Warnings....2
- Important Safety Information....3
- Need Help? 6
- What's Included 8
- Product Information......8
- Operating Instructions 11
- Troubleshooting 15
- Care and Maintenance....16
- Specifications....16
- Electrohome Warranty 17
- WHAT'S INCLUDED
- PRODUCT INFORMATION
- TOP
- ATTENTION
- POWER CONNECTION
- BATTERY BACKUP
- NOTE:
- SETTING THE TIME
- PLAYING THE RADIO
- TO SET / RECALL THE RADIO PRESETS
- SETTING THE ALARM
- SETTING ALARM 1
- SETTING ALARM 2
- SNOOZE FUNCTION
- OPERATING INSTRUCTIONS
- SLEEP TIMER
- DIMMER FUNCTION
- TROUBLESHOOTING
- CARE AND MAINTENANCE
- Precautions
- SPECIFICATIONS
- ELECTROHOME® WARRANTY
- YEAR PARTS & LABOUR WARRANTY PERIODS - TO OBTAIN THE NAME AND ADDRESS OF THE NEAREST AUTHORIZED ELECTROHOME SERVICE CENTRE OR FOR MORE INFORMATION ON THIS WARRANTY
- GARANTIE ELECTROHOME®
- INFORMATIONS DU PRODUIT
- Dépannage 17
- NE RETOURNEZ PAS CE PRODUIT AU MAGASIN!
- ATTENTION: CONSERVEZ CE MANUEL POUR POUVOIR VOUS Y RÉFÉRER AU BESOIN
Brand : Electrohome
Model : EAAC200
Category : Alarm clock radio