
EAAC600 - Alarm clock radio Electrohome - Free user manual and instructions
Find the device manual for free EAAC600 Electrohome in PDF.

| Product Type | Dual Alarm Projection Clock Radio |
| Brand | Electrohome |
| Model | EAAC600 |
| Main Power | AC 120 V ~ 60 Hz, 5 W |
| Backup Battery | CR2032 (included) |
| Radio Frequency Ranges | AM: 530 – 1710 kHz, FM: 88 – 108 MHz |
| Main Functions | Dual alarm with radio or buzzer, automatic time setting (SelfSet), wall/ceiling projector, sleep timer, temperature display |
| Time Zone Setting | 6 zones available (Newfoundland to Pacific) |
| Alarm Duration | 30 minutes before automatic shut-off |
| Snooze Function | 9 minutes |
| Display | LCD with dimmer (Auto Off/Low/High) |
| Projector | Adjustable focus, 180° tilt, 3 to 9 feet distance |
| Operating Temperature | 0 to +50°C / 32 to 122°F |
| Maintenance and Cleaning | Soft dry cloth; display window with cloth slightly dampened with water |
| Safety | Do not expose to water, do not open the casing (laser), use only recommended accessories |
| Spare Parts and Repairability | Repair by authorized service center only; use manufacturer-recommended parts |
Frequently Asked Questions - EAAC600 Electrohome
User questions about EAAC600 Electrohome
0 question about this device. Answer the ones you know or ask your own.
Ask a new question about this device
Download the instructions for your Alarm clock radio in PDF format for free! Find your manual EAAC600 - Electrohome and take your electronic device back in hand. On this page are published all the documents necessary for the use of your device. EAAC600 by Electrohome.
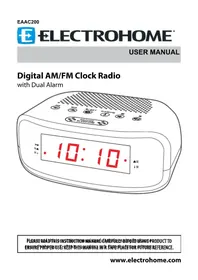
USER MANUAL EAAC600 Electrohome
SelfSet™ Clock Radio
with Dual Alarm
Thank you for your purchase of this Electrohome product. Please read this instruction manual carefully before using product to ensure proper use. Keep this manual in a safe place for future reference.
DO NOT RETURN THIS PRODUCT TO THE STORE
Please contact an ELECTROHOME® customer support representative first regarding any additional information on product features, specifications or assistance with setup.
Please contact us via one of the methods below:

Support:
www.electrohome.com/support
Online live web chat:
www.electrohome.com
For more product information visit www.electrohome.com
WARNING
To reduce the risk of fire or electric shock, do not expose this appliance to rain or moisture.
CAUTION
Use of controls or adjustments or performance of procedures other than those specified may result in hazardous radiation exposure.

natural_image
Black triangular warning symbol with a lightning bolt inside, indicating electrical hazard (no text)

natural_image
Black triangular warning symbol with exclamation mark (no text or numbers)CAUTION - TO REDUCE THE RISK OF ELECTRIC SHOCK, DO NOT REMOVE COVER (OR BACK). NO USER-SERVICABLE PARTS INSIDE, REFER TO QUALIFIED USER PERSONNEL.
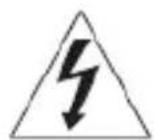
The lightning flash with arrowhead symbol, within an equilateral triangle, is intended to alert the user to the presence of uninsulated “dangerous voltage” within the product’s enclosure that may be of sufficient magnitude to constitute a risk of electric shock to persons.

The exclamation point within an equilateral triangle is intended to alert the user to the presence of important operating and maintenance (servicing) instructions in the literature accompanying the appliance.
! WARNING
DO NOT INGEST BATTERY, CHEMICAL BURN HAZARD
This product contains a coin/button cell battery. If the coin/button cell battery is swallowed, it can cause severe internal burns in just 2 hours and can lead to death.
Keep new and used batteries away from children. If the battery compartment does not close securely, stop using the product and keep it away from children.
If you think batteries might have been swallowed or placed inside any part of the body, seek immediate medical attention.
TABLE OF CONTENTS
Warnings....3
Table of Contents 4
Product Information....7
Operating Instructions....8
Power Connection 8
DST - Daylight Savings Time....8
Reset 8
Manually Set the Clock Time and Date....9
Setting Alarm Output and Alarm On/Off 9
Alarm Length and Snooze Function....9
Change Display Content....10
Sleep Function 10
Radio Operation 10
Projection Unit 10
Troubleshooting ....11
Care and Maintenance ....11
Specifications....12
Warnings....12
ELECTROHOME WARRANTY 13
WARNING
TO PREVENT ELECTRIC SHOCK; DO NOT USE THIS PLUG WITH AN EXTENSION CORD RECEPTACLE OR OTHER OUTLET UNLESS THE BLADES CAN BE FULLY INSERTED TO PREVENT BLADE EXPOSURES. TO PREVENT FIRE OR SHOCK HAZARD; DO NOT INSTALL THIS PRODUCT IN A CONFINED SPACED SUCH AS A BOOK CASE OR SIMILAR UNIT.
LASER SAFETY
The unit uses a laser. Only a qualified service technician should remove the cover or attempt to service this product to avoid possible eye injury.
CAUTION: USE OF CONTROLS OR ADJUSTMENT OF PERFORMANCE OR PROCEDURES OTHER THAN SPECIFIED HEREIN MAY RESULT IN HAZARDOUS RADIATION EXPOSURE.
LASER SAFETY
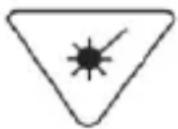
INVISIBLE LASER RADIATION WHEN OPEN AND INTERLOCK FAILED OR DEFEATED. AVOID DIRECT EXPOSURE TO LASER BEAM.
CAUTION: RETAIN THIS MANUAL FOR FUTURE REFERENCE
- Read these instructions.
- Keep these instructions.
- Read all warnings.
- Follow all instructions.
- Do not use this product near water.
- Clean only with a dry cloth.
- Clean the screen only with a dry cloth, moistened slightly if needed. Do not clean the inside of this product.
- Check that the power voltage stated on the rating label corresponds to your local electricity supply.
- Do not block any ventilation openings. Install in accordance with the manufacturer's instructions.
- Do not place this product near any heat sources such as radiators, heat registers, stoves or other apparatus (including amplifiers) that produce heat.
- Do not immerse this product, the power cord or any accessories in water or any other liquid.
- Unplug the power adaptor from the wall when the product is unused for a long period of time and during thunderstorms.
- Only use attachments / accessories specified by the manufacturer.
- Unwind and straighten the power cord before use.
15. Damage Requiring Service
Unplug the power cord and refer servicing to qualified service professional under the following conditions:
A. If liquid has been spilled on or into the product.
B. If the product has been exposed to rain, water, or other liquids.
C. If the product does not operate normally by following the operating instructions. Adjust only those controls that are covered by the operating instructions Improper adjustment of other controls may result in damage and will often require extensive work by a qualified technician to restore the product to its normal operation.
D. If the product has been dropped or damaged in any way.
E. When the product exhibits a distinct change in performance. This may indicate a need for service.
16. Servicing
Do not attempt to service this product yourself as opening or removing covers may expose you to dangerous voltages or other hazards. Refer all servicing to a qualified service professional.
17. Replacement Parts
When replacement parts are required, be sure the service technician has used replacement parts specified by the manufacturer, or have the same characteristics as the original parts. Unauthorized substitutions may result in fire, electric shock, or other hazards.
18. Safety Check
Upon completion of any service or repairs to this product, ask the service technician to perform safety checks to determine that the product is in proper operating condition.
-
Caution marking is located at the back of apparatus.
-
The marking information is located at the bottom of apparatus.
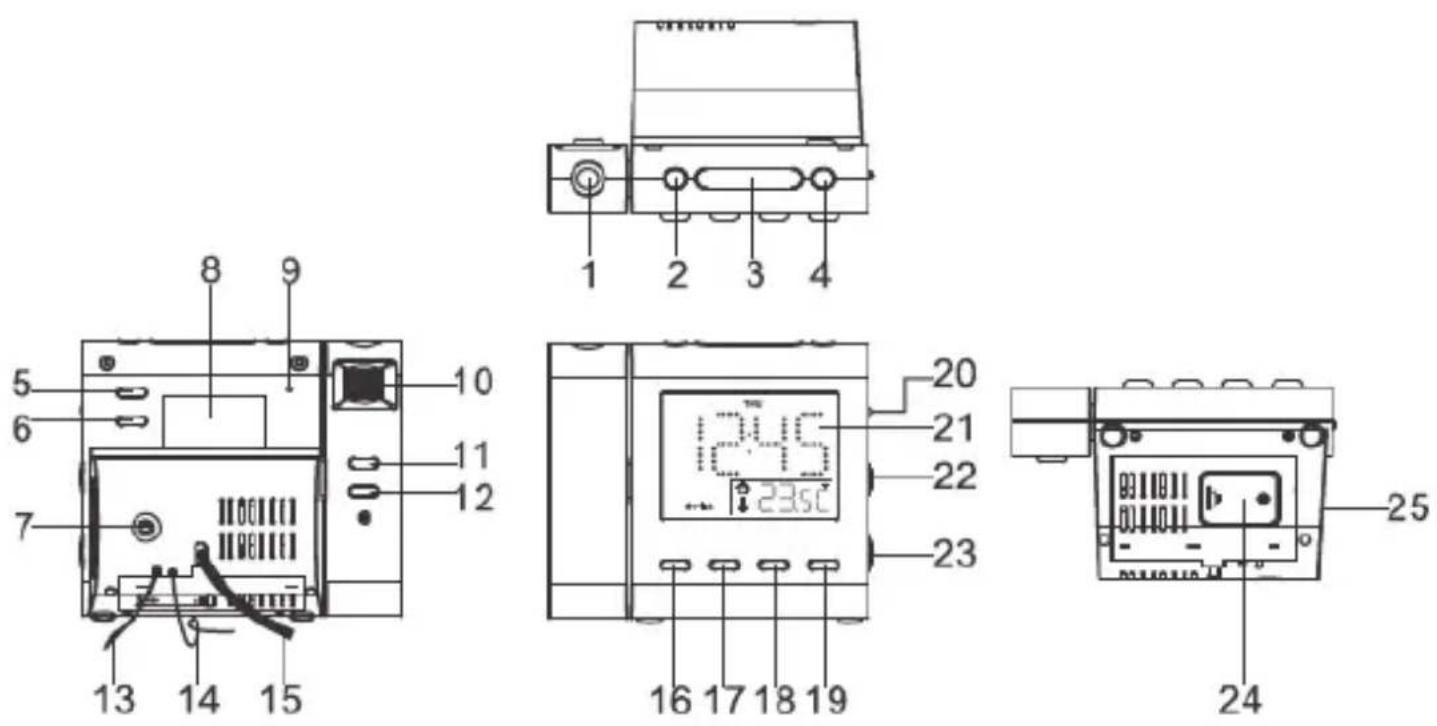
- Projection Unit
- AM/FM Band
- Snooze/Sleep/Time Zone
- ON/OFF
- Alarm 1 Radio/Buzz
- Alarm2 Radio/Buzz
- Line In Jack
- Rating Label
- Reset
- Focus Adjustment for Projection
- Projection Time 180° Flip
- Projection ON/OFF
- Temperature Sensor (indoor)
-
FM Antenna
-
AC Power Cord
- Alarm Set
- <</MONTH-DAY/°C/°F
-
/YEAR/DST
- Mode/Set
- Display Light-Auto Off/Low/High Dimmer
- LCD Display
- Volume Dial
- Tuning Dial
- Battery Door
- Speaker
PRODUCT INFORMATION
PACKAGING CONTENTS
- Projection Dual Alarm Clock Radio with Auto Time Set
- Backup Battery "CR2032"
- Instructional Manual
ATTENTION
- Do not plug or unplug the power cable if you have wet hands.
- If you are not planning to use the unit for an extended period of time, disconnect the power cable from the wall outlet.
- When disconnecting the power cord from the wall outlet. In order to avoid damage to the power cord and electric shock, do not pull on the cord; pull firmly at the base of the plug.
OPERATING INSTRUCTIONS
POWER CONNECTION
- Plug the AC power cord into a household AC outlet.
- Clock display will flash "3" indefinitely.
- Unit will go to Zone 3, which is the default setting, and correct time will be displayed.
SETTING THE TIME ZONE (FACTORY PRESET TO ZONE "3"- EST)
Press the >> / YEAR / DST(18) or << / MONTH - DAY(17) to select time zone 1-6. Press MODE (19) to confirm when the correct time zone appears on the display.
Zone 1 Newfoundland
Zone 4 Central time
Zone 2 Atlantic time
Zone 5 Mountain time
Zone 3 Eastern time
Zone 6 Pacific time
Change the time zone:
To change your time zone, press and hold the SNOOZE/SLEEP/TIME ZONE (3) button for 3 seconds. The screen should start to flash. Select the corresponding number for your time zone. 1 for Newfoundland, 2 for Atlantic time, 3 for Eastern time, 4 for Central time, 5 for Mountain time and 6 for Pacific time.
SETTING DST – Daylight Savings Time
To turn on Daylight Saving Time, press and hold the >> / YEAR / DST (18) button for 5 seconds. The hour will adjust as necessary and a small sun icon will be displayed near the top right of the hour.
RESET
The RESET(9) is located on the back of unit. Use a ballpoint pen to press it whenever you change the batteries, or unit is not performing as expected. This will return all settings to default value, you will lose any stored data (alarm and clock settings).
SETTING TIME AND CALENDAR MANUALLY
Press and hold MODE SET (19) button for 2 seconds. The display should start flashing.
- Press << / MONTH-DAY / °C/°F (17) to decrease number by one.
- Press>> / YEAR / DST (18) to increase number by one.
- Press and Hold << or >> for 2 seconds to enable auto forward.
Once you have set the YEAR press Mode/Set to confirm. Next, set the MONTH and DAY, press Mode/Set to confirm. You must then select the time format; either a 12 or 24 hour clock and then press Mode/Set. You will then be prompted to set the hours and minutes then press Mode/Set to confirm and save your settings.
Setting Alarm 1 and Alarm 2
Press and hold the ALARM SET (16) button on the front of the unit for 2 seconds. The display should start flashing.
- Press << / MONTH-DAY / °C/°F (17) to decrease number by one.
- Press>> / YEAR / DST (18) to increase number by one.
- Press and Hold << or >> for 2 seconds to enable auto forward.
Once you have the correct hour press AL.Set to confirm. This will make the minutes flash and you can use the arrow keys to adjust the minutes. Once you have the correct minutes press AL.Set to confirm and save your settings.
Next, you will see the days of the week that you would like the alarm set.
1-1 : A single day of the week
1-5 : Monday to Friday
1-7: Whole week
6-7: Saturday & Sunday
If you select 1–1 you will be prompted to select the day of the week at the top of the screen by pressing the arrow keys. Once you have chosen the day of the week press AL Set. You have successfully set Alarm 1. This will now bring up the settings for alarm two. Please follow the same steps for setting alarm 1.
SETTING ALARM OUTPUT & ALARM ON/OFF
Now that your alarms are set you need to turn them on. These buttons are located on the back of the clock radio on the top right. To turn the alarms on press AL.1 for alarm 1 or AL.2 for alarm 2.
- Press AL.1 or AL.2 ONCE for Buzzer (bell icon)
- Press AL.1 or AL.2 again for RADIO (music note)
- Press AL.1 or AL.2 a third time to turn alarm OFF
ALARM LENGTH AND SNOOZE FUNCTION
Alarm Duration – Buzzer alarm or Radio alarm will continue to sound for 30 minutes if no keys are pressed, it will stop automatically and be set for the next day.
SNOOZE FUNCTION
- When alarm is activated, press the SNOOZE (3) to enable snooze function, Buzzer alarm or Radio alarm will stop.
- Snooze interval is 9 minute (not including one second offset).
- Snooze will continue unless the ON/OFF (4) is pressed. Buzzer alarm or Radio alarm will stop automatically after 30 minutes.
- Select the display AUTO OFF / LOW / HIGH dimmer (20) to the AUTO OFF mode, when alarm sounds the display will automatically turn on.
CHANGING THE DISPLAY CONTENT
- Pressing the << / MONTH-DAY / °C/°F(17) can switch the display to show the month and day, after 5 seconds the display will timeout and return to display the time.
- Pressing the >> / YEAR / DST(18) can switch the display to show the year, after 5 seconds display will timeout and return back to display the time.
- Press and hold the << / MONTH-DAY / °C/°F (17) for 3 seconds to change temperature unit °C/°F.
SLEEP FUNCTION
- While radio is on, press SNOOZE/SLEEP (3) to turn on Sleep mode, the sleep time will keep flashing for 5 seconds, while flashing press SLEEP to change the duration from 90 min – 15 min. Press ON/OFF (4) to cancel sleep function.
- When radio is off, set the display Auto OFF / LOW / HIGH dimmer (20) to the Auto OFF mode, the LCD display light will automatically turn off in 15 seconds. Press any key to turn the display light on.
RADIO OPERATION
- Press the ON/OFF (4) to turn radio on.
- Select AM/FM band BY pressing the AM/FM band(2).
- Select the station using the TUNING DIAL (23).
- Turn the volume DIAL (22) to adjust volume as required.
- Press the ON/OFF (4) to turn radio off.
Note:
- The AM band uses an internal directional aerial, rotate the radio for best reception.
- Ensure that the FM antenna (14) is completely unrolled and extended for best FM reception.
PROJECTION
- Focus setting: Adjust the projection clock brightness/focus by turning the brightness/focus adjustment wheel (10) until the projected time is clearly shown on the ceiling or wall.
- To flip projected image by 180^ , press 180^ flip (11).
NOTE: PROJECTS TIME IMAGE ON THE CEILING OR WALL OF A DARKENED ROOM. MAXIMUN PROJECTION DISTANCE IS 3-9 FEET.
TROUBLESHOOTING
If you experience a problem with this unit, check the chart below before calling for service.
| SYMPTOM POSSB | LE CAUSE POSSIBLE SOLUTION | |
| GENERAL | ||
| Power does not come on. AC | cord not plugged in. Insert plug firmly into AC outlet. | |
| RADIO | ||
| No Sound. Power is not on. | Press POWER to turn the unit on. | |
| VOLUME control at minimum position. | Turn the VOLUME control up. | |
| Noise or sound distorted on AM or FM. | AM-interference from traffic. Tune the radio for better AM reception. | |
| FM-antenna wire not extended. Extend antenna wire. | ||
| Radio does not turn off with SLEEP feature. | Power is not turned off. Press POWER to turn the unit off before activation sleep. | |
| CLOCK | ||
| Incorrect Time. Batteries inserted incorrectly, no connected or dead. | Check batteries. | |
| Alarm does not turn on. Alarm is not set to turn on. Press ALARM ON/OFF to turn the alarm on. | ||
| Clock is not set. Set the clock. | ||
| Alarm time is not set. Set alarm time. | ||
CARE AND MAINTENANCE
Precautions
- Always turn off the unit after use.
- Keep the unit away from magnetic objects, water or heat sources.
- Use a clean soft cloth moistened with lukewarm water to clean the cabinet. Never use chemical cleaners that could damage the finish of the unit.
- Disconnect the unit from any power sources before cleaning.
NOTE: This equipment has been tested and found to comply with the limits for a Class B digital device, pursuant to Part 15 of the FCC Rules. These limits are designed to provide reasonable protection against harmful interference in a residential installation. This equipment generates, uses, and can radiate radio frequency energy and, if not installed and used in accordance with the instructions, may cause harmful interference to radio communications. However, there is no guarantee that interference will not occur in a particular installation. If this equipment does cause harmful interference to radio or television reception, which can be determined by turning the equipment off and on, the user is encouraged to try to correct the interference by one or more of the following measures:
- Reorient or relocate the receiving antenna.
- Increase the separation between the equipment and the receiver.
- Connect the equipment to an outlet on a circuit different from that to which the receiver is connected.
SPECIFICATIONS
Frequency Range: AM 530 - 1710 kHz FM 88 - 108 MHz
Power Supply: AC 120V \~ 60Hz, 5W
Battery Backup: DC 3V CR2032 (Battery included)
Indoor Temperature Range: 0 to +50°C or 32 to 122°F
Specifications are subject to change without notice.
WARNINGS
WARNING
- No naked flame sources, such as lighted candles, should be placed on the apparatus.
- Do not place the product in closed bookcases or racks without proper ventilation.
- The mains plug is used as the disconnect device, the disconnect device shall remain readily operable.
- The ventilation should not be impeded by covering the ventilation openings with items, such as newspapers, table-cloths, curtains, etc.
- It shall not be exposed to dripping or splashing and that no objects filled with liquids, such as vases, shall be placed on the apparatus.
- Do not connect FM antenna to outside antenna.
- The unit should not be exposed to direct sunlight, very high or low temperature, moisture, vibrations or placed in dusty environment.
- Do not use abrasive, benzene, thinner or other solvents to clean the surface of the unit. To clean, wipe it will mild non-abrasive detergent solution and clean soft cloth.
- Never attempt to insert wires, pins or other such objects into the vents or opening of the unit.
- Batteries shall not be exposed to excessive heat such as sunshine, fire or the like.
- Attention should be drawn to the environmental aspects of battery disposal.

Do not dispose this product into usual household garbage at the end of its lifecycle; hand it over to a collection center for recycling the electrical and electronic appliances. By recycling, some of the materials can be reused. You are making an important contribution to protect our environment. Please inquire your community administration for the authorized disposal center.
CAUTION
Danger of explosion if battery is incorrectly replaced. Replace only with the same or equivalent type.
ELECTROHOME® WARRANTY
Thank you for choosing ELECTROHOME® Consumer Electronics Products!
ELECTROHOME gives the following express warranty to the original consumer purchaser or gift recipient for this ELECTROHOME product, when shipped in its original container and sold or distributed by ELECTROHOME or by an Authorized ELECTROHOME Dealer: ELECTROHOME warrants that this product is free, under normal use and maintenance, from any defects in material and workmanship. If any such defects should be found in this product within the applicable warranty period, ELECTROHOME shall, at its option, repair or replace the product as specified herein. Replacement parts furnished in connection with this warranty shall be warranted for a period equal to the unexpired portion of the original equipment warranty.
This warranty shall not apply to:
A. Any defects caused or repairs required as a result of abusive operation, negligence, accident, improper installation or inappropriate use as outlined in the owner's manual.
B. Any ELECTROHOME product tampered with, modified, adjusted or repaired by any party other than ELECTROHOME or ELECTROHOME's Authorized Service Centres.
C. Damage caused or repairs required as a result of the use with items not specified or approved by ELECTROHOME, including but not limited to head cleaning tapes and chemical cleaning agents.
D. Any replacement of accessories, glassware, consumable or peripheral items required through normal use of the product including but not limited to earphones, remote controls, AC adapters, batteries, stylus, trays, filters, cables, paper, cabinet, cabinet parts, knobs, buttons, baskets, stands and shelves.
E. Any cosmetic damage to the surface or exterior that has been defaced or caused by normal wear and tear.
F. Any damage caused by external or environmental conditions, including but not limited to transmission line/power line voltage or liquid spillage.
G. Any product received without appropriate model, serial number and CSA /cUL /cULus /cETL /cETLus markings.
H. Any products used for rental or commercial purposes.
I. Any installation, setup and/or programming charges.
Should this ELECTROHOME product fail to operate during the warranty period, warranty service may be obtained upon delivery of the ELECTROHOME product together with proof of purchase and a copy of this LIMITED WARRANTY statement to an Authorized ELECTROHOME Service Centre. In-home warranty service may be provided at ELECTROHOME's discretion on any ELECTROHOME television with the screen size of 40" or larger. This warranty constitutes the entire express warranty granted by ELECTROHOME and no other dealer, service centre or their agent or employee is authorized to extend, enlarge or transfer this warranty on behalf of ELECTROHOME. To the extent the law permits, ELECTROHOME disclaims any and all liability for direct or indirect damages or losses or for any incidental, special or consequential damages or loss of profits resulting from a defect in material or workmanship relating to the product, including damages for the loss of time or use of this ELECTROHOME product or the loss of information. The purchaser will be responsible for any removal, reinstallation, transportation and insurance costs incurred. Correction of defects, in the manner and period of time described herein, constitute complete fulfillment of all obligations and responsibilities of ELECTROHOME Electronics to the purchaser with respect to the product and shall constitute full satisfaction of all claims, whether based on contract, negligence, strict liability or otherwise.
1 YEAR PARTS & LABOUR WARRANTY PERIODS - TO OBTAIN THE NAME AND ADDRESS OF THE NEAREST AUTHORIZED ELECTROHOME SERVICE CENTRE OR FOR MORE INFORMATION ON THIS WARRANTY
Contact ELECTROHOME Support :
• Support: www.electrohome.com/support
• Website: www.electrohome.com
- By mail: ELECTROHOME Customer Service, 4080 Montrose Road, Niagara Falls, ON L2H 1J9

BESOIN D'AIDE?
NE RETOURNEZ PAS CE PRODUIT AU MAGASIN!
www.electrohome.com/support
natural_image
Black triangular warning symbol with a lightning bolt inside, indicating electrical hazard (no text)

natural_image
Black triangular warning symbol with exclamation mark (no text or numbers)POUR RÉDUIRE LE RISQUE DE CHOC ÉLECTRIQUE, NE PAS RETIRER LE COUVERCLE (ENDOS). AUCUNE PIÈCE RÉPARABLE PAR L'UTILISATEUR. VEUILLEZ CONSULTER LE PERSONNEL DE SERVICE QUALIFIÉ.

GARANTIE ELECTROHOME....28
MISE EN GARDE
AFIN D'ÉVITER TOUT RISQUE D'INCENDIE OU D'ÉLECTROCUTION, NE BRANCHEZ PAS LE CORDON D'ALIMENTATION DE CET APPAREIL SUR UN CORDON PROLONGATEUR DANS LEQUEL TOUTES LES TIGES DE LA FICHE POURRONT S'INSÉRER COMPLÈTEMENT. AFIN D'ÉVITER TOUT RISQUE D'INCENDIE OU D'ÉLECTROCUTION, N'INSTALLEZ PAS CET APPAREIL DANS UN ESPACE FERMÉ, TEL QU'UNE ÉTAGÈRE OU AUTRE MEUBLE SEMBLABLE.
PRÉCAUTION AVEC LE LASER
INFORMATIONS DU PRODUIT
CONTENU DE L'EMBALLAGE
- SelfSet™ Clock Radio
- DO NOT RETURN THIS PRODUCT TO THE STORE
- WARNING
- CAUTION
- ! WARNING
- DO NOT INGEST BATTERY, CHEMICAL BURN HAZARD
- TABLE OF CONTENTS
- LASER SAFETY
- CAUTION: RETAIN THIS MANUAL FOR FUTURE REFERENCE
- Damage Requiring Service
- Servicing
- Replacement Parts
- Safety Check
- PRODUCT INFORMATION
- PACKAGING CONTENTS
- ATTENTION
- OPERATING INSTRUCTIONS
- POWER CONNECTION
- SETTING THE TIME ZONE (FACTORY PRESET TO ZONE "3"- EST)
- Change the time zone:
- SETTING DST – Daylight Savings Time
- RESET
- SETTING TIME AND CALENDAR MANUALLY
- Setting Alarm 1 and Alarm 2
- SETTING ALARM OUTPUT & ALARM ON/OFF
- ALARM LENGTH AND SNOOZE FUNCTION
- SNOOZE FUNCTION
- CHANGING THE DISPLAY CONTENT
- SLEEP FUNCTION
- RADIO OPERATION
- Note:
- PROJECTION
- TROUBLESHOOTING
- CARE AND MAINTENANCE
- Precautions
- SPECIFICATIONS
- WARNINGS
- ELECTROHOME® WARRANTY
- YEAR PARTS & LABOUR WARRANTY PERIODS - TO OBTAIN THE NAME AND ADDRESS OF THE NEAREST AUTHORIZED ELECTROHOME SERVICE CENTRE OR FOR MORE INFORMATION ON THIS WARRANTY
- BESOIN D'AIDE?
- NE RETOURNEZ PAS CE PRODUIT AU MAGASIN!
- MISE EN GARDE
- PRÉCAUTION AVEC LE LASER
- INFORMATIONS DU PRODUIT
- CONTENU DE L'EMBALLAGE
Brand : Electrohome
Model : EAAC600
Category : Alarm clock radio