EV48SS - Cooker Vulcan - Free user manual and instructions
Find the device manual for free EV48SS Vulcan in PDF.

| Product Type | Restaurant Electric Range |
| Brand | Vulcan |
| Model | EV48SS |
| Width | 48 in (1219 mm) |
| Depth | Approximately 36 in (914 mm) |
| Height (with legs) | Approximately 36 in (914 mm) |
| Weight | Approximately 227 kg (500 lb) |
| Electrical Supply | 208, 240 or 480 V, three-phase or single-phase, 13–20 kW depending on configuration |
| Surface Configuration | Up to 8 French hotplates (2,000 W each) or 4 hotplates (2,500 W each) or combination with smooth griddles |
| Number of Ovens | 2 |
| Oven Power | 5,000 W per oven (1,250 W upper, 3,750 W lower) |
| Oven Temperature Range | 93 to 288 °C (200 to 550 °F) |
| Smooth Griddle Temperature Range | 93 to 288 °C (200 to 550 °F) |
| Material | Stainless Steel |
| Recommended Cleaning | Warm soapy water and soft cloth; avoid abrasive products |
| Safety Devices | Automatic shutdown in case of failure, indicator lights |
| Optional Accessories | Backsplash, shelf, casters, adjustable legs, cutting board, towel rack |
| Standards | ANSI/NFPA-70, Canadian Electrical Code |
| Warranty | Consult the manual or dealer |
Frequently Asked Questions - EV48SS Vulcan
User questions about EV48SS Vulcan
0 question about this device. Answer the ones you know or ask your own.
Ask a new question about this device
Download the instructions for your Cooker in PDF format for free! Find your manual EV48SS - Vulcan and take your electronic device back in hand. On this page are published all the documents necessary for the use of your device. EV48SS by Vulcan.
USER MANUAL EV48SS Vulcan
ITW Food Equipment Group


MODELS
EV12 EV48S
EV24S EV48SS
EV36S EV60SS
EV72SS
natural_image
Exterior view of a stainless steel electric stove with open lid and four circular venters (no text or symbols visible)For additional information on Vulcan-Hart or to locate an authorized parts and service provider in your area, visit our website at www.vulcanequipment.com
VULCAN-HART
3600 NORTH POINT BLVD.
DIVISION OF ITW FOOD EQUIPMENT GROUP, LLC
BALTIMORE, MD 21222
TABLE OF CONTENTS
ELECTRIC RESTAURANT RANGE MODELS.... 3
GENERAL.... 5
FIELD INSTALLABLE ACCESSORIES.... 5
INSTALLATION.... 6
Unpacking 6
Location.... 7
Installation Codes and Standards 7
Assembly.... 7
Electrical Connections.... 9
Leveling 9
Accessory Bullnose Installation.... 9
OPERATION.... 11
Controls 11
Before First Use 12
French Plates.... 12
Griddle 13
Oven 14
Power Outage 14
Cleaning.... 14
MAINTENANCE 15
Service and Parts Information 16
ELECTRICAL CONNECTION INFROMATION.... 16
WIRING DIAGRAMS.... 17-21
NOTES....22
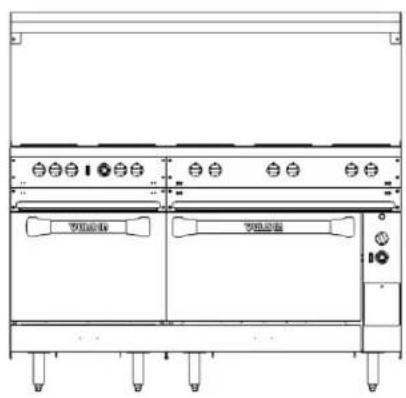
ELECTRIC RESTAURANT RANGE MODELS
EV12
EV24S
natural_image
Technical line drawing of a vertical electronic device with control panel and base (no text or symbols)EV36S

natural_image
Technical line drawing of a mechanical or electrical cabinet with mounting feet and control buttons (no text or symbols)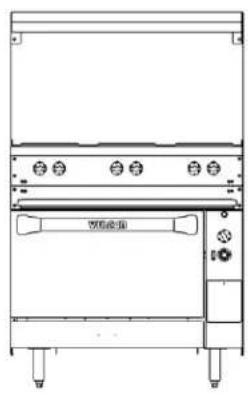
natural_image
Technical line drawing of a double-bay air oven or gas stove with mounting feet and control panel (no text or symbols)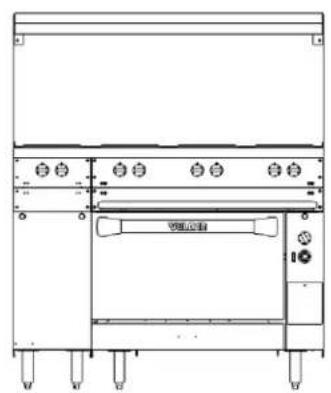
natural_image
Technical line drawing of a mechanical or electrical enclosure with mounting feet and control panel (no text or symbols)EV48S
text_image
1 2 3 4 5 6 7 8 9 10 11 12 13 14 15 16 17 18 19 20 21 22 23 24 25 26 27 28 29 30 31 32 33 34 35 36 37 38 39 40 41 42 43 44 45 46 47 48 49 50 51 52 53 54 55 56 57 58 59 60 61 62 63 64 65 66 67 68 69 70 71 72 73 74 75 76 77 78 79 80 81 82 83 84 85 86 87 88 89 90 91 92 93 94 95 96 97 98 99 100EV48SS
KEEP THESE INSTRUCTIONS FOR FUTURE USE
GENERAL
Thoroughly read this entire manual and carefully follow all of the instructions provided.
Your Vulcan-Hart range is produced with quality workmanship and material. Proper installation, usage and maintenance of your range will result in many years of satisfactory performance.
OPTIONAL FIELD INSTALLABLE ACCESSORIES
| ACCESSORY CODE | DESCRIPTION |
| RSHELF-XL(24,36,48,60,72) | Reinforced High Shelf - 23" (584 mm) high stainless steel backsplash with broiler mounting brackets for Salamander/Cheesemelter. |
| STUB10-XL(12,24,36,48,60,72) | 10" Stainless steel stub riser. Available for 12", 24", 36", 48", 60", and 72" ranges. |
| OVNRACK-XL(20,26)RKGUIDE-XL | 1 extra oven rack with standard ovens.1 pair of rack guides (set of 2). |
| CASTERS-RR4CASTERS-RR8CASTERS-ADJRR4 | Set of four (4) standard casters.Set of eight (8) standard casters.Set of four (4) adjustable casters. Two (2) sets required for 48", 60", and 72" ranges. |
| RCTWLBR-(24,36,48,60,72) | Towel Bar Assembly - Replaces standard bullnose. Available for 24", 36", 48", 60", and 72" ranges. |
| RCCUTBD-(24,36,48,60,72) | Cutting Board Assembly - Replaces standard bullnose. Available for 24", 36", 48", 60", and 72" ranges. (Includes Sani-TUFF® all-rubber cutting board) |
| RCCONRL-(24,36,48,60,72) | Condiment Rail Assembly - Replaces standard bullnose.Available for 24", 36", 48", 60", and 72" ranges. (Does not include condiment pans) |
| SHIELD-FRYRHSHIELD-FRYLH | Fryer Splash Shield - Right hand or left hand side. Protects range top against grease splatter from adjacent fryer. |
| VFLANGED-FEET/4 | Set of four (4) flanged feet. Two (2) sets required for 48", 60", and 72" ranges. |
| CURBMNT-XL4 | Curb mounting kit. Two (2) sets required for 48", 60", and 72" ranges. |
INSTALLATION
UNPACKING
This range was inspected before leaving the factory. The transportation company assumes full responsibility for safe delivery upon acceptance of the shipment. Immediately after unpacking, check for possible shipping damage. If the range is found to be damaged, save the packaging material and contact the carrier immediately.
Remove all shipping bands, blocking, and packaging. Remove the high shelf, and backsplash assembly.
Before installing, verify that the electrical service agrees with the specifications on the rating plate located behind the kick panel on the left side. If the supply and equipment requirements do not agree, contact your dealer or Vulcan-Hart immediately.
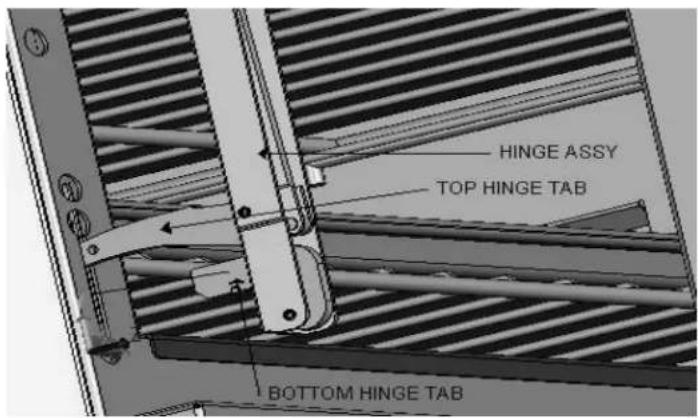
If it is required to remove the door and install it for access through a kitchen door, follow the instructions below.
Door removal
- Open door.
- Grasp door firmly at both sides.
- Lift door upward and pull it out so bottom hinge tab disengages.
* This may be easier to accomplish one side at a time.
- Close door almost shut and lower slightly to disengage top hinge tab.
- Pull door outward.
Door installation
- Grasp door firmly at both sides.
- Starting with either LH or RH side top hinge tab, angle door and slide top hinge tab into opening between hinge stop roller and hinge stop pin.
- Lift door up (compress door hinge as if opening the door) and position bottom tab downward about 30 degrees down from horizontal.
- Push door inward, inserting downward angled bottom hinge tab into opening just above hinge stop pin.
* Bottom hinge tab must enter chassis at downward angle to engage.
- Bottom hinge tab should engage on hinge stop pin.
- Open door and pull door outward until bottom hinge tab locks on hinge stop pin.
- Repeat above steps for opposite side.
- Open and close door to make sure door hinges are locked in place and door operates smoothly.
text_image
HINGE ASSY TOP HINGE TAB BOTTOM HINGE TABLOCATION
The installation location must allow adequate clearance for servicing and proper operation. A minimum front clearance of 40" (1016 mm) is required. Side and rear clearance varies based on range top and adjacent materials of construction:
Clearance Requirements
| Combustible | Non-Combustible | |
| Side – French Plate, Griddle | 1" | 0" |
| Side – Hot Top | 6" | 0" |
| Rear | 0" | 0" |
Combustible Material includes materials made of or surfaced with wood, compressed paper, plant fibers, or other materials that are capable of being ignited and burned. Such material shall be considered combustible even though flame-proofed, fire-retardant treated, or plastered. [definition courtesy ANSI]
INSTALLATION CODES AND STANDARDS
Your Vulcan range must be installed in accordance with state and local codes, or in the absence of local codes, with National Electrical Code ANSI/NFPA-70 (latest edition) available from The National Fire Protection Association, Batterymarch Park, Quincy, MA 02269. In Canada refer to Canadian electrical code C22.1 Part 1 (latest edition).
ASSEMBLY
Leg/Caster Assembly
The range is shipped fully assembled, except for the legs. The range is provided with 6"(152 mm) adjustable stainless steel legs (hardware included), packaged in a box located inside of the oven. A set of 6"(152 mm) casters or 6" adjustable casters are available as an optional field installable accessories.
| RANGE SERIES | LEGS TO INSTALL | CASTERS TO INSTALL |
| EV_12 | 4 | 4 |
| EV_24 | 4 | 4 |
| EV_36 | 4 | 4 |
| EV_48 | 8 | 8 |
| EV_60 | 8 | 8 |
| EV_72 | 8 | 8 |
Installation of Legs/Casters:
-
Carefully tip or lift range to access bottom for leg installation.
-
Align holes in leg/caster mounting plate with pre-drilled holes in bottom of range located in each of the four corners.
-
Attach mounting plate to bottom of range using four 14 - 20 x 58 self tapping screws (provided). If casters are being installed, the locking casters should be mounted on the front.
-
After all legs/casters have been installed, carefully return the range to its upright position.
(For additional leg information, see Leveling section of this manual).
A permanently connected appliance mounted on casters and intended to be secured to the building structure should adhere to the following:
a. Adequate means must be provided to limit the movement of the appliance without depending on or transmitting stress to the electrical conduit;
b. The location(s) where restraining means are to be attached to the appliance needs to be on the outside rear parts of the oven chassis frame of the Range. Attachment points are available on the riser supports, including thru holes and tapping holes for #10-24 screws. Strap clamps are also optional and included with caster accessory kits for attachment to the rear oven wall (screws not provided).
c. The appliance should be installed using a flexible conduit.
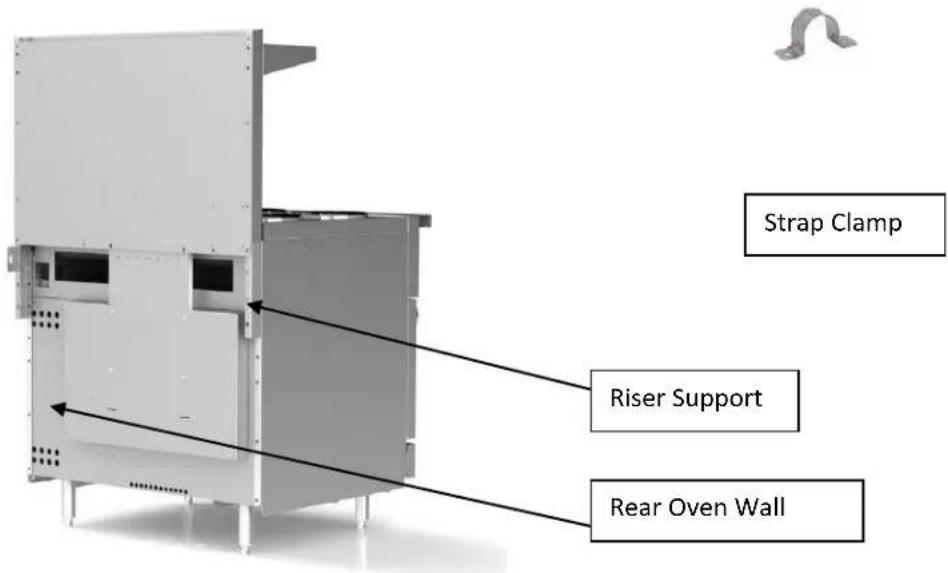
text_image
Strap Clamp Riser Support Rear Oven WallIf the range is installed on casters and is moved for any reason, it is recommended that the range be re-leveled front to back and side to side for even baking.
ELECTRICAL CONNECTIONS
WARNING ELECTRICAL AND GROUNDING CONNECTIONS MUST COMPLY WITH THE APPLICABLE PORTIONS OF THE NATIONAL ELECTRICAL CODE AND/OR OTHER LOCAL ELECTRICAL CODES.
WARNING DISCONNECT ELECTRICAL POWER SUPPLY AND PLACE A TAG AT THE DISCONNECT SWITCH TO INDICATE THAT YOU ARE WORKING ON THE CIRCUIT.
Position the range in its final location. Bring conduit containing the proper supply wire to the range through the knockout located on the bottom of the range. Select the size and type of field wire in accordance with the National Electrical Code suitable for carrying the equipment's rated amps and voltage. Use field wires suitable for 75^ C on units carrying more than 80 amps.
NOTICE If you have purchased an EV48, EV60 OR EV72 model, it will have two (2) electrical connections. The left and the right portions of the range are supplied with individual branch circuits, the connection points are found under each oven or in the right hand side control panel.
NOTICE THE 48, 60 AND 72 INCH UNITS HAVE MORE THAN ONE SOURCE OF ELECTRICAL SUPPLY. EACH SOURCE MUST BE CONNECTED IN ACCORDANCE WITH THE NATIONAL ELECTRIC CODE (LATEST EDITION) OR OTHER LOCAL CODES.
Connect supply leads to field terminal block and green grounding lead to the labeled ground lug. The supply wire should be anchored through the access hole with a bulkhead fitting.
Ranges ship wired for 3-phase service but may be changed to 1-phase, in the field. Refer to the wiring diagram and schematic decal attached to the range for necessary alterations.
LEVELING
Place a carpenter's level on top of the range and level the range front-to-back and side-to-side by turning the adjustable feet.
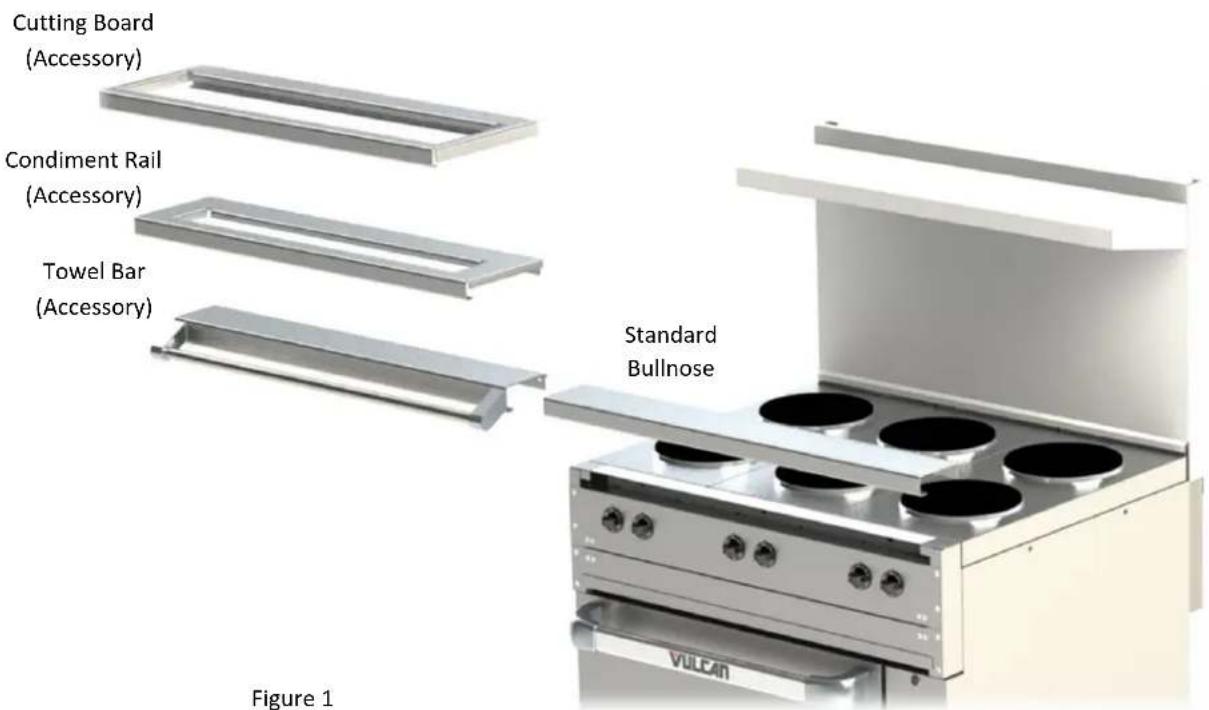
ACCESSORY BULLNOSE INSTALLATION
1.) Remove screws holding the switch cover in place and allow it to pivot down out of the way.
2.) Remove screws, from the front, holding the Bullnose in place.
3.) Slide standard Bullnose up to remove it from the range.
4.) Slide accessory back into the gap the standard Bullnose was removed from and align with the side of range for fit.
5.) Start screw at one end of the Range, do not tighten completely.
6.) Going across the width of the Range install the next screw, as shown in Figure 2, set the alignment and tighten screw completely.
7.) Install the remaining screws and tighten all screws completely.
text_image
Cutting Board (Accessory) Condiment Rail (Accessory) Towel Bar (Accessory) Standard Bullnose VULCAN Figure 1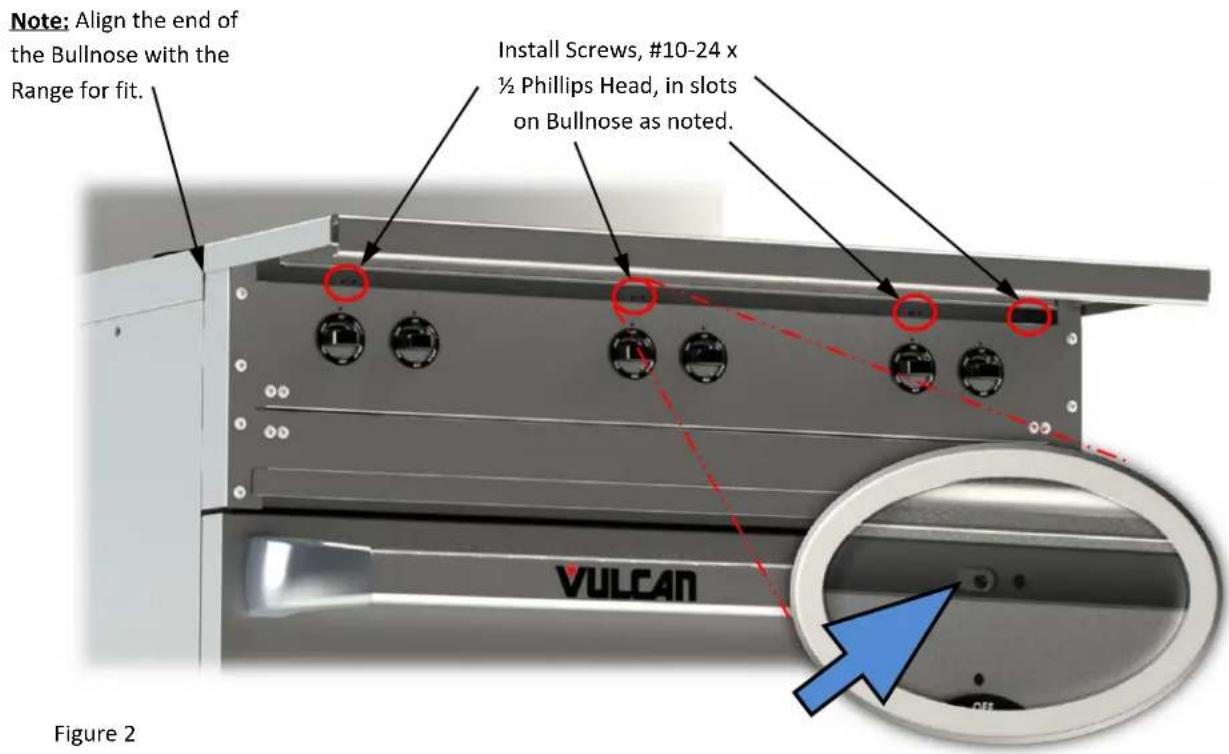
text_image
Note: Align the end of the Bullnose with the Range for fit. Install Screws, #10-24 x ½ Phillips Head, in slots on Bullnose as noted. VULCAN Figure 2OPERATION
WARNING THE RANGE AND ITS PARTS ARE HOT. BE VERY CAREFUL WHEN OPERATING, CLEANING OR SERVICING THE RANGE.
text_image
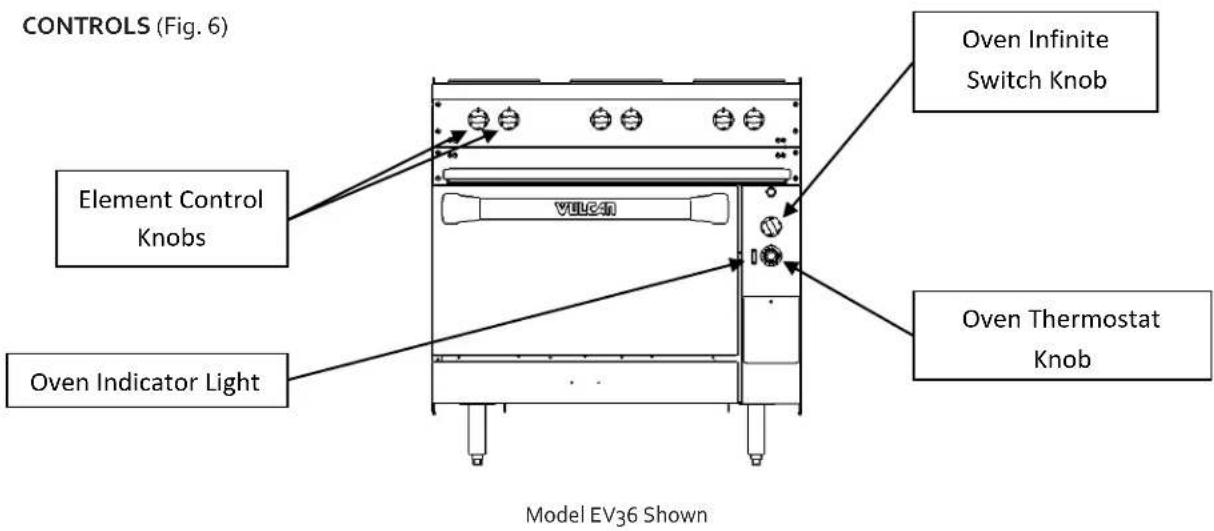
CONTROLS (Fig. 6) Element Control Knobs Oven Indicator Light VULCAN Oven Infinite Switch Knob Oven Thermostat Knob Model EV36 ShownFig. 6
| Element Controls — | Infinite load switches that control and maintain heat to the surface plates. The controls are arranged in pairs; the left knob controls the front plate and the right knob controls the rear plate. NOTE: On 480 volt units, French plates are controlled with a 3-heat switch (HIGH = 2000 watts, MED = 1000 watts, LOW = 500 watts). |
| Hot Top Switch — | (Not shown.) A thermostat (1-10) controls and maintains heat to the top section. Select desired heat level, (1 is minimum, 10 is maximum). |
| Griddle Thermostat — | (Not shown.) Regulates the amount of heat needed to maintain the set temperature. Each 12" (305 mm) section of the griddle has its own thermostat with a temperature range of 200°F (93°C) to 550°F (288°C). |
| Griddle Indicator Light — | (Not shown.) Will be lit until the selected temperature is reached or when it is being maintained. |
| Oven Thermostat — | Regulates the amount of heat needed to control and maintain oven temperature around the desired set temperature. The temperature range is from 200°F (93°C) to 550°F (288°C). Turn dial counterclockwise to increase temperature and clockwise to decrease temperature. |
| Infinite Switch for Oven —Top Heating Element | Provides control for top browning element. Adjust as needed for the amount of top heat required in order to brown product as desired. NOTE: Infinite switch not available on 480 volt units. This position on the panel will be filled with a panel plug. |
| Oven Indicator Light — | Will be lit until the selected temperature is reached or when it is being maintained. |
BEFORE FIRST USE
Cleaning
Clean the range and all accessories with water and a mild detergent. Rinse thoroughly and wipe dry with a soft clean cloth.
Griddle Seasoning
Before leaving the factory the griddle is coated with vegetable oil as a rust inhibitor. Remove this film when the griddle plate is being cleaned prior to its first cooking use. Heat the griddle to 200-300°F to loosen and melt the coating, then clean the surface with a non-corrosive, grease dissolving commercial cleaner, following the manufacturer's directions. Rinse thoroughly and wipe dry with a soft clean cloth.
A new griddle surface must be seasoned. The metal surface of the griddle is porous. Food tends to get trapped in these pores and stick; therefore, it is important to "season" or "fill up" these pores with cooking oil before cooking. Seasoning gives the surface a slick, hard finish from which the food will release easily.
To season, heat griddle top section at a low setting. Pour one ounce of cooking oil per square foot of surface over the griddle top section. With an insulated cloth, spread the oil over the entire griddle surface to create a thin film. Wipe off any excess oil with an insulated cloth.
Repeat this procedure 2 to 3 times until the griddle has a slick surface.
FRENCH PLATES
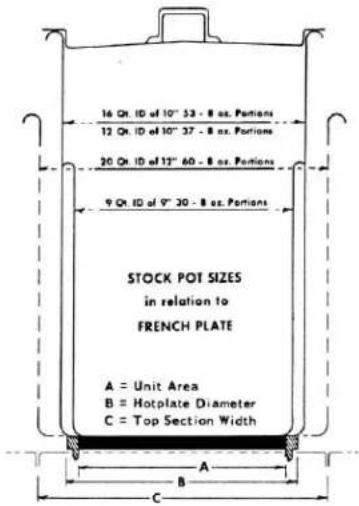
French plates are most efficient when used with utensils having a maximum inside diameter of 10" (254) or a minimum inside diameter of 9" (229). Stock pots of 9, 12 and 16 qt. capacities are recommended for bulk cooking. (Fig. 7)
NOTICE It is important that the utensil used has a flat bottom that sits uniformly on the surface of the plate. Utensils with curved bottoms (either through design or warped from use) will have poor contact and therefore poor heat transfer. This will result in poor cooking performance.
text_image
16 Qt. ID of 10" 53 - 8 oz. Portions 12 Qt. ID of 10" 37 - 8 oz. Portions 20 Qt. ID of 12" 60 - 8 oz. Portions 9 Qt. ID of 9" 30 - 8 oz. Portions STOCK POT SIZES in relation to FRENCH PLATE A = Unit Area B = Hotplate Diameter C = Top Section Width A B CFig. 7
The French (solid surface) Plates are rated for 2000 Watts and are controlled by an infinite heat switch. A French (solid surface) Plate will reach cooking temperature from room temperature in 5 to 7 minutes at a HI switch setting.
Each control knob is marked HI, MED, LO, MED-LO, and VERY-LO. The HI setting is full heat. Use the HI setting to start cooking quickly and to bring water to a boil.
Some DO'S and DO NOT'S of Surface Cooking
DO use utensils to fit the tops (9" to 10" [229 to 254 mm] inside diameter).
DO use flat-bottomed, straight-sided pots and pans.
DO use covers for stock pot work. Water will boil much sooner and much less heat is required for cooking in a covered container. Less water may be used, thereby retaining vitamins and minerals in the food.
DO turn off plates a few minutes before cooking is completed to use the heat stored in the plate.
DO NOT allow surface plates to idle unloaded at HI switch settings. The surface plates will reach very high temperatures, and this can cause the casting to warp or dome. Plates idled at a setting of MED-LO and turned to HI when loaded, will perform bulk cooking jobs just as rapidly, without damage to the plates. Damage caused by plates left running unloaded on HI will void the warranty.
HOT TOPS
Hot Tops can make up for the irregularity of stock pots that have an inside diameter of over 10". Pots can overlap from one Hot Top section to another without any loss of heating area.
NOTICE It is important that the utensil used has a flat bottom that sits uniformly on the surface of the hot top plate. Utensils with curved bottoms (either through design or warped from use) will have poor contact and therefore poor heat transfer. This will result in poor cooking performance.
The Hot Top section is rated for 2500 Watts and are controlled by snap action thermostatic controller, with knob indicator marks from 0 to 10 (with 10 being the highest temperature setting). A Hot Top section will reach cooking temperature from room temperature in 15 to 20 minutes at a 10 thermostat setting.
Some DO'S of Hot Top Cooking
DO use flat-bottomed, straight-sided pots and pans.
DO use covers for stock pot work. Water will boil much sooner and much less heat is required for cooking in a covered container. Less water may be used, thereby retaining vitamins and minerals in the food.
GRIDDLE
See BEFORE FIRST USE in this manual for griddle seasoning procedure.
NOTICE
This griddle plate is steel, but the surface is relatively soft and can be scored or dented by the careless use of a spatula or scraper. Be careful not to dent, scratch, or gouge the plate surface. Do not try to knock off loose food that may be on the spatula by tapping the corner edge of the spatula on the griddle surface.
Griddles are supplied with one 3400 watt heating element per 12" of griddle surface. Each heating element is individually controlled by a thermostat with a range of 200°F to 550°F (93°C to 288°C).
OVEN
NOTICE
Never cover the oven deck or rack with aluminum foil. The oven will not operate properly and the range may be damaged.
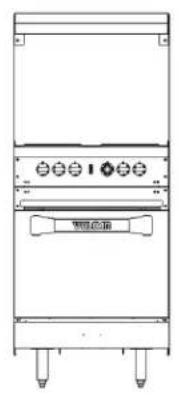
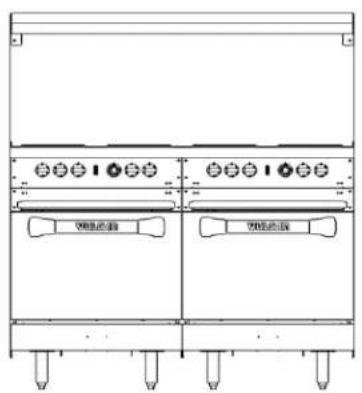
Model EV24S, EV36S and EV48S ranges have a single oven; Model EV48SS, EV60SS AND EV72SS ranges have two separate ovens. Each oven is equipped with top and bottom heating elements. The top element has an infinite heat switch for browning. THIS IS NOT A BROILER ELEMENT. (infinite switch is not available on the 480 volt range for the top element)
The oven has an input of 5000 W., 3750 W. for the bottom element and 1250 W. for the top element.
Preheating
Thoroughly preheat the oven by setting the switch and the thermostat to the desired temperature. When the red light goes out, the oven is ready for use. For full loads and delicate baked products, it may be desirable to allow the oven to cycle (red light on and off) a second time before loading.
Baking
Most products can be baked with the top element infinite switch set between VERY LO and LO. Hard-to-brown products, such as corn bread or biscuits, may require a top switch setting of MED to HI. Start off by using a LO setting on top element and then increase only as needed.
Roasting
Place meat on a rack in an open pan with sides sufficiently high to retain the drippings. Roasting may be done on the oven rack or the deck. For best results, roast at the low temperatures of 200°F (93°C) to 325°F (163°C) recommended by the Department of Agriculture and the American Meat Institute. Most meats may be roasted with the infinite heat switch set at HI. If heavy browning on poultry is not desired, the switch should be set between MED-LO and VERY-LO.
The top oven element is not suitable for broiling, and will not operate independent of the oven thermostat (bottom element).
POWER OUTAGE
If a power outage occurs, the range will automatically shut down. When power is restored, the range will automatically resume normal functions. If the range is left unattended during the power outage, turn all control knobs/switches OFF. When power is restored, turn desired control knobs/switches back ON. The unit will be
preheated in 5 minutes and normal cooking operations can be resumed.
CLEANING
WARNING
DISCONNECT ELECTRICAL POWER SUPPLY BEFORE CLEANING.
DO NOT use Dawn ^® dish detergent to clean the exterior or interior components of the range.
DO NOT use scouring powder. It is extremely difficult to remove completely. It can build up accumulations that will damage the range.
DO NOT use cleaning products containing TSC.
Clean all parts of the range and the oven with a soft cloth and warm water and detergent. Rinse thoroughly and wipe dry with a soft clean cloth.
Griddle
Scrape the griddle with an approved scraper after each use. The griddle grease can should be emptied on a routine basis. A weep hole is provided to indicate that the grease can is near full capacity. Failure to empty the grease can will cause it to overflow and may result in damage to the range. Weekly, or more often if necessary, thoroughly clean the griddle surface. You may use a griddle screen or stone with a little grease, rubbing with the grain of the metal while it is still warm, or use water and detergent with a steel brush. The detergent must be thoroughly removed. After each thorough cleaning, the griddle must be re-seasoned (see BEFORE FIRST USE in this manual).
Avoid build-up of caked grease under the drip edge and around the outside edges of the griddle.
If the griddle is to be shut down for an extended period, put a heavy coat of grease over the griddle plate.
Oven
Clean oven and oven door daily, especially if fruit pies or tomato sauces were baked, meats roasted, and if there have been spillovers. Failure to clean spills may result in corrosion of metal components.
If the oven liners and decks are heavily soiled, ammonia or oven cleaner may be used to remove spillage of burned on sugar and grease, but must be thoroughly rinsed with water to prevent corrosion.
After processing some foods at low temperatures, odors may linger in the oven. These odors may be cleared by setting the thermostat at 500^ F ( 260^ C) and allowing the oven to operate unloaded for 30 to 45 minutes.
MAINTENANCE
WARNING THE RANGE AND ITS PARTS ARE HOT. BE VERY CAREFUL WHEN OPERATING, CLEANING OR SERVICING THE RANGE.
WARNING Disconnect power supply and follow lockout / tagout procedures before cleaning and servicing the appliance.
SERVICE AND PARTS INFORMATION
To obtain service and parts information concerning this range, contact the Vulcan-Hart Service Department in your area or Service Department at the address or phone number shown on the front cover of this manual.
ELECTRICAL CONNECTION INFORMATION
| Kilowatts | 208 Volt Amps | 240 Volt Amps | 480 Volt Amps | |||||||||||||
| Model Configuration | X-Y Y-Z | Z-X | Single Phase | X Y Z | Single Phase | X Y Z | Single Phase | X Y Z | Single Phase | |||||||
| 12 Inch Range | ||||||||||||||||
| EV12-2FP 2.0 | 2.0 | 0.0 | 4.0 | 9.6 17.0 | 9.6 19.0 | 8.3 14.0 | 8.3 17.0 | 4.2 7.2 4 | 2 8.3 | |||||||
| EV12-1HT 5.0 | 24.0 | 21.0 | 10.4 | |||||||||||||
| 24 Inch Range w/Standard Oven | ||||||||||||||||
| EV24S-4FP | 5.0 | 4.0 | 4.0 | 13.0 | 37.5 | 37.5 | 33.3 | 62.5 | 32.5 | 32.5 | 28.9 | 54.2 | 16.3 | 16.3 | 14.4 | 27.1 |
| EV24S-2HT | 5.0 | 5.0 | 5.0 | 15.0 | 41.6 | 41.6 | 41.6 | 72.1 | 36.1 | 36.1 | 36.1 | 62.5 | 18.1 | 18.1 | 18.1 | 31.2 |
| 36 Inch Range w/Standard Oven | ||||||||||||||||
| EV36S-6FP | 4.0 | 8.0 | 5.0 | 17.0 | 37.5 | 50.0 | 54.1 | 81.7 | 32.5 | 43.3 | 46.9 | 70.8 | 16.3 | 21.7 | 23.5 | 35.4 |
| EV36S-3HT | 5.0 | 10.0 | 5.0 | 20.0 | 41.6 | 62.5 | 62.5 | 96.2 | 36.1 | 54.1 | 54.1 | 83.3 | 18.1 | 27.1 | 27.1 | 41.7 |
| EV36S-2HT2FP | 4.0 | 10.0 | 5.0 | 19.0 | 37.5 | 58.3 | 62.5 | 91.4 | 32.5 | 50.5 | 54.1 | 79.2 | 16.3 | 25.3 | 27.1 | 39.6 |
| EV36S-1HT4FP | 4.0 | 9.0 | 5.0 | 18.0 | 37.5 | 54.1 | 58.3 | 86.5 | 32.5 | 46.9 | 50.5 | 75.0 | 16.3 | 23.5 | 25.3 | 37.5 |
| EV36S-2FP24G | 3.4 | 7.4 | 5.0 | 15.8 | 35.0 | 45.0 | 51.6 | 76.0 | 30.3 | 39.0 | 44.7 | 65.8 | 15.2 | 19.5 | 22.4 | 32.9 |
| EV36S-1HT24G | 3.4 | 8.4 | 5.0 | 16.8 | 35.0 | 49.1 | 55.8 | 80.8 | 30.3 | 42.6 | 48.4 | 70.0 | 15.2 | 21.3 | 24.2 | 35.0 |
| EV36S-4FP12G | 3.4 | 8.0 | 5.0 | 16.4 | 35.0 | 47.5 | 54.1 | 78.8 | 30.3 | 41.1 | 46.9 | 68.3 | 15.2 | 20.6 | 23.3 | 34.2 |
| EV36S-2HT12G | 3.4 | 10.0 | 5.0 | 18.4 | 35.0 | 55.8 | 62.5 | 88.5 | 30.3 | 48.4 | 54.1 | 76.7 | 15.2 | 24.2 | 27.1 | 38.4 |
| EV36S-36G | 3.4 | 6.8 | 3.4 | 15.2 | 35.0 | 42.5 | 49.1 | 73.1 | 30.3 | 36.8 | 42.6 | 63.3 | 15.2 | 18.4 | 21.3 | 31.7 |
Key - FP = French Plates (2 per 12inch section) HT = Hot Top (1 per 12 inch section) G = Griddle (can actually have a 12, 24 or 36 inch Griddle)
All Griddles less than 36 inches are always positioned on the right hand side of the range.
WARNING All ranges over 36 inches in width have two electrical connections. Ensure both power supplies have been disconnected before beginning service on the appliance.
DOUBLE RANGES
Ranges ordered over 36 inches wide are constructed as follows:
• EV48S - Consists of an EV36S and an EV12
• EV48SS - Consists of two EV24S
• EV6oSS - Consists of an EV24S and an EV36S
• EV72SS - Consists of two EV36S
other
| Component | Unit Type | Description | Color | Annotation | | :--- | :--- | :--- | :--- | :--- | | L1 | 1-PH EIGHT [208, 240 VOLT] | Thermal ILLDC | N/A | - | | L2 | 1-PH EIGHT [220 & 240 VOLT] | Thermal ILLDC | N/A | - | | L3 | 1-PH EIGHT [220 & 240 VOLT] | Thermal ILLDC | N/A | - | | L4 | 1-PH EIGHT [220 & 240 VOLT] | Thermal ILLDC | N/A | - | | L5 | 1-PH EIGHT [220 & 240 VOLT] | Thermal ILLDC | N/A | - | | L6 | 1-PH EIGHT [220 & 240 VOLT] | Thermal ILLDC | N/A | - | | L7 | 1-PH EIGHT [220 & 240 VOLT] | Thermal ILLDC | N/A | - | | L8 | 1-PH EIGHT [220 & 240 VOLT] | Thermal ILLDC | N/A | - | | L9 | 1-PH EIGHT [220 & 240 VOLT] | Thermal ILLDC | N/A | - | | L10 | 1-PH EIGHT [220 & 240 VOLT] | Thermal ILLDC | N/A | - | | L11 | 1-PH EIGHT [220 & 240 VOLT] | Thermal ILLDC | N/A | - | | L12 | 1-PH EIGHT [220 & 240 VOLT] | Thermal ILLDC | N/A | - | | L13 | 1-PH EIGHT [220 & 240 VOLT] | Thermal ILLDC | N/A | - | | L14 | 1-PH EIGHT [220 & 240 VOLT] | Thermal ILLDC | N/A | - | | L15 | 1-PH EIGHT [220 & 240 VOLT] | Thermal ILLDC | N/A | - | | L16 | 1-PH EIGHT [220 & 240 VOLT] | Thermal ILLDC | N/A | - | | L17 | 1-PH EIGHT [220 & 240 VOLT] | Thermal ILLDC | N/A | - | | L18 | 1-PH EIGHT [220 & 240 VOLT] | Thermal ILLDC | N/A | - | | L19 | 1-PH EIGHT [220 & 240 VOLT] | Thermal ILLDC | N/A | - | | L20 | 1-PH EIGHT [220 & 240 VOLT] | Thermal ILLDC | N/A | - | | L21 | 1-PH EIGHT [220 & 240 VOLT] | Thermal ILLDC | N/A | - | | L22 | 1-PH EIGHT [220 & 240 VOLT] | Thermal ILLDC | N/A | - | | L23 | 1-PH EIGHT [220 & 240 VOLT] | Thermal ILLDC | N/A | - | | L24 | 1-PH EIGHT [220 & 240 VOLT] | Thermal ILLDC | N/A | - | | L25 | 1-PH EIGHT [220 & 240 VOLT] | Thermal ILLDC | N/A | - | | L26 | 1-PH EIGHT [220 & 240 VOLT] | Thermal ILLDC | N/A | - | | L27 | 1-PH EIGHT [220 & 240 VOLT] | Thermal ILLDC | N/A | - | | L28 | 1-PH EIGHT [220 & 240 VOLT] | Thermal ILLDC | N/A | - | | L29 | 1-PH EIGHT [220 & 240 VOLT] | Thermal ILLDC | N/A | - | | L30 | 1-PH EIGHT [220 & 240 VOLT] | Thermal ILLDC | N/A | - | | L31 | 1-PH EIGHT [220 & 240 VOLT] | Thermal ILLDC | N/A | - | | L32 | 1-PH EIGHT [220 & 240 VOLT] | Thermal ILLDC | N/A | - | | L33 | 1-PH EIGHT [220 & 240 VOLT] | Thermal ILLDC | N/A | - | | L34 | 1-PH EIGHT [220 & 240 VOLT] | Thermal ILLDC | N/A | - | | L35 | 1-PH EIGHT [220 & 240 VOLT] | Thermal ILLDC | N/A | - | | L36 | 1-PH EIGHT [220 & 240 VOLT] | Thermal ILLDC | N/A | - | | L37 | 1-PH EIGHT [220 & 240 VOLT] | Thermal ILLDC | N/A | - | | L38 | 1-PH EIGHT [220 & 240 VOLT] | Thermal ILLDC | N/A | - | | L39 | 1-PH EIGHT [220 & 240 VOLT] | Thermal ILLDC | N/A | - | | L40 | 1-PH EIGHT [220 & 240 VOLT] | Thermal ILLDC | N/A | - | | L41 | 1-PH EIGHT [220 & 240 VOLT] | Thermal ILLDC | N/A | - | | L42 | 1-PH EIGHT [220 & 240 VOLT] | Thermal ILLDC | N/A | - | | L43-5 (L) = (L) / (L) = (L) / (L) = (L) / (L) = (L) / (L) = (L) / (L) = (L) / (L) = (L) / (L) = (L) / (L) = (L) / (L) = (L) / (L) = (L) / (L) = (L) / (L) = (L) / (L) / (L) = (L) / (L) = (L) / (L) = (L) / (L) = (L) / (L) = (L) / (L) = (L) / (L) = (L) / (L) = (L) / (L) = (L) / (L) = (L) / (L) = (L) / (L) = (L) = (L) / (L) = (L) / (L) = (L) / (L) = (L) / (L) = (L) / (L) = (L) / (L) = (L) / (L) = (L) / (L) = (L) / (L) = (L) / (L) = (L) / (L) = (L) / (L) < PPTT > PPTT > PPTT > PPTT > PPTT > PPTT > PPTT > PPTT > PPTT > PPTT > PPTT > PPTT > PPTT > PPTT > PPTT > PPTT > PPTT > PPTT > PPTT > PPTT > PPTT > PPTT > PPTT > PPTT > PPTT > PPTT> PPTT> PPTT> PPTT> PPTT> PPTT> PPTT> PPTT> PPTT> PPTT> PPTT> PPTT> PPTT> PPTT> PPTT> PPTT> PPTT> PPTT> PPTT> PPTT> PPTT> PPTT> PPTT> PPTT> PPTT> PPTT>
text_image
B 7 6 5 4 3 2 1 S DESCRIPTION DATE APPENDS REV. NO. #1/2018 #2/2018 #3/2018 #4/2018 #5/2018 #6/2018 #7/2018 #8/2018 #9/2018 #10/2018 #11/2018 #12/2018 #13/2018 #14/2018 #15/2018 #16/2018 #17/2018 #18/2018 #19/2018 #20/2018 #21/2018 #22/2018 #23/2018 #24/2018 #25/2018 #26/2018 #27/2018 #28/2018 #29/2018 #30/2018 #31/2018 #32/2018 #33/2018 #34/2018 #35/2018 #36/2018 #37/2018 #38/2018 #39/2018 #40/2018 #41/2018 #42/2018 #43/2018 #44/2018 #45/2018 #46/2018 #47/2018 #48/2018 #49/2018 #50/2018 #51/2018 #52/2018 #53/2018 #54/2018 #55/2018 #56/2018 #57/2018 #58/2018 #59/2018 #60/2018 #61/2018 #62/2018 #63/2018 #64/2018 #65/2018 #66/2018 #67/2018 #68/2018 #69/2018 #70/2018 #71/2018 #72/2018 #73/2018 #74/2018 #75/2018 #76/2018 #77/2018 #78/2018 #79/2018 #80/2018 #81/2018 #82/2018 #83/2018 #84/2018 #85/2018 #86/2018 #87/2018 #88/2018 #89/2018 #90/2018 #91/2018 #92/2018 #93/2018 #94/2018 #95/2018 #96/2018 #97/2018 #98/2018 #99/2018 #A B C D E F G H I T H J K L M N O P A N T S U V W X Y Z X X X X X X X X X X X X X X X X X X X X X X X X X X X X X X X X X X X X X X X X X X X X X X X X X X X X X X X X X X X X X X X X X X X X X X X X X X X X X X X X X X X X X X X X X X X X X X X X X X X X C:\WINDOWS\BHD\ALW\BHD\ALW\BHD\ALW\BHD\ALW\BHD\ALW\BHD\ALW\BHD\ALW\BHD\ALW\BHD\ALW\BHD\ALW\BHD\ALW\BHD\ALW\BHD\ALW\BHD\ALW\BHD\ALW\BHD\ALW\BHD\ALW\BHD\nHOT ROLLARLE\n34V GRIPLABLE\n34V GRIPLABLE\nHOT ROLLARLE\nHOT ROLLABLE\nHOT ROLLABLE\nHOT ROLLABLE\nHOT ROLLABLE\nHOT ROLLABLE\nHOT ROLLABLE\nHOT ROLLABLE\nHOT ROLLABLE\nHOT ROLLABLE\nHOT ROLLABLE\nHOT ROLLABLE\nHOT ROLLABLE\nHOT ROLLABLE\nHOT ROLLABLE\nHOT ROLLABLE\nHOT ROLLABLE\nHOT ROLLABLE\nHOTRINEL VOLTING ON ENERGMENT ON ENERGMENT ON ENERGMENT ON ENERGMENT ON ENERGMENT ON ENERGMENT ON ENERGMENT ON ENERGMENT ON ENERGMENT ON ENERGMENT ON ENERGMENT ON ENERGMENT ON ENERGMENT ON ENERGMENT ON ENERGMENT ON ENERGMENT ON ENERGMENT ON ENERGMENT ON ENERGMENT ON ENERGMENT ON ENERGMENTS ON ENERGMENTS ON ENERGMENTS ON ENERGMENTS ON ENERGMENTS ON ENERGMENTS ON ENERGMENTS ON ENERGMENTS ON ENERGMENTS ON ENERGMENTS ON ENERGMENTS ON ENERGMENTS ON ENERGMENTS ON ENERGMENTS ON ENERGMENTS ON ENERGMENTS ON ENERGMENTS ON ENERGMENTS ON ENERGMENTS ON ENERGMENTS ON ENERGENTILATION OF CANES LIMITED OF CANES LIMITED OF CANES LIMITED OF CANES LIMITED OF CANES LIMITED OF CANES LIMITED OF CANES LIMITED OF CANES LIMITED OF CANES LIMITED OF CANES LIMITED OF CANES LIMITED OF CANES LIMITED OF CANES LIMITED OF CANES LIMITED OF CANES LIMITED OF CANES LIMITED OF CANES LIMITED OF CANES LIMITED OF CANES LIMITED OF CANES LIMITED OF CANES LIMITED OF CANES LIMITED OF CANES LIMITED OF CANES LIMITED OF CANES LIMITED OF CANES LUTTER OF CANES LUTTER OF CANES LUTTER OF CANES LUTTER OF CANES LUTTER OF CANES LUTTER OF CANES LUTTER OF CANES LUTTER OF CANES LUTTER OF CANES LUTTER OF CANES LUTTER OF CANES LUTTER OF CANES LUTTER OF CANES LUTTER OF CANES LUTTER OF CANES LUTTER OF CANES LUTTER OF CANES LANETARY POWER IN CHAPITARY POWER IN CHAPITARY POWER IN CHAPITARY POWER IN CHAPITARY POWER IN CHAPITARY POWER IN CHAPITARY POWER IN CHAPITARY POWER IN CHAPITARY POWER IN CHAPITARY POWER IN CHAPITARY POWER IN CHAPITARY POWER IN CHAPITARY POWER IN CHAPITARY POWER IN CHAPITARY POWER IN CHAPITARY POWER IN CHAPITARY POWER IN CHAPITARY POWER INCHAPITARY POWER IN CHAPITARY POWER IN CHAPITARY POWER IN CHAPITARY POWER IN CHAPITARY POWER IN CHAPITARY POWER IN CHAPITARY POWER IN CHAPITARY POWER IN CHAPITARY POWER IN CHAPITARY POWER IN CHAPITARY POWER IN CHAPITARY POWER IN CHAPITARY POWER IN CHAPITARY POWER IN CHAPITARY POWER IN CHAPITARY POWER IN CHAPITARY POTENTURE POWER IN CHAPITARY POTENTURE POWER IN CHAPITARY POTENTURE POWER IN CHAPITARY POTENTURE POWER IN CHAPITARY POTENTURE POWER IN CHAPITARY POTENTURE POWER IN CHAPITARY POTENTURE POWER IN CHAPITARY POTENTURE POWER IN CHAPITARY POTENTURE POWER IN CHAPITARY POTENTURE POWER IN CHAPITARY POTENTURE POWER IN CHAPITARY POTENTURE PERCENTRAL POWER IN CHAPITARY POTENTURE PERCENTRAL PERCENTRAL PERCENTRAL PERCENTRAL PERCENTRAL PERCENTRAL PERCENTRAL PERCENTRAL PERCENTRAL PERCENTRAL PERCENTRAL PERCENTRAL PERCENTRAL PERCENTRAL PERCENTRAL PERCENTRAL PERCENTRAL PERCENTRAL PERCENTRAL PERCENTRAL PERCENTRAL PERCENTRAL PERCENTRAL PERCENTRAL PERCENTRAL PERCENTRAL PERCENTRAL PERCENTRAL PERCENTRAL PERCENTRAL PERCENTRAL PERCENTRAL PERCENTRAL PERCENTRALPERCENTRAL PERCENTRAL PERCENTRAL PERCENTRAL PERCENTRAL PERCENTRAL PERCENTRAL PERCENTRAL PERCENTRAL PERCENTRAL PERCENTRAL PERCENTRAL PERCENTRAL PERCENTRAL PERCENTRAL PERCENTRAL PERCENTRAL PERCENTRAL PERCENTRAL PERCENTRAL PERCENTRAL PERCENTRAL PERCENTRAL PERCENTRAL PERCENTRAL PERCENTRAL PERCENTRAL PERCENTRAL PERCENTRAL PERCENTRAL PERCENTRAL PERCENTRAL PERCENTRAL PER CENTRAL PER CENTRAL PER CENTRAL PER CENTRAL PER CENTRAL PER CENTRAL PER CENTRAL PER CENTRAL PER CENTRAL PER CENTRAL PER CENTRAL PER CENTRAL PER CENTRAL PER CENTRAL PER CENTRAL PER CENTRAL PER CENTRAL PER CENTRAL PER CENTRAL PER CENTRAL PER CENTRAL PER CENTRAL PER CENTRAL PER CENTRAL PER CENTRAL PER CENTRAL PER CENTRAL PER CENTRAL PER CENTRAL PER CENTRAL PER CENTRAL PER CENTRAL PER CENTRAL PER CENTRAPER CENTRAPER CENTRAPER CENTRAPER CENTRAPER CENTRAPER CENTRAPER CENTRAPER CENTRAPER CENTRAPER CENTRAPER CENTRAPER CENTRAPER CENTRAPER CENTRAPER CENTRAPER CENTRAPER CENTRAPER CENTRAPER CENTRAPER CENTRAPER CENTRAPER CENTRAPER CENTRAPER CENTRAPER CENTRAPER CENTRAPER CENTRAPER CENTRAPER CENTRAPER CENTRAPER CENTRAPER CENTRAPER CENTRAPER-centraPER CENTRAPER CENTRAPER CENTRAPER CENTRAPER CENTRAPER CENTRAPER CENTRAPER CENTRAPER CENTRAPER CENTRAPER CENTRAPER CENTRAPER CENTRAPER CENTRAPER CENTRAPER CENTRAPER CENTRAPER CENTRAPER CENTRAPER CENTRAPER CENTRAPER CENTRAPER CENTRAPER CENTRAPER CENTRAPER CENTRAPER CENTRAPER CENTRAPER CENTRAPER CENTRAPER CENTRAPER CENTRAPER CENTRAPer CentraPer CentraPer CentraPer CentraPer CentraPer CentraPer CentraPer CentraPer CentraPer CentraPer CentraPer CentraPer CentraPer CentraPer CentraPer CentraPer CentraPer CentraPer CentraPer CentraPer CentraPer CentraPer CentraPer CentraPer CentraPer CentraPer CentraPer CentraPer CentraPer CentraPer CentraPer CentraPer CentraPer CentraPersenture Power in ACDC (in ACDC) (in ACDC) (in ACDC) (in ACDC) (in ACDC) (in ACDC) (in ACDC) (in ACDC) (in ACDC) (in ACDC) (in ACDC) (in ACDC) (in ACDC) (in ACDC) (in ACDC) (in ACDC) (in ACDC) (in ACDC) (in ACDC) (in ACDC) (in ACDC)
text_image
RINCHON CODE: 20V TYPE: 10000000000000000000000000000000000000000000000000000000000000000000000000000000000000000 APPROVED BY: APPROVED SHEET NO. NO. PROJET NO. PROJET NO. PROJET NO. SHEET ID: 134 SHEET MOUNT: 25V SHEET POWER: 12V SHEET POWER: 12V SHEET POWER: 12V SHEET POWER: 12V SHEET POWER: 12V SHEET POWER: 12V SHEET POWER: 12V SHEET POWER: 12V SHEET POWER: 12V SHEET POWER: 12V SHEET POWER: 12V SHEET POWER: 12A SHEET POWER: 12A SHEET POWER: 12A SHEET POWER: 12A SHEET POWER: 12A SHEET POWER: 12A SHEET POWER: 12A SHEET POWER: 12A SHEET POWER: 12A SHEET POWER: 12A SHEET POWER: 12A SHEET POWER: 12A
other
| Component | Value | | :--- | :--- | | RED | 400 VOLT | | 2.5 | 31.7 | | 3.4 | 31.7 | | 3.4 | 31.7 | | 3.4 | 31.7 | | 3.4 | 31.7 | | 3.4 | 31.7 | | 3.4 | 31.7 | | 3.4 | 31.7 | | 3.4 | 31.7 | | 3.4 | 36.7 | | 3.4 | 36.7 | | 3.4 | 36.7 | | 3.4 | 36.7 | | 3.4 | 36.7 | | 3.4 | 36.7 | | 3.4 | 36.7 | | 3.4 | 36.7 | | 3.4 | 36.7 | | | 3.4 | 36.7 | | | 3.4 | 36.7 | | | 3.4 | 36.7 | | | 3.4 | 36.7 | | | 3.4 | 36.7 | | | 3.4 | 36.7 | | | 3.4 | 36.7 | | | 3.4 | 38.7 | | | 3.4 | 38.7 | | 3.4 | 38.7 | | 3.4 | 38.7 | | 3.4 | 38.7 | | 3.4 | 38.7 | | 3.4 | 38.7 | | 3.4 | 38.7 | | 3.4 | 38.7 | | | 3.4 | 38.7 | | | 3.4 | 38.7 | | | 3.4 | 38.7 | | | 3.4 | 38.7 | | | 3.4 | 38.7 | | | 3.4 | 38.7 | | | 3.4 | 38.7 | | | 3.4 | 36.7 | | | 3.4 | 36.7 | | | 3.4 | 36.7 | | | 3.4 | 36.7 | | | 3.4 | 36.7 | | | 3.4 | 36.7 | | | 3.4 | 36.7 | | | 3.5 | -100 VOLT | | -100 VOLT -100 VOLT -100 VOLT -100 VOLT -100 VOLT -100 VOLT -100 VOLT -100 VOLT -100 VOLT -100 VOLT -100 VOLT -100 VOLT -100 VOLT -100 VOLT -100 VOLT -150 VOLT -150 VOLT -150 VOLT -150 VOLT -150 VOLT -150 VOLT -150 VOLT -150 VOLT -150 VOLT -150 VOLT -150 VOLT -150 VOLT -150 VOLT -150 VOLT -150VOLT -150VOLT -150VOLT -150VOLT -150VOLT -150VOLT -150VOLT -150VOLT -150VOLT -150VOLT -150VOLT -150VOLT -150VOLT -150VOLT -150VOLT
NOTES
MANUEL D'INSTALLATION & MODE D'EMPLOI
CUISINIÈRES ÉLECTRIQUES DE RESTAURANTS
natural_image
Exterior view of a stainless steel VULCAN electric stove with four burners and open top (no text or symbols visible)natural_image
Technical line drawing of a mechanical or electrical cabinet with mounting feet and control panel (no text or symbols)EV36S
natural_image
Technical line drawing of a mechanical or electrical enclosure with mounting feet and a central component (no text or symbols)EV48S
other
| Panel | Description | Unit Type | Voltage (V) | |---|---|---|---| | H | Diagram of French Plates Option | FRONT SINGLE ZONE HOT TOP OPTION | - | | I | Table of French Plates Option | FRONT SINGLE ZONE HOT TOP OPTION AND TENTRAL BLOCK | - | | J | Table of French Plates Option AND TENTRAL BLOCK | FRONT SINGLE ZONE HOT TOP OPTION AND TENTRAL BLOCK | - | | K | Table of French Plates Option AND TENTRAL BLOCK | FRONT SINGLE ZONE HOT TOP OPTION AND TENTRAL BLOCK | - | | L | Table of French Plates Option AND TENTRAL BLOCK | FRONT SINGLE ZONE HOT TOP OPTION AND TENTRAL BLOCK | - | | M | Table of French Plates Option AND TENTRAL BLOCK | FRONT SINGLE ZONE HOT TOP OPTION AND TENTRAL BLOCK | - | | N | Table of French Plates Option AND TENTRAL BLOCK | FRONT SINGLE ZONE HOT TOP OPTION AND TENTRAL BLOCK | - | | O | Table of French Plates Option AND TENTRAL BLOCK | FRONT SINGLE ZONE HOT TOP OPTION AND TENTRAL BLOCK | - | | P | Table of French Plates Option AND TENTRAL BLOCK | FRONT SINGLE ZONE HOT TOP OPTION AND TENTRAL BLOCK | - | | Q | Table of French Plates Option AND TENTRAL BLOCK | FRONT SINGLE ZONE HOT TOP OPTION AND TENTRAL BLOCK | - | | R | Table of French Plates Option AND TENTRAL BLOCK | FRONT SINGLE ZONE HOT TOP OPTION AND TENTRAL BLOCK | - | | S | Table of French Plates Option AND TENTRAL BLOCK | FRONT SINGLE ZONE HOT TOP OPTION AND TENTRAL BLOCK | - | | T | Table of French Plates Option AND TENTRAL BLOCK | FRONT SINGLE ZONE HOT TOP OPTION AND TENTRAL BLOCK | - | | U | Table of French Plates Option AND TENTRAL BLOCK | FRONT SINGLE ZONE HOT TOP OPTION AND TENTRAL BLOCK | - | | V | Table of French Plates Option AND TENTRAL BLOCK | FRONT SINGLE ZONE HOT TOP OPTION AND TENTRAL BLOCK | - | | W | Table of French Plates Option AND TENTRAL BLOCK | FRONT SINGLE ZONE HOT TOP OPTION AND TENTRAL BLOCK | - | | X | Table of French Plates Option AND TENTRAL BLOCK | FRONT SINGLE ZONE HOT TOP OPTION AND TENTRAL BLOCK | - | | Y | Table of French Plates Option AND TENTRAL BLOCK | FRONT SINGLE ZONE HOT TOP OPTION AND TENTRAL BLOCK | - | | Z | Table of French Plates Option AND TENTRAL BLOCK | FRONT SINGLE ZONE HOT TOP OPTION AND TENTRAL BLOCK | - | | AA | Table of French Plates Option AND TENTRAL BLOCK | FRONT SINGLE ZONE HOT TOP OPTION AND TENTRAL BLOCK | - | | AB | Table of French Plates Option AND TENTRAL BLOCK | FRONT SINGLE ZONE HOT TOP OPTION AND TENTRAL BLOCK | - | | AC | Table of French Plates Option AND TENTRAL BLOCK | FRONT SINGLE ZONE HOT TOP OPTION AND TENTRAL BLOCK | - | | AD | Table of French Plates Option AND TENTRAL BLOCK | FRONT SINGLE ZONE HOT TOP OPTION AND TENTRAL BLOCK | - | | AE | Table of French Plates Option AND TENTRAL BLOCK | FRONT SINGLE ZONE HOT TOP OPTION AND TENTRAL BLOCK | - | | AF | Table of French Plates Option AND TENTRAL BLOCK | FRONT SINGLE ZONE HOT TOP OPTION AND TENTRAL BLOCK | - | | AG | Table of French Plates Option AND TENTRAL BLOCK | FRONT SINGLE ZONE HOT TOP OPTION AND TENTRAL BLOCK | - | | AH | Table of French Plates Option AND TENTRAL BLOCK | FRONT SINGLE ZONE HOT TOP OPTION AND TENTRAL BLOCK | - | | AI | Table of French Plates Option AND TENTRAL BLOCK | FRONT SINGLE ZONE HOT TOP OPTION AND TENTRAL BLOCK | - | | AJ | Table of French Plates Option AND TENTRAL BLOCK | FRONT SINGLE ZONE HOT TOP OPTION AND TENTRAL BLOCK | - | | AK | Table of French Plates Option AND TENTRAL BLOCK | FRONT SINGLE ZONE HOT TOP OPTION AND TENTRAL BLOCK | - | | AL | Table of French Plates Option AND TENTRAL BLOCK | FRONT SINGLE ZONE HOT TOP OPTION AND TENTRAL BLOCK | - | | AM | Table of French Plates Option AND TENTRAL BLOCK | FRONT SINGLE ZONE HOT TOP OPTION AND TENTRAL BLOCK | - | | AN | Table of French Plates Option AND TENTRAL BLOCK | FRONT SINGLE ZONE HOT TOP OPTION AND TENTRAL BLOCK | - | | AO | Table of French Plates Option AND TENTRAL BLOCK | FRONT SINGLE ZONE HOT TOP OPTION AND TENTRAL BLOCK | - | | AP | Table of French Plates Option AND TENTRAL BLOCK | FRONT SINGLE ZONE HOT TOP OPTION AND TENTRAL BLOCK | - | | AQ | Table of French Plates Option AND TENTRAL BLOCK | FRONT SINGLE ZONE HOT TOP OPTION AND TENTRAL BLOCK | - | | AR | Table of French Plates Option AND TENTRAL BLOCK | FRONT SINGLE ZONE HOT TOP OPTION AND TENTRAL BLOCK | - | | AS | Table of French Plates Option AND TENTRAL BLOCK | FRONT SINGLE ZONE HOT TOP OPTION AND TENTRAL BLOCK | - | | AT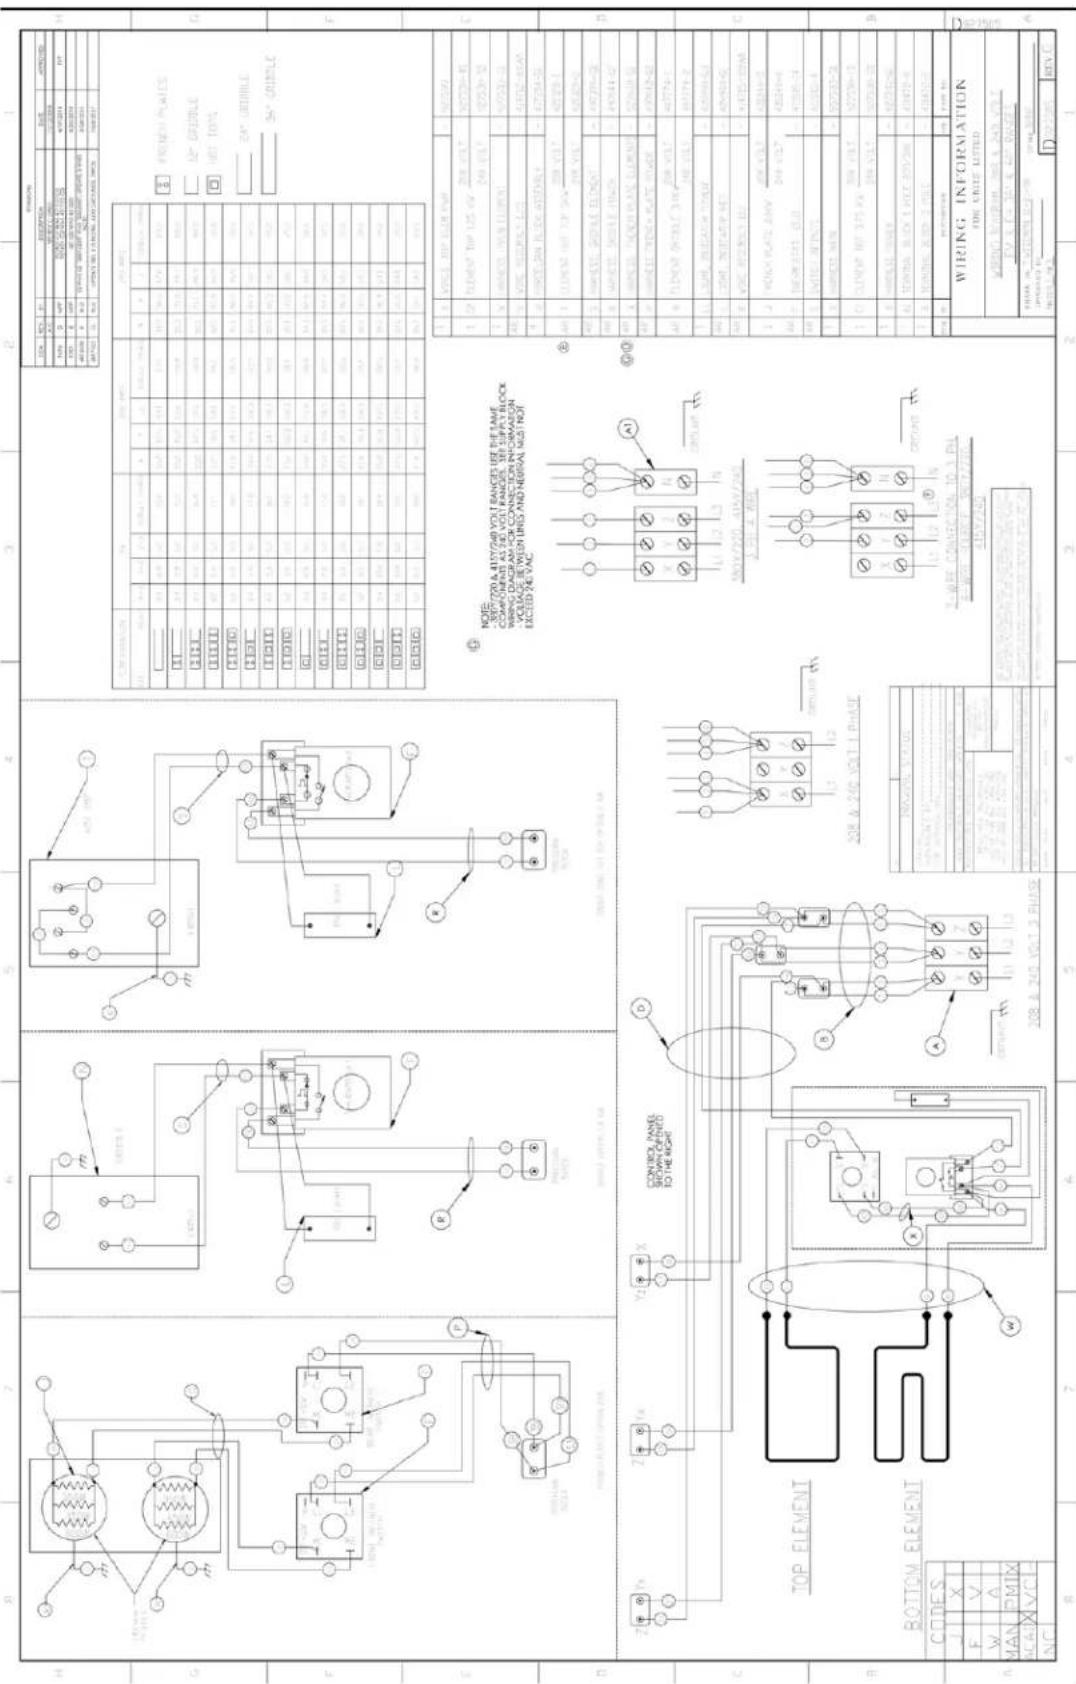
text_image
FRIKING DCM NC BY: B1 DESCRIPTION: DUE VINHOL: 500Ω Auto: 3 MPa POWER/POWER RESOURCES: 4W/2021 ACI: 8 MPa ACI: 6 MPa ACI: 10 MPa ACI: 12 MPa ACI: 14 MPa ACI: 16 MPa ACI: 18 MPa ACI: 20 MPa ACI: 22 MPa ACI: 24 MPa ACI: 26 MPa ACI: 28 MPa ACI: 30 MPa ACI: 32 MPa ACI: 34 MPa ACI: 36 MPa ACI: 38 MPa ACI: 40 MPa ACI: 42 MPa ACI: 44 MPa ACI: 46 MPa ACI: 48 MPa ACI: 50 MPa ACI: 52 MPa ACI: 54 MPa ACI: 56 MPa ACI: 58 MPa ACI: 60 MPa ACI: 62 MPa ACI: 64 MPa ACI: 66 MPa ACI: 68 MPa ACI: 70 MPa ACI: 72 MPa ACI: 74 MPa ACI: 76 MPa ACI: 78 MPa ACI: 80 MPa ACI: 82 MPa ACI: 84 MPa ACI: 86 MPa ACI: 88 MPa ACI: 90 MPa ACI: 92 MPa ACI: 94 MPa ACI: 96 MPa ACI: 98 MPa ACI: 100 MPa ACI: 102 MPa ACI: 104 MPa ACI: 106 MPa ACI: 108 MPa ACI: 110 MPa ACI: 112 MPa ACI: 114 MPa ACI: 116 MPa ACI: 118 MPa ACI: 120 MPa ACI: 122 MPa ACI: 124 MPa ACI: 126 MPa ACI: 128 MPa ACI: 130 MPa ACI: 132 MPa ACI: 134 MPa ACI: 136 MPa ACI: 138 MPa ACI: 140 MPa ACI: 142 MPa ACI: 144 MPa ACI: 146 MPa ACI: 148 MPa ACI: 150 MPa ACI: 152 MPa ACI: 154 MPa ACI: 156 MPa ACI: 158 MPa ACI: 160 MPa ACI: 162 MPa ACI: 164 MPa ACI: 166 MPa ACI: 168 MPa ACI: 170 MPa ACI: 172 MPa ACI: 174 MPa ACI: 176 MPa ACI: 178 MPa ACI: 180 MPa ACI: 182 MPa ACI: 184 MPa ACI: 186 MPa ACI: 188 MPa ACI: 190 MPa ACI: 192 MPa ACI: 194 MPa ACI: 196 MPa ACI: 198 MPa ACI: 200 MPa ACI: 202 MPa ACI: 204 MPa ACI: 206 MPa ACI: 208 MPa ACI: 210 MPa ACI: 212 MPa ACI: 214 MPa ACI: 216 MPa ACI: 218 MPa ACI: 220 MPa ACI: 222 MPa ACI: 224 MPa ACI: 226 MPa ACI: 228 MPa ACI: 230 MPa ACI: 232 MPa ACi: A: B: C: D: E: F: G: H: A: B: C: D: E: F: G: H: A: B: C: D: E: F: G: H: A: B: C: D: E: F: G: H: A: B: C: D: E: F: G: H: A: B: C: D: E: F: G: H: A: B: C: D: E: F: G: H: A: C: B: C: D: E: F: G: H: A: B: C: D: E: F: G: H: A: B: C: D: E: F: G: H: A: B: C: D: E: F: G: H: A: B: C: D: E: F: G: H: A: B: C: D: E: F: G: H: A: B: O:A:B:C:D:E:F:N:E:F:N:E:F:N:E:F:N:E:F:N:E:F:N:E:F:N:E:F:N:E:F:N:E:F:N:E:F:N:E:F:N:E:F:N:E:F:N:E:F:N:E:F:N:E:F:N:E:F:N:E:F:N:E:F:N:E:F:N:E:F:N:E:F:N:E:F:N:E:F:N:E:F:N:E:F:N:E:F:N:E:F:N:E:F:N:E:F:N:E:F:N:E:F:N:E:F:N:P:A:A:A:A:A:A:A:A:A:A:A:A:A:A:A:A:A:A:A:A:A:A:A:A:A:A:A:A:A:A:A:A:A:A:A:A:A:A:A:A:A:A:A:A:A:A:A:A:A:A:A:A:A:A:A:A:A:A:A:A:A:A:A:A:A:A:A:A:A:A:A:A:A:A:A:A:A:A:A:A:A:A:A:A:A:A:A:A:A:A:A:A:A:A:A:A:A:A:A:A : A : A : B : C : D : E : F : G : H : I : J : K : L : M : N : O : P : Q : R : S : T : U : V : W : X : Y : Z : A : A : A : A : A : A : A : A : A : A : A : A : A : A : A : A : A : A : A : A : A : A : A : A : A : A : A : A : A : A : A : A : A : A : A : A : A : A : A : A : A : A : A : A : A : A : A : A : A : A : B : ITEMS FOR ELEMENTS AND ITEMS OF THE ELEMENTS AND ITEMS OF THE ELEMENTS AND ITEMS OF THE ELEMENTS AND ITEMS OF THE ELEMENTS AND ITEMS OF THE ELEMENTS AND ITEMS OF THE ELEMENTS AND ITEMS OF THE ELEMENTS AND ITEMS OF THE ELEMENTS AND ITEMS OF THE ELEMENTS AND ITEMS OF THE ELEMENTS AND ITEMS OF THE ELEMENTS AND ITEMS OF THE ELEMENTS AND ITEMS OF THE ELEMENTS AND ITEMS OF THE ELEMENTS AND ITEMS OF THE ELEMENTS AND ITEMS OF THE ELEMENTS AND ITEMS OF THE ELEMENTS AND ITRES. TOP ELEMENTS AND ITEMS OF THE ELEMENTS AND ITEMS OF THE ELEMENTS AND ITEMS OF THE ELEMENTS AND ITEMS OF THE ELEMENTS AND ITEMS OF THE ELEMENTS AND ITEMS OF THE ELEMENTS AND ITEMS OF THE ELEMENTS AND ITEMS OF THE ELEMENTS AND ITEMS OF THE ELEMENTS AND ITEMS OF THE ELEMENTS AND ITEMS OF THE ELEMENTS AND ITEMS OF THE ELEMENTS AND ITEMS OF THE ELEMENTS AND ITEMS OF THE ELEMENTS AND ITEMS OF THE ELEMENTS AND ITEMS OF THE ELEMENTS AND II | TOP ELEMENTS AND ITEMS OF THE ELEMENTS AND ITEMS OF THE ELEMENTS AND ITEMS OF THE ELEMENTS AND ITEMS OF THE ELEMENTS AND ITEMS OF THE ELEMENTS AND ITEMS OF THE ELEMENTS AND ITEMS OF THE ELEMENTS AND ITEMS OF THE ELEMENTS AND ITEMS OF THE ELEMENTS AND ITEMS OF THE ELEMENTS AND ITEMS OF THE ELEMENTS AND ITEMS OF THE ELEMENTS AND ITEMS OF THE ELEMENTS AND ITEMS OF THE ELEMENTS AND ITEMS OF THE ELEMENTS AND ITEMS OF THE ELEMENTS & ITEMS OF THE ELEMENTS & ITEMS OF THE ELEMENTS & ITEMS OF THE ELEMENTS & ITEMS OF THE ELEMENTS & ITEMS OF THE ELEMENTS & ITEMS OF THE ELEMENTS & ITEMS OF THE ELEMENTS & ITEMS OF THE ELEMENTS & ITEMS OF THE ELEMENTS & ITEMS OF THE ELEMENTS & ITEMS OF THE ELEMENTS & ITEMS OF THE ELEMENTS & ITEMS OF THE ELEMENTS & ITEMS OF THE ELEMENTS & ITEMS OF THE ELEMENTS & ITEMS OF THE ELEMENTS & ITEMS OF THE Element S/P / V / W / X / Y / Z / AA / AB / AC / AD / AE / AF / AG / AH / AI / AJ / AK / AL / AM / AN / AO / AP / AQ / AR / AS / AT / AU / AV / AW / AX / AX / AX / AX / AX / AX / AX / AX / AX / AX / AX / AX / AX / AX / AX / AX / AX / AX / AX / AX / AX / AX / AX / AX / AX / AX / AX / AX / AX / AX / AX / AX / AX / AX / AX / AX / AX / AX / AX / AX / AX / AX / AX / AX / AX / AX / AX / AX / AX / AX / AZ | TOP ELEMENTS AND ITEMS OF THE ELEMENTS AND ITEMS OF THE ELEMENTS AND ITEMS OF THE ELEMENTS AND ITEMS OF THE ELEMENTS AND ITEMS OF THE ELEMENTS AND ITEMS OF THE ELEMENTS AND ITEMS OF THE ELEMENTS AND ITEMS OF THE ELEMENTS AND ITEMS OF THE ELEMENTS AND ITEMS OF THE ELEMENTS AND ITEMS OF THE ELEMENTS AND ITEMS OF THE ELEMENTS AND ITEMS OF THE ELEMENTS AND ITEMS OF THE ELEMENTS AND ITEMS OF THE ELEMENTS AND ITEMS of the above section of the above section of the above section of the above section of the above section of the above section of the above section of the above section of the above section of the above section of the above section of the above section of the above section of the above section of the above section of the above section of the above section of the above section of the above section of the above section of the above section of the above section of the above section of the above section of the above section of the above sections of the above section of the above section of the above section of the above section of the above section of the above section of the above section of the above section of the above section of the above section of the above section of the above section of the above section of the above section of the above section of the above section of the above section of the above section of the above section of the above section of the above section of the above section of the above section of the above section of the above sectional view (AB) - (AB) - (AB) - (AB) - (AB) - (AB) - (AB) - (AB) - (AB) - (AB) - (AB) - (AB) - (AB) - (AB) - (AB) - (AB) - (AB) - (AB) - (AB) - (AB) - (AB) - (AB) - (AB) - (AB) - (AB) - (AB) = (AB) = (AB) = (AB) = (AB) = (AB) = (AB) = (AB) = (AB) = (AB) = (AB) = (AB) = (AB) = (AB) = (AB) = (AB) = (AB) = (AB) = (AB) = (AB) = (AB) = (AB) = (AB) = (AB) = (AB) = (AB) < AB > AB> AB> AB> AB> AB> AB> AB> AB> AB> AB> AB> AB> AB> AB> AB> AB> AB> AB> AB> AB> AB> AB> AB> AB> AB> AB> AB> AB> AB> AB> AB> AB> AB> AB> AB> AB> AB> AB> AB> AB> AB> AB> AB> AB> AB> AB> AB> AB> AB> AB> AB>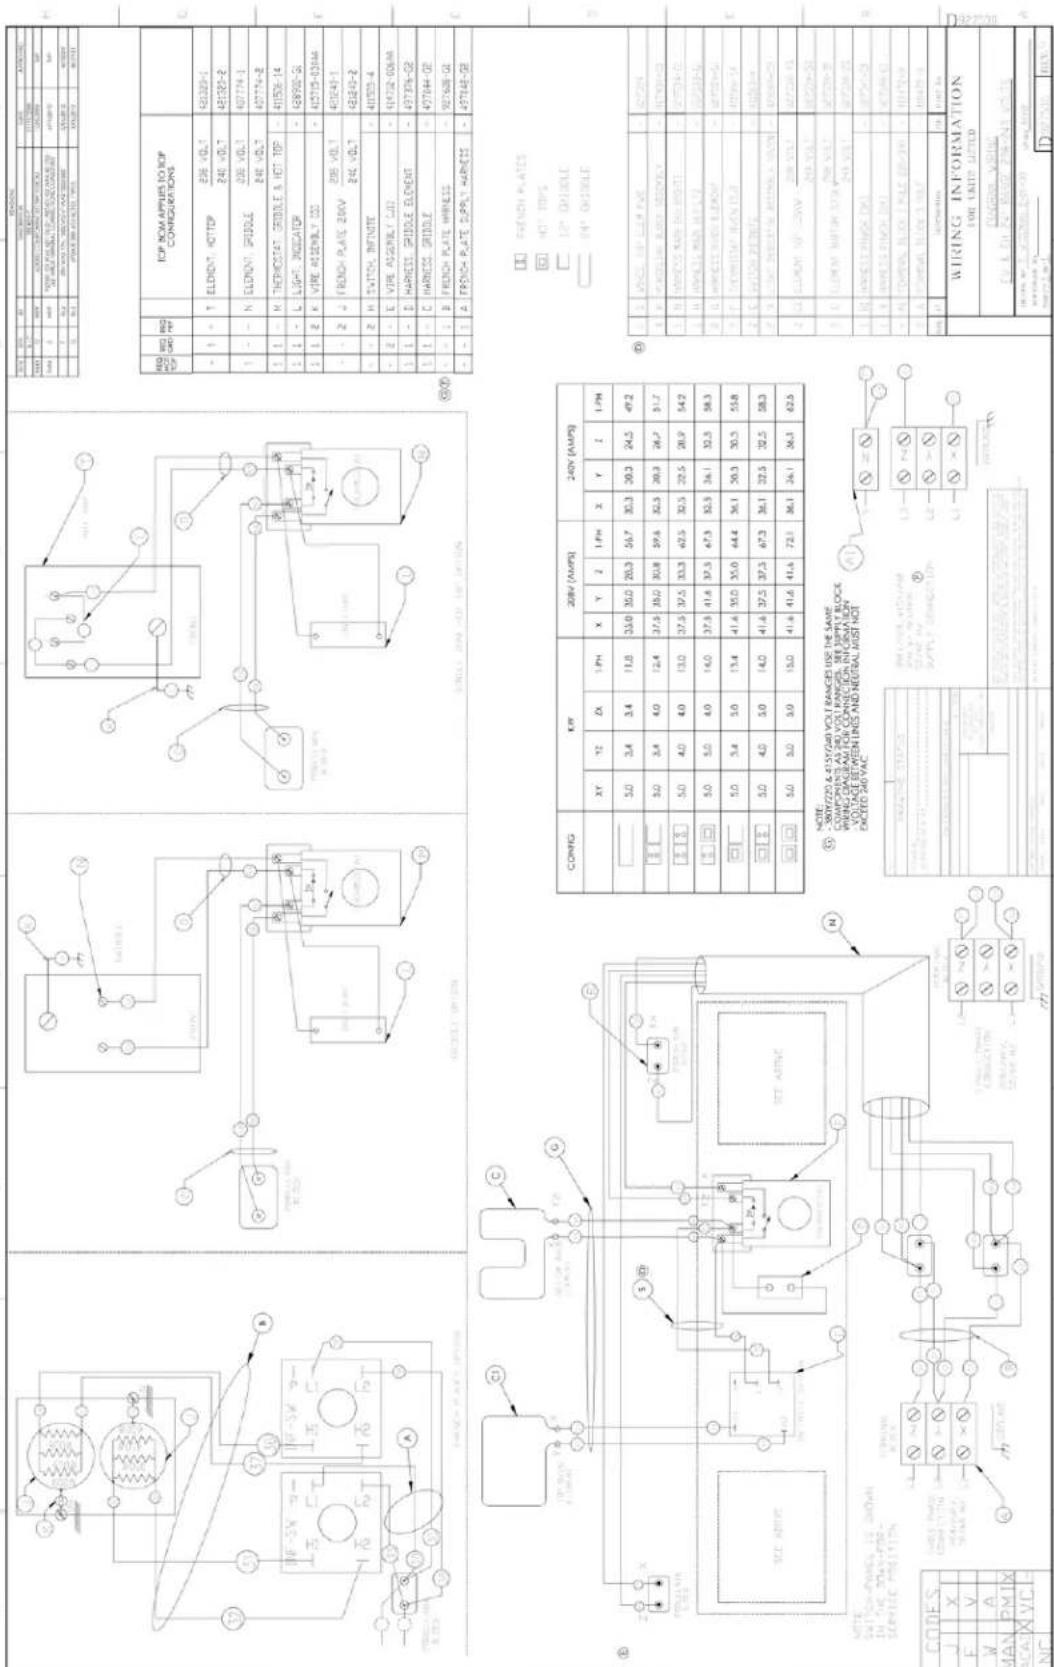
| SPESS | ||||||
| R10 | R20 | R30 | R40 | R50 | R60 | R70 |
| 1 | 1 | 2 | 3 | 4 | 5 | 6 |
| 100 | 100 | 100 | 100 | 100 | 100 | 100 |
| 100A | 100 | 100 | 100A | 100A | 100A | 100A |
| 1 | 1 | 2 | 3 | 4 | 5 | 6 |
| 1 | 1 | 2 | 3 | 4 | 5 | 6 |
| 100A | 100A | 100A | 100A | 100A | 100A | 100A |
| 1 | FROCH PLATES HOT TIPS LIP DOUBLE ON+ ODBCABLE | ||
| 2 | S. | WING, LIP, LIP, PUE | - |
| 3 | A. | TOMATO ON FOR GROUND | - |
| 4 | B. | HOTTLE WITH THE FEET | - |
| 5 | C. | SHORT WIND LIP | - |
| 6 | D. | TOMATO PLATE D. | - |
| 7 | E. | SINGLE SHEET | - |
| 8 | F. | SINGLE SHEET | - |
| 9 | G. | SINGLE SHEET | - |
| 10 | H. | SHORT SHEET | - |
| 11 | I. | SHORT SHEET | - |
| 12 | J. | SHORT SHEET | - |
| 13 | K. | SHORT SHEET | - |
| 14 | L. | SHORT SHEET | - |
| 15 | M. | SHORT SHEET | - |
| 16 | N. | SHORT SHEET | - |
| 17 | O. | SHORT SHEET | - |
| 18 | P. | SHORT SHEET | - |
| 19 | Q. | SHORT SHEET | - |
| 20 | R. | SHORT SHEET | - |
| CONFIG | Ker | 24N (AMPS) | 24N (AMPS) | ||||||||||
| XY | Y2 | Zx | 1PH | X | Y | Z | 1PH | X | Y | Z | 1PH | ||
| 5.0 | 3.4 | 3.4 | 11.8 | 33.0 | 35.0 | 26.3 | 56.7 | 30.3 | 30.3 | 24.5 | 49.2 | ||
| 5.0 | 3.4 | 4.0 | 12.4 | 37.5 | 35.0 | 30.8 | 59.6 | 32.5 | 20.3 | 26.7 | 51.7 | ||
| 5.0 | 4.0 | 4.0 | 13.0 | 37.5 | 37.5 | 33.3 | 67.5 | 30.5 | 27.5 | 20.9 | 54.2 | ||
| 5.0 | 5.0 | 4.0 | 14.0 | 37.8 | 41.8 | 32.3 | 47.3 | 32.8 | 36.1 | 32.8 | 58.3 | ||
| 5.0 | 5.4 | 5.0 | 15.4 | 41.6 | 35.0 | 35.0 | 64.4 | 36.1 | 20.3 | 30.5 | 55.8 | ||
| 5.0 | 4.0 | 5.0 | 14.0 | 41.6 | 37.5 | 37.5 | 67.2 | 36.1 | 27.5 | 32.5 | 58.3 | ||
| 5.0 | 5.0 | 5.0 | 15.0 | 41.6 | 41.6 | 41.6 | 72.1 | 36.1 | 26.1 | 36.3 | 62.5 | ||