HS9N - Slicer Hobart - Free user manual and instructions
Find the device manual for free HS9N Hobart in PDF.

| Product type | Automatic and manual slicer |
| Brand | Hobart |
| Model | HS9N |
| Blade diameter | 33 cm (13 inches) |
| Blade material | CleanCut™ stainless steel |
| Motor power | 1/2 hp |
| Power supply | Single-phase, 3-prong grounded plug |
| Slicing capabilities | Manual and automatic with 4 carriage speeds |
| Special function | Select-a-Stroke™ to adjust stroke length |
| Thickness adjustment | By rotary knob (numbered markings) |
| Safety | Plate lock, automatic stop after 30 s, restart after power failure, start in home position |
| Cleaning | Easy disassembly of sharpener, heel pusher, carriage, knife guard, and blade cover |
| Maintenance | Built-in sharpening, monthly lubrication of slide rods |
| Included accessories | Heel pusher, carriage, sharpener, blade extractor (for removable blade) |
| Options | Guard, hopper, deflector |
| Country of manufacture | United States (headquarters in Troy, Ohio) |
Frequently Asked Questions - HS9N Hobart
User questions about HS9N Hobart
0 question about this device. Answer the ones you know or ask your own.
Ask a new question about this device
Download the instructions for your Slicer in PDF format for free! Find your manual HS9N - Hobart and take your electronic device back in hand. On this page are published all the documents necessary for the use of your device. HS9N by Hobart.
USER MANUAL HS9N Hobart
FORM 35284 Rev. D (May 2017)
TABLE OF CONTENTS
GENERAL 3
Features 4
Accessories and Options....4
INSTALLATION 5
Unpacking....5
Electrical Connections 5
Location 5
Assembly 6
Clean Before Using 6
OPERATION....7
Slicing In Manual Mode (HS6 and HS8 Series)....7
Slicing In Manual Mode (HS7 and HS9 Series).... 7
Slicing In Automatic Mode (HS7 and HS9 Series)....8
CLEANING 9
Cleaning Surface and Parts....9
Disassembly for Cleaning....9
Sharpener 9
Meat Grip 10
Product Tray 10
Top Knife Cover and Ring Guard Cover 11
Knife (Removable – HS6, HS7, HS8, and HS9) 11
Cleaning 12
Sharpener 12
Meat Grip 12
Product Tray 12
Top Knife Cover and Ring Guard 12
Knife (Removable) 12
Knife (Non-Removable) 12
Under the Slice 12
Reassembly After Cleaning 13
Knife (Removable with Knife Removal Tool).... 13
Ring Guard Cover and Top Knife Cover 14
Product Tray 14
Meat Grip 15
Sharpener 15
Gasket Inspection.... 16
MAINTENANCE 17
Knife Sharpening....17
Lubrication — Carriage Slide Rod 18
Lubrication — Meat Grip Slide Rod 18
Service....18
Installation, Operation and Care of MODEL HS Series Slicers
SAVE THESE INSTRUCTIONS
GENERAL
The HS Series Slicers are equipped with a ^1/_2 hp motor and are available for single-phase electrical service. The slicer features the Hobart CleanCut™ 13" diameter contoured stainless steel knife. The slicer is furnished with a cord and plug as standard equipment.
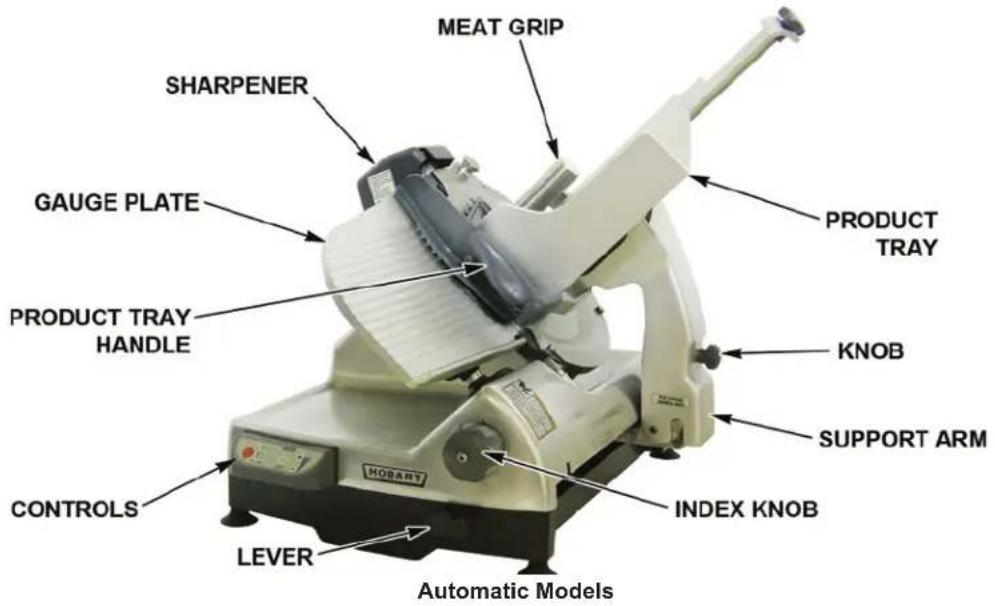
text_image
MEAT GRIP SHARPENER GAUGE PLATE PRODUCT TRAY HANDLE PRODUCT TRAY KNOB SUPPORT ARM CONTROLS LEVER INDEX KNOB AUTOMATIC Models
text_image
SHARPENER MEAT GRIP GAUGE PLATE PRODUCT TRAY HANDLE CONTROLS CLEANING LEG INDEX KNOB MANUAL Models PRODUCT TRAY KNOB SUPPORT ARMFig. 1
FEATURES
- No Volt Release – requires the slicer to be restarted after a power interruption.
- Gauge Plate Interlock – prevents the Product Tray (Fig. 1) from being tilted or removed unless the Product Tray is in the home position (pulled all the way forward) and the Gauge Plate is closed.
- Home Start – requires the Product Tray (Fig. 1) to be in the home position (pulled all the way forward) before the slicer can be started.
- Close-to-Stop – turns the slicer off when the Gauge Plate is returned to the closed position by turning the Index Knob (Fig. 1) fully clockwise. The slicer also is turned off if the OFF button is pressed.
- Auto-Shutoff – will automatically turn the slicer off if a back-and-forth stroke of the Product Tray has not been made within 30 seconds.
The HS7 and HS9 Series Slicers feature automatic slicing with a choice of four speeds for the Product Tray. The Select-a-Stroke™ feature allows the user to select the exact stroke length to fit the product being sliced. This can increase the slice rate on items needing a shorter stroke.
| MODEL | NO VOLT RELEASE | GAUGE PLATE INTERLOCK | HOME START | CLOSE TO STOP | AUTO SHUTOFF | REMOVABLE KNIFE |
| HS6 Y | e | s | N | o | o | N |
| HS6N Y | e | s | N | o | N | o |
| HS7 Y | e | s | N | o | Y | e |
| HS7N Yes No | Yes No No No | |||||
| HS8 | Yes | Yes | Yes | Yes | Yes | Yes |
| HS8N | Yes | Yes | Yes | Yes | Yes | No |
| HS9 | Yes | Yes | Yes | Yes | Yes | Yes |
| HS9N | Yes | Yes | Yes | Yes | Yes | No |
ACCESSORIES AND OPTIONS
- Fences – The fence clamps on the Product Tray to limit product movement during slicing.
- Food Chute – Clamps on the Product Tray to limit movement of product during slicing (for tomatoes, onions or similar items).
- Deflector – Assists in deflecting sliced product to the platter during slicing. The Deflector fits on the Deflector Bracket located on the Sharpener Mount.
INSTALLATION
UNPACKING
The slicer was inspected before leaving the factory. The carrier assumes full responsibility for safe delivery upon acceptance of the shipment. Check for possible shipping damage immediately after receipt.
If the slicer is found to be damaged, complete the following steps:
- Carrier must be notified within five business days of receipt.
- Carrier's local terminal must be notified immediately upon discovery (note the time, date, and who was spoken to), and follow up and confirm with written or electronic communication.
- All original packing materials must be kept for inspection purposes.
- The slicer cannot have been moved, installed, or modified.
- Notify Hobart customer care at (800) 333-7447.
Prior to installing the slicer, test the electrical service to ensure it agrees with the specifications on the machine data plate. The data plate is located on the left side of the slicer base.
ELECTRICAL CONNECTIONS
⚠ WARNING The electrical cord on this machine is equipped with a three-pronged grounding plug which must be connected to a properly grounded receptacle. If the receptacle is not the proper grounding type, contact an electrician. Do not remove the grounding prong from the plug.
LOCATION
Place the slicer on a suitable counter or tabletop. Allow enough space around the slicer so the carriage can move freely forward and back.
ASSEMBLY
The Product Tray (Fig. 1) must be installed.
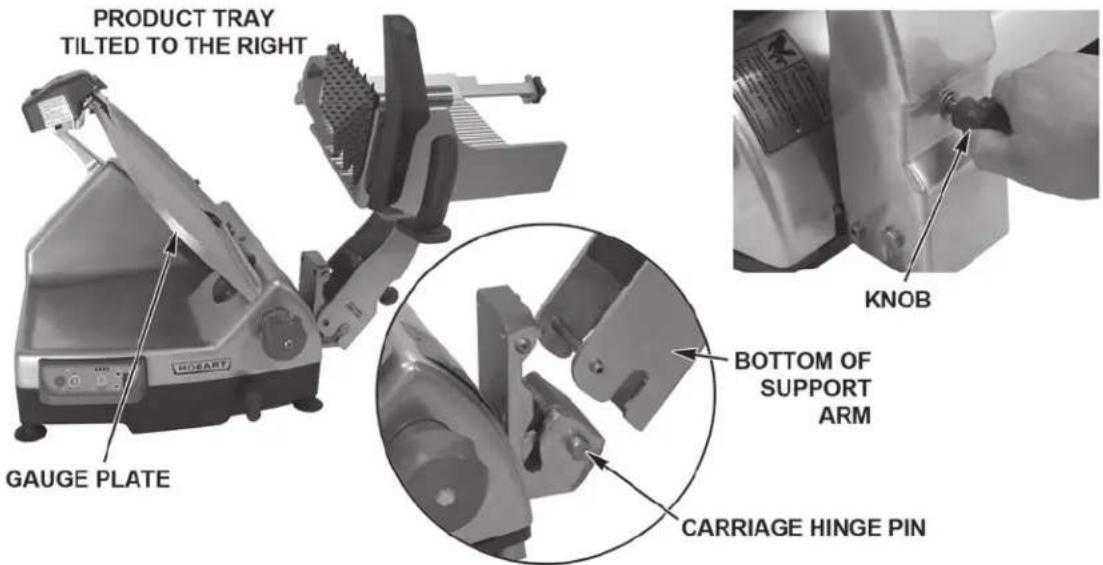
To install the Product Tray on the slicer, lower the bottom of the Support Arm onto the Carriage Hinge Pins (Fig. 2). Tilt the Product Tray toward the Gauge Plate. Turn the Knob on the Support Arm until it is tight against the Support Arm.
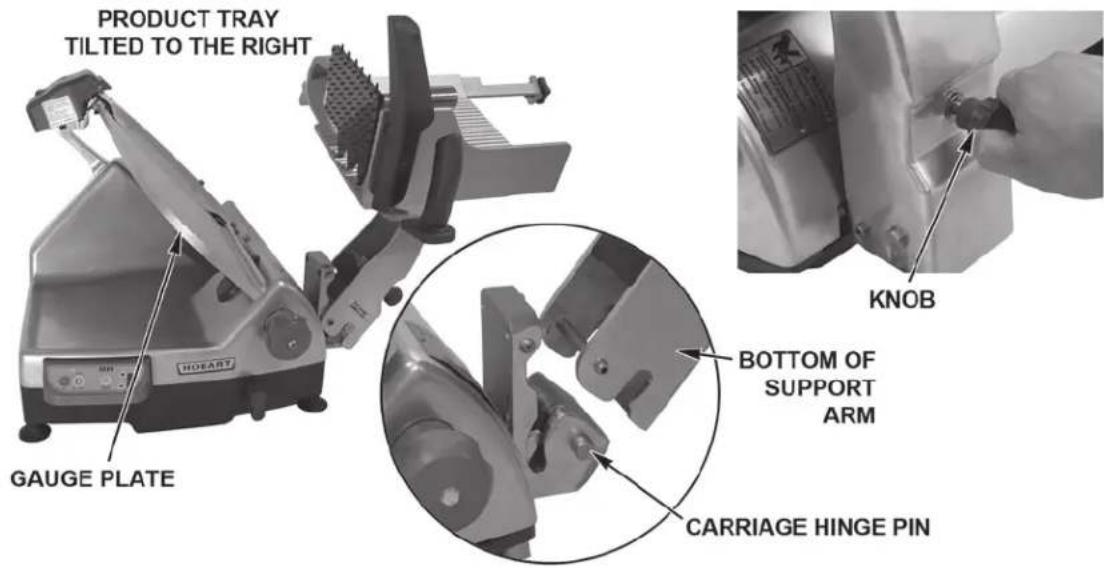
text_image
PRODUCT TRAY TILTED TO THE RIGHT HAOEBY GAUGE PLATE KNOB BOTTOM OF SUPPORT ARM CARRIAGE HINGE PINFig. 2
CLEAN BEFORE USING
The slicer must be thoroughly cleaned and sanitized after installation and before being used. See Cleaning.
OPERATION
WARNING Rotating knife. Use meat grip. Unplug machine power cord before cleaning, servicing or removing parts. Replace parts before use.
SLICING IN MANUAL MODE (HS6 AND HS8 SERIES)
- Close the Gauge Plate (Fig. 1) by turning the Index Knob (Fig. 1) fully clockwise.
- Pull the Product Tray (Fig. 1) toward the operator until it reaches its stop. This is the home position.
- Raise the Meat Grip (Fig. 1) to the top of the Product Tray to rest in the Meat Grip Slot.
- Place the product to be sliced against the Gauge Plate (Fig. 1) on the Product Tray (Fig. 1).
- Set the Meat Grip against the product, or use the Fence or Food Chute if desired. Refer to Accessories & Options on page 4.
- Turn the slicer on by pressing the KNIFE ON button (Fig. 3).
- Adjust the Gauge Plate to obtain the desired slice thickness by turning the Index Knob counterclockwise. The numbers on the Index Knob do not indicate actual measurements but may be used for reference to duplicate slice thickness.
- Use the Product Tray Handle (Fig. 1) to push and pull the Product Tray back and forth to slice. When finished, pull the Product Tray forward until it stops. Turn the Index Knob fully clockwise to close the Gauge Plate, this will turn the slicer off. The OFF Button (Fig. 3) can also be pressed to stop the slicer.
- Raise the Meat Grip to the top of the Product Tray to rest in the Meat Grip Slot.
SLICING IN MANUAL MODE (HS7 AND HS9 SERIES)
- Close the Gauge Plate (Fig. 1) by turning the Index Knob (Fig. 1) fully clockwise.
- Ensure Lever (Fig. 4) is in the down position for manual mode.
- Pull the Product Tray (Fig. 1) toward the operator until it reaches its stop. This is the home position.
- Raise the Meat Grip (Fig. 1) to the top of the Product Tray to rest in the Meat Grip Slot.
- Place the product to be sliced against the Gauge Plate (Fig. 1) on the Product Tray (Fig. 1).
- Set the Meat Grip against the product, or use the Fence or Food Chute if desired. Refer to Accessories & Options on page 4.

text_image
KNIFE OFF ONFig. 3

text_image
HOBART LEVER DOWN (MANUAL MODE)Fig. 4
- Turn the slicer on by pressing the KNIFE ON button (Fig. 5).
- Adjust the Gauge Plate to obtain the desired slice thickness by turning the Index Knob counterclockwise. The numbers on the Index Knob do not indicate actual measurements but may be used for reference to duplicate slice thickness.
- Use the Product Tray Handle (Fig. 1) to push and pull the Product Tray back and forth to slice. When finished, pull the Product forward until it stops. Turn the Index Knob fully clockwise to close the Gauge Plate. This will turn the slicer off. The OFF Button (Fig. 5) can also be pressed to stop the slicer.
- Raise the Meat Grip to the top of the Product Tray to rest in the Meat Grip Slot.
text_image
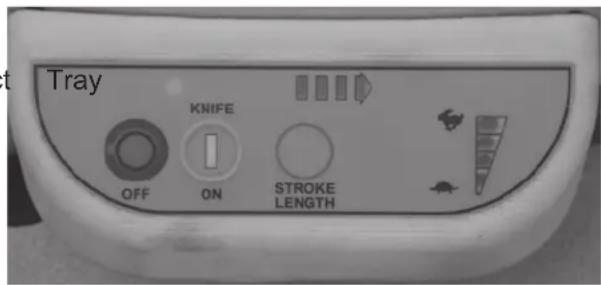
Tray KNIFE STROKE LENGTH OFF ONFig. 5
SLICING IN AUTOMATIC MODE (HS7 AND HS9 SERIES)
- Close the Gauge Plate (Fig. 1) by turning the Index Knob (Fig. 1) fully clockwise.
- Ensure Lever (Fig. 4) is in the down position for manual mode.
- Pull the Product Tray (Fig. 1) toward the operator until it reaches its stop. This is the home position.
- Raise the Meat Grip (Fig. 1) to the top of the Product Tray to rest in the Meat Grip Slot.
- Place the product to be sliced against the Gauge Plate (Fig. 1) on the Product Tray (Fig. 1).
- Set the Meat Grip against the product, or use the Fence or Food Chute if desired. Refer to Accessories & Options on page 4.
- Lift the Lever (Fig. 6) to the up position for automatic mode.
- Select one of the four speeds for the Product Tray to move back and forth. Press the Rabbit symbol (Fig. 5) to increase speed; press the

natural_image
Close-up of a HUBART robotic device with a small circular mark and base (no visible text or symbols)LEVER UP (AUTOMATIC MODE)
Fig. 6
Turtle symbol (Fig. 5) to decrease speed. The speed indicator, located to the right of the symbols, shows which speed is selected. The speed can be changed at any time.
- Select a stroke length for the Product Tray to move back and forth. Press the STROKE LENGTH button (Fig. 5) to toggle through the lengths. The indicator above the button shows the length. More lights equal a longer stroke. The stroke length can be changed at any time.
- Turn the slicer on by pressing the KNIFE ON button (Fig. 5).
- Adjust the Gauge Plate to obtain the desired slice thickness by turning the Index Knob counterclockwise. The numbers on the Index Knob do not indicate actual measurements but may be used for reference to duplicate slice thickness.
- When finished, turn the Index Knob fully clockwise to close the Gauge Plate or press the KNIFE ON button (Fig. 5) to stop the slicer. This will stop the slicer and return the Product Tray to the home position.
NOTE: The OFF button can be pressed to stop the slicer. The Product Tray will stop moving immediately. Lower the Lever (Fig. 4) and pull the Product Tray toward the operator to the home position.
- Raise the Meat Grip to the top of the Product Tray to rest in the Meat Grip Slot.
CLEANING
⚠ WARNING Unplug the machine power cord and turn the index knob fully clockwise to close the gauge plate before cleaning the slicer.
WARNING The slicer knife is very sharp. Exercise extreme caution when working near the knife.
This machine must be thoroughly cleaned and sanitized at least as often as required by local regulation or after being idle for an extended period of time.
NOTE: Sanitizer concentration shall comply with Section 4-501.114, Manual and Mechanical Warewashing Equipment, Chemical Sanitization – Temperature, pH, Concentration, and Hardness of the FDA Food Code. If a chemical sanitizer other than chlorine, iodine, or quaternary ammonium is used, it shall be applied in accordance with the EPA-registered label use instructions.
For general cleaning, use a clean cloth soaked in mild detergent and warm water, and wipe all surfaces of the machine especially where food or liquids can accumulate. Be sure to wipe any surface where there is frequent hand contact including handles, knobs, and the control pad. Use generous amounts of soapy water and sanitizer on the Sharpener Mount hardware. Rinse using a fresh cloth and clean water. Apply sanitizing solution to clean surfaces. Make sure the slicer is clean of all food soil before sanitizing. Use only products formulated to be safe on stainless steel or aluminum. DO NOT exceed chemical manufacturer's recommended concentrations for detergent or sanitizer.
CLEANING SURFACE AND PARTS
Frequency – The slicer shall be cleaned and sanitized at intervals to comply with national, state, and/or local health codes.
DISASSEMBLY FOR CLEANING
In order to clean the slicer thoroughly, it is necessary to disassemble the slicer. It is recommended that all parts be removed, cleaned, sanitized, and allowed to dry before re-assembling for use.
Sharpener
- The Sharpener (Fig. 7) is mounted on top of the slicer.
- Remove the Sharpener by lifting straight up.
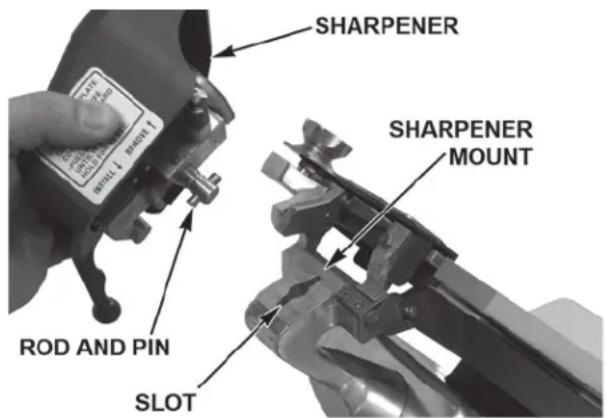
text_image
SHARPENER SHARPENER MOUNT ROD AND PIN SLOTFig. 7
Meat Grip
- The Meat Grip (Fig. 8) is mounted on the Product Tray and can be removed for ease of cleaning.
- Remove the Meat Grip by loosening the Meat Grip Slide Rod from the Product Tray while holding the Meat Grip Handle.
- Pull the Meat Grip Slide Rod from the Meat Grip Handle and Product Tray.
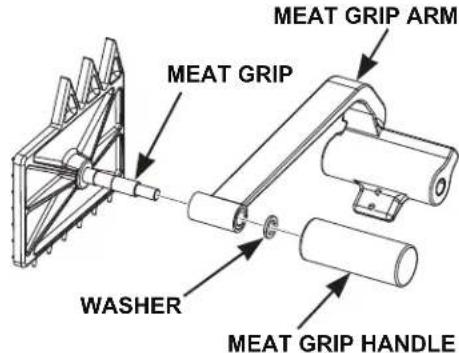
- Loosen the Meat Grip Handle (Fig. 9) and remove the Handle, Meat Grip Arm, and Washer from the Meat Grip.

text_image
MEAT GRIP HANDLE MEAT GRIP SLIDE ROD PRODUCT TRAY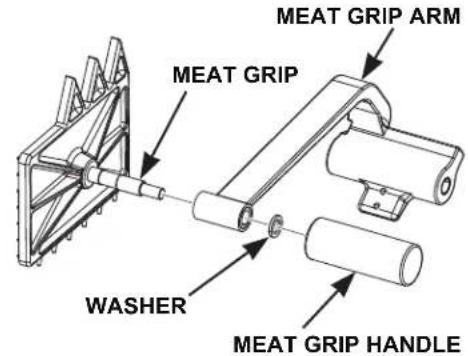
text_image
MEAT GRIP ARM MEAT GRIP WASHER MEAT GRIP HANDLEFig. 8 Fig. 9
Product Tray
• To clean the Product Tray, make sure the Gauge Plate is closed.
- Pull the Product Tray toward the operator until it stops.
- Loosen the Knob (Fig. 10) on the Support Arm. Tilt the Product Tray to the right (Fig. 10).
- The Product Tray can be cleaned in this open position, or it can be removed by grasping with both hands and lifting straight up.
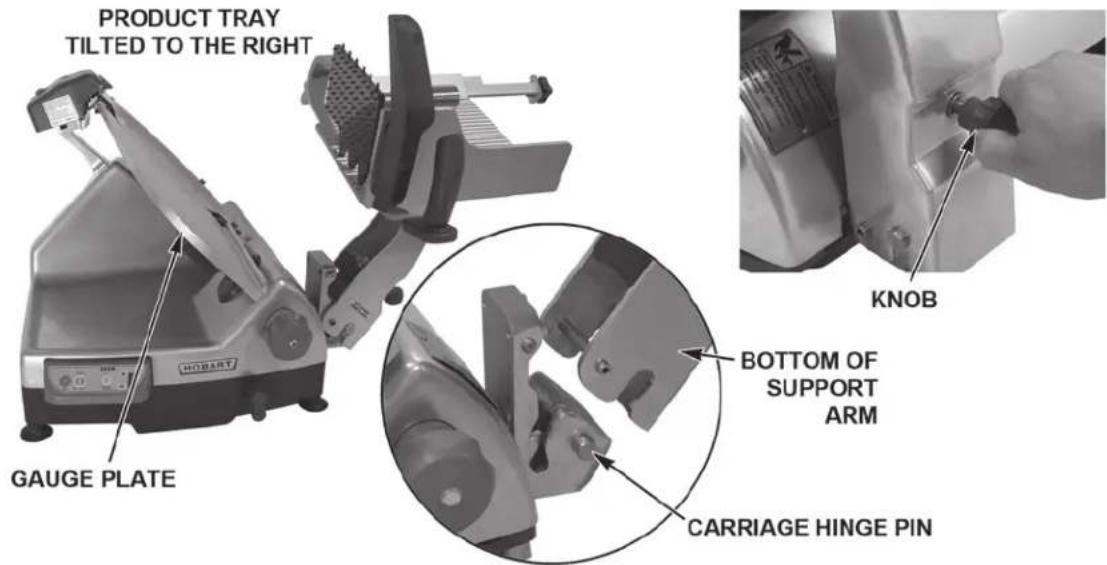
text_image
PRODUCT TRAY TILTED TO THE RIGHT HAOBAV GAUGE PLATE KNOB BOTTOM OF SUPPORT ARM CARRIAGE HINGE PINFig. 10
Top Knife Cover and Ring Guard Cover
- Remove the Top Knife Cover (Fig. 11) by pulling on the Latch Knob. The Top Knife Cover is held in place by a magnet under the Latch Knob.
- Remove the plastic Ring Guard Cover (Fig. 11) by lifting up.
Knife (Removable - HS6, HS7, HS8, and HS9)
WARNING The slicer knife is very sharp. Exercise extreme caution when working near the knife.
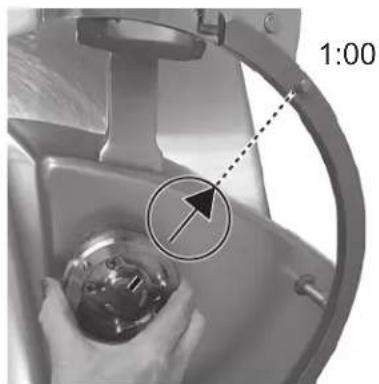
- Ensure the gauge plate is closed, then rotate the Knife by hand to align the arrow on the Knife with the Pin on the Ring Guard at the 1 o'clock position (Fig. 12). The ridge on the Knife Hub will also align with the same pin.
- The Pin (Fig. 13) on the Knife Removal Tool fits the hole in the Knife at the position (Fig. 13).

text_image
LATCH KNOB RING GUARD COVER TOP KNIFE COVERFig. 11

text_image
HOLE AT 11 O'CLOCK PIN AT 1 O'CLOCK 11 o'clock RIDGE IN KNIFE HUBFig. 12

text_image
HOLE AT 11 O'CLOCK PINFig. 13 Fig. 14

text_image
PIN AT 11 O'CLOCK KNIFE REMOVAL TOOL SLOTS AROUND PINS- Place the Knife Removal Tool on the Knife (Fig. 14). The three slots on the Tool fit the three Pins on the Ring Guard (Fig. 14).
- Push the Handle firmly, all the way into the hub. Then, turn the Handle counterclockwise until it stops (Fig. 15). Some resistance may be experienced when turning.
- Lift Knife and Tool up and out (Fig. 15).

text_image
PUSH IN AND TURN COUNTERCLOCKWISE TURN CCW PUSH FIRSTFig. 15
CLEANING
Sharpener
- Wipe out any residue remaining inside the Sharpener housing.
- Wash, rinse, and sanitize the Sharpener in a sink or dishwasher.
Meat Grip
- The Meat Grip can be washed, rinsed, and sanitized in a sink.
Product Tray
- The Product Tray can be washed, rinsed, and sanitized in a sink.
- Clean the Product Tray pin with the brush as shown (Fig. 16).
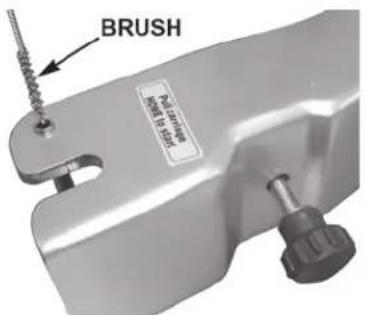
text_image
BRUSH Brush in the toolFig. 16
Top Knife Cover and Ring Guard
- Wash, rinse, and sanitize the Top Knife Cover and the plastic Ring Guard Cover in a sink or dishwasher.
Knife (Removable)
NOTE: Always carry Knife Removal Tool and Knife by Tool Handle.
- Wash, rinse, and sanitize the Knife and Knife Removal Tool in a sink or dishwasher.
Knife (Non-Removable)
⚠ WARNING The slicer knife is very sharp. Exercise extreme caution when working near the knife.
- Clean completely around the Ring Guard by working a moistened, folded paper towel between the Ring Guard and the Knife (Fig. 17).
- Wash, rinse, and sanitize both sides of the Knife by wiping outward from the center. Never clean any part of the slicer with steel pads.
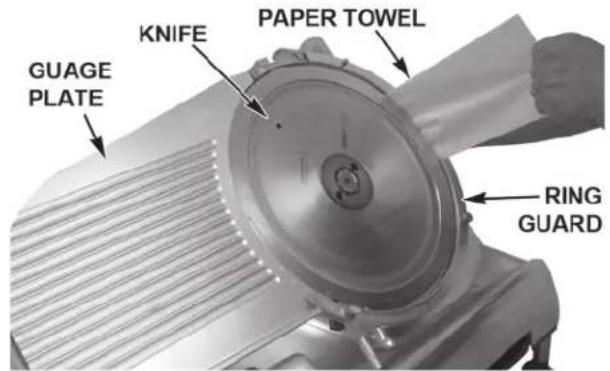
text_image
GUAGE PLATE KNIFE PAPER TOWEL RING GUARDFig. 17
Under the Slice
The HS6 and HS8 Series Slicers are equipped with a Cleaning Leg (Fig. 18) to assist in cleaning under the slicer. To engage the Cleaning Leg, lift the front of the slicer base. The Cleaning Leg will swing straight down. Pull the Cleaning Leg all the way to the front so the slicer is completely supported before cleaning underneath.
The HS7 and HS9 Series Slicers are equipped with Gas Assist Spring (Fig. 19) to assist in cleaning under the slicer. To raise the slicer, place hands under the front of the base and lift up until it stops. The spring will hold the slicer in position for cleaning. Push down base of the slicer to lower the slicer.
NOTE: Do not lift or lower the slicer with the control panel.

text_image
HOBBART CLEANING LEGFig. 18 Fig. 19

natural_image
Industrial HOBART machine with visible control panel and mechanical components (no text or symbols on the device itself)REASSEMBLY AFTER CLEANING
After all components have been cleaned, sanitized, and allowed to dry, the slicer can be reassembled for use.
Knife (Removable with Knife Removal Tool)
- Orient the Knife Hub mark to the arrow as shown (Fig. 20), so it points to the Pin on the Ring Guard at the 1 o'clock position (Fig. 20).
natural_image
Close-up of a hand holding a small metallic object in a kitchen sink, with a dashed arrow and '1:00' label (no readable text or symbols on the object itself)Fig. 20
- Place the Knife and Tool so the Pin on the Knife Removal Tool is at the 11 o'clock position (Fig. 21).
- Place the Slots on the Knife Removal Tool fit around the three Pins on the Ring Guard (Fig. 21).
NOTE: If the Tool does not push the pins on the back of the Knife into the Hub, slightly nudge the Handle upwards to lock the pins into the Knife Nut.

text_image
PIN AT 11 O'CLOCK KNIFE REMOVAL TOOL SLOTS AROUND PINSFig. 21
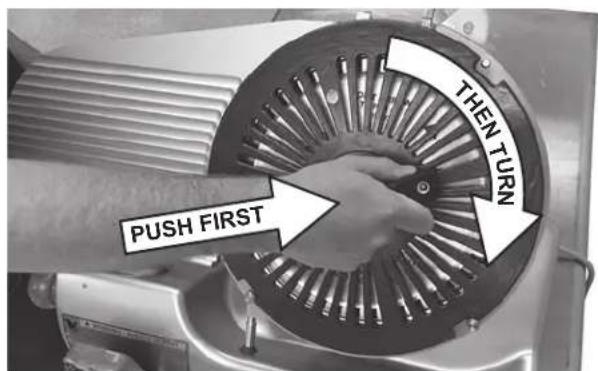
- Push the Handle firmly (Fig. 22), all the way into the Hub to engage the pins. Then, turn the Handle clockwise until it stops. Some resistance may be experienced when turning.
- The Knife is reattached. Lift the Tool up and out.
text_image
THEN TURN PUSH FIRSTFig. 22
Ring Guard Cover and Top Knife Cover
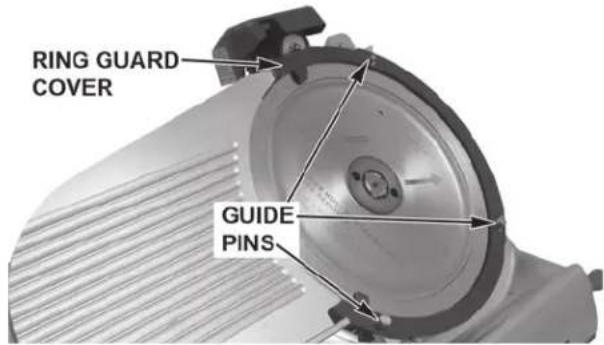
• Install the Ring Guard Cover on the three Guide Pins (Fig. 23).
- Position the Top Knife Cover (Fig. 24) on the lower two Guide Pins and lower the Latch Knob until the magnet secures the Top Knife Cover in place.
text_image
RING GUARD COVER GUIDE PINSFig. 23

text_image
RING GUARD COVER LATCH KNOB TOP KNIFE COVERFig. 24
Product Tray
- Lower the bottom of the Support Arm onto the Carriage Hinge Pins (Fig. 25).
- Tilt the Product Tray toward the Gauge Plate.
- Turn the Knob on the Support Arm until it is tight against the Support Arm.
text_image
PRODUCT TRAY TILTED TO THE RIGHT GAUGE PLATE KNOB BOTTOM OF SUPPORT ARM CARRIAGE HINGE PINFig. 25
Meat Grip
- Assemble the Meat Grip Assembly (Fig. 26) by placing the Washer, Meat Grip Arm, and Meat Grip Handle on the shaft of the Meat Grip.
- Tighten the Handle.
• Install the Meat Grip Assembly (Fig. 27) on the Product Tray by sliding the Meat Grip Slide Rod into the Meat Grip Handle and Product Tray. - Tighten the Meat Grip Slide Rod into the Product Tray.
- Lubricate the Meat Grip Slide Rod. See Maintenance.
text_image
MEAT GRIP ARM MEAT GRIP WASHER MEAT GRIP HANDLEFig. 26 Fig. 27

text_image
MEAT GRIP HANDLE MEAT GRIP SLIDE ROD PRODUCT TRAYSharpener
• Install the Sharpener by lowering it back onto the Sharpener Mount so the Rod and Pin on the bottom of the Sharpener fit the Slot in the Sharpener Mount (Fig. 28).
• To use the Sharpener, see Maintenance.

text_image
SHARPENER SHARPENER MOUNT ROD AND PIN SLOTFig. 28
GASKET INSPECTION
The interval between inspections shall not exceed six months.
The inspection (Fig. 29) must be made by the manufacturer or an authorized service agent.
⚠ WARNING The slicer must be removed from service until repaired by the manufacturer or an authorized service agent if any gasket or seal is found to be damaged or missing.

text_image
GASKET UNDER THUMB SHIELD KNIFE SHAFT BOOT GAUGE PLATE BOOT INDEX ROD BOOT GASKET BEHIND BEZELFig. 29
MAINTENANCE
⚠ WARNING Unplug the machine power cord and turn the index knob fully clockwise to close the gauge plate before doing any maintenance on the slicer.
KNIFE SHARPENING
The CleanCut™ Knife will provide long service in normal food retail or commercial kitchen use.
NOTICE Sharpen only when necessary. Prolonged or sharpening too frequently results in unnecessary Knife wear.
Remove the Top Knife Cover by pulling on the Latch Knob. The Top Knife Cover is held in place with a strong magnet under the Latch Knob. Remove the plastic Ring Guard Cover (Fig. 30) by lifting up.
Clean and sanitize the slicer as outlined in the cleaning section before sharpening the knife. Food debris must not be allowed to transfer from the Knife to the Sharpener. Plug in the machine power cord.

text_image
RING GUARD COVER LATCH KNOB TOP KNIFE COVERFig. 30
Press and hold the KNIFE ON button for 15 seconds (Fig. 31) while pulling the Sharpener Lever fully forward (Fig. 31). After 15 seconds, release the Sharpener Lever and press the OFF button. Unplug the machine power cord. Clean and sanitize the slicer as outlined in the cleaning section after sharpening the knife. Install the plastic Ring Guard Cover and the Top Knife Cover (Fig. 30).
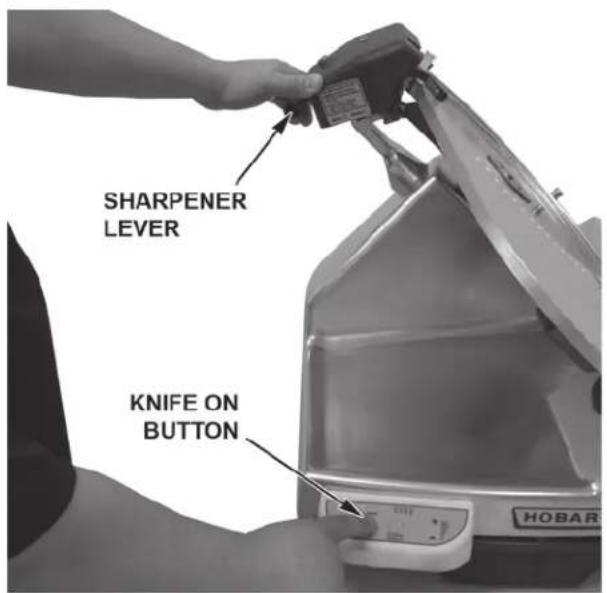
text_image
SHARPENER LEVER KNIFE ON BUTTONFig. 31
LUBRICATION — CARRIAGE SLIDE ROD
Lubricate the Carriage Slide Rod with Lubriplate FMO-200-AW oil (supplied). Once monthly, apply 4 - 5 drops directly onto the Carriage Slide Rod on each side of the Carriage Transport (Fig. 32).
To apply oil, pull out the telescoping tube on the oil bottle, aim the tube, and squeeze gently on the sides of the bottle. After applying oil, move the Carriage Tray back and forth a few times so the oil spreads over the entire length of the slide rod.

text_image
CARRIAGE TRANSPORT CARRIAGE SLIDE RODFig. 32
LUBRICATION — MEAT GRIP SLIDE ROD
The Meat Grip Slide Rod can be lubricated periodically or when any resistance is felt while using the Meat Grip assembly (Fig. 33). First, wipe the Meat Grip Slide Rod so the lubrication is applied to a clean, dry surface. Next, gently squeeze a small amount of the provided Lubriplate oil on the rod. Then slide the Meat Grip up and down the rod to restore smooth operation.
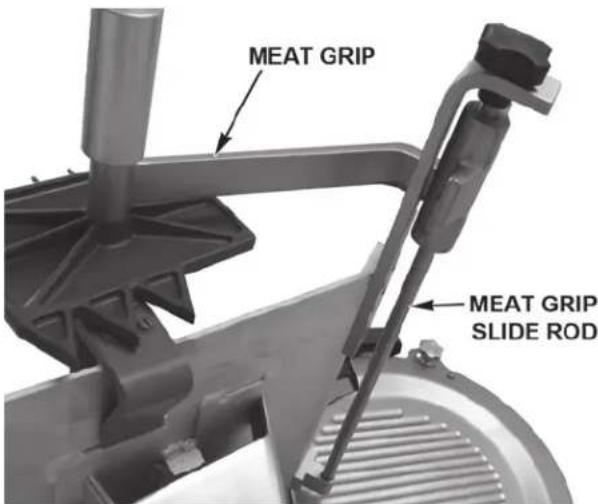
text_image
MEAT GRIP MEAT GRIP SLIDE RODFig. 33
SERVICE
Contact your local Hobart-authorized service office for any repairs or adjustments needed on the slicer.
TRANCHEUSES SÉRIE HS
MODÈLE
Trancheuse manuelle
HS6
HS6N
HS6 (Canada)
HS6N (Canada)
HS8
HS8N
HS8 (Canada)
HS8N (Canada)
natural_image
Close-up of a HOBART robotic device with a circular button labeled 'AUTO' and a small knob at the base (no additional text or symbols visible)LEVIER VERS LE HAUT (MODE AUTOMATIQUE)
Fig. 6
natural_image
Exterior view of a HOBART robotic food processor with a lever mechanism (no visible text or symbols)natural_image
Close-up of a hand holding a small metallic object with a dashed arrow pointing to it, next to a circular target symbol (no text or symbols present)Fig. 20