
CL401V - Hot beverage machine WestBend - Free user manual and instructions
Find the device manual for free CL401V WestBend in PDF.

| Product Type | Hot Drink Machine |
| Brand | WestBend |
| Model | CL401V |
| Power Supply | 120 V ~, 60 Hz |
| Maximum Capacity | 72 oz (2.1 L) |
| Main Functions | Mix, Heat, Dispense, Cancel |
| Automatic Keep Warm | Yes, "Perfect Temperature" function |
| Beverage Types | Hot chocolate, coffee, tea, cappuccino, latte, milk-based drinks, etc. |
| Materials | Plastic, stainless steel (heating plate), rubber (seals) |
| Dimensions (approx.) | 30 x 25 x 35 cm (not specified, estimate) |
| Weight (approx.) | 3 kg (not specified, estimate) |
| Cleaning | Hand wash removable parts; do not immerse the motor base or mixing container |
| Maintenance | Regular disinfection with diluted bleach |
| Spare Parts | Available by order from the manufacturer |
| Repairability | Limited 1-year warranty; manufacturer repair recommended |
| Safety | Polarized plug, short cord, safety switch, mandatory lid |
| Included Accessories | Lid, cap, detachable dispensing tap, measuring spoon (not mentioned, but likely) |
| Recipes Provided | Yes, over 20 recipes in the manual |
| Usage | Household use only |
| Warranty | 1 year limited |
Frequently Asked Questions - CL401V WestBend
User questions about CL401V WestBend
0 question about this device. Answer the ones you know or ask your own.
Ask a new question about this device
Download the instructions for your Hot beverage machine in PDF format for free! Find your manual CL401V - WestBend and take your electronic device back in hand. On this page are published all the documents necessary for the use of your device. CL401V by WestBend.
USER MANUAL CL401V WestBend
natural_image
Black and white photo of a WestBend blender with a small robot inside, no visible text or symbols on the device body.Register this and other Focus Products Group International products through our website: www.registerfocus.com.
Product registration is not required to activate warranty.
Important Safeguards....2
Before Using for the First Time .... 3
Using Your Venti Hot Beverage Maker....4
Helpful Hints....5
Cleaning Your Venti Hot Beverage Maker....6
Recipes 7
Warranty....10
SAVE THIS INSTRUCTION MANUAL FOR FUTURE REFERENCE
IMPORTANT SAFEGUARDS

CAUTION
To prevent personal injury or property damage, read and follow all instructions and warnings.
When using electrical appliances, basic safety precautions should always be followed including the following:
- Read all instructions.
- To protect against fire, electric shock, and injury to persons, do not immerse cord, plugs, or other electric parts in water or other liquids.
- Close supervision is necessary when this appliance is used by or near children.
- Scalding may occur if the cover is removed during the brewing cycle.
- Do not touch hot surfaces. Use handles and knobs.
- Always unplug the appliance from outlet when not in use and before cleaning. Allow to cool before putting on or taking off parts and before cleaning.
- Avoid contacting moving parts.
- Do not operate this appliance with a damaged cord or plug, after the appliance malfunctions or if the appliance is dropped or damaged in any manner. If you experience any problems with your machine, unplug it immediately from the electrical outlet. For service information see warranty page.
- The use of accessory attachments not recommended by Focus Products Group International may result in fire, electric shock, or injury to persons.
- Do not use this appliance outdoors.
- Do not let cord hang over the edge of a table or counter, or touch hot surfaces.
- Do not place on or near a hot gas or electric burner, or in a heated oven.
- Keep hands and utensils out of container to reduce the risk of injury to persons or damage to the appliance.
- Never add to container while the appliance is operating.
- The container must be properly in place before operating the appliance.
- Do not use appliance for other than intended use.
- This appliance has a polarized plug (one blade is wider than the other). To reduce the risk of electric shock, this plug is intended to fit into a polarized outlet only one way. If the plug does not fit fully into the outlet, reverse the plug. If it still does not fit, contact a qualified electrician. Do not attempt to modify the plug in any way.
- A short power-supply cord is provided to reduce risks resulting from becoming entangled in or tripping over a longer cord.
- Longer, detachable power-supply cords or extension cords are available and may be used if care is exercised in their use. While use of an extension cord is not recommended, if you must use one, the marked electrical rating of the detachable power-supply cord or extension cord should be at least as great as the electrical rating of the appliance. If the appliance is of the grounded type, the extension cord should be a grounding-type 3-wire cord. The cord should be arranged so that it will not hang over the counter top or tabletop where it can be pulled on by children or tripped over unintentionally.
- Do not use an outlet or extension cord if the plug fits loosely or if the outlet or extension cord feels hot.
- To disconnect, turn any control to "OFF," then remove plug from wall outlet.
- Do not move an appliance containing hot water, tea or other hot liquids.
- Do not place the mixing container on the motor base while the motor is running.
- Do not remove the mixing container from the motor base while the motor is running.
• Always allow the appliance to cool completely before disassembling and cleaning. - Do not run the motor while the mixing container is empty.
- After running the motor continuously for one "Heat" cycle, wait until appliance has cooled completely before running another "Heat" cycle.
• Always operate this appliance with the cover in place. - Do not attempt to repair this appliance yourself.
- For household use only.
SAVE THESE INSTRUCTIONS
text_image
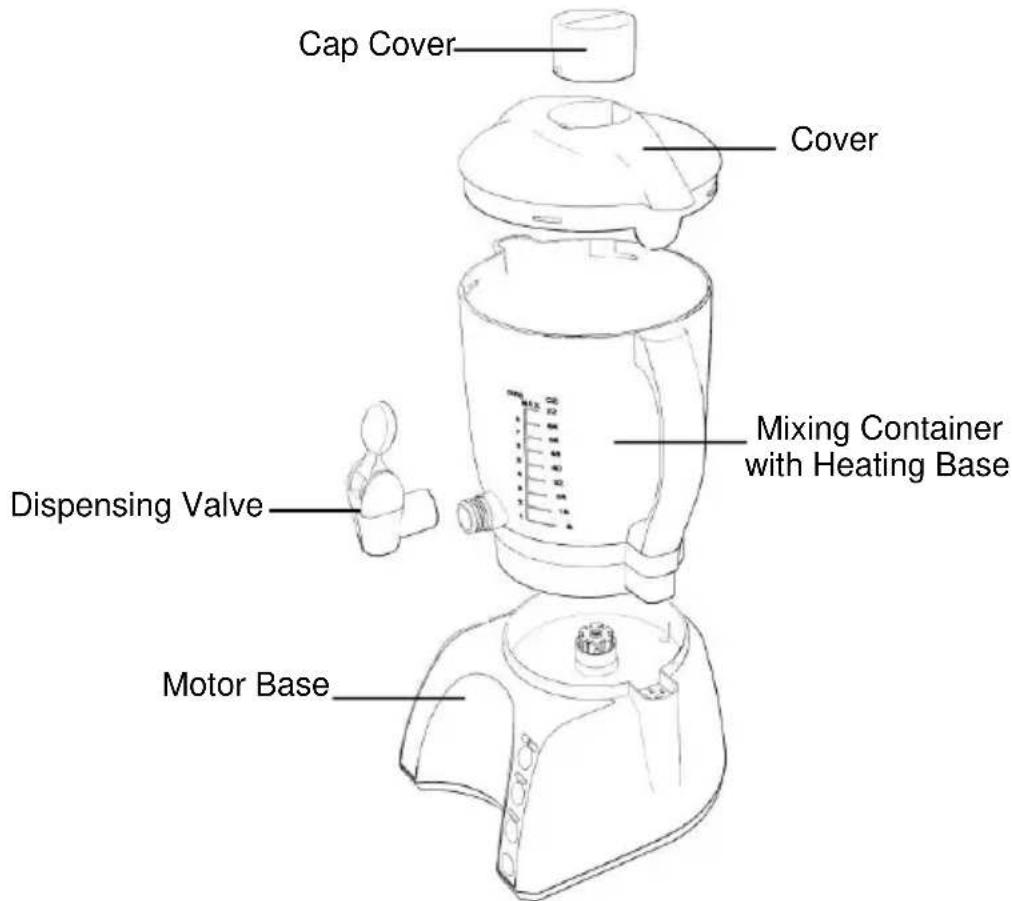
Cap Cover Cover Mixing Container with Heating Base Dispensing Valve Motor BaseBEFORE USING FOR THE FIRST TIME
Please check all packaging material carefully before discarding. Many accessory parts are contained within the packaging material.
Add hot water and a couple drops of dish soap to the mixing container. Wash and rinse. Do not immerse the mixing container in water or any other liquid.
Remove and disassemble the dispensing valve as described in "Cleaning Your Venti Hot Beverage Maker" below. Wash cover, cap cover, and dispensing valve pieces in hot, soapy water. Rinse and dry pieces thoroughly before reassembling.
If desired, wipe the exterior of the motor base and mixing container with a soft, damp cloth. Note: Do not wash any parts in the dishwasher and do not immerse the motor base or mixing container in water or any other liquid. This may permanently damage the product and void the warranty.
English - 3
USING YOUR VENTI HOT BEVERAGE MAKER
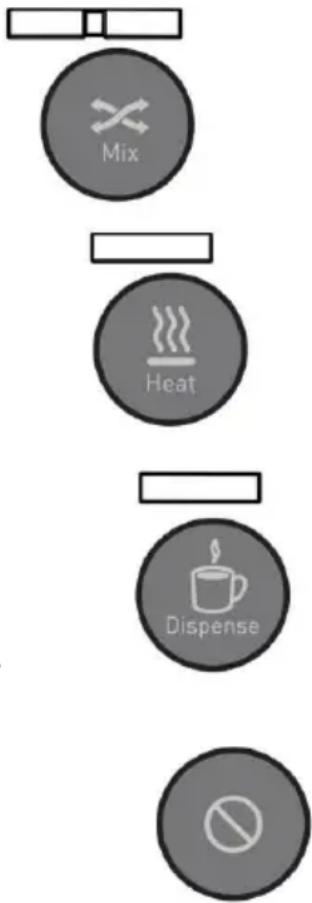
CONTROL BUTTONS:
MIX - Mixes your beverage. Press once for high speed; both selection indicator lights will illuminate. Press twice for low speed; the left selection indicator light will illuminate. Pressing "Mix" will mix only, without heat. "Mix" will operate for 3 cycles of 1 minute with 5 minute rests in between. After 3 cycles, the appliance will turn off.
HEAT - Heats and mixes your beverage. "Heat" will mix at high speed for the first 2 minutes, then will switch to low speed for the remaining time.
DISPENSE - Mixes your beverage at a high speed, without adding heat, to mix and froth your beverage for serving. The selection indicator lights above “Dispense” and “Mix” will be illuminated.
CANCEL - Stops all functions. "Cancel" can be pressed at any point in the cycle to turn the appliance off.
The measurements used below produce 72 ounces. Refer to the Ingredients Chart to determine usage for alternate serving sizes.
- Place mixing container on to the motor base. Make sure that it is completely seated, as there is a safety switch that will not engage if not fully seated.
- Pour up to 72 ounces of water or milk into the mixing container. Note: Do not fill the mixing container past the 72 ounce "Max Fill" line.
- Add your favorite instant drink mix, using the measurements included on the packaging or given below. Always use instant drink mixes, this appliance can not brew or steep.
- Place the cover onto the mixing container, making sure that it covers the pour spout.
- Plug the Venti Hot Beverage Maker into a 120 volt, AC outlet only.
- Press the "Heat" button. The selection indicator lights will be illuminated and your Venti Hot Beverage Maker will begin to mix and heat. When the beverage reaches the "Perfect Temperature," the appliance will automatically go idle. As the beverage cools down, the appliance will automatically reheat and remix back to the "Perfect Temperature." The appliance will remain on until Ⓧ (cancel) is pressed. "Cancel" may be used at any time to turn the appliance off. Selecting another setting will change the operation and the selected control button will glow blue. Note: A full 72 ounces may take up to 15 minutes to reach the "Perfect Temperature."
- Once the appliance automatically goes idle, place a cup underneath the dispensing valve and press the "Dispense" button. This setting will mix the beverage while you dispense so that a rich layer of froth is dispensed into your cup along with the hot beverage.
- Press down on the dispensing valve lever to dispense the hot beverage into your cup while the motor is mixing the beverage. After dispensing the beverage, press "Heat" if there is still liquid in the mixing container or press the "Cancel" button if less than 1 cup of beverage remains.
- When the container has less than 1 cup of liquid remaining, or is empty, press the Ⓧ (cancel) button. Note: The appliance will remain on until you press Ⓧ (cancel).
English - 4
flowchart
graph TD
    A[" "] --> B["Mix"]
    B --> C["Heat"]
    C --> D["Dispense"]
    D --> E[" prohibition"]
flowchart
graph TD
    A[" "] --> B["Mix"]
    B --> C["Heat"]
    C --> D["Dispense"]
    D --> E[" prohibition"]
| INGREDIENTS CHART | |||||
| CUPS | 2 | 4 | 6 | 8 | 9 |
| LIQUID Milk/Water | 16 oz. | 32 oz. | 48 oz. | 64 oz. | 72 oz. |
| POWDER MIX with Milk | 114 cup | 112 cup | 314 cup | 1 cup | 112 cup |
| POWDER MIX with Water | 114 cup | 112 cup | 314 cup | 1 cup | 112 cup |
Note: Different instant cocoa, coffee, and tea mixes may vary from the quantities shown in this chart. Use the quantities specified on the packaging of the instant hot drink mix for exact measurements, or adjust to taste.
"PERFECT TEMPERATURE" FEATURE
The Venti Hot Beverage Maker is designed to maintain the “Perfect Temperature.” Once the beverage reaches the “Perfect Temperature,” the motor will stop running and the mixing paddle will stop mixing, but the selection indicator lights will still be lit. The appliance is now idle but still on. As the beverage cools down, the appliance will automatically reheat and remix back to the “Perfect Temperature.” THE APPLIANCE WILL CONTINUE TO CYCLE ON AND OFF UNTIL THE(SCANCEL) BUTTON IS PRESSED. The control buttons can be pressed at any time to change the settings.
- A small amount of smoke and/or odor may occur upon heating due to the release of manufacturing oils – this is normal.
- Some minor expansion/contraction sounds may occur during heating and cooling – this is normal.
HELPFUL HINTS
- Skim milk and milks with lower fat content are best for creating the most froth.
- Soy milk is an excellent alternative for people who cannot consume dairy. Because of its low fat content, it provides lots of froth.
- Cocoa powder does not mix well and has a tendency to settle out. When this happens, the heating plate is insulated from the liquid and the beverage may not get as hot. Be sure to always thoroughly clean the heating plate after beverages are made with cocoa powder.
- To prevent cocoa powder from settling, we recommend mixing the cocoa powder with a small amount of boiling water and mixing to make a paste before adding to the Venti Hot Beverage Maker. Chocolate syrup can also be used in place of cocoa powder and sugar in most recipes.
- "Mix" will operate for 3 cycles of 1 minute with 5 minute rests in between. After 3 cycles, the appliance will turn off.
- “Dispense” will run for 2 minutes if you forget to press “Cancel” when you finish dispensing. After 2 minutes of operating time, the appliance will shut off.
- If your appliance stops operating, check that it hasn't just gone idle (lights will be flashing). If you cannot change settings, unplug your appliance and let it cool completely. This should reset your thermostat.
CLEANING YOUR VENTI HOT BEVERAGE MAKER
The Venti Hot Beverage Maker must be cleaned after every use. Note: Do not wash any parts in the dishwasher and do not immerse the motor base or mixing container in water or any other liquid.
- Unplug the appliance from the electrical outlet. Allow the entire appliance to cool before cleaning.
- Remove the mixing container from the motor base.
- Pour out any unused portion of the hot beverage mixture.
- Add hot water and a couple drops of dish soap to the mixing container. Wash and rinse. Note: For any difficult to remove build-up, use a nylon scrub pad. To remove build-up around the edge of the mixing container and under the gasket, use the corner of a nylon scrub pad. It may help to let hot, soapy water sit inside the mixing container for a few minutes. Do not immerse the mixing container in water or any other liquid.
- Separate the cover and cap cover, then remove and disassemble the dispensing valve as described below. Wash cover, and dispensing valve pieces in hot, soapy water. Rinse and dry pieces thoroughly before reassembling.
- Wipe the exterior of the motor base and mixing container with a soft, damp cloth.
- Periodically sanitize mixing container and gasket. Place mixing container on the motor base and add 4 cups of water and 14 tsp. unscented bleach to the mixing container. Put cover with cap cover on mixing container, and run the appliance through a complete cycle on "Heat." After cycle, empty mixing container through the dispensing valve and let air dry.

text_image
Cleaning the Dispensing Valve Lever Cap Spring Stopper Pin and Rubber Stopper Valve BodyTo disassemble the valve for cleaning:
- Remove the valve from the container by unscrewing the entire valve body counter-clockwise.
- Remove the cap by unscrewing it counter-clockwise.
- Remove the stopper/stopper pin, spring, cap, and lever from the valve body. Note: The stopper pin and rubber stopper are tightly fit and need not be separated.
- Compress the cap and stopper together to remove the lever and cap.
- Clean all parts and reassemble in the order shown.
English - 6
RECIPES
All beverage recipes in this booklet use whole milk. You may also substitute an equal amount of 2%, 1%, skim milk, or soy milk for any recipe.
Follow these basic instructions for all recipes listed below; special instructions may apply.
Add ingredients to the Venti Hot Beverage Maker, liquids first, and press "Heat." Wait for the Venti Hot Beverage Maker to stop mixing; it has reached the "Perfect Temperature!" Press "Dispense" to dispense the beverage into a mug. "Dispense" mixes the beverage for serving with the maximum amount of froth in your mug. Be creative! All of the beverages below can be changed with flavored syrups or garnished with cinnamon, nutmeg, chocolate shavings or syrup, to taste.
Hot CHOCOLATE
BASIC COCOA
8 cups Milk
1 13 tbsp. Vanilla
14 cup + 2 tbsp. Unsweetened Cocoa
Powder**
1 cup Sugar **
** Or substitute with 1 cup of chocolate syrup.
CREAMY COCOA
7 cups Milk
1 cup Half-and-half
12 cup Unsweetened Cocoa Powder**
2 tbsp. + 2 tsp. Sugar **
Whipped Cream (optional)
Chocolate Powder or Chocolate
Shavings (optional)
** Or substitute with 1¼ cup of chocolate syrup.
CHOCOLATE MINT
7 cups Milk
^3/_4 cup Mint Syrup or Crème de Menthe
1/2 cup Unsweetened Cocoa Powder**
1/4 cup + 1 tbsp. Sugar**
Whipped cream (optional)
** Or substitute with 1¼ cup of chocolate syrup.
HONEY COCOA
8 cups Milk
1 / 2 cup Honey
12 cup Unsweetened Cocoa Powder
1 tsp. Ground Cinnamon
MEXICAN HOT COCOA
8 cups Milk
4 tsp. Vanilla
1/2 cup Hot Cocoa Mix **
1 / 2 cup Sugar**
4 tsp. Ground Cinnamon
** Or substitute with 1 ^1/4 cup of chocolate syrup.
HOT SPICED COCOA
6 cups Milk
2 cup Half-and-half
12 cup Unsweetened Cocoa Powder
12 cup Brown Sugar
2 tsp. Ground Cinnamon
1 tsp. Ground Nutmeg
1 tsp. Ground Cloves
WHITE CHOCOLATE COCOA
6 cups Milk
2 cup Half-and-half
2 tsp. Vanilla
12 oz. Grated or Finely Chopped White Chocolate
COFFEE, TEA, AND ESPRESSO STYLE BEVERAGES
CAFÉ AU LAIT
4 cups Water
4 cups Milk
4 heaping tsp. Instant Coffee
2 tbsp. + 2 tsp. Sugar (optional)
Ground Cinnamon or Nutmeg (optional)
CAFÉ MOCHA
4 cups Water
4 cups Milk
4 heaping tsp. Instant Coffee
3/4 cup Chocolate Syrup**
Chocolate Shavings (optional)
** Or substitute with 14 cup unsweetened cocoa powder and 12 cup sugar.
CHOCOLATE & CREAM COFFEE
6 cups Water
2 cup Heavy Cream
1 cup Chocolate Syrup**
2 heaping tbsp. + 2 tsp. Instant Coffee
Cinnamon (optional)
Whipped cream (optional)
** Or substitute with 14 cup + 1 tbsp. unsweetened cocoa powder and 34 cup sugar.
SPICED CREAM COFFEE
6 cups Water
2 cup Heavy Cream
2 heaping tbsp. Instant Coffee
14 cup White or Brown Sugar
1 tbsp. Ground Cinnamon
1 tsp. Ground Nutmeg
Whipped cream (optional)
Whipped cream (optional)
Nutmeg or Cinnamon (optional)
MOCHACCINO
6 cups Milk
1 ^1/3 cup Water
1/2 cup + 2 tbsp. Chocolate Syrup**
1 heaping tbsp. + 1 tsp. Instant Coffee
Whipped cream (optional)
** Or substitute with 14 cup unsweetened cocoa powder and 12 cup sugar.
CAFFÈ LATTE
7 cups Milk
1 cup Water
1 heaping tbsp. + 1 tsp. Instant Coffee
2 tsp. Sugar
Ground Cinnamon, Nutmeg, or
Chocolate Powder (optional)
SPICED CHAI LATTE
7 cups Milk
1 cup Water
1 / 2 cup Honey
1 heaping tbsp. + 1 tsp. Instant Tea
12 tsp. Ground Cinnamon
12 tsp. Ground Ginger
12 tsp. Ground Cloves
VANILLA CHAI LATTE
7 cups Milk
1 cup Water
1 heaping tbsp. + 1 tsp. Instant Tea
12 cup Brown Sugar
12 tsp. Ground Cinnamon
12 tsp. Ground Ginger
1 tbsp. + 1 tsp. Vanilla
MOCHA CHAI LATTE
7 cups Milk
1 cup Water
^3/_4 cup Chocolate Syrup**
1 heaping tbsp. + 1 tsp. Instant Tea
12 tsp. Ground Cinnamon
12 tsp. Ground Ginger
** Or substitute with 14 cup unsweetened cocoa powder and 12 cup sugar.
APPLE-SPICE TEA
4 cups Water
4 cup Apple Cider
3 heaping tbsp. Instant Tea
2 tbsp. + 2 tsp. Brown Sugar
12 tsp. Ground Cinnamon
12 tsp. Ground Cloves
8 Lemon Slices (in mugs)
2 cups Cranberry Juice Cocktail
^3/_4 cup Lemon Juice
1 tsp. Ground Cinnamon
1 tsp. Ground Ginger
12 tsp. Ground Nutmeg
12 tsp. Ground Cloves
SPICED FRUIT PUNCH
1 cup Water
4 cups Cranberry Juice
2 cups Pineapple Juice
1 cup Grapefruit Juice
1 tsp. Ground Cloves
1 tsp. Ground Coriander seed
2 tsp. Ground Cinnamon
CREAMY CARAMEL APPLE CIDER
8 cups Apple Cider or Apple Juice
1 cup Caramel Syrup
1 tsp. Cinnamon
Whipped cream (optional)
HOT BUTTERED RUM\*
8 cups Water
12 cup Butter
1 tsp. Vanilla
2 tbsp. + 2 tsp. Brown Sugar
Dash of Nutmeg
Dash of Cardamom
12 oz. (1½ cups) Rum
8 Cinnamon Sticks
8 Lemon Slices
Vanilla Ice Cream (optional)
*Add water, butter, sugar, nutmeg, cardamom, and vanilla to the Venti Hot Beverage Maker and press "Heat." Place
1 lemon slice, 1½ ounces of rum, 1 cinnamon stick, and one scoop of vanilla ice cream (optional) in each mug.
Dispense the beverage into the mug over them.
PRODUCT WARRANTY
Appliance 1 Year Limited Warranty
Focus Products Group International, LLC (“the Company”) warrants this appliance from failures in the material and workmanship for one (1) year from the date of original purchase with proof of purchase, provided that the appliance is operated and maintained in conformity with the Instruction Manual. Any failed part of the appliance will be repaired or replaced without charge at the Company’s discretion. This warranty applies to indoor household use only.
This warranty does not cover any damage, including discoloration, to any non-stick surface of the appliance. This warranty is null and void, as determined solely by the Company, if the appliance is damaged through accident, misuse, abuse, negligence, scratching, or if the appliance is altered in any way.
THIS WARRANTY IS IN LIEU OF ALL IMPLIED WARRANTIES, INCLUDING WARRANTIES OF MERCHANTABILITY, FITNESS FOR A PARTICULAR PURPOSE, PERFORMANCE, OR OTHERWISE, WHICH ARE HEREBY EXCLUDED. IN NO EVENT SHALL THE COMPANY BE LIABLE FOR ANY DAMAGES, WHETHER DIRECT, INDIRECT, INCIDENTAL, FORSEEABLE, CONSEQUENTIAL, OR SPECIAL ARISING OUT OF OR IN CONNECTION WITH THIS APPLIANCE.
If you think the appliance has failed or requires service within its warranty period, please contact the Customer Care Department at (866) 290-1851, or e-mail us at customercare@focuspg.com. A receipt proving the original purchase date will be required for all warranty claims, hand written receipts are not accepted. You may also be required to return the appliance for inspection and evaluation. Return shipping costs are not refundable. The Company is not responsible for returns lost in transit.
Valid only in USA and Canada
REPLACEMENT PARTS
Replacement parts, if available, may be ordered directly from the Company several ways. Order online at www.westbend.com, e-mail customercare@focuspg.com, over the phone by calling (866)290-1851, or by writing to:
Focus Products Group International, LLC.
Attn: Customer Care Dept.
P. O. Box 53
West Bend, WI 53095
To order with a check or money order, please first contact Customer Care for an order total. Mail your payment along with a letter stating the model or catalog number of your appliance, which can be found on the bottom or back of the appliance, a description of the part or parts you are ordering, and the quantity you would like. Your check should be made payable to Focus Products Group International, LLC.
Your state/province's sales tax and a shipping fee will be added to your total charge. Please allow two weeks for processing and delivery.
This manual contains important and helpful information regarding the safe use and care of your product. For future reference, attach dated sales receipt for warranty proof of purchase and record the following information:
Date purchased or received as gift: ____
Where purchased and price, if known: ____
Item number and Date Code (shown bottom/back of product):
WestBend®
natural_image
Black and white photo of a WestBend blender with a digital display and control buttons (no visible text or symbols on the device body)Focus Products Group International, LLC.
Attn: Customer Care Dept.
P. O. Box 53
West Bend, WI 53095
natural_image
Black and white photo of a WestBend blender with a small robot inside, no visible text or symbols on the device itself.CAFÉ CON CHOCOLATE Y CREMA
6 tazas Agua
2 tazas Crema espesa
1 taza Jarabe de chocolate**
Focus Products Group International, LLC.