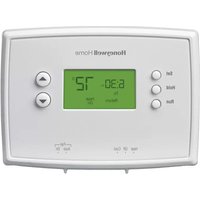
RTH2300B1038/E1 - Thermostat HONEYWELL - Free user manual and instructions
Find the device manual for free RTH2300B1038/E1 HONEYWELL in PDF.


User questions about RTH2300B1038/E1 HONEYWELL
0 question about this device. Answer the ones you know or ask your own.
Ask a new question about this device
Download the instructions for your Thermostat in PDF format for free! Find your manual RTH2300B1038/E1 - HONEYWELL and take your electronic device back in hand. On this page are published all the documents necessary for the use of your device. RTH2300B1038/E1 by HONEYWELL.
USER MANUAL RTH2300B1038/E1 HONEYWELL
Programmable Thermostat
Owner's Manual
Read and save these instructions.
For help please visit honeywellhome.com
RTH2300/RTH221 Series

text_image
Set Hold Run Heat Off Cool Fan Auto Off M37777Identify System Type
This thermostat is compatible with the following systems:
• Gas, oil or electric furnace
• Central air conditioner
• Hot water system with or without pump
- Millivolt system
• Central heating and cooling system
• Heat pump without auxiliary/backup heat
Do you need assistance? We are here to help.
Visit http://honeywellhome.com/support for wiring assistance before returning the thermostat to the store.
This thermostat cannot be used on heat pumps with backup heat or on multistage systems.
text_image
HgNO MERCURY NE PAS JETER LE MERCURE

ATTENTION: MERCURY RECYCLING NOTICE
This product does not contain mercury. However, this product may replace a product that contains mercury. Mercury and products containing mercury should not be discarded in household trash.
For more information on how and where to properly recycle a thermostat containing mercury in the United States, please refer to the Thermostat Recycling Corporation at www.thermostat-recycle.org.
For mercury thermostat recycling in Canada, please refer to Switch the Stat at www.switchthestat.ca

NOTICE: To avoid possible compressor damage, do not run air conditioner if the outside temperature drops below 50^ F ( 10^ C).
Customer assistance
For assistance with this product, please visit http://honeywellhome.com/support
To save time, please note your model number and date code before calling.
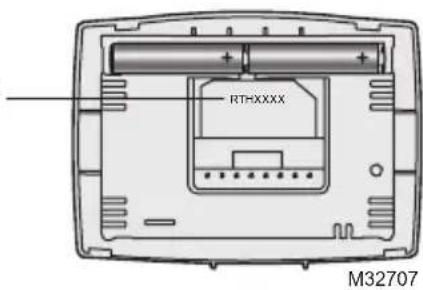
Pull at bottom to remove thermostat from wallplate.
Turn thermostat over to find model number and date code.
text_image
RTHXXXX M32707Table of contents
Installation
Installation....3
Advanced Installation 8
About your new thermostat
Controls and Home screen
quick reference....10
Preset energy-saving schedules.....11
Programming and operation
Setting the clock....11
Adjusting program schedules.....12
Overriding schedules temporarily .... 13
Overriding schedules permanently ... 13
Compressor protection....14
Change filter 14
Replace batteries....15
Appendices
Troubleshooting....16
Limited warranty....17
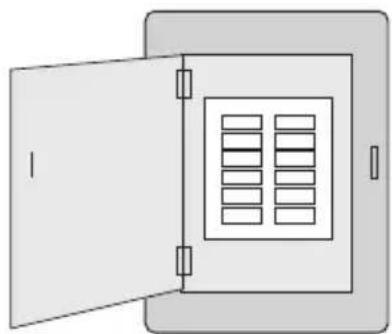
1 Turn Off Power to Heating/Cooling System
natural_image
Simple line drawing of an open storage cabinet with internal compartments (no text or symbols)Circuit breaker box
or
natural_image
Simple electrical switch symbol with two terminals and a central rectangular block (no text or labels)Heating/cooling system power switch
2 Remove Old Thermostat
Remove old thermostat but leave wallplate with wires attached.

text_image
Do not remove wallplate yet Terminal designation If you have an older a sealed mercury tu 2 for proper disposa3 Label Wires with Tags
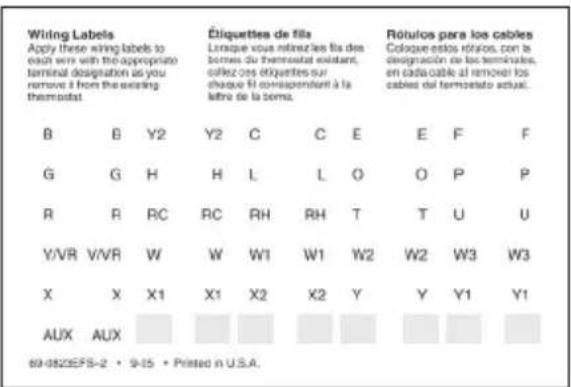
Label the wires using the supplied wire labels as you disconnect them.
text_image
Wiring Labels Apply these wiring labels to each wire with the appropriate terminal designation as you remove it from the existing thermostat Étiquettes de fille Liraque vous retezées les fis des bornes du thermostat existant, collect ces étiquettes sur chaque fil correspondir à la lutre de la soms. Rótulos para los cables Coloque-estos rótulos, con la designación de los terminales, en cada cable al remover los cables del termosado actual. B B Y2 Y2 C C E E F F G G H H L L O O P P R R RC RC RH RH T T U U Y/VR V/VR W W W1 W1 W2 W2 W3 W3 X X X1 X1 X2 X2 Y Y Y1 Y1 AUX AUX 69-0823EFS-2 • 9-15 • Printed in U.S.A.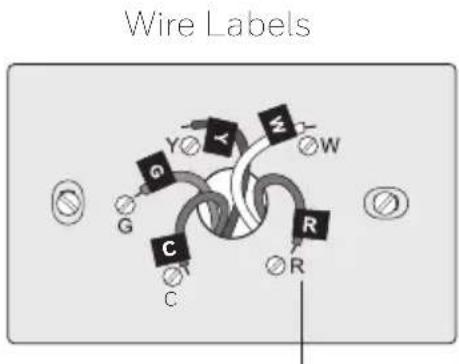
text_image
Wire Labels G C Y Z W R C RTerminal designation
4 Separate Wallplate from New Thermostat
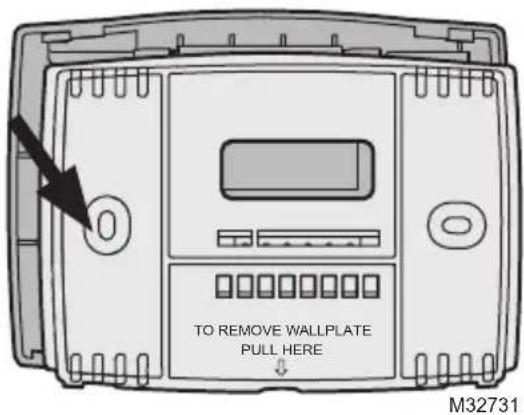
Remove wallplate from the new thermostat and mount onto wall.
text_image
TO REMOVE WALLPLATE PULL HERE M32731Wallplate
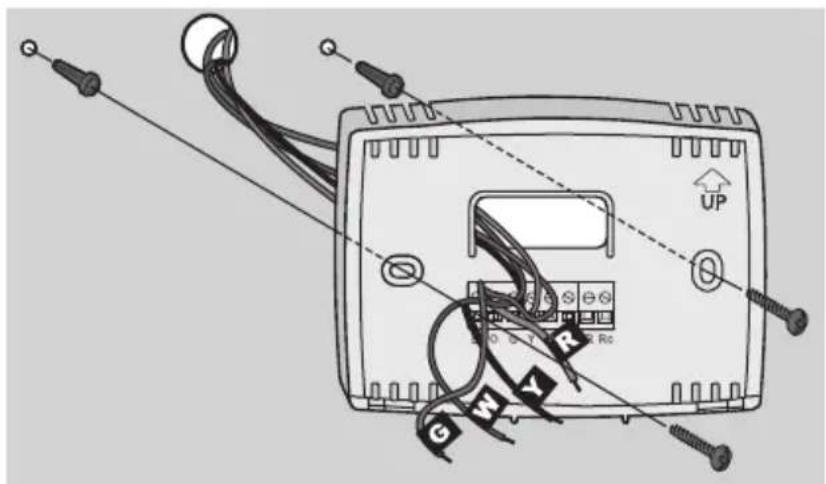
5 Mount Wallplate
Mount the new wallplate using the included screws and anchors.
text_image
Diagram of an electronic device with labeled wires and components, including a 'UP' indicator and terminal labels like G, H, Y.M32714
Drill 3/16-in. holes for drywall
Drill 3/32-in. holes for plaster
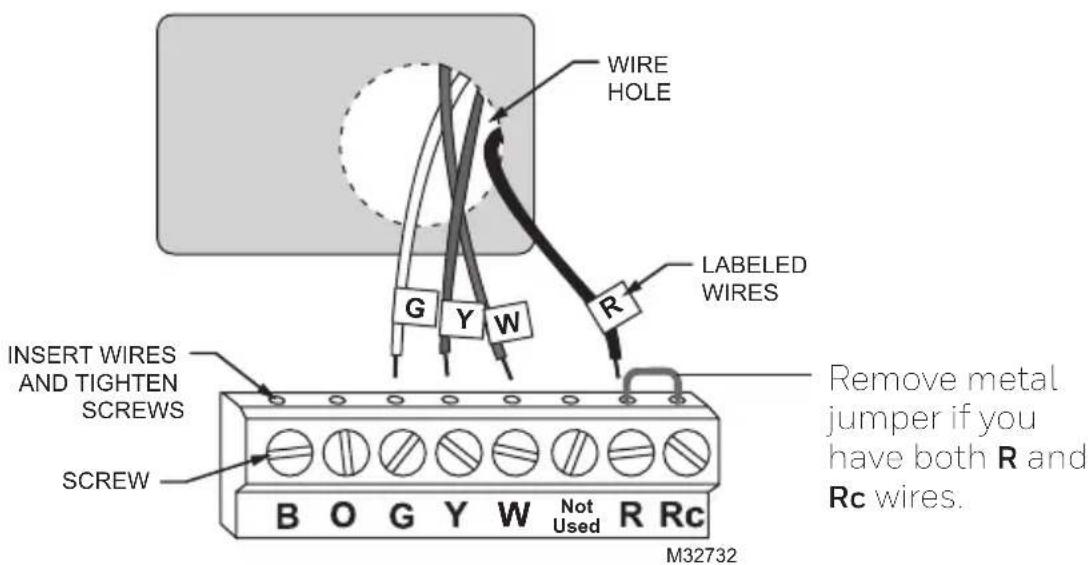
6 Connect Wires
Simply match wire labels.
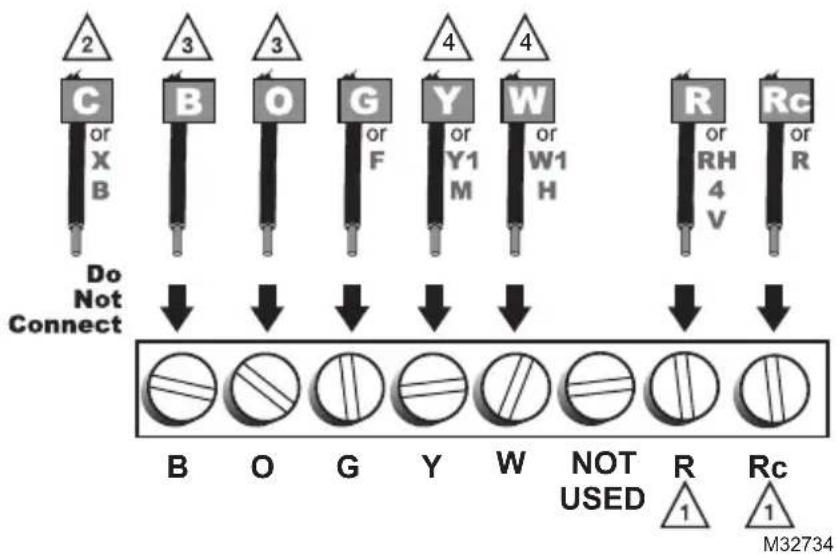
If labels do not match letters on the thermostat, check "Alternate Wiring" on page 6 and connect to terminal as shown here (see notes, below).
text_image
WIRE HOLE G Y W R LABELED WIRES INSERT WIRES AND TIGHTEN SCREWS SCREW B O G Y W Not Used R Rc M32732 Remove metal jumper if you have both R and Rc wires.Thermostat does not work on Heat Pumps with auxiliary/backup heat.
Alternate Wiring
text_image
2 C or X B 3 B O 3 G or F 4 Y or Y1 M W or W1 H 4 R or RH 4 V Rc or R Do Not Connect B O G Y W NOT USED R 1 Rc 1 M32734
If wires will be connected to both R and Rc terminals, remove metal jumper.

Do not use C or X. Wrap bare end of wire with electrical tape.

If you have a heat pump without auxiliary/backup heat connect O or B, not both. If you do not have a heat pump, do not connect B. Wrap bare end of wire with electrical tape.

Place a jumper (piece of wire) between Y and W if you are using a heat pump without auxiliary/backup heat.
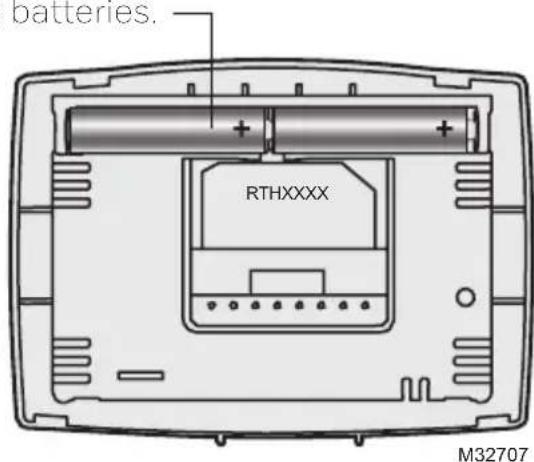
7 Install Batteries
Install two AAA alkaline batteries.
text_image
batteries. RTHXXXX M32707Back of thermostat
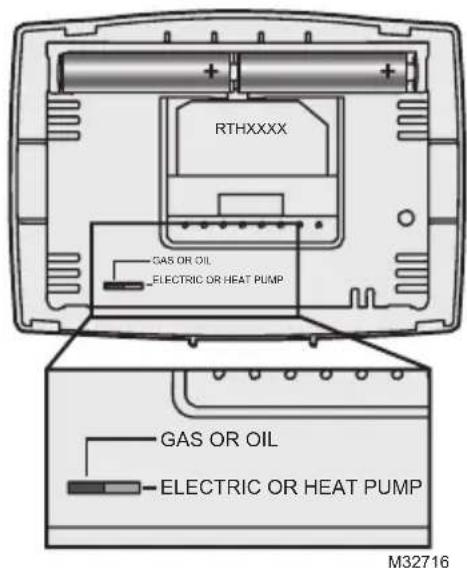
8 Set fan operation switch
Move the switch to the proper setting:
Gas or Oil: For gas or oil heating systems, leave the fan operation switch in this factory-set position (for systems that control the fan in a call for heat).
Electric or Heat Pump: Change the switch to this setting for heat pump or electric heat systems. (This setting is for systems that allow the thermostat to control the fan in a call for heat, if a fan wire is connected to the G terminal.)
text_image
RTHXXXX GAS OR OIL ELECTRIC OR HEAT PUMP GAS OR OIL ELECTRIC OR HEAT PUMP M327169 Install Thermostat onto Wallplate
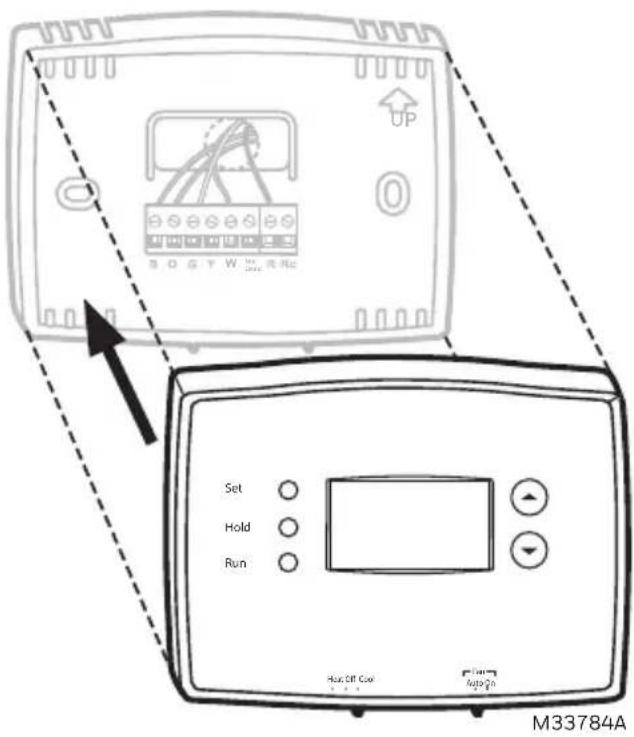
Install thermostat onto the wallplate on the wall.
text_image
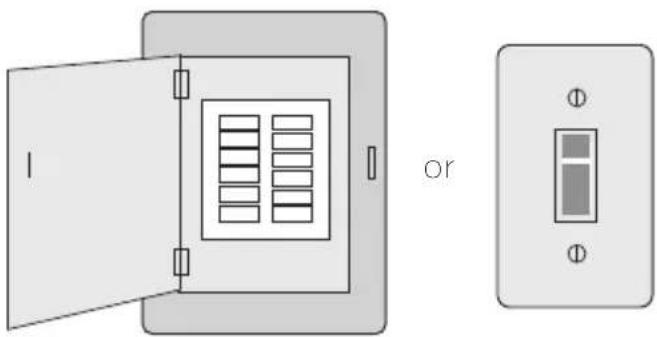
UP Set Hold Run Run Off Coo M33784A10 Turn Power Back On
Turn the power back on to the heating/cooling system.
natural_image
Diagram showing two open electrical enclosures with internal compartments and a separate rectangular panel (no text or symbols)Circuit breaker box Heating/cooling system power switch
11 If your system type is...
If your system type is:
☐ Single Stage Heat and Cool
Heat Only or Cool Only
Congratulations, you're done!
If your system type is:
□ Heat pump □ Electric furnace
☐ High efficiency furnace ☐ Gas/oil steam
Hot water Gravity system
Continue with Advanced Installation to match your thermostat to your system type.
This thermostat works on 24 volt or 750 mV systems. It will NOT work on multi-stage conventional systems.
Advanced Installation
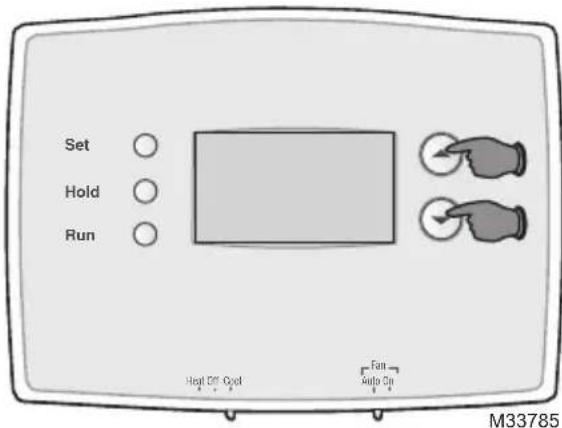
Enter System Setup
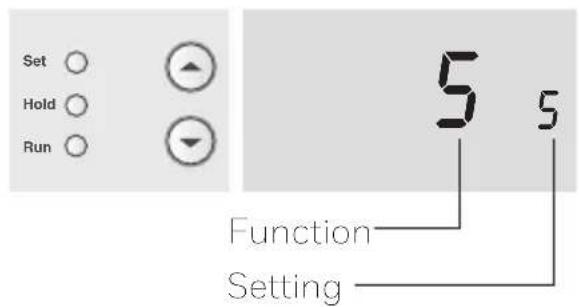
To enter system setup, press and hold both the ▲ and ▼ buttons until the display changes (approximately 5 seconds).
text_image
Set Hold Run Hot Def. Cool Fan Auto On M33785Changing Settings
- Press the ▲ or ▼ button to change the setting.
- Press the ▲ and ▼ buttons simultaneously for one second to advance to the next function.
- Press the RUN button to exit and save settings.
text_image
Set Hold Run 5 5 Function SettingNOTE: If you do not press any button for 60 seconds while you are in the setup menu, the thermostat automatically saves any changes made and exits the menu.
| Function | DescriptionPress the ▲ or ▼ button to Setting | |
| 5 select your heating system and optimize its operation | 5 Gas or oil furnace: Use this setting if you have a standard gas or oil furnace that is less than 90% efficient.6 Electric furnace: Use this setting if you have any type of electric heating system.3 Heat pump, hot water or high-efficiency furnace:Use this setting if you have a hot water system or a gas furnace of greater than 90% efficiency.2 Gas/oil steam or gravity system: Use this setting if you have a steam or gravity heat system. | |
| 14 select Fahrenheit or Celsius temperature display | 0 Fahrenheit temperature display (°F)1 Celsius temperature display (°C) | |
| 15* select Compressor Protection settings | 1 On0 Off | |
| 20 select clock display 0 12-hour display | 1 24-hour display | |
| 21 (RTH2300 only) | select Change Filter Timer 0 | Off1 30 days2 90 days3 6 months4 9 months5 1 year |
| 40 (RTH2300 only) | restore program schedule to default settings | 0 Off1 On: Program schedule default settings are listed on page 11. |
* Compressor Protection: This feature forces the compressor to wait approximately 5 minutes before restarting, to prevent equipment damage. During the wait time, the message "Cool On" or "Heat On" flashes on screen.
About your new thermostat
Your new thermostat has been designed to give you many years of reliable service and easy-to-use, push-button climate control.
- Backlit display on RTH2300
- Displays ambient (measured) temperature at all times
• One-touch access to setpoint temperature - Preset program settings
- Temporary and permanent override of schedule
• Built-in compressor protection
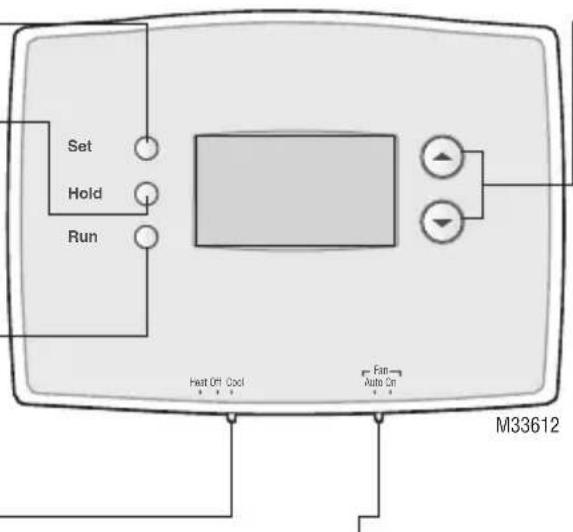
Thermostat controls
Set: Press to set time/day/schedule.
Hold: Press to override programmed temperature control.
Run: Press to resume program schedule.
text_image
Set Hold Run Heat Off Cool Fan Auto On M33612Temperature adjustment
Press the up or down buttons until you reach the desired temperature.
NOTE: Make sure the SYSTEM switch is set to the system you want to control (Heat or Cool).
System Switch is used to control your heating or cooling system.
• Heat: Heating system control.
- Off: All systems off.
• Cool: Cooling system control.
Fan Switch is used to control your fan.
In "Auto" mode, the fan runs only when the heating or cooling system is on.
If set to "On," the fan runs continuously.
Display screen
Setpoint indicator
Appears when the setpoint temperature is displayed.
Current time (see page 11)
Current day — (RTH2300 only) (see page 11)
Current program period
Wake/Leave/Return/Sleep (see pages 11-13)
System status
Cool on: Cooling system is on.
Heat on: Heating system is on.
When Cool On is flashing, compressor protection is engaged (see page 14).
Low battery warning
(see page 15)
Heat On
M32701
Temperature
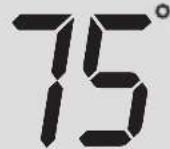
The ambient (measured) temperature is normally displayed. To view the setpoint temperature, press the Up or Down button once. The setpoint temperature will appear for five seconds.
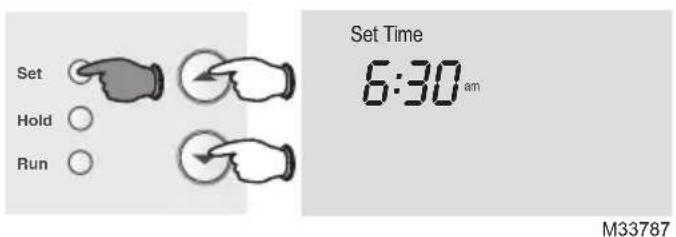
Set the time and day
- Press the SET button, then press ▲ or ▼ to set the clock time.
- Press the SET button, then press ▲ or ▼ to select the day of the week. (RTH2300 only)
- Press RUN to save & exit.
NOTE: If the clock flashes, the thermostat will follow your settings for the Monday "Wake" time period until you reset the time and day.
text_image
Set Hold Run Set Time 6:30 am M33787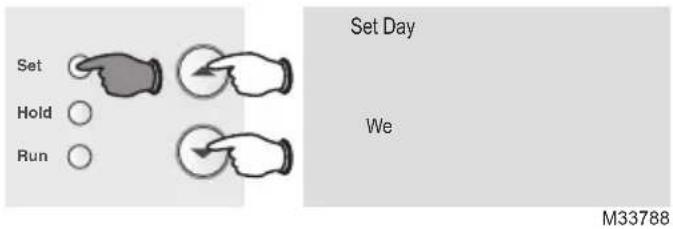
text_image
Set Hold Run Set Day We M33788Program Schedule
You can program four time periods each day. The RTH2300 can be programmed with different schedules for weekdays and weekends. We recommend the pre-set settings (shown in the table below), since they can
reduce your heating/cooling expenses.
Wake - Set to the time you awaken and the temperature you want during the morning, until you leave for the day.
Leave - Set to the time you leave home and the temperature you want while you are away (usually an energy-saving level).
Return - Set to the time you return home and the temperature you want during the evening, until bedtime.
| Heat | Cool | |
| Wake(6:00 am) | 70° | 78° |
| Leave(8:00 am) | 62° | 85° |
| Return(6:00 pm) | 70° | 78° |
| Sleep(10:00 pm) | 62° | 82° |
Sleep - Set to the time you go to bed and the temperature you want overnight (usually an energy-saving level).
NOTE: Leave and Return periods can be canceled on weekends (RTH2300 only).
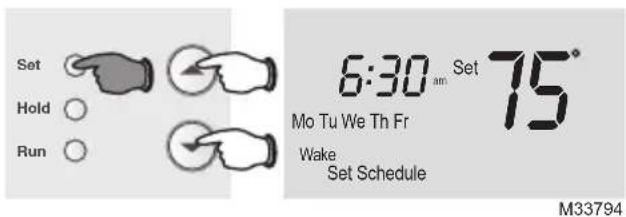
To adjust program schedules (RTH2300)
- Press SET until Set Schedule is displayed.
- Press ▲ or ▼ to set your weekday Wake time (Mo-Fr), then press SET.
- Press ▲ or ▼ to set the temperature for this time period, then press SET.
- Set time and temperature for the next time period (Leave). Repeat steps 2 and 3 for each weekday time period.
- Press SET to set weekend time periods (Sa & Su), then press RUN to save & exit.
NOTE: Make sure the thermostat is set to the system you want to program (Heat or Cool).
text_image
Set Hold Run 6:30 am Set 75° Mo Tu We Th Fr Wake Set Schedule M33794To adjust program schedules (RTH221)
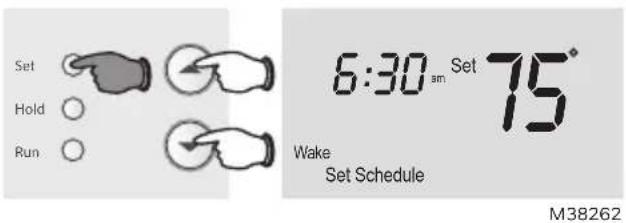
- Press SET until Set Schedule is displayed.
- Press ▲ or ▼ to set your Wake time (Mo-Su), then press SET.
- Press ▲ or ▼ to set the temperature for this time period, then press SET.
- Set time and temperature for the next time period (Leave). Repeat steps 2 and 3 for each time period.
- Press RUN to save & exit.
NOTE: Make sure the thermostat is set to the system you want to program (Heat or Cool).
text_image
Set Hold ○ Run ○ 6:30 am Set 75° Wake Set Schedule M38262Program schedule override (temporary)
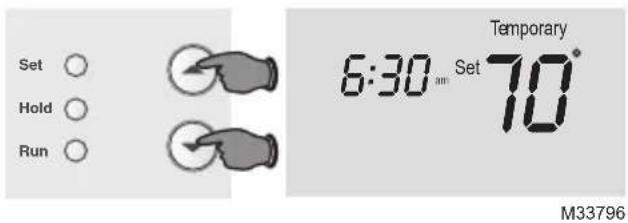
Press ▲ or ▼ to immediately adjust the temperature. This will temporarily override the temperature setting for the current time period.
"Temporary" will appear on the display and the current program period will flash.
The new temperature will be maintained only until the next programmed time period begins (see page 11).
To cancel the temporary setting at any time, press RUN.
NOTE: Make sure the thermostat is set to the system you want to control (heat or cool).
text_image
Set ○ Hold ○ Run ○ Temporary 6:30 am Set 70° M33796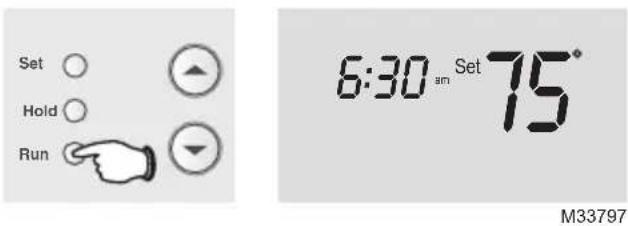
text_image
Set Hold Run 6:30 am Set 75° M33797Program schedule override (permanent)
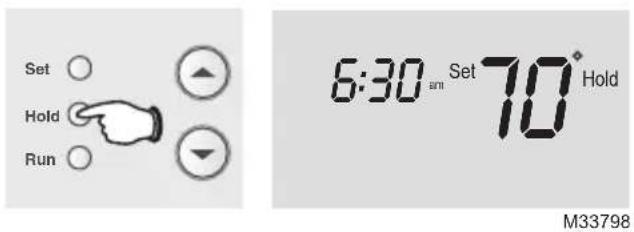
Press HOLD to permanently adjust the temperature. This will override the temperature settings for all time periods.
The "Hold" feature turns off the program schedule and allows you to adjust the thermostat manually, as needed.
Whatever temperature you set will be maintained 24 hours a day, until you manually change it, or press RUN to cancel "Hold" and resume the program schedule.
NOTE: Make sure the thermostat is set to the system you want to control (heat or cool).
text_image
Set Hold Run 6:30 am Set 70° Hold M33798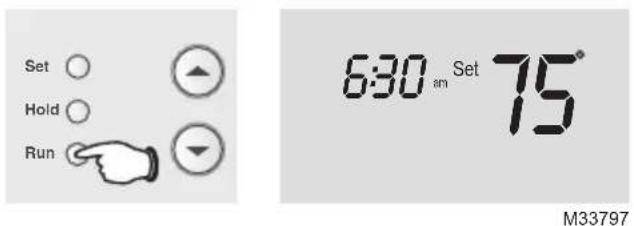
text_image
Set Hold Run 6:30 am Set 75° M33797Built-in compressor protection
This feature helps prevent damage to the compressor in your air conditioning or heat pump system.
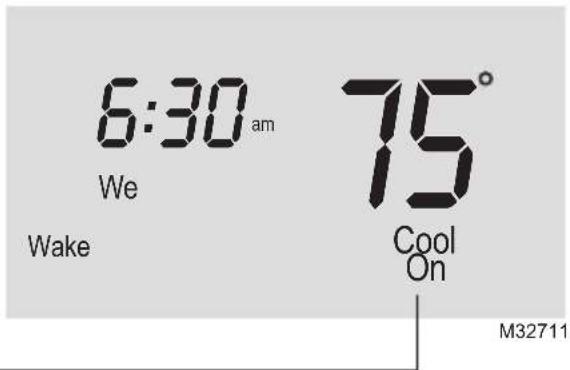
Damage can occur if the compressor is restarted too soon after shutdown. This feature forces the compressor to wait 5 minutes before restarting.
During the wait time, the display will flash the message Cool On (or Heat On if you have a heat pump). When the safe wait time has elapsed, the message stops flashing and the compressor turns on.
text_image
6:30 am We Wake 75° Cool On M32711Change filter (RTH2300 only)
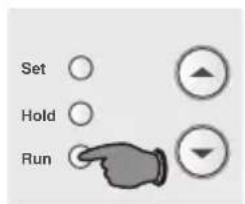
If the filter reminder is turned on during installation, the words Change Filter will flash on the screen when the filter needs to be replaced.
After you replace the air filter, press and hold the RUN button for 3 seconds to reset the alert.
text_image
Set Hold Run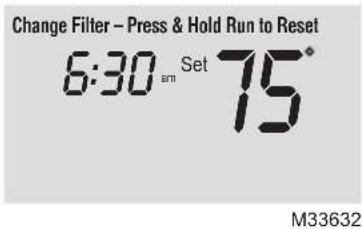
text_image
Change Filter – Press & Hold Run to Reset 6:30 am Set 75° M33632Battery replacement
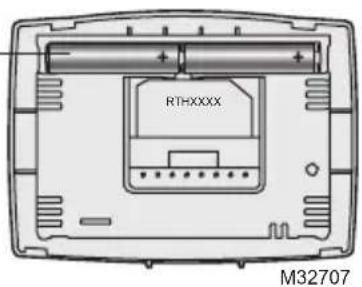
Install two fresh AAA batteries when Lo Batt flashes on the screen. Lo Batt appears for 60 days before the batteries are depleted.
Replace batteries once a year, or when you will be away for more than a month.
Most settings are stored in non-volatile (permanent) memory. Only the clock and the day must be set after you replace the batteries.
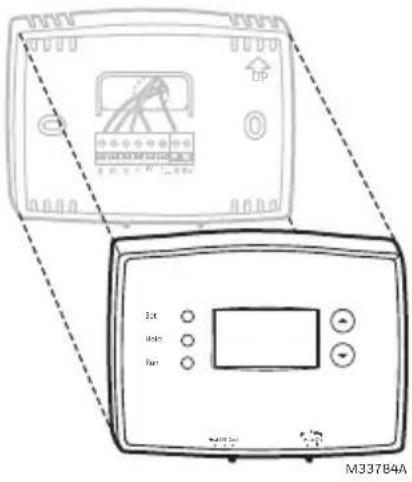
Pull at bottom to remove thermostat from wallplate.
text_image
OP Ext Hold Part M33784A
Set the System switch to Off before removing the batteries. Otherwise, the heating/cooling system could remain activated even when batteries are removed.
Turn thermostat — over, insert fresh AAA alkaline batteries, then reinstall thermostat.
text_image
RTHXXXX M32707Electrical Ratings
| Terminal | Voltage (50/60Hz) | Max. Current Rating |
| B | 20-30 Vac | 1.0 A |
| O | 20-30 Vac | 1.0 A |
| G | 20-30 Vac | 1.0 A |
| Y | 20-30 Vac | 1.0 A |
| W | 20-30 Vac | 1.0 A |
| R | 20-30 Vac | 1.0 A |
| Rc | 20-30 Vac | 1.0 A |
Troubleshooting
If you have difficulty with your thermostat, please try the following suggestions. Most problems can be corrected quickly and easily.
Display is blank
- Make sure fresh AAA alkaline batteries are correctly installed.
Heating or cooling system does not respond
- Set system switch to Heat. Make sure the temperature is set higher than the Inside temperature.
- Set system switch to Cool. Make sure the temperature is set lower than the Inside temperature.
- Wait 5 minutes for the system to respond.
Temperature settings do not change
Make sure heating and cooling temperatures are set to acceptable ranges:
- Heat: 40^ to 90^ (4.5° to 32°C).
• Cool: 50^ to 99^ F ( 10^ to 37^ C).
"Cool On" or "Heat On" is flashing
- Compressor protection feature is engaged. Wait 5 minutes for the system to restart safely, without damage to the compressor.
"Heat On" is not displayed
- Set the System switch to Heat, and set the temperature level above the current room temperature.
"Cool On" is not displayed
- Set the System switch to Cool, and set the temperature level below the current room temperature.
For assistance with this product, please visit http://honeywellhome.com/support
1-year limited warranty
http://honeywellhome.com/support

resideo
www.resideo.com
Resideo Technologies Inc.
1985 Douglas Drive North, Golden Valley, MN 55422
http://honeywellhome.com/support
33-00102EF-05 M.S. Rev. 08-20 | Printed in United States
© 2020 Resideo Technologies, Inc. All rights reserved.
The Honeywell Home trademark is used under license from Honeywell International, Inc. This product is manufactured by Resideo Technologies, Inc. and its affiliates. Tous droits réservés. La marque de commerce Honeywell Home est utilisée avec l'autorisation d'Honeywell International, Inc.
http://honeywellhome.com/support
natural_image
Diagram showing a door opening and a separate electrical outlet with a resistor symbol (no text or labels)5 Installer la plaque
text_image
Diagram of an electronic device with labeled wires and components, including a 'UP' indicator and labeled pins G, F, Y.M32714
text_image
UP Set Head Run M33784Anatural_image
Diagram showing a door open with internal compartments and a separate electrical outlet (no text or symbols)text_image
Set Hold Run Heat Diff Cond Fan Auto On M33785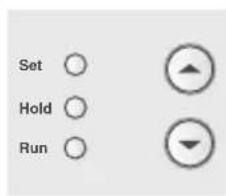
text_image
Set Hold Run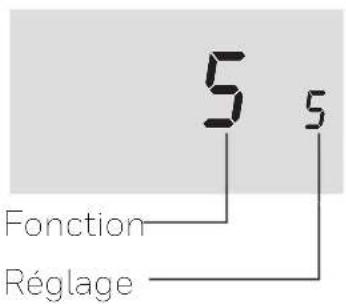
text_image
Set Hold Run Set Day We M33788text_image
Set Hold Run 6:30 am Set 75° M33797text_image
Set Hold Run 6:30 am Set 70° Hold M33798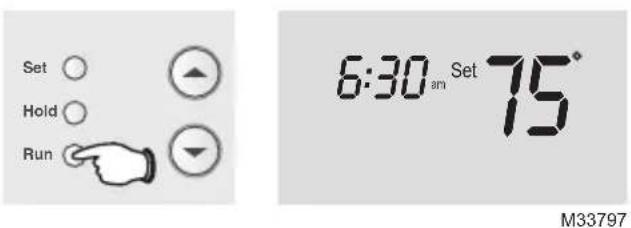
text_image
Set Hold Run 6:30 am Set 75° M33797text_image
6:30 am We Wake 75° Cool On M32711text_image
Set Hold Run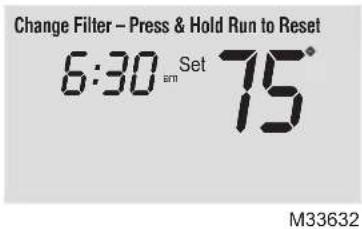
text_image
Change Filter – Press & Hold Run to Reset 6:30 Set 75° M33632| Borne | Tension (50/60Hz) | Courant nominal max. |
| B | 20-30 V CA | 1,0 A |
| O | 20-30 V CA | 1,0 A |
| G | 20-30 V CA | 1,0 A |
| Y | 20-30 V CA | 1,0 A |
| W | 20-30 V CA | 1,0 A |
| R | 20-30 V CA | 1,0 A |
| Rc | 20-30 V CA | 1,0 A |
Dépannage
http://honeywellhome.com/support

resideo
www.resideo.com
Resideo Technologies Inc.
1985 Douglas Drive North, Golden Valley, MN 55422
http://honeywellhome.com/support
© 2020 Resideo Technologies, Inc. All rights reserved.
The Honeywell Home trademark is used under license from Honeywell International, Inc. This product is manufactured by Resideo Technologies, Inc. and its affiliates. Tous droits réservés. La marque de commerce Honeywell Home est utilisée avec l'autorisation d'Honeywell International, Inc.