WM2677HSM - Washing machine LG - Free user manual and instructions
Find the device manual for free WM2677HSM LG in PDF.

User questions about WM2677HSM LG
0 question about this device. Answer the ones you know or ask your own.
Ask a new question about this device
Download the instructions for your Washing machine in PDF format for free! Find your manual WM2677HSM - LG and take your electronic device back in hand. On this page are published all the documents necessary for the use of your device. WM2677HSM by LG.
USER MANUAL WM2677HSM LG
Please read this manual carefully. It provides instructions on safe installation, use, and maintenance.
Retain it for future reference.
Record the model and serial numbers of your machine.
Quote this information to your dealer if you require service.
Laveuse
GUIDE DU PROPRIÉTAIRE
The advanced Brushless DC motor directly drives the drum without belt and pulley.
■ Tilted Drum and Extra Large Door Opening
Tilted drum and extra large opening make it possible to load and unload clothing more easily.
■ Water Circulation
Spray detergent solution and water onto the load over and over.
Clothes are soaked more quickly and thoroughly during wash cycle.
The detergent suds can be removed more easily by the water shower during rinse cycle. The water circulation system uses both water and detergent more efficiently.
RollerJets
Washing ball enhances the wash performance and reduces damage to the clothing. The jets spray and help tumble clothes to enhance washing performance while maintaining fabric care.
■ Automatic Wash Load Detection
Automatically detects the load and optimizes the washing time.
■ Built-in Heater
Internal heater helps to maintain water temperature at its optimum level for selected cycles.
■ Child Lock
The Child lock prevents children from pressing any button to change the settings during operation.
■ Using the RLM (Remote Laundry Monitor)
The RLM monitors status of your washer and/or dryer. You can plug the display unit into any power outlet in your home.
The RLM Display Unit can be purchased separately for this washer.
CONTENTS
Important Safety Information ....3
Specifications....4
Installation Instructions ....5
Preparation Before Washing....10
Using the Dispenser ....11
Cycles 13
How to Use the Washer....14
Maintenance....17
Troubleshooting Guide ....20
Warranty 23
READ ALL INSTRUCTIONS BEFORE USE
WARNING!
For your safety, the information in this manual must be followed to minimize the risk of fire or explosion, electric shock, or to prevent property damage, personal injury, or loss of life.
IMPORTANT SAFETY INSTRUCTIONS
▲ WARNING: To reduce the risk of fire, electric shock, or injury to persons when using the washer, follow basic precautions, including the following:
- Read all instructions before using the washer.
- Do not wash articles that have been previously cleaned in, washed in, soaked in, or spotted with gasoline, dry cleaning solvents, or other flammable or explosive substances, as they give off vapors that could ignite or explode.
- Do not add gasoline, dry cleaning solvents, or other flammable or explosive substances to the wash water. These substances give off vapors that could ignite or explode.
- Under certain conditions, hydrogen gas may be produced in a hot water system that has not been used for 2 weeks or more. HYDROGEN GAS IS EXPLOSIVE. If the hot water system has not been used for such a period, before using the washing machine, turn on all hot water faucets and let the water flow from each for several minutes. This will release any accumulated hydrogen gas. As the gas is flammable, do not smoke or use an open flame during this time.
-
Do not allow children to play on or in the washer. Close supervision of children is necessary when the washer is used near children.
-
Before the washer is removed from service or discarded, remove the door to prevent children from hiding inside.
- Do not install or store the washer where it will be exposed to the weather.
- Do not tamper with controls.
- Do not repair or replace any part of the washer or attempt any servicing unless specifically recommended in the user-maintenance instructions or published user-repair instructions that you understand and have the skills to carry out.
• See Installation Instructions for grounding requirements. - ALWAYS follow the fabric care instructions supplied by the garment manufacturer.
- Do not place items exposed to cooking oil in your washer. Items contaminated with cooking oils may contribute to a chemical reaction that could cause a load to catch fire.
- Do not use fabric softeners or products to eliminate static unless recommended by the manufacturer of the fabric softener or product.
SAVE THESE INSTRUCTIONS
GROUNDING INSTRUCTIONS
This appliance must be grounded. In the event of malfunction or breakdown, grounding will reduce the risk of electric shock by providing a path of least resistance for electric current. This appliance is equipped with a cord having an equipment-grounding conductor and grounding plug. The plug must be plugged into an appropriate outlet that is properly installed and grounded in accordance with all local codes and ordinances.
- Do not use an adapter or extension cord.
- Do not remove ground prong.
- If you don't have the proper outlet, consult an electrician.
▲ WARNING: Improper connection of the equipment-grounding conductor can result in risk of electric shock. Check with a qualified electrician or serviceman if you are in doubt as to whether the appliance is properly grounded. Do not modify the plug provided with the appliance - if it does not fit the outlet, have a proper outlet installed by a qualified electrician.
text_image
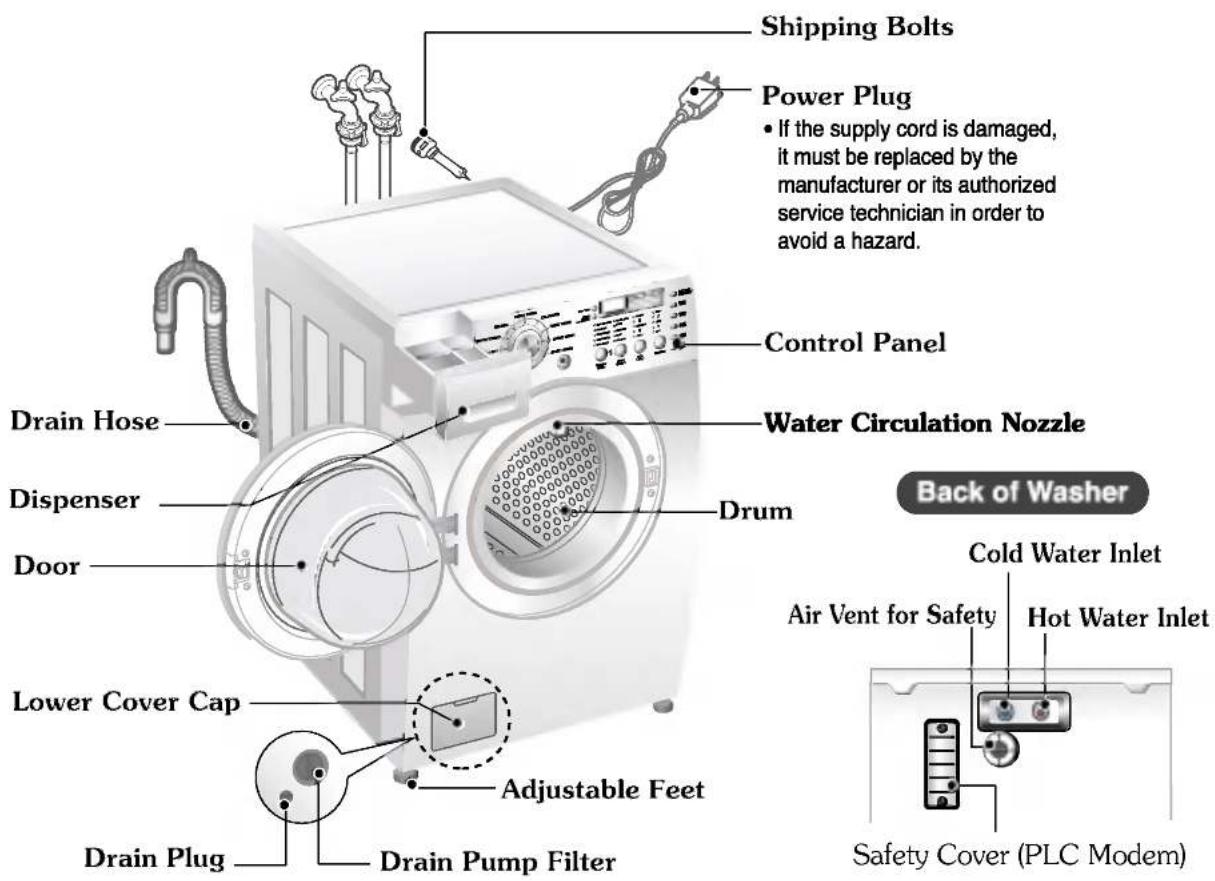
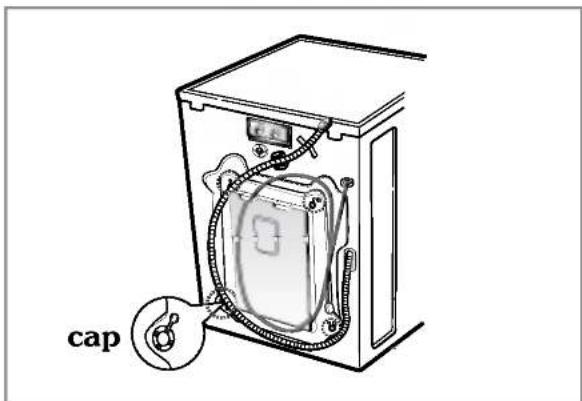
Shipping Bolts Power Plug • If the supply cord is damaged, it must be replaced by the manufacturer or its authorized service technician in order to avoid a hazard. Control Panel Drain Hose Water Circulation Nozzle Drum Back of Washer Cold Water Inlet Air Vent for Safety Hot Water Inlet Lower Cover Cap Adjustable Feet Drain Plug Drain Pump Filter Safety Cover (PLC Modem)■ Name: Front-loading Washing Machine
■ Power supply: 120V\~60Hz
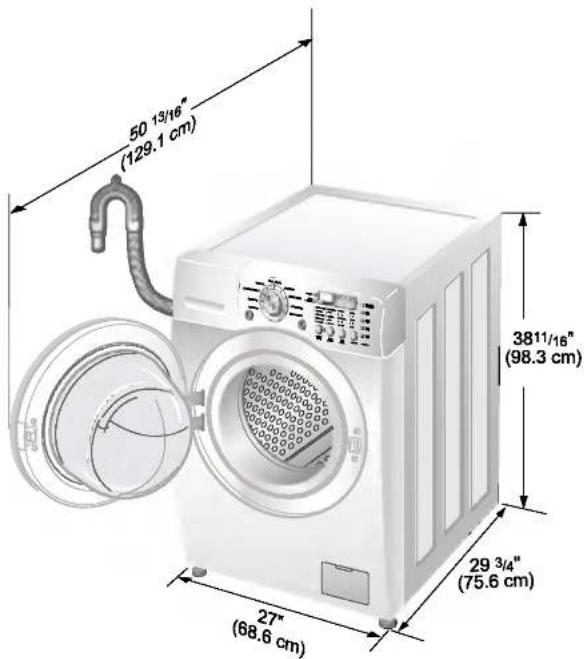
■ Size: 68.6 cm (W) X 75.6 cm (D) X 98.3 cm (H), 129.1 cm (D with door open)
27"(W) X 29 ^3 / 4 "(D) X 38 ^11 / 16 "(H), 50 ^13 / _16 "(D with door open)
■ Weight: 190 lbs. (86 kg)
■ Wash capacity: 3.32 cu. ft. (IEC: 3.83 cu. ft.) ^1)
■ Spin speed: 1320 rpm max.
■ Permissible water pressure: 4.5 \~ 145 PSI (30 \~ 1000 kPa)
* Specifications subject to change by manufacturer.
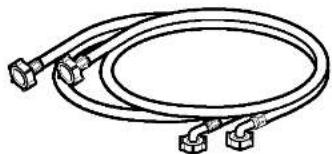
■ Accessories
natural_image
Pure diagram of a coiled cable or hose with connectors, no text or symbols presentHot/Cold (1 each) Hose
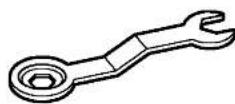
Wrench

Tie strap
to secure drain hose to standpipe, inlet hose, or laundry tub
1) Per IEC 60456, washes the equivalent of a 3.83 cu. ft. agitator washer.
INSTALLATION INSTRUCTIONS
Install or store unit where it will not be exposed to temperatures below freezing or exposed to outside weather conditions.
Properly ground washer to conform with all governing codes and ordinances.
To reduce the risk of electric shock, do not install the washer in humid spaces.
The base opening must not be obstructed by carpeting when the washing machine is installed on a carpeted floor.
In countries where there are areas which may be subject to infestation by cockroaches or other vermin, pay particular attention to keeping the appliance and its surroundings in clean condition at all times.
Damage caused by cockroaches or other vermin will not be covered by the appliance warranty.
■ Shipping bolts
The appliance is fitted with shipping bolts to prevent internal damage during transport.
■ Removing shipping bolts
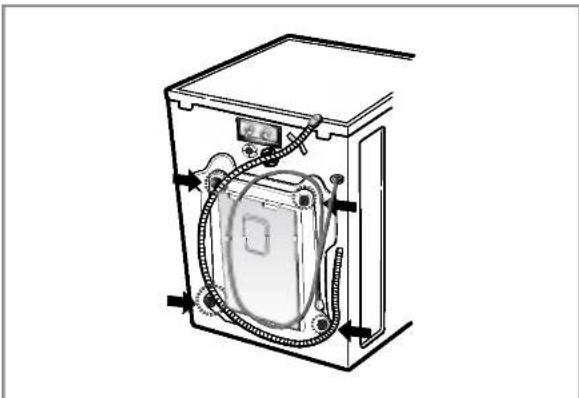
natural_image
Technical line drawing of a mechanical device with hoses and control panel (no text or symbols)- To prevent internal damage during transport, 4 locking bolts are installed. Before operating the washer, remove the bolts and braces.
- If they are not removed, it may cause severe vibration, noise, and malfunction.
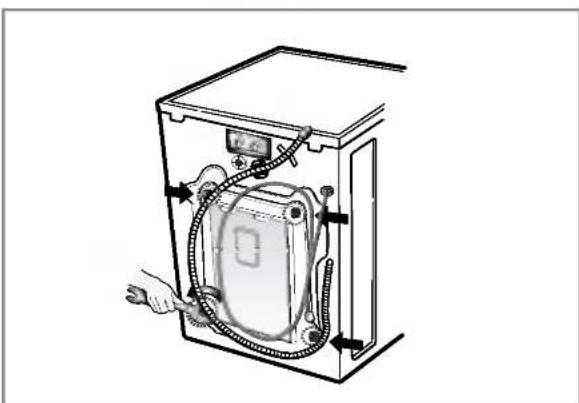
natural_image
Line drawing of a device inside a box with cables and a hand pointing to it (no text or symbols)- Unscrew the 4 bolts with the wrench supplied.
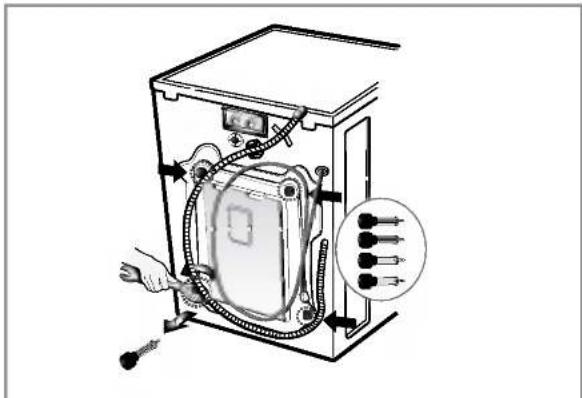
text_image
Diagram of an electrical enclosure with labeled components and wiring, showing a hand operating the unit.- Take out the 4 bolts and braces by twisting the braces slightly. Keep the 4 bolts, braces and the wrench for future use.
- Whenever the appliance is transported, the shipping bolts and braces must be replaced.
text_image
cap- Close the holes with the caps supplied.
INSTALLATION INSTRUCTIONS
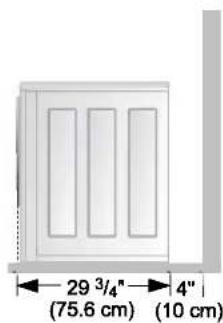
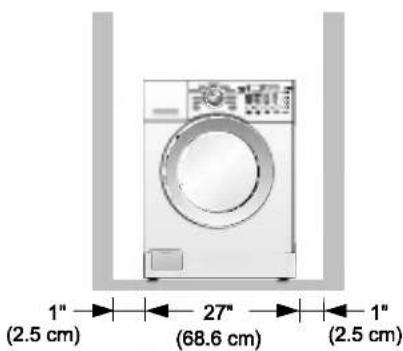
■ Installation clearances
The location must be large enough to fully open the washer door.
■ Washer dimensions
text_image
50 13/16" (129.1 cm) 3811/16" (98.3 cm) 29 3/4" (75.6 cm) 27" (68.6 cm)- Most installations require a minimum 4 in. (10 cm) clearance behind the washer.
■ Minimum installation spacing for recessed area installation.
The following dimensions shown are for the minimum spacing allowed.
Additional spacing should be considered for installation and servicing.
• Additional clearances might be required for wall, door and floor moldings.
• Additional spacing of 1 in. (2.5 cm) on all sides of the washer is recommended to reduce noise transfer.
Companion appliance spacing should also be considered.
text_image
29 3/4" → 4" (75.6 cm) (10 cm)[Side view]
text_image
1" (2.5 cm) 27" (68.6 cm) 1" (2.5 cm)[Front view]
■ Level floor
- Allowable slope under entire washer is 1^ .
- To minimize noise and vibration, the washer MUST be installed on a solidly constructed floor.
- Carpeting and soft tile surfaces are not recommended.
- Never install the washer on a platform or weakly supported structure.
NOTE: A firm, solid floor is even more critical to a front-loading washer than to a top-loader. If your floor is wood and/or frame construction, you may need to reinforce it. Front-loaders use substantially faster spin speeds than top-loaders, causing greater vibration. If the floor is not solid, your washer will vibrate. You will hear and feel the vibration throughout your house.
■ Power outlet
- Must be within 60 in. (1.5 m) of either side of the washer. Do not overload the outlet with more than one appliance.
- Time-delay fuse or circuit breaker is recommended.
NOTE: It is the personal responsibility and obligation of the customer to have a proper outlet installed by a qualified electrician.
INSTALLATION INSTRUCTIONS
■ Electrical connection
- Do not use an extension cord or double adapter.
- If the supply cord is damaged, it must be replaced by a qualified person in order to avoid a hazard.
- If the machine will not be used for an extended time, unplug it and shut off the water supply.
- Connect the machine to a grounded outlet in accordance with current wiring regulations.
- The appliance must be positioned so that the plug is easily accessible.

CAUTION! Concerning the Power Cord
Most appliances recommend they be placed upon a dedicated circuit; that is, a single outlet circuit which powers only that appliance and has no additional outlets or branch circuits. Check the specification page of this owner's manual to be certain.
Do not overload wall outlets. Overloaded wall outlets, loose or damaged wall outlets, extension cords, frayed power cords, or damaged or cracked wire insulation are dangerous. Any of these conditions could result in electric shock or fire. Periodically examine the cord of your appliance, and if its appearance indicates damage or deterioration, unplug it, discontinue use of the appliance, and have the cord replaced with an exact replacement part by an authorized servicer.
Protect the power cord from physical or mechanical abuse, such as being twisted, kinked, pinched, closed in a door, or walked upon. Pay particular attention to plugs, wall outlets, and the point where the cord exits the appliance.
■ Connecting water supply hose

text_image
Hot water tap Cold water tap Cold Hot• Water supply pressure must be between 4.5 and 145 PSI (30\~1000 kPa).
- Do not crossthread when connecting inlet hose to the valve.
- If the water supply pressure is more than 145 PSI, a pressure reducing device should be installed.
- Two Sealing washers are supplied with the water inlet hoses to prevent water leaks.
- Check for leakage of washing machine connections by turning the tap completely on.
- Periodically check the condition of the hose and replace the hose if necessary.
• Make sure that there is no kink in the hose and that it is not crushed.
- Be sure that the two water input ports are connected to the correct water faucets. The connector for hot water is colored red.
NOTE: Washing Machine is to be connected to the water mains using new hoses. Old hoses should not be used.
Repairs to the washing machine must only be carried out by qualified personnel. Repairs carried out by inexperienced persons may cause injury or serious malfunctioning. Contact your local service center.
Do not install your washing machine in a room where temperatures below freezing may occur. Frozen hoses may burst under pressure. The reliability of the electronic control unit may be impaired at temperatures below the freezing point.
If the appliance is delivered in the winter months and temperatures are below freezing, store the washing machine at room temperature for a few hours before putting it into operation.
INSTALLATION INSTRUCTIONS
■ Installation of drain hose
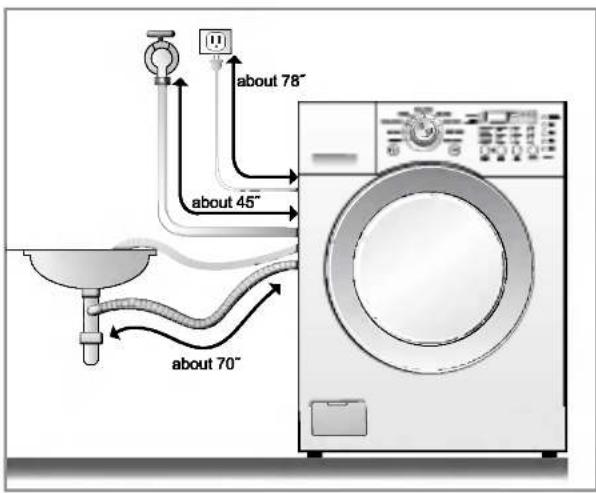
text_image
about 78" about 45" about 70"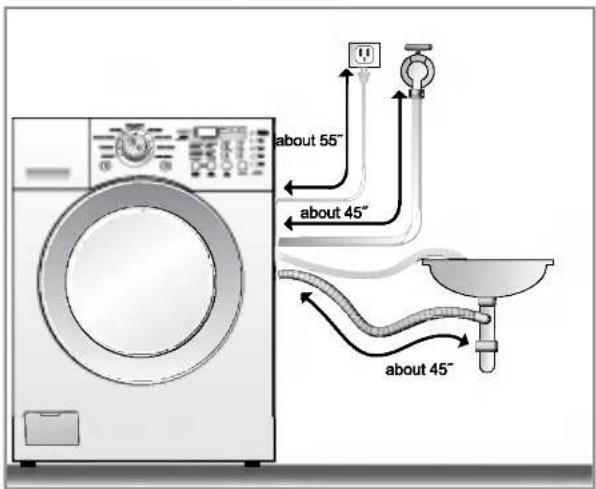
text_image
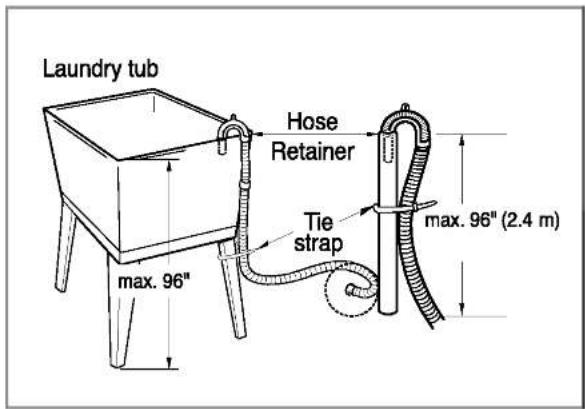
about 55" about 45" about 45"- The drain hose should not be placed higher than 96 in. from the bottom of the washer.
- Properly securing the drain hose will protect the floor from damage due to water leakage.
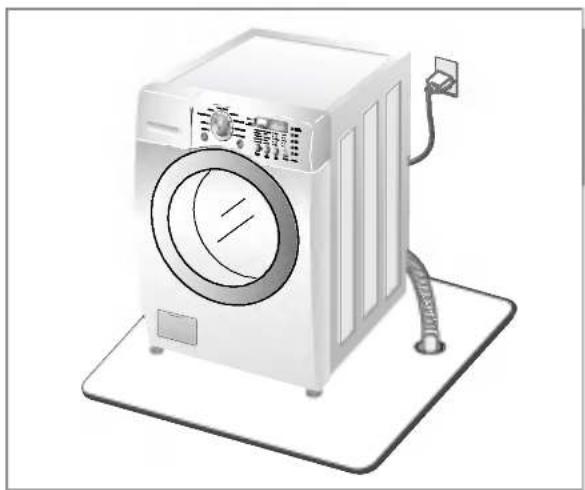
natural_image
Illustration of a white front-loading washing machine with a stand and power outlet (no text or symbols)- Place the end of the drain hose in the hole of the floor drain system.
text_image
Laundry tub Hose Retainer Tie strap max. 96" max. 96" (2.4 m)- When installing the drain hose at a sink, secure it so it cannot break away and cause flooding and damage.
• Properly securing the drain hose will protect the floor from damage due to water leakage.
This equipment is not designed for maritime use or for mobile installations such as in RV's, aircraft, etc.
Turn off the faucet if the machine is to be left for an extended period of time (e.g. holiday).
When disposing of the appliance, cut off the power cable, and destroy the plug.
Disable the door lock to prevent young children being trapped inside.
Packaging material (e.g. Films, Styrofoam) can be dangerous for children. There is a risk of suffocation! Keep all packaging from children.
INSTALLATION INSTRUCTIONS
■ Level adjustment
natural_image
Illustration of a white front-loading washing machine with control panel and side panel (no text or symbols)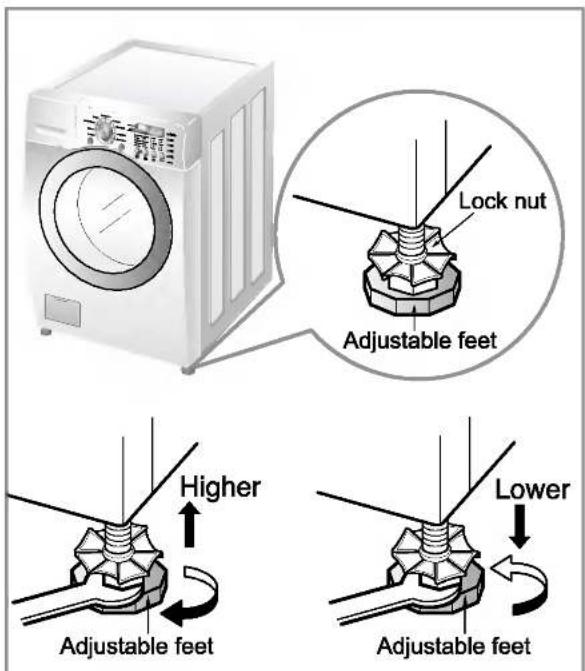
text_image
Lock nut Adjustable feet Higher Lower Adjustable feet Adjustable feet
natural_image
Illustration of a white front-loading washing machine with control panel and side panels (no text or symbols)- Leveling the washing machine properly prevents excessive noise and vibration. Install the appliance on a solid and level floor surface, preferably in a corner of the room.
- If the floor is uneven, adjust the adjustable feet as required. (Do not insert pieces of wood, etc. under the feet.)
NOTE: Extend the feet no more than necessary to level the washer. The more the feet are extended, the more the washer will vibrate.
- Make sure that all four feet are stable and resting on the floor and then check that the appliance is perfectly level (Use a level).
• After the washer is level, tighten the lock nuts up against of the base of the washer. All lock nuts must be tightened. - It is critical to adjust the feet perfectly. This must be done while the washer is spinning with a load. Use the wrench (supplied) to adjust the feet until there is no vibration. Then tighten the lock nuts to prevent further adjustment.
NOTE: If there are vibration and noise during the spin cycle, re-check the leveling of the washer, adjust the feet as required, and tighten the lock nuts securely to prevent changes in adjustment. Run the washer with a test load to make certain your washer is properly leveled. Put approximately 6 pounds of laundry in the machine. Then, press POWER, RINSE+SPIN, and START/PAUSE, in that order. When the machine spins at high speed, verify that it is stable. If not, adjust the feet accordingly.
\* Diagonal Check
When pushing down the edges of the washing machine top plate diagonally, the machine should not move up and down at all. (Please, check both directions.) If the machine rocks when pushing the machine top plate diagonally, adjust the feet again.

WARNING
To reduce the risk of fire, electric shock, or injury to persons, read the IMPORTANT SAFETY INSTRUCTIONS before operating this appliance.
1. Fabric Care Labels
Look for a care label on your clothes. This will tell you about the fabric content of your garment and how it should be washed.
2. Sorting
To get the best results, sort clothes into loads that can be washed with the same wash cycle.
Different fabrics need to be washed in different ways.
Always sort dark colors from pale colors and whites. Wash separately as dye and lint transfer can occur causing discoloration of white clothing. If possible, do not wash heavily soiled items with lightly soiled ones.
Soil (Heavy, Normal, Light) Color (White, Lights, Darks) Lint (Lint Producers, Collectors)
Separate clothes according to amount of soil. Separate white fabrics from colored fabrics. Wash lint producers and lint collectors separately.
3. Check before loading
Combine large and small items in a load. Load large items first.
Large items should not be more than half the total wash load.
Do not wash single items. This may cause an out-of-balance load. Add one or two similar items.

natural_image
Illustration of a person's trousers with directional arrows indicating movement or direction (no text or symbols)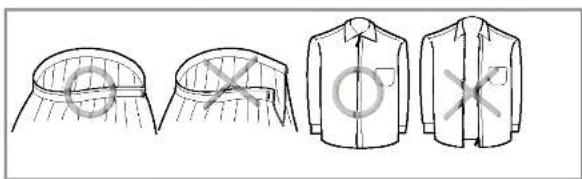
natural_image
Illustration of four different garment types: a hem, a skirt, a collared shirt, and a front view with X marks (no text or symbols)
natural_image
Line drawing of a hand pouring liquid from a bottle into a container (no text or symbols)- Check all the pockets to make sure that they are empty. Things such as clip, matches, pens, coins, and keys can damage both your washer and your clothes.
- Close zippers, hooks, and strings to make sure that these items do not snag on other clothes.
- Pretreat dirt and stains by brushing a little detergent dissolved in water onto stains like collars and cuffs to help lift dirt.
NOTE: Do not wash or spin water-proof clothes.
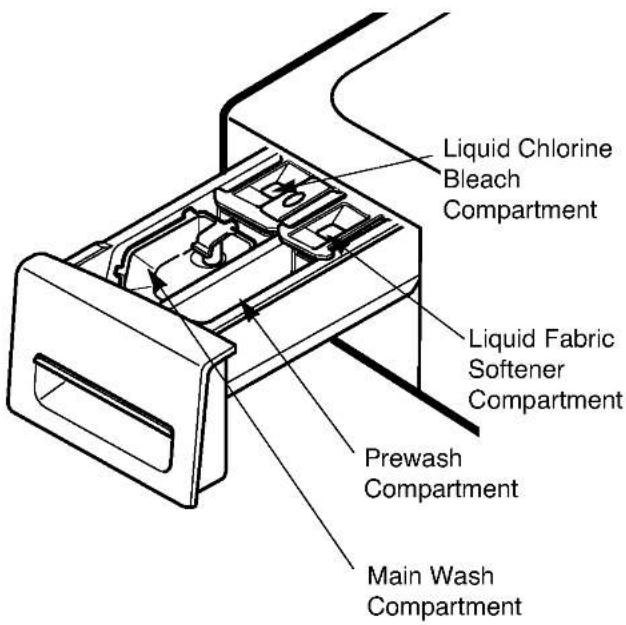
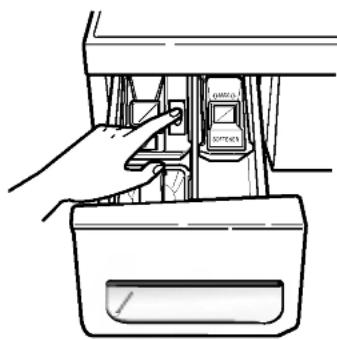
USING THE DISPENSER
The automatic dispenser consists of four compartments which hold 1) liquid chlorine bleach, 2) liquid fabric softener, 3) liquid or powdered detergent for prewash and 4) liquid or powdered detergent and color safe bleach for main wash.
All laundry products can be added at once in their respective dispenser compartments.
They will be dispensed at the appropriate time for most effective cleaning. After loading the laundry additives into the dispenser, close the dispenser drawer.
Add detergent, bleach and fabric softener to the automatic dispenser following these steps:
- Open the dispenser drawer.
- Load the laundry products into the appropriate compartments.
- Close the dispenser drawer.
■ About detergent
Low sudsing detergent is recommended for this washer. Use the manufacturer's recommended amount. If low sudsing detergent is not available, a reduced amount of regular detergent may be used.
Because reducing the amount of detergent may reduce cleaning, it is important to pretreat stains, sort carefully by color and soil level, and avoid overloading.
Detergent usage may need to be adjusted for water temperature, water hardness, size and soil level of the load. For best results, avoid using too much detergent.
text_image
Liquid Chlorine Bleach Compartment Liquid Fabric Softener Compartment Prewash Compartment Main Wash Compartment1. Prewash Detergent Compartment
- Add detergent to this compartment when using the Prewash option. Liquid or powdered detergent may be used in this compartment. The detergent will automatically be dispensed during Prewash if the Prewash option is selected.
- Add 1/2 the recommended amount of detergent to the Prewash compartment and the recommended amount of detergent to the main wash compartment.
NOTE : Liquid detergent will drain into the washer drum as it is added.
2. Main Wash Detergent Compartment
- Add measured detergent to this compartment for Main wash. Detergent is flushed from the dispenser at the beginning of the cycle. Either powdered or liquid detergent can be used.
- Liquid or powdered color-safe bleach may be added to the main wash compartment along with the same type of liquid or powdered detergent.
- When using liquid detergent, make sure the liquid detergent box and insert are in place. Do not exceed the maximum fill line.
- For powered detergent, remove both the liquid detergent box and insert.
- Powdered detergent will not dispense with the liquid detergent box and insert in place.
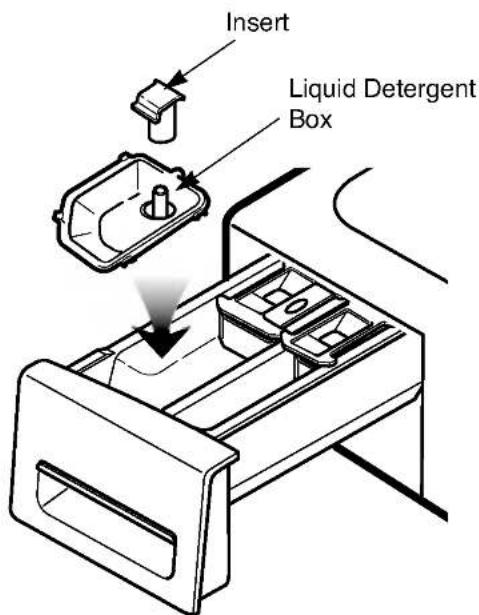
text_image
Insert Liquid Detergent Box3. Liquid Bleach Compartment
- Add measured liquid chlorine bleach to this compartment. The bleach will be automatically dispensed at the proper time during the wash cycle.
- Do not exceed the maximum fill line. Overfilling can cause early dispensing of the bleach which could result in damaged clothes.
- Do not pour undiluted liquid chlorine bleach directly onto the load or into the drum. Fabric damage can occur.
- Do not use powdered bleach in this compartment.
4. Fabric Softener Compartment
- Add recommended amount of fabric softener to this compartment.
- Dilute concentrated softeners with warm water to the fill line.
- Do not exceed the maximum fill line. Overfilling can cause early dispensing of the fabric softener which could result in stained clothes.
- Do not pour fabric softener directly on the wash load.
- The fabric softener will be automatically dispensed during the last rinse cycle.
NOTE: Do not place, store, or spill laundry products (soap, detergent, bleach, softener, etc.) on the top of your washer or dryer. These products can damage the finish or controls if left there too long.
■ Select cycles designed for different types of fabric and soil levels.
| Cycle | Fabric type | Wash/Rinse Temp. | Spin speed | Soil Level | Pre-Wash | Quick Cycle | Stain Cycle | Extra Rinse | Rinse+ Spin | Auto-Load Detection^1) |
| Sanitary | Heavily soiled underwear, work clothes, diapers, etc. | Extra Hot/Cold | High | Normal | O | O | O | O | O | |
| Extra High No spin Low Medium | Heavy Light | |||||||||
| Cotton/Towels | Cotton, linen, towels, shirts, sheets | Warm/Cold | High | Normal | O | O | O | O | O | O |
| Warm/Warm Hot/Cold Cold/Cold | Extra High No spin Low Medium | Heavy Light | ||||||||
| Normal | Mixed loads, work clothes, jeans, shirts | Warm/Cold | High | Normal | O | O | O | O | O | O |
| Warm/Warm Hot/Cold Cold/Cold | Extra High No spin Low Medium | Heavy Light | ||||||||
| Perm Press | Dress shirts/pants, wrinkle free clothing, poly/cotton blend clothing, table cloths | Warm/Cold | Medium | Normal | O | O | O | O | O | |
| Warm/Warm Hot/Cold Cold/Cold | High No spin Low | Heavy Light | ||||||||
| Delicates | Dress shirts/blouses, nylons, sheer or lacy garment | Cold/Cold | Medium | Normal | O | O | O | O | ||
| Warm/Cold Warm/Warm | No spin Low | Heavy Light | ||||||||
| Wool/Silk | Woolens, silk identified as machine washable | Cold/Cold | Low | Normal | O | O | O | |||
| Warm/Cold Warm/Warm | Medium No spin | Light | ||||||||
| Hand Wash | Items labeled "hand washable" | Cold/Cold | Low | Normal | O | O | O | |||
| Warm/Cold Warm/Warm | Medium No spin | Light | ||||||||
| Speed Wash | Lightly soiled clothing | Hot/Cold | Extra High | Light | O | O | ||||
| Cold/Cold Warm/Cold Warm/Warm | No spin Low Medium High | Normal Heavy | ||||||||
| Drain+ Spin | Drain/Spin only | High | O | |||||||
| Extra high No spin Low Medium |
1) Automatic wash load (weight) detection:
Automatically detects the load and optimizes the washing time. After detecting, the estimated time remaining in the cycle will be displayed.
HOW TO USE THE WASHER
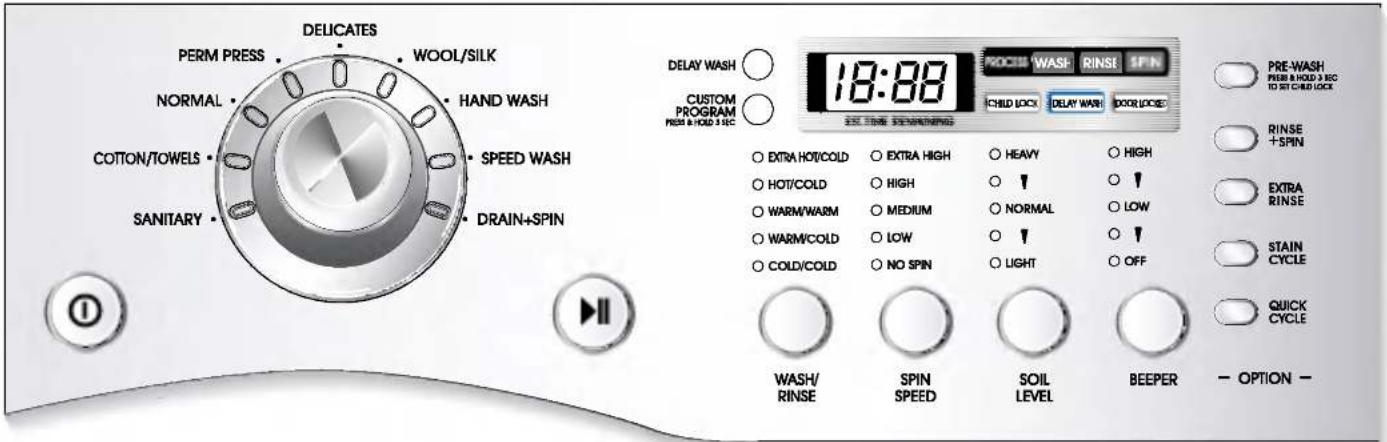
text_image
DELICATES PERM PRESS NORMAL COTTON/TOWELS SANITARY WOOL/SILK HAND WASH SPEED WASH DRAIN+SPIN 18:88 DELAY WASH CUSTOM PROGRAM PEN & YO2 3 EC PROC# WASH RINSE SPIN CHILD LOCK DELAY WASH DOOR LOCKED SEC ORDER PROCESERING PRE-WASH PRESS & HOLD 3 REC TO SET CHILD LOCK RINSE +SPIN EXTRA RINSE STAIN CYCLE QUICK CYCLE WASH/ RINSE SPIN SPEED SOIL LEVEL BEEPER - OPTION -1. Power

- Use this button to turn the Power On/Off.
2. Cycles
- Rotate the Cycle selector knob to select cycle designed for different types of fabric and soil levels.
• Each cycle has a preset Water Temperature, Spin Speed, Soil Level, and Option (See page 13). - The preset settings can be changed anytime before Start.
NOTE: This front load washer requires longer cycle time and gets clothes much cleaner, yet is more gentle on the fabrics, than top load washers. Washing time can be reduced significantly for small loads or lightly soiled loads by selecting Quick Cycle with the Option button and setting the Soil Level button at Light.
3. Start/Pause

- Use this button to start/stop the washer.
4. Delay Wash
- Allows the start of any cycle to be delayed for 1\~19 hours.
- Choose the wash cycle for your load, and then press the Delay Wash button once for one hour or press the button again to increase the delay wash time up to 19 hours in one hour increments.
HOW TO USE THE WASHER
5. Custom Program
-
Custom Program allows you to store a customized wash cycle for future use.
• To make a Custom Program: -
Select a cycle.
- Select Wash/Rinse Temperature, Spin Speed, and Soil Level.
- Select other desired Options.
- Press and hold Custom Program button 3 seconds (2 beep sounds). The Custom program is now stored for future use. To reuse the program, select Custom Program and press Start/Pause (H).
6. Wash/Rinse Temperature
- Select a water temperature based on the type of load you are washing.
- Follow the fabric care label and chart below for best results.
| Suggested Wash Temp. | Garment |
| Extra Hot | Kitchen towels, sheets, and baby garments |
| Hot | Whites and Heavy soiled color-fast items |
| Warm | Most loads |
| Cold | Brightly colored items, washable woolens |
- Warm rinses leave the loads dryer than cold rinses. Warm rinses increase wrinkling.
- In cold climates, a warm rinse makes the load more comfortable to handle.
• Cold rinses save energy. - The Cold rinse temperatures depend on the cold water at your faucet.
7. Spin speed
• To change the spin speed, press the Spin Speed button repeatedly to cycle through available options.
8. Soil Level
• To change the soil level, press the Soil Level button repeatedly until the desired setting is on.
9. Beeper
- Press repeatedly to adjust the volume of the Beeper.
HOW TO USE THE WASHER
OPTION
1. Prewash
- Use this option for loads that need pretreatment. Adds 16 minutes prewash and drain.
2. Rinse+Spin
- Use this option to rinse and then spin.
3. Extra Rinse
- This option provides an additional rinse and more water at rinse cycle.
- Use this option to ensure the removal of detergent or bleach residue from garments.
4. Stain cycle
- Adds time to the wash and rinse for better stain removal.
• Automatically provides a rinse.
5. Quick Cycle
• The Quick cycle offers a quick cycle time.
- Suggested uses include freshening newly purchased clothes, or clothing that has been packed away.
EST. TIME REMAINING
• This display shows:
a) the estimated time remaining in the cycle when operating,
b) the error code when an error has been detected.
STATUS INDICATOR
• These lights show which portion of the cycle the washer is operating.
CHILD LOCK
PRE-WASH PRESS & HOLD 3 SEC TO SET CHILD LOCK
- Use this option to prevent unwanted use of the washer. Press and hold PRE WASH button for 3 seconds to lock/unlock control.
- When Child lock is set, CHILD LOCK lights and all buttons are disabled except the Power button. You can lock the washer while it is operating.
DOOR LOCKED
- Lights whenever the door of the washer is locked.
- The door can be unlocked by pressing the Start/Pause button to stop the washer.
NOTE: If the water temperature or the level is too high, the door cannot be unlocked. Do not try to force the door open when DOOR LOCKED lights on.
MAINTENANCE
Before cleaning the washer interior, unplug the electrical power cord to avoid electrical shock hazards. When disposing of the appliance, cut off the power cable, destroy the plug, and disable the door lock to prevent young children from being trapped inside.
■ The water inlet filter
• " iE " error message will blink on the control panel when water does not enter the dispenser.
- If your water is very hard or contains traces of lime deposit, the water inlet filter may become clogged. We recommend cleaning it every few months.
natural_image
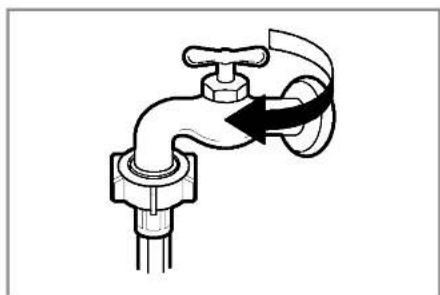
Diagram of a faucet with a valve and curved pipe, showing fluid flow direction (no text or symbols)- Turn off the water tap.

natural_image
Hand holding a mechanical component with an arrow indicating direction (no text or symbols)- Unscrew the water inlet hose.
natural_image
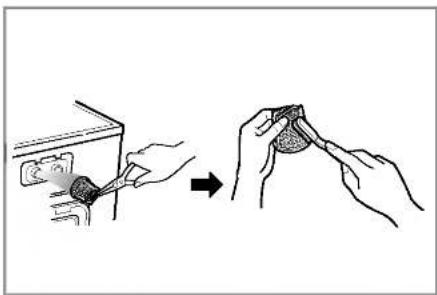
Illustration showing a hand using a tool to remove a small object from a box, then adding a sample into a container (no text or symbols present)- Clean the filter using a hard bristle brush.
natural_image
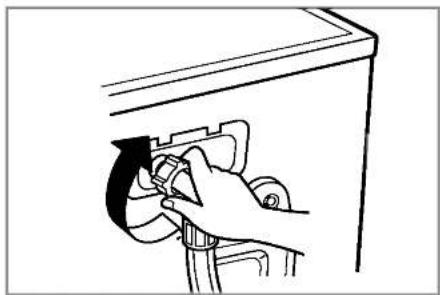
Line drawing of a hand inserting a component into a device (no text or symbols)- Tighten the inlet hose.
■ The drain pump filter
- The drain filter collects threads and small objects left in the laundry.
Check regularly that the filter is clean to ensure smooth running of your machine.

CAUTION
Drain, using the drain hose, before opening the pump filter to remove objects. Be careful when draining if the water is hot.
- Allow the water to cool down before cleaning the drain pump filter.
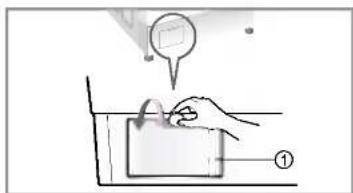
-
Open the lower cover cap ① with a tool such as coin. Turn the drain plug ② to pull out the hose.
-
Unplug the drain plug ②, allowing the water to flow out. At this time use a vessel to prevent water from flowing onto the floor. When water does not flow any more, turn the pump filter ③ open to the left.
-
Remove any foreign objects from the pump filter ③. After cleaning, turn the pump filter ③ clockwise and insert the drain plug ② to the original place. Close the lower cover cap①.
text_image
Diagram showing a hand pressing a button on a device with a speech bubble above, labeled with number ①.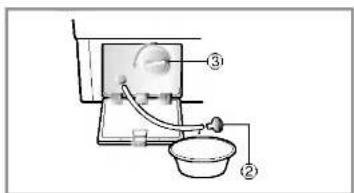
text_image
Diagram of a toilet with labeled components including a bucket and water tap, marked with numbers ② and ③.
natural_image
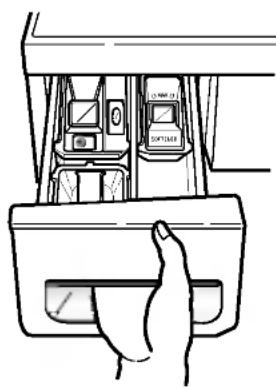
Simple line drawing of a mechanical device with a handle and base, no text or symbols present■ Cleaning the Dispenser
- The dispenser may need to be cleaned periodically due to laundry additive build-up.
1 Pull the dispenser drawer out until it stops.
natural_image
Line drawing of a hand inserting a device into a container with a 'SOTTERE' label (no text or symbols on the device itself)2 Press down the lock tab on the bleach insert. Remove the drawer.
natural_image
Hand pressing a button on a device panel (no text or symbols visible)3 Remove the liquid detergent box, softener and bleach inserts from their compartments.

natural_image
Technical line drawing of a device with internal components and exploded view (no text or symbols)- Run warm water and use a soft brush or cloth on the drawer, liquid detergent box and inserts to remove any excess laundry additives.
- Clean the drawer opening using water and a small brush.
- Follow the illustrations in reverse order to replace the parts to their proper location.
NOTE: Do not use any cleaning substance on the drawer opening other than water because it will drain into the tub. If this should happen, set the washer for a rinse and spin cycle to remove any cleaning substance from the washer before doing a load of laundry.
■ The washing drum
- If you live in a hard water area, lime scale can continuously build up in places where it cannot be seen and it is not easily removed from the drum.
Over time the build-up of scale clogs appliances, and if it is not kept in check, these will eventually have to be replaced. - Although the washing drum is made of Stainless steel, specks of rust can be caused by small metal articles (paper clips, safety pins, etc.) which have been left in the drum.
- The washing drum should be cleaned from time to time.
- If you use descaling agents, dyes, or bleaches, make sure they are suitable for washing machine use.
- Descaler could contain components that can damage part of your washing machine.
- Remove the spots with a stainless steel cleaning agent.
- Never use steel wool.
MAINTENANCE
■ The water circulation nozzle
- Clean the water circulation nozzle, if clogged.
■ Cleaning your washer
1. Exterior
Proper care of your washer can extend its life.
The outside of the machine can be cleaned with warm water and a neutral, non-abrasive household detergent.
Immediately wipe off any spills with a damp cloth.
Try not to damage the surface with sharp objects.
* IMPORTANT: Do not use methylated spirit, solvents or similar products.
2. Interior
Dry around the washer door opening, flexible gasket and door glass. These areas should always be clean to ensure a water-tight seal.
Run washer through a complete cycle using hot water.
Repeat process if necessary.
NOTE: Remove hard water deposits using only cleaners labeled as safe for washing machines.
■ Winterizing instructions
If the washer is stored in an area where freezing can occur or moved in freezing temperatures, follow these winterizing instructions to prevent damage to the washer:
- Turn off water supply tap.
- Disconnect hoses from water supply and drain water from hoses.
- Plug electrical cord into a properly grounded electrical outlet.
- Add 1 gallon (3.8ℓ) nontoxic recreational vehicle (RV) antifreeze to empty wash drum. Close door.
- Set spin cycle and let washer spin for 1 minute to drain out all the water.
Not all of the RV antifreeze will be expelled. - Unplug electrical power cord, dry drum interior, and close door.
- Remove the two-compartment container from the Dispenser. Drain any water in compartments and dry the compartments.
- Store washer in an upright position.
- To remove antifreeze from washer after storage, run empty washer through a complete cycle using detergent. Do not add laundry.
TROUBLESHOOTING GUIDE
* This washing machine is equipped with automatic safety functions which detect and diagnose problems at an early stage and react appropriately. When the machine does not function properly or does not function at all, check the following points before you call the Service Department.
| Problem | Possible Cause | Solution |
| Rattling and clanking noise | ·Foreign objects such as coins or safety pins may be in drum or pump. | Stop washer and check drum and drain filter. If noise continues after washer is restarted, call for service. |
| Thumping sound | ·Heavy wash loads may produce a thumping sound. This is normal. | If sound continues, washer is probably out of balance. Stop and redistribute wash load. |
| Vibrating noise | ·Have all the transit bolts and packing been removed? ·Wash load may be unevenly distributed in the drum. ·Are all the feet resting firmly on the ground? | See Installation Instructions for removing shipping bolts. Stop washer and rearrange wash load. Adjust the leveling feet. Make sure all four feet are in firm contact with the floor, while the washer is in the spin cycle with a load. |
| Water leaks | ·Fill hose connection is loose at tap or washer. ·House drain pipes are clogged. | Check and tighten hose connections. Unclog drain pipe. Contact plumber if necessary. |
| Excessive suds | ·Too much detergent or unsuitable detergent. | Reduce detergent amount or use low sudsing detergent. |
| Water does not enter washer or it enters slowly | ·Water supply is not adequate in area. ·Water supply tap is not completely open. ·Water inlet hose is bent. ·The filter of the inlet hose clogged. | Check another tap in the house. Fully open tap. Straighten hose. Check the filter of the inlet hose. |
| Water in the washer does not drain or drains slowly | ·Drain hose is bent or clogged. ·The drain filter is clogged. | Clean and straighten the drain hose. Clean the drain filter. |
TROUBLESHOOTING GUIDE
| Problem | Possible Cause | Solution |
| Washer does not start | Electrical power cord may not be plugged in or connection may be loose.House fuse is blown, circuit breaker tripped, or a power outage has occurred.Water supply tap is not turned on. | Make sure plug fits tightly in wall outlet.Reset circuit breaker or replace fuse.Do not increase fuse capacity.If problem is a circuit overload, have it corrected by a qualified electrician.Turn on water supply tap. |
| Washer won't spin | Check that the door is firmly shut. | Close the door and press the Start/Pause button. After pressing the Start/Pause button, it may take a few moments before the clothes washer begins to spin. The door must lock before spin can be achieved. |
| Wash cycle time delayed | The washing time may vary by the amount of laundry, water pressure, water temperature, and other using conditions. | If the imbalance is detected or if the suds removing program operates, the wash time shall be increased. |
| RLM problem | See the Owner's Manual of RLM & PLC modem. | |
| IE | ·Water supply is not adequate in area.·Water supply taps are not completely open.·Water inlet hose is bent.·The filter of the inlet hose clogged. | Check another tap in the house.Fully open tap.Straighten hose.Check the filter of the inlet hose. |
| OE | ·Drain hose is bent or clogged.·The drain filter is clogged. | Clean and straighten the drain hose.Clean the drain filter. |
| UE | ·Load is too small.·Load is out of balance.·The appliance has an imbalance detection and correction system. If individual heavy articles are loaded (bath mat, bath robe, etc.) and the imbalance is too great, after several attempts to restart the spin cycle the machine will stop and the error code will be displayed. | Add 1 or 2 similar items to help balance the load.Rearrange load to allow proper spinning. |
| dE | ·Is the door opened or not completely closed? | Close the door completely.* If dE is not released, call for service. |
| tE | Unplug the power plug and call for service. | |
| FE | ·The water overfills due to the faulty water valve. | Close the water tap.Unplug the power plug.Call for service. |
| PE | ·The water level sensor malfunction. | |
| CE | ·Overload in motor. | |
| LE | ·Overload in motor. | |
| PF | ·The washer experienced a power failure. | Restart the cycle. |
Visit our web site: www.LG.ca
LG Electronics Canada, Inc.
LIMITED WARRANTY
Should your product prove to be defective in materials or workmanship under normal use during the warranty period listed below, which warranty period runs from the original date of purchase, LG Electronics will, at its option, repair or replace the product at no charge to you.
The warranty is valid only to the original purchaser of the product, during the warranty period, as long as it is in Canada.
LG Washing Machine / Dryer Warranty Period
| Components | Parts | Labor |
| All Parts | 2 Years | 2 Years (In-Home Service) |
| Motor, Controller | 3 Years | 2 Years (In-Home Service) |
| Drum Tub | 5 Years | 2 Years (In-Home Service) |
No other warranty is applicable to this product. THE DURATION OF ANY IMPLIED WARRANTIES, INCLUDING THE IMPLIED WARRANTY OF MERCHANTABILITY, IS LIMITED TO THE DURATION OF THE EXPRESS WARRANTY HEREIN. LG ELECTRONICS SHALL NOT BE LIABLE FOR THE LOSS OF USE OF THE PRODUCT, INCONVENIENCE, LOSS OR ANY OTHER DAMAGES, DIRECT OR CONSEQUENTIAL, ARISING OUT OF THE USE OF OR INABILITY TO USE, THIS PRODUCT OR FOR ANY BREACH OF ANY EXPRESS OR IMPLIED WARRANTY, INCLUDING THE IMPLIED WARRANTY OF MERCHANTABILITY OR FITNESS FOR A PARTICULAR PURPOSE, APPLICABLE TO THIS PRODUCT.
Some Provinces or Territories do not allow for the exclusion or limitation of incidental or consequential damages of limitations on how long an implied warranty lasts; so these limitations or exclusions may not apply to you. This warranty gives you, (the original purchaser) specific legal rights and you may also have other rights, which vary from province to province or territory to territory.
THE ABOVE WARRANTY DOES NOT APPLY TO:
- Service trips to your home to deliver and pickup, install, instruct or replace house fuses, or connect house wiring or plumbing, or correction of unauthorized repairs.
- Damage to the product caused by accident, pest, fire, floods or acts of God.
- Repairs when your LG product is used in other that normal, single-family household use or contrary to the instructions outlined in the product's owners manual.
- Damage resulting from accident, alteration, misuse, abuse, or improper installation or maintenance.
- Products with altered or removed serial numbers
If the product is installed outside the normal service area, any cost of transportation involved in the repair of the product, or the replacement of a defective part, shall be borne by you (the owner).
CUSTOMER ASSISTANCE INFORMATION:
| To obtain Warranty Coverage: | Retain your Bill of Sale to prove the date of purchase.A copy of your Sales Receipt must be submitted when warranty service is provided.This warranty is invalid if the factory applied serial number has been altered or removed from the product. |
| To obtain Product or Customer Service Assistance: | Call 1-888-LG-CANADA (542 2623)Press the appropriate menu option, and have your product model and serial numbers and your postal code ready. |
| To obtain the nearest Authorized Service Center: | Access our web-site at: www.LG.ca (Service Option) or Call 1-888-LG-CANADA (542 2623)Press the appropriate menu option, have your product model & serial numbers & your postal code ready. |
CARACTÉRISTIQUES DU PRODUIT

natural_image
Pure diagram of a coiled cable or hose with connectors, no text or symbols presentnatural_image
Technical line drawing of a device enclosure with internal tubing and control panel (no text or symbols)natural_image
Diagram of a device inside a container with tubing and a hand pointing to it, no text or symbols present.natural_image
Diagram of a device with tubing and a magnified inset showing cable connectors (no text or symbols)text_image
29 3/4" → 4" (75,6 cm) (10 cm)[Vue latérale]

text_image
1" (2,5 cm) 27" (68,6 cm) 1" (2,5 cm)[Vue avant]
natural_image
Illustration of a white front-loading washing machine on a base, with a power cord and attached electrical outlet (no text or symbols)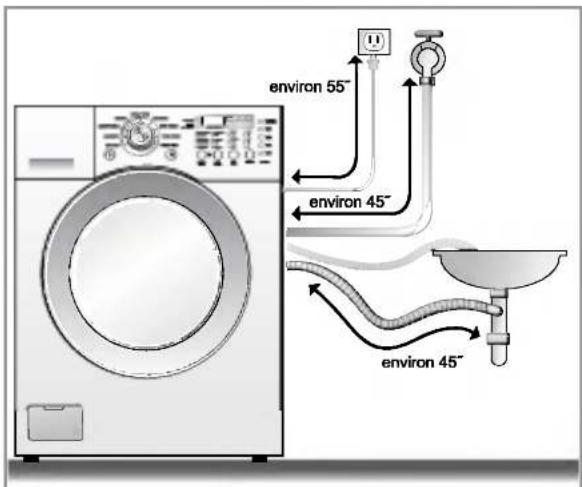
natural_image
Illustration of a white three-wheeled washing machine with control panel and side door (no text or symbols)
natural_image
Illustration of a white washing machine with black arrows pointing downward (no text or symbols on the device itself)natural_image
Illustration of a person's trousers with directional arrows indicating movement or direction (no text or symbols)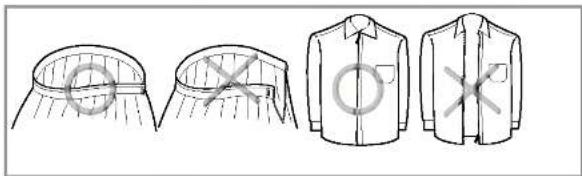
natural_image
Illustration of four different garment types: a pleated skirt, a rolled shirt, a collared shirt, and a jacket with crossed-out buttons (no text or symbols)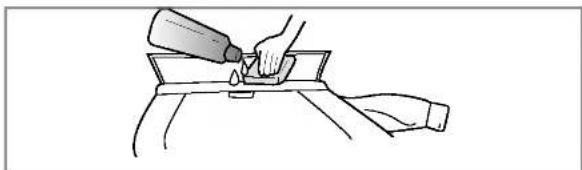
natural_image
Line drawing of a hand pouring liquid from a bottle into a container (no text or symbols)1. Power Ⓞ (Alimentation)
4. Stain Cycle (Cycle tache)
5. Quick Cycle (Cycle rapide)
natural_image
Diagram of a faucet with a valve and arrow indicating clockwise motion (no text or symbols)natural_image
Illustration of a hand using a tool to adjust or install a component, no text or symbols presentnatural_image
Illustration showing a hand using a tool to remove a small object from a container, then adding a sample (no text or symbols present)natural_image
Line drawing of a hand inserting a component into a cabinet (no text or symbols)text_image
Diagram showing a hand pressing a button on a device with a speech bubble above, labeled with number ①text_image
Diagram of a toilet or shower system with labeled components including a bucket and water outletnatural_image
Simple line drawing of a mechanical device with a handle and base, no text or symbols presentnatural_image
Line drawing of a hand pressing down on a car interior panel (no text or symbols)natural_image
Line drawing of a hand inserting a device into a container with a switch (no text or symbols)natural_image
Technical line drawing of a device with exploded view showing internal components (no text or symbols)LG Electronics Canada, Inc.