
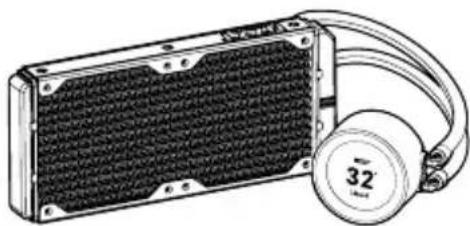
Kraken Elite 240 - Computer cooling system NZXT - Free user manual and instructions
Find the device manual for free Kraken Elite 240 NZXT in PDF.

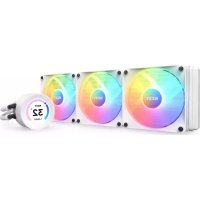
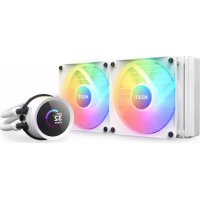
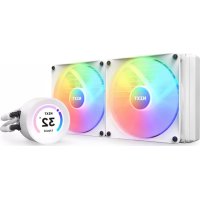
| Product type | All-in-one liquid cooling system for CPU |
| Brand | NZXT |
| Model | Kraken Elite 240 |
| Radiator dimensions | 277 x 123 x 27 mm (approx.) |
| Included fans | 2 NZXT RGB fans, 120 mm |
| Radiator material | Aluminum |
| Pump material | Copper (base) and plastic (body) |
| Pump speed | 800 – 2800 RPM (PWM) |
| Fan speed | 500 – 1800 RPM (PWM) |
| Max airflow | ~73 CFM (per fan) |
| Max noise level | ~36 dBA (fans) |
| Static pressure | ~2.6 mmH₂O (per fan) |
| Lighting | Rotatable LCD screen on pump and RGB lighting on fans |
| Connectivity | USB 2.0 (internal), SATA (power), PWM (pump and fans) |
| Socket compatibility | Intel LGA 115X, 1200, 1700; AMD AM4, AM5, TR4 (support included for TR4) |
| Control software | NZXT CAM (monitoring, control, screen customization) |
| Power supply | 12 V via SATA connector for pump; fans via motherboard |
| Maintenance and cleaning | Clean the radiator and fans with a soft, dry cloth. Do not use aggressive liquids. |
| Safety | Compliant with CE directives (EMC, RoHS, LVD). Do not expose to extreme temperatures. |
| Spare parts and repairability | Fans and cables replaceable. Contact NZXT support for parts. |
| General information | Warranty: check NZXT website. Support: service@nzxt.com |
Frequently Asked Questions - Kraken Elite 240 NZXT
User questions about Kraken Elite 240 NZXT
0 question about this device. Answer the ones you know or ask your own.
Ask a new question about this device
Download the instructions for your Computer cooling system in PDF format for free! Find your manual Kraken Elite 240 - NZXT and take your electronic device back in hand. On this page are published all the documents necessary for the use of your device. Kraken Elite 240 by NZXT.
USER MANUAL Kraken Elite 240 NZXT
natural_image
Technical line drawing of a two-sided cooling fan assembly with a labeled '32" liquid model (no text or symbols on the fan itself)KRAKEN ELITE RGB
NZXT CAM
240MM / 280MM / 360MM LIQUID COOLER WITH LCD DISPLAY AND F RGB CORE FANS
TABLE OF CONTENTS
VERSION 3.0, 2023/05/23
COMPONENT LIST 01
HARDWARE INTRODUCTION 04
INSTALLING THE PUMP INTEL LGA 1700&1200/115X 06
INSTALLING THE PUMP AMD SOCKET AM5, AM4, STRX4 & TR4.. 10
MOUNTING THE RADIATOR & FANS.... 16
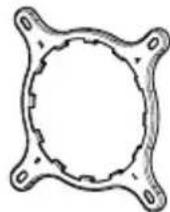
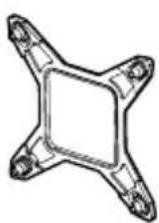
B Intel Retention Bracket (Pre-installed)
×1
C AMD Retention Bracket
×1
D Intel Backplate
×1
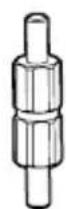
E Intel Socket 1200/115X Standoff
×4
F Intel Socket 1700 Standoff
×4
G AMD Standoff
×4
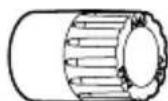
H Dual-Sided AMD Sleeve
×4
natural_image
Illustration of a portable electronic device with a black mesh panel and a beige hard hat (no text or symbols)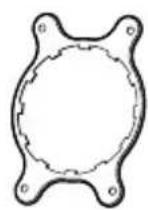
AM4 AM5
30mm UNC 6-32 Fan Screw 240 - x8, 280 - x8, 360 - x12
J 5mm UNC 6-32 Screw
240 - x8, 280 - x8, 360 - x12
K Washer
240 - x16, 280 - x16, 360 - x24
L Thumbscrew
×4
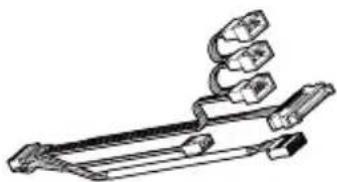
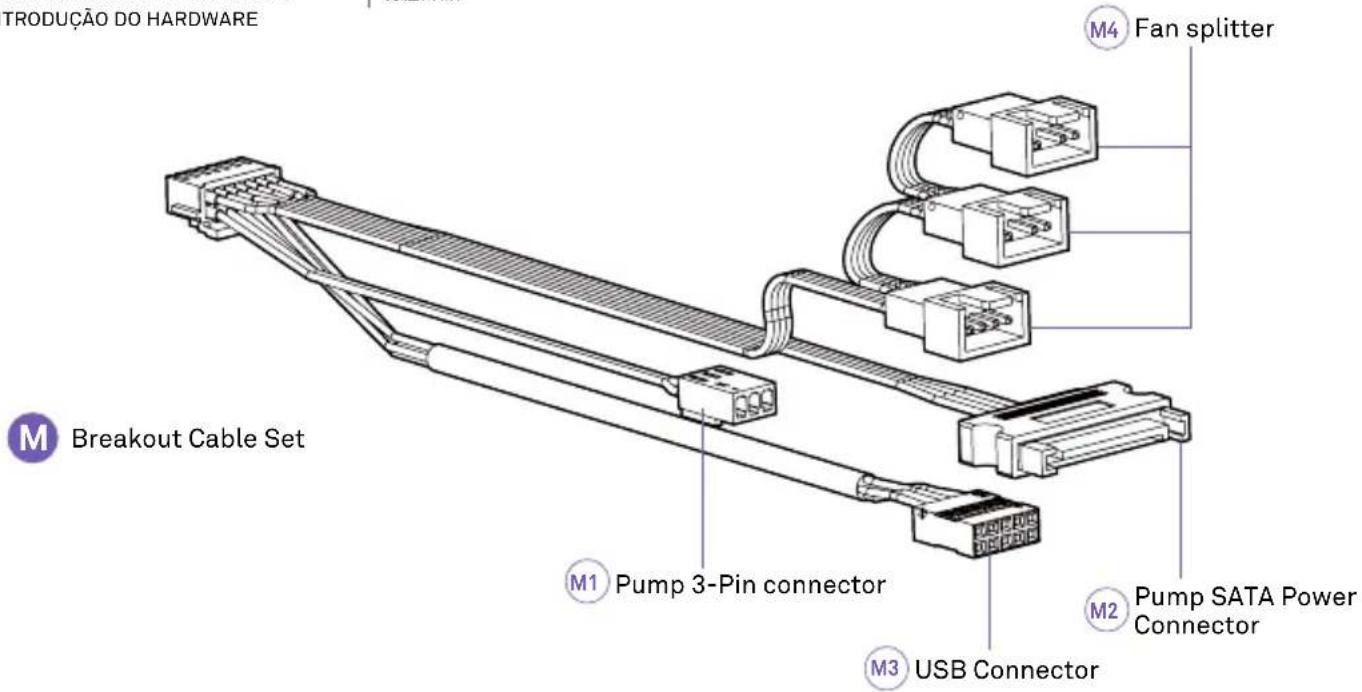
M Breakout Cable Set
×1
N F RGB Core Fan
natural_image
Technical line drawing of a square fan with internal blades and two labeled connectors (no text or symbols)
natural_image
Simple line drawing of two connectors tied together (no text or symbols)
natural_image
Technical line drawing of a mechanical clamp or bracket assembly (no text or symbols)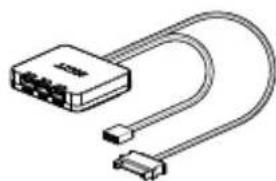
natural_image
Illustration of a USB cable connector with two connectors (no text or symbols)| A. Kraken Elite 240/280/360B. Soporte de retención Intel (preinstalado)C. Soporte de retención AMDD. Placa trasera IntelE. Separador de zócalo 1200/115x IntelF. Separador de zócalo 1700 IntelG. Separador AMDH. Manguito de AMD de doble cara | I. Tornillo de ventilador UNC 6-32 de 30 mmJ. Tornillo UNC 6-32 de 5 mmK. ArandelaL. Tornillo moleteadoM. Juego de cable breakoutN. Ventilador Serie F RGB CoreO. Controlador de RGBP. Cable USB en Y |
| A. Kraken Elite 240 / 280 / 360B. Support de maintien Intel (préinstallé)C. Support de maintien AMDD. Platine arrière IntelE. Vis d'espacement pour interface de connexion Intel 1200/115XF. Vis d'espacement pour interface de connexion Intel 1700G. Vis d'espacement AMDH. Manchon AMD à double sens | I. Vis pour ventilateur 30 mm UNC 6-32J. Vis 5 mm UNC 6-32K. RondelleL. Vis à mainM. Kit de câblage de raccordementN. Ventilateur Série F RGB CoreO. Commande RGBP. Câble USB en Y |
| A. Kraken Elite 240 / 280 / 360B. Intel-Halterung (vormontiert)C. AMD-HalterungD. Intel-RückplatteE. Intel-Sockel 1200/115X AbstandshalterF. Intel-Sockel 1700 AbstandshalterG. AMD-AbstandshalterH. AMD-Sleeve, beidseitig | I. 30 mm UNC 6-32 LüfterschraubeJ. 5 mm UNC 6-32 SchraubeK. UnterlegscheibeL. RändelschraubeM. BreakoutkabelsatzN. F-Serie RGB Core LüfterO. RGB-SteuierungP. USB-Y-Kabel |
| A. Kraken Elite 240 / 280 / 360B. Staffa di supporto Intel (preinstallata)C. Staffa di supporto AMDD. Piastra posteriore IntelE. Distanziatore per socket Intel 1200/115XF. Distanziatore per socket Intel 1700G. Distanziatore AMDH. Manicotto a doppia faccia AMD | I. Vite per ventola UNC 6-32 da 30 mmJ. Vite UNC 6-32 da 5 mmK. RondellaL. Vite con testa ad aletteM. Set di cavi breakoutN. Ventola Serie F Rgb CoreO. Controller RGBP. Cavo USB a Y |
| A. Kraken Elite 240 / 280 / 360B. Braçadeira de retenção Intel (pré-instalada)C. Braçadeira de retenção AMDD. Placa traseira IntelE. Parafuso afastador para encaixe Intel 1200/115XF. Parafuso afastador para encaixe Intel 1700G. Parafuso afastador AMDH. Manga AMD com dois lados | I. Parafuso 30mm UNC 6-32 para ventoinhaJ. Parafuso 5mm UNC 6-32K. AnilhaL. Parafuso de aperto manualM. Cabo de comunicação completoN. Ventoinha RGB Core Serie FO. Controlador RGBP. Cabo USB Y |
| A. 크라젠 엘리트 240 / 280 / 360B. Intel 리텐션 브라켓(사전 설치)C. AMD 리텐션 브라켓D. Intel 백플레이트E. Intel 소켓 1200/115X 스탠드오프F. Intel 소켓 1700 스탠드오프G. AMD 스탠드오프H. 듀얼 사이드 AMD 슬리브 | I. 30mm UNC 6-32 戴스크류J. 5mm UNC 6-32 ス크류K. 와서L. 나비나사M. 브레이크아웃 케이블 세트N. F 시리즈 RGB CORE 戴N.O. RGB 컨트롤러P. USB Y-케이를 |
| A. Kraken Elite 240 / 280 / 360B. Intelリテンションブラケット (ブリインストール済み)C. AMDリテンションブラケットD. IntelパックブレートE. Intelソケット 1200/115XスタンドオフF. Intelソケット 1700スタンドオフG. AMDスタンドオフH. 両面AMDスリーブ | I. 30mm UNC 6-32 ファン用 ネ ジJ. 5mm UNC 6-32 ネジK. ワッシャーL. つまみネジM. プレークアウトケーブ ル セットN. Fシリーズ RGB CORE ファンO. RGBコントロ 一ラP. USB Yケーブル |
| A. Kraken Elite 240 / 280 / 360B. Intel 扣具 (预装)C. AMD 扣具D. Intel 貨板E. Intel Socket 1200/115X 螺丝柱F. Intel Socket 1700 螺丝柱G. AMD 螺丝柱H. 双面 AMD 套管 | I. 30mm UNC 6-32 风扇螺丝J. 5mm UNC 6-32 螺丝K. 垫圈L. 手動螺絲M. 分支电缆组件N. F RGB CORE 风扇O. RGB 控制器P. USB Y型电缆 |
| A. Kraken Elite 240 / 280 / 360B. Intel 扣具 (預装)C. AMD 扣具D. Intel 貨板E. Intel Socket 1200/115X 螺丝柱F. Intel Socket 1700 螺丝柱G. AMD 螺丝柱H. 雙面 AMD 套管 | I. 30mm UNC 6-32 風扇螺絲J. 5mm UNC 6-32 螺絲K. 墄圈L. 手動螺絲M. 分支電纜組件N. F RGB CORE 風扇O. RGB 控制器P. USB Y型電纜 |

HARDWARE INTRODUCTION
INTRODUCCIÓN DE HARDWARE PRÉSENTATION DU MATÉRIEL EINLEITUNG HARDWARE INTRODUZIONE ALL'HARDWARE INTRODUÇÃO DO HARDWARE
하드웨어 소개
ハードウェア紹介
硬件介绍
硬體介紹

RGB Controller

N1. Cable RGB NZXT de cuatro pines
N2. Cable de ventilador PWM de cuatro pines
01. Canales de iluminación
02. Conector USB
03. Cable de alimentación SATA del controlador
N1. Câble RGB NZXT à 4 broches
N2. Câble de ventilateur à modulation de largeur d'impulsions à 4 broches
01. Canaux lumineux
02. Connecteur USB
03. Câble d'alimentation SATA du contrôleur
N1. 4-poliges NZXT-RGB-Kabel
N2. 4-poliges PBM-Lüfterkabel
01. Beleuchtungskanäle
02. USB-Anschluss
03. SATA-Stromkabel für die Steuerung
N1. Cavo per RGB a 4 pin NZXT
N2. Cavo per ventola PWM a 4 pin
01. Canali di illuminazione
02. Connettore USB
03. Cavo di alimentazione SATA per controller
N1. Cabo RGB NZXT de 4 pinos
N2. Cabo de Ventoinha PWM de 4 pinos
01. Canais de Iluminação
02. Conector USB
03. Cabo de Alimentação SATA do Controlador
N1.4핀 NZXT RGB 케이블
natural_image
Symmetrical diagram with four petal-like shapes and directional arrows, no text or symbols presentSOCKET 1200/115X SOCKET 1700
natural_image
Symmetrical diagram of a four-pole antenna or connector with directional arrows, no text or symbols present.STEP 1
Move all four sliders on the Intel backplate to:
• the innermost positions for Socket 1200 / 115X
• the outermost positions for Socket 1700
natural_image
Technical diagram of a mechanical bracket assembly with mounting holes and mounting brackets (no text or symbols)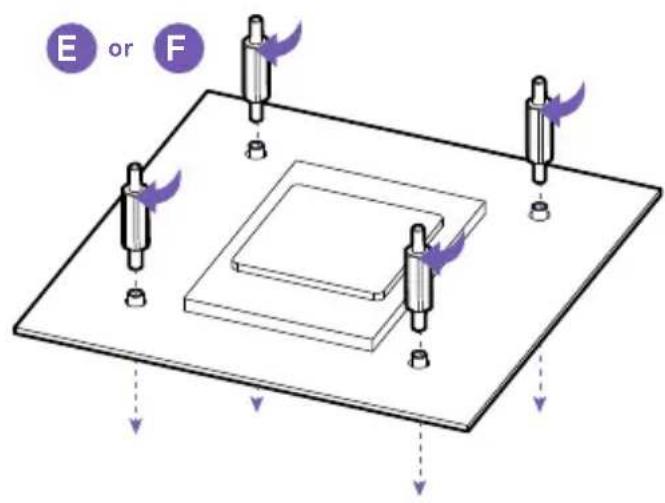
STEP 2
Install the Intel backplate on the rear of the motherboard. Instala la placa trasera Intel en la parte trasera de la placa base. Installez la platine arrière Intel à l'arrière de la carte mère. Die Intel-Rückplatte an der Rückseite des Mainboards befestigen. Installare la piastra posteriore Intel sul retro della scheda madre. Instalar a placa traseira Intel na parte de trás da motherboard. Intel 백플레이트를 마더보드 뒷면에 설치합니다. Intel バックプレートをマザーボード背面に取り付けます。 在主板后面安装 Intel 背板。 在主板後面安装 Intel 背板。
STEP 3
From the front of the motherboard, install the four Socket standoffs.
STEP 4
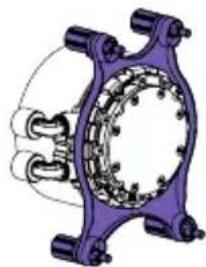
Orient the pump's tube to fit your build. The display orientation can be adjusted in 90° increment via CAM.
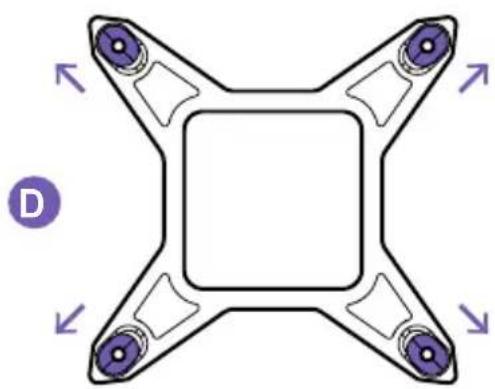
Place the pump with the retention bracket onto the CPU. Ensure the standoffs go through the holes on the bracket and apply the thumb nuts in the order as shown.
natural_image
Isometric technical diagram of a mechanical assembly with directional arrows indicating motion or force (no text or symbols)STEP 1
Remove the stock AMD mounting bracket and keep the original backplate on the rear of the motherboard. Retira el soporte de montaje de serie AMD y mantén la placa trasera original en la parte trasera de la placa base. Retirez le support de maintien AMD de série et conservez la platine arrière d'origine à l'arrière de la carte mère. Die AMD-Befestigungsplatte entfernen und die Originalrückplatte an der Rückseite des Mainboards belassen. Rimuovere la staffa di montaggio di serie e tenere la piastra posteriore originale sul retro della scheda madre. Remover a braçadeira de montagem AMD e manter a placa traseira original na parte de très da motherboard. 기본 AMD 마운팅 브래킷을 제거하고 마더보드 후면에 기존의 백플레이트를 유지합니다.
From the front of the motherboard, install the four AMD sleeves. Make sure you use the right side of the sleeve. According to your socket, place the sleeves with the name of the socket facing up.
natural_image
Isometric diagram of a computer motherboard with five cylindrical sensors and a central CPU socket (no text or labels)From the front of the motherboard, install the four AMD standoffs.
natural_image
Mechanical component diagram showing a rotating shaft and housing with no visible text or symbols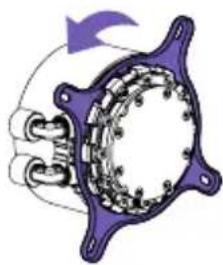
natural_image
Mechanical component diagram showing a rotating shaft and housing with no visible text or symbols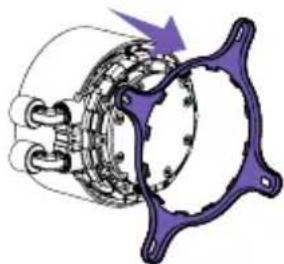
natural_image
Mechanical component diagram showing a rotating assembly with purple arrows indicating motion (no text or symbols)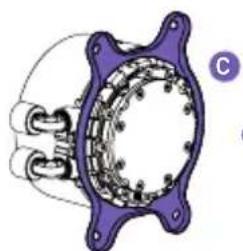
natural_image
Mechanical component diagram showing a cam and housing assembly (no text or symbols)or
natural_image
Mechanical assembly diagram showing a purple frame with internal components and no visible text or symbolsSTEP 4
natural_image
Diagram of a mechanical component with purple and blue parts, no visible text or symbols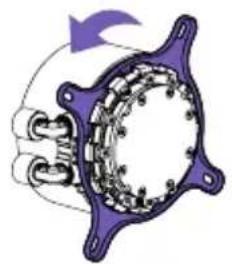
natural_image
Diagram of a mechanical or electrical component with purple and white sections, no visible text or symbols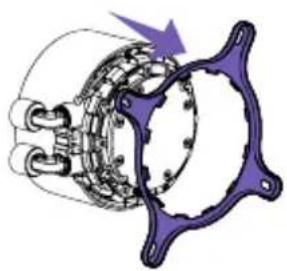
natural_image
Mechanical component diagram showing a rotating assembly with no visible text or symbols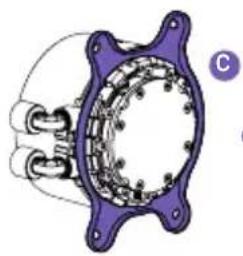
natural_image
Mechanical component diagram showing a cam and rotor assembly (no text or symbols)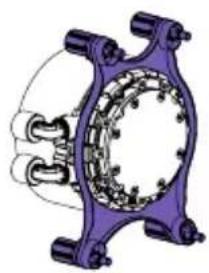
natural_image
Mechanical assembly diagram showing a purple frame with internal components and no visible text or symbolsSTEP 5
Orient the pump's tube to fit your build. We recommend installing with the tubes exit at the 6 o'clock position. The display orientation can be adjusted in 90^ increment via NZXT CAM.
Place the pump with the retention bracket onto the CPU. Ensure the standoffs go through the holes on the bracket and apply the thumb nuts in the order as shown.
MOUNTING THE RADIATOR & FANS
MONTAJE DEL RADIADOR Y LOS VENTILADORES INSTALLATION DU RADIATEUR ET DES VENTILATEURS BEFESTIGEN VON RADIATOR UND LÜFTERN MONTAGGIO DEL RADIATORE E DELLE VENTOLE MONTAGEM DO RADIADOR E DOS FANS
DEPENDING ON YOUR RADIATOR MOUNTING SETUP,
PLEASE USE THE APPROPRIATE SCREWS TO MOUNT THE RADIATORS
Note: Always use washers to prevent damage.

DIRECT MOUNTING
For mounting in which the radiator fits directly onto the case, please install the fan(s) first using the 30mm fan screws and washers. Use the 5mm case screws and washers to mount the radiator.
For mounting in which the fan(s) fit between the radiator and chassis, please use the 30mm fan screws and washers for mounting.
natural_image
Technical line drawing of a mechanical assembly with labeled component M (no text or symbols beyond label)STEP 1
Connect the breakout cable to the pump.

STEP 2
Connect the 4-pin PWM fan cable to an open header on the fan splitter.
natural_image
Technical line drawing of a mechanical assembly with a pin and bracket, no text or symbols presentSTEP 3
Connect the pump 3-pin connector to the 4-pin CPU_FAN or AIO_PUMP connector on the motherboard.
Note: You may need to disable fan-fail warning within the motherboard BIOS if CPU_FAN is unused.
natural_image
Pure diagram of a cable or wire with a labeled component M3, no text or symbols present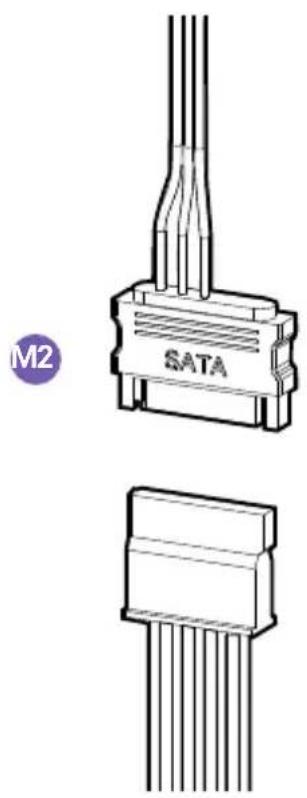
natural_image
Technical line drawing of an SATA connector with multiple pins, shown from top and side views (no text or symbols on the diagram itself)
STEP 4 STEP 5
Connect the USB connector to an available USB 2.0 internal header on the motherboard.
Connect pump SATA power cable to an available SATA power connector.
Connect the fan 4-pin NZXT RGB connector to an NZXT RGB lighting channel on your lighting controller.
Plug the USB Connector to an internal USB 2.0 header on the motherboard.
NOTE: If your motherboard only supports one USB header, use the USBY-Cable to connect the pump & controller USB connectors to the USB 2.0 header on the motherboard.
Connect the controller SATA power cable to the power connector
After setting up the Kraken, turn on your PC and proceed to download and install NZXT CAM software to enable Kraken controls: nzxt.com/camapp/
This NZXT Global Warranty Policy governs the sale of products by NZXT to you.

I. WARRANTY LENGTH
New NZXT Product Warranty Length
Kraken Elite RGB 6 Years
Any replacement product will be covered under warranty for the remainder of the warranty period or thirty days, whichever is longer. Proof of purchase is required for warranty service.
II. WHO IS PROTECTED
The Warranty covers only NZXT products purchased by the original consumer.
III. WHAT IS AND IS NOT COVERED
Please note that our warranty is not an unconditional guarantee. If the product, in NZXT's reasonable opinion, malfunctions within the warranty period, NZXT will provide you at its sole discretion with a repaired or replacement product, either new or refurbished, with a similar function that is equal or greater in value depending on supply. Our warranty does not cover the following:
- any product or serial number/warranty sticker modification applied without permission from NZXT;
- any damage that is not a manufacturing defect;
- damage, deterioration or malfunction resulting from: accident, abuse, misuse, neglect, fire, water, lightning, or other acts of nature, unauthorized product modification or failure to follow instructions included with the product;
- improper installation, unauthorized alterations or modifications, or repair or attempted repair by anyone not authorized by NZXT;
- shipping or transport damage (claims must be made with the carrier);
• normal wear and tear.
NZXT does not warrant that this product will meet your requirements. It is your responsibility to determine the suitability of this product for your purpose. For NZXT Store orders, we cover two way return shipping for all exchanges and returns. For all other authorized dealers, NZXT Support does not cover return shipping and only covers one way shipping from NZXT back to the end user for exchanges. Two way expedited shipping is provided for all PSUs covered under the Less Than Three program, indiscriminate of purchase location, provided the location is an approved NZXT reseller.
IV. EXCLUSION OF DAMAGES (DISCLAIMER)
NZXT's sole obligation and liability under this warranty is limited to the repair or replacement of a defective product with either a new or refurbished product with a similar function that is equal or greater in value at our option. NZXT shall not, in any event, be liable for any incidental or consequential damage, including but not limited to damages resulting from interruption of service and loss of data, business, or for liability in tort relating to this product or resulting from its use or possession.
V. LIMITATIONS OF IMPLIED WARRANTIES
There are no other warranties, expressed or implied, including but not limited to those of merchantability or fitness for a particular purpose. The duration of implied warranties is limited to the warranty length specified in Paragraph I.
VI. TO OBTAIN TECHNICAL SUPPORT
If you have already referenced your product owner's manual and still need help, you may contact us by phone at +1 (800) 228-9395, by email at service@nzxt.com, or visit the NZXT Support site at nzxt.com/customer-support.
VII. HOW TO OBTAIN A WARRANTY SERVICE FROM NZXT
To receive a warranty service for your product when purchased directly from NZXT, you must submit a request via the NZXT Support site outlining the problem. If a technician deems the product defective or requiring testing, you will be required to provide a copy of your proof of purchase, which will enable you to submit a Return Merchandise Authorization "RMA" request.
Once approved, you'll receive an RMA number, upon which you will be asked to ship the defective item back to NZXT with the RMA number clearly marked or labelled on the package. NZXT recommends that appropriate measures are taken to safeguard the product from damage during shipping.
VIII. APPLICABLE LAW AND ADDITIONAL LEGAL RIGHTS FOR CONSUMERS
This warranty gives you specific legal rights. These conditions are governed and construed in accordance with the laws of California (with exception of its conflict of law provisions), and the application of the United Nations Convention of Contracts for the International Sale of Goods is expressly excluded. The non-exclusive jurisdiction of the courts of California is agreed, which means that you may bring a claim to enforce your consumer protection rights in connection with this Global Warranty in the country which you have your habitual residence where you may have additional rights. These rights may vary.
For original consumers who are covered by consumer protection laws or regulations in their country, state, or province of purchase or, if different, their country, state, or province of residence, the benefits conferred by this warranty are in addition to all rights and remedies conveyed by such consumer protection laws and regulations. To the extent that liability under such consumer laws can be limited, NZXT's liability is limited, and its sole option, to repair or replacement, either new or refurbished, with a similar function that is equal or greater in value depending on supply.
In the United Kingdom:
• For NZXT products sold to customers in the UK, during the expected lifespan of your product your legal rights entitle you to the following:
Up to 30 days: if your goods are faulty, then you can get an immediate refund.
Up to six months: if your goods can't be repaired or replaced, then you're entitled to a full refund, in most cases.
Up to six years: if your goods do not last a reasonable length of time you may be entitled to some money back.
- If the person seeking to rely on the guarantee is not the original consumer, the NZXT Warranty will cover the product in relation to that person provided that they are able to provide proof of the transfer of the benefit of the guarantee from the original consumer.
- The implied warranties under the Consumer Rights Act 2015 says that your goods must be as described, fit for all purposes for which such goods are usually supplied, and of satisfactory quality.
In the EU:
- If you are a consumer and have your habitual residence in the EU, you additionally enjoy the protection afforded to you by provisions that cannot be derogated from by agreement by virtue of the law where you have your habitual residence.
IX. WARRANTY SERVICE FROM RESELLERS
In the event that a warranty service is sought, you must provide proof of purchase (store receipt or invoice) in order to receive the service and if deemed necessary, repair or replacement product.
In North America:
Within the first 60 days after purchase, please return your product (or for power supplies installed within our enclosures, just the failed power supply) to your dealer or reseller for a replacement. If the product is still within warranty and you can no longer return it to your dealer, please contact NZXT Customer Support (see above) for assistance and instructions. NZXT will not accept returns without prior approval and an RMA number.
In Europe:
Within the first year after purchase, please return your product (or for power supplies installed within our enclosures, just the failed power supply) to your dealer or reseller for a replacement. If the product is still within warranty and you can no longer return it to your dealer, please contact NZXT Customer Support (see above) for assistance and instructions. NZXT will not accept returns without prior approval.

In Australasia:

Within the first two years after purchase, please return your product (or for power supplies installed within our enclosures, just the failed power supply) to your dealer or reseller for a replacement. If the product is still within warranty and you can no longer return it to your dealer, please contact NZXT Customer Support (see above) for assistance and instructions. NZXT will not accept returns without prior approval.
The cost of shipping will be borne at the first instance by you; however, if the purchased item is defective, NZXT will reimburse reasonable postage or transportation of costs.
Outside North America, Europe, and Australasia:
If your product needs to be returned within the warranty period, please contact the retailer or distributor from whom you purchased the product.
X. NZXT.COM STORE RETURNS/EXCHANGE POLICY
Eligible products under this NZXT Warranty qualify for a full refund or exchange only with an authorized RMA number and if the item is returned to the NZXT.com store inventory within 30 days of purchase. Returns are not allowed beyond 30 days of the purchase date. The NZXT.com Store reserves the right to deny any return or exchange. Refunds will be credited to the original method of payment. To initiate a return, simply submit a request via NZXT support site.
Visit nzxt.com/warranty and support.nzxt.com for information on warranty coverage and service.
Visite el sitio Web nzxt.com/warranty y support.nzxt.com para obtener información sobre la cobertura y el servicio de la garantía.
Visitez nzxt.com/warranty et support.nzxt.com pour les informations de la couverture de la garantie et du service.
Informationen zu Geltungsbereich und Service der Garantie finden Sie unter support.nzxt.com und nzxt.com/warranty.
Visitare il sito nzxt.com/warranty e support.nzxt.com per informazioni sulla copertura e sul servizio della garanzia.
Visite nzxt.com/warranty e support.nzxt.com para obter informações sobre a cobertura da garantia e assistência.
제품 보증 범위와 서비스 정보를 확인하시려면 nzxt.com/warranty 또는 support.nzxt.com을 방문해 주시기 바랍니다.
保証範囲およびサービスに関する情報については、support.nzxt.comとnzxt.com/warrantyにアクセスしてください。
请造访 nzxt.com/warranty 和 support.nzxt.com 了解保修范围和服务的信息。
請訪問 nzxt.com/warranty 和 support.nzxt.com 了解產品保固範圍和更多服務訊息。
NZXT, Inc. | 15736 E. Valley Blvd, City of Industry, CA 91744, USA
NZXT UK Ltd. | First Floor 5 Fleet Place London EC4M 7RD, GB United Kingdom
+1 (800) 228-9395 / service@nzxt.com / nzxt.com
REGULATORY STATEMENT

Designed in Los Angeles, California.
This device complies with Part 15 of the FCC Rules. Operation is subject to the following two conditions: (1) This device may not cause harmful interference, and (2) this device must accept any interference received, including interference that may cause undesired operation. CAN ICES-003/NMB-003(B)
전기용품안전관리법에 의한 표시
제품명: Liquid CPU Cooling System,
모델명: RL-KR24E/RL-KR24E-B1/RL-KR24E-W1/
RL-KR28E/RL-KR28E-B1/RL-KR28E-W1/
RL-KR36E/RL-KR36E-B1/RL-KR36E-W1,
The maximum ambient temperature is 50^ C, the maximum normal operating temperature of the radiator (coolant) is 60^ C, and the maximum abnormal temperature of the radiator (coolant) is 70^ C.
This equipment is not suitable for use in locations where children are likely to be present.

NB-0009

UKCA statement
The object of the declaration described above is in conformity with the relevant UK harmonization legislation:
• Electromagnetic Compatibility Regulations 2016
• Electrical Equipment (Safety) Regulations 2016
• The Restriction of the Use of Certain Hazardous Substances in Electrical and Electronic Equipment Regulations 2012
RoHS statement
This product is compliant to implemented RoHS (Restriction of Hazardous Substances) type regulations worldwide, including but not limited to Japan, India, Korea, and European Union.
REACH statement
EU REACH SVHC Disclosure on Candidate List
REACH (Registration, Evaluation, Authorization and Restriction of Chemicals, EC 1907/2006) is the European Union's (EU) chemical substances regulatory framework. REACH requires NZXT Inc. to provide customers with sufficient information on Substances of Very High Concern (SVHC) contained in products in concentration above 0.1% weight by weight (w/w) to allow safe use of the product.
EU CE DOC

DECLARATION OF CONFORMITY
The device complies with the requirements set out in the Council Directives relevant Union harmonization legislation:
• EMC Directive 2014/30/EU
• RoHS Directive 2011/65/EU & (EU) 2015/863
• LVD Directive 2014/35/EU
- Turkish EEE Directive
DÉCLARATION DE CONFORMITÉ
KONFORMITETSDEKLARATION
To protect the global environment and as an environmentalist, NZXT must remind you that: Under the European Union ("EU") Directive on Waste Electrical and Electronic Equipment, Directive 2002/96/EC, which takes effect on August 13, 2005, products of "electrical and electronic equipment" cannot be discarded as municipal waste anymore and manufacturers of covered electronic equipment will be obligated to take back such products at the end of their useful life. NZXT will comply with the product take back requirements at the end of life of NZXT-branded products that are sold into the EU. You can return these products to local collection points.
This device complies with Part 15 of the FCC Rules. Operation is subject to the following two conditions: (1) This device may not cause harmful interference, and (2) this device must accept any interference received, including interference that may cause undesired operation.
CAN ICES-003(B) / NMB-003(B)
限用物质及元素列表/限用物質及元素清單


If you have any questions or problems with the NZXT product you purchased, please don't hesitate to contact us using our support system. service@nzxt.com support.nzxt.com
Please include a detailed explanation of your problem and your proof of purchase. For comments and suggestions, you can e-mail our design team, designer@nzxt.com.
Lastly we would like to thank you for your support by purchasing this product. For more information about NZXT, please visit us online. NZXT Website: NZXT.com
SOPORTE Y SERVICIO
NZXT, Inc. | 15736 E. Valley Blvd, City of Industry, CA 91744, USA
NZXT UK Ltd. | First Floor 5 Fleet Place London EC4M 7RD, GB United Kingdom
+1 (800) 228-9395 / service@nzxt.com / nzxt.com

- KRAKEN ELITE RGB
- TABLE OF CONTENTS
- HARDWARE INTRODUCTION
- STEP 1
- STEP 2
- STEP 3
- STEP 4
- STEP 5
- MOUNTING THE RADIATOR & FANS
- DIRECT MOUNTING
- STEP 4 STEP 5
- WARRANTY LENGTH
- New NZXT Product Warranty Length
- WHO IS PROTECTED
- WHAT IS AND IS NOT COVERED
- EXCLUSION OF DAMAGES (DISCLAIMER)
- LIMITATIONS OF IMPLIED WARRANTIES
- TO OBTAIN TECHNICAL SUPPORT
- HOW TO OBTAIN A WARRANTY SERVICE FROM NZXT
- APPLICABLE LAW AND ADDITIONAL LEGAL RIGHTS FOR CONSUMERS
- In the United Kingdom:
- In the EU:
- WARRANTY SERVICE FROM RESELLERS
- In North America:
- In Europe:
- In Australasia:
- Outside North America, Europe, and Australasia:
- NZXT.COM STORE RETURNS/EXCHANGE POLICY
- REGULATORY STATEMENT
- Designed in Los Angeles, California.
- 전기용품안전관리법에 의한 표시
- UKCA statement
- RoHS statement
- REACH statement
- EU CE DOC
- DECLARATION OF CONFORMITY
- DÉCLARATION DE CONFORMITÉ
- KONFORMITETSDEKLARATION
- 限用物质及元素列表/限用物質及元素清單
- SOPORTE Y SERVICIO
Brand : NZXT
Model : Kraken Elite 240
Category : Computer cooling system