
TBS8154X - Blender BEKO - Free user manual and instructions
Find the device manual for free TBS8154X BEKO in PDF.
| Brand | BEKO |
| Model | TBS8154X |
| Product Type | Blender |
| Power Supply | 120 V ~ 60 Hz |
| Power | 1500 W |
| Speeds | Variable speed via speed adjustment knob |
| Automatic Programs | Smoothie, Frozen Foods, Sauce (3 programs) |
| Pulse Function | Yes, Pulse button |
| Motor Protection | Automatic overheating protection with Reset button on base |
| Cleaning | Bowl and lid dishwasher safe; motor base wipe with damp cloth |
| Maximum food temperature | 60 °C |
| Maximum continuous operation time | 2 minutes, then cool down 5 minutes (15-20 minutes if overheated) |
| Included Accessories | Measuring cup, lid with gasket, dosing cap, mixing rod, mixing accessories, anti-slip feet |
| Anti-slip coating | Yes (feet and base) |
| Cord storage | Yes (cord wrap button under base) |
| Warranty | 2-year limited (see manual for details) |
Frequently Asked Questions - TBS8154X BEKO
User questions about TBS8154X BEKO
0 question about this device. Answer the ones you know or ask your own.
Ask a new question about this device
Download the instructions for your Blender in PDF format for free! Find your manual TBS8154X - BEKO and take your electronic device back in hand. On this page are published all the documents necessary for the use of your device. TBS8154X by BEKO.
USER MANUAL TBS8154X BEKO
natural_image
Line drawing of a blender with handle and control panel (no text or symbols)TBS8154R TBS8154X
EN FR E\$
Please read this manual first!
Dear Valued Customer,
Thank you for preferring this Beko appliance. We hope that you get the best results from your appliance which has been manufactured with high quality and state-of-the-art technology. For this reason, please read this user manual and all other provided documents carefully before using the appliance and keep it as a reference for future use. If you hand over the appliance to someone else, give the user manual as well. Follow the instructions by paying attention to all the information and warnings in the user manual.
Meanings of the symbols
Following symbols are used in various sections of this manual:

Important information and useful hints about usage.

WARNING: Warnings for dangerous situations concerning the safety of life and property.

Suitable for contact with food.

Do not immerse the appliance, the power cable, or the power plug in water or any other liquid.

This product has been produced in environmentally-friendly, state-of-the-art facilities.
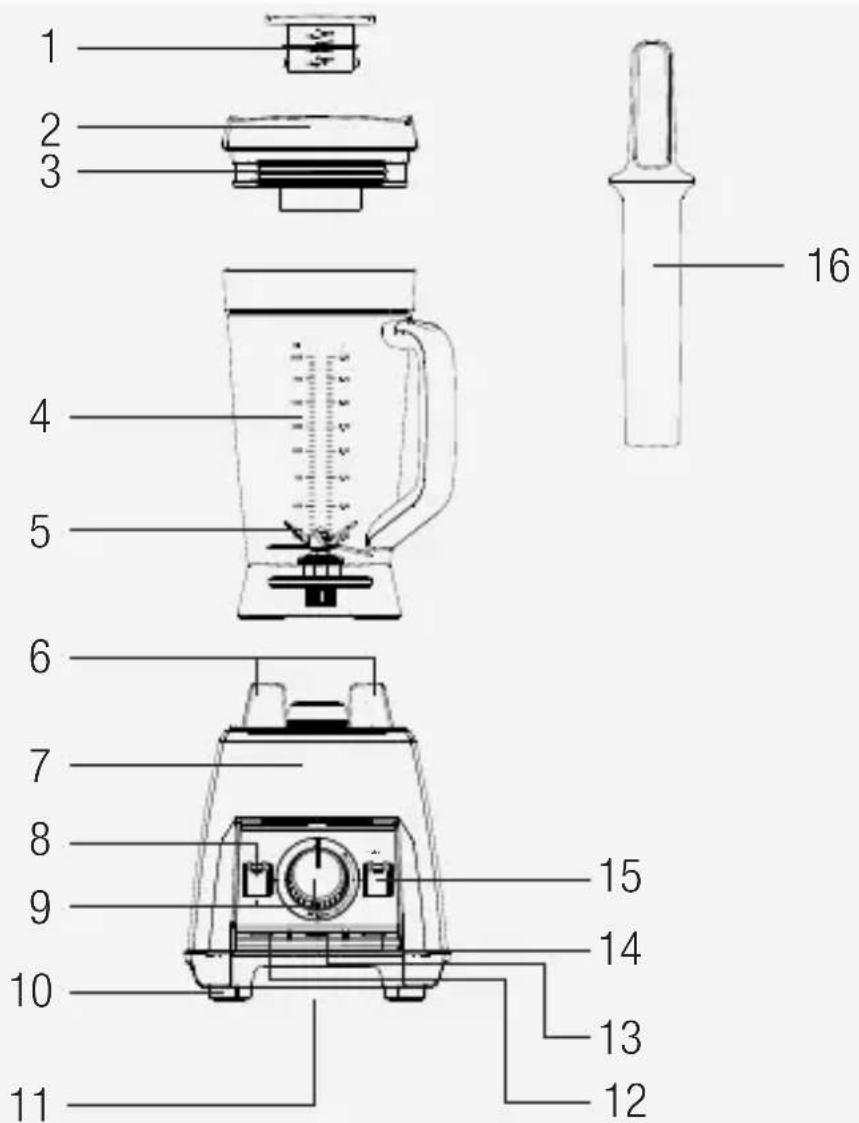
- Measuring cap
- Lid
- Leak-proof gasket
- Measuring jug
- Blending shaft
- Jug placement feet
- Motor unit
- On(I) / OFF(O) button
- Speed adjustment button
-
Non-slip feet
-
Cable winding bay
- Smoothie button
- Frozen food button
- Sauce button
- Pulse
- Blending accessory
In case of lose, break or need replacement for the parts below:
- Jug with top cover - complete set (2,3,4)
- Plunger – black part that you use to shovel fruits/veggies in to the jug from top cover hole (1)
- Set of 4 rubber feet (10)
Technical data
Voltage:120V\~60 Hz
Power consumption:
1500 W
Rights to make technical and design changes are reserved.
CONTENTS
| ENGLISH | 06-20 |
| FRANÇAIS | 21-39 |
| ESPAÑOL | 40-58 |
01M-8838283200-2117-01
1 Important safety and environmental instructions
This section contains safety instructions that will help protect from risk of personal injury or material damage.
Failure to follow these instructions voids any granted warranty.
1.1 General safety
- Read all instructions.
- This appliance may be used by people whose physical, perceptive or mental skills are impaired or who are inexperienced or not knowledgeable about the appliance as long as they are supervised or informed and made understood the safe use of the appliance and the encountered dangers. Children should not play with the appliance.
- Do not operate any appliance with a damaged cord or plug or after the appliance malfunctions, or is dropped or damaged in any manner. Contact the manufacturer at their customer service telephone number for information on examination, repair, or adjustment.
1 Important safety and environmental instructions
- The use of attachments, including canning jars, not recommended by the manufacturer may cause a risk of injury to persons.
- Do not attempt to dismantle the appliance.
- Do not operate or place any part of this appliance or its parts on or near hot surfaces.
- Do not use the device for hot food.
- Your mains power supply should comply with the information supplied on the rating plate of the appliance.
- Do not use the appliance with an extension cable.
- Do not touch the plug of the appliance with damp or wet hands.
- Unplug from outlet when not in use, before putting on or taking off parts, and before cleaning.
- Hold the blending shaft of the appliance carefully during transportation and cleaning.
- Never touch blades while using the appliance. There is the possibility of injury due to incorrect usage.
- Avoid contacting moving parts.
1 Important safety and environmental instructions
- Do not use outdoors.
- Do not let cord hang over edge of table or counter.
- Keep hands and utensils out of container while blending to reduce the risk of severe injury to persons or damage to the blender. A scraper may be used but must be used only when the blender is not running
- Blades are sharp. Handle carefully.
• Always operate blender with cover in place. - Do not blend hot liquids.
- This appliance has a polarized plug (one blade is wider than the other). To reduce the risk of electric shock, this plug will fit in a polarized outlet only one way. If the plug does not fit fully in the outlet, reverse the plug. If it still does not fit, contact a qualified electrician. Do not modify the plug in any way.
• After cleaning, dry the appliance and all parts before connecting it to mains supply and before attaching the parts.
1 Important safety and environmental instructions
- Do not immerse the appliance, the power cable, or the power plug in water or any other liquid.
- If you keep the packaging materials, store them out of the reach of children.
- Children shall not use the appliance. Keep the appliance out of the reach of children.
- SAVE THESE INSTRUCTIONS
1.2 Compliance with the WEEE Directive and Disposing of the Waste Product:
This product complies with EU WEEE Directive (2012/19/EU). This product bears a classification symbol for waste electrical and electronic equipment (WEEE).

This product has been manufactured with high quality parts and materials which can be reused and are suitable for recycling. Do not dispose of the waste product with normal domestic and other wastes at the end of its service life. Take it to the collection center for the recycling of electrical and electronic equipment. Please consult your local authorities to learn about these collection centers.
1 Important safety and environmental instructions
1.3 Compliance with RoHS Directive
The product you have purchased complies with EU RoHS Directive (2011/65/EU). It does not contain harmful and prohibited materials specified in the Directive.
1.4 Package information

Packaging materials of the product are manufactured from recyclable materials in accordance with our National Environment Regulations. Do not dispose of the packaging materials together with the domestic or other wastes. Take them to the packaging material collection points designated by the local authorities.
2 Use
2.1 Initial use
Clean the parts of the appliance prior to initial use (see 3.1).
2.2 Operation

WARNING: Do not operate the appliance when empty.

Maximum temperature allowed inside the appliance is 60^ C.
natural_image
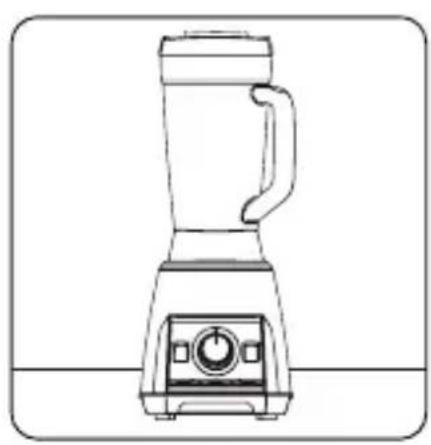
Line drawing of a blender with handle and control panel (no text or symbols)Place your appliance on a solid and flat surface.
natural_image
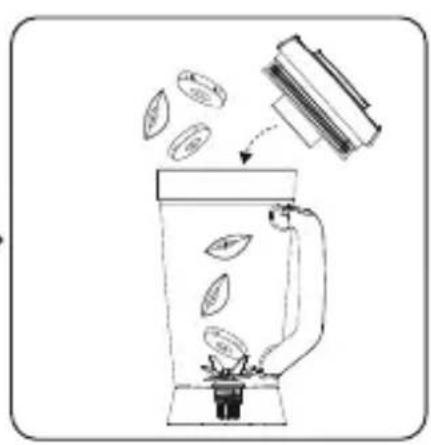
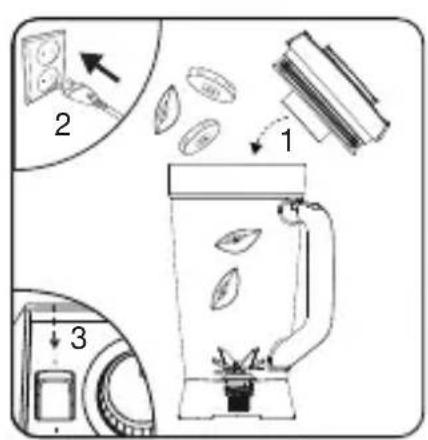
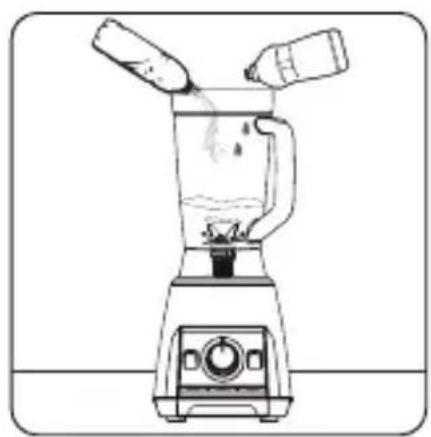
Simple line drawing of a blender with leaves inside, pouring into a container (no text or symbols)Put the ingredient you want to process into the jug (3) and place the lid (2) on it.
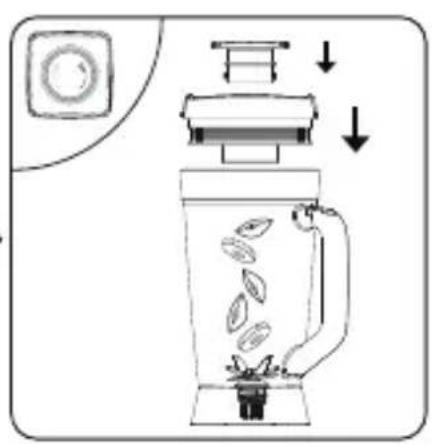
natural_image
Illustration of a blender with leafy contents inside, showing a lid and control panel (no text or symbols)Place the measuring cap (1) on the lid (2) so that the tab on it seats on the slots of the lid, turn it to the "Lock" position and secure.

Put soft foods or liquids before adding hard foods or ice.
2 Use

Adding some water into the appliance will allow it run smoothly (e.g. 40ml water for 60gr solid food). Add the water before the ingredients.

If you want to add food into the jug (3) during the blending process, use the measuring cap (1) inlet. Raise this cap and feed the food in through this opening.

WARNING: Do not insert any foreign objects into the jug (3) when the appliance is in use.
natural_image
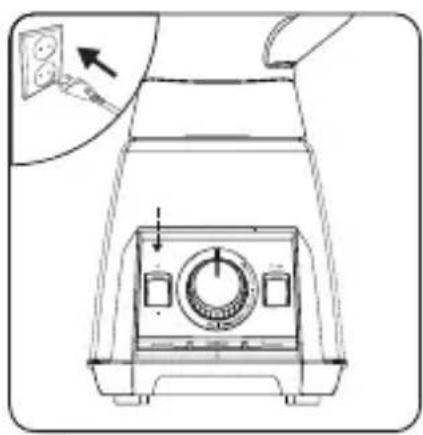
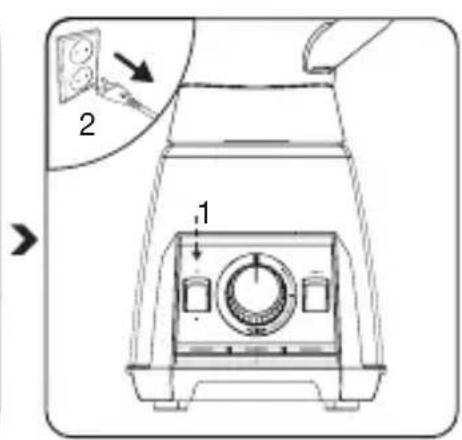
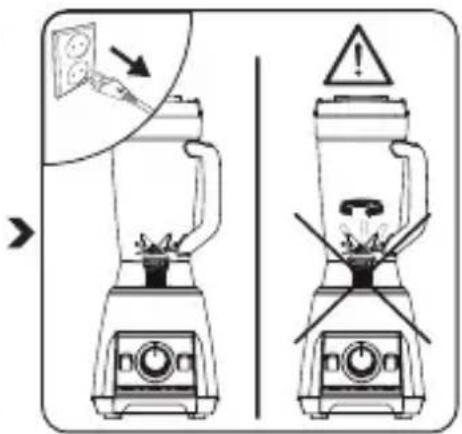
Technical line drawing of a mechanical device with a central dial and control panel (no text or symbols)Plug in the appliance and move the ON/OFF button (8) down to (1) position.
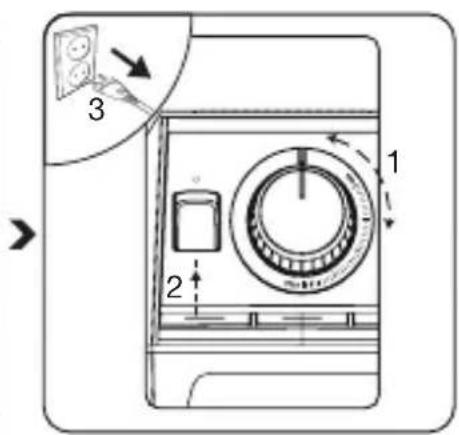
Process the ingredients at the desired speed using the speed adjustment button (9). When the process is complete, move the ON/OFF button (8) up to (0) position and unplug the appliance.
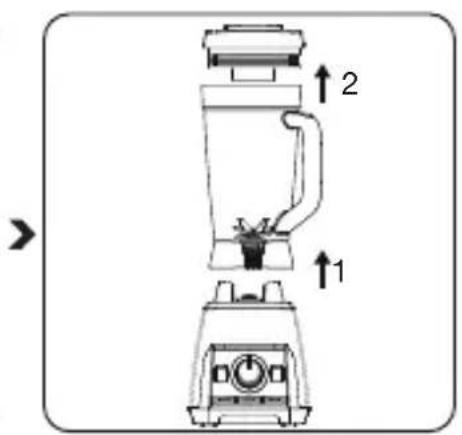
Pull up the jug (3) without turning it to remove it from the motor unit (7). Open the lid (2) and take out the food.
2 Use

You can use the measuring cap (1) or the measuring cap inlet to add ingredients into the jug (3) during the process. To remove the measuring cap, slightly turn it to the "Open" direction and pull gently.

WARNING: Gradually increase the speed of the appliance. Do not operate it at the highest speed suddenly. Otherwise the motor may overheat.

WARNING: Do not run the appliance continuously for more than 2 minutes. Let it cool for 5 minutes before operating it again.
2 Use
2.2.1 Automatic programs
The appliance is equipped with three automatic programs that you can use: Smoothie (12), Frozen food (13), and Sauce (14).
Put the ingredients in the jug (3) and close the lid (2). Move the ON/OFF button (8) down to (1) position.
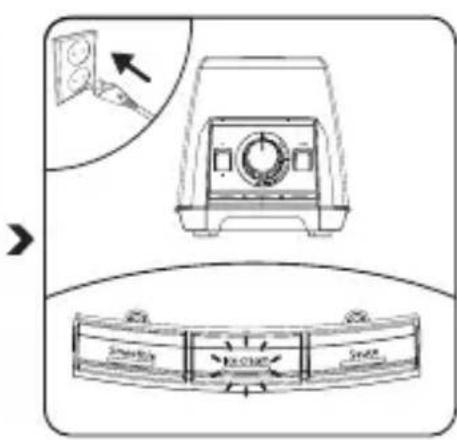
Select the desired automatic program. The light of the selected program will turn on and the program will start to operate at different speeds. It will stop about 26 seconds later.
When the process is complete, move the ON/OFF button (8) to (0) position and unplug the appliance.
2.3 "Pulse" position
Press "Pulse" (15) while the speed adjustment button (9) is in "OFF" position for mixing with high-speed short pulses. The appliance will stop when you release the button.
2.5 Blending accessory
You can use this accessory to put in the jug (3) the ingredients that remain on the sides and have not been blended in the blending process.
2 Use

WARNING: Make sure that the appliance is in OFF (8) (0) position and at full stop while using the blending accessory (16).

If you want to stop the appliance at any time during the operation, move the ON/OFF button (8) to (0) position.
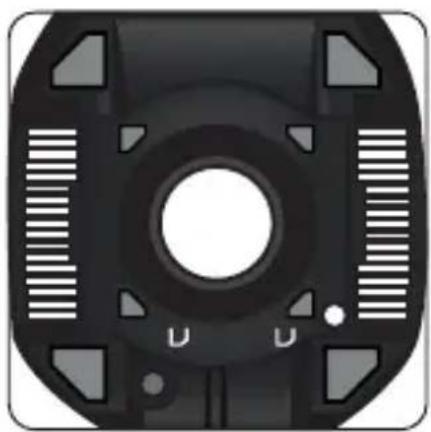
2.6 Motor protection
Automatic motor protection will get activated and stop the appliance when the appliance overheats. In this case;
- Move the ON/OFF button (8) to (0) position.
- Unplug the appliance.
- Let it cool for 15-20 minutes.
- Pull up and remove the jug (3).
- Turn the motor unit (7) upside down and press the "Reset" button on the bottom side of it.
natural_image
Top-down view of a black mechanical component with circular center and four side protrusions (no text or symbols)2 Use

If the "Reset" button does not work, let the appliance cool for a bit longer time and try again.
After using the "Reset" button, you can set up and resume using the appliance again.
3 Cleaning and care
3.1 Cleaning
natural_image
Line drawing of a blender with three blades and a handle, no text or symbols presentAdd 1 or 1 12 cups of lukewarm water and some drops of dish-washing liquid into the jug (3) and operate it at speed level (9) "4" for a couple of seconds.
Unplug the appliance before cleaning.
Wait for the accessories used to stop completely.
natural_image
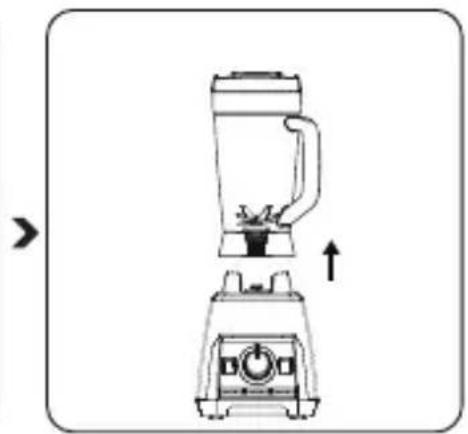
Diagram of a blender with an arrow indicating rotation direction (no text or symbols)Pull up the jug (3) to remove it from the motor unit (7).
natural_image
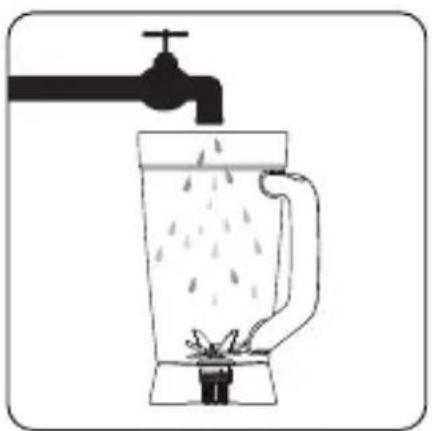
Simple line drawing of a blender with a faucet and water droplets (no text or symbols)Then rinse it.

You can wash the jug (3) and the caps/lids (2) in your dishwasher. It is recommended to clean the appliance immediately after using.
3 Cleaning and care

WARNING: Do not immerse the motor unit (7) in water. You can wipe it with a damp cloth.
3.2 Storage
- If you do not intend to use the appliance for a long time, store it carefully.
- Unplug the appliance and wait for it to cool completely before storing it.
- Keep the appliance and its accessories in their original packages.
- Store it in a cool, dry place.
• Always keep the appliance out of the reach of children.
3.3 Handling and transportation
- During handling and transportation, carry the appliance in its original packaging. The packaging of the appliance protects it against physical damages.
- Do not place heavy loads on the appliance or on the packaging. The appliance may get damaged.
- Dropping the appliance may render it non-operational or cause permanent damage.
WARRANTY STATEMENT FOR BEKO TABLE TOP BLENDER
The warranties provided by Blomberg in these statements only apply to BEKO Table Top Blenders sold to the original purchaser or homeowner in the US and Canada. This warranty is not transferable.
You will need your Table Top Blender's model number, serial number, retailer name and address, where purchased and purchase date / installation date in order to receive a warranty service.
This warranty gives you specific legal rights, and you may also have other rights which vary from state to state.
All warranties stated below are based upon normal household use. The use of the product in a commercial setting will void all warranties.
Service must also be performed by an authorized Beko Service Agency.
Cosmetic defects must be reported within 10 business days from installation
2 years * limited warranty from date of first installation BEKO will repair or replace at no cost to the consumer any defective parts of Table Top Blender including shipping costs.
Disclaimers of warranties and exclusions: Warranty does not cover service costs by an authorized service agent to correct installation, electrical problems or educational instruction on the use of Table Top Blenders. The warranty also does not cover defects or damage caused by an act of god (such as storms, floods, fires, mudslides, etc.), damage cause by use of Table Top Blender for purposes other than those for which it was designed, misuse, abuse, accident, alteration, improper installation, maintenance, travel fees, service calls outside normal service hours, unauthorized service work or work.
This product is fully tested and went through official quality assurance inspections before leaving the original manufacturing site. Warranty terms for this BEKO household appliance is not valid if the product is altered, tampered, modified, additional parts assembled, fixed and re-packed by an authorized distributor, servicer, a third party retailer, reseller or by any other unauthorized person(s).
TO THE EXTENT PERMITTED BY LAW, THIS WARRANTY IS IN LIEU OF ALL OTHER EXPRESSED AND IMPLIED WARRANTIES, INCLUDING THE IMPLIED WARRANTIES OF MERCHANTABILITY AND FITNESS FOR APARTICULAR PURPOSE. BEKO UNDERTAKES NO RESPONSIBILITY FOR THE QUALITY OF THIS PRODUCT EXCEPT AS OTHERWISE PROVIDED IN THIS WARRANTY STATEMENT. BEKO ASSUMES NO RESPONSIBILITY THAT THE PRODUCT WILL BE FIT FOR ANY PARTICULAR PURPOSE FOR WHICH YOU MAY BE BUYING THIS PRODUCT, EXCEPT AS OTHERWISE PROVIDED IN THIS WARRANTY STATEMENT.
4 Warranty
BEKO does not assume any responsibility for incidental or consequential damages. Such damages include, but are not limited to, loss of profits, loss of savings or revenue, loss of use of the cooker or any associated equipment, cost of capital, cost of any substitute equipment, facilities or services, downtime, the claims of third parties, and injury to property. Some states do not allow the exclusion or limitation of incidental or consequential damages, so the above limitations or exclusion may not apply to you.
* installation date shall refer to either purchase date or 5 business days after delivery of the product to the home, whichever is later. ++Parts replaced will assume the identity of the original parts + their original warranty.
No Other Warranties. This Warranty Statement is the complete and exclusive warranty from the manufacturer. No employee of BEKO or any other party is authorized to make any warranty statements in addition to those made in this Warranty Statement.
Please keep this user manual and your sales slip for future reference.
HOW TO GET SERVICE
Please contact your local authorized Beko dealer, or call our Toll Free Customer Hotline number at 1-888-352 BEKO (2356) for direction to an Authorized Beko Service Agent or contact via http://www.beko.us. You can also look up for authorized dealer list at "Where To Buy" section at the website for further reference.
natural_image
Line drawing of a blender with handle and control knob (no text or symbols)natural_image
Simple line drawing of a blender with leaves inside, pouring into a container (no text or symbols)natural_image
Diagram of a blender with liquid being opened, showing mechanical components and downward arrows indicating process (no text or symbols)natural_image
Technical line drawing of a washing machine head with control panel and dial (no text or symbols)natural_image
Close-up of a black mechanical component with circular center and side grooves (no text or symbols)2 Utilisation

natural_image
Line drawing of a blender with three blades and a handle, no text or symbols presentnatural_image
Diagram of a blender with an upward arrow indicating motion (no text or symbols)natural_image
Simple line drawing of a blender with a faucet and water droplets (no text or symbols)Puis rincez-le.

natural_image
Symbol of a waste bin crossed out by a diagonal line, with no text or numbers present.natural_image
Line drawing of a blender with handle and control knob (no text or symbols)natural_image
Simple line drawing of a blender with leaves inside, pouring into a container (no text or symbols)natural_image
Illustration of a blender with leafy contents inside, showing a lid and control panel (no text or symbols)natural_image
Technical line drawing of a car front panel with control buttons and a directional arrow (no text or symbols)natural_image
Top-down view of a black mechanical component with circular center and four side protrusions (no text or symbols)2 Uso

natural_image
Line drawing of a blender with three blades and liquid, no text or symbols presentnatural_image
Diagram of a blender with an arrow indicating rotation direction (no text or symbols)natural_image
Simple line drawing of a blender with a faucet and water droplets (no text or symbols)Luego enjuáguela.

natural_image
Abstract geometric design with blue gradient triangular shapes on white background (no text or symbols)


- Please read this manual first!
- Meanings of the symbols
- Technical data
- Power consumption:
- Important safety and environmental instructions
- General safety
- - SAVE THESE INSTRUCTIONS
- Compliance with the WEEE Directive and Disposing of the Waste Product:
- Compliance with RoHS Directive
- Package information
- Use
- Initial use
- Operation
- Automatic programs
- "Pulse" position
- Blending accessory
- Motor protection
- Cleaning and care
- Cleaning
- Storage
- Handling and transportation
- WARRANTY STATEMENT FOR BEKO TABLE TOP BLENDER
- Warranty
- HOW TO GET SERVICE
- Utilisation
- Uso
Brand : BEKO
Model : TBS8154X
Category : Blender