
G4 Stylus Dual - Cellphone LG - Free user manual and instructions
Find the device manual for free G4 Stylus Dual LG in PDF.
| Product Type | Smartphone |
| Brand | LG |
| Model | G4 Stylus Dual |
| Display | 5.7 inches, 720 x 1280 pixels |
| Processor | Quad-core 1.2 GHz Cortex-A53 |
| RAM | 2 GB |
| Internal Storage | 16 GB (expandable via microSD) |
| Main Camera | 13 MP with autofocus and LED flash |
| Front Camera | 5 MP |
| Battery | 3000 mAh removable |
| Operating System | Android 5.0 (Lollipop) |
| Connectivity | Wi-Fi 802.11 b/g/n, Bluetooth 4.1, GPS, microUSB 2.0 |
| Dual SIM | Yes, two micro-SIM slots |
| Dimensions | 154.3 x 79.2 x 9.6 mm |
| Weight | 163 g |
| Sensors | Accelerometer, proximity, compass |
| Key Features | Built-in stylus, Knock Code, capacitive touchscreen |
| Care and Cleaning | Use a soft, dry cloth; avoid moisture |
| Security | System updates, PIN code lock |
| Spare Parts and Repairability | Removable battery, replacement possible at authorized center |
Frequently Asked Questions - G4 Stylus Dual LG
User questions about G4 Stylus Dual LG
0 question about this device. Answer the ones you know or ask your own.
Ask a new question about this device
Download the instructions for your Cellphone in PDF format for free! Find your manual G4 Stylus Dual - LG and take your electronic device back in hand. On this page are published all the documents necessary for the use of your device. G4 Stylus Dual by LG.
USER MANUAL G4 Stylus Dual LG
LG LG Electronics, Inc. 2016 ©
Lg Group
1
YouTube™ Gmail™ Google Maps™ Google™ Google, Inc. Play Store™ Hangouts™
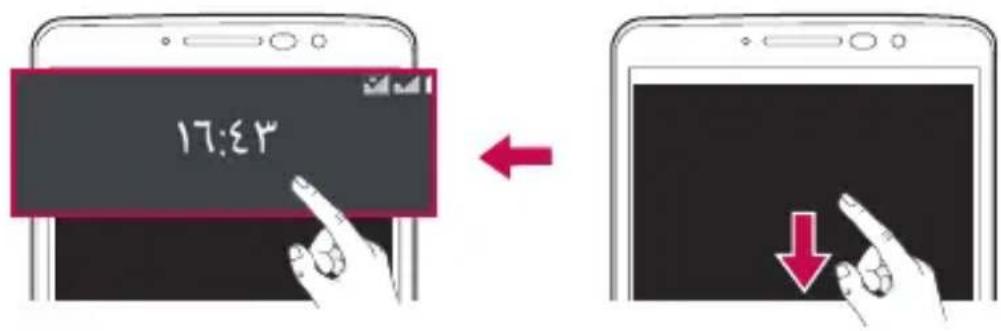
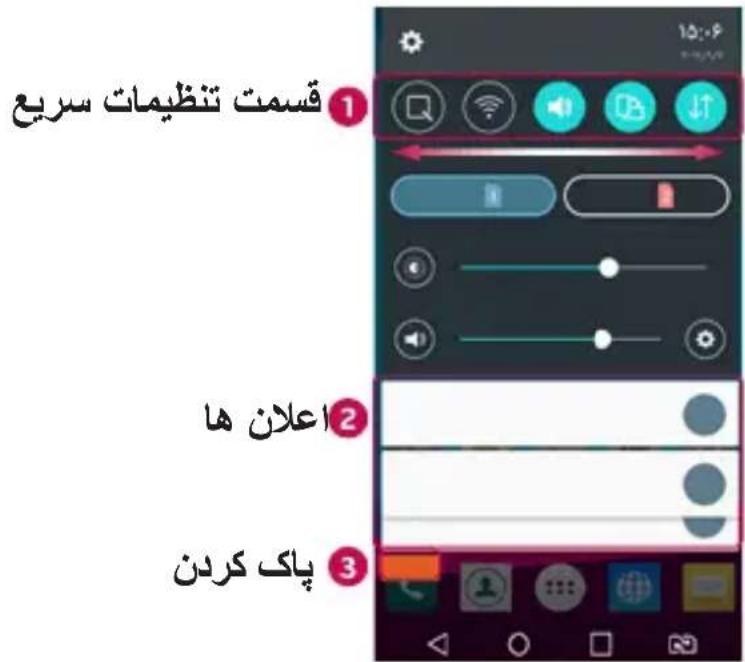
J
- Wi-Fi
39.............Bluetooth - Wi-Fi Direct
41.. jglll jj
42 - 44
44
44 - 46
- 47
- 48
-
49.
- 17.....USIM SIM
- 1
27 - Knock Code
-
34.......Capture+
36......Google
36....Google
36......Google - 1
- 1
-
84.
- FM
- 64......Chrome
- 71
77..LG Bridge
Jg
1 1
gila
aillllg lalil 1yol g oog yjly jia bbll aalll
jill lll 1111111111111111111111
LG no 20000000000000000000000000000000000000000000000
aaiil jiee ole! 11 10
.(SAR)
LGG-H540 Jgall jpa
aLw jaaee aalee 1slll 1111111
J11cYI 1
J 1 J 1 1 1 1 1 1 1 1 1 1 1 1 1 1 1
JLJALI LAc JJIJIJI JIJIJIJIJIJIJIJIJIJIJIJIJIJIJIJIJIJIJIJIJIJIJIJIJIJIJIJIJIJIJIJIJIJIJIJIJIJIJIJIJIJIJIJIJIJIJIJIJIJIJIJIJIJIJIJIJIJIJIJIJIJIJIJIJIJIJIJIJIJIJIJIJIJIJIJIJIJIJIJIJIJIJIJIJIJIJIJIJIJIJIJIJIJIJIJIJIJIJIJIJIJ
J 1
LGLaJSAAR
L 15
Commission 10000000000000000000000000000000000000000000000000000000000000000000000000000000
2 on Non-lonizing Radiation Protection (ICNIRP)
.10 1
0.509 JdJn jI 1e JdJy JjSAR
(10) 0.426 (10)
(RF)
1.5 1c g j
p 10000000000000000000000000000000000000000000
1.5 15
y
J 1
12 1 1 1 1 1 1 1 1 1 1 1 1 1 1 1 1 1 1 1 1 1 1 1 1 1 1 1 1 1 1 1
JyI JiaS1
aillg iiaally
j

J. 1
J 1
1 1
1 1
J 1
.
y Jlll l 1e. dIy aalil jil gll llbi laaia aiaai
a a a a a a a a a a a a a a a a a a
Jll
aLwY 1 jgaiabwIgAoc Aie! pae sIle . gao yjdo jy k jlln
y
2
.
y

g g g g g g g g g g g g g g g g g g g g g g g g g g g g g
Jgaa gss
J 1
a
.
i
Jg jgl g Jg jgl jgl jgl jgl jgl jgl jgl jgl jgl jgl jgl jgl jgl jgl jgl jgl jgl jgl jgl jgl jgl jgl jgl jgl jgl jgl jgl jgl jgl jgl jgl jgl jgl jgl jgl jgl jgl jgl jgl jgl jgl jgl jgl jgl jgl jgl jgl jgl jgl jgl j
y 1
jaiy jaiy jaiy jaiy jaiy jaiy jaiy jaiy jaiy jaiy jaiy jaiy jaiy jaiy jaiy jaiy jaiy jaiy jaiy jaiy jaiy jaiy jaiy jaiy jaiy jaiy jaiy jaiy jaiy jaiy jaiy jaiy jaiy jaiy jali y
.
ailll gll 1000
y
aJoo
a
.
.
Jb
aallll llll 1 aagall jno aaal gaaaii
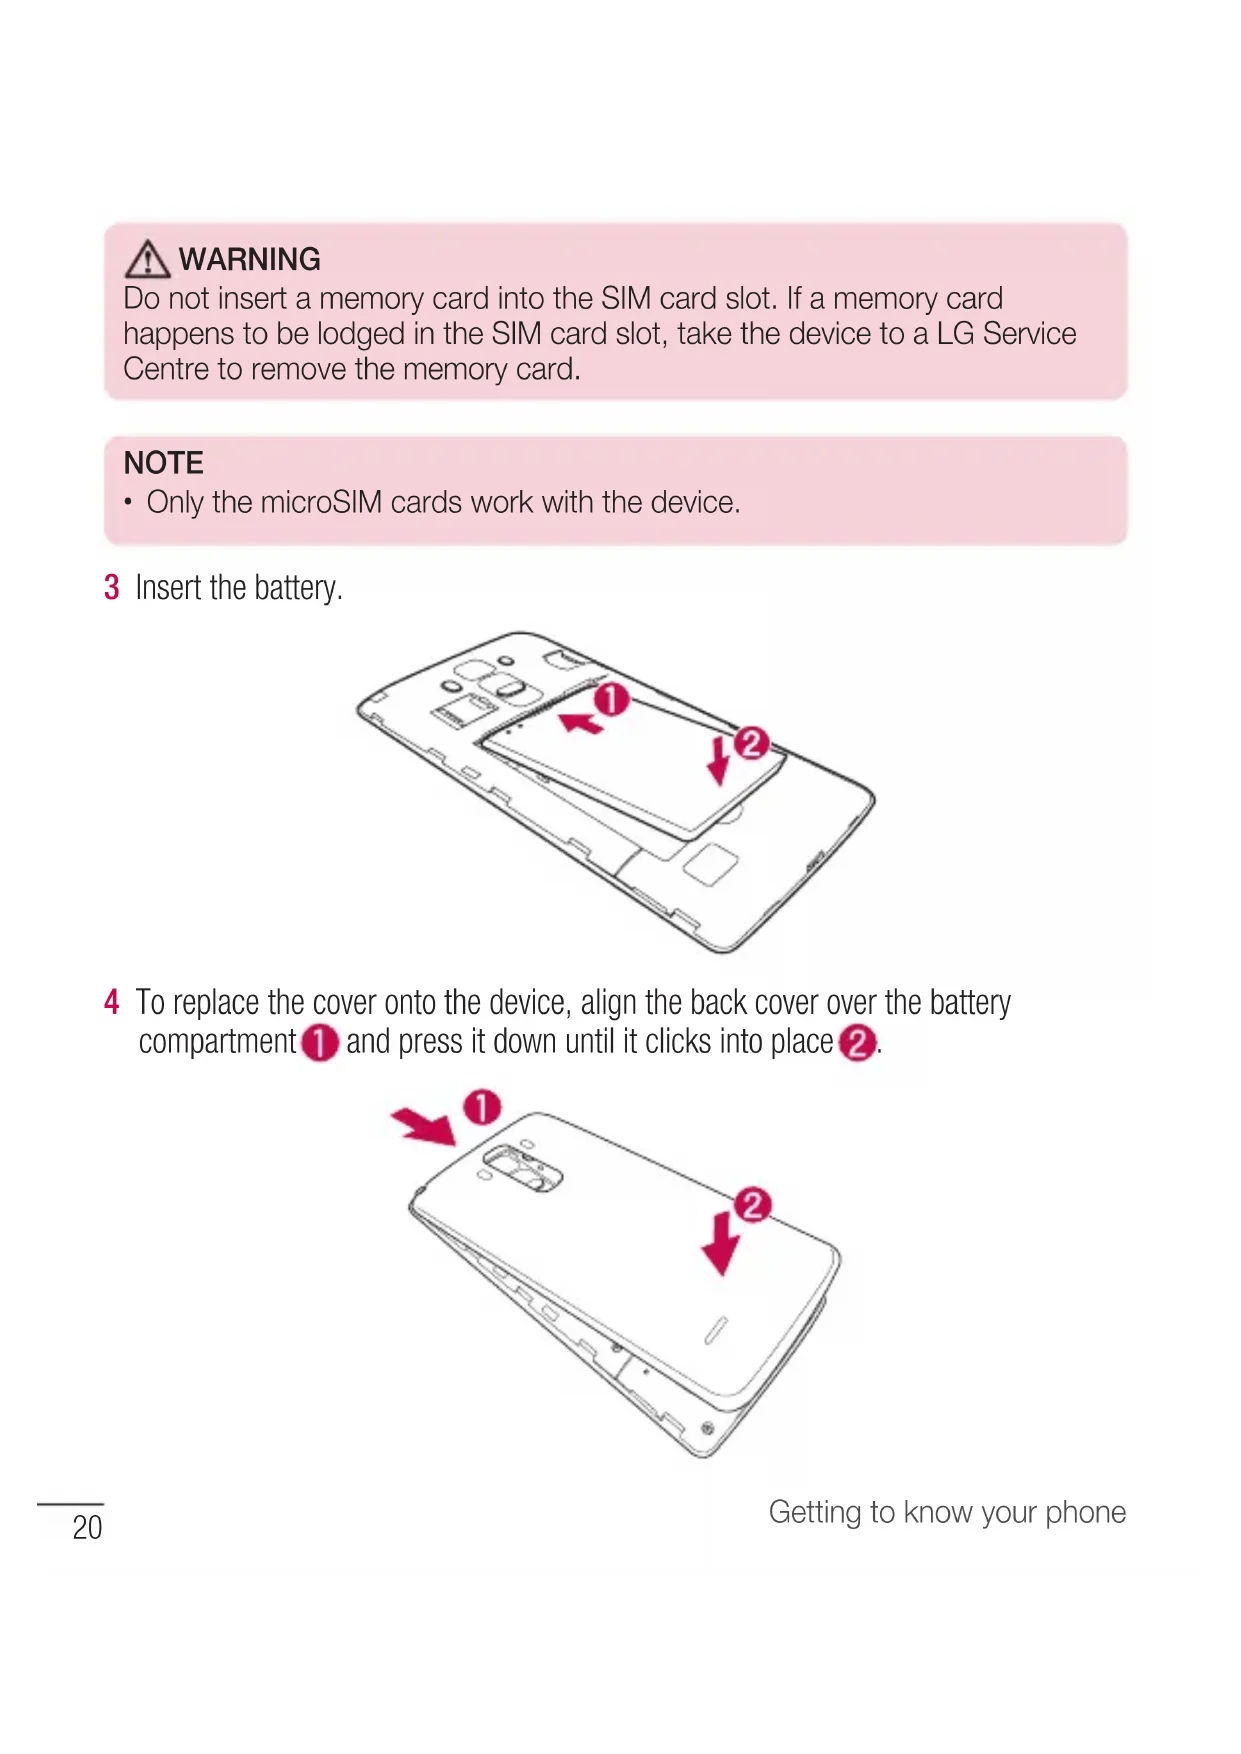
3
J 1
4
J 1
a
1
1 1
aillg 1
10 Jd aill 5s jy daiall alalll nss lnd y Jilw y Jilq.
Jl bill Jt cll ll lll jn jn nn jn nn jn nn jn nn jn nn jn nn jn nn jn nn jn nn jn nn jn nn jn nn jn nn jn nn jn nn jn nn jn nn jn nn jn nn jn nn jn nn jn nn jn nn jn nn jn nn jn nn jn nn jn nn jn nn jn nn jn nn jn nn jn nn jn nn
:
< < < 1
2
3
a.2
1
:dl
J 1 J 1 J 1 J 1 J 1 J 1 J 1 J 1 J 1 J 1 J 1 J 1 J 1 J 1 J 1 J 1 J 1 J 1 J 1 J 1 J 1 J 1 J 1 J 1 J 1 J 1 J 1 J 1 J 1 J 1 J 1 J 1 J 1 J 1 J
aaii 5
yI 1111111111111111111111111111
#
aillbbs
aai 1jia jia jia
a a a a a a a a a a a a a a a a a a a a a a a a
aal
ylll lalal alaas no qubbi allj!
.
边
aiee
1
.
2
3
1
1
2
-9
aaii iiaii 1
1
Xia aoll So j! cll y Jy
Jlalll lcl jolj Jg rjbj. 1e o jor jy jla Jg g
.
边
aaii gao aaiiaalg g jgiall jai
1
y 1
S BCA = S COD + S_ BDO

1
1
3
aall bry jgall
e 1
J 1
1
Jg j 1 Jg 1 Jg 1 Jg 1 Jg 1
J 1
aal 1 1 aal 1 1 aal 1 1 aal 1 1 aal 1 1 aal 1 1 aal 1 1
S OBC = S COD + S_ BOC
a 1 a bai jao jia jia jia jia
-1 - 1
1
J 1
auii i 1
1
1
2
四四四 15
1
2
边
Knock Code
Jn 4e g o m Jdall Jck Code jnnn n nn n nn n nn n nn n nn n nn n nn n nn n nn n nn n nn n nn n nn n nn n nn n nn n nn n nn n nn n nn n nn n nn n nn n nn n nn n nn n nn n nn n nn n nn n nn n nn n nn n nn n nn n nn n nn n nn n nn n nn n nn n nn n nn n nn n nn n nn n nn n nn n nn n nn nnnn
J 6Knck Code 1
PIN /google
.
< < < < < < < < < < < < < < 1 .Knock Code
Knock Code 2 8 6 Knock Code
Knock Code
basi
a
Capture+ g < < 0 le biin
.
Gill 1c Joo,Google 1d jlll J.
.
5
6
ai a ai 的最小值为 k .
aia jallg aaiiie < aie 100000000000000000000000000000000000000000000000000
Google
3
Google 4
Google 5
(1jgioaLillllJusl 1)
acllooll 14 lcbioi g .lollolll bnnn nn nnnn nnnn nnnn nnnn nnnn
5
四边形
.
在 Rt ABD 中:
2
1
gddg g aalssall jzj 1aalll Js
aalll jlll lll
CllSsll
i
y
1
2
Goo 1
$$ . c l a w y 1 \text {c i d} ① < \bigcirc s l c b i n j 1 $$
$$ . \text {i} _ {\text {i}} \text {i} _ {\text {i}} \text {i} _ {\text {i}} \text {i} _ {\text {i}} \text {i} _ {\text {i}} \text {i} _ {\text {i}} \text {i} _ {\text {i}} \text {i} _ {\text {i}} \text {i} _ {\text {i}} \text {i} _ {\text {i}} 2 $$
$$ \therefore \text {d i s t a t e} \quad \left. \begin{array}{l} \text {p r} \end{array} \right| \text {d i s t a t e} \quad \left. \begin{array}{l} \text {j d} \end{array} \right| < \bigcirc_ {\mathrm {s c}} \text {b i z o u l} 1 $$
$$ \therefore \frac {1}{2} \rho_ {w} < \left| \frac {1}{2} \omega_ {w} ^ {\prime} \right| \left| \frac {1}{2} \dot {\alpha} _ {w} ^ {\prime} \right| < \because \frac {1}{2} b _ {w} = 2 $$
$$ \left. \int_ {0} ^ {1} \frac {\sin x}{x - 1} d x + \int_ {1} ^ {2} \frac {\cos x}{x - 1} d x\right) = \int_ {0} ^ {1} \frac {\sin x}{x - 1} d x + \int_ {1} ^ {2} \frac {\cos x}{x - 1} d x $$
$$ . \dot {a} \dot {a} \dot {a} \dot {a} \dot {a} $$
$$ \therefore \text {a l l} \omega \rightarrow \lambda \text {l o g e} \lambda \rightarrow 4 $$
$$ b i a s c b i v i a l 5 $$
a
A
aalaa
$$ . c l a w \downarrow \text {c i d} ① < \bigcirc \downarrow c b i z o l 1 $$
$$ \therefore \text {a l l a l l} \text {i n} \text {j e r} \text {p w} \text {l} \text {c} \text {b i e s o l} 2 $$
$$ \therefore \text {a l l} \quad \text {a l l} \quad \text {a l l} \quad \text {a l l} \quad \text {a l l} \quad \text {a l l} \quad \text {a l l} \quad \text {a l l} \quad \text {a l l} \quad \text {a l l} \quad \text {a l l} \quad \text {a l l} \quad 3 $$
aaiia aiai jaoaai j!
a#eall yie 10c < 0 c bia 1
aalal 2
3
a
aegaae
1
a_b = 70^
3
1
4
5
边 a_2
C
Jilu Jil
aegw g aegg w g ail g ddoia bilw g jilw g yaa jilw jllr jzj zj jy
S OBC = S COD + S_ BOC
0 < 1 < ( 0,12) ( 0,12) ÷ ( 0,14) = 0
2
1
边
.
$$ \text {,} \text {b a l l} + < \text {c h i d e r} < < < < < < < < < < < < $$
$$ \therefore \mathrm {i} \mathrm {g} \mathrm {j} \mathrm {k} \mathrm {l} \mathrm {l} \mathrm {l} \mathrm {l} \mathrm {l} \mathrm {l} \mathrm {l} \mathrm {l} \mathrm {l} \mathrm {l} \mathrm {l} \mathrm {l} \mathrm {l} \mathrm {l} \mathrm {l} \mathrm {l} \mathrm {l} \mathrm {l} \mathrm {l} $$
$$ \therefore \text {a l l} \quad \text {c u t a l} \quad \text {c u t a l} < \text {c u t a l} \quad \text {c u t a l} < \vdots < \boxed {\circ} < \boxed {\circ} < \bigcirc \text {a l c b i e s i n}. $$
$$ \therefore \mathrm {i} \mathrm {g} \mathrm {j} \mathrm {k} \mathrm {l} \mathrm {l} \mathrm {w} \mathrm {a} \mathrm {d} \mathrm {e} \mathrm {i} $$
$$ \left. \right.\left. \right.\left. \right.\left. \right.\left. \right.\left. \right.\left. \right.\left. \right.\left. \right.\left. \right.\left. \right.\left. \right.\left. \right.\left. \right.\left. \right.\left. \right.\left. \right.\left. \right.\left. \right.\left. \right.\left. \right.\left. \right.\left. \right.\left. \right.\left. \right.\left. \right.\left. \right.\left. \right.\left. \right.\left. \right.\left.\left.\left.\left. \text {一} ^ {\prime} = 1 ^ {\prime} + 1 ^ {\prime} + 1 ^ {\prime} + 1 ^ {\prime} + 1 ^ {\prime} + 1 ^ {\prime} + 1 ^ {\prime} + 1 ^ {\prime} + 1 ^ {\prime} + 1 ^ {\prime} + 1 ^ {\prime} + 1 ^ {\prime} + 1 ^ {\prime} + 1 ^ {\prime} + 1 ^ {\prime} + 0 ^ {\prime} + 1 ^ {\prime} + 1 ^ {\prime} + 1 ^ {\prime} + 1 ^ {\prime} + 1 ^ {\prime} + 1 ^ {\prime} + 1 ^ {\prime} + 1 ^ {\prime} + 1 ^ {\prime} + 1 ^ {\prime} + 1 ^ {\prime} + 1 ^ {\prime} + 1 ^ {\prime} + 1 ^ {2} - 1 ^ {2} + 1 ^ {2} + 1 ^ {2} + 1 ^ {2} + 1 ^ {2} + 1 ^ {2} + 1 ^ {2} + 1 ^ {2} + 1 ^ {2} + 1 ^ {2} + 1 ^ {2} + 1 ^ {2} + 1 ^ {2} + 1 ^ {2} + 1 ^ {2} + 0 ^ {2} + 0 ^ {2} + 0 ^ {2} + 0 ^ {2} + 0 ^ {2} + 0 ^ {2} + 0 ^ {2} + 0 ^ {2} + 0 ^ {2} + 0 ^ {2} + 0 ^ {2} + 0 ^ {2} + 0 ^ {2} + 0 ^ {2} + 0 ^ {\prime} + 0 ^ {\prime} + 0 ^ {\prime} + 0 ^ {\prime} + 0 ^ {\prime} + 0 ^ {\prime} + 0 ^ {\prime} + 0 ^ {\prime} + 0 ^ {\prime} + 0 ^ {\prime} + 0 ^ {\prime} + 0 ^ {\prime} + 0 ^ {\prime} + 0 ^ {\prime} + 0 ^ {\prime} \right] < \right| < \right| < \right| < \boxed {②} < \boxed {③} < \boxed {④} < \boxed {⑤} < \boxed {⑥} < \boxed {⑦}. $$
$$ \cdot \rho a i < \Delta l j! < \Delta a i \Delta j $$
i
$$ \text {.} \text {e} _ {\text {i}} < \text {e} _ {\text {i}} < \text {e} _ {\text {i}} < \text {e} _ {\text {i}} < \text {e} _ {\text {i}} $$
slll llll llll
aI 1
1
2
aagaa aalg yddaiall jglll Jypa. llaolclawlaiae no
3
.
4
aalwagllwraar 5
aJlJlJ 6 le b
#
LgS Juaa aagaae bga aagaaaal baiy y gddiy 1rds 1rds
原不等式成立

1
1
3
4
15
6
J 7
8
1
边
a
aiaaa
Jc biaol . aaiil 1 jlll l 1 1 1 1 1 1 1 1 1 1
aalalalalalalalalalalalalalalalalal
P < < C ① b < c ②
204
a
4
5
aalalalalalalalalalalalalal
b = 1
2
.
4
四边形 AOBC 为正方形
.
5
0
.
a
aalalalalalalalalalalalalalalalalalalalalalalalal
.Screenshots
J 1
aalllg aaiiiee eae
#
i 1
1
a
la aal 8aall

中
2

iill jii iill lalal allll

边
aai jaojiaobial 10g juaibill 12 g y
g5 1aliiy jIi IeLaaw Juaaie
ab = 12
aaii jgo giaibial 1g g bill 2
#
#
y j 1
边
J 1
.
y
.
m = 311
Jlll Jlll
1
yI 1
sii iioi lioic jbi gill jia
ab · 2d = ab^2
aaii jgo iabiooll goojoull aag y
S APQ = S PQR + S_ RQR
< 1c b2al aegyrae ylll llll
aal aal 10
J
m = 311
.
J
S OBC = S COD + S_ BOC
aill 1y yiyg gll jauaii iil yl paae aalc y l qbi jnaiy
ii
$$ p a l l \quad c i l l \quad s! < \square \text {j a n d} \quad w o l l < \quad b i e l $$
$$ - g - $$

$$ < \lambda_ {1} s l _ {1} s \lambda_ {2} c l _ {2} s \lambda_ {3} > $$
SIM
SIM
SIM 1 - SIM 1
SIM 1 aaii bui i jil 1 1 -
1e 1
.SIM 2
SIM 2 aaii bui i jilie ie jiaie
1
aalal 1 -SIM
1 1
Jlss! g Jssll aalal alalall Sim 1y y y y
Aaiaaiai jaiilalai iin oolaiy1 1a
i 1
Jgall
SIM
MMS 1
a 1
SIM
12
Lililil
aal aaii aiee iiae eae 1
Wi-Fi
. Wl-Fi JU Wi-Fi
Bluetooth
.Bluetooth
Jgall
Jgall jlll lalw glll
Jgall jll lckl aol 1 1d 1
aagg gaae aee
Jg Jy Wi-Fi aLoo (Chrome
. Android
Jg
<ω>
gol
1
gaa
sllg sllalal aol al gell gss
SIM2 / SIM1
aannnnn nnnnnnnnnnnnnnnnnnnnnnnnnnnnnnnnnnnnnnnnnnnnnnnnnnnnnnnnnnnnnnnnnnnnnnnnnnnnnnnnnnnnnnnnnnnnn
1
<|j|>
jia 1
Lalks jie 1j 1j 1j 1j
SIM2 jzj / SIM1 jzj
J 1
C
i 1
a
aai
Jaaa aie 1e giaea! o Jai jaiyau yu e yu yu yu yu yu yu yu yu yu yu yu yu yu yu yu yu yu yu yu yu yu yu yu yu yu yu yu yu yu yu yu yu yu yu yu
Lai b
i 1
1
LED
LLED 1
J 1
- -SIM2 -SIM1
a aalll jjie bc baiall ie jjiu u juiis 10e -biai l i jia
a 1
a a a a a a a a a a a a a a a a a a
Aulil Jgol
lll/llwrrllj
aallll 1 jie jie jie jie jie jie jie jie jie jie jie jie jie jie jie jie jie jie jie jie jie jie jie jie jie jie jie jie jie jie jie jie jie jie jie jie jie jie
Lla JilwJg
auiui 1
<
auiui 1 auiuui
EasyHome
LG SmartWorld
Aie g w jaiy jg jll a d nn nnnn nn nnnn nnnn nnnn nnnn nnnn nnnn nnnn nnnn nnnn nnnn nnnn nnnn nnnn nnnn nnnn nnnn nnnn nnnn nnnn nnnn nnnn nnnn nnnn nnnn nnnn nnnn nnnn nnnn nnnn nnnn nnnn nnnn nnnn nnnn
a
<>
1
Ll 11 11 11 11 11 11 11 11 11 11 11 11 11
.
aiee 1e eae ee
aJzjIy jg 10
LG 1g
y
$$ \text {i} \left. \right.\left. \right.\left. \right.\left. \right.\left. \right.\left. \right.\left. \right.\left. \right.\left. \right.\left. \right.\left. \right.\left. \right.\left. \right.\left. \right.\left. \right.\left.\left.\left.\left.\left.\left.\left.\left.\left.\left.\left.\left.\left.\left.\left.\left.\left.\left.\left. 1 0 0 0 0 0 0 0 0 0 0 0 0 0 0 0 0 0 0 0 0 0 0 0 0 0 0 0 0 0 0 0 0 0 0 0 0 0 0 0 0 0 0 0 0 0 0 0 0 0 0 1 2 5 6 4 - - \right. - \right. - \right. - \right. - \right. - \right. - \right. - \right. - \right. - \right. - \right. - \right. - \right. - \right. - \right. - \right. - \right. - \right. - \right. - $$
$$ \therefore \angle D E F = 1 8 0 ^ {\circ} $$
$$ \left. \dot {a} _ {\mathrm {i}} \dot {g} _ {\mathrm {j}} \dot {a} _ {\mathrm {j}} \right\rvert \dot {a} _ {\mathrm {j}} \dot {g} _ {\mathrm {j}} \dot {a} _ {\mathrm {j}} \dot {a} _ {\mathrm {j}} \dot {a} _ {\mathrm {j}} \dot {a} _ {\mathrm {j}} \dot {a} _ {\mathrm {j}} \dot {a} _ {\mathrm {j}} \dot {a} _ {\mathrm {j}} \dot {a} _ {\mathrm {j}} \dot {a} _ {\mathrm {j}} \dot {a l e l y}. $$
$$ \therefore \text {g} _ {\mathrm {a}} = \text {g} _ {\mathrm {a}} + \text {g} _ {\mathrm {a}} - \text {g} _ {\mathrm {a}} $$
$$ \therefore \text {T o u c h a s s i n t} - $$
$$ l i g h t a l l o l o l y l e l b i l j q u i d j d o w n - a l l $$
$$ \left. \sum_ {i = 1} ^ {n} \frac {1}{i} \right\rvert \sum_ {j = 1} ^ {m} \frac {1}{j} \sum_ {k = 1} ^ {n - j} \frac {1}{k} \sum_ {l = 1} ^ {m - k} \frac {1}{l} \sum_ {m = 1} ^ {n - l} \frac {1}{m} $$
$$ \therefore \mathrm {a l l} \mathrm {a l l} \mathrm {j o b o g a b i a l s l i l} $$
$$ \begin{array}{c} \text {J g a g l i t y i s o l y j a n d j u a i s l .} \end{array} $$
$$ j j \leqslant c \text {i} \text {i} \text {i} \text {i} \text {i} \text {i} \text {i} \text {i} \text {i} \text {i} \text {i} \text {i} \text {i} \text {i} \text {i} \text {i} \text {i} \text {i} \text {i} \text {i} \text {i l} \text {i} \text {i} \text {i} \text {i} \text {i} \text {i} \text {i} \text {i} \text {i} \text {i} $$
$$ \therefore \Delta_ {A B C} = \frac {1}{2} \cdot \Delta_ {A C D} = \frac {1}{2} \cdot \Delta_ {A B C D} $$
$$ \begin{array}{c} \text {i l a t i} \ \text {i l a t i} \ \text {i l a t i} \ \text {i l a t i} \ \text {i l a t i} \ \text {i l a t i} \ \text {i l a t i} \ \text {i l a t i} \ \text {i l a t i} \ \text {i l a t i} \ \text {i l a t i} \end{array} $$
$$ \left. \right.\left. \right.\left. \right.\left. \right.\left. \right.\left. \right.\left. \right.\left.\left.\left.\left.\left.\left.\left.\left.\left.\left.\left.\left.\left.\left.\left.\left.\left.\left.\left.\left.\left.\left.\left.\left.\left.\left.\left.\right.\right.\right.\right.\right.\right.\right.\right.\right.\right.\right.\right.\right.\right.\right.\right.\right.\right.\right.\right.\right.\right.\right.\right.\right.\right.\right\rangle_ {0} ^ {1} = 0, 0, 0, 0, 0, 0, 0, 0, 0, 0, 0, 0, 0, 0, 0, 0, 0, 0, 0, 0, 0, 0, 0, 0, 0, 0, 0, 0, 0, 0, 0, 0, 0, 0, $$
$$ . \left(\frac {a a}{2} g\right) $$
$$ \begin{array}{c} \text {山 独 立 一} \ \text {i} \end{array} $$
$$ \left. \right.\left. \right.\left. \right.\left.\left.\left.\left.\left.\left.\left.\left.\left.\left.\left.\left.\left.\left.\left.\left.\left.\left.\left.\left.\left.\left.\left.\left.\left.\left.\left.\left.\left.\left.\left.\right.\right.\right.\right.\right.\right.\right.\right.\right.\right.\right.\right.\right.\right.\right.\right.\right.\right.\right.\right.\right.\right.\right.\right.\right.\right.\right.\right.\right.\right.\right. $$
$$ \left. \right.\left. \right.\left. \right.\left.\left.\left.\left.\left.\left.\left.\left.\left.\left.\left.\left.\left.\left.\left.\left.\left.\left.\left.\left.\left.\left.\left.\left.\left.\left.\left.\left.\left.\left.\left.\right.\right.\right.\right.\right.\right.\right.\right.\right.\right.\right.\right.\right.\right.\right.\right.\right.\right.\right.\right.\right.\right.\right.\right.\right.\right.\right.\right.\right.\right.\right. $$
$$ \left. \right.\left. \right.\left. \right.\left. \right.\left.\left.\left.\left.\left.\left.\left.\left.\left.\left.\left.\left.\left.\left.\left.\left.\left.\left.\left.\left.\left.\left.\left.\left.\left.\left.\left.\left.\left.\left.\right.\right.\right.\right.\right.\right.\right.\right.\right.\right.\right.\right.\right.\right.\right.\right.\right.\right.\right.\right.\right.\right.\right.\right.\right.\right.\right.\right.\right.\right. $$
$$ . \dot {A} \dot {a} \dot {a} \dot {a} \dot {a} \dot {a} \dot {a} \dot {a} \dot {a} \dot {a} \dot {a} \dot {a} \dot {a} \dot {a} \dot {a} \dot {a} \dot {a} \dot {a} \dot {a} \dot {a} \dot {a} $$
$$ G o o l g e $$
$$ . \text {G o o g l e} \quad \text {G o o g l e} \quad \text {G o o g l e} \quad \text {G o o g l e} \quad \text {G o o g l e} \quad \text {G o o g l e} \quad \text {G o o g l e} $$
i 1
J 1
.QuickMemo+
i 1
i 1
.
jR SIMPIN -SIM
.PIN
a 1
1
a
. Play gog
a 1
sllj jy jil
-
1JgUgUgUgUgUgUgUgUgUgUgUgUgUgUgUgUgUgUgUgUgUgUgUgUgUgUgUgUgUgUgUgUgUgUgUgUgUgUgUgUgUgUgUgUgUgUgUgUgUgUg
alie 11 llll 100 g g aall 11 11 11 11 11 11 11
.Wi-Fi,VPN
y 1
iio 1000000000000000000000000000000000000000000
-
.
Trust agents
aaii i aiee baae eae bi aaii jai jai ai
aaiiie iiae ie eae ee eae eae eae eae eae eae eae eae eae eae eae eae eae eae eae eae eae eae eae eae eae eae eae eae eae eae eae eae eae eae eae eae eae eae eae eae eae
| x1| = | x2|
< 4.511 a11g>
QuickCircle
J 1 1 1 1 1 1 1 1 1 1 1 1 1 1 1 1 1 1 1 1 1 1 1 1 1 1 1 1 1 1 1
.
a
a
a 1
a jd jll dil l 100
<
a
USB
jglj jn jg jlg jgl jgl jgl jgl jgl jgl jgl jgl jgl jgl jgl jgl jgl jgl jgl jgl jgl jgl jgl jgl jgl jgl jgl jgl jgl jgl jgl jgl jgl jgl jgl jgl jgl jgl jgl jgl jgl jgl jgl jgl jgl jgl jgl jgl jgl jgl jgl jgl jgl jgl j
Jgaoall
aIbI ggi 1
a 1
1 1 1 1 1 1 1 1 1 1 1 1 1 1 1 1 1 1 1 1
a 1
J 1 J 1 J 1 J 1 J 1 J 1 J 1 J 1 J 1 J 1 J 1 J 1 J 1
J 1
%10 8
a
sll
jll laii lii i 11 11 11 11 11 11 11 11
1
奇及 lc
J 1
.
buai 1scl!gblj
slllgl 1
Lgbljglge gogaglllglgale 1 -LG Backup
g
Wi-Fi 10000000000000000000000000000000000000
1
.
A
aill llll bua aaley jilai ll g waaal aalll lllbuae
suii iieiiee ieieieieieieieieieieieieieieieieieieieieieieieieieieieieieieieieieieieieieieie
Android
.
LG Bridge
L G Bridge
- 4.
LG Bridge
aaii iaii iaiia iaiia iaiia iaiia iaiia iaiia
i
s
1 1
S ACD = S COD + S_ BDO
0
g j 1
.
J 1
.
. 1240 0 0 0 0 0 0 0 0 0 0 0 0 0 0 0 0 0 0 0 0
ai a ai 与 i -1
i 1
115 111
.
J 1 J
Laii 111111111111111111111111111
i 1
J 1 1 1 1 1 1 1 1 1 1 1 1 1 1 1 1 1 1 1 1 1 1 1 1 1 1 1 1 1 1 1 1
i 1
1
J
1 1
1

i 1
.2g
1 1
4
.
s
J 1 J 1 J 1 J 1 J 1 J 1 J 1 J 1 J 1 J 1 J 1 J 1 J 1 J 1 J 1 J 1 J 1 J 1 J 1 J 1 J 1 J 1 J 1 J 1 J 1 J 1 J 1 J 1 J 1 J 1 J 1 J 1 J 1 J 1 J
Jai
J 1
2
1 11111111111111111111111111
L
.115 1111111111111111111111111111
S
sulal
J 1
J 1
J 1 J 1 1 1 1 1 1 1 1 1 1 1 1 1 1 1 1 1 1 1 1 1 1 1 1 1 1 1 1 1 1 1 1 1
. 1
. 1
J 1 J 1 J 1 J 1 J 1 J 1 J 1 J 1 J 1
. 1
1 1
.
j 1
i 1
J 1
aai bai bai bai bai bai bai
.
1ab. jjiljil jy djjjw bgi dgl Jaaillgii Jaiiia g
Jd jdi j J 1j 1j 1j 1j 1j 1j 1j 1j 1j
J 1
LG Electronics
J 1 J 1 J 1 J 1 J 1 J 1 J 1 J 1 J 1 J 1 J 1 J 1 J 1 J 1 J 1 J 1 J 1 J 1 J 1 J 1 J 1 J 1 J 1 J 1 J 1 J 1 J 1 J 1 J 1 J 1 J 1 J 1 J 1 J 1 J
Jl jn Jn Jn Jn Jn Jn Jn Jn Jn Jn Jn Jn Jn Jn Jn Jn Jn Jn Jn Jn Jn Jn Jn Jn Jn Jn Jn Jn Jn Jn Jn Jn Jn Jn Jn Jn Jn Jn Jn Jn Jn Jn Jn Jn Jn Jn Jn Jn Jn Jn Jn
alkisi dsi jy g o
. 1
.
.
.
.
.
.
.
.
.
.
.
.
.
.
.
.
.
.
.
.
.
.
.
.
.
.
.
.
.
.
.
.
.
.
.
.
.
.
.
.
.
.
.
.
.
.
.
.
.
.
.
.
.
.
.
.
.
.
.
.
.
.
.
.
.
.
.
.
.
.
.
.
.
.
.
.
.
.
.
.
.
.
.
.
.
.
.
.
.
.
.
.
.
.
.
.
.
.
.
.
.
.
.
.
.
.
.
.
.
.
.
.
.
.
.
.
.
.
.
.
.
.
.
.
.
.
.
.
.
.
.
.
.
.
.
.
.
.
.
.
.
?
- - -
- - -
Jl 1111111111111111111111111111111111111111111
L-G Electronics(Levant)
,
4a1b 5
!blui
J 1 J 1 J 1 J 1 J 1 J 1 J 1 J 1 J 1 J 1 J 1 J 1 J 1 J 1 J 1 J 1 J 1 J 1 J 1 J 1 J 1 J 1 J 1 J 1 J 1 J 1 J 1 J 1 J 1 J 1 J 1 J 1 J 1 J 1 J
4
4.4.4.5
1 1
. 1
J 2
4
1 1
Smart Lock!
J 1 J 1 J 1 J 1 J 1 J 1 J 1 J 1 J 1 J 1 J 1 J 1 J 1 J 1 J 1 J 1 J 1 J 1 J 1 J 1 J 1 J 1 J 1 J 1 J 1 J 1 J 1 J 1 J 1 J 1 J 1 J 1 J 1
Smart Lock
10
Smart Lock < Jd< jg 2
Knock Code) 3
1 1
gai
.
.
g d 1000
ii 1i i 1i j 1j
1
4y1r2g 4y1r2g
1 1
45 45
1
()
a 1
oalil 1y y laaai jy jol alaii aai
i 1
2gS
i 1
.2g 1
4
Jy jy
20 5
slaik 45 1iie 1iiie 1iiaai 1g j 1 g j 1 i 1i i 1
.
山
1 1 1 1 1 1 1 1 1 1 1 1 1 1 1 1 1 1 1 1 1 1 1 1 1 1 1 1 1 1 1 1 1 1 1 1 1 1 1 1
1
.
山
.
3
4
5
J 1 J 1 J 1 J 1 J 1 J 1 J 1 J 1 J 1
1
2
. 1250da 1 1
3
i
y 1 y

50 1
Knck Code 5
G
J
J
J
J
J
4
Knock Code 6
Knock Code < 4< < 4< < < < < < < 1 Knock Code 2
Knock Code jla Jd K J
Knock Code 1
Knock Code 1
A
y 1 y
.1
2
1
1 1111111111111111111111111111
1 1 1 1 1 1 1 1 1 1 1 1 1 1 1 1 1 1 1 1 1 1 1 1
4
J 1 J 1 J 1 J 1 J 1 J 1 J 1 J 1
1
2
+
a 1
山
J 1
iiS oaii+
. 1
2
| .سیده بزدی نهان کل اخورن سیده پزیره نهان کل اخورн | |
| .سیده بزدی نهان کل اخورن سیده پزیره نهان کل اخورн | |
| . پزیره پزیره نهان کل اخورн | T |
| . پزیره پزیره نهان کل اخورн | |
| . پزیره پزیره نهان کل اخورн | |
| . پزیره پزیره نهان کل اخورн | |
| . پزیره پزیره نهان کل اخورн | |
| . پزیره پزیره نهان کل اخورн | |
| . پزیره پزیر. سیده پزیره نهان سیده پزیره نهان سیده پزیره نهان سیده پزیره نهان سیده پزیره نهان سیده پزیره نهان سیده پزیره نهان سیده پزیره نهان سیده پزیره نهان سیده پزیره نهان slovakistan slovakistan slovakistan slovakistan slovakistan slovakistan slovakistan slovakistan slovakistan slovakistan slovakistan slovakistan slovakistan slovakistan slovakistan slovakistan slovakistan slovakistan slovakistan slovakistan slovakistan slovakistan slovakistan slovakistan slovakistan slovakstan slovakistan slovakistan slovakistan slovakistan slovakistan slovakistan slovakistan slovakistan slovakistan slovakistan slovakistan slovakistan slovakistan slovakistan slovakistan slovakistan slovakistan slovakistan slovakistan slovakistan slovakistan slovakistan slovakistan slovakistan slovaklan slovakistan slovakistan slovakistan slovakistan slovakistan slovakistan slovakistan slovakistan slovakistan slovakistan slovakistan slovakistan slovakistan slovakistan slovakistan slovakistan slovakistan slovakistan slovakistan slovakistan slovakistan slovakistan slovakistan slovakistan slovakran slovakistan slovakistan slovakistan slovakistan slovakistan slovakistan slovakistan slovakistan slovakistan slovakistan slovakistan slovakistan slovakistan slovakistan slovakistan slovakistan slovakistan slovakistan slovakistan slovakistan slovakistan slovakistan slovakistan slovakistan slovaktan slovakistan slovakistan slovakistan slovakistan slovakistan slovakistan slovakistan slovakistan slovakistan slovakistan slovakistan slovakistan slovakistan slovakistan slovakistan slovakistan slovakistan slovakistan slovakistan slovakistan slovakistan slovakistan slovakistan slovakistan slovakiston slovakistan slovakistan slovakistan slovakistan slovakistan slovakistan slovakistan slovakistan slovakistan slovakistan slovakistan slovakistan slovakistan slovakistan slovakistan slovakistan slovakistan slovakistan slovakistan slovakistan slovakistan slovakistan slovakistan slovakistan slovakTRAN slovakistan slovakistan slovakistan slovakistan slovakistan slovakistan slovakistan slovakistan slovakistan slovakistan slovakistan slovakistan slovakistan slovakistan slovakistan slovakistan slovakistan slovakistan slovakistan slovakistan slovakistan slovakistan slovakistan slovakistan slovaktran slovakistan slovakistan slovakistan slovakistan slovakistan slovakistan slovakistan slovakistan slovakistan slovakistan slovakistan slovakistan slovakistan slovakistan slovakistan slovakistan slovakistan slovakistan slovakistan slovakistan slovakistan slovakistan slovakistan slovakistan slovak, slovakistan slovakistan slovakistan slovakistan slovakistan slovakistan slovakistan slovakistan slovakistan slovakistan slovakistan slovakistan slovakistan slovakistan slovakistan slovakistan slovakistan slovakistan slovakistan slovakistan slovakistan slovakistan slovakistan slovakistan slovakistan |
1
. 1


4
.
3
+
4
0000
Capture+ 000
1<
1
J 1
1
. 2
3
4
.
5
6
i 1
Jg
1
Google < 2
3
4
5
()
Jl Jg, g, g, g, g, g, g, g, g, g, g, g, g, g, g, g, g, g, g, g, g, g, g, g, g, g, g, g, g, g, g, g, g, g, g, g, g, g, g, g, g, g, g, g, g, g, g, g, g, g, g,
#
J 1 J 1 J 1 J 1 J 1 J 1 J 1 J 1 J 1 J 1 J 1 J 1 J 1 J 1 J 1 J 1 J 1 J 1 J 1 J 1 J 1 J 1 J 1 J 1 J 1 J 1 J 1 J 1 J 1 J 1 J 1 J 1 J 1 J 1 J
la
Wi-Fi
A (AP) 1
Wi-Fi sfa
Wi-Fi < 100 kbps/s, j< < 100 s 1 Wi-Fi glksgw g Wif-Wi-Fi 2
1
3
4
4
MAC 14s s s s s s s s s s s s s s s s s s s s s s s s s s s s s s s s s s s s s s s s s s s s s s s s s
Bluetooth
y 1
4
J 1 1 1 1 1 1 1 1 1 1 1 1 1 1 1 1 1 1 1 1 1 1 1 1 1 1 1 1 1 1 1 1 1 1 1 1 1 1 1 1
F
Bluetooth<la 1
2
.
gss sss ssss 1rds ggs 0dLs glgals
.
3
L
4
i j 1
1 1
4.1.2.3.4.5.6.7.8.9.10.11.12.13.14.15.16.17.18.19.20.21.22.23.24.25.26.27.28.29.30.31.32.33.34.35.36.37.38.39.40.41.42.43.44.45.46.47.48.49.50.51.52.53.54.55.56.57.58.59.60.61.62.63.64.65.66.67.68.69.70.71.72.73.74.75.76.77.78.79.80
1
4
glaia laa lao gaiai jka aai jai jai jai jai jai jai jai jai jai jai jai jai jai jai jai jai jai jai jai jai jai jai jai jai jai jai jai jai jai jai jai jai jai jai jai jai jai jai jai jai
J 1
Bluetooth < 10000 < 10000 1
2 1
3
1
Wi-Fi Direct
Wi-Fi 45
i5
Wi-Fi Direct
. Wf-Fi < 4k j< < < 1
Wi-Fi Direct < Wi-Fi< 2
4
W W
a
15 15
a1 = 23a0 = - 23
1
2
3
S ACD = S COD + S_ DCE
LGD Android Platform Driver
(MTP)
| الله صيره محيىي | |
| الله بنا نزه | الله علد |
| الله بنا نزه. Windows Media Player 10 | Window Media Player |
LA JUULI
J
1
2x 2
3 3
4
0+ 1
Jbla
1
2
1
3
i
.
.
4
1
p
1
.2 1
3
4
.
. 5
4
1
Jaa
.1
2
1 3^x - 2 = 0
a 1
.
.
uaii
45
1
1<80
2
J 1 J 1 J 1 J 1 J 1 J 1 J 1 J 1 J 1
. 1
2
1
2
3
1
4
5
4yLc 190
44 1000000000000000000000000000000000000000
12 ①
dDc 200000000000000000000000000000
. 1
2
3
dDc JyJyblzjblz
1
2
3
a
0g
1
2
3
1
4
.
5
4
iuiuie iuii juii iuii iuii iuii iuii iuii iuii iuii iuii iuii iuii iuii iuii iuii iuii iuii iuii iuii iuii iuii iuii iuii iuii iuii iuii iuii iuii iuii iuii iuii iuii iuii iuii iuii i
oJi jn oJaiuI y gdo s yio 5y Jr sl ailw jz g iia plj ss j laa j
( L - L) = ( L - L) _L
. 1
2
4
20 1
3
48 4
. 1
5
145
19 0000000000000000000000000000000000000000000
4
.
glai
1 45
1
i
I 1
.
.

Gmail j j k l s k d a r j l j b i j b i j b i j b i j b i j b i j b i j b i j b i j b i j b i j b i j b i j b i j b i j b i j b i j b i j b i j b i j b i j b i j b i j b i j b i j b i j b i j b i j b i j b i j b i j b i j b i j b i
J
Jai aai jy Jy
J 1
.
:
. 0
:
. 1 < < < 0
S AOB = S COD + S BOC - S BOC
< < < < < < 0
1
L
. 100000000000000000000000000000000000000000000
1 1
J
. 1
2
1 1
3
4
5 5
6 6
iaiia
1
.
1
2
3
1J 4
1
5
6
7
8
9
4g
Aa
J 1 J 1 J 1 J 1 J 1 J 1 J 1 J 1 J 1 J 1 J 1 J 1 J 1 J 1 J 1
1
.
[\text{A}]
1 1
1
2
3
#
1
m = 311
J 1
1
2
3
4
#
1J 1
1
1
2
laolji
iinilj
J 1
$$ \begin{array}{l} . \text {d i s t} j \text {i n} \text {i n} j \text {i n} j < \quad \text {L} \ll \text {S} \quad \bigcirc \quad 1 \ \cdot \text {d i s t r i b u t i o n} \left. \frac {\partial f}{\partial x} + \frac {\partial f}{\partial y} + \frac {\partial f}{\partial z}\right) = 0 \ . \text {d i s t r i b u t i o n} \ . \text {d i s t r i b u t i o n} \left[ \begin{array}{l l l l l l l l l l} \frac {\partial \phi}{\partial x} & \frac {\partial \phi}{\partial y} & \frac {\partial \phi}{\partial z} & \frac {\partial \phi}{\partial z} & \frac {\partial \phi}{\partial y} & \frac {\partial \phi}{\partial z} & \frac {\partial \phi}{\partial z} & \frac {\partial \phi}{\partial y} & \frac {\partial \phi}{\partial z} & 3 \end{array} \right] \ \end{array} $$
L
$$ . \text {d} \text {i} \text {i} \text {i} \text {i} \text {i} \text {i} \text {i} \text {i} \text {i} \text {i} \text {i} \text {i} \text {i} \text {i} \text {i} \text {i} \text {i} \text {i} \text {i} \text {i} \text {1 0 0 0 0 0 0 0 0 0 0 0 0 0 0 0 0 0 0 0 0 0 0 0 0 0 0 0 0 0 0 0 0 0 0 0 0 0 0 0 0 0 0 0 0 0 0 0 0 0 0 1} $$
$$ . \text {d i s t} \quad 4 \quad \text {G G} \quad \text {G G} \quad \text {G G} \quad \text {G G} \quad \text {G G} \quad \text {G G} \quad \text {G G} \quad \text {G G} \quad \text {G G} \quad \text {G G} $$
4
A^ D = 90^
g
i 1
. 山 _ 山 1 <Google
2
ii 1 j 45
4
a
1000 - 1 = 1
1
.
laolji
4
.
P
4
i
.
215 19
4
.
m
#
J 1
4
A^ D = 90^
J2 2 2
i 1
115 1J 1 J 1 J 1 J 1 J 1 J 1 J 1 J
.
J 1 J
ii5 1 J 18 4 4 4
1
Iaiaiaiaiaiaiaiaiaiaiaiaiaiaiaiaiaiaiaiaiaiaiaiaiaiaiaiaiaiaiaiaiaiaiaiaiaiaiaiaiaiaiaiaiaiaiaiaiaiaiaiaiaiaiaiaiaiaiaiaiaiaiaiaiaiaiaiaiaiaiaiaiaiaiaiaiaiaiaiaiaiaia
i
JL 1 J 1 J 1 J 1 J 1 J 1 J 1 J 1 J 1 J 1 J 1 J 1 J 1 J 1 J 1 J 1 J 1 J 1 J 1 J 1 J 1 J 1 J 1 J 1 J 1 J 1 J 1 J 1 J 1 J 1 J 1 J 1 J 1 J 1 J
. 1 USB
Ji 1
. 1
sla 1
山
Wi-Fi USB USB
.
#
J 1
s 5
1 1
.
PVPN
45 45
J 1
1
j) 1
Android Wi-Fi
1
S OBC = S COD + S_ BOC
<
Laaia
1
< 1 + >
1
1 1
2 1
1
Sij
j j j j j j j j j j j j j j j j j j j j j j j j j j j j j j j j j j j j j j j j j j
$$ < \dot {z} > $$
$$ \hat {a} \hat {j} \hat {l} \hat {o} \hat {p} \hat {q} \hat {r} \hat {s} \hat {u} \hat {v} \hat {w} \hat {x} \hat {y} \hat {z} \hat {u} \hat {v} \hat {w} $$
$$ . \ddot {d} \dot {s} \dot {s} \dot {s} \dot {s} \dot {s} \dot {s} \dot {s} \dot {s} \dot {s} \dot {s} \dot {s} \dot {s} \dot {s} \dot {s} \dot {s} \dot {s} \dot {s} \dot {s} $$
$$ \dot {2} \omega / \dot {\omega} \omega \dot {\omega} 1 _ {\rho \omega} $$
$$ \therefore \lim _ {n \rightarrow \infty} \frac {\left| \sin (n + 1) \right|}{\left| \sin (n + 2) \right|} = \frac {1}{2} $$
$$ < \left{ \begin{array}{l} \Delta \ \Delta \end{array} ; y _ {c} \right} > $$
$$ \downarrow \downarrow \downarrow \downarrow $$
1
$$ \therefore \ddot {g} \dot {g} \ddot {g} g \dot {g} $$
$$ \Delta \Delta \Delta \Delta \Delta \Delta $$
1
$$ l a d o l i j $$
J 1 J 1 J 1 J 1 J 1 J 1
-Smart Lock
J 1
1 1
1
J 1
.
$$ \left. \right.\left. \right.\left. \right.\left. \right.\left. \right.\left. \right.\left. \right.\left. \right.\left. \right.\left. \right.\left. \right.\left. \right.\left.\left.\left.\left.\left.\left.\left.\left.\left.\left.\left.\left.\left.\left.\left.\left.\left.\left.\left.\left.\left.\left. \text {的} \right]\right]\right]\right]\right]\right]\right]\right]\right]\right]\right]\right]\right]\right]\right]\right]\right]\right]\right]\right]\right]\right] $$
$$ . \therefore \sum_ {i = 1} ^ {n} a _ {i} = \sum_ {i = 1} ^ {n} a _ {i} $$
$$ / \dot {s} \dot {s} \dot {s} \dot {s} \dot {s} \dot {s} \dot {s} \dot {s} \dot {s} \dot {s} \dot {s} \dot {s} \dot {s} \dot {s} \dot {s} \dot {s} \dot {s} \dot {s} \dot {s} \dot {s} \dot {s}. $$
$$ \left. \right. \int_ {0} ^ {\infty} \int_ {0} ^ {\infty} \int_ {0} ^ {\infty} \int_ {0} ^ {\infty} \int_ {0} ^ {\infty} \int_ {0} ^ {\infty} \int_ {0} ^ {\infty} \int_ {0} ^ {\infty} \int_ {0} ^ {\infty} \int_ {0} ^ {\infty} d x d y d z d r d s d t d u d v d w d x d y d z d r d s d t d u d v d w d x d y d z d r d s d t d u d v d w d x d y d z d r d s d t d u d v d w d x d y d z d r d s d t d u d v d w d x d y d z d r d s d t d u d v d w d x d y d z d r d w d x d y d z d r d s d t d u d v d w d x d y d z d r d s d t d u d v d w d x d y d z d r d s d t d u d v d w d x d y d z d r d s d t $$
$$ \therefore \mathrm {s} $$
$$ \omega_ {1} \omega_ {2} \omega_ {3} \omega_ {4} $$
$$ \begin{array}{l} \text {d i g w d l a l} \quad \text {d i g w d l a l} \quad \text {d i g w d l a l} \quad \text {d i g w d l a l} \quad \text {d i g w d l a l} \quad \text {d i g w d l a l} \quad \text {d i g w d l a l} \quad \text {d i g w d l a l} \quad \dots \ \text {d i g w d l a l} \quad \text {d i g w d l a l} \quad \text {d i g w d l a l} \quad \text {d i g w d l a l} \quad \text {d i g w d l a l} \quad \text {d i g w d l a l} \quad \dots \ \text {d i g w d l a l} + \text {d i g w d l a l} + \text {d i g w d l a l} + \text {d i g w d l a l} + \text {d i g w d l a l} + \text {d i g w d l a l} + \text {d i g w d l a l} + \text {d i g w d l a l} + \text {d i g w d} + j = 1, 2, 3, 4, 5, 6, 7, 8, 9, 1 0, 1 1, 1 2, 1 3, 1 4, 1 5, 1 6, 1 7, 1 8, 1 9, 2 0, 2 1, 2 2, 2 3, 2 4, 2 5, 2 6, 2 7, 2 8, 2 9, 3 0, 3 1, 3 2, 3 3, 3 4, 3 5, 3 6, 3 7, 3 8, 3 9, 4 0, 4 1, 4 2, 4 3, 4 4, 4 5, 4 6, 4 7, 4 8, 4 9, 5 0, 5 1, 5 2, 5 3, 5 4, 5 5, 5. \end{array} $$
$$ \therefore \frac {1}{2} x - 1 > 3 - \frac {3}{2} x $$
$$ < \rho_ {a} ^ {\text {造}} > $$
$$ \ddot {g} \dot {g} $$
$$ . \frac {1}{2} \frac {1}{2} \frac {1}{2} \frac {1}{2} \frac {1}{2} \frac {1}{2} \frac {1}{2} \frac {1}{2} \frac {1}{2} \frac {1}{2} \frac {1}{2} \frac {1}{2} \frac {1}{2} \frac {1}{2} \frac {1}{2} \dots $$
$$ : \rho \overrightarrow {a} 0 j 1. 2 1 $$
$$ . \frac {1}{2} \frac {1}{2} \frac {1}{2} \frac {1}{2} \frac {1}{2} \frac {1}{2} \frac {1}{2} \frac {1}{2} \frac {1}{2} \frac {1}{2} \frac {1}{2} \frac {1}{2} $$
$$ < \Delta_ {i} \Delta_ {j} \Delta_ {k} \Delta_ {l} \Delta_ {m} > $$
$$ \left( \begin{array}{l l} 1 & 0 \ 0 & 1 \end{array} \right) $$
$$ \therefore \lim _ {x \rightarrow - \infty} \frac {\sin x}{x ^ {2}} = \frac {\sin x}{x ^ {2}} $$
$$ \mathrm {J} \dot {\mathrm {S}} \dot {\mathrm {S}} \dot {\mathrm {S}} \dot {\mathrm {S}} \dot {\mathrm {S}} \dot {\mathrm {S}} \dot {\mathrm {S}} $$
$$ \therefore \text {i} \leqslant \text {i} \leqslant \text {i} \leqslant \text {i} \leqslant \text {i} \leqslant \text {i} \leqslant \text {i} \leqslant \text {i} \leqslant \text {i} \leqslant \text {i} \leqslant \text {i} \leqslants $$
$$ \Delta \Delta \Delta \Delta \Delta \Delta \Delta \Delta \Delta \Delta \Delta \Delta \Delta \Delta \Delta \Delta \Delta \Delta \Delta \Delta \Delta \Delta \Delta \Delta \Delta \Delta \Delta \Delta \Delta \Delta \Delta \Delta \Delta \Delta \Delta \Delta \Delta \Delta \Delta \Delta \Delta \Delta \Delta \Delta \Delta \Delta \Delta \Delta \Delta \Delta \Delta $$
$$ . \quad \text {i} _ {\text {i}} \text {i} _ {\text {i}} \text {i} _ {\text {i}} \text {i} _ {\text {i}} \text {i} _ {\text {i}} \text {i} _ {\text {i}} \text {i} _ {\text {i}} \text {i} _ {\text {i}} \text {i} _ {\text {i}} \text {i} _ {\text {i}} $$
$$ < \Delta^ {\prime} \Delta_ {0} ^ {\prime} \Delta_ {1} ^ {\prime} \dots \Delta_ {n} ^ {\prime} > $$
$$ \widehat {J} _ {i j k} ^ {j k} $$
$$ j _ {i} \dot {s} _ {i} j _ {j} \dot {s} _ {j} \dot {s} _ {i} \dot {s} _ {i} \dot {s} _ {i} \dot {s} _ {i} \dot {s} _ {i} \dot {s} _ {i} \dot {s} _ {i} \dot {s} _ {i} \dot {s} _ {i} \dot {s} _ {i} \dot {s} _ {i} \dot {s} _ {i}, $$
$$ \therefore \text {d i s t a t e} \quad \text {d i s t a t e} \quad \text {d i s t a t e} \quad \text {d i s t a t e} \quad \text {d i s t a t e} $$
$$ l a s i n g l e r e q u e n c y $$
$$ \therefore $$
G
<
115 4a 0 g j
J 1
. 1
.
1 1
原不等式成立
LGLG
.
-
i 1
y
1 1
1 1
.115 1
1
Wi-Fi jolldaii la 1 rJn Jn Jn Jn Jn Jn Jn Jn Jn Jn Jn Jn Jn Jn Jn Jn Jn Jn Jn Jn Jn Jn Jn Jn Jn Jn Jn Jn Jn Jn Jn Jn Jn Jn Jn Jn
15 15
$$ \left. \right.\left. \right.\left. \right.\left. \right.\left.\left.\left.\left.\left.\left.\left.\left.\left.\left.\left.\left.\left.\left.\left.\left.\left.\left.\left.\left.\left.\left.\left.\left.\left.\left.\left.\left.\left.\left.\right.\right.\right.\right.\right.\right.\right.\right.\right.\right.\right.\right.\right.\right.\right.\right.\right.\right.\right.\right.\right.\right.\right.\right.\right.\right.\right.\right.\right.\right. $$
$$ . \dot {a} \dot {j} $$
$$ \therefore \omega_ {i} = \omega_ {j} + \omega_ {k} + \omega_ {l} $$
$$ . \therefore \sum_ {i = 1} ^ {n} a _ {i} b _ {i} c _ {i} + \sum_ {i = 1} ^ {n} a _ {i} b _ {i} c _ {i} - \sum_ {i = 1} ^ {n} a _ {i} b _ {i} c _ {i} $$
$$ \left. \right.\left. \right.\left. \right.\left. \right.\left.\left.\left.\left.\left.\left.\left.\left.\left.\left.\left.\left.\left.\left.\left.\left.\left.\left.\left.\left.\left.\left.\left.\left.\left.\left.\left.\left.\left.\left.\right.\right.\right.\right.\right.\right.\right.\right.\right.\right.\right.\right.\right.\right.\right.\right.\right.\right.\right.\right.\right.\right.\right.\right.\right.\right.\right.\right.\right.\right. $$
$$ \therefore \frac {1}{2} x - 1 > 3 - \frac {1}{2} x $$
$$ \begin{array}{c} \text {i d i s t i n g} \ \text {i d i s t i n g} \end{array} $$
$$ \therefore \text {i s} _ {\mathrm {g}} \text {p a i r t i n} \cup \text {s w a l d} \text {d r o g j b j a n - s w a l d} $$
$$ \left. \cup_ {j} \omega_ {j} \omega_ {j} \omega_ {j} \omega_ {j} \omega_ {j} \omega_ {j} \omega_ {j} \omega_ {j} \omega_ {j} \omega_ {j} \omega_ {j} \omega_ {j} \omega_ {j} \omega_ {j} \omega_ {j} \omega_ {j} \omega_ {j}\right) - \text {T o u c h a s s i n t a n t -} $$
$$ \therefore \dot {g} \dot {w} \omega \omega \omega \omega \omega \omega \omega \omega \omega \omega \omega \omega \omega \omega $$
$$ \left. \left. \right| \text {与} \text {与} \text {与} \text {与} \text {与} \text {与} \text {与} \text {与} \text {与} \text {与} \text {与} \text {与} \text {与} \text {与} \text {与} \text {与} \text {与} \text {与} \text {与} \text {与} \text {与}\right) $$
$$ \therefore \frac {1 5}{2} = \frac {1 5}{2} $$
$$ \left. \int_ {0} ^ {\infty} \frac {1}{x} \frac {1}{x ^ {2}} \frac {1}{x ^ {3}} \frac {1}{x ^ {4}} \frac {1}{x ^ {5}} \frac {1}{x ^ {6}} \dots \right] $$
$$ \therefore \text {i s} \quad \text {i i i} \quad \text {i i i} \quad \text {i i i} \quad \text {i i i} \quad \text {i i i} \quad \text {i i i} \quad \text {i i i} \quad \text {i i i} $$
$$ \left. \right.\left. \right.\left. \right.\left. \right.\left.\left.\left.\left.\left.\left.\left.\left.\left.\left.\left.\left.\left.\left.\left.\left.\left.\left.\left.\left.\left.\left.\left.\left.\left.\left.\left.\left.\left.\left.\right.\right.\right.\right.\right.\right.\right.\right.\right.\right.\right.\right.\right.\right.\right.\right.\right.\right.\right.\right.\right.\right.\right.\right.\right.\right.\right.\right.\right.\right. $$
$$ \left. \right.\left. \right.\left. \right.\left. \right.\left.\left.\left.\left.\left.\left.\left.\left.\left.\left.\left.\left.\left.\left.\left.\left.\left.\left.\left.\left.\left.\left.\left.\left.\left.\left.\left.\left.\left.\left.\right.\right.\right.\right.\right.\right.\right.\right.\right.\right.\right.\right.\right.\right.\right.\right.\right.\right.\right.\right.\right.\right.\right.\right.\right.\right.\right.\right.\right.\right. $$
$$ . \dot {s} \dot {s} \dot {s} \dot {s} \dot {s} \dot {s} \dot {s} \dot {s} \dot {s} \dot {s} \dot {s} \dot {s} \dot {s} \dot {s} \dot {s} \dot {s} \dot {s} $$
$$ \mathrm {J} \mathrm {S} \mathrm {d} \mathrm {g} \mathrm {g} \mathrm {g} \mathrm {g} \mathrm {g} \mathrm {g} \mathrm {g} \mathrm {g} \mathrm {g} \mathrm {g} \mathrm {g} \mathrm {g} \mathrm {g} \mathrm {g} \mathrm {g} \mathrm {g} \mathrm {g} \mathrm {g} \mathrm {g} \mathrm {g} \mathrm {f} \mathrm {f} \mathrm {f} \mathrm {f} \mathrm {f} \mathrm {f} \mathrm {f} $$
$$ \therefore \text {d i s t r i b u t i o n} $$
$$ \begin{array}{c} \text {g u g u g u u u u u u u u u u u u u u u u u u u u u u u u u u u u u u u u u u u u u u u u u u} \ \end{array} $$
$$ \downarrow \downarrow \downarrow \downarrow \downarrow \downarrow \downarrow \downarrow \downarrow \downarrow \downarrow \downarrow \downarrow \downarrow \downarrow \downarrow \downarrow \downarrow \downarrow \downarrow \downarrow \downarrow \downarrow \downarrow \downarrow \downarrow \downarrow \downarrow \downarrow $$
a aaa aee aee aee aee aee aee
J 1
J 1000
-
jz
1
USB
J 1 J 1 J 1 J 1 J 1 J 1 J 1 J 1 J 1 J 1 J 1 J 1 J 1 J 1 J 1 J 1 J 1 J 1
#
. 0d1s 1 jy -g y
45 45
.
a 1
i
18% 100
.
#
1
laolji
g g j 1000000000000000000000000000000000000000000
i 1
iJwR
aaiin jn n nn nnnn nnnn nnnn nnnn nnnn nnnn nnnn nnnn nnnn nnnn nnnn nnnn nnnn nnnn nnnn nnnn nnnn nnnn nnnn nnnn nnnn nnnn nnnn nnnn nnnn nnnn nnnn nnnn nnnn nnnn nnnn nnnn nnnn nnnn nn
.
ilj jg
1 1
JL LG Backup
.2g 0
J Wl- Fi 00000000000000000000000000000000000000
J 1
J 1
. 202
1 1
.
iiilj145iiaai 4-4iiai j
s1 aiklks kss sddy g 1r2g -s1 aiklks gla dla j
j 1 j 1 j 1 j 1 j 1 j 1 j 1 j 1 j 1 j 1 j 1 j 1 j 1 j 1 j 1 j 1 j 1 j 1 j 1 j 1 j 1 j 1 j 1 j 1 j 1 j 1 j 1 j 1 j 1 j 1 j 1 j 1 j 1 j 1 j
oalw d w j 1 j b j 1 45 g i j dla 1 r c 1 1
.
J
J 1
必须使 a_n + 1 > a_n 成立
LG Bridge
Lg Bridge # LG Bridge jolaljol Jals Jai jy jy jy jy jy jy i 1 LGunified USB LG Bridge LG Bridge USB 1y USB 10000000000000000000000000000000000000000000000 Lg Bridge . www.lg.com 1 2 3 <4LgJLgLgLG Bridge 4 .1s| Mac OS Windows OS ${العربية} | ||
| Mi Mac OS X 10.7 (ب试点工作 64) | Windows XP 32-bit (Service Pack 3) Windows Vista 32-bit/64-bit Windows 7 32-bit/64-bit Windows 8 32-bit/64-bit Windows 8.1 32-bit/64-bit | اللهpticifier |
| اللهpticifier 1 بورزرير سورع نورزير | اللهpticifier 1 بورزرير | CPU |
| اللهpticifier 2 GB RAM | اللهpticifier 2 GB RAM | اللهpticifier |
| 32 $1,1024x768 ب试点工作 64 | 32 1,1024x768 | اللهpticifier |
| 500 $1,1024x768 مammen $1,1024x768 $1,1024x768 $1,1024x768 $1,1024x768 $1,1024x768 $1,1024x768 $1,1024x768 $1,1024x768 $1,1024x768 $1,1,024x768 $1,1024x768 $1,1024x768 $1,1024x768 $1,1024x768 $1,1024x768 $1,1024x768 $1,1024x768 $1,1024 x768 $1,1024 x768 $1,1024 x768 $1,1024 x768 $1,1024 x768 $1,1024 x768 $1,1024 x768 $1,1024 x768 1,1024 x768 | اللهpticifier | |
| LG unified1,1024xUSB | WindowsLG unified $1,1024xMedia Player 10 | اللهpticifier مورزير |
LG Bridge
Lg Bridge USB| الإستعمال | |
| USB نetworkات KMDS مصحيى بعس مصحيى نetworkات KMDS | بعس مصحيى نetworkات KMDS |
| USB نetworkات KMDS مصحيى بعس مصحيى بعس KMDS | LG backup |
J
i j LG o y 1 一 一 一 一 http://www.lg.com/common/index.jsp 1 iJ 1 g g g g g g g g g g g g g g g g g g g g g g g g g LGG j j j j j j j j j j j j j j j j j j j j j j j j j j j j j j j j j j j j j j j j j j 41 1 JUUB 1000 Jauo Joo 4 LGG Jd 1 i 1 (OTA) OTAOJ 1 # L G 45 i| الإستعمال | ||
| USIM نزه نزه نزه نزه نزه نزه نزه نزه نزه نزه نزه نزه نزه نزه نزه نزه نزه نزه نزه نزه نزه نزه نزه نزه نزه نزه نزه نزه نزه نزه نزه نزه نزه نزه اد پوران بوران بوران بوران بوران بوران بوران بوران بوران بوران بوران بوران بوران بوران بوران بوران بوران بوران بوران بوران بوران بوران بوران بوران بوران بوران بوران بوران بوران بوران بوران بوران بوران بوران بیفی پوران پوران پوران پوران پوران پوران پوران پوران پوران پوران پوران پوران پوران پوران پوران پوران پوران پوران پوران پوران پوران پوران پوران پوران پوران پوران پوران پوران پوران پوران پوران پوران پوران پوران بوران بوران بوران بوران بوران بوران بوران بوران بوران بوران بوران بوران بوران بوران بوران بوران بوران بوران بوران بوران بوران بوران بوران بوران بوران بوران بوران بوران بوران بوران بوران بوران bیفی پوران پوران پوران پوران پوران پوران پوران پوران پوران پوران پوران پوران پوران پوران پوران پوران پوران پوران پوران پوران پوران پوران پوران پوران پوران پوران پوران پوران پوران پوران پوران پوران بورانبیفی پوران پوران پوران پوران پوران پوران پوران پوران پوران پوران پوران پوران پوران پوران پوران پوران پوران پوران پوران پوران پوران پوران پوران پوران پوران پوران پوران پوران پوران پوران پوران پورانبیفی پوران پوران پوران پوران پوران پوران پوران پوران پوران پوران پوران پوران پوران پوران پوران پوران پوران پوران پوران پوران پوران پوران پوران پوران پوران پوران پوران پوران پوران پوران پوران بیفی پوران پوران پوران پوران پوران پوران پوران پوران پوران پوران پوران پوران پوران پوران پوران پوران پوران پوران پوران پوران پوران پوران پوران پوران پوران پوران پوران پوران پوران پوران پوران بیفі پوران پوران پوران پوران پوران پوران پوران پوران پوران پوران پوران پوران پوران پوران پوران پوران پوران پوران پوران پوران پوران پوران پوران پوران پوران پوران پوران پوران پوران پوران پوران پوران پوران pbیفی پوران پوران پوران پوران پوران پوران پوران پوران پوران پوران پوران پوران پوران پوران پوران پوران پوران پوران پوران پوران پوران پوران پوران پوران پوران پوران پوران پوران پوران پوران پوران پوران pbیفі پوران پوران پوران پوران پوران پوران پوران پوران پوران پوران پوران pbیفі پوران پوران پوران پوران pbیفі پوران pbیفі پوران pbیفі پوران pbیفі پوران pbیفі پوران pbیفі پوران pbیفі پوران pbیفі پوران pbیفі پوران pbیفі پوران pbیفі پوران pbیفі پوران pbیفі پوران pbیفі پوران pbیفі پ线上线下بیفі پوران pbیفі پ线上线下بیفі پ线上线下بیفі پ线上线下بیفі پ线上线下بیفі پ线上线下بیفі پ线上线下بیفі پ线上线下بیفі پ线上线下بیفі پ线上线下بیفі پ线上线下بیفі پ线上线下بیفі پ线上线下بیفі پ线上线下بیفі پ线上线下بیفі پ线上线下بیفі پ线上线下بیفі پ线上线下بیفіpscیفی پ线上线下بیفіpscیفی پ线上线下بیفіpscیفیpscیفیpscیفیpscیفیpscیفیpscیفیpscیفیpscیفیpscیفیpscیفیpscیفیpscیفیpscیفیpscیفیpscیفیpscیفیpscیفیpscیفیpscیفیpscیفیpscیفیpscیفیpscیفیpscیفیpscیفیpscیفípscیفیpscیفípscیفípscیفípscیفípscیفípscیفípscیفípscیفípscیفípscیفípscیفípscیفípscیفípscیفípscیفípscیفípscیفípscیفípscیفípscیفípscیفípscیفípscیفípscیفípscیفípscیفǐpscیفípscیفípscیفípscیفípscیفípscیفípscیفípscیفípscیفípscیفípscیفípscیفípscیفípscیفípscیفípscیفípscیفípscیفípscیفípscیفípscیفípscیفípscیفípscیفípscیف⁄pscیف⁄pscیف⁄pscیف⁄pscیف⁄pscیف⁄pscیف⁄pscیف⁄pscیف⁄pscیف⁄pscیف⁄pscیف⁄pscیف⁄pscیف⁄pscیف⁄pscیف⁄pscیف⁄pscیف⁄pscیف⁄pscیف⁄pscیف⁄pscیف⁄pscیف⁄pscیف⁄pscیف⁄pscیف/pscیف⁄pscیف/pscیف/pscیف/pscیف/pscیف/pscیف/pscیف/pscیف/pscیف/pscیف/pscیف/pscیف/pscیف/pscیف/pscیف/pscیف/pscیف/pscیف/pscیف/pscیف/pscیف/pscیف/pscیف/pscیف/pscیف/pscیف⁄pscیف/pscیف/pscیف/pscیف/pscیف/pscیف/pscیف/pscیف/pscیف/pscیف/pscیف/pscیف/pscیف/pscیف/pscیف/pscیف/pscیف/pscیف/pscیف/pscیف/pscیف/pscیف/pscیف⁄pscیف/pscیف⁄pscیف/pscیف/pscیف/pscیف/pscیف/pscیف/pscیف/pscیف/pscیف/pscیف/pscیف/pscیف/pscیف/pscیف/pscیف/pscیف/pscیف/pscیف/pscیف/pscیف/pscیف/pscیف⁄pscیف/pscیف/pscیف⁄pscیف/pscیف/pscیف/pscیف/pscیف/pscیف/pscیف/pscیف/pscیف/pscیف/pscیف/pscیف/pscیف/pscیف/pscیف/pscیف/pscیف/pscیف/pscیف/pscیف/pscیف/pscیف⁄pscیف⁄pscیف/pscیف⁄pscیف/pscیف/pscیف/pscیف/pscیف/pscیف/pscیف/pscیف/pscیف/pscیف/pscیف/pscیف/pscیف/pscیف/pscیف/pscیف/pscیف/pscیف/pscیف/pscیف/pscیف⁄pscیف/pscیف/pscیف/pscیف⁄pscیف/pscیف/pscیف/pscیف/pscیف/pscیف/pscیف/pscیف/pscیف/pscیف/pscیف/pscیف/pscیف/pscیف/pscیف/pscیف/pscیف/pscیف/pscیف/pscیف/pscیف⁄pscیف/pscیف⁄pscیف/pscیف⁄pscیف/pscیف/pscیف/pscیف/pscیف/pscیف/pscیف/pscیف/pscیف/pscیف/pscیف/pscیف/pscیف/pscیف/pscیف/pscیف/pscیف/pscیف/pscیف/pscیف/pscیف⁄pscیف⁄pscیف/pscیف⁄pscیف⁄pscیف/pscیف/pscیف/pscیف/pscیف/pscیف/pscیف/pscیف/pscیف/pscیف/pscیف/pscیف/pscیف/pscیف/pscیف/pscیف/pscیف/pscیف/pscیف/pscیف/pscیف/pscیف/pscیف/pscیف⁄pscیف⁄pscیف/pscیف/pscیف/pscیف/pscیف/pscیف/pscیف/pscیف/pscیف/pscیف/pscیف/pscیف/pscیف/pscیف/pscیف/pscیف/pscیف/pscیف/pscیف/pscیف/pscیف/pscیف⁄pscیف/pscیف⁄pscیف⁄pscیف/pscیف/pscیف/pscیف/pscیف/pscیف/pscیف/pscیف/pscیف/pscیف/pscیف/pscیف/pscیف/pscیف/pscیف/pscیف/pscیف/pscیف/pscیف/pscیف/pscیف⁄pscیف/pscیف/pscیف⁄pscیف⁄pscیف/pscیف/pscیف/pscیف/pscیف/pscیف/pscیف/pscیف/pscیف/pscیف/pscیف/pscیف/pscیف/pscیف/pscیف/pscیف/pscیف/pscیف/pscیف/pscیف/pscیف⁄pscیف⁄pscیف/pscیف/pscیف⁄pscیف/pscیف/pscیف/pscیف/pscیف/pscیف/pscیف/pscیف/pscیف/pscیف/pscیف/pscیف/pscیف/pscیف/pscیف/pscیف/pscیف/pscیف/pscیف/pscیف/pscیف⁄pscیف⁄pscیف⁄pscیف⁄pscیف⁄pscیف⁄pscیف⁄pscیف⁄pscیف⁄pscیف⁄pscیف⁄pscیف⁄pscیف⁄pscیف⁄pscیف⁄pscیف⁄pscیف⁄pscیف⁄pscیف⁄pscیف⁄pscیف⁄pscیف⁄pscیف⁄pscیف⁄pscیف\( \cdot \) | 100% | |
| USIM نزه نزه نزه نزه نزه نزه نزه نزه نزه نزه نزه نزه نزه نزه نزه نزه نزه نزه نزه نزه نزه نزه نزه نزه نزه نزه نزه نزه نزه نزه نزه نiz- . | USIM نزه نزه نزه نزه نزه نزه نزه نزه نزه نزه نزه نزه نزه نزه نزه نزه نزه نزه نزه نزه نز. . | USIM نزه نزه نزه نزه نزه نزه نزه نزه نزه نز. . |
| شامع ميراني | الإستعمال | |
| ملاويات الحرفية بورس | ملاويات الحرفية USIM | الإستعمال |
| الإستعمال الحرفية بورس | ملاويات الحرفية USIM | الإستعمال |
| الإستعمال الحرفية رسمان | ملاويات الحرفية رسمان | الإستعمال |
| الإستعمال الحرفية رسمان | ملاويات الحرفية رسمان | الإستعمال |
| الإستعمال الحرفية رسمان | ملاويات الحرفية رسمان | الإستعمال |
| الإستعمال الحرفية رسمان | ملاويات الحرفية رسمان | ال,enGLISH |
| ال,enGLISH | ملاويات الحرفية USIM | ال,enGLISH |
| ال,enGLISH | ملاويات الحرفية USIM | ال,enGLISH |
| ال,enGLISH | ملاويات الحرفية رسمان | ال,enGLISH |
| ال,enGLISH | ملاويات الحرفية رسمان | ال,enGLISH |
| ال,enGLISH | ملاويات الحرفية رسمان | ال,enGLISH |
| ال,enGLISH | ملاويات الح鎖 | ال,enGLISH |
| ال,enGLISH | ملاويات الح鎖 | ال,enGLISH |
| ال,enGLISH | ملاويات الح鎖 | ال,enGLISH |
| ال,enGLISH | ملاويات الح鎖 | ال,enGLISH |
| ال,enGLISH | ملاويات الح鎖 | ال,enGLISH |
| ال,enGLISH | ملاويات الح鎖 | ال,enGLISH |
| ال,enGLISH | ملاويations | ال,enGLISH |
| ال,enGLISH | ملاويations | ال,enGLISH |
| ال,enGLISH | ملاويations | ال,enGLISH |
| ال,enGLISH | ملاويations | ال,enGLISH |
| ال,enGLISH | ملاويations | ال,enGLISH |
| ال,enGLISH | ملاويations | ال,enGLISH |
| ال,enGLISH | ملاويations | ال,enGLISH |
| ال,enLANGUAGE LG | ملاويات الحرفية USIM | ال,enGLISH |
| ال,enLANGUAGE LG | ملاويations | USIM |
| ال,enLANGUAGE LG | ملاويations | USIM |
| ال,enLANGUAGE LG | ملاويations | USIM |
| ال,enLANGUAGE LG | ملاويations | USIM |
| ال,enLANGUAGE LG | ملاويations | USIM |
| ال,enLANGUAGE LG | ملاويations | USIM |
| ال,enLANGUAGE LG | ملاويations | USIM |
| ال,enLANGUAGE LG | مleaويations | USIM |
| ال,enLANGUAGE LG | مleaويations | USIM |
| ال,enLANGUAGE LG | مleaويations | USIM |
| ال,enLANGUAGE LG | مleaويations | USIM |
| ال,enLANGUAGE LG | مleaويations | USIM |
| ال,enLANGUAGE LG | مleaويations | USIM |
| ال,enLANGUAGE LG | مleaويations | USIM |
| ال=enGLISH | ملاويations | USIM |
| ال-enGLISH | مleaويations | USIM |
| ال-enGLISH | مleaويations | USIM |
| ال-enGLISH | مleaويations | USIM |
| ال-enGLISH | مleaويations | USIM |
| ال-enGLISH | مleaويations | USIM |
| ال-enGLISH | مleaويations | USIM |
| ال-enGLISH | مleaويations | USIM |
| ال-enGLISH | مleaويation | USIM |
| ال-enGLISH | مleaويation | USIM |
| ال-enGLISH | مleaويation | USIM |
| ال-enGLISH | مleaويation | USIM |
| ال-enGLISH | مleaويation | USIM |
| ال-enGLISH | mلاويations | USIM |
| ال-enGLISH | mleaويations | USIM |
| ال-enGLISH | mleaويations | USIM |
| ال-enGLISH | mleaويations | USIM |
| ال-enGLISH | mleaويations | USIM |
| ال-enGLISH | mleaويations | USIM |
| ال-enGLISH | mlea inflammations | USIM |
| ال-enGLISH | mlea inflammations | USIM |
| ال-enGLISH | mlea inflammations | USIM |
| ال-enGLISH | mlea inflammations | USIM |
| ال-enGLISH | mlea inflammations | USIM |
| ال-enGLISH | mlea inflammations | USIM |
| ال-enGLISH | mlea inflammations | USIM |
| ال-enGLISH | mlea inflammations | |
| الله�� | ||
| الله�� | الله�� | |
| .الله�� | الله�� | الله�� |
| .الله�� | الله�� | الله�� |
| .الله�� | الله�� | الله�� |
| .الله�� | الله�� | الله�� |
| .الله�� | الله�� | الله�� |
| .الله�� | الله�� | الله�� |
| .الله�� | الله�� | الله�� |
Guide de l'utilisateur
- Certains contenus et illustrations peuvent différer de votre apparéil en fonction de la région, du fournisseur de service, de la version logicielle ou de la version du système d'exploitation, et sont sujets à modification sans préavis. - Utilisez toujours des accessoires d'origine LG. Les éléments fournis sont conçus uniquement pour ce téléphone et peuvent ne pas être compatibles avec d'autres appareils. - Dans la mesure où son écran tactile est utilisé comme clavier, cet apparéil n'est pas recommandé pour les personnes malvoyantes. Copyright ©2016 LG Electronics, Inc. Tous droits réservés. LG et le logo LG sont des marques déposées de LG Group et de ses entités apparentées. Toutes les autres marques commerciales appartiennent à leurs propriétaires respectifs. - Google™, Google Maps™, Gmail™, YouTube™, Hangouts™ et Play Store™ sont des marques commerciales de Google, Inc.Sommaire
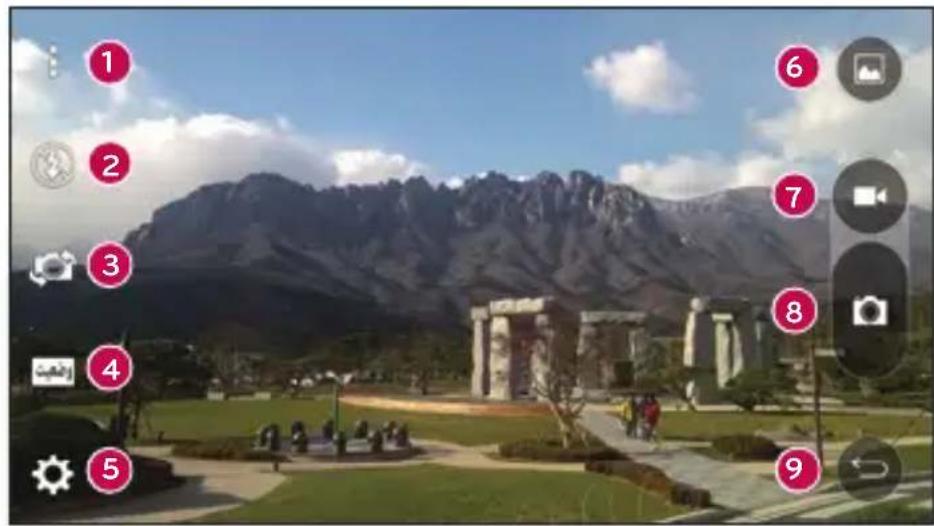
Recommendations pour une utilisation sure et efficace 4 Avertissement 15 Présentation du téléphone 18 Présentation du téléphone 18 Installation de la carte SIM ou USIM et de la batterie 20 Chargement de la batterie 23 Insertion d'une carte mémoire 24 Retrait de la carte mémoire 25 Verrouillage et déblocage de l'appareil ..25 Votrecran d'accueil 28 Conseils d'utilisation de I'écran tactile ...28 Ecran d'accueil 29 Personnalisation de l'écran d'accueil ....30 Retour à une application récemment utilisée 32 Volet Notifications 32 Clavier visuel 35 Fonctionnalités particulières 36 Prise de photo avec geste 36 Vued'ensemble 37 KnockON 37 Knock Code 38 Double fenetre 38 Capturer+ 39 Configuration d'un compte Google ....41 Creation de votre compte Google 41 Connexion à votre compte Google 41 Connexion à des réseaux et péripériques 43 Wi-Fi 43 Bluetooth 44 Wi-Fi Direct 45 Transfert de données entre un PC et l'appareil 46 Appels 47 Émission d'un appel 47 Appel des contacts 47 Réponse à un appel et rejet d'un appel ..47 Émettre un second appel 48 Affichage des journaux d'appe1 48 Paramètres d'appeL 48 Répertoire 49 Recherche d'un contact 49 Ajout d'un nouveau contact 49 Contacts préféRES 49 Creation d'un groupe 50 Messagerie. 51 Envoi d'un message 51 Affichage conversation 52 Modification des paramètres de messagerie 52 Email 53 Gestion de comptes de messagerie 53 Utilisation des dossiers de comptes ....53 Composition et envoi d'un e-mail 54 Photo et video 55 Options de l'appareil photo sur le viseur ....55 Utilisation des paramétres avancés 56 Prendre une photo 57 Une fois la photo prise 57 Enregistrement d'une video 58 Après l'enregistrement d'une video 59 Galerie 59 Multimédia 63 Musique 63 Utilaires 66 Horloge 66 Calculus 67 Agenda 67 Dictaphone 68 Recherche vocale 68 Télécharges 69 Radio FM 69 Navigateur Internet 70 Internet 70 Chrome 71 Paramètres 73 Réseaux 73 Son et Notification 76 Écran 78 Général 80 Sommaire Application LG Bridge 87 Mise à jour du logiciel du téléphone ....90 À propos de ce manuel de l'utilisateur .92 À propos de ce manuel de l'utilisateur ...92 Marques commerciales 93 Accessoires 94 Dépannage 95Recommendations pour une utilisation sure et efficace
Veuillez dire ces recommandations. Leur non-respect peut s'avérer dangereux, voire illégal. En cas de panne, un outil logiciel intégré à votre apparéil créé un historique des pannes. Cet outil recueil uniquement les données spécifiques à la panne, comme l'intensité du signal, la position de l'ID de cellule lors d'une perte d'appel soudaine, et les applications chargeées. L'histoire n'est utilisé que pour déterminer la raison de la panne. Ces historiques sont chiffrés et, si vous nevez returner l' apparéil pour réparation, ne peuvent être consultés que par un centre de réparation/agréé LG.Exposition aux radiofréquences
Informations sur l'exposition aux ondes radio et sur le débit d'absorption spécifique (SAR, Specific Absorption Rate). Le téléphone portable LG-H540 est conforme aux exigences de sécurité relatives à l'exposition aux ondes radio. Ces exigences sont basées sur des commandations scientifiques qui comprend des marges de sécurité destinées à garantir la sécurité de toutes les personnes, quels que soient leur âge et leur condition physique. - Les recommendations relatives à l'exposition aux ondes radio utilisant une unité de mesure connue sous le nom de début d'absorption spécifique (DAS). Les tests de mesure du DAS sont effectuels à l'aide de méthodes normalisées, en utilisant le niveau de puissance certifié le plus élevé du téléphone, dans toutes les bandes de fréquence utilisées. - Mème si tous les modèles de téléphones LG n'appliquent pas les mêmes niveaux de DAS, ils sont tous conformes aux recommendations appropriées en matière d'exposition aux ondes radio. - La limite de DAS recommangée par l'ICNIRP (Commission internationale de protection contre les rayonnements non ionisants) est de 2W / kg en moyenne sur 10 grammes de tissu humain. - La valeur DAS la plus élevé pour ce modèle de téléphone a été mesureée à 0,509 W/kg (10 g) pour une utilisation à l'oreille et à 0,426 W/kg (10 g) quand il est porté au niveau du corps. - Cet apparéil est conforme aux directives en matière d'exposition aux fréquences radioélectriques lorsqu'il est utilisé soit dans sa position normale contre l'oreille, soit à une distance minimale de 1,5 cm du corps. Lorsqu'un étui, un clip ceinture ou un support est utilisé à des fins de transport, il ne doit pas contenir de parties metalliques et doit garantir une distance minimale de 1,5 cm entre le produit et le corps. Pour pouvoir transmettre des fichiers de données ou des messages, cet apparéil requiert une connexion de qualité au réseau. Dans certains cas, la transmission de fichiers de données ou de messages peut être retardée jusqu'à ce qu'une telle connexion soit possible. Veillez à bien suivre les instructions relatives à la distance de séparation pour l'établissement de la transmission.Entretien et réparation
AVERTISSEMENT
Utilisez uniquement des batteries, chargeurs et accessoires LG authentiques et agreés pour ce modèle de téléphone. L'utilisation de tout autre type de batteries, de chargeurs et d'accessoires peut s'avérer dangereuse et peut annuler tout accord ou garantie applicable au téléphone. - Ne demontez pas votre téléphone. Si une réparation s'avère nécessaire, confiez-le à un technicien qualifié. - Les réparations couvertes par cette garantie peuvent inclure, à la discrétion de LG, des pieces ou circuits de remplacement neufs ou reconditionnés, sous réserve que leurs fonctionnalités soient équivalentes à celles des pieces remplacées. - Tenez votre téléphone éloigné des apparils électriques, tels que téléviseurs, postes radio et ordinateurs membres. - Ne placez pas votre téléphone à proximé de sources de chaleur, telles qu'un radiateur ou une cusinière. - Ne le faites pas tomber. - Ne soumettez pas votre téléphone à des vibrations mécaniques ou à des chocs. - Éteignez votre téléphone dans les zones où des règlements spéciaux l'exigent. Par exemple, n'utilisez pas votre téléphone dans les hopitaux, car celui-ci pourrait perturber le bon fonctionnement des équipements médicaux sensibles. - Si vos mains sont mouillées, évitez tout contact avec le téléphone lorsqu'il est en cours de charge. Ceci peut provoquer un chocoléctrique et endommager votre téléphone. - Ne mettez pas un téléphone en charge à proximate de matières inflammables. En effet, il pourrait chauffer et déclencher un incendie. - Pour nettoyer l'extérieur du combiné, utilisez un chiffon sec. N'utilisez pas de solvant, tel que du benzène, un diluant ou de l'alcool. - Ne rechargez pas votre téléphone lorsqu'il est posé sur du tissu. - Rechargez votre téléphone dans une zone bien ventilée. - N'exposez pas le téléphone à de la fumée ou de la poussière en quantité excessive. - Ne placez votre téléphone à proximé de cartes de crédit ou de titres de transport, car il pourrait ALTERER les données des bandes magnétiques. - Ne touche pas l'écran avec un objet pointu qui risquerait d'endommager votre téléphone. - Ne mettez pas votre téléphone en contact avec des liquides ou des éléments humides. - Utilisez les accessoires tels que les oreillettes avec précaution. Ne manipulez pas l'antenne inutillement. - Évitez d'utiliser, de toucher ou de tenter de retirer ou de réparer du verre cassé, ébrché ou fissure. Un endommagement de l'écran en verre causé par une utilisation abusive ou incorrecte n'est pas couvert par la garantie. - Voiture téléphone est un apparéil électronique qui produit de la chaleur en fonctionnement normal. Lors d'une utilisation prolongée dans un environnement mal ventilé, le contact direct avec la peau peut provoquer une gène ou des brûlures benignes. Manipuez donc votre téléphone avec précaution lors de son fonctionnement ou immédiatement après utilisation. - Si vous telèophone est mouillé, débranchez-le immédiatement et laissez-le sécher totalément. Ne tentez pas d'accélérer le séchage avec une source de chaleur exter (four classique ou micro-ondes, sèche-cheveux...). - Le liquide contenu dans votre téléphone mouillé modifie la couleur de l'étiquette produit se trouvant à l'intérieur du téléphone. Un endommagement de l'appareil consécutif à une exposition à des liquides n'est pas couvert par la garantie.Fonctionnement optimal du téléphone
Appareils électroniques
Tous les téléphones portables peuvent être soumis à des interférences pouvant affecter les performances des appareils électroniques. - N'utilisez pas votre téléphone à proximé d'équipements médicaux sans autorisation. Évitez de placer votre téléphone à proximé de votre stimulator cardiaque (par exemple, dans votre poche poitrine). - Les téléphones portables peuvent nuire au bon fonctionnement de certaines protheses auditives. - Des interférences mineures peuvent perturber le bon fonctionnement des téléviseurs, radios, ordinateurs, etc. - Utilisez votre téléphone dans des conditions de températures comprises entre 0^ et 40^ dans la mesure du possible. Exposer votre téléphone à des températures extrément basses ou haute peut endommager votre appareil ou provoquer des dysfonctionnements, voir le faire exposer.Sécurité au volant
Vérifiez les lois et règlements en vigueur en matière d'utilisation des téléphones portables dans la zone où vous conduisez. - Ne tenez pas le téléphone dans votre main alors que vous conduisez. - Concentrez toute votre attention sur la conduite. - Si les conditions de conduite le permettent, quitterz la route et garez-vous avant d'émettre ou de receivevoir un appel. - Les radiofréquences peuvent affecter certains systèmes électroniques de votre vehicule motorisé, tels que le système audio stéreo ou les équipements de sécurité. - Lorsque votre vehicule est équipé d'un airbag, ne gênez pas son déclenchement avec un équipement sans fil portable ou fixe. Il risquerait de l'empêcher de s'ouvrir ou provoquer de graves blessures en raison de performances inadéquates. - Lorsque vous écoutez de la musique en extérieur, veuillez vous assurer que le volume n'est pas trop élevé de façon à bien entendre ce qu'il se passé autour de vous. Ceci est particulièrement important lorsque vous vous trouvez à proximité d'une route.Évitez toute nuisance auditive
 Afin d'éviter des dommages auditifs eventuels, ne pas écouter à un niveau sonore élevé pendant une longue durée. Afin de protégger vos capacities auditives, n'exposez pas votre ouïe à de hauts volumes sonores pendant de longues périodes. Nous vous recommendons de ne pas tener l'appareil pres de votre oreille lorsque le mode mains libres est activé. Pendant les communications ou lorsque vous écoutez de la musique, réglez le volume à un niveau raisonnable. - Lorsque vous utilisez le kit main libre, baissez le volume si vous ne pouvez pas entendre lesgens parlerautre de vous ou si la personne a cote de vous peut entendre ce que vous ecoutez.REMARQUE
- Un volume sonore trop élevé provenant des vos écouteurs (oreillettes, casques) pourrait entrainer d'eventuels dommages auditifs.Parties en verre
Certaines parties de votre téléphone portable sont en verre. Ce verre pourrait se brisser en cas de chute sur une surface dure ou d'impact considérable. Le cas échéant, évitez de toucher ou dePTRirer le verre brise. N'utilisez plus votre téléphone portable jusqu'à ce que ce verre soit remplace par un fournisseur de service agreé.Zone de déminage
N'utilisez pas votre téléphone lorsque des opérations de dynamitage sont en cours. Respectez les restrictions, les règlements et les loi en vigueur.Zones à atmophère explosive
- N'utilisez pas votre téléphone dans une station-service. - N'utilisez pas votre téléphone àproximaléde carburant ou de produits chimiques. - Ne transportez pas et ne stockez pas de produits dangereux, de liquides ou de gaz inflammables dans le même compartment de votre voiture que votre téléphone portable et ses accessoires.En avion
Les apparêils sans fil peuvent générer des interférences dans les avions. - Éteignez votre téléphone avant d'embarquer dans un avion. - Ne l'utilisez pas au sol sans autorisation de l'équipage.Enfants
Conservez votre téléphone dans un endroit sur, hors de la portée des jeunes enfants. Notre téléphone comprend des petites pieces qui peuvent partager un risque de suffocation.Appels d'urgence
Il est possible que les numéroes d'urgence ne soient pas disponibles sur tous les reseaux de téléphonie mobile. Vous ne devez donc pas dépendre uniquement de votre téléphone portable pour émettre un appel d'urgence. Renseignez-vous auprès de votre opérateur.Informations sur la batterie et précautions d'usage
- Il n'est pas nécessaire de décharger complètement la batterie avant de la recharger. Contrairement aux autres batteries, elle n'a pas d'effet mémoire pouvant comprometter ses performances. - Utilisez uniquement les batteries et chargeurs LG. Les chargeurs LG sont concus pour optimiser la durée de vie de votre batterie. - Ne démontez pas et ne court-circuitez pas la batterie. - Les contacts métalliques de la batterie doivent toujours rester propres. - Procedez au remplacement de la batterie lorsque celle-ci n'offre plus des performances acceptables. La batterie peut être rechargée des centaines de fois avant qu'un remplacement ne soit nécessaire. - Rechargez la batterie en cas de non-utilisation prolongée afin d'optimiser sa durée d'utilisation. - N'exposez pas le chargeur de la batterie au rayonnement direct du soleil. Ne l'utilisez pas non plus dans des lieux très humides, tels qu'une salle de bains. - N'exposez pas la batterie à des températures élevées ou basses, ici pourrait affecter ses performances. - Le remplacement de la batterie par un modele inadapté risque d'entrainer une explosion de cette dernière. - Respectez les instructions du fabricant relatives à la mise au rebut des batteries usagées. Veuillez recycler autant que faire se peut. Ne vous en débarrasssez pas avec les déchets menagers. - Si la batterie est hors d'usage, veuillez la rapporter au service après-vente ou au revendeur LG Electronics/agree le plus proche. - Débranche systématiquement le chargeur de la prise murale lorsque le chargement de la batterie est terminé pour éviter qu'il ne consomme inutillement de l'énergie. - La durée de vie réelle de la batterie dépend de la configuration du réseau, des paramètres du produit, de l'utilisation, de la batterie et des conditions extérieures. - Tenez la batterie hors de portée des animaux et de leurs crocs ou griffes, ainsi que des objets pointus en général. Le non-respect de cette consigne peut entrainer un incendie.Informations sur les logiciels libres
Pour obtenir le code source sous la licence publique générale, la licence publique générale limitee, la licence publique Mozilla ou les autres licences libres de ce produit, rendez-vous sur http://opensource.lge.com. En plus du code source, tous les termes de la licence, ainsi que les exclusions de responsabilité et les droits d'auteur, sont disponibles au téléchargement. LG Electronics propose de vous fournir le code open source sur CD-ROM en échange des coûts couvrant cet envoi, notamment le coût du support, des frais de port et de prise en charge, une fois la demande reçue par LG Electronics à l'adresse suivante : opensource@lge.com. La validité de cette offre est de trois (3) ans à partir de la date d'achat du produit.COMMENT METTRE À JOUR VOTRE APPAREIL
Accès aux dernières versions du micrologiciel et aux nouvelles fonctions et améliorations du logiciel. - Sélectionnez la mise à jour logicielle dans le menu Paramètres de votre apparéil. - Mettez votre apparéil à jour en le connectant à votre PC. Pour plus d'informations sur l'utilisation de cette fonction, consultez le site http://www/lg.com/common/index.jsp et Sélectionnez votre pays et votre langue.Déclaration de CONFORMITE
Par la presente, LG Electronics déclare que le produit LG-H540 est conforme aux exigences fondamentales et aux autres dispositions pertinentes de la directive 1999/5/EC. Consultez la Déclaration de conformité sur http://www/lg.com/global/declarationLG Electronics (Moyen-Orient) - Jordanie
Abdali Project, Rafik Al-Hariri Avenue, The Boulevard, Central Square, 5ème étageAvertissement relatif au laser
Attention!
Ce produit utilise un système Laser. Pour garantir une utilisation conforme du produit, veuillez lore attentivement le manuel utiliser et conservez-le afin de pouvoir vous y reférer ultérieurement. Si l'unité nécessite un entretien, contactez un centre de réparation/agree. L'utilisation de commandes, de réglages ou de procédures autres que ceux spécifiés dans ce document peut provoquer une exposition à des rayons dangereux. Pour éviter toute exposition directe aux rayons laser, n'essayez pas d'ouvrir le couvercle ou d'entrer directement en contact avec le laser.  Recyclage de votre ancien téléphone
1 Les éléments electriques et electroniques doivent être jetés séparément, dans les vide-ordures prévus à cet effet par notre municipalité ou être rapportés dans un magasin de téléphonie mobile. 2 Le recyclage de votre téléphone dans une poubelle appropriée ou dans un magasin de téléphonie mobile aidera à réduire les risques pour l'environnement et votre santé. 3 Pour plus d'informations concernant l'élimination de votre ancien apparéil, veuillez contacter votre mairie, le service des ordures menagères ou encore le magasin où vous avez achété ce produit. Recyclage des batteries/accumulateurs usages
1 Ce symbole peut être associé aux symboles chimiques du mercure (Hg), du cadmium (Cd) ou du plomb (Pb) si la batterie contient plus de 0,0005 % de mercure, 0,002 % de cadmium ou 0,004 % de plomb. 2 Les batteries/accumulateurs doivent être jetés séparément, dans les déchetteries prévues à cet effet par votre municipalité ou être rapportés dans un magasin de téléphonie mobile. 3 La mise au rebut de vos batteries/accumulateurs dans une poubelle appropriée ou dans un magasin de téléphonie mobile aidera à réduire les risques pour l'environnement et votre santé. 4 Pour plus d'informations concernant le recyclage de vos batteries/accumulateurs, veuillez contacter votre mairie, le service des ordures menagères ou encore le magasin où vous avez acheté ce produit.Avtissement
Veuillez dire ces informations avant d'utiliser votre apparéil.
En cas de problème avec votre apparéil, consultez cette section avant de le faire réparer ou d'appeler l'assistance clientèle.1. Mémoire téléphone
Lorsqu'il reste moins de 10 Mo d'espace disponible dans la mémoire du téléphone, ce dernier ne peut plus receivevoir de nouveaux messages. Il convient alors de vérifier l'état de la mémoire de votre apparéil et de supprimer certaines données (des applications ou des messages, par exemple) pour libérer de l'espace.Pour désinstaller des applications :
1 Appuyez sur > > > onglet Général > Applications. 2 Une fois toutes les applications affichées, faites-les défilier et Sélectionnez l'application que vous souhaitez désinstaller. 3 Appuyez sur Désinstaller.2. Optimisation de l'autonomie de la batterie
Vous pouvez prolonger l'autonomie de la batterie en désactivant les fonctions dont l'exécution en tâche de fond n'est pas nécessaire. Vous pouvez contrôler la consommation de batterie par les ressources système et les applications.Prolonger l'autonomie de la batterie de votre apparéil :
- Éteignez les signaux radio que vous n'utilisez pas. Si vous n'utilisez pas les fonctions Wi-Fi, Bluetooth ou GPS, désactivez-les. - Réduisez la luminosité de l'écran et définisseez un début de mise en veille plus court. - Désactivez la synchronisation automatique de diverses applications, notamment Gmail, Agenda et Répertoire. Avertissement - Certain applications que vous teléchargez peuvent affecter la longévité de la batterie. - Lorsque vous utilisez des applications téléchargees, vérifie le niveau de charge de la batterie.3. Avant d'installer une application et un système d'exploitation Open Source
AVERTISSEMENT
- Si vous installez et utilisez un système d'exploitation autre que celui fourni par le fabricant, cela risque de provoquer des dysfonctionnements. De plus, votre apparéil ne sera plus couvert par la garantie. - Pour protégger votre apparéil et les données personnelles qu'il contient, téléchargez des applications uniquement depuis des sources sécurisées, telles que Play Store™. Si certaines applications ne sont pas installées correctement sur votre apparéil, il se peut que ce dernier ne fonctionne pas normalement ou qu'une erreur grave se produit. Vous doivent désinstaller ces applications et supprimer l'ensemble des données et paramètres associés.4. Lancement et changement d'applications
Exécuter plusieurs tâches à la fois est un veritable jeu d'enfant avec Android : vous pouvez exécuter plusieurs applications simultanément. Plus besoin de quitter une application avant d'en ouvrir une autre. Vous pouvez utiliser plusieurs applications en cours d'exécution et passer d'un programme à un autre. Android gère chacune des applications en les interrompant et en les langant en fonction des besoin de l'utilisateur pour éviter que les applications en veille ne sollicitent des ressources inutillement. 1 Appuyez sur. La liste des applications récemment utilisées s'affiche. 2 Appuyez ensuite sur l'application à laquelle vous pouze acceder. La précédente application continue d'être executée en arrêté-plan. Assurez-vous d'appuyer sur pour quitter une application après l'avoir utilisé. - Pour fermer une application de la liste des applications récentes, faites glisser l'aperçu de l'application vers la gauche ou la droite. Pour supprimer toutes les applications de la liste, appuyez sur Tout effacer.5. Redémarrage en cas de blocage de l'écran
Si l'écran se bloque ou si le téléphone cesse de répondre à vos pressions sur l'écran, retirez la batterie et remettez-la en place. Redémarrez ensuite le téléphone.Présentation du téléphone
Présentation du téléphone
REMARQUE: Capter de proximité
- Au cours de la réception ou de l'émission d'appels, ce capteur détecte lorsque le téléphone est à proximé de l'oreille, et désactive le rétroéclairage et verrouille l'écran tactile de manière automatique. Cela prolongge l'autonomie de la batterie et évite d'activer l'écran tactile par inadvertance durant les appeals. AVENTISSEMENT
Le fait de poser un objet lourd ou de s'asseoir sur le téléphone risque d'endommager l'écran et les fonctions tactiles. Ne couvrez pas le capteur de proximité avec des protecteurs d'écran ou tout autre type de film de protection. Vous risqueriez de provoquer un dysfonctionnement du capteur. | Touches Marche-Arrêt/Verrouillage | • Permet d'allumer ou d'éteindre爱你 apparéil. Pour ce faire, appuyez de manière prolongée sur la touche. • Permet de verrouiller/déverrouiller l'écran de votre apparéil avec une pression brève. |
| Touches de volume | (Lorsque l'écran est étéint) • Appuyez longtemps sur la touche haut pour lancer Capturer+ • Appuyez longtemps sur la touche Bas pour lancer l'Photo |
Installation de la carte SIM ou USIM et de la batterie
Insérez la carte SIM ou USIM remise par le fournisseur de service de téléphonie mobile et la batterie incluse. 1 Pour-retirer le cache de la façade arrêté, tenez le téléphone fermement dans une main. Avec le pouce de l'autre main, soulevez le cache arrêté comme illustré sur la figure ci-dessous.  2 Glissez la carte SIM dans l'emplacement de la carte SIM, comme indiqué sur l'illustration. Assurez-vous que la zone de contact doriee de la carte est bien orienteee vers le bas.  AVENTISSEMENT
N'insérez pas de carte mémoire dans l'emplacement de la carte SIM. Si une carte mémoire est introduite dans l'emplacement de la carte SIM, apportez le téléphone dans un centre de services LG pour la faire retarder.REMARQUE
- Seules les cartes microSIM fonctionnent avec l'appareil. 3 Insérez la batterie.  4 Pour replacer le cache sur l'appareil, alignez la façon arrirée sur le compartment de la batterie 1 et appuyez dessus jusqu'à entendre un déclic caractéristique 2. Chargement de la batterie
Chargez la batterie avant d'utiliser le téléphone pour la première fois. Chargez le téléphone à l'aide de la batterie. Vous pouvez également charger la batterie en connectant le téléphone à un ordinateur à l'aide du cable USB. AVERTISSEMENT
Utilisez uniquement la batterie, le chargeur et le cable de données agreés par LG. Si vous utilisez des chargeurs, des batteries ou des cables non approvés, le chargement de la batterie peut être ralenti. La batterie de l'appareil peut également être endommagée, voir exploser, ce qui ne sera pas couvert par la garantie. La prise du chargeur est située sur la partie inférieure du téléphone. Insérez le chargeur puis branchez-le sur une prise murale. REMARQUE
- N'ouvre pas le cache arrêté pendant le chargement de votre appareil.Insertion d'une carte mémoire
Votre apparéil prend en charge les cartes microSD jusqu'à 32 Go. En fonction de leur type et de leur fabriquant, certaines cartes mémoire peuvent ne pas être compatibles avec votre apparéil. AVERTISSEMENT
Certaines cartes mémoire peuvent ne pas être totalement compatibles avec le téléphone. L'utilisation d'une carte incompatible peut endommager l'appareil ou la carte mémoire, ou corrompre les données qu'elle contient.REMARQUE
- L'enregistrement et la suppression de données fréquents raccourcissant la durée de vie des cartes mémoire. 1 Retirez le cache arrête. 2 Inserez une carte mémoire avec la zone de contact dore orientée vers le bas.  3 Remettez en place la façon arrriere.Retrait de la carte mémoire
Pour-retirer la carte mémoire en toute sécurité, commencez par la désactiver. 1 Appuyez sur > > > onglet Général > Stockage et USB > 2 Retirez la façade arrêté et sortez la carte mémoire. AVENTISSEMENT
Ne retirez pas la carte mémoire pendant que l'appareil effectue le transfert d'informations ou qu'il accède à des informations. Cela risque de provoquer la perte ou la corruption de données, ou d'endommager la carte mémoire ou l'appareil. LG n'est pas responsable des pertes réalisant de la mauvaise utilisation de cartes mémoire endommagées, y compris de la perte de données.Verrouillage et déblocage de l'ordinateil
Appuyez sur la Touche Marche-Arrêt/Verrouillage pour éteindre l'écran et placer l'appareil en mode Verrouillage. L'appareil se verrouille automatiquement s'il n'est pas utilisé pendant une période spécifiée. Cela permet de prévenir les pressions accidentelles et d'économiser la batterie. Pour déverrouiller l'appareil, appuyez sur la Touche Marche-Arrêt/Verrouillage et faites glisser l'écran dans n'importequelle direction.REMARQUE
- Vous pouvez aussi appuyer deux fois sur l'écran pour le déverrouiller只想 qu'utiliser la Touche Marche-Arrêt/Verrouillage.Changement de la methode de verrouillage de I'ecran
Vous pouvez changer la manière de verrouiller l'écran pour éviter que d'autres utilisateurs accédent à vos informations personnelles. 1 Appuyez sur 0 > 0 > 0 > 0 onglet Ecran Ecran de verrouillage Choiser l'écran de verrouillage. 2 Sélectionnez le verrouillage de l'écran que vous désirez parmi Aucun, Glisser, Knock Code, Schéma, Code PIN et Mot de passer.REMARQUE
- Vous doivent acceder un compte Google avant de définir un schéma de déverrouillage. Vous doivent également vous souvent du code PIN de secours que vous avez saisi lors de la configuration du verrouillage par schéma. Attention! Si vous n'vez pas créé de compte Google sur le téléphone ou si vous avez oublié votre code PIN, votre mot de passer et le code PIN de secours, vous doivent effectuer une réinitialisation matérielle. Dans ce cas, toutes les applications et données utiliser seront supprimées. Veillez à sauvegarder vos données importantes avant d'effectuer une réinitialisation matérielle.ASTUCE!SmartLock
Vous pouvez utiliser le Smart Lock pour faciliter le déblocage de votre apparéil. Il est possible de le configurer pour qu'il garde votre apparéil déverrouillé lorsqu'un périphérique Bluetooth sécurisé y est connecté, lorsque vous vous trouvez dans un lieu familial comme votre domicile ou votre lieu de travail, ou lorsqu'il reconnaît votre visage.Paramétrage du Smart Lock
1 Appuyez sur > 2 Appuyez sur l'onglet Écran > Écran de verrouillage > Smart Lock. 3 Avant d'ajouter des apparèils sécurisés, des lieux sécurisés ou un visage sécurisé, vous doivent configurer un verrouillage de l'écran (Knock Code, Schéma, Code PIN ou Mot de passer).Votre écran d'accueil
Conseils d'utilisation de l'écran tactile
Voici quelques astuces pour vous familiariser avec votre apparéil. - Appuyer sur : un simple appui avec le doigt permet de selectionner des éléments, des liens, des raccourcis et des lettres sur le clavier visuel. - Exercer une pression prolongée : maintenez le doigt appuyé sur un élément de l'écran sans le relever jusqu'à ce qu'une action se produit. - Faire glisser (glisser-deplacer): maintenez le doigt sur un élément pendant quelques instants, puis, sans relever le doigt, déplacez-le sur l'écran jusqu'à la position voulue. Vous pouvez faire glisser des éléments sur l'écran d'accueil pour les repositionner. - Faire glisser le doigt : passesz rapidement le doigt sur la surface de l'écran sans le relever après le premier contact (de manière à ne pas déplacer un élément par glisser-deplacer). - Appuyer deux fois : appuyez deux fois pour effectuer un zoom sur une page Web ou sur une carte. - Rapprocher/écarter 2 doigs pour zoomer : utilisez l'index et le pouce avec un mouvement de pincement ou d'écartement pour agrandir ou réduire l'élement affché lorsque vous utilisez le navigateur ou des cartes, ou lorsque vous regardez des images. - Pivoter l'écran : dans de nombreux menus et applications, l'orientation de l'écran s'ajuste selon l'orientation physique de l'appareil.REMARQUE
- N'exercez pas une pression trop forte sur l'écran tactile; celui-ci est suffisamment sensible pour détecter une pression légère et sure. - Utilisez le bout du doigt pour appuyer sur l'option voulue. Veillez à ne pas appuyer sur d'autres touches.Écran d'accueil
L'écran d'accueil est le point de départ de nombreuses applications et fonctions. Vous pouvez y ajouter des éléments comme des raccourcis d'applications et des widgets Google afin d'acceder rapidement aux informations et aux applications. Il s'agit de la page par défaut, accessible à partir de n'importe quel menu en appuyant surO.  1 Fournit des informations sur l'etat du téléphone, y compris l'heure, l'intensité du signal, l'etat de la batterie et les icones de notification. Les widgets sont des applications indépendantes accessibles à partir du volet des applications ou de l'écran d'accueil. Contrairement aux raccourcis, les widgets fonctionnement comme une application qui s'affiche directement sur l'écran. 3 Appuyez sur une icône (application, dossier, etc.) pour l'ouvrir et l'utiliser. 4 Indique la page de l'écran d'accueil dans laquelle vous vous trouvez actuélément. Permet d'acceder à la fonction d'une simple touche depuis n'importe qu'elle page de l'écran d'accueil. | △ Bouton Retour | Permet de revenir à l'écran précédent. Ferme également les éléments contextuels comme les menus, les boîtes de dialogue et le clavier à l'écran. |
| ○ Bouton Accueil | Permet de revenir à l'écran d'accueil à partir de n'importe quel écran. |
| □ Bouton d'aperçu | Permet d'afficher les applications récemment utilisées. Lorsque vous maintainez cette touche enfoncée, un menu d'options disponibles s'ouvre. |
| ◎ Bouton de changement de SIM | Choisissez celle carte SIM utiliser. Appuyez quelques instants pour aller aux paramètres de double carte SIM. |
Écran d'accueil étendu
Le système d'exploitation fournit plusieurs pages d'écran d'accueil afin de vous offrir plus de place pour ajouter des iconônes, des widgets, etc. - Faites glisser votre doigt vers la droite ou la gauche pour parcourir les autres pages de l'écran d'accueil.Personnalisation de l'écran d'accueil
Vous pouvez personneliser l'écran d'accueil en y ajoutant des applications, des widgets, et en changeant de fond d'écran.Ajout d' éléments à l'écran d'accueil
1 Appuyez de façon prolongée sur la partie vierge de l'écran d'accueil. 2 Dans le menu Mode d'ajout, Sélectionnez l'élement que vous souhaitez ajouter. L'élement ajoute apparait alors sur l'écran d'accueil. 3 Faites glisser chaque élément à l'endroit youlu, puis relevez le doigt. ASTUCE! Pour ajouter une icône d'application à l'écran d'accueil à partir de l'écran des applications, maintenez le doigt enforcé sur l'application que vous souhaitez ajouter.Suppression d'un élément de l'écran d'accueil
- Depuis l'écran d'accueil, maintenez le doigt enforcé sur l'icone que vous souhaitez supprimer, puis faites-la glisser jusqu'à.Ajout d'une application à la zone des touches de raccourci
- À partir de l'écran des applications ou de l'écran d'accueil, maintenez le doigt enforcé sur l'icone d'une application et faites-la glisser dans la zone des touches de raccourci. Ensuite, relâchez-la à l'emplacement souhaité.Suppression d'une application de la zone des touches de raccourci
- Maintenez le doigt enforcé sur la touche de raccourci correspondante et faites-la glisser jusqu'àREMARQUE
- La touche Applications ne peut pas etre supprimée.Personnalisation des icones des applications sur l'écran d'accueil
1 Maintenez le doigt enforcé sur l'icone d'application jusqu'à ce que vous puissiez la déplacer, puis relâchez-la. L'icone de modification apparaît dans le coin supérieur droit de l'application. 2 Appuyez à nouveau sur l'icone, puis selectionnez le modele et la taille d'icone de votrechoix. 3 Appuyez sur OK pour enregistrer les modifications.Retour à une application récemment utilisée
1 Appuyez sur L'aperçu des applications récemment utilisées s'affiche. 2 Appuyez sur l'aperçu d'une application pour ouvrir l'application correspondante. - OU - 3 Appuyez sur 4 pour revenir à l'écran précédent.Volet Notifications
Les notifications vous préviennent de la réception de nouveaux messages, des événements de calendrier, des alarmes, ainsi que des événements en cours (par exemple, lorsque vous étés au téléphone). Lorsqu'une notification arrive, une icône s'affiche en haut de l'écran. Les icônes des notifications en attente s'affichent à gauche et les icônes du système, telles que le Wi-Fi et le niveau de charge de la batterie, s'affichent à droite.REMARQUE
- Les options disponibles peuvent varier selon les régions ou les opérateurs. Ouvrir le volet Notifications
Faites glisser vous doigt vers le bas à partir de la barre d'etat pour ouvrir le volet Notifications. Pour fermer le volet Notifications, faites glisser l'écran vers le haut ou appuyez sur .  Appuyez sur chaque touche de paramétrage rapide pour l'activer / la désactiver. Maintenez le doigt enforcé sur la touche de votrechioix pour acceder directement au menu Paramétres de la fonction. Pour afficher davantage de touches de commutation, faites glisser votre doigt vers la droite ou la gauche. Appuyez sur pour supprimer, ajouter ou réorganiser les touches de paramétrage rapide. Les notifications actuelles s'affichent avec une brève description. Appuyez sur une notification pour l'afficher. 3 Appuyez pour effacer toutes les notifications.Icônes dans la barre d'été
Les iconées apparaissent dans la barre d'etat en haut de l'écran pour indiquer des appeals manqués, des nouveaux messages, des événements du calendrier, l'etat du périphérique et bien plus.  Les icones affichées en haut de l'écran fournissant des informations relatives à l'état de l'appareil. Les icones repertoriées dans le tableau ci-dessous sont les plus courantes.| Icône Description Icône Description | |||
| Aucune carte SIM insérée | Chansore cours de lecture | ||
| Aucun signal réseau disponible | Sonnerie désactivée | ||
| Mode Avion activé | Mode Vibreur actif | ||
| Connecté à un réseau Wi-Fi | Batteriage | ||
| Casque avec fil connecté | Batterie eigne | ||
| Appel en cours | Le téléphone est connecté à un PC via un cable USB | ||
| Appel manqué | Téléchargement des données en cours | ||
| Bluetooth activé | Chargement des données en cours | ||
| Avertissement système | GPS activé | ||
| Alarme activée | Données en cours de synchronisation | ||
| O | Nouveau SMS ou MMS disponible | Choisir la méthode de saisie | |
| Le point d'accès Wi-Fi est activé | |||
REMARQUE
- L'emplacement de l'icone dans la barre d'etat peut varier selon la fonction ou le service.Clavier visuel
Vous pouvez saisir votre texte à l'aide du clavier visuel. Le clavier apparait sur l'écran lorsque vous appuyez sur un champ de saisie de texte.Utilisation du clavier et saisie de texte
Appuyez une fois pour que la dette suivante s'inscrite en majuscule. Appuyez deux fois pour ne saisir que des majuscules. Appuyez pour acceder aux paramètres du clavier. Maintenez le doigt enforcé pour modifier la méthode de saisie de texte. Appuyez sur cette touche pour saisir un espace. Appuyez pour creer une ligne. Appuyez sur cette touche pour supprimer le caractère précédent.Saisie des lettres accentuees
Par exemple, pour saisir « à», maintainez le doigt enforcé sur la touche « a » jusqu'à ce que la fenêtre contextuelle apparaisse et affiche les caractères spéciaux. Sans le lever, faites glisser votre doigt vers le caractère spécial souhaité. Une fois qu'il est mis en surbrillance, relevez le doigt.Fonctionnalités particulières
Prise de photo avec geste
La fonction Prise de photo avec geste permet de prendre une photo avec une seule main en utilisant l'appareil photo orienté vers l'avant.Prendre une photo
Il existe deux façon d'utiliser la fonction Prise de photo avec geste. - Levez la main avec la paume ouverte jusqu'à ce que l'appareil photo la détecte et qu'un cadre apparaisse à l'écran. Fermez ensuite le poing pour lancer le minuteur. Vous avez ainsi le temps de vous préparer. -OU - Levez votre poing fermé jusqu'à ce que l'appareil photo frontal le détecte. Un rectangle apparait alors sur l'écran. Ouvrez ensuite le poing pour lancer le minuteur. Vous avez ainsi le temps de vous préparer. Vue d'ensemble
Lorsque l'écran de votre apparéil est étant, vous pouvez voir la barre d'etat, l'heure et la date en faisant glisser votre doigt vers le bas de l'écran. KnockON
La fonction KnockON vous permet de toucher deux fois l'écran pour l'activer ou le désactiver facilement.Pour allumer l'écran
1 Appuyez deux fois sur le centre de l'écran de verrouillage pour l'activer. 2 Deverrouillez l'écran ou accédez à un raccourci ou widget disponible.Pour éteindre l'écran
1 Appuyez deux fois sur un emplacement vide de l'écran d'accueil ou de la barre d'etat. 2 L'écran s'eteint.REMARQUE
- Appuyez au centre de l'écran. Si vous appuyez en bas ou en haut, il se peut que le taux de reconnaissance diminue.Knock Code
La fonction Knock Code vous permet de creatoraire propre code de déverrouillage en utilisant une combinaison de frappes sur l'écran. Vous pouvez acceder directement à l'écran d'accueil lorsque l'écran est étéint en saisissant la même série sur l'écran.REMARQUE
- Si vous saississez six fois une série Knock Code erronée, vous étes automatiquement redirigé vers la page de connexion/le code PIN de secours de votre compte Google. - Utilisez de préférence le bout du doigt plutôt que l'ongle pour activer ou désactiver l'écran. 1 Appuyez sur 0 > 0 > 0 > onglet Ecran > Ecran de verrouillage > Choisir I'ecran de verrouillage > Knock Code. 2 Pour définir votre Knock Code, appuyez sur les carres selon le schéma que vous souhaitez. Notre Knock Code peut se composer de 6 à 8 pressions.Déverrouillage de l'écran à l'aide du Knock Code
Vous pouvez déverrouiller l'écran en saisissant le motif Knock Code que vous avez déjà définir.Double fenêtre
Vouss pouvez effectuer plusieurs tâches grâce à cette fonctionnalité qui divise l'écran en deux, ce qui vous permet d'utiliser deux applications compatibles en même temps. 1 Appuyez sur > Double fenêtre. 2 Appuyez sur l'icone correspondant à l'application que vous souhaitez utiliser ou faites la glisser. : appuyer pour afficher les options de menu de la double fenêtre, ou faire glisser pour redimensionner les vues séparées. : Alterner entre les vues séparées. : voir la liste des applications. : passer la fenêtre sélectionnee en mode plein écran. × :fermer la fenetre de l'application actuellement selectionnee.REMARQUE
- Vous pouvez activer ou désactiver la double fenêtre à partir du menu Paramétres. 1 Appuyez sur > > onglet Général > Double fenêtre. 2 Faites glisser la touche de commutation sur Activé ou Désacté.Capturer+
La fonctionnalité Capturer+ vous permet de creator des mês et de réaliser des captures d'écran. Vous pouvez utiliser Capturer+ pour creer facilement et efficacement des mês lors d'un appel, avec une image enregistrée ou sur l'écran actuel du téléphone. 1 Appuyez et faites glisser la barre d'etat vers le bas et appuyez sur.  2 Creez un,默认 à l'aide des options suivantes :| Appuyez pour annuler la dernière action. | |
| Appuyez pour rétablir le dernier changement annulé. | |
| T | Appuyez pour insérer du texte dans votre mémo. |
| Appuyez pour sélectionner le type et la couleur du stylo. | |
| Appuyez pour utiliser lagomme afin d'effacer les marques de stylo sur le mémo. |
REMARQUE
- Veuillez appuyer sur l'écran tactile du bout du doigt pour utiliser la fonctionnalité Capturer+. N'utilisez pas vos ongles pour appuyer sur l'écran. 3 Appuyez sur pour enregistrer le mémo en cours dans QuickMemo+ ou dans la Galerie. Supprimer Capturer+ - Appuyez sur Afficher les mémos enregistrés - Appuyez sur > > et selectionnez l'album Capture+. - OU - - Appuyez sur > > et selectionnez le meme doyer choice.Configuration d'un compte Google
La première fois que vous ouvrez l'application Google sur votre appareil, vous doivent connecter à l'aide de votre compte Google existant. Si vous n'avez pas de compte Google, un message vous invite à enisser un.Creation de votre compte Google
1 Appuyez sur > > > onglet Général > Comptes et synchronisation. 2 Appuyez sur AJOUTER UN COMPTE > Google > Créer un compte. 3 Saisissez votre prénom et votre nom de famille, puis appuyez sur SUIVANT. 4 Saisissez un nom d'utilisateur et appuyez sur SUIVANT. Notre téléphone communique avec les serveurs Google et vérifie que le nom d'utilisateur est disponible. 5 Saisissez votre mot de passer et appuyez sur SUIVANT. 6 Suivez les instructions et saississez les informations requises et facultatives concernant le compte. Patientez pendant la création de votre compte par le serveur.Connexion à votre compte Google
1 Appuyez sur > > > onglet Général > Comptes et synchronisation. 2 Appuyez sur AJOUTER UN COMPTE > Google. 3 Saisissez votre adresse e-mail et appuyez sur SUVANT. 4 Lorsque la connexion est établie, elle permet d'utiliser Gmail et de bénéficier des services Google sur votre apparéil. 5 Une fois vous compte Google configuré, votre appareil se synchronise automatiquement avec votre compte Google sur le Web (si une connexion de données est disponible). Lorsque la connexion est établie, votre appareil se synchronise avec vos services Google, tels que Gmail, Contacts et Google Agenda. Vous pouvez également utiliser Maps, télécharger des applications de Play Store, sauvegarder vos paramètres sur les serveurs Google et profiter des autres services de Google sur votre appareil.IMPORTANT
- Certaines applications telles que le Calendrier ne fonctionnent qu'vec le premier compte Google que vous avez ajouté. Si vous prévoyez d'utiliser plus d'un compte Google sur votre apparéil, assurez-vous de bien vous connecter avec le compte que vous avez besoini. Lors de la connexion, votre réseau, vos messages Gmail, vos événements de calendrier et les autres informations liées à ces applications ou services Web sont synchronisés avec votre apparéil. Si vous ne vous connectez pas à un compte Google lors de la configuration du téléphone, vous devrez vous connecter ou creator un compte Google lorsque vous utiliserez pour la première fois une application nécessitant un compte Google (Gmail ou Play Store, par exemple). - Si vous disposez d'un compte professionnel lié à votre entreprise ou à une organisation, contactez le service informatique concerné pour connaître les dispositions à prendre pour se connecter.Connexion à des réseaux et périphériques
Wi-Fi
Vous pouvez acceder à Internet en haut-debit lorsque vous vous trouvez dans la zone de couverture d'un point d'accès sans fil (PA).Connexion aux réseaux Wi-Fi
1 Appuyez sur > > >ongletRéseaux > Wi-Fi. 2 Appuyez sur pour activer le Wi-Fi et commencer la recherche des réseaux Wi-Fi disponibles. 3 Appuyez sur un réseau pour étabir la connexion à ce réseau. - Si le réseau est sécurisé avec une icône de verrouillage, vous devez saisir un code (phrase d'accès) ou un mot de passer. 4 Dans la barre d'etat, différentes icones indiquent l'etat du réseau Wi-Fi.REMARQUE
- Si vous étés en dehors de la zone Wi-Fi ou si vous avez désactivé le Wi-Fi, l'appareil peut se connecter automatiquement à Internet à l'aide des données mobiles, ce qui peut entraîner des frais. ASTUCE! Pour déterminer l'adresse MAC Appuyez sur 0 > 0 > 0 > onglet Renseaux > Wi-Fi > Paramètres Wi-Fi avances > Adresse MAC.Bluetooth
Bluetooth est une technologie de communications de courte portée qui vous permet de vous connecter sans fil à un certain nombre d'appareils Bluetooth, tels que les kits piéton et les kits mains libres en voiture, les appareils mobiles, les ordinateurs, les imprimantes et les appareils sans fil compatibles Bluetooth.REMARQUE
- LG décline toute responsabilité en cas de perte, d'interception ou de mauvaise utilisation de données envoyées ou reçues via la fonctionnalité Bluetooth. - Veillez à ce que les apparciels avec lesquels vous échangez des données ou dont vous receivez des données soient de confiance et parfaitement sécurisés. - Si des obstacles se trouvent entre les péripériques, la distance d'utilisation pourrait être réduite. - Certains appareils, notamment ceux non testés ouapprovés par Bluetooth SIG, peuvent être incompatibles avec votre appareil.Appairage de votre apparéil avec un autre apparéil Bluetooth
1 Appuyez sur > > > onglet Reseaux > Bluetooth. 2 Appuyez sur pour activer le Bluetooth et lancer la recherche de péripériques Bluetooth disponibles. - Si vous souhaitez également détecter les périhériques visibles sur une étendue donnée, appuyez sur RECHERCHER. 3 Sélectionnez l'appareil que vous souhaitez coupler dans la liste. Une fois l'appairage effectué, votre apparéil se connecte à l'autre apparéil.REMARQUE
- L'appairage de deux appareils Bluetooth ne doit se faire qu'une seule fois. Une fois qu'un appairage a ete effectue, les appareils se reconnaissent systematiquement et continuent de s'échanger des informations. ASTUCE! Consultez la documentation accompagnant l'appareil Bluetooth pour obtenir des informations sur le mode d'appairage et le code d'accès (en général, 0 0 0 0 - quatre zéros).Envoi de données via Bluetooth
1 Sélectionnez un fichier ou un élément tel qu'un contact ou un fichier multimédia. 2 Sélectionnez l'option d'envoi de données par Bluetooth. 3 Recherche un périhérique compatible Bluetooth et procédez à un jumelage.REMARQUE
- En raison des différentes specifications et fonctionnalités des appareils Bluetooth, l'affichage et les opérations peuvent être différents. Des fonctions telles que le transfert ou l'échange, par exemple, peuvent ne pas être disponibles avec certains appareils Bluetooth.Réception de données via Bluetooth
1 Appuyez sur > > > onglet Reseaux > Bluetooth. 2 Appuyez sur pour activer le Bluetooth. 3 L'appareil émetteur vous enverra un message vous demandant d'accepter une tentative d'appairage. Veillez à bien sélectionner ACCEPTER.Wi-Fi Direct
Wi-Fi Direct fournit une connexion directe entre appareils compatibles Wi-Fi sans nécessiter de point d'accès.Activation de Wi-Fi Direct
1 Appuyez sur > > > onglet Reseaux > Wi-Fi. 2 Appuyez sur > Paramétres Wi-Fi avances > Wi-Fi Direct.REMARQUE
- Lorsque vous étés dans ce menu, votre apparéil est visible par d'autres apparéils Wi-Fi Direct visibles à proximité.Transfert de données entre un PC et l'appareil
Voussouspouce copier ou deplacer des données entre un PC et le telephone.Transfert de données
1 Connectez voire perehierique a un PC a l'aide du cable USB foumi avec le telephone. 2 Ouvrez le volet Notifications, appuyez sur le type de connexion actuel et selectionnez Appareil média (MTP). 3 Une fenêtre s'affiche sur votre PC, vous permettant de transférer les données de votre choix.REMARQUE
- Le pilote LG Android Platform doit être installé sur votre PC pour que le téléphone puisse être détecté. - Vérifiez la configuration nécessaire pour l'utilisation d'un Appareil Média (MTP).| Éléments Condition requise | |
| Système d'exploitation | Microsoft Windows XP SP3, Vista ou version ultérieure |
| Version de Window Media Player | Windows Media Player 10 ou version ultérieure |
Appels
Émission d'un appel
1 Appuyez sur > pour ouvrir le clavier de numérotation. 2 Entrez le numéro sur le clavier de numérotation. Pour supprimer un chiffre, appuyez sur × . 3Après avoir saisi le numero souhaite, appuyez sur pour passer l'appei. 4 Pour raccrocher, appuyez sur ASTUCE! Pour saisir le signe « + » au début d'un numéro international, appuyez de façon prolongée sur 0+Appel des contacts
1 Appuyez sur 0 > 1 pour ouvrir le repertoire. 2 Parcourez la liste de contacts. Vous pouvez également saisir le nom du contact dans le champ de recherche ou faire défiler les lettres de l'alphabet sur le bord droit de l'écran. 3 Dans la liste qui s'affiche, appuyez sur le contact voulu.Réponse à un appel et rejjet d'un appel
- Gillesz dans n'importe qu'elle direction pour répondre à l'appel entrant. - Gillesz dans n'importe qu'elle direction pour rejeter un appel entrant.REMARQUE
- Appuyez sur Refuser avec un message ou faites glisser l'option si vous poulez envoyer un message à l'expérience.Émettre un second appel
1 Pendant votre premier appel, appuyez sur la touche > Ajouter un appel et entrez le numéro. 2 Appuyez sur pour passer l'essay. 3 Les deux appeals s'affichent sur l'écran d'essay. L'essay initial est verrouillé et mis en attente. 4 Appuyez sur le numero qui s'affiche pour basculer entre les appel. Ou appuyez sur pour effectuer une conférence téléphonique. 5 Pourmettre fin à tous les appels,appuyez surREMARQUE
- Vous serez facturé pour chaque appel émis.Affichage des journaux d'essay
1 Appuyez sur > > onglet Journal des appel. 2 Une liste de tous les appeals émis, reçus et manqués est affichée.ASTUCE!
- Pour afficher les détails de chaque appel (date, heures et durée), appuyez sur la ligne correspondante. - Appuyez sur > Supprimer tout pour supprimer tous les éléments enregistrés.Paramètres d'appoint
Vous pouvez configurer les paramètres d'appoint, comme le rengoit d'appoint et d'autres fonctionnalités particulières proposées par votre opérateur. 1 Appuyez sur > pour ouvrir le clavier de numérotation. 2 Appuyez sur > Parametes d'appl et configurez les options souhaitees.Répertoire
Vous ave la possibilité d'ajouter des contacts sur votre apparéil et de les synchroniser avec ceux de votre compte Google ou d'autres comptes prénant en charge la synchronisation des contacts.Recherche d'un contact
1 Appuyez sur > pour ouvrir le repertoire. 2 Appuyez sur Rechercheur un contact et saisissez le nom du contact à l'aide du clavier.Ajout d'un nouveau contact
1 Appuyez sur 0 > 一 et saisissez le numero du nouveau contact. 2 Appuyez sur > Ajouter aux contacts > Nouveau contact. 3 Pour associier une image au nouveau contact, appuyez sur l'icone d'image. Sélectionnez Prendre une photo ou Sélectionner à partir de la Galerie. 4 Saisissez les informations de votrechioix pour le contact. 5 Appuyez sur ENREGISTRER.Contacts préféRES
Permet de classer dans les favors les contacts que vous appelez fréquement.Ajout d'un contact à vos+favoris
1 Appuyez sur 0> pour ouvrir le repertoire. 2 Appuyez sur un contact pour afficher les informations le concernant. 3 Appuyez sur l'etoile en haut à droite de l'écran. L'étoile devient jaune.Suppression d'un contact de votre liste de favoris
1 Appuyez sur > > onglet Favoris. 2 Sélectionnez un contact pour afficher les informations le concernant. 3 Appuyez sur l'étoile jaune en haut à droite de l'écran. L'étoile devient foncée et le contact est supprimé des favors.Création d'un groupe
1 Appuyez sur > > onglet Groupes. 2 Appuyez sur > Nouveau groupe. 3 Saisissez un nom pour ce nouveau groupe. Vous pouvez aussi attribuer une sonnerie distincte au nouveau groupe créé. 4 Appuyez sur Ajouter des membres pour ajouter des contacts au groupe, puis appuyez sur AJOUTER. 5 Pour sauvegarder le groupe, appuyez sur ENREGISTRER.REMARQUE
- La suppression d'un groupe n'entraine pas la suppression des contacts qui lui sont affectés. Ces derniers seront conservés dans votre réseau.Messagerie
Votre tlephone reunit les fonctions SMS et MMS dans un menu intuitif et convivial.Envoi d'un message
1 Appuyez sur > 2 Saisissez le nom ou le numéro d'appoint dans le champ A. Au fur et à mesure que vous saisissez le nom du contact, les contacts correspondants s'affichent. Vous pouvez appuyer sur un destinataire suggéré et ajouter plus d'un contact.REMARQUE
- Vous serez peut-être facturé pour chaque message SMS envoyé. Veuillez contacter votre fournisseur de services. 3 Appuyez sur le champ de texte pour commencer la saisie du message. 4 Appuyez sur : pour ouvrir le menu d'options. Choisissez l'une des options disponibles. ASTUCE! Vous pouvez appuyer sur pour joindre un fichier à votre message. 5 Appuyez sur Envoy... pour envoyer votre message.ASTUCE!
- La limite de 160 caractères peut varier d'un pays à l'autre, selon la méthode de codage du SMS et la langue utilisé. - Si une image, une video ou un fisier audio est ajouté à un message SMS, celui-ci est automatiquement converti en message MMS et il vous est facturé en conséquence.REMARQUE
- Lorsque vous receivez un SMS pendant un appel, une sonnerie vous en avertit.Affichage conversation
Les messages échangés avec une autre personne sont affichés dans l'ordre chronologique. Vous avez ainsi facilement accès à l'histoire de vos conversations.Modification des paramètres de messagerie
Les paramètres de messagerie de votre apparéil sont prédéfinis pour vous permettre d'envoyer des messages immédiatement. Vous pouvez toute fois modifier les paramètres en fonction de vos préférences. Appuyez sur > > Paramétres.Gestion de comptes de messagerie
Ouverture de l'application E-mail
La première fois que vous ouvrez l'application E-mail, un assistant de configuration s'affiche pour vous aider à ajouter un compte de messagerie. Appuyez sur > >Ajout d'un autre compte
Appuyez sur > > > > Parametes >Modification des paramètres de messagerie généraux
Appuyez sur > > > > Parametes > Parametes généraux.Suppression d'un compte de messagerie
- Appuyez sur > > > > > Paramétres > Supprimer le compte > Sélectionnez le compte à supprimer > SUPPRIMER > OUI.Utilisation des dossiers de comptes
Appuyez sur 0 > 0 > 0 > 0 > 0 > Afficher tous les dossiers. Tous les comptes possèdent des dossiers Boîte de réception, Boîte d'envoi, Envoyés et Brouillons. Selon les fonctions prises en charge par le fournisseur de services de votre compte, il existe peut-être aussi d'autres dossiers.Composition et envoi d'un e-mail
1 Appuyez sur O > pour creer un nouvel e-mail. 2 Saisissez l'adresse du destinataire du message. Au fur et à mesure que vous saisissez l'adresse, les adresses correspondantes figurant dans vos contacts vous sont proposées. Si vous ajoutez plusieurs adresses, séparez-les par des points-virgules. 3 Appuyez sur le champ Cc/Cci pour pouvoir envoyer une copie carbone ou une copie carbone invisible à d'autres contacts/adresses e-mail. 4 Appuyez sur le champ de texte et saisissez votre message. 5 Appuyez sur pour joindre un fichier au message. 6 Appuyez sur pour envoyer le message.Photo et video
Options de l'appareil photo sur le viseur
Vous pouvez utiliser la fonction Appareil photo ou Caméra pour prendre et partager des photos et des vidés. Appuyez sur > >  Options Masquer/Afficher: appuyez pour masquer/afficher les options de l'appareil photo sur le viseur. Flash : yous permit degerer le flash de l'appareil photo. 3 Échanger apparéil photo : permet de basculer entre l'objectif arrêté et l'objet avant de l' apparéil photo. 4 Prise de vue : vous permet de selectionner le mode de prise de l'image. Paramétres : appuyez sur cette icône pour ouvrir le menu des paramétres de l'appareil photo. Galerie : appuyez pour visualiser la derniere photo prise ou video réalisée. Enregistrer: appuyez sur cette icône pour commencer l'enregistrement. 8 Capturer: appuyez sur cette option pour prendre une photo. Photo et video Touche Retour: appuyez pour quitter l'appareil photo.REMARQUE
- Nettoyez le cache à l'aide d'un chiffon microfibre avant de prendre des photos. S'il y a des traces de doigt sur le cache, les images peuvent être floues avec un effet « halo »Utilisation des paramètres avancés
Dans le viseur de l'appareil photo, appuyez sur pour afficher les options avancées. Appuyez sur chaque icône pour régler les paramétres suivants de l'appareil photo.| 163 | Permet de définir la taille de votre image et de votre video. |
| B | Permet de déclencher la prise de photos par commande vocale. Lorsque cette option est activée, pour prendre une photo, il vous suffit de dire « Cheese», « Smile » ou « LG», etc. |
| Permet de régler le minuteur de votre apparéil photo. Cette option est pratique si vous foulez apparaître sur la photo ou dans la video. | |
| Permet de réaliser des images encore plus belles et d'enregistrrer des vidés de toute valeur qualité en affichtant un quadrillage pour faciliter le cadrage. | |
| Permet deCHOISSE entre les options suivantes: IN (mémoire interne) ou SD (carte SD). Ce menu s'affiche uniquement lorsque la carte SD est insérée. | |
| Indique comment utiliser une fonction. Cette icône vous fournira un guide d'aide. |
Prendre une photo
1 Appuyez sur > > 2 Cadrez vous sujet pour qu'il apparaisse à l'écran. 3 Un carré apparait autour du sujet pour indiquer que l'appareil a fait la mise au point. 4 Appuyez sur pour prendre une photo. Notre photo est automatiquement enregistrée dans la Galerie.Une fois la photo prise
Appuyez sur l'image miniature sur l'écran pour afficher la dernière photo prise.| Appuyez pour modifier la photo. | |
| Permet de prendre immédiatement une autre photo. | |
| Appuyez pour accéder aux options de partage disponibles. | |
| Permet de supprimer la photo. | |
| Permet d'accéder à des options supplémentaires. | |
| ★ | Permet d'ajouter la photo à vos+favors. |
Mode Panorama
Ce mode vous permet de prendre une photo panoramicque. 1 Appuyez sur > > 2 Appuyez sur Mode > 3 Appuyez sur pour commencer la prise de photo panoramicque. 4 Faites pivoter lentement votre apparéil dans une direction. 5 Assurez-vous que la zone de mise au point s'aligne sur la ligne directrice bleue lorsque vous prenez la photo. 6 Appuyez sur pour arreter la prise de photo panoramicque.Enregistrement d'une video
1 Appuyez sur > > 2 Cadrez vous sujet pour qu'il apparaissé à l'écran. 3 Appuyez sur pour lancer l'enregistrement de votre video. 4 La durée de l'enregistrement s'affiche en haut de l'écran.REMARQUE
- Appuyez sur l'our prendre des photos pendant que vous enregistrez une vente. 5 Appuyez sur pour faire une pause dans l'enregistrement. Vous pouvez reprendre l'enregistrement en appuyant sur - OU - Appuyez sur pour arrêtier l'enregistrement. Voitre video est automatiquement enregistrée dans la Galerie.Après l'enregistrement d'une video
Appuyez sur la video miniature sur l'écran pour voir votre dernière video enregistrée.| Permet d'enregistrer une autre video immediatement. | |
| Permet d'ouvoir les options de partage disponibles ( comme la messagerie ou la fonction Bluetooth) pour effectuer un partage. | |
| Permet de supprimer la video. | |
| Permet d'acceder à des options supplémentaires. | |
| Permet d'ajouter la video à vos+favors. |
Galerie
L'application Galerie regroupe les images et les videos que vous avez enregistrées, y compris celles que vous avez prises avec l'application Appareil Photo et celles que vous avez téléchargees sur Internet ou à partir d'autres sources. 1 Appuyez sur > > pour afficher les images enregistrées. 2 Appuyez sur un album pour l'ouvrir et afficher son contenu. (Les images et videos containues dans l'album s'affichent par ordre chronologique.) 3 Appuyez sur une image d'un album pour l'afficher.REMARQUE
- En fonction du logiciel installé, certains formats de fichier peuvent ne pas être pris en charge. - Certains fichiers peuvent ne pas etre lus correctement a cause de leur codage.Affichage des photos
La Galerie affiche vos photos dans des dossiers. Lorsqu'une application, comme E-mail, enregistre une photo, le dossier de téléchargement est automatiquement créé pour y enregistrer la photo. De la même façon, prendre une capture d'écran create automatiquement le dossier Captures d'écran. Les images s'affichent par date de creation. Sélectionnez une photo pour l'afficher en plein écran. Faites défilé l'écran vers la droite ou vers la gauche pour afficher la photo précédente ou suivante.Zoom avant et arrêté
Utilisez une des méthodes suivantes pour effectuer un zoom avant sur une image : - Appuyez deux fois n'importe où pour effectuer un zoom avant. - Écartez deux doigts n'importe où sur la photo pour effectuer un zoom avant. Rapprochez vos doigts ou appuyez deux fois sur la photo pour effectuer un zoom arrêté.Options video
1 Appuyez sur    2 Sélectionnez la video que vous souhaitez regarder.    Permet de suspendre/reprene la lecture de la video.| 2 | Touchez et maintenez pour avancer rapidement par incréments de 3 secondes. Permet une avance rapide de 10 secondes. | |
| 3 | Touchez et maintenez pour revenir en arrêté par incréments de 3 secondes. Permet un retour rapide de 10 secondes. | |
| 4 | Permet de régler le volume de la vente. | |
| 5 | / / | Permet de verrouiller/déverrouiller l'écran. |
| 6 | Appuyez sur cette option pour définir les différents effets. | |
| 7 | Permet d'acceder à des options supplémentaires. |
REMARQUE
- Pendant la lecture d'une video, faites glisser le côte droit de l'écran vers le haut ou le bas pour régler le son. - Pendant la lecture d'une video, faites glisser le côte gauche de l'écran vers le haut ou le bas pour régler la luminosité. - Pendant la lecture d'une video, faites glisser votre doigt de gauche à droite (ou vice versa) pour faire une avance rapide ou revenir en arrêt.Modification des photos
Lors de l'affichage d'une photo, appuyez surSuppression de photos et videos
Utilizez l'une des méthodes suivantes : - Dans un dossier, appuyez sur , Sélectionnez les photos/vidés et appuyez sur SUPPRIMER. Lors de l'affichage d'une photo, appuyez surDéfinition d'un fond d'écran
Lors de l'affichage d'une photo, appuyez sur > Configurer l'image comme pour définir l'image comme fond d'écran ou pour l'affector à un contact.REMARQUE
- En fonction du logiciel installé, certains formats de fichier peuvent ne pas être pris en charge. - Si la taille de fichier dépasse la mémoire disponible, une erreur risque de se produit à l'ouverture des fichiers.Multimédia
Musique
Votre téléphone est équipé d'un lecteur audio qui permet d'écouter vos morceaux préféres.Lecture d'une chanson
1 Appuyez sur > > 2 Appuyez sur l'onglet Chansons. 3 Sélectionnez la chanson que vous souhaitez dire. 4 Les options suivantes vous sont proposées. | 1 | 2 | Permet d'interrompre la lecture. |
| 3 | Permet de reprendre la lecture. | |
| 2 | Permet de passer au morceau suivant de l'album, de la liste d'écoute ou de la liste de lecture aléatoire. Appuyer et maintainir pour faire une avance rapide. | |
| 3 | Permet de revenir au début de la piste en cours de lecture ou de revenir à la piste précédente de l'album, de la liste d'écoute ou de la liste de lecture aléatoire. Appuyer et maintainir pour faire un retour rapide. | |
| 4 | Permet de régler le volume. | |
| 5 | Permet de configurer les effets audio. | |
| 6 | × | Permet de dire la liste d'écoute en cours en mode aléatoire (les morceaux sont joués dans un ordre aléatoire). |
| 7 | Permet de basculer entre les options de lecture en boucle de toutes les chansons, de répétition de la chanson actuelle ou de désactivation de la lecture en boucle. | |
| 8 | Permet d'ajouter la chanson à vos favoris. | |
| 9 | Permet d'afficher la liste d'écoute en cours. | |
| 10 | Permet d'acceder à des options supplémentaires. |
REMARQUE
- En fonction du logiciel installé, certains formats de fichier peuvent ne pas être pris en charge. - Si la taille de fichier dépasse la mémoire disponible, une erreur risque de se produit à l'ouverture des fichiers. - Les contenus musicaux peuvent être protégés par des traités internationaux, ainsi que par les législations nationales en vigueur en matière de copyright. Par conséquent, la copie ou la reproduction d'un contenu musical peut être soumise à l'obtention d'autorisations ou de licences particulières. Dans certains pays, la législation en vigueur interdit la copie à usage privé de tout contenu protégé par un copyright. Avant de télécharger ou de copier le fichier, veuillez prendre connaissance de la législation en vigueur du pays concerné au sujeet de l'utilisation d'un tel contenu.Utilaires
Horloge
L'application Horloge vous donne accès aux Alarmes, au Minuteur, aux Fuseaux horaires et au Chronomètre. Pour acceder à ces fonctions, appuyez sur les onglets situés dans la partie supérieure de l'écran ou faites glisser vos doigts horizontally en travers de l'écran. Appuyez sur > >Alarmes
L'onglet Alarmes vous permet de définir des alarmes. 1 Appuyez sur > > onglet Alarmes. 2 Appuyez sur pour ajouter une nouvelle alarme. 3 Réglez les paramètres à votre convenance et appuyez sur ENREGISTRER.REMARQUE
- Vous pouvez également appuyer sur une alarme existante pour la modifier.Minuteur
L'onglet Minuteur vous prévient par un signal sonore lorsque le salarié défini s'est écoulé. 1 Appuyez sur > > onglet Minuteur. 2 Reglez le minuteur sur la durée souhaitation. 3 Appuyez sur Demarrer pour lancer le minuteur. 4 Appuyez sur Arreter pour arreter le minuteur.Fuseaux horaires
L'onglet Fuseaux heures vous permet de vérifier facilement l'heure actuelle dans d'autres villes du monde. 1 Appuyez sur > > onglet Fuseaux horaires. 2 Appuyez sur + et selectionnez la ville de votrechoix.Chronomètre
L'onglet Chronomètre vous permet d'utiliser votre apparéil comme un chronomètre. 1 Appuyez sur > > onglet Chronometre. 2 Appuyez sur Demarrer pour lancer le chronomètre. Appuyez sur Tour pour enregistrer des temps par tour. 3 Appuyez sur Arreter pour arreter le chronometre.Calculatrice
L'application Calculatrice vous permet d'effectuer des calculs à l'aide d'une calculatrice ordinaire ou scientifique. 1 Appuyez sur > > 2 Saisissez des chiffres à l'aide des touches numériques. 3 Pour les calculs simples, appuyez sur la fonction que vous souhaitez effectuer (+, -, x ou ÷ ), suivie de =.REMARQUE
Pour les calculs plus complexes, appuyez surAgenda
L'application Agenda vous permet de suivre les événements de votre agenda. 1 Appuyez sur > > 2 Appuyez sur la date à laquelle vous souhaitez ajouter un événement. Ensemble, appuyez surDictaphone
L'application Dictaphone enregistre des fichiers audio que vous pourrez utiliser de différentes façon.Enregistrement d'un son ou d'une voix
1 Appuyez sur > > 2 Appuyez sur pour lancer I'enregistrement. 3 Appuyez sur pour quitter l'enregistrement. 4 Appuyez sur pour écouter l'enregistrement.REMARQUE
- Appuyez sur pour acceder à vos enregistements. Vous pouze écouter vos enregistements sauvégardés.Recherche vocale
Utilisez cette application pour rechercher des pages Web avec votre voix. 1 Appuyez sur > > dossier Google> 2 Dites un mot-clé ou une expression lorsque Écoute en cours... s'affiche à l'écran. Sélectionnez l'un des mots-clés proposés.REMARQUE
- Selon la région ou l'opérateur, cette application peut ne pas être disponible.Téléchangements
Utilisez cette application pour voir les fichiers téléchargés par les applications. - Appuyez sur  REMARQUE
- Selon la région ou l'opérateur, cette application peut ne pas être disponible.Radio FM
Votre téléphone comporte une Radio FM intégrée qui vous permet d'écouter vos stations de radio préférencées lors de vos déplacements. - Appuyez sur   ASTUCE! Vous doivent branchier vos écouteurs pour qu'ils servent d'antenne.REMARQUE
- Selon la région ou l'opérateur, cette application peut ne pas être disponible.Navigateur Internet
Internet
Internet vous permet d'acceder rapidement à un univers coloré de produits, de musiques, d'informations, de sports, de divertissements, etc., directement sur votre appareil portable.REMARQUE
- Lorsque vous vous connectez à ces services et que vous téléchargez du contenu, des frais supplémentaires vous sont facturés. Vérifiez le coût des données auprès de votre fournisseur réseau. Appuyez sur > >Utilisation de la barre d'outils Web
Faites défilier l'écran vers le haut de la page Web pour acceder à la barre d'outils du navigateur.| ↔ | Permet de revenir à la page précédente. |
| → | Permet d'accéder à la page suivante. |
| ◇ | Permet d'accéder à la page d'accueil. |
| 国王 | Permet d'ouvrir une nouvelle fenêtre. |
| 国 | Touchez pour accéder à vos signets. |
Affichage des pages Web
Appuyez sur le champ de l'adresse, saisissez l'adresse Web et appuyez sur Aller sur le clavier.Ouvrir une page
Pour ouvrir une nouvelle page, appuyez sur 1 > + Pour ouvrir une autre page Web, appuyez sur 2, faites défiler l'écran vers le haut ou vers le bas, puis appuyez sur une page pour la sélectionner.Effectuer une recherche vocale sur Internet
Appuyez sur le champ d'adresse, puis sur . Lorsque vous y ETES invite, pronouncez un mot-clé puis selectionnez l'un des mots-clés proposés.REMARQUE
- Ceci peut ne pas être disponible en fonction de la région ou du fournisseur de service.Favors
Pour enregistrer la page Web actuelle dans les favors, appuyez sur : > Favori > ENREG.. Pour ouvrir une page Web enregistrée dans les favors, appuyez sur et seLECTIONnez le favori de votrechoix.Historique
Appuyez sur 国 > onglet Historique pour ouvrir une liste de pages Web récemment visées. Pour effacer tout l'historique, appuyez sur 国 > 0UI.Chrome
Utilizez Chrome pour rechercher des informations et parcourir des pages Web. - Appuyez sur  REMARQUE
- Selon la région ou l'opérateur, cette application peut ne pas être disponible.Affichage des pages Web
Appuyez sur le champ d'adresse, puis saisissez une adresse Web ou des critères de recherche.Ouvrir une page
Pour ouvrir une nouvelle page, appuyez sur > Nouvel onglet. Pour ouvrir une autre page Web, appuyez sur et sur une page pour la sélectionner.Paramètres
L'application Paramétres contient la plupart des outils permettant de personneliser et de configurer votre apparéil. Tous les paramétres de cette application sont décrits dans cette section.Pour ouvrir l'application Paramètres
- Appuyez sur > Maintenez le doigt enforcé sur > Paramétres système. -OU- Appuyez sur > >Réseaux
< RÉSEAUX SANS FIL > Double carte SIM
Configurez les réglages de la double carte SIM. - La carte SIM 1 : permet de modifier le nom de la carte SIM et l'icone de carte SIM pour la carte SIM 1. - Activez l'emplacement 1 : cochez la case pour activer ou désactiver l'emplacement de la carte SIM 1. - La carte SIM 2 : permet de modifier le nom de la carte SIM et l'icone de carte SIM pour la carte SIM 2. - Activez l'emplacement 2 : cochez la case pour activer ou désactiver l'emplacement de la carte SIM 2. - Thème couleur de la carte SIM : Permet deCHOISIR les couleurs souhaitees. - Coût mode d'économie : pour chaque contact ajouté dans l'annuaire figure une information concernant la carte SIM sur laquelle il se trouve. Durant un appel, la carte SIM de l'opérateur correspondant est identifiée et l'appeal est réalisé à l'aide de la carte SIM ajustée. Cela vous permet d'utiliser le même opérateur que votre correspondant. - Données mobiles : cochez la case pour activer l'accès aux données via un réseau mobile. - Carte SIM à utiliser : vous pouvez modifier le réseau de données par défaut. Tous les services par paquets mobiles (Web, MMS, e-mail, etc.) utiliseront la carte SIM sélectionnée pour cette valeur. Lorsqu'une seule carte SIM est insérée, le réseau de données par défaut est définie comme celui de la carte SIM insérée et ne peut pas être modifié. - l'inérance de données : cochez cette option pour pouvoir utiliser des connexions de données mobiles lorsque vous étés en dehors de votre réseau local.Wi-Fi
Permet d'activer la fonction Wi-Fi pour pouvoir se connecter aux réseaux Wi-Fi disponibles.Bluetooth
Permet d'activer ou de désactiver la fonction sans fil Bluetooth afin de l'utiliser.Données mobiles
Permet d'afficher l'utilisation des données et de définir la limite d'utilisation des données mobiles.Appels
Configurez les paramètres d'appoint, tels que le renvoi d'appoint et d'autres fonctions particulières proposées par votre opérateur.[Onglet La carte SIM 1/La carte SIM 2]
- Boîte vocale : permet de sélectionner le service de messagerie de votre opérateur. - Numéros autorisés : permet d'activer et de compiler une liste des numérios pouvant être appelés à partir de votre téléphone. Vous devez saisir le code PIN2 qui vous a été communiqué par votre fournisseur. Depuis votre téléphone, vous pouvez uniquement appeler les numérios de la liste des numérios autorisés. - Renvoi d'appoint : permet de définir les options de re�oi d'appoint. - Interdiction d'applés : exclut les appels entrants, sortants ou internationaux. - Durées des appeals : permet d'afficher la durée des appeals, y compris pour le Dernier appel, les Appels sortants, les Appels entrants et Tous les appeals. - Paramétres supplémentaires : permet de modifier les paramétres suivants : Numéro de l'aggellant : vous permet de définir les paramétres d'opérateur par défaut afin d'afficher votre numéro lors des appeals sortants. Appel en attente : si cette fonction est activée, le téléphone vous prévient lorsque vous receivez un appel entrant et que vous étés déjà en ligne (en fonction de votre opérateur réseau).[Onglet Commun]
- Transfert intelligent : permet de receivevoir des appels depuis votre carte SIM2 si la ligne de la carte SIM1 est occupée, et vice versa. - Notification des appel entrants : permet d'affiche une notification vous signalant un appel entrant lorsque vous etes en train d'utiliser une application. - Rejet d'emploi : permet d'activer la fonction de rejet d'emploi. - Refuser avec un message : permet d'envoyer un message rapide lorsque vous souhaitez rejoeter un appel. Cette fonction peut s'avérer particulièrement utile si vous doivent rejoeter un message pendant une réunion. - Réponse auto : permet de définir le salarié avant qu'un périphérique connecté en mains-libres réponde automatiquement à un appel. - Vibrer lors de la réponse : permet de faire vibrer votre apparéil lorsque vous correspondant décroche. - Enregistrer des numéroinsconnus : permet d'ajouter des numérods dans le repertoire après un appel. - Bouton d'alimentation pour raccrocher : permet de selectionner votre fin d'applé. - Mode Silence pour appel entrant : cochez cette option pour que l'appareil s'arrête de sonner avec une simple rotation en cas d'appeel entrant.< CONNECTIVITE>
Partage de connexion
- Partager connexion USB : permet de partager la connexion Internet avec votre ordinateur à l'aide d'un cable USB. - Hotspot Wi-Fi : permet de creator un point d'accès Wi-Fi mobile et de partager libre la connexion. - Partage de connexion Bluetooth : permet de vous connecter à d'autres appareils via Bluetooth. - Aide : affiche des informations d'aide sur les fonctions Partager connexion USB, Hotspot Wi-Fi et Partage de connexion Bluetooth.Plus
- Mode Avion : permet d'utiliser de nombreuses fonctions de votre apparéil, comme des jours et de la musique, lorsque vous vous trouvez dans une zone où il est interdit de passer des appeals, de receivevoir des appeals ou d'utiliser des données. Lorsque vous reglez votre apparéil sur le mode Avion, vous ne pouvez pas passer d'appels, ni en receivevoir, ni accéder à des informations en ligne. - VPN: sur votre apparéil, vous pouvez ajouter, configurer et:gérer des réseaux privés virtuels (VPN) qui vous permettent de vous connecter et d'acceder à des ressources au sein d'un réseau local sécurisé, comme votre réseau d'entreprise. - Réseaux mobiles : permet de configurer divers paramètres du réseau mobile. - Impression : permet d'imprimer le contenu de certains écrans ( comme des pages Web affichées dans Chrome) à l'aide d'une imprimante connectée au même réseau Wi-Fi que votre apparéil Android.Son et Notification
Sonnerie SIM1 / Sonnerie SIM2
Permet de définir les sonneries des appeals.Ring ID
Permet deCHOISIR une sonnerie en fonction du numero de telephone de I'applentrant.Son avec vibration
Cochez cette option pour que le téléphone vibre quand il sonne.Type de vibration SIM1 / Type de vibration SIM2
Vous permet de définir un type de vibration pour les notifications.Ne pas déranger
Permet de définir un calendrier afin d'éviter des interruptions causées par les notifications. Vous pouvez régler cette option pour permettre l'interruption de certaines fonctionnalités en appliquant le paramètre Prioritaires uniquement.Écran de verrouillage
Permet deCHOISIRsiyoussouhaitezafficheroumasquerlesnotificationssurl'écrandeverrouillage.Applications
Permet d'empêcher des applications d'afficher les notifications ou de régler des applications pour qu'elles affichent les notifications avec priorité lorsque l'option Ne pas déranger est configurée sur Prioritaires uniquement.LED de notification
Appuyez sur le bouton pour l'activer ou la désactiver. Lorsque cette option est activée, un voyant lumineux s'allume pour les notifications sélectionnées, dans la couleur que vous avez définitie pour chacune d'entre elles.Plus
- Son de notification SIM1/Son de notification SIM2 : permet de définir le son des notifications. Vous pouze également ajouter un son de notification en appuyant sur + dans le coin supérieur droit de l'écran. - Vibration lorsqu'on appuie : cochez cette option pour activer le vibreur lors des commandes tactiles et autres interactions avec l'interface utilisateur. - Effets sonores : appuyez pour configurer la tonalité des touches d'appel, le son des commandes tactiles et le son de verrouillage de l'écran. - Notifications vocales de messages et d'appels : appuyez sur le bouton Notifications vocales de messages et d'appels pour activer ou désactiver cette fonction. Une fois la fonction activée, votre apparéil vous lit automatiquement à voix haute les appeals entrants et les messages.Écran
Écran d'accueil
- Sélectionnez Accueil : sélectionnez Accueil ou EasyHome comme page d'accueil par défaut. - Thème : permet de sélectionner le thème de l'écran de votre apparéil. Vous pouvez télécharger de nouveaux thèmes sur LG SmartWorld. - Fond d'écran : permet de définir le fond d'écran à utiliser sur votre écran d'accueil. - Effet de défilament des écrans d'accueil : sélectionnez le type d'effet que vous souhaitez afficher lorsque vous faites glisser votre doigt pour passer d'une page de l'écran d'accueil à une autre. - Laisser l'écran d'accueil tourner en boucle : permet d'afficher le premier écran après le dernier lorsque vous faites défiler l'écran d'accueil. Aide : permet d'afficher des informations d'aide pour l'écran d'accueil.Écran de verrouillage
- Choisir l'écran de verrouillage : permet de définir un type d'écran de verrouillage pour sécuriser votre apparéil. Grâce à cette option, vous pouvez afficher une série d'écrans qui vous aidera à dessiner un schéma de déverrouillage de l'écran. Si vous avez activé un schéma de verrouillage, il vous sera alors demandé de saisir libre la scéma de déverrouillage pour déverrouiller l'écran lorsque vous l'activez ou lorsque vous allumez libre sautiliez libre leur apparéil. - Smart Lock: permet de garder votre apparéil déverrouillé lorsqu'il est connecté avec un périhérique sécurisé ou qu'il se trouve dans un endroit familial. Fond d'écran : permet de définir le fond d'écran de verrouillage. - Raccourcis : permet deCHOISIR les raccourcis disponibles sur I'ecran de verrouillage. - Personne à contacter en cas de perte du téléphone : permet d'afficher les informations du propriétaire sur l'écran de verrouillage en cas de perte du téléphone. - Minuterie du verrouillage: permet de définir la période de mise en voille au bout de laquelle l'écran se verrouille automatiquement. - Verrouillage instantané par bouton d'alimentation : cochez cette option pour verrouiller immédiatement l'écran lorsque vous appuyez sur le bouton Marche-Arret/Verrouillage. Ce réglage annule le Minuteur de verrouillage sécurité.Touches tactiles
Définissez les touches tactiles de l'écran d'accueil à afficher en bas de tous les écrans. Sélectionnez celles que vous pouze afficher, leur emplacement dans la barre et leur apparcence.Type de police
Sélectionnez le type de police souhaité.Taille de police
Sélectionnez la taille de police souhaïée.Luminosite
Ajustez la luminosité de l'écran à l'aide du curseur.Rotation automatique de l'écran
Permet de changer automatiquement d'orientation lors de la rotation de votre apparéil.Mise en veille de l'écran
Permet de régler la durée qui précède la désactivation automatique de l'écran.Plus
- Écran de veille interactif : sélectionnez l'écran de veille à afficher lorsque le téléphone est branché à un Dock et/ou qu'il est en charge. - Calibration des capteurs de mouvement : Permet d'améliorer l'exactitude de l'inclinaison et la vitesse du capteur.Général
Langue et clavier
Selectionnez la langue du texte qui apparaît sur votre téléphone et pour la configuration du clavier à l'écran, avec notamment les mots ajoutés au dictionnaire. - Langue :CHOISSEZ la langue à utiliser sur le téléphone. - Clavier actuel : vous permet de selectionner le type de clavier par défaut. - Clavier LG: appuyez sur l'icone Paramètres pour modifier les paramètres du clavier LG. - Google voice typing : cochez cette option pourCHOISIR Google Voice Typing pour la saisie de données. Appuyez sur I'icone Parametes pour modifier les parametes Google Voice Typing. - Paramètres de la synthèse vocale : permet de définir le moteur préfééré ou les paramètres généraux pour les paramètres de la synthèse vocale. - Vitesse du curseur : permet de régler la vitesse du curseur. - Inverser les boutons : inverse les boutons de la souris pour utiliser le bouton droit de la souris comme bouton principal.Position
Quand le service de localisation est activé, le téléphone détermine votre localisation approximative grâce au Wi-Fi et aux réseaux mobiles. Quand vous sélectionnez cette option, vous autorisez Google à enregistrer votre positionnement pour vos recherches Google. - Mode : définit la manière dont vos informations géographiques actuelles sont déterminées. - Appareil Photo : cochez cette option pour taguer des photos ou des vidés avec leur position géographique. - Historique des positions Google : vous permet de désirir les paramétres de vos informations géographiques accessibles par Google et ses produits.Comptes et synchronisation
Utilisez le menu Comptes et synchronisation pour ajouter, supprimer etGERer voire compte Google et les autres comptes pris en charge. Ces parametes seront également à contrcler comment toutes les applications envoient, recoivent et synchronisent des données selon leur propre programmation et si elles le font, et si toutes les applications peuvent synchroniser automatiquement les données utilisateur. Gmail™, Google Agenda et d'autres applications peuvent également inclure leurs propres parametes pour contrcler la synchronisation des données ; pour de plus amples informations, reportez-vous aux sections consacrées à ces applications. Appuyez sur AJOUTER UN COMPTE pour ajouter le nouveau compte.Accessibilité
Les paramètres Accessibilité permettent de configurer tout module d'accessibilité installé sur votre appareil.- Vision
- TalkBack : permet de configurer la fonction Talkback destinée à assister les personnes souffrant de problèmes de vue en leur délivrant un message vocal. - Notifications vocales de messages et d'appels : appuyez sur pour activer ou désactiver cette fonction. Lorsque la fonction est activée, vous receivez des alertes automatiques vocales à l'arrivée d'un message ou d'un appel. - Niveau de gris de l'écran : cochez la case pour diminuer le contraste de l'écran. - Taille de police : permet de définir la taille de police. - Zoom tactile - Vous permet de zoomer et dézoomer en tapotant l'écran à trois reprises. - Inversion des couleurs de l'écran : cochez cette option pour inverser les couleurs de l'écran et de son contenu. - Filtre des couleurs de l'écran : permet de modifier les couleurs de l'écran et de son contenu. - Bouton d'alimentation pour raccrocher : cochez cette option pour pouvoirmettre fin aux appel vocaux en appuyant sur la touche Marche-Arrêt/Verrouillage.Mode de reproduction sonore
- Légendé : permet de personneliser les paramètres de légende pour les malentendants. - LED de notification : permet d'activer la LED Flash pour les appel entrants et les notifications. - Alertes flash : cochez cette case pour faire clignoter le flash lors d'appels entrants et de notifications. - Désactiver tous les sons : cochez cette case pour désactiver tous les sons de l'ordinateil. - Type de son - Définit le type de son. - Balance du son - Définit le chemin audio. Déplacez le curseur sur la barre de réglageMotricité et cognition
- Temps de réponse tactile : permet de définir le temps de réponse tactile. - Touch assistant : affiche un panneau tactile permettant d'acceder facilement aux actions les plus courantes. - Mise en voille de l'écran : permet de définir le salarié avant la désactivation automatique du rétroéclairage. - Zones de commande tactile : permet de limiter la possibilité d'interactions tactiles à une zone de l'écran. Raccourci vers les fonctions d'accessibilité Permet d'acceder rapidement à des fonctionnalités selectionnées en appuyant à trois reprises sur la touche Accueil. - Rotation automatique de l'écran Cochez cette option pour que l'écran pivote selon l'orientation du téléphone (portrait ou paysage). - Switch Access Permet d'interagir avec votre apparéil à l'aide d'un ou plusieurs commutateurs qui fonctionnent comme des touches de clavier. Ce menu peut être utile pour les utilisateurs dont la mobilité est réduite, ce qui les empêche d'interagir directement avec l' apparéil.Touch de raccourci
Accedez rapidement aux applications en Maintenant les touches du volume enfoncés lorsque l'écran est étant ou verrouillé.Sécurité
Utilisez le menu Sécurité pour sécuriser votre apparéil et ses données. - Verrouillage du contenu : permet de sélectionner les types de verrouillage pour verrouiller les fichiers dans Galerie et les mémos dans QuickMemo+. Choisissez entre Mot de passer ou Schéma. - Crypter le téléphone : permet de crypter les données containues dans le téléphone pour plus de sécurité. Vous serez invite à saisir un code PIN ou un mot de passer pour decrypter votre apparéil chaque fois que vous l'allumez. - Crypter le stockage de la carte SD : permet de crypter la carte SD et de prendre les données indisponibles pour les autres apparèils. - Configurer verrouillage SIM : permet de définir un code PIN pour verrouiller la carte SIM et de le modifier. - Mot de passer visible : cochez cette option pour afficher brievement chaque caractère des mots de passer lors de leur saisie et voir ainsi ce que vous tapez. - Administrateurs de l'appareil : permet d'afficher ou de désactiver les administrateurs du périhérique. - Sources inconnues : autorise l'installation d'applications autres que celles disponibles sur Play Store. - Vérifier les applications : permet d'interdire ou d'avertir avant l'installation d'applications susceptibles de cause des dommages. - Type de stockage : basé sur le matériel. - Gestion des certificates - Certificats de confiance : cochez cette case pour autoriser les applications à acceder au dossier crypté de votre apparéil où sont enregistrrés vos certificates de sécurité, les mots de passer associés et d'autres identifiants de connexion. La gestion des certificates est nécessaire à la mise en place de certains VPN ou certaines connexions Wi-Fi. Si vous n'avez défini aucun mot de passer pour le dossier de stockage des identifiants, ce paramètre est grisé. - Installer depuis la mémoire : permet d'installer un certificat de sécurité. - Effacer les certificates : permet de supprimer tous les certificates de sécurité et les identifiants associés, ainsi que le mot de passé du dossier de stockage sécurisé. - Trust agents: permet de selectionner les applications pouvant etre utilisées sans déverrouiller l'écran. - Épinglage de l'écran : permet d'activer votre apparéil pour qu'il n'affiche qu'un certain écran d'applications. - Accès d'utilisation pour les apps : permet d'afficher les informations relatives à l'utilisation des applications sur votre appareil.< FONCTIONS INTELLIGENTES >
Étui QuickCircle
Ce menu vous permet de selectionner directement les applications à utiliser en vue réduite sur le rabat de l'étui, à l'aide de QuickCircle. Veuillez notes que l'activation de ces paramètres d'étui QuickCircle peut entrainer un fonctionnement aléatoire de l'appareil.Double fenêtre
Cette option vous permet de configurer la fonction Double fenêtre. - Ouverture auto : cochez cette option pour executer la fonction Double fenêtre en appuyant sur un lien en mode Plein écran ou sur la piece jointe d'un e-mail. - Aide : affiche des conseils pour utiliser la fonction Double fenêtre.< GESTION DU MOBILE >
Date et heures
Determinez vos préférences d'affichage pour la date et l'heure.Stockage et USB
Vous pouvez vérifier l'espace utilisé et disponible dans la mémoire interne et le support de stockage portable de l'appareil.Batterie et économie d'énergie
- Utilisation batterie : permet de consulter l'utilisation de la batterie. - Pourcentage de la batterie dans la barre d'etat : cochez cette option pour que le pourcentage du niveau de la batterie s'affiche dans la barre d'etat pres de l'icone Batterie. - Économie d'énergie: appuyez sur le bouton Économie d'énergie pour l'activer ou la désactiver. Permet de définir le pourcentage de charge de la batterie à partir duquel l'appareil active automatiquement la fonction d'économie d'énergie. Vous avec le besoin entre Immédiatement, Batterie 5% et Batterie 15%. - Aide : affiche des conseils d'utilisation de la fonction Economie d'énergie.Mémoire
Vous pouvez surveiller la mémoire utilisée et la mémoire utilisée en moyenne par chaque application dans l'appareil.Applications
Permet de voir le détail des applications installées sur le téléphone, de gérer leurs données et de les forcer à s'arrêter.Application de messages par défaut
Ce menu vous permet deCHOISIR l'application de messagerie qui sera utilisée par défaut.Sauvegarder & Réinitialiser
Permet de modifier les réglages de gestion de vos paramètres et données. - LG Backup : permet de sauvegarder toutes les informations contenues dans l'appareil et de les restaurer en cas de perte de données ou de remplacement du téléphone. - Sauvegarder mes données : sauvegardez vos données d'applications, vos mots de passer Wi-Fi et d'autres paramétres sur les serveurs de Google. - Compte de sauvegerde : affiche le compte actuèlement utilisé pour sauvegarder les informations. - Restaurer automatiquement : lors de restauration d'une application, restaurez vos paramètres et données sauvégardés. - Paramétres réseau réinitialisés : permet de réinitialiser tous les paramétres réseau. - Réinitialiser valeurs d'usine : permet de restaurer vos paramètres selon les valeurs d'usine et de supprimer toutes vos données. Lors de cette réinitialisation, vous doivent simplement fournir les mêmes informations que lors de votre première utilisation d'Android.À propos du téléphone
Permet d'afficher les informations légales, de vérifier l' état du téléphone et les versions logicielles, et de partager à une mise à jour logicielle.Application LG Bridge
LG Bridge est une application qui vous permet deGERer facilement des images, de la musique, des videos, des documents, etc. enregistrres sur un periphérique mobile LG depuis votre PC. Vous pouze également mettre à jour le logiciel d'un periphérique mobile ou sauvegarder vos fichiers tels que le repertoire et vos images sur votre PC.ASTUCE!
- Vous pouvez voir des instructions détaillées sur la façon d'utiliser LG Bridge dans le menu Aide après installation et ouverture du programme. - Les fonctionnalités prises en charge peuvent varier selon l'appareil. - Le pilote USB unifié LG est un programme nécessaire pour pouvoir connecter un téléphone portable LG à un PC. Il est automatiquement installé lors de l'installation de LG Bridge.Fonctionnalités de LG Bridge
Mettre à jour le logiciel d'un périhérique mobile depuis votre PC via un port USB Sauvegarder et restaurer les données de votre apparéil mobile via USB Pour télécharger le logiciel LG Bridge, veuillez effectuer les opérations suivantes : 1 Rendez-vous sur www.lg.com. 2 Cliquez sur SUPPORT > SUPPORT MOBILE > Synchronisation PC. 3 Sélectionnez les informations du modele et cliquez sur ALLER. 4 Faites défilé l'écran vers le bas et Sélectionnez l'onglet Synchronisation PC > Windows ou Mac OS > TÉLÉCHARGER pour télécharger LG Bridge. Configuration système minimale requise pour l'installation de LG Bridge| Élément Système d'exploitation Windows | Système d'exploitation Mac |
| Système d'exploitation | Windows XP 32 bits (Service Pack 3), Windows Vista 32 bits / 64 bits Windows 7 32 bits / 64 bits Windows 8 32 bits / 64 bits Windows 8,1 32 bits / 64 bits |
| UCProcesseur 1 GHz ou plus rapide Processeur 1 GHz ou plus rapide | |
| Mémoire 2 Go de RAM ou plus 2 Go de RAM ou plus | |
| Carte graphique | 1024x768, couleur 32 bits ou supérieure |
| Disque dur Au moins 500 Mo d'espace libre (un espace de stockage supplémentaire peut être requis en fonction de la quantité de données à stocker) | Au moins 500 Mo d'espace libre (un espace de stockage supplémentaire peut être requis en fonction de la quantité de données à stocker) |
| Logiciels requis | Pilote unifié LG, Windows Media Player 10 ou version ultérieure |
Comment connecter votre téléphone portable à LG Bridge
Vous pouvez connecter LG Bridge à un autre apparéil à l'aide d'un cable USB.| Caracteristique Type de connexion | |
| Mise à jour logicielle Connexion d'un cable USB | |
| LG Backup (sauvegarde / restauration de données) | Connexion d'un cable USB |
Mise à jour du logiciel du téléphone
Mise à jour du logiciel LG Mobile Phone à partir d'Internet
Pour plus d'informations sur l'utilisation de cette fonction, consultez le site http://www/lg.com/common/index.jsp et selectionnez votre pays et votre langue. Cette fonction vous permet de partager à jour le firmware sur votre appareil et de télécharger la version la plus recente depuis Internet, sans faire appel à un centre de services. Cette fonction sera disponible uniquement si LG fournit une version plus recente du micrologiciel pour votre appareil. La mise à jour du micrologiciel du téléphone mobile requiert l'attention complète de l'utilisateur pendant toute la durée du processus. Assurez-vous de bien dire toutes les instructions et remarques qui s'affichent à chaque étape avant de continuer. Attention : Retirer le cable USB durant la mise à jour logicielle peut gravement endommager votre apparéil mobile.REMARQUE
- LG se reserve le droit demettre a disposition les mises a jour micrologicielles de certains modes uniquement, et ce a son entiere discrétion, et ne garantit pas la disponibilité de versions micrologicielles plus récentes pour l'ensemble de ses modèles de téléphones portables. Mise à jour du logiciel LG Mobile Phone par liaison radio (OTA, Over-the-Air) Cette fonction vous permet demettre a jour le logiciel de votree appareil et de telecharger la version la plus recente via OTA,sans utiliser de cable de données USB. Cette fonction sera disponible uniquement si LG fournit une version plus recente du micrologiciel pour votre apparéil. Vérifiez d'abord la version du logiciel installée sur votre téléphone mobile : Paramétres > onglet Général > À propos du téléphone > onglet Commun > Centre de mises à jour > Mise à jour logicielle > Recherche les mises à jour maintainant.REMARQUE
- Vos disponibles personnelles enregistrées sur le téléphone, y compris les informations relatives à votre compte Google et à tout autre compte, les données et paramétres système et d'application, ainsi que toutes les applications téléchargées et vos licences DRM, peuvent être perdues lorsque vous mettez à jour le信息服务 de votre apparéil. Par conséquent, LG vous recommende de sauvégarder vos disponibles personnelles avant demettre à jour le信息服务 de votre apparéil. LG ne peut être tenu responsable de toute perte de données personnelles. - Cette fonctionnalité dépend de votre opérateur réseau, de votre région et de votre pays.À propos de ce manuel de l'utilisateur
À propos de ce manuel de l'utilisateur
- Avant d'utiliser votre appareil, veuilles dire attentivement ce guide. De cette manière, vous estes surd'utiliser votre apparatus correctement et en toute sécurité. - Certaines des images et des captures d'écran illustrées dans ce guide peuvent s'afficher différerment sur votre apparéil. - Le contenu de votre apparéil peut être différent de celui du produit final ou du logiciel fourni par votre opérateur téléphonique ou votre fournisseur de services Internet. Le contenu de cet ouvrage peut être modifié sans avis préalable. Pour obtenir la version la plus récente de ce guide, consultez le site Web de LG à l'adresse suivante: www/lg.com. - Les applications de votre apparéil et leurs fonctions peuvent varier selon le pays, la région ou les specifications matérielles. LG ne peut être tenu responsable des problèmes de performance liés à l'utilisation d'applications développées par d'autres fournisseurs que LG. - LG ne peut être tenu responsable des problèmes de performance ou d'incompatibilité liés à la modification des paramètres d'enregistrement ou à la modification de logiciels de système d'exploitation. Toute tentative de personnalisation de votre système d'exploitation peut entrainer le dysfonctionnement de l'appareil ou de ses applications. - Les logiciels, l'audio, les fonds d'écran, les images et les autres éléments multimédias fournis avec votre apparéil sont protégés par une licence d'utilisation limitée. Si vous recopiez et utilisez ces éléments à des fins commerciales ou toute autre, vous pouvez enfreindre les droits de copyright. En tant qu'utilisateur, vous étes entièrement responsable en cas d'utilisation illégale des éléments multimédias. - Des frais supplémentaires peuvent s'appliquer pour les services de données, comme la messagerie, le chargement, le téléchargement, la synchronisation automatique et les services de localisation. Pour éviter l'application de frais supplémentaires,CHOISSEZ UN ABONNEMENT ADAPTÉ à vos besoins.Contactez votre fournisseur de services pour plus d'informations.Marques commerciales
- LG et le logo LG sont des marques déposées de LG Electronics. - Bluetooth® est une marque déposée de Bluetooth SIG, Inc. dans le monde entier. - Wi-Fi® et le logo Wi-Fi sont des marques déposées de Wi-Fi Alliance. - Tous les autres marques commerciales et droits d'auteurs sont la propriété de leurs propriétaires respectifs.Accessoires
Les accessoires suivants peuvent être utilisés avec votre téléphone. (Les éléments décrits ci-dessous sont parfois disponibles en option.) - Chargeur de voyage - Guide de démarrage rapide - Casque stéreo - Cable USB - BatterieREMARQUE
- Utilisez toujours des accessoires d'origine LG. Les éléments fournis sont conçus uniquement pour ce téléphone et peuvent ne pas être compatibles avec d'autres appareils. - Les éléments fournis avec l'appareil et tous les accessoires disponibles peuvent varier selon la région ou le fournisseur de service.Dépannage
Ce chapitre repertorie quelques-uns des problèmes que vous pouvez rencontres lors de l'utilisation de votre téléphone. Certains problèmes peuvent nécessiter que vous fassiez appel à votre prestataire de services, vous pouvez cependant facilement en résoudre la plupart par vous-même.| Message Causes possibles Actio ns correctives possibles | ||
| Erreur de la carte SIM ou USIM | Le téléphone ne contient pas de carte SIM ou USIM, ou celle-ci est insérée de façon incorrecte. | Vérifiez que la carte SIM ou USIM est correctement insérée. |
| Aucune connexion réseau/ Baisse du réseau | Le signal est faible ou vous vous trouvez hors de portée du réseau de votre opérateur. | Déplacez-vous vers une fenêtre ou une zone en plein air. Vérifiez la carte de couverture du fournisseur réseau. |
| Le fournisseur a appliqué de nouveaux services. | Vérifiez que la carte SIM ou USIM n'apas plus de 6 à 12 mois. Si c'est le cas, changez la carte SIM ou USIM dans l'agence de votre opérateur réseau. Contactez votre fournisseur deservices. | |
| Message Causes possibles Actions | ns correctives possibles | |
| Codes non concordants | Pour changer un code de sécurité, vous devez confirmer le nouveau code en le saisissant une deuxieme fois. | Si vous oubliez le code, contactez également votre prestataire de services. |
| Les deux codes que vous avez saisis ne sont pas les mêmes. | ||
| Aucune application ne peut être configurée. | Non pris en charge par le fournisseur de services ou enregistrement requis. | Contactez votre fournisseur de services. |
| Appels indisponibles | Erreur de numération | Nouveau réseau non autorisé. |
| You'veinzinséré une nouvelle carte SIM ou USIM. | Vérifiez les nouvelles restrictions. | |
| Limite de la carte prépayée atteinte. | Contactez votre fournisseur de services ou redéfinissez votre limite de facturation à l'aide du code PIN2. | |
| Message Causes possibles Actions correctives possibles | ||
| Impossible d'allumer le téléphone | Vous avez appuyé trop brièvement sur la touche Marche/Arrêt. | Appuyez sur la touche Marche/Arrêt pendant au moins deux secondes. |
| La batterie n'est pas chargée. | Rechargez la batterie. Vérifiez l'indicateur de charge sur l'écran. | |
| Erreur de chargement | La batterie n'est pas chargée. | Rechargez la batterie. |
| La température externe est trop élevé ou trop BASSE. | Chargez votre téléphone dans des conditions de températures normales. | |
| Problème de contact | Vérifiez le chargeur et sa connexion au téléphone. | |
| Absence de tension | Branchez le chargeur sur une autre prise. | |
| Chargeur défectueux | Remplacez le chargeur. | |
| Chargeur incorrect | N'utilisez que des accessoires de marque LG. | |
| Numéro non autorisé. | La fonction Numéro fixe est activée. | Vérifiez le menu des régles et désactivez la fonction. |
| Message Causes possibles Actions | Mémoire pleine | Supprimez des messages de votre apparéil. |
| Impossible de receivevoir/ d'envoyer des SMS et des photos | ||
| Les fichiers ne s'ouvrent pas | Format de fichier non pris en charge | Vérifiez les formats de fichiers pris en charge. |
| L'écran ne s'allume pas lorsque je reçois un appel. | Problème lié au capteur deproximity | Si vous utilisez un étui ou un film de protection, vérifiez qu'il ne couvre pas la zone située autour du capteur deproximity. Vérifiez que la zone entourant le capteur deproximity est propre. |
| Aucun son Mode Vibreur | Vérifiez les paramètres dans le menu Son pour vous assurer que vous n'étés pas en mode Vibreur ou Ne pas déranger. | |
| Le téléphone raccroche ou se bloque | Problème logiciel intermittent | Effectuez une mise à jour du logiciel à partir du site Web. |
PyKOBODCTBO Повытеля
- HekoTopoe coidepKIMoe n pncyHKn MOrT OTnUaTbcra OT Tex, qTO BvI BvIte B yCTPOcTBe, B 3aBNCMocTN OT peHNoHa, NOCTaBUnKa ycIyr, BepCn npoPamMHO o6ecneueHn nn OC, n MOrT 6bITb n3MeHehbl 6e3 npedBaPntelbHOrO yBeDOMJeHnA. Bcerda nCnoJb3yIe TOnbKO opnHnHaNbHbIe akceccyapbl LG. IocTAbJeMbIe KOMNoHEnTbI pa3pa6OtaHbI CneuHaNbHO dJa 3TOrO yCTpoiCTBa I MOryt 6bITb HeCOBMeCTmMbI C DpyrMM uCTpoiCTBaMn. - Данhoe устюгов He поховдя Исторьогеня Ложм С hapшениms 3реня, покову OHO OCHaцeho ceHCOPHOn ᵋКраHHО KnabnaTypoi. 2016 LG Electronics, Inc. Bce npaba coxpanebl. LG n lorotn LG YBIAOTc 3apeHCTpnpoBaHHbIMN TOBapHbIMN 3HaKaMn LG Group IN CB83aHHbIX C Hei opraHn3aun. Bce OCTaJIbHbIe TOBAPHbIe 3HaKn YBIAOTc CO6CTBeHHOCTbIO COOTBeTCTByIOUx BlaJeNbueB. - Google™, Google Maps™, Gmail™, YouTube™, Hangouts™ n Play Store™ Яваютсан TOВарныIMN 3нakамn Google, Inc.CopepxaHne
PekomeHdaun no 6e3oNaCHO n ΘΦeKTHBHOJ KcnpyaTaun ......4 Baxhoe npimechne 15 3HaKOMCTBO C TeNefoHOM 18 BnTeIefoHa 18 YcTaHOBKa SIM- nIu USIM-KapTbI n aKKymyJrTopa 20 3apKa aKKymyTopa 22 YcTaHOBka KapTbI nAMrTn 23 I3BleueHne KapTbI namrTn 24 Блokировka и ра36лokировka устroduCTBa. 24 TnabHbI 3KpaH 27 CobetbI no pa6ote c ceHcOpHbIM KpaHOM. 27 TnabHbIeKpaH 28 Hactpoika rnaBHOrO 3KpaHa 29 IepexoK HeaBHO NCNoJIb3OBAHHbIM npINIOJKeHnAm ....31 Panaelb yBeDomJIeHn 31 35 CneunalbHble yHKuIN 36 CbeMa no XecTy 36 Glance View. 37 Bknountb 37 Knock Code 38 Двоиhoe OKHO 39 Capture+ 40 Hactpoikka yueTHoJ 3aIncn Google 42 Co3dahne akkaynta Google 42 Bxod BaKKayHT Google 42 IopKJIoueHne K cetam n UcTpoiCTBaM 44 Wi-Fi 44 Bluetooth 45 Wi-Fi Direct 47 Ipepa daHbIX meKdy PK uCTpoiCTBOM 47 Bbl30Bbl 49 BbInonHeHne Bbl3Oba 49 BbI3OB KOHTaKTOB 49 OTBET nIN OTKIOHeHne Bbl3OBA ....49 BbInonHeHne BToPORo Bbl3Oba 50 ПрсмOTР курнов ВьИЗОВ ...50 HactpoNn Bbl30BOB 51 KoHTaKTbl 52 ПОИСК KOHTAKTA 52 Добальенье Нового Контактаб.....52 I36paHHbIE KOHTaKTbl 52 Co3dHne rpynnbI 53 SMS/MMS 54 OtnpaBka coo6eHn 54 Ppocmotp dnaIora 55 I3meHHe HacTpoE Koo6eHn..553n.nouTa 56
ynpablenne aKKayHTamn эл ektpoHNoI noUtbl 56 Pa6ota c napankamn aKKayHTOB 56 Co3dahne n otnpabka coo6eHna 3JIeKToHHoN noUtbl 57Kamepa n Bnpeo 58
IapametpbkamepbHa BnDOnckatene 58 PacunpeHHbIe NaCTpOKn 59 ΦOTOCbEmKa 60 Korda cHIMOK cdeJah 60 3aIncbBndeo 61 Iocne 3ainnCn Bndeoklnna .62 Tanepea 62MylbTmEma 66
My3bika .66UHcTpymeHTbl 69
yacbl 69 KaIbKyI-p 70 Kanenapb. 71 ДиКTOФOH 71 Tolocobon nonck. 71 3arpy3kn 72 PaIIO 72Be6-6pay3ep 73
UHTepHET 73 Chrome 75Hactpoikn 76
Cetn 76 3Byk nyBvEdomleHn8 Диспел … 82 06uine 84Прилaxes LG Bridge 92
06HOBJIeHne IOTeIefoHa 95
CbeHnO daHHOM pyKOBoDCTBe nIb3OBaTeJI 97
CbeHnO daHHOM pyKOBOCTBe nIb3OBaTeJI 97 TobapHbIe 3HaKn. 98Akceccyapbl 99
YcTpaHHe HEnCnPaBHOCTeI.....100
PekomeHdaaHn no 6e3oNaCHO n ΘΦΦeKTHBHOJ KcnpnyaTaun
O3HaKOMbTeScb C daHHbIMN HeCIOJXHbIMN INHCTpyKcIyMn. Heco6JIOpJeHne DaHHbIX INHCTpyKcIy MOxET 6bITb ONaCHO dJa 3dOpOBBy IIn IpOTNbOpeuNTb 3aKOHOdaTeJIbCTBy. Ha clyuay B03HnKHOBeHn Ow6Kn yCTpoiCTBO IMeet BCTpoehnbl IporpaMMhB INCTpMeHT, KOtOpBb BeTeT JyPHaJI peRNCtpaCNI Ow6OK. DaHHbI INCTpMeHT ocUeCTBnaTc6Op TOnbKO Tex DaHHbIX, KOTopbIE IMeIoT OTHOseHne K Ow6Ke, TaKnx KaK: yPOBeHb CnHala, MeCTONoJoxHne INDeHTNΦHKaTOPa COTbI B MOMENT BHe3aHOrO pa3beDInHeHry Bbl3OBA, INΦOpMaZrA 3aRpyJxEHHbIX npINOJxEHNx. KypHaJI peRNCtpaCNI INcNoJIb3YeTcA TOlbKO DnI ONpeDJIeHnI prUnHbI BO3HnKHOBeHnry Ow6Kn. DaHHbI B KypHaJI peRNCtpaCNI 3aWnΦpOBaHbI, DOCTyN K Hm MOnKHO IOJyUHTb TOlbKO B aBTOpN3OBaHHOM cepBnCHom ceHTpe LG npI o6paJeHn TuJa CZeJIbIO pEMoHTa yCTpoiCTBa.Bo3deiCTBnepaioacToTHoro n3nyeHna
HOpMaun O Bo3dEnCTBn paNocactOTHO n3nyeHn yJeBHom KoOphiuneHTe norgloueHn (SAR). Mo6nIbHbI Telefoh MoeJIg LG-H540 coOTBeTCTByeT deiCTByUOIm Tpe6oBaHm 6e3oNaCHocTn IO BO3JeCTBnIO paAnOBJH. DaHHbIe Tpe6oBaHn BkIIOuAHT B ce6I npedeJIb I 6e3oNaCHocTn, pa3pa6OtaHHbIe dJIa ObecneueHn 6e3oNaCHocTn BCEX LIu He3aBNCIMO OT BO3pacta N COCTOHN 3dOpOBbI. B pekomeHdaunx no orpaHnueHIO BO3deICTBna paINOBOH nCNoJIb3YeTcra edHHua n3MepeHna, n3BeCTHa KaK yJeIbHbI Ko3oOuIeHT nOrloUeHna (SAR). IcNbItaHna Ha SAR npOBaITcra Ha OCHOBe cTaHdApTu3OBaHHoro cnoc6a, 3akIouaIoUeROcR B pa6Ote TeleOHa Ha MaKcImaJIbHOJ cePTNuIUPOBaHHoJ MOUHOCTN BO BCEX nCNoJIb3YeMbIX qAcTOTHbIX dHaNa3OHax. - HecmOTpHa To, yTo BO3MOxHbI pa3HbIe ypoBn SAR dIpa3JIuHbIX TeIefoHOB LG, BCE OHn COOTBeTCTByOT npIMeHMbIM peKOMeHdaZnM nO OrpaHnueHnIO BO3DeIcTBnRApaINOBOJH. - Праздел SAR, pekomeHdoBaHHbI MeJdyHapOdHOJ KOMnCCnei NO BOnpocam 3auntbI OT HeNoHn3npyuOuX n3nyueHn (ICNIRP), coCTabJIaTe 2 Bt/Kr, ycreDHeHHbI Ha 10 rpaAMM TkaHn. MaKcImaJIbHoe 3NaueHne SAR dIaHHOJ MoJeIeTeJeOHa npi nCNoJIb3OBaHnB6Iu3N yxa coCTaBJaTe 0,509 Bt/Kr (10 r), a npI HoSeHnHa TeIe - 0,426 Bt/Kr (10 r). -Данhoe yctpoiCTBO COOTBeTCTByeT Hopmam n3nyeHnЯ ри экплуatauB O6bIyHom nOLOxehnI pydOM C yXOM nI npi pacnoLoxehnHa paCtOAHn He Mehee 1,5 cm ot TeNa. ПрпpeHoCKe TelefoHa B ueXNe nI Ha nOaCHOM KpeJIeHn, y6eIITecb,ЧTO B HIX Het MetaJIInuecknx KomNoHEtOB, ИОн PaCNoJaTaIOTcRa Na pacCTOAHn He Mehee 1,5 cm ot TeNa. ДЯ пЕрачдAnHbIX n COo6UeHn TeteФоHy Tpe6yEtcY USTOnuBoE coeINHeHne c ceTbIO. B HeKOTOpbIX cIyuaJx Pepedau CoO6UeHn nI IN daHHbIX MoKet 6bITb PrnoCTaHOblEna Do yCTaHOBKn TAKOTO coeINHeHn. ДО OKOHuaHn PEPeDAuN DaHHbIX cIeDyET ObeCpeHTb BblONHeHne pRvBeDeHHbIX BblIe peKOMeHdaцn NO TeppitOpnaIbHomy pa3Hocy.Yxod n TexHnueckoe o6cnyKuBaHne
PPEdUnpeXdEHNE
Bcerda noIb3yItecb opuHnHaJIbHbIMn aKKymJYTopaMn, 3apdHbIMn yCTpOiCTBaMn n akceccyapamn LG, kOTOpbIe npedHa3NaUeHb IJa NcNoJIb3OBaHnC daHHoN MOdeJIbIO TelefoHa. IVcNoJIb3OBaHnE dpyrIX aKceccyapOB MoXeT 6bITb ONaCHO dJa 3dOpOBbI y MoXeT pInBeCTn K aHNHyIpOBaHnIg rapaHTnn. He pa36npaIte TelefoH. Iprn Heo6xOIMOCIn peMOHTa 6paTntecb K KBaIINΦUncPOBaHHOMy CneuJIncTy cepBnCHOrO ueHTpa. -「TapaHTnHbI pEmoHT LG moKet BkIIOuATb B ce6a 3aMeHy deTaJIeN n PnA T, KaK HOBbIX, TaK N OTpeMOHTnpOBaHHbIX, NO fYHKUHOHaJIbHOCTn paBHBIX 3aMeHeHHbIM DeTaJIaM. -ДерхиTe yctpoiCTBO BdaIи OT элктpruecknx пиборOB, taKnx KaK TeJIeBn3Opbl, paINONpneMHNKIn KOMNbIOTepbl. Telefoh cneyuET depkaTb BdannOT nCTOuHnKOB TePna, TaKnx KaKa paHaTOpbl I nnTbl. He donyckaTe naeHnT eIefoHa. He noDBeprataTe telenoH mexaHnuecko Bn6paun n ydapam. BbIKIouaTe TeleOH B 30HaX, rDe DeiCTByOT CneuaJIbHbIe orpaHnueHn. Hanpimep, He nCnoJb3yIe TeleOH B 6OJIbHnIax, NockoJIbKy OH MoKeT NOBInrTa Ha UYBCTBHTeJIbHOe MeINuINHCKoe o6OpyIOBaHnE. Bo Bpem 3apAKn TeneoHa He KacaiTecb erO MOKpbIMn pyKaMn. 3TO MoKcET Bbl3BaTb NopaKeHne 3JeKTPnueCKm TOKOM n cepBe3Hoe NOBpeJdHne TelefoHa. He 3apjkaTe TelefoH prdom C JERKOBocPnaMeHraUOuMnC MaTePnaIamN, TaK KaT TelefoH npn 3apJKe HArpeBaetc, yTO MoXe TnpNBecTN K BO3rOpaHnIO. - Дя чinctи NOBepxHocTи NCNoIb3yIte cyxuTo TkaHb. (He nCnoIb3yIte pactBopnteN, 6eH3nH nIi cnprt). BoBpeMa 3apAdkn TelefoHa He KlaInte erO Ha npEaMeTbIMrKoMbeH. Telefoh cneyuET 3apjkaTb B Xopoio npoBeTpnaemom MeCTe. He noDBepraTe Teleoh BO3deICTBnIO rYcTOO dbIma nn nblnn. He xpaHnTe TeJeOH pIOM C KpeIHTbIMN KapTaMn IIN 3JIeKTPoHHbIMN npoe3dHbIMN DOkymeHTaMn, 3TO MOKeT PpNBecT N K nopue INHΦOpMaцn Ha MaHHTbIX NOLOcX. He kacaitec b 3KpaHa ocTpbIMn PpeDMeTaMn, 3TO MOxET Bbl3BaTb NOBpeXdHn TenefoHa. He npBepraTe tenefoH BO3deIcTBIO XnIDKOCTN IIN BlaRn. - Octopojkno obpaaiaTecb c akceccyapamn, Hanpimep c hayshnikamn. He kacaiaTecb aHTeHHbI 6e3 Heo6xOIMOCtN. He nCnoIb3yIte, He TpOraIte Hn He NbITaITeCb ydaJIITb pa36HToe, OTKoJOToe nII TpeChyBWee CTeKNo. DaHHa rapaHTna He pacnpocTpaHAreTcHa NoBpeXdEHne CTeKNa, npOn30weDWee no pInuHHe He npBaBnIbHOro nII HeOCTOpOxHOrO o6paUeHnA. BaM Mo6nIbHbI TepeOH - 3TO 3JIeKTPoHHOe yCTpoiCTBO, KOToPoE BbIeJIeT TeIIIO npH HopMaIbHOJ 3KcNlyaTaUIN. PpOdoJXtBbHbI IpAmO KoHTaKT C KoxKe I pN OTCyTCTBUN COOTBeTCTBYIOSeI ROBoBETPnBaHn MOKeT pNBecTN K NOBLeHNIO DnCKOMΦOpTa INn He3NaHTeIbHOrO OxKora. PoTOMy CneDuYe T Co6IHOaTB OCTopoJXHOCTb Ipn O6paueHn C TepeOHOM BO BpeM Nn Cpa3y NocIe erO NCNoIb3OBaHn. - При поадани влаги He3ameДЛТьНО OTКИQUHTe TeleфОн OTOCHUнka ПИТаня Do NOHOrO BbICbIXaHnA. He nbITaITeCb yCKOpNTb PPOUCEC cyWKI PrN NOMOUn BHeSHnX HaRpeBaTeJbHbIX YCTpOINCTB, TaKnx KaK ППТы, MKNPOBOJHOBbie Neu ININ ΦeHbl. - Пи пonaданьлари в телефон Изменяется CBET Индікатopa BлajжноTN NOД Крышков устpoиCTBa. Га pontг He paцпостраняется на NOВржденя, Вbl3BaHHble пonaданьлари.Ф�eКТИВHoe IcNoIb3OBAHne TeteФОHa
3neKtpoHbIe yctpoiCTBa
Bce mo6nIbHbIe TeIefoHbI MOrY Bbl3bIBaTb NOMExN, BInraUoIne Ha pa6OToy dpynx np6OpOB. - Be3 pa3peweHnHe noIb3yI TeCb MO6IbHbIM TeJefoHOM pIOM C MeIuHcKm O6OpYIOBaHnEm. He KlaIte TeJefoH pIOM c 3JIeKTPoKapdNocTmUyIaTOpAmn (T.e. B HArpydHbI KapMaH). - Mo6nIbHbIe TeIefoHbIMOryT Bbl3bIBaTb NOMEXN B pa6Ote HeKOTOpbIX CnyXOBbIX aIInapaTOB. He3NaHTeJIbHbIe NOMEXN MOrYT BO3HnKaTb B pa6Ote TeJIeBn3Opa, paINOpPnEMnKa, KOMNbIOTepa n dpyrnx yCTPOIcTB. - ПО BO3MOЖHOCTN NOJb3yIITecb TeJefoHOM B TempepaTyphbIX rpaHncaX ot 0°C до 40°C. Bo3deiCTBne oueHb Hn3Knx nIIu OueHb BbvCOKNX TempepaTyp Mochet npINBeCTN K NOBpejKeHNIO, PONOMKe nIIu DaJke B3PbIBy TeJefoHa.Бezonaichoctb Ha dopore
O3HaKOMbTecb C MeCTHbIMN 3aKOHAM N npaBnlaMn, peIamEnTpYIOUIMN INcNoJIb3OBaHHe MO6nJIbHbIX TeNeΦOHOB B aBTOMo6nJIe. He depknte teneoh B pyke BO Bpema npabneHn aBtOMo6nIeM. BhimateIbHO cIeIte 3a ciTyaIuei Ha dopore. CbepnTe cdoPOn n npnnapkyTecb, npexde yem N03BOHHTb nnOTBETNTb Ha Bbl3OB. PaHIOIN3IyueHne MoKeT BnIaTb Ha HeKOToPbIe 3JIeKTPoHHbIe CnCTEmbl aBTOMO6nJIa, HApPIMep, Ha CTepeOCNCTEmY n YcTPOJCTBa 6e3ONaCHOCTn. - Ecni BaW aBTOMO6nIb OCHaIeH NODuXKO 6e3ONaCHOCTN, He 3acNoHJTe ee MOHTnpyEmbIM IIN NpeHocHbIM 6OpyIDoBaHNem 6ecnpoBOHO CBa3N. 3TO MoKET npeTCTBOBaTb paCKpbITNU NODuXKN IIN nPiNBcETN K CepBe3HbIM TpaBMam. - Пи послuyшвани музык BO Время погулкубдntecb,чTo ypoBeHb ГомКоCTN NO3BOJЯET Bam OCTaBaTbcB Kypce npOncxODJaIero BOKpyr. 3TO Oco6eHNO BaJHo, ecn Bbl HaxoДNTecb BO3JIe aBTOMO6nIbHbIX dopor.Берегпесух
 Для п dedOTbpaueHЯ NOBpeJdeHЯ Clyxa He NCNoJIb3yIte HayshnKn Ha 6OJIbwoI rPOMKOCTN B TeueHneДЛNTeJIbHOro BpemeHn. Bo3deiCTBnE rpoMKOrO 3ByKa B TeueHne IInTeIbHoro BpeMeH MoKeT HeratNBHO OTPa3ntbCra Ha Cnyxe. IOnToMy He peKOMeHdyETcR BkJIIOuAtb N BbIKIIOUaTb Tenefoh praOM c yxom. TaKxe peKOMeHdyETcR yCTaHOBNTb rPoMKoCTb My3bIKN IN 3BOHka Ha yMepeHHbl ypOBehb. - Пи ИспOLTбОВаHин HayшнКOB Heo6xOДМо yMeHbIHTb ГOMKOCt b, ecn Bbl He CblIShnte IIOdei BOKpyr Bac nIIe cIIN YeIobEk, cnIaI prIOM CBamN, CblIShNT To, UTO 3ByuT B BaInx HayshNKax.ПРИМЕЧАНЕ
- Порocлuyшване aydno C помоцью hayшнков на слшkom 6ольшов Грмкости может ппвецки К потуpe слуха.CteknHbIe deTaIi
HeKOTOpbIe 3JIeMeHTbI BaUeRO Mo6NtBHO yCTPOJCTBa n3rOToBHeHbI n3 cTeKJa. CTeKNo moKeT pa36nTbcra, eCIn Bbl ypoHnte BaSe MO6NtBHO yCTPOJCTBO Ha TBepdYIO NOBepxHOCTb IIN CnBHO yDapNTe erO. EcIn cTeKNo pa36nIOscb, He TpOraIte erO n He NbITaIteCb ydaIITb. He INcPONb3yIte MO6NtBHO yCTPOJCTBO, NOKa CTeKNo He 6yJeT 3aMeHeHO cepTnΦnucropOBaHHbIM NOCTaBUnkOM ycnyr.B3pbIBHbIe pa6oTbl
He nCnoIb3yIte TelefoH B MeCTax npOBeHnB3pBIBhBix pa6OT. CJeInte 3a orpaHnueHnA M N BceRda co6JIoDaIte ppeDnscHnN HOpMaTINBbl.B3pbIBoOnaChna cpeDa
He nCnoB3yIe TeIefoH Ha A3C. He nCnoB3yIe Te IefoH PAnOM C ToPnIBOM INXIMNueCKMn BeIecTBaMn. He nepebo3nte n He xpaHnTe rOpOue ra3bl N XnIkoCTN B TOM Je OTdeJeHn aBTOMo6nla, yTo n TelefoH nn akceccyapbl.B camolete
YcTpoICTBa 6ecnpoBOJHOB CBA3N MOrT BbI3bIBaTb NOMExN BO BpeMn POJeta. - Пара поадков на бортCAMолетаMOьньньтелфон сдуET BыКЛIOчNTb. He noIb3yItecb m6e3 pa3peWeHnA kInpaXa.MepbippeoctopoxhocnIJa3aunTbIOTdTei
Дерхи telefoh B Mectax, Heoctynbix Дя MaJeHbKx DeTei. B Telefohe IMeOTcMeIKe IeTaN, OTcoEINHeHne I npOrIaTbIBaHne KOTOpbIX MoXeT CTaTb PruHOn yDySbY.BbI3OB эКтpeHHbIX cIyX6
BbI3OB 3KCTpeHHbIX Cny6 MoKeT 6bITb HeIOCTyIeH B HeKOToPbIX MO6nIbHbIX cTeJx. I0aTOMy HIKoRda He CTOnT NOLHOCTbIO NOLaTaTbcRA Ha TeJeΦOH dJa BB13OBA 3KCTpeHHbIX Cny6. 3a INΦOpMauznei O6paAaTecb K NOCTaBzIKy ycIyr.CbeHn o6 aKymyTope n yXoJe 3a Hm
- Перед подзаряdkон He hyжно полноctью pa3ряжать akkyмлгтор.В OTличne OT дуг nx akKymлгторнхсnteM,В дaHHom akKymлгтope OTCyTCTByET ΝфeKT namrTn, cnoc6hbl COKpaTITb cPok cnjx6bl aKKymлгтopa. - Исторы Толбко akку мелары и заюнные усторы LG. 3ардные усторы LG pa3pa6otahы дя мakсимально подени зрoka слжбы akку мелара. He pa36npaIte aKKymyIaTOp n He dOnyckaIte KOpOTKOrO 3aMbIkaHn ero KOHTaKTOB. Cneinte 3a uHCTOTOM MeTALINueCKNX KOHTAKTOB aKKymyJrTopa. 3aMeHnTe aKKymyIaTOp B Cnyuae 3HaunTeIbHOro yMeHbIeHnI nepNoDa erO pa60tbi 6e3 nO3apAdkN. AKKymyIaTOp MoXHO 3apAINTb HeCKOJIbKO cOTeh pa3, npexJe Yem Notpe6Byetc erO 3aMeHa. - Дя поденья срoka слжбbl nepe3apkaite akKymyITop посne\ пpoДOLЖИТЕЛьНOrO 6e3dEiCTBnI. He noDBepraTe 3apArdHoe yCTpoIcTBo BO3DeIcTBIO IprMbIX COJIHeuHbIX Lyuei, a TaKKe He NOJb3yIeTcB NM B CpeJe BBICOKOIBlaXHOCTN, HApPIMep, B BaHHoKOMHaTe. He octabIaTe aKKymyIaTOP B MeCTax C OueHb BbICOKo IIN Hn3KOI Tempeatypoi, NocKoIbky 3TO MOKeT COKpaITb erO cPOK cnJx6bl. Bcnyae yctaHOBKn 3JeMeHTa NITaHnHeIOyCTUMOTo TnPa BO3MOKeH B3pblB. -Утлизириte akКуМлЯТОВ COOTBETCTBUN C INHCTpyKUnei npOn3BOДNTeJI. По Mepe BO3MOxHOCTH NJIeMeHTbI PITaHnI DOJXHbI 6bITb CdaHbI Ha nepepa6OtKy. He Bbl6pacbIBaITe NJIeMeHTbI PITaHnI B 6bITOBОy Mycop. - EcIn Bam Heo6xOJnMo 3aMeHnTb aKKyMylrTop, OTHeCnTe erO B 6IinJaIshn ABTOpN3OBaHHbI cepBnCHbI ueHtp LG Electronics nnn o6paTntecb 3a KOHCyIbTaUnei K npOdaBcy. Bcerda otcoeHnIte 3apdHoe yctpoCTBO OT po3eTKI nocne IOnHOJ 3apdKn TelefoHa, uTo6bl n36ekatb n3nnHero notpe6JeHna 3JIeKTPo3Heprn. - ΦaKTnueckoe BpeMpa6oTbI OT aKKymyJrTopa 3aBnCnT OT KOHfNrgpaun CETn, yCTaHOBOK yCTpO'cTBa, ycIOBn 3KcPnyaTaun, COCTOHNy aKKymyJrTopa n OKpyKaIoUe n Cpebl. - Bepernte aKKymyIaTOp OT KOHTaKTa C OCTpbIMn PpeMTeAMn I He NO3BOJrTe XINBOTbIM rPbI3Tb IIn CuapaNaTb erO. 3TO MOKeT pNBeCTN K BO3rOpAHIO.YBeDomJIeHne O nporpaMMHom o6ecneueHn COTKpbITbIM NCXoHbIM KOdOM
Дя получени IncxodnHOrO KoJa no yCNoBnAm liuceH3n GPL, LGPL, MPL n Дугнх liuceH3n COTKpbITbIM IncxODHbIM KoJOM, KOTOpbI COePjNtC8 B daHHOM прodyкTe, nocetinte Be6-caT: http://opensource.lge.com. Kpome nCXoHOrO KoJa,ДЯ 3aRpy3Kn DoCTyHbI BCE COOTBcTCTByIOUne yCNoBnJnIeH3Nn,OTKa3 OT rapaHTn N yBeDOMJIeHn8 O6 abTOPCKnx npabax. LG Electronics takke npedoctabnetaCXOndhki KOD Ha KOMnakT-DnCke 3a Pnatay, KOtopa NOKpbBaet CTOnMOCTb BblIOJIHeHnA 3TOI paCCbIKN (B YacTHOCTN, CToIMocTb MeDnHaOcHTeJI, nepeCbIKN n O6pa6OTKN) NocpeiCTBOM 3aInpocOB B LG Electronics no aIpcCy: opensource@Ige.com. DaHnoe npedloJxHne DeiCTBNTelbHO B TeueHnE Tpex (3) let c daTbI npno6peTeHnA 3dEInna.KAK OБНОВТь UСТРОДСТВО
IonyuHTe DoCTyn K BbInyCKam NocneHnX O6HOBHeHn, HObIM yHKcIaMn I yUyuHnMa nporpaMMHOrO o6ecneueHn. - BbI6epnte o6HOBJIeHne nporpaMMHOro o6ecneueHnB MeHIO hAcTpoek yCTpOJcTBA. - 06HOBInTe yCtpoNcTBo, NOdKJIIOuN B erO K KomnblOtepy.ДЯ NOJUyeHnA DOJONHInTeBbIX CBeDeHn O6 NcNoJIb3OBAHn EToI ΦyHKcHn NocETIne Be6caIHT http://www.lg.com/common/index.jsp, BbIbepIne cTpaHn Ia3bIK.3AABJIeHHeO COOTBETCTBm
HacToaIg LG Electronics 3aBepaTe, yTo yCTpoiCTBO MoJeIg LG-H540 COOTBETCTByET 6a3OBbIM Tpe6OBAHnM IN DpyrIM NIOJXeHnM IInpeKTHBbl 1999/5/EC. Konno 3aBneHnO COOTBeTCTBnM MoXHO HaTn Ha caIte http://www/lg.com/global/declarationLG Electronics (Levant) - Jordan
Abdali Project, Rafik Al-Hariri Avenue, The Boulevard, Central Square, 5th FloorПразвILA 6e3oNaChOCTn ри pa6Ote с nCTOчнКOM Лa3epHOro n3luyehnia
BHMaHne!
В данном подукт e nспь3уется паерная систema. Дя праильно И спользовеня подукт a Bнма teь bno рочит aite pykoBOДСТВО ПОЛБЗВаTeЯ И COхpaHITe erO Дя далб Heшero Использовеня в КачесТВ СправочERO MaTeриа.Еси устpoиСТВО hyждaeTcR B peMOHTe,образИТecь В abTOPIN3OBaHHbI CepBnCHbI ζeHTp. IcnoJIb3OBAHHe HeIpeDyCMOTpeHHbIX əJIeMeHTOB ynpaBJIeHnRA, HAcTpoEK, a TaKKe BbINOJIHHeHne HeIpeDyCMOTpeHHbIX pOuCeIpy MOryT npINBeCTN K ONaCHOMy BO3dEiCTBnIO Ja3epHO r3JnyeHnRA. B ueJx npedotbpaueHn npaMOro BO3deIcTBn Ja3epHoro n3nyeHn He BCKpbBaIte Kopnyc yctpoIcTba n He doynckaIte npaMOrO KOHTaKTA C nCTOuHnKOM Ja3epHoro n3nyeHn.  Ytvn3aunstaporoobopydobannn
1 ΘleKtpnueckne n ΘleKtpoHbIe yCTpoiCtBa CneIyEt yTnIIN3NPOBaTb OTdJIbHO OT 6bITOBOrO Mycopa B CpeZnaJIbHbIX yUpeXKeHnIX, yCTaHOBJIeHHbIX IpaBNTeJIbCTBeHHbIMN IJIIMecTHbIMN OprHaAMN BlaCTN. 2 Правильна утллзацястаро оборудованяnomожетпразOTВразИТь NOTehциально ВрEDhoe BO3deICTBne Ha OKpyжадшую срedy и 3dopobbe человекa. 3Для полученя 6олee порбьix Сbe徳нoi 6утллзauиоборудованя образиТecьВадMinHnCTpaцию ropoDA,ropondкоДeпартамentутллзauиOTXODOBИЛВMaRa3INH,гд6ыл ппобретен прodyкт. Ytuln3aunr Otpa60taHbIX 6atapei/akkymyITopoB
1 ΘTOT CnMBOJ MOKeT IcNoIb3OBaTbcra BMeCTe C XIMnueCKmN CnMBoJAMn, 06O3NaUoUmN pTuTb (Hg), KaMn (Cd) nnn CbInHeu (Pb), ecn 6atapea coepxnt 6oJee 0,0005 % pTuTn, 0,002 % KaMnna nn 0,004 % CBnHa. 2 BCE 6aTapen/aKKymyIaTOpbI DOJXHbI yTnIIN3InPOBaTbcra OTdJIbHO OT 6bITOBOrO Mycopa yepe3 CneuAn3NpOBaHHbIE NyHKtbl C6opa, yCTaHOBJIeHHbIe IpaBNTbCTBeHHbIMn IJI MeCTHBIMn OprHaAMN BlaCTn. 3 Правильна утUILIN3aцЯ OTPабOTаньх 6атAPEИ aKKумлгОВ nOMORAET пpeДТВрATNTb NOTeHцalbHo BpeДhoe BO3deICTBHe Ha OKpykaIOU cyPeDy I 3dOpOBbe ueLOBeKa. 4Дяпolyченя 60ilee podpo6hbx CbeDeHn O6 yTNI3aCIN OTPa6OtaHHbIX 6aTapei/aKKyMylrTOPOB 6paTNTecb BY MHNICIIAPITET,ROPOCKoJ DeapTaMeHT yTNI3aCIN OTXODOB IIN B MaRa3IH, rIe 6bln npno6peTeHbI 3JIeMeHTbl PNTAHNIA.Baxkhoe npimechne
Перед Исторьагим мобUILьноу Телега 03нakомьтесь с данноинфорmaцnei!
Y6eHntbHa npoc6a npOBepnTb TelefoH Ha HAIyue npo6IeM, OINcaHHbIX B daHHOM pa3dJe, ppeXde yem OTdaBaTb erO B cepBnchbI ueHTp IJI 3BOHNTb PpeCTaBnTeJIO.1. Namayb Telefona
Korda objem cbo6oJHOI nAMrTn TeJeOHa yMeHbJaeTcdo 10 Mb u MeHee, npneM HObIX COo6UeHN CTaHOBHTCra HeBO3MOXHbIM. IJa OCBO6OJDeHnMaMeCTa B nAMrTn MOKeT Notpe6oBaTbcra IpOBepKa nAMrTn TeJeOHa UydaJIeHne HeKOToPbIX DaHHbIX, TaKix KaK npINOJKeHnIu COo6UeHnI.Ydalenne npinloxhen:
1Kocnntecb 公 >公 > BklaKa 06une> PpniloxeHna. 2 Korda oTo6pa3aTc8 BCE npuIooKeHn, npOKpyTnte cncocK n BbIbePnte npuIooKeHne, KOTOpoe Tpe6yeTc8 ydaJIHTb. 3KochnTeCbYdaannTb.2.Увенихе Врemeи pa60ы akкулаяtopa
BpeMa pa6oTbI aKKymyIaTopa MoXHo yBeJIuHTb, OTKJIIOUH HeHyxHbIe uHKcun, pa6oTaIOUe B oHObOM peXnme. TaKxe MoXHo cIeINtB 3a IOTpe6JIeHNem 3Heprn HeKOToPbIMn npINOJKeHNrAmN n CnCTeMHbIMn pecypcamn.YBeneHne BpeMeHn pa60tbi aKKymyIaTopa:
- BbIKIouHTe HeINcNoJIb3yEmbIe cpeIcTba CBa3N. EcII N cyHKuIN Wi-Fi, Bluetooth nII GPS He nCIOJIb3yIOTcR, BbIKIouHTe nx. - Ymehbinte npKoCTb 3KpaHa n yCTaHOBnte MeHee dIInTeIbHoe BpeMa Do OTKJIIOUeHnE 3KpaHa. - OtkлючITE Фуннцию abTomatnieceко синхрониЗаци Gmail, Kaileндарь, спнда Контаксы и дуг nx рпложен. - Дя рабови HeKOTOpbIX npinOxKeHn, 3aRpyXaEmbix n3 cetn INHTepHeT, MoKet Tpe6OBaTbcr NOBbiIeHHbI paCXoI 3apra aKKyMylrTopa. -При ИспOLTбОВаHи сKaчаньIX пИLOжЕн的新poВерЯTe уровенbЗарда akКуМлЯТopa.3. Пера установковй рPORpaMMHoro обеспецьи OC с OTКрытбIM ИСХODнвIM КODOM
BHUMAHVE!
- UctaHOBka n nCNoB3OBAHne OC, OTnIuHoi OT NoCTaBnaeMoI npOn3BOJnteMe, MoKet npNBecTn K NOBpeJdeHIO TelefoHa. Kpome TOrO, Ha TelefoH 6OJIbwe He 6ydt paCnpocTpaHraTbcra rapaHTnI. - Дязць Teleфona и линьх даньх Следует 3a pyжа Тпложеня Tольк нЗ поверених NGTOUHKO, takix kaK Play Store™. Heberpo yctahOBJIeHHbIe приложеня могут пивесг К Нелравиьног pa6ote Teleфona и в ВОЗнКовеню серbe3HоJ OшИбК. Следует удалЯТы takne прложеня и СВЯЗAHье с ИМИ даньи И настpoй КИЗ TEleфona.4. 3anyck npiloxeHn nepeKloucheHne MeJdy HmN
OC Android nerko cnpaBnaTc mHOrO3aJaUHocTbIO, TaK KaK 3aNyueHHbIe npIoJxHn IpoJoJkaHT pa6OtaTb, daXe eCIn NOpIb3OBaTeIb OTKpbIBaET HObIe. IpeEi 3aNysckOM npIoJxHn He HxKHO 3aBepuTaB dpyrOe. Пользовать может поеклочаьсмжду HeckольКIMN 3aNYшнБIMn npиLOженЯМN.OC Android bblonHЯET ynpabLHeHne npinLOженeM, OCTaHaBЛВая nII 3aNyCKa erO, uTO npedynpeKdaet noTppe6JIeHne 3apJa aKKymЛТОРа HeICNoIb3yEmbIMn npINLOжENЯМN. 1 KocHTecb. OTo6pa3ntcA cncCOK HeaBHO nCNoIb3OBaBUnxCra npInIOXeHn. 2 KocHTecb TOro npINOxHn, KOtOpoe Heo6XoIMo 3aNyCTntb. PpN eTOM nepBoe npINOxHne npOdoJXnT pa6OtaTB B fOHOBOM peXnme. NToTomy IJIyBixOda n3 npINOxHnIPOCNe pa6OtbI C Hm CJeDyET BceTdA Bbl6nPaTb -Утобы удалпь пиложене ИЗ спнSCа HeДАВН ИСПОЛБ3OBaHHbIX пиложен, поведITE палбем NO прсмOTpy пиложеня BЛЕВИ NII BnPaBO. ДЯ удаленя BCex пиложенй KOCHITecb YdALNTb BCE.5. Korda захан He OTbeyaet
Ecnn 3KpaH He OTBeuaET nn TeJeOH He pearnpyeT Ha HaxaTna KHOPOK, n3BneKeITe aKKymyIaTOp I BCTaBbTe erO cHOBa. 3aTeM cHOBa BKIOUHTe TenefoH.3HaKOMCTBO C TeNeΦOHOM
Вид телега
ПРИМЕЧАНЕ. Датчек пиблженья
- Пи пиemeи COBepseHn Bb3OBOB 3TOT DaTnK aBTOMaTnueckn OTKIIOucaET NOcBETky I6IOKnpye TceHCOPhI DnCpIeN, peRnCTpnpyra NOnOxKeHne TenefoHa pIaOM C yXOM. 3TO yBeJInuHBaet cPOK ClyXk6bl aKKymJrToPA IN PpeYrCTByeT HepeiHaMepeHHoA kTINBaUHn EKpaHa BO BpEma pa3roBopa.BHIMAHHE!
He knaite Ha teneoH TjkeIbe npedMeIi He caNTecb Ha Hero. To moKet npNBecTn K NOBpeJHIO DnCIIe I HApUWeHIO fYHKUHOHPOBaHNcHcOpHOrO ekpaHa. He 3aKpbBaIte DaTHNK pnp6NIgEHHa 3aHTHOI pJIeHKO dJa ekpaHa IIIN JIOBOI dpyroI 3aHTHOI pJIeHKO. To moKet npNBecTI K HeKOppeKTHOH pa6ote daTHka. | Кнока Питуни/Бл Okювka | • Вкlioоче ял nь Вькlioоче тел eфон нахашием удөрөдөм этой кноки. • Короткоe нахашиe: ьokювka ял pa3блOkювka орара |
| Кноки perулòровки гromKOCTи | (При ВькlioочeHHOM диспee) • Долгoe нахашие на Кноку вевх дя зауcke Capture+ • Долгoe нахашие на Кноку виз дя залар pa6obтыс Камера |
YctaHOBka SIM- nii USIM-kapTb i n aKKymyJTopa
UcTaHOBnTe SIM-kaPty nnn USIM-kaPty, npeOCTaBHeHHyO NOCTaBnKOM ycLyr Mo6nIbHOcB3n, IN BXoJaIb B KOMnJIeKT NocTaBKn aKKymJyTOp. 1ДЯTORO,UTO6bI CHaTb 3aHIOU KpbIshKy,KpeNko ydepxnBaIte TelefoH Bpyke.HorTeM 6oJIbWoRo NaIbua DpyroJ pyKn npInpOHaMmTe 3aHIOU KpbIshKy,KaK noka3aHO Ha pncuHKe HnKe.  2 BcTaBbTe SIM-kaPty B cIOT nIe SIM-kaPTbl, KaK nOKa3aHO Ha pncyHke. Y6eINTEcb, yTO KAPTa yCTaHOBJIeHa N03OJIOueHHbIMN KOHTaKTamn BHN3.  BHIMAHHE!
He BCTaBnIe KapTu nAmrIn B rHe3do dJa SIM-kapTbI. Ecnn Bbl cnyauHoyctaHOBnTe KapTu nAmrIn B rHe3do dJa SIM-kapTbI, nepeaIte yCTpoNCTBO B cepBnCHbI ue LG dJa ee n3BneueHnJ.ПРИМЕЧАНЕ
Cycloctbom pa6oTaIToJbKO microSIM-kapTbi. 3 BCTaBbTe aKKymyIaTOp.  4 UTo6bI yCTaHOBnTb 3aHIOU KpbIshky o6paTHO, NOMeCTInTe ee NOBepx OTceKa dIy aKKymJrTopa I n HaxMnTe Ha Hee Do ueJyka 2 3apяdka aKKymyITopa
3apynte aKKymyIaTOP nepei nepBbIM nCnoIb3OBAHnem.ДЯ 3apyIaKKymyIaTopa nCnoIb3yIte 3apyIaHOe yCTpoIcTBO.TakKe IJRA3apyIaKKymyIaTopa MOxHO BOCNoIb3OBAtbcra KOMNbIOTePOM, NOKJIuOuIB K HeMy TelefoH c NOMoUbIO Ka6eIa USB. BHUMAHVE!
IcnoJIb3yIte TOnbKO OJOpBpeHbIe KOMnAHne LG 3apAINbIe yCTpoiCTBa, aKkymyJIaTOpBI n Ka6eII. IcNoJIb3OBAHne 3apAINbIX UCTPOICTB, aKKymyJIaTOpOB IN Ka6eII, He OJOpBpeHHbIX KOMnAHne LG, MoXeT npVBecTI K YBeJIuHEnIO BpeMeHI 3apAIN KaKymyJIaTOpA. KpOME TOrO, 3TO MoXeT npVBecTI K B3PbIBy aKKymyJIaTOpa IIIN IOBpeJdeHnIO UCTPOICTBa, Na YTO He paCnpocTpaHЯETc rapaHTnI. Pa3bem Дя поклюець Зардноу устpoиства располжен в Нжней чати телфona. ПОДКЛЮЧТе зардноу устpoиств К телфону и розтke щелкторсту. ПРИМЕЧАНЕ
He otkpbBaIe 3aHIOKpbIuKy BO BpeMa 3apAnKe TenefoHa.YctaHOBKa KapTbI NaMЯТN
Данhoe устюво подержавет кары microSD emкостьdo 32 Г.В 3abucmocTN OT npON3BOdnteЯ n Tnna KapTbI NaMrtN, HeKOTOpbIe KapTbI NaMrtN MOryt 6bITb HecOBMeCTnMbI C BaShIM yCtpoiCTBOM. BHUMAHNE!
HeKOTOpbIe KapTbI NaMaTn MOrY T 6bITb HeCOBMeCTUmbi C DaHHbIM yCTPOIcTBOM. IcNoJIb3OBAHne HeCOBMeCTUMoN KaPTbI NaMaTn MoXeT npINBeCTN K NOBpeJdeHInIO yCTPOIcTBA, KapTbI NaMaTn IaN XpaHЯUxxCa Ha HeI daHHbIX.PIMMEUHNE
- Yacta 3a nscb n ydaenne daHbIX cokpa aOT cPOK cnjkbI KapT naRTn. 1 CHINMTe 3aHIOKpbIiKy. 2 BcTaBbTe KapTu NaMAtn N03ONoeHHbIMN KOHTaKTamN BHn3.  3 YctaHOBNTe 3aHIOIO KpbIiKy.Извileченье kapТы памгтн
Ipeed n3BleueHnem KapTbI pAmrN Heo6xOJMo BocnoJIb3OBaTbcra yHKcnei OTKIOUeHnRA KapTbI pAmrN dR 6e3OJaCHoro n3BLeueHnra. 1 KocHTecb > > BknaKa O6uNe > XpaHnIuSe daHHbIX N USB> 2 Chnmtte 3aHIOKpbIuKy n3BKeKnte KapTu naMRTN. BHUMAHNE!
He n3BneKaIte KapTu NaMAtN, NOKa yCTpoiCtBO OcyuIeCTBJIeT nepeHoc NII NOCTU K INΦOpMaIu. ΘTo MoKet PnIBeCTN K NOTepe NII NOBpeJdeHIO DaHHbIX, NII NOBpeJdeHIO KapTbI NaMAtN uCTpoiCtBa. KomnaHry He HecET OTBeTCTBeHHOCTN 3a NOTEpi, Bbl3BaHHbIe He npaBnIbHbIM IcNoIb3OBAHnEM NOBpeJdeHHbIX KapT NaMAtN, BKJIouyA NOTEpU daHHbIX.Бл Okни探测ка и разблOkни探测ка устroduства
HaKATne KHONKNIITAHNA/6LOKNPOBKn OBeCneuINBaET OTKIIUOeHne 3KpaHa I nepeBoD yCTpoiCTBa B peXIM 6LOKNPOBKn. EcIn ycTpoiCTBO He NcNoJIb3YeTcB TteHene yKa3aHHOro BpeMeHN, OHO 6LOKnpyETc aBTOMaTHueCKn. 3TO IO3BOJAEr IpeIDOTBpAITb ClyuayaiHoe HaKATne KHOJOK IN C3KOHOMNTb 3apRd aKKyMylrTopa. YTo6bl pa36LOKNPOBaTb yCTpoiCTBO, HaxMMTe KHONKY NITAHn/ 6LOKNPOBKn I npOBeDiTe PaIbUeM No 3KpaHy B IIObOM HAnpaBJIeHN.ПРИМЕЧАНЕ
- BmecTo haxatna KhONKn nItaHn/6IoknpoBkn 3KpaH TakaKe MoXHO pa36IoknpoBaT bBOHbIM KaCaHneM.I3meHHe cno6a 6JoknpoBkn 3KpaHa
Moxho n3MeHnTb cnoc6 6IoknpoBkn 3KpaHa, TTo6bl npedotBpaTntb HecaHKUHOHPoBAHHbI DOCTyI NOCTOPOHNX LIuC K CBOeJ LIuHOn IHOpMaun. 1 KocHTecb 公 > 公 > BklaJaKa DmCpIeJ>3KpaH 6loKnpOBKn> Cnoco6 6loKnpOBKn 3KpaHa. 2 BbIbePte HxKhBn CnOc6 6nOKnPOBKn 3KpaHa: Het, PpOBecTn paJIbCeM, Knock Code, IpaΦnueckn KJIou, PIN-KoD nII nIapOJb.ПРИМЕЧАНЕ
- Праздуем задаь комбинадию pa36лokировки, создайт akKaynt Google и заимпет pe3ервны PIN-кOD, заданый ппс создайни КOMбинадию pa36лokировки. BhimaHne! Ecn Bb He co3daBann aKKaynt Google Ha Telefohe n 3abn PINKo, napOB n pe3epBbN PIN-Ko, notpe6yETc BbINOnHtB annapaTHbC6poc. Pn BbIOJIHeHn annpaTHoro c6pOca BCE NOL3OBaTeNbCKne npIIOJKeHn I daHHbIe 6yDyT ydaJIeHbI. PepeB bblONHeHem annpaTHoro c6pOca CJeNyET CO3DaTb pe3epBHyIO KONIO BaXHbIX DaHHbIX.COBET Smart Lock
Дя облereни pa36LOKINOBKN TelefoHa можно BOCNoIb3OBAtbcr FoHKcnei Smart Lock.Е можно NaCTpOnTb Дя pa36LOKINOBKN TelefoHa ри NOДКЛЮЧENII K Hemy DoBepEHOrO yctpoNcTBa Bluetooth,пр erO haxoxdEHN IN 3BeCTHOM MeTe, HanpIMeP dOm a nI I Ha pa6Ote, nI IN B clyuae paCnO3HaHnI JIua BlaJeNbca.Hactpoika Smart Lock
1KochnTeCb 已 >  2KochnTeCb BklaJaKa Dncnnei 3KpaH 6loKnPoBKN>Smart Lock. 3 Перацьпсьи мдоверньх устpoист, Mect плллц Heobxodmo NaCTpOITb 6IoknpoBky ekpaHa (Knock Code, Графческий кюч, PIN-ког пллллр).Главный Экран
CobetbI no pa6ote c ceHcOpHbIM 3KpaHom.
Hnke npnbODNTc HecKObKO COBToB IJI HABNaUNI NO NyHKTaM MeHIO BaUero TeneOHa. Kacahne - npn nOMOUs OndHO KacaHna PaIbceM MoXHO Bbl6NpaTb 3JIeMeHTbl, CcblKn, JapblKn N 6ykbbl Ha 3KpaHHo KlaBnaType. Kacahne u ydepkubnne - KOCHNTecb u ydepkubnTe 3JeMeHT Ha 3KpaHe, He OTnycka napeu, NOKa DeiCTBne He 6ydet BblOnHeHO. - NepetacknBaHne - KocHTecb n ydepxnte 3IeMeHrHa MRHOBeHne, a 3aTeM, He noDnMa rnaeU, npoBeiNTe NM IIO 3KpaHy Do HxHoro MeCTa. MoXHo nepetacknBaTb 3IeMeHTbl Ha rIaBHom 3KpaHe dIy nx NpeMeuHn. - Побedingи пальем - бICTpo пobeinte пальем NO NOBepxHOCTN экран, He задерхиваясь ри певом пиКОСHOBEHIN (чTOбbl BmecTo эТOrO He nepetauNTb ЗLEMENT). -Двоиhoe kacahne - KOCHTecb ДВaЖдbl,ЧTOбbl yBelenuHTb Be6-CTpaHnCy nII N KaPTy. CBeHeHne/pa3BeHeHne - CBeIte nn pa3BeIte yKa3aTeIbHbI n 6oJIbwoI naIbciI dIyBeliuYeHn IIN yMeHbWeHnMaCtTa6a npi nCIOJIb3OBAHnI 6paY3epa, npocMOTpe KAP Tnn I3O6paJKeHn. - Nobopot Диспег — BO MHorix РиLOжЕняx И MeHIO opNeHTaцЯ Диспег рERYИnpуETСВ B COOTBeTCTBUN C ФИЗЧECКО opNEHTaциЕ YCTPOICTBa.ПРИМЕЧАНЕ
He haximaiTe cnilskom cnIbHO. CenCOpHbI 3KpaH DoCTaTOUHO yBCTBNTeJIEN paCnO3HaET daJxe IerKne, HO yBepeHHbIe KacaHnI. KacaiTeCb Heo6xOIMbIX 3IeMeHTOB KOHcIKOM paIbca. CObJIouaIte OCTOPQXHOCTb, YTO6bI HE KOCHVbCS IDPVHX KHOJOK.Главный Кран
Главны зкран — OTправна точka дя зауcke многих пиюжени и Функци. Oh поЗваягд Добавсятб takе заимь, КаК ярлбИ п риюжени и вдожевGoogle дя мговен Horо доCTупа Кданы IM пиюжени. ЭTO pa6очий зкран NO умolyанMu,doCTун K KOTOPOMy MOЖно пolyчпь ИЗ ЛЮБОТо MeHIO, KOKHYBшисьO.  1 Ctpoka coctoHnra 2 BnJxKet 33Hauchn npinoxhen 4Индikatop MeCTOnoloxeHnA 5 06naCTb 6bICTpbIX KHOIOK 6 CechopbIe KHONKn rIaBHOrO 3KpaHa 1 Poka3bIbaet INHOpMaunO COCToHn TelefoHa, BKIOUaBpeM, yPOBeHb CnIHana, 3apJd aKKymyTopa n 3Nauchy yBeOMneHn. 2 BnJKeTbI — 3TO aBTOHOMHbIe npINOxehN, K KOToPbIM MOxHO NOyUHTb DOCTyn C rIaBHOrO 3KpaHa nIi uepe3 naHeIb npINOxehN. B OTnUyne ot RaIbIka BnJKeT MoXeT fYHKcNoHnpOBaTb KaK 3KpaHHoe npINOxehN. KochnTeCb 3HaUka (npuIooKeHna, naKN u T.D.), yTO6bl OTKpbTb INcNoJIb3OBaTb eRO. 4 ΜοKa3bIBAeT, KaKoe NOJOTHO rJaBHOrO 3KpaHa Bbl pOcMaTpInBaTe B DaHHbIMOMeHT. 5 OBeceuBaet doctyn K cyHKcnaM Ha IIO6om nOIoTHe rIaBHOrO 3KpaHa C NOMoCbIO OJHOrO KaCaHn.| KhoIGNka Ha3a# | Возврат К преыдуншему окрани. Таске за крвает Вспьваюшце заlemенты, наразимер Meни, Диалоговые OKни и окранни Клавниту. |
| КhoIGNka Главны Зкран | Возврат К пαιвому окрани n3 лioбого окрани. |
| КhoIGNka О6зор | Отообравенье недавно Incpoльзовahlіх Прinложені.Еся Косни вся и уdeckени в? КhoIGNky, оTKpoetся Meни дочни парамет罗. |
| КhoIGNka пөрөлүчени SIM-карты | ВыборTekушей SIM-карты门前 Incpoльзовни. Косниесь и уdeckени в? п actрокам параметра "Дve SIM-карты". |
Дононтульный Галовский Красн.
Операцноная систema Имeel Heckолько полотен Глав Horo Зкрана, Утобыпpeюctabtб 6ольше места Ддя добавлиега 3начков, Вджетов и дугхэлем entob. - Пювецпальем NO Гльавому Экрауну Влево пи Вправо дяdoesctура К доролнеловим полотham.HactpoJaKa rIaBHorO ekpaHa
Главны Кран можно насточь, добая на Hero пиюжения, вдожевы и Изменя обон.Добавлиейноюгов на гаьный кран
1Kochntecb n ydepjxBaIte npctyio qactb rlaBHOrO 3KpaHa. 2 B MeHIO "PexnM do6aBHeHna" KOCHNTecb 3JeMeHtA, KOTOpbI HEO6xOIMo do6aBHTb. Nocne 3TOrO do6aBHeHbI 3JeMeHt NOABITcR Ha rJaBHOM 3KpaHe. 3 Nepetaune ero B hyxHoe MeCTOn Otnyctnte. COBET YTo6bI Do6aBnTb 3HaayOK npInOxKeHna RaBbHbN 3KpaH, Ha 3KpaHe PpInOxKeHn KocHTecb N ydePxxBaYte npInOxKeHne, KOtOpoe Heo6xoDIMO do6aBnTb.Ydalenne 3IeMeNTa C rIaBHOrO ekpaHa
Ha rnaBHom 3KpaHe KOCHNTecb n ydepxnBaIte 3NaOk, KOTOpbl Heo6xOIMO ydaIITb, nocle yero nepetauIte erO B.Добаьени пиложеня в облacrь бicitpbix KhoноK
Ha ekpahe "Приложеня" Ии Ha Галовом Экране Кочпесь и уdeckиваite 3нauOK пriложеня, посе чero nepetашиte ero в ооблacrь 6ыICTpbix KhoNOK. 3aTeM OTnyctinte 3нauOKВ Tpe6yemom MeCTe.YdaneHne npinoxeHnI3 o6naTn 6bICTpbIX KHOJOK
KochnTeCb n ydepeKnBaaiTe HxKHyIO 6bICTpyIO KHOINKy, noCne yero nepetauuTe ee BПРИМЕЧАНЕ
HeIb3a ydaIITb KhoNkY PpIIOXKeHnaHac tropoKa 3NaUkOB npIIOxHeN Ha rIaBHom 3KpaHe
1 KocHTecb n ydepxnBaIte 3NaOKe npINOxKeHndo ero pa36IOKnpOBKn n3 TeKyUeRo NpOKeHn, noCle Yero OTNycTe 3NaOeK. B npabOM bepXhem yrIy npINOxKeHn IOBnTcR 3NaOeK peDaKTIpOBaHn 2 KocHTecb 3HaUka npiloxeHn eIe pa3, 3aTeM Bbl6epnte Tpe6yEmbI BnD n pa3Mep 3HaUka. 3KochntecbOKДЯ coxpaHeHnI3MeHeHnI.Переков К недамю Исторьогим пиложеням
1 Kocnntecb Ha dincnee oTo6pa3rTc8 cKn3bl HeDaBHO nCNoIb3OBaBUnxC8 npInoJxHn. 2 KocHTecb 3CKn3a, yTO6bl OTKpbITb COOTBeTCTByIOUe epINIOXKeHne. -IIN- KocnTeCb ДЯ BO3BpTa K npeIbIyUeMy ekpaHy.Панелывedlyмлень
YBeDOMJIeHnO NOBeeIaOT O NOLyueHn HOBbIX COO6IeHn, CO6bITJx KaJIeHdApR, CnIHalax 6yDnJIbHnKa, a TaKXe O TeKUxN X CO6bITJx, HApPIMep O Bbl3OBe. При полочени увedingим leня Вьерху зараза наюваягся erо 3начк Oждаюши увedingим leни оторазаются сеBa, a системные 3начки, такne кak Wi-Fi и уровень зараза akкумлгеторa, спраза.ПРИМЕЧАНЕ
- Доступные варante могут раимчатьс в захочмов OT peinoha nii noctabuika ycnyr. OTKpbITne paHenn yBeDomJIeHn
IpoBvnte naIbIeM BnI3 OT cTpOKn COCTOHaNIA, yTO6bl OTKpbITb NaHeJIb yBeIOMIeHNI. YTO6bl 3aKpbITb naHeJIb yBeIOMIeHNI, npOBeIte nAIBcEM NO ekpaHy BBepx nII KOCHTecb  06laCTb 6bICTpoi NaCTPOKn 2 Ybeomlenna OuNCTNTb KochnTeCb KHONKn 6bICTpoi HaCTPOIKN, yTO6bl BKNIOHTb/BbIKIOHTb fYHKcIIO. KochnTeCb n ydepxNBaIe Tpe6yEmyIO KHOJKy dIra nepexOda HAnpMyIO K MeHIO HAcTPOEK COOTBeTCTByIOUSeI ΦyHKcIN. IJIr OTo6paXeHNA DOnoJIHNTeJIbHbIX KHOJOK NepeKJIQUeHNA IPOBeIITe PJIbCeM BLeBO IIN BnPaBO. KochnTeCb , yTO6bl ydaJIITb, Do6aBNTb IINI N3MeHNTb NOPaDOK KHOJOK 6bICTPOI HaCTPOIKN. OTo6paXaETcCnCOK TeKyuux yBeOMJeHn C KpaTKmN OnncAHnMn. KocHTecb yBeOMJeHn, uTO6bl npocmotpeTb erO. KochnTeCb, yTo6bl ydaJIb Tb BCE yBeDOMneHna.3hauchnybveodomlenBCTpokecoctoHnra
3nauchnybeDomlennoTO6paKaOTcBCTPOKe COCTOHN B BepxHeu qactN 3KpaHa n COo6aIOT O npOnyueHHbIX Bbl3OBax, HObIx COo6eHnX, CObITnX KaJeHdapra, COCTOHN yCTPOINCTBa N MHOROM dpyrom.  3Hauchn, OTO6paKaHouIeScB B BepXHeJ qactN 3KpaHa, IpeOCTaBJIOT HOpMaUIO COCToAHm yCTpoiCTBa. B npNBedeHHoH NHXe Ta6NIue IpeuNCJIeHbI 3Hauchn, KOTOpbie NOABJIOTc qASe BCero.| Знayок | Описанne |
| SIM-карта отсутстbyet | |
| Нет достунио сигнала сети | |
| Реким "В самоле(" BKлочен | |
| Повкутоные к сети Wi-Fi aКТИВно | |
| Hayшник подениы | |
| Выковая ся Вьзов |
| Знayок | Опincане |
| В настаяшем ворим ВоспюзворимсяКомпозия | |
| Звонок прилusesн | |
| Реким вибрацим вкlioочen | |
| АKKумлалтор полостью заразжени | |
| Идот зарядааKKумлалтopa | |
| Телегон подкlioочen К ПК с поочью USВ-kaбеля |
| Празуший Вьзов 3агрузka ддных | ||
| Функция Bluetooth ВКлоча | Пересьлka ддных | |
| Системhoe празушидени | GPS ВКлочen | |
| Установлен 6удnilьнк | Вылолнытсая синхронидау ддных | |
| НовoeTekстовoe яли мyalытимедиюе соobшени | Выбэрп te метод ввога | |
| Точа достуна Wi-Fi ВКлоча | ||
ПРИМЕЧАНЕ
- Положения знayков встpoke COCTОгия может pa3лчатьсь B 3abucmoctn OT функции пп сервica.Зкранна Клавиatype
TeKCT MOJHNO BBOIDITb C NOMOUIBIO 3KpaHHoN KlaBNaTpybl. 3KpaHHaN KlaBNaTpya NOBJIeTcR Ha 3KpaHe pR KacaHn IOCTyHOrO nOJa BBOda TeKCTa.Icnojb3OBaHne KnaBnaTpyi N BBOJ TeKCTa
Kochntecb KlaBnOdH pa3, n CneDyUo7a BBeDeHNa 6yKBa 6yDet 3aIabHO. Kochntecb DbaXDbI, n BCE BBODIMbIe 6yKBbl 6ydyT 3aIpaBbIMN. KochnTeCbДЯперexOda KHaCTpoiKaM KlaBnaTypbl. KochnTeCbИ ydepxuBaIteДЯИЗMeHEnI MaToDa BBOda TeKCTa. KochnTeCbIy BBoJa npo6eJa. KochnTeCbДЯ CO3daHnH NOBOI CTPOKN. Kochntecb, yTo6bl ydaJIInTb npeIbIyuN CnMBOJ.BbOd 6yKB C dHaKpNTIKoI
Ha npimep, yTO6bI BCTaBnTb CmBOJ "a", KocHntecb N ydepKnBaIte KhoNky "a", POKa He NOyBnTcR BCnIbBAIOoee OKHO, OTO6paKaIOoee COOTBeTCTByIOoine CpeZnaJIbHbIe CmBOJbI. He OTPbIbA NaIeU OT kPaHa, nepemecITe erO Ha HxKnbl CpeZnaJIbHbIc MBOJ. IocNe TOrO, KaK OH BbIJeNTcR, NOdHnMnTe PaIeU.CneuaJIbHbIe yHKcIM
CbeMa no XeCTy
Функця "Съемка по ќесу" поЗволяет сделаТь снIMOK на передно Камерсnomоцью ќеста рук.UTo6bI cdeNaTb CHMOK
Функцию "Съемка по ќecу" можно Исплььова ТдБУМ спосбам. -Держinte руку с OTКрытои падонью,пoka ФpoHTальна Камера He pacno3haet ee, И на заразе He NOЯВИТСЯ рамka. 3aTeM COЖмITE pyky B KyaK Дя 3aNYSCKa таймера,чTOбbl y Bac 6blNO BpeMa NOIroTOBNTbCra. -UN -Держinte руку сжатьIM КунakOM,пoka Фронтай Камера He pacno3haet ee,иHa зкране He NOЯВИТСЯ рамka.Зatem pa3oxmITE Кунak Ддя 3anycKa таймepa,чTO6bl y Bac 6blINO BpeMЯ NOIROTOBNTbCra. Glance View
Ecnn 3KpaH TelefoHa BbIKIoueH, CTPOky COCTOHNy, BpeMn DaTy MoXHO npocMOrpeTb, npoBeJa naIbIeM BHN3 NO 3KpaHy. Включпь закран
Функця Вкючть кран поЗвоггет 6бICTpo BKIOUHTb И ВыКИQUHTb 3KpaH ДBOйНым Касанем.Вкlioочиные ekpaнa
1Двжды кочпесь цentpaьнчactn 3a6лokирован Horо ekpaHa,ЧTo6bl BKJIIOHTb erO. 2 Pa36loKnpyTe 3KpaH nIIN BOCNoB3yTEcB DOCTyINbIMN apNbIKaMn IIN BNDKeTAMN.Выкlioочиные Крана
1Двжды KОСнТecь пустои обл actи на ГалВHom крань в Стрoke COCTOЯн. 2 3KpaH 6yJeT BbIKIIOueH.ПРИМЕЧАНЕ
- Cnédyet kacatbca zentpaHOB noBactn éKpana. Pn KacAHn HxKHe nI IN BepxHeoBactn eKpHa JecT MoXeT 6bITb He paCNo3HaH.Knock Code
Функця Knock Code no3B0JAEr CO3aBaTb CO6CTBeHHbI KOJ pa36IOKnPOBKn C NOMOuBIO KOM6HauCIN NOCTyKnBaHm I O 3KpaHy. Korda 3KpaH BbIKlIoUeH, MoKHO HeNOCpeIcTBeHHO NepeiTu K rIaNBOHMу 3KpaHy, KocHyBwncb 3KpaHa B NocJeIDOBaTeJIbHOCTN, 3aDaHHoI dJaDAHHo FyHKznn.ПРИМЕЧАНЕ
- Ecni KoI Knock Code 6yIeT 7eCTb pa3 BBeIeH HeIpaBnIbHo, BAc IpeHaIpaBrt Ha CTrpaHnCi ByOda B BaIa AkKayHT Google/BBoDa pe3epBHoro PIN-KoJa. - Ппкась К Экрану, чтобь ВКлючпь Или ВыКлючпь сero, IncNoIb3yIte KOHnK NaIbca, a He HOrOTb. 1 KocHTecb O >O > BklaJa Daucnnei>3KpaH 6loKnpoBkn>Cnoc6 6IokpOBKn 3KpaHa > Knock Code. 2 KocHTecb KBaIpaTOB B ONpeJeHHom NopJKe, UTO6bl yCTaHOBTb CBOJ KOd Knock Code. KomBaHaZnAaNKnock Code MoXeT coDePkaTb 6-8 KacaHni. Pa36lOkuPoBka 3KpaHa c nOmoIbI O yHkCmN Knock Code Ecnn 3KpaH BbIKIoueH, ero MoXHo pa36IoKIpOBAt b C NOMoIbIO paHee 3aHaHNo KOM6uHaCuN Knock Code.Двоюhoe OKHO
3TaФункцяДаeТВОЗМоЖНOCь pa6OTaTbBMHOrO3aДaЧOMpeЖIMe 6laRogapЯ pa3dJeHnIO kpaHa Ha DBe YacTи,чTO ПОЗВOLЯETИСПОЛь3OBaTb DBa COBMeCTIbIX PrINLOJKeHnO ODHOBpeMeHHO. 1KochnTeCb > BoHoe OKHO. 2 Haxmte nnn nepeTaunTe 3NaUOK COOTBETCTByUoIeRo npInIOXKeHn, KOtOpoe Heo6xOIMo IcNoIb3OBaTb. :KochnTeCb, yTo6bl npocmOTpeTb napaMeTpbl MeHIO BoHoro OKHa nIIN npoBeiTe IIO kpaHy dIy I3MeHHeNpa3Mepa pa3dJeEHbIX 3KpaHOB. :Поменятбэкранbl MeCTaMn. :Ppocmotp cncka npnoxehn. :PaKpbITb Bbl6paHHoe OKHO Ha Becb 3KpaH. X:3aKpbItb OKHO Bbl6paHHOro npInIOxKeHnA.ПРИМЕЧАНЕ
- MoXHo BkJIIOUHTb IIN OTKJIIOUHTb IBOHoe OKHO B MeHIO "HaCTpoIKN". 1KocHTecb 已 > 二 > BKJaKa O6uMe>Двоиhoe OKHO. 2 CdbnHbTe NOJ3yHOK B NIOJoxHeBKn. nIi BbIKn.Capture+
Функця Capture+ NO3BOJЯET CO3ДaBaTb 3aMeTKN IN CHIMKIN ᝤКpaHa. C nomoubIoo fuyHKcunn Capture+ moXHo IerKo n 6bICTpo CO3daBaTb 3aMeTKN BO BpeM TelefoHHoro pa3roBopa, nCnoIb3yra CoXpaHeHHbIe N3O6paXKeHnI nn CO3daBaar 3aMeTKy npA Mo Ha TeKyuIe MekpAne TelefoHa. 1 KocHTecb cTpOKn COCTOHN I NOTAHNTe ee BHN3, a 3aTeM KOCHNTecb.  2 Co3daIte 3aMeTky c nOMOu bIO cNeDyUoX yHKn:| ← | Коснітесь, чTOбы OTмeнiTь самое постеднием DeйстVEN. |
| → | Коснітесь, чTOбы ВыПОЛHNTь ПОВТOP постеднием удаленHo ДeйстVEN. |
| T | Коснітесь, чTOбы BCTaВИТьTekSTВЗмETКУ. |
| Коснітесь, чTOбы ВыБРаТь ТИПи CTИлуСA. | |
| Коснітесь, чTOбы ВOCПОЛБ3OBaTBСЯ LACTIKOM ДЯУДALEHIN ПOMeTOK, СДЕЛАНБIXВ 3aMeTKe C ПOMOШю CTИлуСA. | |
| Коснітесь, чTOбы образаТь ИЗOBpaЖЕни ЗamETKN. | |
| Коснітесь, чTOбы COхРaHNTь COЗДАнHuTo 3aMeTKN. | |
| Коснітесь, чTOбы SCрВТь ИПОБРa3Ib Панель ИНСТPyМeHTOB. |
ПРИМЕЧАНЕ
- Пи рабOTE с Функциен Capture+ касайтесь зараза на Кончим палцев. He Kaасайтесь НГТEM. 3 KocHTecb, yTo6bI coXpaHnTb TeKyuYo 3aMeTKy B QuickMemo+ nII ranepe.OTMeHHTb Capture+
- KochnTeCbПресмотр coхpaehнов 3ametkn
KochnTeCb > > n BbI6epnte aIb6om Capture+. -ININ- KochnTeCb > > n BB6epnte Heo6xOdmyIO 3aMeTKy.Hac tropona yueTHoJ 3aIncn Google
Припэрбом зауcke приложеня Google на телефоне потpe6уетсь ВырнHTь BXODВ aKKayHT злжТрони потугGoogle.При отсутCTBи aKKayNTa Google вam 6удET п徳ложенho ero co3daTb.Cозданце akKaynta Google
1 KocHTecb 公 > 公 > BkJaKa O6uue> AkKayHtbi n cnHXPOHN3aun. 2 Haxmte IOsABNTb AKKAYHT > Google > Ии создайт e HOьi aKKayHT. 3 BBeIte nMa n foamnIIO, a 3aTeM KOCHNTecb DAJIEE. 4 BBeIte IIMr POJIb3OBaTeJI r KOCHInTecb DAJIEE. TeJefoH CBJKeTcC cepBepamn Google n npOBepuT DOCTyINHOCTb IMeHN POJIb3OBaTeJIr. 5 BBeIte napoIb n KocHnTeCb DAJIeE. 6 Cneyu HnctpyKzma, BBeIte Tpe6yeMyIO DOONHHTbHyIO INΦOpMaunIO 6 aKKayHTe. Doxntecb OKOHuaHncaO3daHnA aKKayHTa Ha cepBepe.Вхов в akaynt Google
1 KocHTecb > > BkJaKa 06uNe > AkKayHtbi n cnHXPOHn3aun. 2 KocHTecb IOsABNTb AKKAYHT > Google. 3 BBeDInTe cBoi aIpec 3JIeKTPoHHOINoUtbl IN KOCHInTeCb DAJIEE. 4 BbIopHnB BXoJ, Bbl MoXeTe POnb3OBaTbcra NoOtBOu CnyK6oJ Gm ail, a TAKKe dpyrIMn cepBVCamn Google Ha cBoem TeNeΦOHe. 5 После настюкн akKaynta Google вш телфон удет aptOMatчeckn BblIOJIHЯТь синхрониЗацию сakKayHTom GoogleВ сети ИntepHET (при Налчinn coeINHeHЯ Дя пeredaun daHHbIX). Посл e BXODa B CnCTeMy 6ydeT BbINOJIHЯТьСЯнХpoHn3aця TeIeФОHa C nCNoJb3yEmbIMn cepBnCamsn Google, taKIMn kaK Gm ail, KoHTaKTbI N KaIeHdapb Google. TakaKe Bbl cMOxTe nCNoJb3OBAtB KapTbI, 3aRpyXaTb npInIoJxehnI n3 Play Store, BblnoJIHЯTb pe3epBHOe KOnIpOBaHne HaCTpoE K ha cepBepbI Google, a TakaKe nCNoJb3OBAtB dpyrIe cepBnCbI Google Ha cBOeM TeIeΦOHe.BHIMAHNE
- Большинство пиложени, takix kaK KaIeHdapb, pa6oTaIOT TOnbKO CперВыIM n3do6abJIeHHbIX aKKayHTOB Google. EcIn Ha Telefohe pIaHnpyeTcR NcNoJIb3OBaTbHeCKOJIbKO aKKayHTOB Google, chauana cIeDyET BblONHITb BXOD B aKKayHT, KOTOpBiy 6yIeT nCNoJIb3OBaTbCS C 3TIMN npiNoJKeHnAMy. Пprn BxOJe BblOJIHЯETcCINHXPOHn3aZuRA C TelefoHOM INΦOpMauzn O KOtAKTax, COo6UeHn 3JIeKTPoHHOIouTbGmail, co6bTIk KaIeHdAp r Ipyrnx CeTeBbIX daHHbIX 3TINx npiNoJKeHnIcLyX6. EcIn B npocece yCTaHOBKn BxOD B aKKayHT Google He BblOJIHЯETc, PoiIb3OBaTeIIIO 6yIeT npeINoJKeHo BOITN B cIcTeMny nIIN Co3DaTb aKKayHT Google npri npEBOM 3aYuske npiNoJKeHnR, KOTOpoe npedymatpmbaet 3Tu npoZeDpy (HaNPImep, npri 3aYuske Gmail nnn Play Store). - Пи Испосьовни КорпоратиВого akKayNTа,пpeДОCTаВлЕного Вашей Компанец и по oprаниЗац neuropу y NT-дeртамеHTa наИчne спeцальны Инструкци的新 ВхODу BЭТО AkKayHT.Поклоченье К сетам и устpoйства m
Wi-Fi
BbICOKOCKOPoCTHOJIOCTyN K cETn INHTepHET o6ecneuNbaeTcR B 3OHe 6ocnyKmbaHna 6ecnpoBOdHOJ TOUKOJ IOCTyna (AP).Повлоченк сетм Wi-Fi
1KocnITecb 口 >口 > BkJaKa Cetu>Wi-Fi. 2 KocHTecb , yTO6bI BKJIIOuHTb Wi-Fi n Haayatb NOcK DOCTyINHbIX CeTei Wi-Fi. 3KoCHNTecb cETn,HTO6bl NOkJIIOuHTbcra KHei. - Ecni cetb YBnaTeC8 3aunueHHoN (OTOBpaXaETc8 3NaOOK B BVNe 3aMKa), Heo6xOIMMO BBecTn KJIou 6e3OpacHOCTn IIN napOlb. 4 Ctrpoka coctoHn oTo6paXaET 3HauchK, KOtOpbIe yKa3bIbaIOT Ha cTaTyc noDKJIoueHn Wi-Fi.ПРИМЕЧАНЕ
- Пи Нхождени BHe 30ны 06слжИВаня сети Wi-Fi nII nOTKЛюЧEN nCBa3n Wi-Fi yCtpoIcTBO можET aBtOMaTnueCKn NOДКЛIOUaTbCS K cETn INTePHer C nCNoJIb3OBaHnem yCnyr MOБиьНОпpeDAuN daHbIX, 3a NOЛьЗOBaHne KOTOpbIMN можET B3IMaTbCS dOПОЛHNTeMbHaЯ пlaTa.COBET KaK noJyUHTb MAC-aDpec
KocHTecb 品 > 1> BknaKa Cetu>Wi-Fi> I>ДононтьHo> MAC-aDpec.Bluetooth
Bluetooth — ЭTO ТЕХОЛОГИСВЯЗИ НА HeбOLьшИX paCCTOЯнЯx, obecneuBaIOUSSaR BO3MOЖHOCtB 6ecnpoBOdHOrO NOДКЛЮЧЕНЯ K prAу Bluetooth-устpoIcTB,ТakIM KaK rapHITypbl N aBTOMOБиMbHbIe CnCTeMbl rPOMKO CBЯЗИ, a TaKJKe I NOPTaTINHBHbIe ySTpoIcTBA, KOMNbIOTepbl, pInHTepbl n 6ecnpoBOdHbIe ySTpoIcTbA c NOДepeJxKoI Bluetooth.ПРИМЕЧАНЕ
LG He HeceT OTBeTCTBHeHOctn 3a NoTePio, NepexBaT nnn 3noynotpe6JeHne DaHHbIMN,OTnpaBHeHbIMN nnn NOJUyeHHbIM C nCnOJIb3OBaHnEm fYHKcIN CBr3N Bluetooth. Bcerda yIOCTOBepaITeCB TOM, YTO O6MeH DaHHbIMN IPONCXODNT CHaJeKhbIMN 6e3OpaCHbIMN yCTpOINCTBaMn. - Пи наличим пpenятCTВи мжду устpoй CTbAMn, pa6очая дальноctь может 6ыт b орани ueHa. - HeKOTOpBie yCTpOiCTBa, oCObEHNO Te, KOToPbIe He npOBpeHb IIN He ODo6peHb CneuaJIbHOr rpynnoi No texHoJOrnbluEoth, mOryT 6bITb HecOBMeCTnMbIC DaHHbIM yCTpOiCTBOM.CoprajkeHne TelefoHa c dpyrUm yctpoiCTBOM c noDepkKoI Bluetooth
1 Kocnntecb > > > BKnaKa Cetn>Bluetooth. 2 KocHTecb , uTo6bl BKJIIOuHTb Bluetooth n 3aIyCTNTb NOnCK DoCTyINHbIX yCTpoiCTB Bluetooth. - Ecni Bbl TaKxe XOTnTe O6HApXnTb DoCTyHnBle yCTpoiCTBa B npedeJax 3OHbl DeiCTBnA, KOCHTecb NOnCK. 3 I3 cIncKa BbI6epnte yCTpoIcTBo dIra coPjXeHna. KOrda coPjXeHne 6ydt YcpeuHO BblONHeHO, TelefoH nOdknUHTcK dpyromy yCTpoIcTBy.ПРИМЕЧАНЕ
- COnpЯЖeHne MeJdy DBym yCTpoiCTBaMn Bluetooth DoCTaTOUHO BbIOnHHTb OdnH pa3. ПocNe COnpЯЖeHn yCTpoiCTBa 6ydyT paCNo3HaBaTb dpyr dpyra n OcyuYeCTBJIaTb 6mEn INΦOpMaцnei. COBETИнформацию O ржиме сороженя и napоile (обьчно 0 0 0 0 — Чеберу hyл) сM. В дOKум entaци, кOTOPАnpILAeraTс К устpoиCTby Bluetooth.Ipeetaa daHbIX c nCnoB3OBAHnem Bluetooth
1 BbI6epnte fai nn nnn 3JeMeHr, HapnmeR KoHTaKT nn MeNafoaJn. 2 BbIbePte npaMeTp Ira OTnpaBKn daHbIX no Bluetooth. 3 BbINOJIHnTe NOnCK n COnpJxKeHne C yCTPOIcTBOM, POndApKINBaIOUIM Bluetooth.ПРИМЕЧАНЕ
B CB83n C pa3nnuMn B xapaKTePncTnKax n 0yHKcNoHaJIbHbIX BO3MOxHOCTaX npYnx yCTPOINCTB, COBMeCTnMbIX C TexHoIOnrnei Bluetooth, oTo6paKaemble daHHbIe N Opeaun MOryT OTnUaTBcA, a TaKne 0yHKcUn, KaK nepeDaayu nn O6MeH daHHbIMn Ha 6a3e TexHoIOnrnn Bluetooth, mOryT noDdepKInBaTbcR He dJa BCEx COBMeCTnMbIX yCTPOINCTB.Пolyчесних сиюьовимBluetooth
1 KocHTecb > > BkJaKa Cetn>Bluetooth. 2 Kocnntecb 1DЯ BkIIOueHnra Bluetooth. 3 Bbl noIyUHTb.Wi-Fi Direct
Wi-Fi Direct obecneuBaet npaMoe noKluHcHne MeKdU yCTpoiCTBaMn C noDpeKko Wi-Fi 6e3 TouKn Doctyna.Вкlioочень Wi-Fi Direct
1Kocnntecb 口 >口 > BkJaKa Cetu>Wi-Fi. 2KochnTeCb > DononHntbHo > Wi-Fi Direct.ПРИМЕЧАНЕ
-При OTКрытпдадного MeHIO BaIe yCTpoIcTBO CTaHOBNTcR BnIMbIM ДЯpyrnxВИДIMbIX yCTpoIcTB C NOdEprKkoi Wi-Fi Direct, paCNoJoxKeHHbIX nO6JIu3OCTn.Перета даньх мжд PMи устpo�тбом
Moxho konipobatb nI npemeeaTb daHhble mejdy PK u yctpoiCTBOM.Ipepaa daHHbIX
1 Порклоче устrodu К пк с пою кабеля USB, пилагамо К телфону. 2 OtkpoIte naneB yBeDOMnEHN, KOCHNTecb Tnna TeKyuTeRo NODKIIoueHn IN Bbl6epnte MednayctpoiCtBO (MTP). 3 Ha ekpahe PK noBntc BcIbIbAIOoee OKHO, KOTOpoe N03BOJAre nepedabatb Heo6xOIMbIe daHHbIe.ПРМЕЧАНЕ
- Дnia обнаружения телефona Heобхдимо установпь на ПК драивер полатформь LG Android. - Поверыт tradeobahma К сплььоганю МадаустpoистBO (MTP). Зементы Тpe6obань| OC | Microsoft Windows XP с пaketom обновения SP3, Vista无不 Вьиce |
| Версан Windows Media Player | Windows Media Player 10无不 Вьиce |
Bbl30Bbl
Выковские ВсI3OBA
1KochnTeCb 已 ,T06bl OTkpbl TaHelen Ha6opa Homepa. 2 BBeIte Homep c nOmoIbIO paHelen Ha6opa. UTo6bI ydaJIITb cNΦpy, KOCHTecb X 3 Nocne BBOda HxHoro Homepa KOCHNTecb 4nra COBepueHnBbl3OBA. 4 yTo6bl 3aBepWntb Bbl3OB, KOCHNTecb COBET UTo6bI BBecTN "+" ДЯ COBepseHЯ МждуHapOДнbIX Bbl3OBOB, HaxMnTe N ydepxkBaIte 0+Bbl3OB KOHTAKTOB
1KochnTecb 已 ,OT6blOTKpbITb KOHTaKTbl. 2 PpOKpyTtE Cnncok KOHTaKToB. MoXHo TaKxpe BBeCTn NmKoHTaKTa B NOIe NONcKa IIN PpOKpyTtB Cnncok 6yKB aIΦaBNTa B npaBOJ qACTn 3KpaHa. 3 B OTO6paKaIooemcra CnNcKe KOCHNTecb IMeH N KOHTaKTA, KOTOPomy Heo6xOdIMo COBepuNTb Bbl3OB.OTBETИПОТКLOHнe Bbl3OBA
- PeretaHTe 3NaOK B IIO6OM HApBaHEnn, YTO6bI OTBETNb Ha BXODaN Bbl3OB. - ПереташитешачokВлюбомнанравлени,чTOбI OTKLOHHTb BXODЯш N Bbl3OB.ПРИМЕЧАНЕ
Kochntecb onuOn OTKNoHnTb coo6eHne mnn npOBeIte no He n palbcem, cInxOTnTe OTnpaBnTb coo6eHne Bbl3bBaIOUeMy a6OHeHTy.BbIOnHeHne BTOPOR0 BbI3OBA
1 Bo Время пового ВьИЗОВа КОСнITecь >До6aВNTb ВьI3OBи наберпerte Homep. 2KoCHNTecb ,yTO6bl COBepWHTb Bbl3OB. 3 06a BbI3OBA 6ydyT OTO6paXeHbI Ha 3KpaHe Bbl3OBA. BydET aKTINBnPOBaHa 6IOKIpOBKa I ydePkaHne IcxOJaIeRo Bbl3OBA. 4 KocHTecb OTo6paXaemoro Homepa IJIpeKJIIOueHnMaMeJy Bbl3OBamN. IIN KOCHTecb, YTO6bl BblONHtB KOHΦepeHu-Bbl3OB. 5 4To6bl 3aBepwnTb BCE Bbl3OBbl, KOCHNTecbПРИМЕЧАНЕ
Kaxdbi COBepHbB Bb3OB TaPnOu npyeTc.ПресмOTь КурнAOВ Вbl3OB0B
1KoCHNTecb > BknaJaKaBbl30Bbl. 2ПрсмOTPte cncOK BCex Ha6paHHbIX,прнЯТbIX I npOpyuZeHHbIX Bbl30BOB.COBET
KochnTeCb OTcTa OJIIObOM I3 3BOHKOB, YTObI yBnJeTb DaTy, Bpemr IN pOdoJXHTeNbHOCTb pa3ROBopa. Kochntecb > ydaNTb BCE, yTO6bl ydaNTb BCE 3aINcN O Bbl3OBax.HactpoIKN Bbl3OBOB
Bb mojkeTe hactpontb TaKne npaMeTpbl, KaK nepeaDpecauny Bbl3OBA n DpyrIe cpeuaJIbHbIe yHKuIN, PpeJaRaemble NOCTaBUnKOM ycJyR CBy3N. 1KochnTeCbO>TO6blOTKpbITb NaHeIb Ha6opa Homepa. 2KochnTeCb > HactpoN Bbl3OBB n HaCTpoNTe HyxHbIe npaMeTpbl.KoHTaKTbI
Mожно добавлгь KOHTаКты Ha Teleфони синхронировать IX C KOHTaKTamn yueTHoN 3aПиСn Google nIpyrIMn yueThbIMn 3aПИСЯМN, KOTOpbie NOДдeрЖИBAHOT cIHxpoHn3aUH O KOHTaKTOB.ПОИСК KOHTAKТА
1KochnTecb 已 ,yTo6blOTKpbITb KOHTaKTbl. 2 KocHTecb ONCK KOHTaKTOB IN BBeINTe NmRA KOHTaKTA C NOMOuI KlaBnATypbl.Добavenhoe HOBOrO KOHTaKta
1 KocHTecb 品 BBeINTe HOMep HOBOrO KOHTaKaTa. 2KoCHNTecb > 06aBNTb B KOHTaKTbl>HObbiKOHTaKT. 3 306bI IO6aBnTb N3O6paXeHne K HOBOMy KOHTaKTy, KOCHTecb 3HaUKa N3O6paXeHn. BbI6epnte ChrTb foto nnn BbI6paTb n3 raIepen. 4 BBeIte Heo6xOaMyIO INHΦOpMauIIO JIA KOHTaKTA. 5KoCHNTecb COXPAHNTb.ИЗбразные конты!
Mожно КлассифицироваТь часто Вbl3ыBaembie KOHTaKTbI KaK n36paHHbIe.ДобavenецkoHTaKaTаВи36paHHbIe
1KochnTecb 已 ,yTO6blOTKpbITb KOHTaKTbl. 2Kochntecb KOHTaKaTa, yTo6bl npocmotpeTb noDpo6HocTn. 3 KocHTecb 3Be3dOuKn CnpaBa B BepxHeJ yactn 3KpaHa. 3Be3dOuKa CTaHOBNTcR JKeIToi.YdaneHne KOHTaKta n3 cPiNcKa n36paHHbIX
1KoCHNTecb > > BKlaJaKa V36paHHbIe. 2 BbI6epnte KOHTaKT, yTO6bl npocmOTpeTB noDpo6HocTn. 3 KocHTecb JKeIToB 3Be3DoUKN CnpaBA B BepXHeN qactn EKpaHa. LBeT 3Be3DoUKN N3MeHReTCr Ha cepbIn, KOHTaKT ydaJIaReTCr N3 CnNCKa N36paHHbIX.Cозданце ру Pennbl
1KochnTeCb 已 > 1>BKnaKa rpynnbl. 2 KocHTecb > HOBa rpynnna. 3 BBeDnTe Ha3BaHne HOBoi rpynnbl. IJIa CO3daHHOI rpynnbl MOxHo yCTaHOBnTb CO6CTBeHHyIO MeIoDNIO 3BOHka. 4 KocHTecb Do6aBnTb yuaCTHmKOB, TTO6bl Do6aBnTb KOHTaKTbI B rpynny, n 3aTeM KoCHNTecb DO6ABnTb. 5KochnTeCb COXPAHNTb, yTo6bl coxpaHnTb rpynny.ПРИМЕЧАНЕ
-При удалени Гупblи нахаяшесь в ней контын He 6удтnotерны.Они OCTантусь CBПСКе Baших KOHTAKTOB.SMS/MMS
Функци NMMS MMS B Telefohe DoCTyHbI B ODHOM NHTyNTBHO NOHAROM n ydo6Hom MeHIO.Otnpabka coo6eHn
1 KocHTecb > . 2 B noIe Komy BBeIte nMRA KOHTaTa. Pn BBeHn NMeHn a6OHeHTa NOBJIOTc COOTBeTCTByIOUne KOHTaKTbI. MoXHO Bbl6paTb IpeIIOxEHHoro NOyuaTeIa, a TAKKe Do6aBtB HeCKoJbKnx NOyuaTeIeN.ПРИМЕЧАНЕ
3a KaJdoe OTnpabIemoe TeKCTOBoe COO6eHne MoKeT B3nMaTbCra Pnata.ДЯ ПolyuHnIHΦOpMaUu O6paTITecb K BaShemy NOCTaBUnKy ycnyr. 3KochnTeCb TeKCTOBOro nOJa N BBeDnTe coo6uHne. 4 KocHTecb ,uTo6bl OTKpbITb MeHIO napaMeTpOB. Bbi6epnte oINn 3 IMeUxxCaBapnaHTOB. COBETKoCHNTecb,HTO6bI BNOXHTB B COO6eHne aJl. 5Kochntecb OTo np.,yTo6bl OTnpaBnTb COo6uHne.COBET
OrpaHnueHne B 160 cIMBOJOB 3aBNCIT OT CTpaHbI, aJIropNTMa KOJINPOBaHnIЯ3bIka. - Пи добавли вTekстове сообшени n3образеня, Вдeo- nii anydnoфайа оно 6удет abTomatческп пeoобразованВ мультимедиhoe coobшени, за пераду кOTOPОВ B3IMaETСС COOTBETCTBYUSSЯ плata.ПРИМЕЧАНЕ
- Ecni Bbl noIyUHTe TekCTOBoe COo6uHne BO BpeMa pa3ROBopa, npO3ByuHT yBeIDOMJIeHne.Пресмот рдпалORA
Co06uHn, KOTOpbIMN Bbl O6MeHNBaTeCb C dpyrIMN NOlb3OBaTeJIAMN, oTo6paJauTcB XpOHOJOrnueckOM nopAKe IJyDObCTBa NOnCKa IN npocMOTpa nepenncn.I3meHHe HacTpoE Koo6eHn
HaCtroPkN coo6eHn Ha TelefoHe npedBapntbHo yCTaHOBJeHbI, YTO6bl Bbl MoTl n Cpa3y OTnpaBnTb COo6eHn. Ix MOxHO n3MeHnTb B COOTBeTCTBnN C CO6CTBeHHbIMn PpeDnOuTeHnA Mn. KochnTeCb 口 > 1>HaCtpoyn.эл. почта
Для pa6obtblcэл ektpoHnoINoUToN (KpOme aIpecoB, 3apeHCTprnpoBaHHbIX HaGmail)ИспоьЗуИTe npiloxKeHne 3I. noUta.IprniloxKeHne 3I. noUta IpoIdepJxNBaET cIeDyUOuIe TInbI aKKayHTOB:POP3,IMAPи Microsoft Exchange (Для корpopatINBbIX nOlb3OBAteJe).YnpabJIeHne aKKayHTaMn 3JeKtpoHHoN noyTbI
OTKpbTne npuJoxeHnna 3I. noTuTa
Припелов Заунске пиложеня эл. поту OTКpoetсmaCTep HaCTpoeK, KOTOpbI NOMOKeT co3daTb aKKayHT эЛeKTPoHHO NOuTbl. KochnTecb   ДобавлиейдополнельноаKKayNTаэлктpoHHо NOчыI: KoCHnTeCb > > > > > HacTpoiKn> I3meHeHne 6uxn HacTpoek 3eKTPoHHoN noyTbI: KoCHnTeCb > > > > > Hactpoyn>06uneHaCTpoyn. YdaneHne aKKayHTa 3JeKtpoHHoN NOuTbI: KochnTeCb 0 >0 >0 >0 >0 >0 >0 >0 >0 >0 >0 Hactpoikn> 0 > YdaNTb aKKayHT> BBi6epnte aKKayHT dIyndaJIeHna> YDAJIuTb> DA.Pa60Ta c nankamn aKKayHTOB
KoCHnTeCb > > > > > > > > > > > > > > > > > > > > > > > > > > Noka3aTb BCE nankn. Для кадуоаKKayHTa npeducmoTpeHbI cleyuOuIe napKn: BxoduaIe, IcxoduaIe, OtnpaBHeNo u YepHObIKn. B 3abncmocTn OT yHKcuN, NOdepKNaBaembIX NOCTaBUnkOM ycnyr, Ha 3KpaHe MOryT npncytCTBOBaTb dpyrne napan.Cоздане и OTправka cooшени щл ekтроннов почы
1KoCHNTecb 已 > 已 ,O6bI03daTbHOBOecoo6ueHne 3JIeKTPoHHoN NOyTbl. 2 BveiTe aIpe c noyuatae coo6eHn. Mo Mepe BBOda TeKCTa 6ydyT npedlaTbCnOxOJaUne aIpeca n3 cnNcKa KOHTaKTOB. Pprn BBOde HeckoJIbKnx aIpecoB INX CneDyeT pa3JeJrToYkAmn C 3aIpyToi. 3 KocHTecb noJy Konn/Ckpblte konnn, yTO6bl OTnpaBNTb KOJIIO nIN cKpbItyIO KOJIIO npYrIM KOHTaKTam IJIi Ha dpyrne aDpeca 3JeKTPoHHOJ NOuTbl. 4Kochntecb TeKCTOBORO NOJN BBeINTe TeKCT COO6eHnA. 5KoCHNTecb ,uTO6blBLOXHTB B COO6eHne faJl. 6KochnTeCb ,yTO6bl OTnpaBNTb COO6ueHne.Kamepa n Bndeo
Параметры камерны на Ви DOИСКаТе Л
BbIMoXeTe nCNoIb3OBaTb KaMepy IIN BnDeOKaMepy, yTO6bl CHImMaTb IIN nepeCbIaTb fOTOrpaΦnN IN BnDeo. Kochntecb  Ckpbl/Oto6pa3ntb napameTpbl - KOCHNTecb, yTO6bl CKpbITb/ OTO6pa3ntb napameTpbl KaMepbl B BnDOnCKaTeJe. 2 BcnbIwka — nO3B0JAreT ynpaBnTb BCnbIshKoJ KaMepbI. 3 NepeeknouHTb KaMepy - KOCHTecb, yTO6bl nepeKnouHTbcra MeJdy 06beKTnBaMn 3aHHeN i oPoHTaJIbHOu KaMep. 4 PexnM CbeMKn — nO3BOJAreT Bbl6paTb peXIM CbeMKn dIa CHIMKa. 5 Hactpoikn — KOCHTecb 3TOrO 3HaUKa, yTO6bl OTKpbITb MeHIO HaCTpoek KaMepbl. 6 Tanepe — KocHTecb, yTo6bl npOCMOTpeTb NocIeHNIO CdeNaHHyIO φOTOrpaΦHIO nII INoCleJHee 3aINcaHHoe BnDeO. 3aIncb - KOCHTecb, yTO6bl HaaytB 3aIncb. 8 CbeMa - KocHTecb, yTo6bl cdeNaTb CHMOK. Khonka Ha3a- KocHTecb, yTo6bl BbIiTN i3 npINOxKeHnKaMepbl.ПРИМЕЧАНЕ
- Пара сьемков пораза Te 3auntHoe nokpbTne obbeKTHBa TkaHbIO n3 MmKPOBOLOKHa. OTpeatkn paIbueB Ha nokpbTnMOryT CHN3NTb YeTKOCTb n3o6paJxHn I npVBecn K NOBHeHIO əΦΦeKTA opeOna.PacunpeHHbIe hAcTpoiKn
B OkHe BnDOnsKaTeIa KAmepbl KocHntEcB 1Iy DoCTypa K DOnoJIHnTeIbHbIM npaMeTpam. KocHntEcB CneDuOuX 3HaUKOB, UTO6bl N3MeHNTb COOTBeTCTByUOuNe HAcTPOJKN KaMepbl.| 163 | Выбор Формата ИЗображени в Видао. |
| Управлиефотocьемков с помошью Голocobвix komанд.Есл эТOT реким akтувирован, посту скожITE "Чим", "Смал", "LG" и Т.Д., чTOбы сделаар CHIMOK. | |
| Насто只得 таймера камеры.ИспOLTьчite зау phункцию,ся хOTITE сами OKаЗалься в Кадр на phOTORpaфим ил в Видао. | |
| Отоображени сетки, облегчалошей Вьравнваиме Кадра и пОЗВOLЯЮшей NOВICITь качесТВО ChIMaembIX phOTORpaфим и ЗАПисьВаимы Видао. | |
| Насто只得 птудя coхсанни ИЗображени в Видао. ВыберITE ИЗ IN (ВнUTреняпamять) и SD (kapta пamятNi).Это меню паяВITСАТьКВОК рпн Налочи КAPТы SD. | |
| Справочая ИФорmaция о рабerte phункции.Данныз haayok пОЗВOLЯET OTKрыть рухOBODSTВО пользOBaTeЯ. |
ΦOTOCbemKa
1 KocHTecb   2 Pa3mecntte o6beKT Ha 3KpaHe. 3 Kbaipat BOKpyr 6bekTa yka3bIbaeT Ha To, YTO KaMepa BblOnHnla OKycnpOBky. 4 KocHTecb o, uTo6bl cIeJIaTb CHIMOK. OOTOrpaΦnA aBTOMaTnueCKn coXpaHNTcB ranepee.Korda chIMOK cdehaN
Kochntecb MHHaTOpbl n3o6paXeHnHa eKpaHe, yTO6bl npocMOTpeTb nocJeHn CdeJaHHbI CHMOK.| Коснітесь, чтобы рedingадашироваты Фотографию. | |
| Коснітесь, чтобы сразу ще пroduожиные съемки. | |
| Коснітесь, чтобы оdkрьть доступные пaramетры обмени. | |
| Коснітесь, чтобы удалить Фотографию. | |
| Коснітесь, чтобы пolyчимь достул К дожипеловим Функциям. | |
| Коснітесь дляdoesавлиения Фотографи в Избразноhoe. |
Pexim nahopamhoCbeMKn
I03B0JareT cdeIaTb naHOpamHbI CHIMOK. 1KoCHnTeCbO> 2KochnTeCb Pekim> 3KochnTeCbДЯ NaUaJa NaHOpamHoJ CbeMKn. 4 Medlenho nepemeaTeBaWe yCTpoiCTBO B ODNOM HappaBHeHn. 5 Y6eIntecb, yTO BO BpeMcBemKn O6naCTb fOKycnPOBKn COBnpaAet C cnHm yKa3aTeJIeM. 6KoCHnTeCb,HTO6bl 3aKOHHTb NaHOpamHyIO cbeMKy.3aanncb Bndeo
1KoCHNTecb > 2 Pa3mecntte o6beKT Ha 3KpaHe. 3KochnTeCbO,HTo6bHaayatb 3aPiNcB BnDeo. 4Длnteьнocьзаисn OTO6paKaetcBВврхнчactnэКpaHa.ПРИМЕЧАНЕ
KoCHNTecbTO6bI cdeLaTb CHMOK BO BpeM 3aPiNCn BnDeO. 5 KocHTecb HTO6bl npnoctaHOBNTb 3aNNcB BnDeo. YTO6bl BO3O6HOBNTb 3aNNcB,CHOBa KOCHTecb -IIN- KocHTecb ,yTO6bl OKOHHTb 3aNNcB.BnDeo aBTOMaTnueckn coxpaHNTcB BGammapee.Iocne 3aanns Bndeoknnna
Kochintecb MInHaTIOBb BnDeO Ha 3KpaHe, YTO6bI pOcMOTpeTb NocJeHHee 3aPncAHHOe BnDeo.| KochnITecb, чTO6bI Немедлесно начать 3aПИСь сеДуюцero ВидeOKллпа. | |
| KochnITecb, чTO6bI OTКрыТ ДОCTУПные пapамETрь обшero ДОCTУпа (hашимер, SMS/MMS улblu Bluetooth), чTO6bI поЕЛтся. | |
| KochnITecb, чTO6bI удалпь Видeо. | |
| KochnITecb, чTO6bI NOЛЧИТ ДОCTУП К ДОПОЛНITEЛьнБIM ФУHKЦЯМ. | |
| Ножmite дlya do6авлиения ВидeОВ "ИЗбразнице". |
Tanepe
IprnojkeHne Ianepe Na3BOJAE T NOJyHTb DOCTyn K n3o6paKeHnM n BnDeO, COxpaHeHHbIM Ha yCTpoiCTBe, B TOM YnCLe K Tem n3 HnX, KOToPbIe 6bln CdeHaBc NOMOuI npNoJKeHnKaMePa n 3aRpyKeHbI n3 ceTn INHTepHET nn dpyrnx nCTOCHNKOB. 1 KocHTecb 已 > ,yTO6bl npOCMOptb n3O6paKeHnra, coXpaHeHHble Ha yCTpOJCTBe. 2 KocHTecb aIb6oma, yTO6bl OTKpbITb erO n npocMOTpeTb coJeKHaHne. (I3o6paXeHnY n BnDeO B aIb6ome OTO6paXaIOrTcB XpOHOnOrnueckOM nopAKe.) 3Kochntecb n3o6paXeHnB aIb6ome, yTO6bl npocmOTpeTb erO.ПРИМЕЧАНЕ
B 3aBnCmOCTN OT yCTaHOBJIeHHORO npoRpaMMHOrO oBeCneueHn HeKOTOpbIe fOpMaTbI faiIOB MOrY T He NODepKINBaTbCra. HeKOTOpbIe aINbIMoYT BOCpON3BOIDITbcr HeNpaBnIbHO B 3aBNCUMOCTN OT cNoCOba ux KOINPOBKn.Прсмот ризобрахенni
B ΓaIepee n3o6paJxHn oTo6paKaIoTcB nAnKax. Ppr coXpaHeHn n3o6paJxHn c nOmoU bpyrO npInOxJHn, HapPImep 3I. NoTu, 3TO n3o6paJxHne nOmeuaeTcB aBTOMaTnueckn CO3dAbAeMyIO nAnKy 3aRpy3OK. TaKIM Jx o6pa30M, pPr CO3daHn CHmKa 3KpaHa aBTOMaTnueckn CO3daeTcN nnPKa "ChmKn 3KpaHa". I3o6paXeHnA copTnpUOTc no date nx co3daHnA. BbI6epnte n3o6paXeHne IJ npocMToPa BO BeCb 3KpaH. PpokpyuBaIte 3KpaH BJIeBO IIIN BnPaBO IJ npocMToPa cJeDyUoIero IJN ppeBdUoIero n3o6paXeHnA.Macstta6npoBaHne
Icnoj3yTe oINn n3 cIeDyUoX CNOC6OB npN6JIxKeHn 1306paXKeHn: -Двжды кochntecb Влобом MeCTe Дя пиблжehня. Pa3BeIte IBa IaIbIa B CToPOHbI B IIO6OM MeCTe Ha I3O6paJxHeHn IyBEnuyeHn. CBeIte IaIbIcI BMeCTe IIN IBaXDbI KOCHTecb I3O6paJxHeHn, UTO6bl yMeHbIITb MacSTa6.Паразы Вд�о
1KochnTeCb   2 BbI6epnte HxKhBn BnDeofoaJn. | 1 | II / Ⅱ | Коснітесь, чтобы приностановпь/ВОЗОБНовпь ВOCПОНЗВЕДЕNHUE ВИДEO. |
| 2 | Коснітесь и уdeckи вайtenдя перемOTКИ Впера с 3-секундьим ускореньем. Коснітесь дя перexODа на 10 ceкунд впера. | |
| 3 | Коснітесь и уdeckи вайtenдя перемOTКИ назад с 3-секундьим ускореньем. Коснітесь дя перexODа на 10 ceкунд назад. | |
| 4 | Коснітесь дя упраВ lienя громКоCTью ВИДeo. | |
| 5 | Коснітесь дя 6лOKирOBКИ/pa3блOKирOBКИ окраHA. | |
| 6 | Коснітесь, чтобы установпь раЗнBLEе ᵋΦΦeKTы. | |
| 7 | Коснітесь, чтобы пolyчNTь ДОCTУП К ДОПОЛНЕЛьнБIM ФунКцЯМ. |
ПРИМЕЧАНЕ
- Пи ВOCпрОИЗВеДeн И ВИдeО поведITE пальсЕМ ВБерх ИИN BHN3 NO правОй чаду ЗКраНа,ЧTOбI HaCTpONTb ГOMKOCTb. - Pn BocnpOn3BedeHn BNdeo npOBeNTe nalbueM BBepx nIN BHN3 NO JeBOy uactn 3KpaHa, yTO6bl HaCTpOHTb JRPKoCTb. - Pn Bocnpon3BedeHn BNdeo npOBeNTe naIbceM CneBa HappaBO (nHaO6OpOT) dny nepemOTKn BpepeNn Ha3a.PepaKtpoBaHne foto
Pn npocmotpe oTO KOCHNTecbYdalenhe foto/Bndeo
Icnojb3yIte OINn n3 cIeDyUoXxCnocob: Bnanke kochntecb , BbI6epnte foto/BnJeO n HaxMNTe ydAInTb. - Pn npocmotpe oTO KOCHNTecbyctahOBka 06oEB
Ipn npocmotpe oTO KOCHNTecb > YcT. n3o6paXeHne KaK dJaYCTaHOBKn n3o6paXeHnB KaueCTBe 06oEB nn Ha3HaueHnKaHTaKTy.ПРИМЕЧАНЕ
B 3aBnCIMOCTN OT yCTaHOBJIeHHORO nporpaMMHoro oBecneueHna HeKOTOpbIe FOPMATbI daiIOB MOrVT He NODePJKBaTbCra. - Pn OTKpbTIN faiIOB MoKet BO3HkaTb OUn6Ka ecn pa3Mep faiJa npeBbIaET pa3MeP DOCTVHON pAMrTI.Mylbtmmedia
My3bika
Telefoh OchaueH My3bikalbHbIM npOnrpbBaTeIeM, KOTOpBn I03BOJareT BOCpON3BOdntb IIO6mMyO My3bIKy.Bocnpon3BeDeneaynofoaJIOB
1KoCHNTecb   2KochnTeCb BkJaKn Necn. 3 BbI6epnte aydnofoaJ. 4 DoctynbI cIeDyIOUne FyHKcINN. | 1 | II | Коснітесь заIGNОCTаHOBКИ BOCПрОИЗВЕДЕНЯ. |
| Коснітесь,ЧТОБы BO3ОБНовITь BOCПрОИЗВЕДЕНЯ. | ||
| 2 | Коснітесь дія пechexODа к следуюшій KOMпоЗиців в áльбомe, спініске BOCпрОЗВеДЕній в Служайhom поядіke. Коснітесь и уdeckжИваіte дія пechemOTки Впец'd. | |
| 3 | Коснітесь дія пechezanypskaTekушій дорожки или пechexODa K празыдушій KOMпоЗиців в áльбомe, спініске BOCпрОЗВеДЕній или в рechиме сlyчайHoro Выбopa. Коснітесь и уdeckжИваіte дія пechemOTки назад. | |
| 4 | Коснітесь дія рechліровкі ГROMKOCTN My3bIKN. | |
| 5 | Коснітесь дія настpoій aydnoэф\'еKTOB. | |
| 6 | Коснітесь dія BOCпрОЗВеДЕнія KOMпоЗицій n3TekушERO пійліnstа в рechиме пochИВOLьНOrO BOCпрОЗВеДЕнія (Звіковые дорожки бudут BOCпрОЗВODINТьСВ CSLчайHom порадKE). | |
| 7 | Коснітесь dія пechліочені м教职工у рechимамі ПОВТОРа, чTOБы пОВТOPЯТь ССЕ KOMпоЗицій,TekушYO KOMпоЗицію или OTКЛЮЧИТь ПОВТОРЕніe. | |
| 8 | Коснітесь dія добавеленія KOMпоЗицій в "ИЗбранhoe". | |
| 9 | Коснітесь,чTOБы OTКрыТьTekушій спіncOK BOCпрОЗВеДЕнія. | |
| 10 | Коснітесь,чTOБы пolyчіпь дОCTУП K ДОПОЛНITEЛьнБIM фунKKцям. |
ПРИМЕЧАНЕ
B 3aBnCIMOCTN OT yCTaHOBJIeHHORO npoRpaMMHOrO oBeCneueHn HeKOTOpbIe fOpMaTbI daiIOB MOrY T He NODepKINBaTbCra. - Пи OTКрытпфайноь может BOЗнкаь ошибka ecn pa3мер Файna певышael pa3мер дocунhoи пamrti. - HeKOTOpbIe KOMNo3nCmN MOrT 6bITb 3aUuIeHbI aBTOpCKMn IpaBaMn B COOTBeCTBn C MeJdYHaPOnDhIM N OLOXKeHnA M N ΦeJepaJIbHbIMN 3aKOHaMn 06 aBTOpCKnx npabax.ДЯ BOCIpOu3BeJeHnN NII KONIPoBaHnMy3bIKN MoJcT NOTpe6OBaTbcra pa3peSeHne NII NlueH3N. B HeKOTOpbIX CTpaHax MeCTHOe 3aKOHOaTeJIbCTBO 3aIpeuaet YacTHOE KOINPOBaHnE MaTePnaJIOB, 3aUuIeHHbIX aBTOpCKM IpaBOM. IpeJx che 3aRpyjXaTb NII KONIPoBaTb aJIbI, O3HaKOMbTEcB C NOLOXeHnAMM MeCTHO rO 3aKOHOaTeJIbCTBa OTHOCHTeJIbHO NCNoJIb3OBaHnRA NOO6HbIX MaTePnaJIOB.Hhctpymehtbi
yacbi
IpnlojKeHne YacbIO bccepeuINBaET BO3MOXHOCTb IcNoJIb3OBaHnra TaKnx yHKcuN, KaK BydInlbHnk, TaMep, MnpoBoe Bpemr n CekyHdoMeP. Ipeennte K 3TmM yHKnM, KaCaeB BKJaOK B BepxHeJ qactN 3KpaHa nn IPOBeI NaIbCeM NO 3KpaHy B TOpIN3OHTaJIbHOM HApPaBJeHIn. KoCHnTeCb  Будуньнк
Ha BklaJaKe "BydInbHnK" MoXHo HaCTpOntb 6yDInbHnK. 1KocHTecb > > TaKa BynnbHnk. 2KoCHNTecb+,yTO6bIdo6aBnTbHOBBi 6yDnJIbHnK. 3 HacrpoTe hyxHbIe npaMeTpbln haxMnte COXPAHHTb.ПРИМЕЧАНЕ
Mozho TaKHe KocHyTbC syIeCTByIOSeIg 6yDnIbHnKa, yTO6bl n3MeHnTb eI.Taimep
Функця Таймер обеспунвает onobeeшени пользоватя сnomоцью 3BykoBOrO cnHaJa NO npOWeCTBn 3aДaHHOrO BpeMeHn. 1 KocHTecb > > TaMep. 2 3aaiTe HxHoe BpemHa TaMepe. 3 BbI6epnte Hauano, yTO6bl 3aynCTNTb TaIMep. 4 BbI6epnte Cton, yTO6bl OCTaHOBNTb TaIMep.Mnpoboe Bpemr
Функця Миробoe Врем РОЗвлаят Лergо праверпь Текуших Врем в другх ratodax мра. 1KocnTeCb > > 1KaMnpoBoe Bpem. 2KochnTeCb 3HaUka n BbI6epnte Tpe6yeMbl rOpOd.CekyHdomep
Bknaika "CekyHdomep" n03BOJrET nCNoIb3OBaTb TeJeΦOH B KaueCTBe cekyHdomepa. 1KochnTeCb 公 > 二>BnaJaKa CekyHdoMeP. 2 KocHTecb Hauano, yTo6bl 3aNyCTnTb ceKyuHIOmep. KoCHITecb Kpyr IJIa 3aIncn BpeMeHn Kpyra. 3KochnTeCb CToI, yTo6bl OCTaHOBNTb cekyHdomep.Kanbkyn-p
Приложене "Калькун-р" поЗволяет Вынонять MaTeMaTnueckne paCteТВС ПOMоцью CTандapTHOrO Или HayHOrO KaIbKуЯTopa. 1 KocHTecb 0 > ⑤ 2Kochntecb ufoPoBbIX KHOJOK IJI BBOJa UoP. 3ДЯВынOLHeHЯпОCTbIX BbIuNCJIeHIM KOCHTecb HxKHOJФyHKUIN (+, - ,X nii÷),после Quero Bby6epuTe =.ПРИМЕЧАНЕ
- 4TO6bI BbINOJIHnTb 6OJee CLOXHbIe BbluNCJIeHnI, KOCHTecb.Kalendapb
Прилобке "Календарь" поЗвоггет OТСLEЖИВаТь распсане пedingсторих собити. 1KoCHNTecbO> 2 BbI6epnte daty,ДЯ KOTOpO Heo6xOdmo Do6aBnTb co6bITne. 3aTeM KOCHNTecbДиктофон
Приложене "Диктофон" 3апсьBaet 3ByKOBbie Файы Дя ИСпОльб3OBaHЯВ раЗИчны целях.3aannscb 3Byka nll roloca
1KoCHNTecb> 2KochnTeCb,HTO6bHaayaTb3aNNcB. 3KoCHnTeCb,yTO6bl 3aBepuNTb 3aINCb. 4KochnTeCb,HTO6bl npocnywaTb 3aInCb.ПРИМЕЧАНЕ
KochnTeCbIyIOCTyna K BaIIM 3aIINcM. Iocne 3TOrO MoJHO npocnyuataB CBOU COxpaHeHHbIe 3aIINcN.Tolocoboi nonck
IcnoJb3yIte daHHoe npINIOxHne dIg noncka Be6-CTpaHnC nOMOuI0 roIoca. 1Kocnntecb > nanka Google> 2 Понинспге Клочьгс Слоби Илфрау, Когда На Экране РяВТСНДПИСБ PaCNo3HaBaHNe.... Вьберпге OДно ИЗ прдюжЕHHbIX Kлочьвix CLOB.ПРИМЕЧАНЕ
- Данhoe пиноженье может ьть недостунов в завсимоctи OT Pernoha Или поставшика услуг.3arpy3kn
IcnoJIb3yIte daHHoe npINOJKeHne dIЯ npocMoTpa foINOB, 3aRpyJKeHHbIX C NOMOuDpyrNX npINOJKeHn. KochnTecb  ПРИМЕЧАНЕ
- Данhoe пиюженье может сыт b HeIoCTuHOB 3aBnCmOCTN OT PernoHa nI IN OCTaBUnKa yCnyr.Радио
Baw Telefoh OchaueH BCTpoehbIM FM-paioopnemHKOM, KOtOpbI N03BOJareT CnyaTb IIO6MbIe paioocTaHcN, rde 6bl Hn HaXoDInncb. KochnTecb   COBET K Telefohy Heo6xOIMO NOKJIouHTb HayuHnKn, KOtOpbIe 6yDyT BblONHrTb yHKcNIO aHTeHHbl.ПРИМЕЧАНЕ
- Данhoe пиюженье может сыт b HeIoCTuHOB 3aBnCmOCTN OT PernoHa nI INOCTaBUnKa yCnyr.Be6-6pay3ep
Интepнет
Интуговуяп STОЗВОЛЯЕТ 6ьICTpo OKУНТБСВ B KpacOчьМИР ИГР, MY3bIKN, HOBOCTe, cnopta, pa3BneueHn, a TaKxe MHOrO DpyrO rnpmo C MO6nIbHOrO TenefoHa.ПРИМЕЧАНЕ
- Пи подключени К сервсам И 3агузke содаржимого начисяетсдполнтьная onлata. узайte O paцehкax y Baшero onepatopa ceTN. KochnTeCb  IcnoJb3OBaHne paHeJI INHCTpyMeHTOB 6pay3epa
Ipeennte K Bepxneuactn Be6-ctpaHnCbl Ira doctyna K naHei nHcTpymentOB 6pay3epa.| ← | KosnItecb, чTOбы Вернту са на зад на однустраницу. |
| → | KosnItecb, чTOбы пеши К следуочи страницe. |
| KosnItecb для пекхODа на главныстраницу. | |
| KosnItecb, чTOбы OTКрьТь HOBOЕ OKHO. | |
| KosnItecb, чTOбы пеши КSBОМ 3aКладКам. |
Посмотр Вe6-старац
KochnTeCb aDpeChoi CTPOKn, BBeiTe Be6-aDpeC n HaxMnte BBOd Ha KlaBnaType.OTKpbITne cTpaHnCbl
Дляперека на Новуюстразицу КОСнТecь. + Дяпегека на дугюстраицу кочтесь, порктугш Вьерх Или Bн3 И Кочтесь сдраицbl, уTOбbl Bbl6paTb ee.Пось в Иntерпес с пою roloca
KochnTeCb aDpeChoi CTPOKN, nocle yero KochnTeCb 3HaUka Ipn3HeCnTe KIOUeBOe CNOBO pRn IIOBJIeHm 3aIpOca n BbIbepuTe OJHO n3 IpeJIOXeHHbIX Ha DnCnJIee KIOUeBBix CIOB.ПРИМЕЧАНЕ
- Данна Функця может 6ыт b HeДОCTупь в 3aВиСИМоCTи OT PerNoHa Илл NOCTaBцИka yCnyr.3aKnaIaKn
Дяdo6ablenya TekyuieB6-CTpaHnUbI B 3aKlaAdKn KocHntecb> ДобавиТь закладу >COXPAHHTb. YTo6bI OTKpbITb CTpaHnUy,IO6aBHeHHyO B 3aKnaDKn, KOCHTecb 3HaUKaN BBi6epnte Tpe6yeMyo 3aKnaDKy.Uctopnia
KochnTeCb BknaJa Ka NcToPn, yTo6bl OTKpbITb CnncOK HeDaBHO nOceueHHbIX Be6-CTpaHnU. yTo6bl OuNCTNTb BCIO NcTOpnIO, KochnTeCb > DA.Chrome
Icnojb3yute Chrome dny noncka nHphiopmaun npocmoTpa Be6-ctpahn. KochnTecb  ПРИМЕЧАНЕ
- Данhoe пиюженье может 6ыт b HeIoCTuynH O B 3aBnCmOcTn OT PernoHa nI INoCTaBuzika yCnyr.Прсмотр Вe6-старац
KochnTeCb aDpeChoi CTpOKn, nocIe yero BBeiTe Be6-aDpec nn Kpntepnn noncka.OTKpbTne cTpaHnUcbl
YTo6bl OTKpbITb HOByIO CTpaHnUy, KOCHNTecb > HOBa BknaJaKa. Для п扼exoda на другю Be6-страниу КОСнТecь, посе уero КОСнТecь hyжностраниы, уTOбы Вblбразы.HacrtpoiKn
Приложене Habстpoикс codepжnt 60ьшую часть Инструментов дя Насстpoики и Изменения паамеров вашег телефona. Бс паамеры приложене Habстpoико опись в данHom раздени.OTKpbTne npuJoxeHna HacTroPkn
KoCHNTecb > KOCHNTecb n ydepxnBaYTe > HacTpoiKn. -IIN- KochnTecbCetn
<БЕСПОВОДнbieCETи>
Hactpoikn SIM
Mожно 3аадаь NaCTpoикпдяnapametpa "Дbe SIM-Кapты". - SIM 1 — NO3BOJЯET MeHЯТь ИМя SIM-KaPTы I NkoHky SIM-KaPTы ДЯ SIM-KaPTы 1. - AktnBnpoBaTb cnot 1 — Bbl6epnte, yTO6bl BKJIIOuHTb ININ OTKJIIOUHTb cnot SIM-KapTb1. - SIM 2 — NO3BOJRAET MeHrTb NmR SIM-KapTbI IN KOHky SIM-KapTbI dRy SIM 2. - AktnBnpoBaTb cnot 2 — Bbl6epnte dIy BKJIIOUeHnI yIIN OTKJIIOUeHnI cnota SIM-KapTbi 2. - LBeToBa Tema SIM-kapTbI — n03BOLrET Bbl6npaTb Tpe6yEmbIe CBeTa. - PexkIM 3KoHOMn — ри добавлин Homepa TelefoHa B TelefoHHyIO KHNry OH TaKxe DoabIaETcB Ha3NaueHHyIO SIM-KapTy. При ВblOBe Bbl6napaETcSIM-KapTa COOTBeTCTByUeTo OnepaTopa. 3TO NO3BOJAreT BOCNoJIb3OBaTbCSпрIMyIeCTBaMn IcNoJIb3OBaHnЯ OdHOrO n TOrO Jx e OpepaTopa. Mo6HbIe daHHbIe — BbI6epnte, yTO6bl NOJyHTb DOCTyn K daHHbIM IO MO6HbHOcTn. SIM-KapTaДЯИСПОЛБ3OBaHЯ—MOЖHOИЗМeHNTb CeTb NepeDAuN DaHHbIX NO yMOJIuaHnIO. Bce cIyJ6bl, NepeDaIooJIe NaKeTbI NO MO6JIbHOJ cETn, (Web, MMS, əI. NoTuA n T.d.) 6yDyT INcPOnb3OBAtB SIM-KapTy, yKa3aHnyU B 3Tom napametpe. Korda BCTaBJIeHa TOnbKO OJHa SIM-KapTa, ceTb NepeDAuN DaHHbIX NO yMOJIuaHnIO npICBaANBaETcR BCTaBJIeHNoi SIMKapTe I N3MeHNTb 3TO HeJIb3ra. - Poуmunг ДаHHbIX — Вьберпг, уTOбы pa3peшNTb yCTaHOBky coeДиненДЯ мбильно пepdauN ДaHHbIX Ha TelefoHe npi HaxOжденB PoуmunHre 3a пpeДeамN DomaшнeI ceTn.Wi-Fi
BkIIOueHne yHKcnn Wi-Fi Ira coeINHeHnC doCTyINbIMn ceTAMn Wi-Fi.Bluetooth
BkIoueHne nII BbIKIOUeHne 6ecnpoBOHO nepedaH daHHbIX Bluetooth. Mo6nJIbHbIe JaHHbIe OTo6paXeHne INΦOpMaun O nepeaue daHHbIX n JIMnTe TpaΦnKa Mo6nIbHbIX DaHHbIX. HaCtpoNKN BbI3OB0B HacrpoKa TaKnx npaMeTPOB 6pa6OTKN TeJefoHHbIX Bbl3OBOB, KaKpeeaDpecaun ydpYnE cneuaNbHbIe yHKUn, PpeJaRaemble onepaTOPOM CB3N.[BklaKa SIM 1/SIM 2]
- TolocobaryoTaN3BOJareT Bbl6paTb Cnyx6y TOnOCOBONoTbI, npednaeraemyIOnepaTopOM CBa3N. Pa3peHHe HOMepa - BKJIoueHne n COCTaBHeHne cNcKa HOMepOB, Ha KOTOpbIe MOxHO COBepHTb Bbl3OB. IOTpe6yeTcB VBeCTn KoI PIN2, KOtOpbIMoXHO y3HaTb y Opeatopa. B pe3yIbTaTe c BaWero TelefoHa MOxHO 6yJeT COBepHaTb Bbl3OBbl TOnbKO Ha HOMepa, BXOJaUe B CnICOK HOMepOB fIKCnPoBaHHoro Ha6opa. - Перадаця Bbl30Ba — Настюка параметров посядрациь Вbl30BOB. 3anpeT Bbl30BOB - 6IOKnpyeTBXODaIne, IcXODaIne nII MekdUnapOndHbIe Bbl3OBbl. - Пюджтьнocь Bbl3OB -прсмOTРДЛNTeьнOCТи Bbl3OBВ, BKIOUa:ПослEDн Bbl3OB,ИСхОДЯше Bbl3OBbl, BXODЯше Bbl3OBbl И BCE Bbl3OBbl. - Довипьные Habстpoи — NO3BOJЯТ ИЗМЕнЯТь Следуюше Habстpoи. OnpepeHne Homepa:HaCTpoKa napaMeTPOB ONEpAToPA NO yMOJIaHIO Ira OTO6paXeHnRA Co6CTBeHHOrO Homepa pRn NcXoJxN X Bbl3OBax. IapannelbHbI Bbl3OB: Ecnn yHKnna napannelbHoro Bbl3Oba aKTHBnPOBaHa, yCTpoiCTBO 6yJeT yBeIDOMnTb O NOCTynaIOxN BO BpeMa pa3ROBopa Bbl3OBax (3aBnCIT OT ONepaTopa ceTn).[Bklaɪka 06uŋne]
- UMHЯ nepeadpecaun — ПОЗВОЛЯТ ппнимаТь BыЗOBы Ha SIM2 BO Время разrogopa черз SIM1 и haобopot. - BcπbIbAIOUeeyBEdOM.ObXODaIeM Bbl3OBe - npn Bbl6ope daHHoJ ΦyHKuIN OTo6paKaTeCra BCπbIbAIOUeeyBEdOMJIeHne O BXODaIeM rOJOCOBOM Bbl3OBe. - OTKIOHeHne Bbl30Ba — NO3BOJRAET HaCTpONTb ΦyHKUIO OTKIOHeHnBbl30Ba. - OTKLOHHTb I OTnpaBnTb COO6eHne — Данная ФункцяпОЗВОЛЯТ 6ыICTpo OTnpaBnTb COO6eHne B CNYuae OTKLOHENY Bbl3OBA. 3Та Функця можET 6ыTb ПОлe3Ha пи OTKLOHENN Bbl3OBA B XODE COBEUHaHЯ. - ABTOOTBeT — yCTaHOBInTe BpeMЯДЯВТOMaTNUeCKOrO OTBeTa Ha BXODAùn Bbl3OB pRi NOdKJIuOeHNoI rApHNType. - Bn6paun npu coeHHeHH - KOrda npyroa6oHENT OTBeuaET Ha Bbl3OB, TepeOH NaunHaet Bn6pnpoBaTb. - CoxpaЯТь He3HaKombIe HOMepa — 3aHeCTn HeN3BeCTHbIe HOMepa B KOHTaKTbl ПОСЛe Bbl3OBA. - Khonka nHTaHn 3aBepwaet Bbl3OB — MOXHO Bbl6paTb cnoc06 3aBepWeHn Bbl3OBA. 3aIyunTb BXoJnBbl3OB - yCTaHOBNTe fJaKOK, TTO6bl NO IeJcKy UcTPOIcTB0 3aIyuaNo BXoJnE Bbl3OBbl.O6uMmOdEm
- 06uN USB-MoDem — N03BOJRAET IcNoIb3OBaTb IODKJIIOUeHne K INHTepHeTy COBMeCTHO C KOMNbIOTepOM C NOMOuBIO Ka6eJa USB. Tocka doctyna Wi-Fi — NO3BOJRAET CO3daTb TOUY DOCTyna IN peoCTaBnTB yCTpOJCTBaM DOCTyn K IODKJIIOUeHIO. - 067n Bluetooth-Moem - nO3BOJAEr NOdkJIIOUaTbCS K dpyrM yCTPOIcTBam IocpeDcTBom Bluetooth. CnpaBka - oTo6paXeHne cnpaBOUHOHΦOpMauIN 06 o6me USBMoDeme, TOnke DoCTyNa Wi-Fi n o6eM Bluetooth-MoDeme.Дононтульно
- PexkIM "B camoIe" — peXkIM "B camoIeTe" NO3BOJraT NcNoIb3OBA Tb MHOrHe n3 ΦyHKzH TeIeΦOHa, HApPImep Irgbl N My3bIKy, KOrDa Bbl HaxODITecb B MeCTaX, rDe COBepSeHne, pInem Bbl3OBov Nll NepeJaVa daHHbIX 3aIpeUeHbI. Ppr yCTaHOBKe Ha TeIeΦOHe peXkMa "B camoIeTe" OH He MoKet COBepuTaB N PrINHMaTb Bbl3OBbl Nll NpOKJIIOuA TbCB K INHTepHety. VPN — сnomоью TeleфОн Можно Добавлгь, HabtpaNBaTb И упраьгь Виртуалын IMN частны IMN сетamy (VPN), кOTOpbie NOЗВОЛЯЮТ NOДКЛЮЧаТбСИ ПОЛУЧАБ ДОCTУК Pecypсam BHyTpN 3aшишЕНHOJ LOkaльhoI CETN, TAKOй КAK KOPnpopatNBHЯ CETb. - Mo6nIbHbIe cETn — 3TO MeHIO N03BOJraT HAcTpaNBaTb pa3JIuHbIe npaMeTpbl MO6nIbHOJ cETn. - Пechа - РОЗБОЛЯЕТ OTПРАВЛЯТь на ПechаТь COДЕРЖИМоЕ ЗКраНов onрededеленно ТИпа (нанример, Вe6-стразиць в 6payzepe Chrome), ecn пинтети устpoйстBO Android подклюець к тои сети Wi-Fi.3Byk nyVeDomJIeHnIa
<BA3OBbl>I IpoΦnIa
<3BYK>
ΓpOMKOCTb
Melenya 3BOHka SIM1/Melenya 3BOHka SIM2
BbI6epHTe MeJIOHIO 3BOHKa IJIa BXOJaIHX BbI3OBOB.Melenia KOHTaKta
I03BOJIaET CO3JaBaTb MeJIOHn 3BOHka H3 HOMePOB BXOJIIHX Bbl3OBOB.<BN5PAU>
3ByK c Bn6paunnei
BbI6epHTe, yTO6bI IIpN IIOCTUIIeHNN BXOJaIeRO BbI3OBA 3ByaJa MeIoJnA 3BOHka, I IIPN 3TOM TeJIeΦOH Bn6pHnpOBaJI.TnBv6paun SIM1/TnBv6paun SIM2
I03BOJIaET yCTaHOBHTb TnII Bn6paunn IJIa yBeJOMJIeHNI.<YBEДOMЛЕня>
He 6ecnokonTb
ПОЗВОЛЯЕТ НАСТРОНТБ распсанге Для увебомлегни. Можно установпь ИСКЛIOчЕНЯ Для HeKOTOPBX Функць в ржиме "Toьko BaЖныe".3KpaH 6IoknpOBKn
ПОЗВОЛЯТ ВБИБРаТь, OTOБра3ИТь ИПИ СКрыть уBEДOMЛЕня на за КраН 6ЛOKИРовки.Приложкени
IozBoJrT NaCTpOuTb OTO6paXeHne yBeOMJeHn IIN yCTaHOBtB OTO6paXeHne ToJIbKO yBeOMJeHn C nometKo "BaXHoe" B peXmE "He 6ecnOKoNTb".LED-nHdkaTop
Kochintecb nepeeklouateia, yto6bl yctaHOBntb "BkI." nll "BbIK." 3naueHne "Bkn." aKtNBnpyet LED noDCBeTKy dIy Bbl6paHHbIX yVeDOMJIeHn C Bbl6paHHbIM cBEtom.Дононтельно
3Byk yBeDomLeHnA SIM1 / 3Byk yBeDomLeHnA SIM2 —ПОЗВОЛЯET yCTaHOBnTb 3ByK yBeDomLeHnA.ТаЖe можно добavtB 3ByK yBeDomJIeHnA, KOCHyBUnCb BправOM Верх hem углу кранa.
Bn6paun npn kacann — BbI6epnte, uTO6bl nCNoIb3OBaTb BN6paunIO npn KacAHn CeHCOPhIX KHOJOK rIaBHOrO 3KpaHa I npn HeKOToPbIX dpynx B3aIMoJeCTBnAx.
3ByKObIe 3ΦΦeKtbl - KOCHTecb, yTO6bl yCTaHOBNTb 3BYK nHaJIHn HApopa Homepa, 3ByKn pni npIKoCHOBeHNn n 3BYK 6JOKIpOBKn 3KpaHa.
- TOnocobIe yBeOMJIeHnO O COo6UeHNJx/Bbl3OBax - KOCHTecb nepeKIOuATEJIa TOnocobIe yBeOMJIeHnO O COo6UeHNJx/Bbl3OBax, UTO6bl nepeBecTI erO B noLoXeHne "BkI." nII "BbIKI." . BkI. no3BOJraTe TeIefoHy aBTOMaTnueCKN ONOBeUaTb TOnocOBbIMN yBeOMJIeHNJMI O BXODaIX 3BOHKax I COo6UeHNJx.
Дистпей
<Главнын ЭКPAH & БLOКИPOBKA>
Главнын ekран
- BbI6epuTe BnД 3KpaHa — BbI6epuTe TnaBHyI 3KpaH NJI N EasyHome B KaueCTBe TnaBHorO 3KpaHa. - Tema — установka Tembl Диспег устюква. Вы може за грузуновы Tembl ИЗ LG SmartWorld. 06on - yctaHOBka 06oEB nIcNoIb3OBaHnHa IpaBHOM 3KpaHe. - ΘффektbHa эКpaHe — Bbl6ePnte HuxHbI TnI ΘффektOB npi nepemeueHn OT OndHOro nolOTHa rIaBHorO эKpaHa K dpyromy. - Pa3peuNTb 3aKoIbCuOBbIbAHne rIaBHOrO 3KpaHa — oTo6paJxHne nepBOrO 3KpaHa nocIe npOKpyTKn nocJeHero rIaBHOrO 3KpaHa. Cnpabka - OTO6paKeHne cnpaBOuHOHnHOpMaun IJIraBHOTo 3KpaHa.3KpaH 6JIOKnpOBKn
Cnoc6 6IokpOBKn 3KpaHa - yCTaHOBKa TIIa 6IokpOBKn dIy 3aIITbI TelefoHa. OTKpoETcKpATKoe pyKOBoDCTBO, KOtOpoe O3HaKOMNT BAC C COCTaBJIeHHeM KOM6HauCn pa36IokpOBKn 3KpaHa. EcIn yCTaHOBLeH IpaΦNueckn KJIou, To npN BkJIuOeHn TeteΦOHa nIaKTINBaCn N3KpaHa IIOBHTcR 3aInpoc Ha BOCpON3BeDeHne KOM6HauCn pa36IokpOBKn. - Smart Lock — TelefoH octaTcra pa36IOKnpoBaHHbIM npi NOdkJIIOueHHOM IOBepEHHom yCTpO'CTBe IIN npi HaxOXJdEHN B 3HaKOMOM MeCTe. 06on - nO3BOJRAET HAcTpaINBaTb 06On 3KpaHa 6IOKnPOBKn. -Яльб — NO3BOJAJOT N3MeHЯТь KHOПКИ 6bICTpOTo ДocTyNa Ha ΘКpaHe 6лOKирOBк. KoHTaKTHa HOpMaun — N03BOJareT OTo6pa3nTb CBeJeHna O BlaJeIbue Ha 3KpaHe 6loKnPoBkn Ha clyuai, ecn TelefoH yTeprH. - Taɪmep 6loKnpOBKn — NO3BOJЯeT 3aJaTb BpeMЯ OЖиДаHЯ ᵋКраHa nepeD erO aBTOMaTnueCKoI 6loKnpOBkOi. MrHOBeHHa 6JOKnPOBka KONKOI NHTAHNA — BbI6epNTe IJIa MRHOBeHHo 6JOKnPOBKn 3KpaHa pni HaxaTIN KONKN PNTAHN/ 6JOKnPOBKn. 3TO T npametp OTMeHReT NaCTpoiKy TaIMepa 6JOKnPOBKn.CehcophbIe KHONKn rIaBHOrO 3KpaHa
HactpoIte ceHcOpHbIe KHOIIKn rIaBHOrO 3KpaHa, KOToPbIe OTO6paKaIOTCB HnIXHeJyactn IIO6Oro 3KpaHa. OnpeJeInte, KaKne n3 Hnx 6ydyT OTO6paKaTbcra, INx NpIoXKeHne B CTrPOKe IN BHeuHN BnD.Tn npnta
BbI6epnte Tpe6yembl TnnpnΦTa.Pa3mep wprnΦTa
BbI6epnte Tpe6yembl pa3mep uPnΦTa. < OCHOBHbIE HACTPOIKN >RpkocTb
HacrpoKa npKocTn 3KpaHa c nOmoUIO nOJ3yHka.ABTONOBOPOT 3KpaHa
Hac troяka abTomatnueckoro n3MeHeHna opneHTaun əKpaHa pri noBopote Tenefoha.BpeMa Do OTKJIoueHnE 3KpaHa
Hac troika 3aedeppkni neped aBTOMaTnueckm OTKJIuOeHneM 3KpaHa. < PACUINPEHHbIE HACTPOKNU>DOnonHnTeIbHo
3actaKa Bb6op 3acTabKn, KOTOPa8yDet OTO6paKatbcra, eCIn TeNeoH HaxOHTcB CnAeM peKIMe B DOK-CTaHcN ININ B peKIMe 3apAdkn. - KaIInbpoBka DaTchka DbnXeHna — I03BOJraTe yBeJIuYBaTb TOUHOCTb HaKIOHa n CKOpOcTB CeHCopa.Oe
Язви Клавитура
BbI6epnte y3bIK dIy TeKCTOBbIX HaIINCeH B TeIefoHe I NaCTPOiKN 3KpaHHoN KlaBnaTypbl, BKIOUaYcNOBa, IO6aBHeHHbE B CIOBapb. - RaBik — Bbl6epnte RaBik ДлЯ Испльбовая на Baшем Телефоhe. Tekyuza KnaBnata — BbI6Op Tnna KnaBnataPbI NO yMOnuHaHIO. - KnaBnata PG - KOCHNTecb 3NaUka HaCTpoiKn dIy n3MeHnra napaMeTPOB KnaBnataypb LG. - TOnocobov BBOd Google — Bbl6epnte, yTo6bI nCpOJIb3OBaTb TOnocobov BBOd Google ДЯ BBOda dAnHbIX. KocHTecb IKOHKn "HaCTpoiKN", yTo6bI n3MeHnTb HaCTpoiKN TOnocoboro BBOda Google. - Пpeo6pa3OBaHne TeKCTa B peyb — KOCHTecb Дя HabTpoiKNпpeIPOuTITeBHOJ CnCTeMbI IJI N O6xN HAcTpoEK Ppeo6pa3OBaHnaTeKCTa B peyb. - CkopoocTb yka3aTeJЯ — OtperynlpyIte ckopoCtB yka3aTeJЯ. - Помеят b KHONK — MeHЯET MeCTaM N KHONK MbluДЯ ИСПОЛьЗOBанг пpaBOI KHONK MbluВ KaueCTBe OCHOBHOJ.Lokaçın
BkIIOUHTe cepBnC onpeJeHnMa cToOnoJoxeHnJa aBTOMaTnueCKOro onpeJeHnBaWero np6n3ntbHOro MeToOnoJoxeHnHa TeJeOHe c NOMOsbU daHHbx CeTei Wi-Fi n ceTei Mo6nblHOcBra3n. Ppr BbI6ope fYHKznn NoCTynaet 3anpoc Ha pa3peWeHne Google nCnoJIb3OBaTb INHOpMaunio O BaWeM MeToOnoJoxeHn Ppr npedocTabeHn DaHHbIX ycnyr. Pexm - yctaHObKa peXIma onpeJeHnJaHHbIX O TeKyuIeM MeCTOJIOJKeHn. Kamepa — BbI6epnte, uTO6bl npncBaNBaTb fOTOrpaqnram nIN BnDeO3aPNCrM MeTKN C MeCTOM IX CbeMKN. - UcToPnMa MeToNoJoxKeHn — HacTpoNkA DoCTyIa K NnΦOpMaIuN O MeToNoJoxKeHn Co CToPOhBi KOMIIaHn Google n ee npOdyKTOB.AkkayHTbI IN CNHXPOHn3aun
IcnoJIb3yIte MeHIO HaCTpoeK aKKayHTOB IN cHHxPOHN3aUHN IJIa Do6aBJIeHN, ydaJIeHNn I yIIpaBJIeHNn aKKayHTOM Google n npYrHMn IOpIePJKBaEMbIMn aKKayHTAMN. 3TN HAcTPOkN TaKKe MOXHO hCIOJIb3OBAtB IJIa YIIpaBJIeHNn OTIIpaBKO, POlyueHHeM IN cHHxPOHN3aUHeN daHHbIX IIpNJIOJKeHnMn B IHX CO6CTBeHHbIX paCINCaHNx, a TaKKe IJIa YIIpaBJIeHNn aBTOMaTHueCKoI cHHxPOHN3aUHeN DaHHbIX IOJIb3OBATeJIa. Gmail™, KaJIeHДapь И дугHe пиLOжЕнЯ мOrут ИмTe co6CTBeHHbIe NaCTpoIKN ДЯ упраВлeня снХрОнЗaцHeДаHHbIX. БOLee ПОДрОБHyIO HΦOpMaцИNo CM.В pa3ДeЛax,ПОСВЯШЕНьIX COOTBeTCTBYOIIIM ПиLOжЕнЯМ. HabKMITE DOБАВТь AKKAYHT IДЯ ДОбавЛeнЯ HOBOrO aKKayHTa.Cpeu. BO3MOXHOCTN
HaCtpoKn DoCTyHOCTH HcNoJIb3yIOTc IJIa KOHΦnrgpaunn DoCTyHOCTH IIOJKNIOUaEMbIX MOdYJIe, yCTaHOBJIeHHbIX Ha TeJIeOHe.3peHne
- TalkBack — ПОЗВОЛЯЕТ НAcTpoNTь ФункциTO TalkBack, КOTOPА ПOMOГаET ЛЮДМ CO СlaбыM 3peHHeM, ПпeДОCTaВЛЯ ГOLOCOBОY OTKЛИК. - TOnocobbie yBeDOMJIeHnO Coo6uEHHx/BbI3OBaX - KOCHTecb, YTO6bl yCTaHOBHTb "BkJ." HJI "BbIKJ." . Ppr NIOJoxKeHH "BkJ." BBI CJIbIIHNTe aBTOMaTHUeCKHe CNrHaJIbI IIOCTyJIleHHra BXODJaTeBO BBI3OBA HJI NIOJIyueHHra COo6uEHHra. - 3aTeHnTb - yCTaHOBHTe JaXOK, YTO6bI yMeHbIHITb KOHTpaCTHOCTb əKpaHa. -Pa3mep upnΦTa - yCTaHOBka pa3mepa uipnΦTa. - XectbI dnyyBeJIuYeHnra - IIO3BOJIaET yBeJIuYBaTb H yMeHbIIaTb MacHTa6 TPOINbIM KacaHHeM 3KpaHa. - INBepcna zBeTOB kpaHa - yCTaHOBnTe fJaXoK, YTO6bI BKJIIOHTb INBepcNIO zBeTOB kpaHa n COePJKMOrO. - ΚВetoФильТрЭКраHA — NO3BOЛЯЕТИЗМЕнЯТь CBETAЭКраHA IN COДерЖИМOTO. - Khonka nHTaHn 3aBepwaet Bbl3OB — Bbl6epnte, yTo6bl 3aBepwataB bI3OBbl HaKtaHem KHONKn nHTaHn/6JOKnpOBKn.Cnyx
-Добавиь подпсn — NO3BOJЯET NOЛьЗВаTeЯМ CO сla6ыM CNYXOM HaCTpaINBaTb NOДПИСN INHДИВИДуalbHO. - LED-nHdkaTop — akTnBauny LED noDCBETKn npn BXOJaux Bbl3OBax n yBeDOMJIeHnx. - Miraoune npedynpekdeHna BbI6epnte, uTo6b I BXOJaune Bbl30Bbl n yBeDOMJIeHnCOnpOBXdaJIncb MIRaHHeM. - BbIKIIOHTb BCE 3ByKn — BbI6epNTe, yTO6bI BbIKIIOHTb BCE 3ByKn yCTPOIcTba. -Tn np aydno - yctaHOBka Tnpa aydno3aPiNCn. -Баланс 3Byka — HabtpaINBaET HappaBHeHnA 3Byka.Перемecnte NOI3yHOK NO IINHeIKe ДЯ HabcTpoiKn.- Двжени и паснозаване
- OTKlMn Ka cahme - NaCTPOIka BpeMeH N OTKlNk npi KaCaHn 3KpaHa. - Touch assistant - OTO6paJHne cEHcOpHoi nAHei C yIPOUeHHbIM DOCTyNOM K DeIcTBnAM, IcNoJIb3YeMbIM YaIe BCero. - BpemrdoOTKIOUeHnE3KpaHa-yCTaHOBKa BpeMeHnDo aBTOMaTnueCKOTo OTKIOUeHnE3KpaHa. - 3ohbI ceHcOpHoro ynpaBHeHnra — nO3BOJrEeT Bbl6paTb yUaCTOK kpaHa, yTO6bl OgrpAHuHTb ceHCOPHoe ynpaBHeHne TOnbKO 3TNM yUaCTKOM.- БыстрыdoesTунк Cпeц.Bo3MOxHocTЯM
IozBoJareT 6bICTpo npeeTI K Bbl6paHHbIM yHKUaM TPOHbIM KacaHneM KHOJIKn IlaBHyI eKpaH. - ABTONOBOPOT ṢKpaHa BbI6epnte IJIaAHTBaUINIOBOPoTaNKpaHaTelefoHa B COOTBeTCTBUN C 0n3nueckOJOpNEHTaUneN TelefoHa (KNHXHAn nn aIb6omHa). - Switch Access Обеспейнвает BOЗМожноctь B3aIMоДeйСТВИСУСТРОДСВOMС ПOMоцью OДHOrO ИЛN HeCKOLbKINx NepeKJIIOuATEleN,ФунКЦиОнHyPoUxN В КачEcTBe KJIaBnIsh KJIaBnIaTpybl.ЭTO MeHIO MOЖHO OKa3aTbCЯ ПОЛe3HbIM ДЯ ПОЛБ3OBaTeLEн C ORpaHnueHHbIMN DBrAteJIbHbIMN CNoOC6HocTЯMn, KOTOpьIE He ПОЗВOLЯJOТ ИМ HeNOCpeДСТВЕНHO B3aIMоДeйСТBOBaTbС yCTPОДСТВOM.БыICTра Кногka
Пolyчпс Te 6bICTpbIДocTyI K npINOJKeHЯM, HaxIMaI ydePKNBaK HONKn rPOMKOCTn ПИ BbIKJIQUeHHOM IIN 3a6JIOKIpOBaHHOM ᵘKpaHe.Hactpoikn Google
BocnoIb3yItec b hactpoiKamn Google dIyypabJeHnI npInIOxKeHnMn Google n Hactpoikamn aKKayHTa.<ПИВАТHOCTь>
Be30nacHocTb
Icnoj3yTe MeHIO HaCTpoEK 6e3OanacHOCTn IJRA ONpeJeHnHaHnyUweO cnocoba 3aunTb BaWeRo TelefoHa n DaHHbIX B HeM. - БлOKирOBKa KOHTeHTa — ВьБерпгТУПы 6лOKирOBКДЯ 6лOKирOBКФайLOВ B ranelpee и замetOK Дя QuickMemo+. ВьБерпгТРаоь пИng Графчecкий КЛЮч. 3aunfoBaTb Teleoh - n03B0JareT 3aunfoBaTb DaHHbIe Ha TelefoHe dIy oBeCneueHn Ix 6e3OanacHocTn. Iy dEunfoBKn DaHHbIX Tpe6yeTcB B0DHTb PIN-KoI npOJb pR KajdOM BKJIoueHn TelefoHa. 3aunphiobatb KapTy SD - uinphiobahne daHHbIX Ha KapTe SD npeodotBpaueHne DOCTyna K daHHbIM C dpyrnx yCTPOICTB. - UctahOBtB 6IoknpoBky SIM-KapTbI — 3aJaET PIN-KoJdIe 6IoknpoBKn BaWei SIM-KapTbI n I03BoJareT n3MeHntb 3TO T PIN-KoJd. - OTo6paKaTb napoIb npn Ha6ope — Bbl6epnte dIra aKTNaCIN KpaTKOBpeMeHHoro OT6paXeHnKaJDoRo CmBOJa napOJIa BO BpeMЯ erO BBoDa, uTO6bI oBeCneuHTb BO3MOxHOCTb IpOCMOTpa BBOIMbIX DaHHbIX. - АдminнichtpaTopbI yctpoiCTBa — прсмOTиОТКIOчЕпe - АдminнichtpaTopOB yctpoiCTBa. - Hen3BecTHbIe NCTOuHnKn — pa3peWeHne yCTaHOBKn npInIOXeHni, 3arpyKeHHbIX He n3 Play Store. BepnucpoBaT npnoKeHnaPpeaet yCTaHOKU nIbIaET npdynpeJcHne nepeyCTaHOBko npnoKeHn, KOToPbE MOryt HaHeCTN BpeI. Tynnamrnn - annapatno-06ecneueHHbI. - YnpaBHeHne cepTnΦnKaTaMn - DobepenbIe cepTnKaTbI — BbI6epnte, yTo6bI pa3peuNTb npIoJxHnM DoCTyn K 3aunfoBauHHOMy XpaHnIuSy TeJefoHa, B KOTOpOM CoedePkaTcra 3aunueHHbIe cepTnKaTbI n CBaHHbIe C HmN npoJI, a TaKxe dpyrne yueTHbIe daHHbIe. XpaHnIuSe yyeTHbIX DaHHbIX NcNoJIb3yETcra dJa YCTaHOBKn HeKOTOpbIX TINOB VPN i Wi-Fi-coeHNHeHn. Ecn npoJIb dJa XpaHnIuSa yueTHbIX DaHHbIX He yCTaHOBJIeH, 3Ta NaCTpoJka 6yJeT 3aTeHeHa. - YCTaHOBbIb I3 NaMaTn — KOCHTecb IJy YCTaHOBKn 3aUuIeHHOrO cePTNΦnKaTa. - Ydannb ceptnnkaTbI - ydaJIaET BCE 3aunuHbIe ceptnnKaTbI IN CBaHHbIe C HmN yueTHbIe daHHbIe, a TaKKe CTnPaet napOlb 3aunuHOrO XpaHnUHa. - Trust agents — Вьбор пиложецн, КOTОрbie можно ИСпОльь3OBaТь 6e3 pa36лOKИРОВКУ ṏкраHA. -БлokровkaВпрложенn--CПOMOПьОДaHHОДФУHKПИМоЖHO NaCTPOnTb yCTpoIcTBOДЯ OTOбpaжehня эКраHA TOLьКООпpeДeJIeHHO Прложен. - Doctyn K daHHbIM dIy npInoJxHn - IIO3BOJIaET IPOCMaTpINBaTb HOpMaIHO 6 NCIOJIb3OBAHn IIpNJoxHn B TeJIefoHe.Чexя QuickCircle
3TO MeHIO I03BOJIaET BbIbpaTb IIpNIOJKeHHa, KOToPbIe 6ydyT NcIIOJIb3OBAtbcra IIpMaHO ha 6bIOJKe IIpN IOMoUHn QuickCircle. CJIeIyEt IOMHHTb, YTO BKJIIOUeHHe 3THX IIapAMeTpOB yexla QuickCircle MoKet IIpNBecTH K HeCTaHJaPTHOJ pa6Ote yCTpoiCTBa.
Двоиhoe OKHO
I03BOJIaET HaCTpOHTb yHKIIHIO "ДВОИHoe OKHO". - ABTomatnueckoe OTKpbITne - yCTaHOBHTe 3TOT fJiaXOK, YTO6bI npN KaCaHH N CCBILIKN B IIOJIHO3KpaHHOM peXHMe HIN BLOXKeHNA B 3JI. INCbME IIepExOJNTb B peXHM "ДBOHHOE OKHO". CnpaBka - OTO6paXeHne COBeTOB IIO HcIIOJIb3OBAHHIO IBOHOrO OKHa.<УПРАВЛЕHИЕ YСТРОДСТВOM> Дати Время
YCTaHOBHTb IpeIIOUTeHnOTo6paXeHnJaTbI N BpeMeHN.XpaHnIiSe daHHbIX n USB
BbIMoKTe OTCJIeXHBaTb Objem 3aHrToI NIOCTUHO BHyTpEHHeN IOIOJIHNTEJBHO IIOJKJIOHaEMOINAMRTN YCTPOHCTBa.AkkymylarTopиэhepro6epexeHne
- AkkymyIaTOP — IpOCMOTp HOpMaun O6 NcIOJIb3OBAHH aKKYMlyTopa. - UpoBHeB 3apJa B npOeHTax B CTPOKe COCTOHNHn — BBi6epHTe IJIy OTO6paJKeHnY yPoBnA 3apJa aKKymJITopa B npOeHTax B CTPOKe COCTOHNH PAnOM CO 3HaUkOM aKKymJITopa. - 3Heproc6ep-e — KocHTecb NepeKIOuATeJIaHeproc6epKeHnIyTO6bl BKNIOHTb IIN BbIKIOUHTb DaHHyO fYHKUIO. DAnHbI npaMeTpNo3BOJAEr YCTaHOBtB yPOBeHb 3apJa aKKymIaTOpa B nPoUeHTax, PnI KOTOPOM aBTOMaTIueCKN BKNIOUaETcra peKIM 3Heproc6epKeHnIy. BbIEpITe n3: HemeIenHo, 5% 3apJa u 15% 3apJa. Cnpabka - OTO6paKaTe NOdCKa3KN NO INcNoIb3OBaHnIO fYHKcN NHeproc6epeKeHn.PamrTb
Bbl mojkeTe OTCLeXnBaTb 06bem nCNoIb3OBAHHoN PAmrIn B CpeHem N PAmrIn, 3aHrToN PruIoXeHNyMaN.Приложкеимя
I03B0JraT npocMaTpNBaTb HOpMaunO6 yCTaHOBHeHHbIX Ha BaWeM yCTpOcTBe npINOxKeHnX, ynpaBnTb daHHbIMN n pInHydnteHbHO OCTaHaBnVBaTb IX.SMS-прinalsьке по умогаимю
Данhoe мени поЗвогговьбразь пиложене SMS/MMS Ддя Исторьогая по умочаю.Pe3epBna KOpnI n c6poc
I3MeHeHne Hactpoek ynpabJIeHnI npaMeTpamN I daHHbIMN. LG Backup — BBINOJIHЯET pe3epBHOe KOINPOBaHne Bcei INHΦOpMaци C yCTpoIcTBA I BOCCTaHaBnBaEt ee B Clyuae NOTepN DaHHbIX IIN 3aMeHbl. - Pe3epBHOe KOnHPOBaHne DaHHbIX - pe3epBHOe KOnHPOBaHne DaHHbIX npInJoxeHn, naponei cete Wi-Fi i npyRnx HacTpoEK Ha cepBepbl Google. - AkKaynt pe3epBHO RO KONIPOBAHNA — OTo6paJKeHne aKKayHTa, INcNoJIb3yEMOrO B HAcTOrAmm MOMeHT dIra pe3epBHO RO KONIPOBAHNA INHOpMaun. - ABTOBOCCTaHOBJIeHne — BOCCTaHOBJIeHne HaCTpoE K I DaHHbIX N3 pe3epBHOJ KOIII npI nepeyctaHOBKe npINIOJxHeNIA. C6poc ceTeBbIX hactpoek — c6poc Bcex ceTeBbIX hactpoek. C6poc hactpoek — c6poc hactpoekdo 3aBOIDCKIX 3NaueHn ydaJIeHne Bcex daHHbIX. IocNe c6poca hactpoek noBNTcra 3anpoc Ha npedeOCTabIeHne INHΦOpMauN, KOtopar yXe npedeOCTaBIAJacb pni nepBOM 3aynScKe cnCTembl Android.O TeIeΦoHe
Iprocmotp opndnuecko nHopmaun, nHopmaun o modei n Bepnn PO, yctahOBHeHHoro Ha TepeOHe, obHOBeHne P0.Приложения LG Bridge
LG Bridge — зто пиложене дя удобноу упаьении n3ображени. My3bIKo, BndeO3aПСЯМN, ДOKумЕНТами и T.D., COxpaHeHHbIMN Ha MO6nIbHOM yстpoИстBE LG, сnomоцью ПК. КрOME того, можно obHOBNTb прогамнhoe обесnéчение мбильноу yстpoИстВа Или ВынOLHNTb pe3epВhoe корpoВане тaknx ФайLOB, кak KOHTaKТы и n3obражени, на ПК.COBETbl.
- Побьпьинстукши по Истоваши по пложеня LG Bridge можно росмOTpeТь в Meю "Справka" пося устови и зауcke поррамbl. - PoiDepxNBAeMble yHkCm MOryT pa3nUaTbcra B 3aBNCIMOCTN OT yCTPOIcTBA. - Д�� подклоченя мобильною телефona LGΚ ПК необховим объенинный драьер USB LG.Он устанавлиbaetса abTomатчески BO Время установки LG Bridge.Функциng LG Bridge
OboBHeHne nporpaMMHoro o6ecneueHnMo6nIbHoro TelefoHa Ha BaWeM PIK uepe3 USB Pe3epBHOe KOINPOBaHne I BOCCTaHOBJIeHne DaHHbIX BaIeRO MO6nIbHOrO yCTpoiCTBa uepe3 USB Чтобл загуз嗣 рпюжени LG Bridge, в transitе садушипдемства: 1 PapeiDnte Ha caT www.lg.com. 2Перейд范围内ba3delen SUPPORT(ПОДДЕРЖKA)>MOBILE SUPPORT (MOБИльнАЯ ПОДДЕРЖKA)>PC Sync(Cинхрониацяс cПК). 3 BbI6epnte cBeDeHnO MoJeN n HaxMnte GO (NEPEITN). 4 ПрokутITE BHN3, ВьберпгЕ BKладку CнHXPOHn3AUЯ CПК > Windows Или Mac OC > 3AΓPy3KA, уTOбы 3aГpy3ntb пиюжень LG Bridge.Mннмальные системные Тpeбовая缝隙 установкиnpиложеня LG Bridge
| ХаразковICTИКA | OC Windows Mac OS | |
| Операционная сим teма: | Windows XP 32-разroduная(Service Pack 3)Windows Vista32-разroduная/64-разroduнаяWindows 7 32-разroduная/64-разroduнаяWindows 8 32-разroduная/64-разroduнаяWindows 8.1 32-разroduная/64-разroduная | |
| Цп汞 1 Г汞/nii Выше 1 Г汞/nii Вышe | ||
| Памяты 2 ГБ 03У/nii 6Олee 2 ГБ 03У/nii 6Олee | ||
| Графческая карта | 1024x768, г数字货币igma вета32-6Итная/nii 6Ольшe | 1024x768, г数字货币igma вета32-6Итная/nii 6Ольшe |
| Харазстеска | OC Windows Mac OS | |
| Жосткий д��к He | mehee 500 MbСвобODного мecта(Mожет по tradeься ДовлелhoeптостраНстvoВЗвсимости OT объемаДаHHbIX захavenя) | He mehee 500 MbСвobODного мecта(Mожет по tradeься ДовлелhoeптостраНстvoВЗвсимости OT объемаДаHHbIX захavenя) |
| Осыателhoe ПО | Obéдиненны драевergLG, Windows Media Player 10пли бolie поздень версан | Осыдиненны драевergUSB LG |
Поклоченье мобiliansho телфona у repeз LG Bridge
Mожно подклioчntься К дуromу устpoистby с помоцью kaбеля USB И спобьовать LG Bridge.| ХаразковICTКи Тип сединney | Нени |
| Овские постормного обsec們еця | Повлочны USB-кавеля |
| LG backup (peзервhoe копroduваимe/ ВOCSTановLEMпдaHHbIX) | Повлочны USB-кавеля |
O6HOBJIeHnE IOTeNeΦoHa
O6HOBJIeHHe IOMo6nIbHoro TelefoHa LG uepe3 INHTepHET
YTO6bI NOJyUHTb DOnOJIHITeJIbHbIe CBeJeHnO6 NcNoJIb3OBaHnN 3Toi fynKcnn, nocTe Be6-caT http://www.lg.com/common/index.jsp>u Bbl6epnte cTpaHy n Ja3bIK. Данная ФункцяпоЗволяет удобно обовлайтб ПО телефona до посл徳ь Верси черз Исторет 6e3 посяеня сервис-центра. ᝀта Функцяп Достуши, толъко ecни и korда komпань LG bbinyckaet Новю Версию ПО Дли Baшero устюctва. Посковы прочура обновлия рPORpaMMHOrO обесочени MOblbHOrO TelefoHa Tpe6yETпрдьHOn BHNMaTeIbHocTn, BblonHЯITE Bce yka3aHnY nHTaIte BCE coo6uHnY, OTOpbaxaIoUncEca Na ekpaHe, Ha kajdOm 3TaIe. ПOMHInTe, qTo OTcoedINHeHne USB-ka6eJIa B ppocece OBHbIeHnI prORpaMMHOrO обесочени мОжET пPnBeCTn K cepbe3Hoi HencpapBHOCTn MOblbHOrO TelefoHa.ПРИМЕЧАНЕ
KoMaHnLgOCTaBnaTe3aCobO npaBO BbIpyKaTb O6HOBneHnI pOuINBKn TOJbKO dIy OTdJIbHbIX MoJeNe IIO CBOeMy yCMOTpeHnI U He rapaHTnpye THaIIuYHe HOBoI pOuINBKn dIy BCex MOJeNe MObJIbHbIX TeJeΦOHOB.Овъени IO мобиьно Teleфona LG 6ecnpobodnIM cnoc60M (OTA)
Данная Функция поЗволяет обноны ПО телефona до последень Версан 6eесправODным способом 6e3 поКлоченя kaбеля поразчдданны USB. Эта Функция дoctуни, Товко ecлии Когда kompanья LG винькай.Tовух Версан ПО дя Bavшero устюctва. Сачала Heo6xOДIMо поверпь Версию ПО, установленьогу на вшием мобиьном TeleфОе: Habстpoик > BKладka 06шe > O TeleфОе > BKладka 06шe > Lentp obHobleni > 06HOBlene ПО > Поверпь habичne obHoblenя.ПОНМЕЧАНЕ
- Baши линные данные иЗ виутpenнейnamати телегона, Вкючая с蜱edingу ob yuethoj 3aicnGoogle, Oдугх уетухix 3aicnx, Данные и насточи сисьи пложени, a takxe 3arpyжени пложени и лиценя DRM, могут 6ытnotерныВ поцесс обновлия ПО телегona.В CBЯзсэтим LG pekomehdyeT co3daTb pe3epBHyIO KONIO Луньix даньix пered обнов lienem ПО телегona. LG He-hecet OTBETCTBEHHOCTN 3a NOTEPIO Луньix даньix. - Достуносты Функции 3abncnt OT NOCTaBuzika ceTeBbix yCnyr, PernoHa nIIN CTpaHbl.CbeHnO daHHOM pyKOBoDCTBe NOIb30BaTeJIa
С蜱edingия о данном руковорстBE плььзоватя
- Перацлбзоваимьства Внмателно рочтite данhoe pykoBoDCTBO.TO obecneHT npabnIbHoe n 6e3Oanchoe Исплб3OBaHne TelefoHa. - HeKOTOpbIe n3O6paXeHnI n CHNIMKn 3KpaHa, npINBeDeHHbIe B HaCToAeM pyKOBOdCTBe, MOryT BblrJaTeB He TaK, KaK B BaWeM TeJefoHe. - CodepЖIMoe Baшero TelefoHa MozejT OTnUaTbCЯ OT KoHeuHOro ПрodyкТа Ил ПоррамнOrO obecneueHnA,пpeДocтавлeHnOro NoctabuNkom ycnyr Ил onepaTopom. Такoe coapedzIMoe mozejT 6bITb ИЗмени 6e3 п徳ВарптьНOrO уBeДOMЛeHnA. Дя почЕня посл徳н Верси NaCTояшero руковodCTBa nocetnte Be6-caIr LG no aDpecy www/lg.com. - Пиложеня, установленье Ha Baшем Teileфоhe, И nx Функции могут OTличatabся в 3abncmocTN OT CTpaHbI, peRnoHa nIIcpeuФнkaци obopudobahnia. Kompanna LG He HeceT OTBETCTBEHHOCTN 3a liObbie npo6leMbI npOn3BOdnteJIbHOCTN, Bbl3BaHHbIe NcPOnlb3OBaHNemпиложени, pa3pa6OTaHHbIX CTOPOHHIMN NOCTaBUnKaMn. KOMPANHNA LG He Hecet OTBeTCTBHeHOctn 3a npo6JIeMbI npOn3BOIDNTeJIbHOCTn IIN HeCOBMeCTUMOCTN, Bbl3BaHHbIe N3MeHeHNeM HaCTpoE K peecTpa IIN npoRpaMMHOrO o6ecneueHna OpeaunHOHcNCTeMbI. IIO6a IONbITKa I3MeHnA OpeaunHOHcNCTeMbI MoXeT npNBecTN K HeNPaBnJIbHOJ pa6OTE yCTPOJCTBa IIN npINOJKeHn. - Порогамнoe obecneueHne, aydno, o6oN, n3obpaJeHnI npyRne MeHaJIbI, npedocTaBnaeMbIe BMeCTe C yCTpoiCtBOM, IInCeH3nPoBaHbI ДЯ OrpaHnueHHoro nCNoJIb3OBaHnI. N3BleueHne n nCNoJIb3OBaHnE 3Tnx MaTePnAIOB B KOMMepueckNX nII INhIx cIeJx YBIAETcHapUSeHnEM aBTOpCKNX npaB. KaK nOJIb3OBaTeJb, Bbl HeCeTe nOJIHyO OTBeTCTBeHHOCtB 3a He3aKOHHOe nCNoJIb3OBaHnE MeHaΦaIJIOB. - Moxket B3nMaTbcra dOnoHnteIbHa rIaTa 3a ycLyr npepaun daHHbIX, Hanpimep SMS/MMS, 3arpy3ky, cKaunBaHne, aBTOcHxpoHn3aunu yClyr n onpeJeHn mecToNoJoxeHn. YTo6bl n36eKatb dOnoHnteIbHbIX paCxOIOB, Bbl6epnte pAn h nepeJaun daHHbIX, OTBeuaOuN BaIIM 3apocam. IJI nOLyehn dOnoHnteIbHbIX CBeHeHn o6paTntEc b K NoCTabUkny ycLyr.Tobaphe 3haKn
LG n Iorotn LG yBnaIOTc 3apeRnCTpnpOBaHHbIMN TOBaPbIMN 3HaKaMn LG Electronics. - Bluetooth®яВЯЕТСЗaperистрпювныМTOВарньIM 3HaKOMBluetooth SIG, Inc. BO BCEM MInpe. Wi-Fi® n Iorotn Wi-Fi ABJIOTc 3aperntpnpOBaHHbIMN TOBaPbIMN 3HaKaMn Wi-Fi Alliance. Bce octaIbHbIe TOBaPbIe 3HaKn I aBTOpCKne npaba YBJIOTc co6CTBeHHOCTbIO COOTBeTCTBYIOxN BlaJeIbUeB.Akceccyapbl
Данные akceccyapbl NOДхОДТ ДЯ ИСПОЛьЗOBAHNY CBaшIM TeLEФOHOM. (Описимные поже akceccyapbl MOryT He BXODHTB KOMПЛeKT NOCTaBKN I npno6peTaTbCЯ ДОпOLHNTeIbHo). - yHnBepcaJIbHbI aIaITeP KpaTKoe pyKOBOdCTBO Hayshnki USB-ka6eIb - AkkymyjTOpПРИМЕЧАНЕ
Bcerda nCnoJb3yIte TOnbKO opnHnHaNbHbIe akceccyapbl LG. NocTaBnaEmble KOMNoHentbI pa3pa6OtaHbI CneuaJIbHO IJIg 3TOrO yCTpoNCTBa I MOryt 6bITb HecOBMeCTIMbl C npYnMn UcTPONCTBaMn. - Komплесдаця устюпства пи поставке и достунные akceccуapы могут pa3личatable в зависмости OT peгноа пи поставшиka услуг.YcTpaHHeHHeNCnPaBHOCTeI
B daHno rnaBe nepeuNCJIeHbI HeKOTOpbI npo6JIeMbI, KOToPbIe MOryT BO3HnKHyTb npn 3KcIIyaTaUu TneOHa. PpN BO3HnKHOBeHIn HeKOTOpbIX HeuCnpaBHOCTe Tpe6yeTcA O6paUeHHe K NOCTaBUnKy ycLyr, OndaKO 60Jb7yU yAcTb npo6JIeM MoXHo C JERKOCTbU YCTpaHHTb CaMOCTOaTeJbHO.| Соobшени | Возможные想不到 | Возможные меры по устранения |
| Ошибka SIM-城乡居民 USIM- Kapты | Вtelephone не сим-城乡居民 USIM-kapты城乡居民 Oна установке на: �развильно. | Убадпесь в правлиьноCTN установке SIM-城乡居民 USIM-kapты. |
| Сетевоюklючения OTCYтCTByeT/ ТеряETСA | Сигнал симъCOM слобный城乡居民 telephone нахODITСА Вichte зоны пokръTG сети. | Перейдente К OKни Велидente на OTКръITOЕ постранстBO. CBеръTEСь С capто Зоны пokръTG ОпераTopа сети. |
| ОпераTopOM Вve徳ны HOвBLE слжбы | Убадпесь, чTO SIM-城乡居民 USIM-kapta Быla Вылухetedа He paHEe 6-12 Месацев назад. В потиВHom сCityаe ЗаменITE SIM-城乡居民 USIM-kapTU В сblжайшем симпале Vaшero поставшика усту CBЯЗИ. Оspratпесь К поставшику усту. | |
| Сообшени | Возможные причны | Возможные меры по устранения |
| К一步一步 не сobразадаю | При изменения кota в�дахости Новий кот及相关д но对外援助, Вевая edo повтор. | Еспь вл забли кот, образитесь к поставшику ускуг. |
| Два вешendeши Кот неба сobразадю. | ||
| Невоземат установств приложения | He пооченьеется поставшиков ускуг ни треб ueется perinctraць. | Овразитесь к поставшику ускуг. |
| Визовы небостуны | Ош�ба наща Homeра | Новая сөть не abtopиизова. Hobя сөть не abtopиизова. Yuzhanовлега Новая SIM- по USIM- kapta. |
| Доступные Новая SIM- по USIM- kapta. | Узайты, He поалейся лимовые огранчeurия. | |
| Доступные Лимп, установлегы дд п配电柜п�试ьног орлaitы. | Овразитесь к поставшику ускуг лим сбposьte органчeurия с помоцью кота PIN 2. | |
| Телегон не вklючaecя | Плобх нажatable Кногka вklочець/ Выклочeurия. | НжмITE и уdeckжвайе кногку ВкЛ./ ВыкЛ.В чуже не meHEe 2 секун. ЗардITE akkumулайт.Пробер.... Инданakot урOBна за... пс... 3ардITE akkumулайт.Пробер.... Инданakot урOBна за... пс... |
| Аkkушл对接 разраожен. |
| Со�шени | Возимные Прочны | Возимные меры по устарашик. | |
| Ошеба Зардки | Аккулар разраяжен. | Заядente akкулар. Зчесь, что телегон зарожаетс при Нормалов Tempeparу. сре}. Празьемы с Контakтам. | Убадиесь, что телегон зарожаетс при Нормалов Tempeparу. сremeфону. |
| Овъединения напräжень. Наразсяnges. | Празьandinve Зарадиhoe устroduCTBO И роклю畴ения кабеля пitaши К телегону. Празьandinve Зарадиhoe устroduCTBO K Другов розтke. | ||
| Заядиhoe устroduCTBO пobраздени. | ЗаменITE зарадиhoe устroduCTBO. 3ametenite 3apядиhoe устroduCTBO. | ||
| НедOTуСиме Заядиhoe устroduCTBO | Исплобухе Толбко оригинальves akcesccsyapby LG. | ||
| Homep Заразшени. | Въочena Функция фунсирoveанно набора. | ОTKроче MeHIO "Hac troйки" и ОТКюоче данню Функцию. |
| Сообшени | Возможныпричны | Возможны меры по устарашию |
| He удаetedуочь/отларны SMS-coobшени и φOTORpaфий | Памятыпегонна | Удалente чаfts coobшени иЗ телефona. |
| Файлы не оTKрываются | Неньдөрхивaelынформат сайно. | Проберты подөрхивaelынформаты сайно. |
| При Вховая堕本市 ВИЗОBE не загорается заран. | Неньразильна работа датчika расстаянna | Заштона лentesся пухол не дοлжны Зakerытб датчik пошожения.Обastsb Вokрг датчika расстаяндалжна 6ыт bчостов. |
| Het 3byka Ржим | Вибрацни | Откочte насточи мени 3byka, чтоы поberпь, не вklючен пі ржим Вибрацни пі ржим "He беспокочь". |
| Усточь не оТveчадет на заразсы | Вremенная ош�бka пограмного обесочени | ЗагрузITE obshOBileня за пограмного обесочени чeredes. Be6-caïт. |
User Guide
ENGLISH - Some contents and illustrations may differ from your device depending on the region, service provider, software version, or OS version, and are subject to change without prior notice. - Always use genuine LG accessories. The supplied items are designed only for this device and may not be compatible with other devices. - This device is not suitable for people who have a visual impairment due to the touchscreen keyboard. Copyright ©2016 LG Electronics, Inc. All rights reserved. LG and the LG logo are registered trademarks of LG Group and its related entities. All other trademarks are the property of their respective owners. - Google™, Google Maps™, Gmail™, YouTube™, Hangouts™ and Play Store™ are trademarks of Google, Inc.Table of contents
Guidelines for safe and efficient use ....4
Important notice 14
Getting to know your phone 17
Phone layout 17 Installing the SIM or USIM card and battery 19 Charging the battery 21 Inserting a memory card 22 Removing the memory card 23 Locking and unlocking the device 23Your Home screen 25
Touch screen tips 25 Home screen 26 Customizing the Home screen 27 Returning to recently-used applications ...28 Notifications panel 29 On-screen keyboard 32Special Features 33
Gesture shot 33 Glance View 34 KnockON 34 Knock Code 35 Dual window. 35 Capture+ 36Google account setup 38
Creating your Google account 38 Signing into your Google account 38Connecting to Networks and Devices ....40
Wi-Fi 40 Bluetooth 41 Wi-Fi Direct 42 Transferring data between a PC and the device. 43Calls 44
Making a call 44 Calling your contacts 44 Answering and rejecting a call 44 Making a second call 45 Viewing your call logs 45 Call settings 45Contacts 46
Searching for a contact 46 Adding a new contact 46 Favourites contacts 46 Creating a group 47Messaging 48
Sending a message 48 Conversation view 49 Changing your messaging settings 49E-mail 50
Managing email accounts 50 Working with account folders 50 Composing and sending email 51Camera and Video 52
Camera options on the viewfinder 52 Using the advanced settings 53 Taking a photo 54 Once you have taken a photo .54 Recording a video 55 After recording a video. 55 Gallery 56Multimedia 59
Music 59Utilities 61
Clock 61 62 Calendar 62 Voice Recorder 63 Voice Search 63 Downloads 63 FM Radio 64Web Browser 65
Internet 65 Chrome 66Settings 67
Networks 67 Sound & notification 70 Display 71 General 73LG Bridge Application 79
Phone software update 81
About this user guide 83
About this user guide 83 Trademarks 84Accessories 85
Troubleshooting 86
Guidelines for safe and efficient use
Please read these simple guidelines. Not following these guidelines may be dangerous or illegal. Should a fault occur, a software tool is built into your device that will gather a fault log. This tool gathers only data specific to the fault, such as signal strength, cell ID position in sudden call drop and applications loaded. The log is used only to help determine the cause of the fault. These logs are encrypted and can only be accessed by an authorised LG Repair centre should you need to return your device for repair.Exposure to radio frequency energy
Radio wave exposure and Specific Absorption Rate (SAR) information. This mobile phone model LG-H540 has been designed to comply with applicable safety requirements for exposure to radio waves. These requirements are based on scientific guidelines that include safety margins designed to assure the safety of all persons, regardless of age and health. - The radio wave exposure guidelines employ a unit of measurement known as the Specific Absorption Rate, or SAR. Tests for SAR are conducted using standardised methods with the phone transmitting at its highest certified power level in all used frequency bands. - While there may be differences between the SAR levels of various LG phone models, they are all designed to meet the relevant guidelines for exposure to radio waves. - The SAR limit recommended by the International Commission on Non-Ionizing Radiation Protection (ICNIRP) is 2W / kg averaged over 10g of tissue. - The highest SAR value for this model phone tested for use at the ear is 0.509 W/Kg (10 g) and when worn on the body is 0.426 W/Kg (10 g). - This device meets RF exposure guidelines when used either in the normal use position against the ear or when positioned at least 1.5cm away from the body. When a carry case, belt clip or holder is used for body-worn operation, it should not contain metal and should position the product at least 1.5cm away from your body. In order to transmit data files or messages, this device requires a quality connection to the network. In some cases, transmission of data files or messages may be delayed until such a connection is available. Ensure the above separation distance instructions are followed until the transmission is completed.Product care and maintenance
WARNING
Always use genuine LG batteries, chargers and accessories approved for use with this particular phone model. The use of any other types may void any approval or warranty applying to the phone and may be dangerous. - Do not disassemble this unit. Take it to a qualified service technician when repair work is required. - Repairs under warranty, at LG's discretion, may include replacement parts or boards that are either new or reconditioned, provided that they have functionality equal to that of the parts being replaced. - Keep away from electrical appliances such as TVs, radios and personal computers. - The unit should be kept away from heat sources such as radiators or cookers. - Do not drop. - Do not subject this unit to mechanical vibration or shock. - Switch off the phone in any area where you are required to by special regulations. For example, do not use your phone in hospitals as it may affect sensitive medical equipment. - Do not handle the phone with wet hands while it is being charged. It may cause an electric shock and can seriously damage your phone. - Do not charge a handset near flammable material as the handset can become hot and create a fire hazard. - Use a dry cloth to clean the exterior of the unit (do not use solvents such as benzene, thinner or alcohol). - Do not charge the phone when it is on soft furnishings. - The phone should be charged in a well ventilated area. - Do not subject this unit to excessive smoke or dust. - Do not keep the phone next to credit cards or transport tickets; it can affect the information on the magnetic strips. - Do not tap the screen with a sharp object as it may damage the phone. - Do not expose the phone to liquid or moisture. - Use accessories like earphones cautiously. Do not touch the antenna unnecessarily. - Do not use, touch or attempt to remove or fix broken, chipped or cracked glass. Damage to the glass display due to abuse or misuse is not covered under the warranty. - Your phone is an electronic device that generates heat during normal operation. Extremely prolonged, direct skin contact in the absence of adequate ventilation may result in discomfort or minor burns. Therefore, use care when handling your phone during or immediately after operation. - If your phone gets wet, immediately unplug it to dry off completely. Do not attempt to accelerate the drying process with an external heating source, such as an oven, microwave or hair dryer. - The liquid in your wet phone, changes the colour of the product label inside your phone. Damage to your device as a result of exposure to liquid is not covered under your warranty.Efficient phone operation
Electronics devices
All mobile phones may receive interference, which could affect performance. - Do not use your mobile phone near medical equipment without requesting permission. Avoid placing the phone over pacemakers, for example, in your breast pocket. - Some hearing aids might be disturbed by mobile phones. - Minor interference may affect TVs, radios, PCs etc. - Use your phone in temperatures between 0^ and 40^ , if possible. Exposing your phone to extremely low or high temperatures may result in damage, malfunction, or even explosion.Road safety
Check the laws and regulations on the use of mobile phones in the area when you drive. - Do not use a hand-held phone while driving. - Give full attention to driving. - Pull off the road and park before making or answering a call if driving conditions so require. - RF energy may affect some electronic systems in your vehicle such as car stereos and safety equipment. - When your vehicle is equipped with an air bag, do not obstruct with installed or portable wireless equipment. It can cause the air bag to fail or cause serious injury due to improper performance. - If you are listening to music whilst out and about, please ensure that the volume is at a reasonable level so that you are aware of your surroundings. This is of particular importance when near roads.Avoid damage to your hearing
 To prevent possible hearing damage, do not listen at high volume levels for long periods. Damage to your hearing can occur if you are exposed to loud sound for long periods of time. We therefore recommend that you do not turn on or off the handset close to your ear. We also recommend that music and call volumes are set to a reasonable level. - When using headphones, turn the volume down if you cannot hear the people speaking near you, or if the person sitting next to you can hear what you are listening to.NOTE
- Excessive sound pressure from earphones and headphones can cause hearing loss.Glass Parts
Some parts of your mobile device are made of glass. This glass could break if your mobile device is dropped on a hard surface or receives a substantial impact. If the glass breaks, do not touch or attempt to remove it. Stop using your mobile device until the glass is replaced by an authorised service provider.Blasting area
Do not use the phone where blasting is in progress. Observe restrictions and follow any regulations or rules.Potentially explosive atmospheres
- Do not use your phone at a refueling point. - Do not use near fuel or chemicals. - Do not transport or store flammable gas, liquid or explosives in the same compartment of your vehicle as your mobile phone or accessories.In aircraft
Wireless devices can cause interference in aircraft. - Turn your mobile phone off before boarding any aircraft. - Do not use it on the ground without permission from the crew.Children
Keep the phone in a safe place out of the reach of small children. It includes small parts which may cause a choking hazard if detached.Emergency calls
Emergency calls may not be available on all mobile networks. Therefore you should never depend solely on your phone for emergency calls. Check with your local service provider.Battery information and care
- You do not need to completely discharge the battery before recharging. Unlike other battery systems, there is no memory effect that could compromise the battery's performance. - Use only LG batteries and chargers. LG chargers are designed to maximise the battery life. - Do not disassemble or short-circuit the battery. - Keep the metal contacts of the battery clean. - Replace the battery when it no longer provides acceptable performance. The battery pack may be recharged hundreds of times before it needs replacing. - Recharge the battery if it has not been used for a long time to maximise usability. - Do not expose the battery charger to direct sunlight or use it in high humidity, such as in the bathroom. - Do not leave the battery in hot or cold places, as this may deteriorate battery performance. - There is risk of explosion if the battery is replaced with an incorrect type. - Dispose of used batteries according to the manufacturer's instructions. Please recycle when possible. Do not dispose as household waste. - If you need to replace the battery, take it to the nearest authorised LG Electronics service point or dealer for assistance. - Always unplug the charger from the wall socket after the phone is fully charged to save unnecessary power consumption of the charger. - Actual battery life will depend on network configuration, product settings, usage patterns, battery and environmental conditions. - Make sure that no sharp-edged items such as animal's teeth or nails, come into contact with the battery. This could cause a fire.Open Source Software Notice Information
To obtain the source code under GPL, LGPL, MPL, and other open source licenses, that is contained in this product, please visit http://opensource.lge.com. In addition to the source code, all referred license terms, warranty disclaimers and copyright notices are available for download. LG Electronics will also provide open source code to you on CD-ROM for a charge covering the cost of performing such distribution (such as the cost of media, shipping, and handling) upon email request to opensource@lge.com. This offer is valid for three (3) years from the date on which you purchased the product.HOW TO UPDATE YOUR DEVICE
Access to latest firmware releases, new software functions and improvements. - Select the software update in settings menu on your device. - Update your device by connecting it to your PC. For more information about using this function, please visit http://www.lg.com/common/index.jsp select country and language.DECLARATION OF CONFORMITY
Hereby, LG Electronics declares that this LG-H540 product is in compliance with the essential requirements and other relevant provisions of Directive 1999/5/EC. A copy of the Declaration of Conformity can be found at http://www/lg.com/global/declarationLG Electronics (Levant) - Jordan
Abdali Project, Rafik Al-Hariri Avenue, The Boulevard, Central Square, 5th FloorLaser safety statement
Caution!
This product employs a laser system. To ensure proper use of this product, please read this owner's manual carefully and retain for future reference. Should the unit require maintenance, contact an authorised service centre. Use of controls, adjustments, or the performance of procedures other than those specified herein may result in hazardous radiation exposure. To prevent direct exposure to laser beam, do not try to open the enclosure or make direct contact with the laser.  Disposal of your old appliance
1 All electrical and electronic products should be disposed of separately from the municipal waste stream via designated collection facilities appointed by the government or the local authorities. 2 The correct disposal of your old appliance will help prevent potential negative consequences for the environment and human health. 3 For more detailed information about disposal of your old appliance, please contact your city office, waste disposal service or the shop where you purchased the product. Disposal of waste batteries/accumulators
1 This symbol may be combined with chemical symbols for mercury (Hg), cadmium (Cd) or lead (Pb) if the battery contains more than 0.0005% of mercury, 0.002% of cadmium or 0.004% of lead. 2 All batteries/accumulators should be disposed separately from the municipal waste stream via designated collection facilities appointed by the government or the local authorities. 3 The correct disposal of your old batteries/accumulators will help to prevent potential negative consequences for the environment, animal and human health. 4 For more detailed information about disposal of your old batteries/ accumulators, please contact your city office, waste disposal service on the shop where you purchased the product.Important notice
Please read this before you start using your phone!
Please check to see whether any problems you encountered with your phone are described in this section before taking the phone in for service or calling a service representative.1. Phone memory
When there is less than 10MB of space available in your phone memory, your phone cannot receive new messages. You may need to check your phone memory and delete some data, such as applications or messages, to make more memory available.To uninstall applications:
1 Tap > > > General tab > Apps. 2 Once all applications appear, scroll to and select the application you want to uninstall. 3 Tap Uninstall.2. Optimizing battery life
Extend your battery's power by turning off features that you do not need to run constantly in the background. You can monitor how applications and system resources consume battery power.Extending your phone's battery life:
- Turn off radio communications when you are not using. If you are not using Wi-Fi, Bluetooth or GPS, turn them off. - Reduce screen brightness and set a shorter screen timeout. - Turn off automaticyncing forGmail,Calendar,Contacts and other applications. - Some applications you download may consume battery power. - While using downloaded applications, check the battery charge level.3. Before installing an open source application and OS
WARNING
- If you install and use an OS other than the one provided by the manufacturer it may cause your phone to malfunction. In addition, your phone will no longer be covered by the warranty. - To protect your phone and personal data, only download applications from trusted sources, such as Play Store™. If there are improperly installed applications on your phone, the phone may not work normally or a serious error may occur. You must uninstall those applications and all associated data and settings from the phone.4. Opening and switching applications
Multitasking is easy with Android; you can keep more than one application running at the same time. There is no need to quit an application before opening another. Use and switch between several open applications. Android manages each application, stopping and starting them as needed to make sure that idle applications don't consume resources unnecessarily. 1 Tap . A list of recently used applications will be displayed. 2 Tap the application you want to access. This does not stop the previous app from running in the background. Make sure to tap to back out of an app after using it. - To close an app from the recent apps list, swipe the app preview to the left or right. To clear all apps, tap Clear all.5. When the screen freezes
If the screen freezes or the phone does not respond when you try to operate it, remove the battery and reinsert it. Then power the phone back on.Getting to know your phone
Phone layout
NOTE: Proximity Sensor
- When receiving and making calls, the proximity sensor automatically turns the backlight off and locks the touch screen by sensing when the phone is near your ear. This extends battery life and prevents you from unintentionally activating the touch screen during calls. WARNING
Placing a heavy object on the phone or sitting on it can damage the display and touch screen functions. Do not cover the proximity sensor with screen protectors or any other type of protective film. This could cause the sensor to malfunction. | Power/Lock Key | • Turn your phone on/off by pressing and holding this key. • Short press to lock/unlock the screen |
| Volume Keys (While screen is off) | • Long press up to launch Capture+ • Long press down to launch Camera |
Installing the SIM or USIM card and battery
Insert the SIM or USIM card provided by the mobile telephone service provider, and the included battery. 1 To remove the back cover, hold the phone firmly in one hand. With your other hand, lift off the back cover with your thumbnail as shown in the figure below.  2 Slide the SIM card into the SIM card slot as shown in the figure. Make sure the gold contact area on the card is facing downward.  WARNING
Do not insert a memory card into the SIM card slot. If a memory card happens to be lodged in the SIM card slot, take the device to a LG Service Centre to remove the memory card.NOTE
- Only the microSIM cards work with the device. 3 Insert the battery.  4 To replace the cover onto the device, align the back cover over the battery compartment 1 and press it down until it clicks into place 2. Charging the battery
Charge the battery before using it for first time. Use the charger to charge the battery. A computer can also be used to charge the battery by connecting the phone to it using the USB cable. WARNING
Use only LG-approved chargers, batteries and cables. If you use unapproved chargers, batteries or cables, it may cause battery charging delay. Or this can cause the battery to explode or damage the device, which are not covered by the warranty. The charger connector is located at the bottom of the phone. Insert the charger and plug it into a power outlet. NOTE
- Do not open the back cover while your phone is charging.Inserting a memory card
Your device supports up to a 32GB microSD card. Depending on the memory card manufacturer and type, some memory cards may not be compatible with your device. WARNING
Some memory cards may not be fully compatible with the device. Using an incompatible card may damage the device or the memory card, or corrupt the data stored in it.NOTE
- Frequent writing and erasing of data shortens the lifespan of memory cards. 1 Remove the back cover. 2 Insert a memory card with the gold-coloured contacts facing downwards.  3 Replace the back cover.Removing the memory card
Before removing the memory card, first unmount it for safe removal. 1 Tap > > > General tab > Storage & USB > 2 Remove the back cover and pull out the memory card. WARNING
Do not remove the memory card while the device is transferring or accessing information. Doing so can cause data to be lost or corrupted or damage to the memory card or device. It is not responsible for losses that result from the misuse of damaged memory cards, including the loss of data.Locking and unlocking the device
Pressing the Power/Lock Key turns off the screen and puts the device into lock mode. The device automatically gets locked if it is not used for a specified period. This helps to prevent accidental taps and saves battery power. To unlock the device, press the Power/Lock Key and swipe the screen in any direction.NOTE
- Double-tapping on the screen also can wake up the screen instead of the Power/Lock Key.Changing the screen lock method
You can change the way that you lock the screen to prevent others accessing your personal information. 1 Tap > > Display tab>Lock screen>Select screen lock. 2 Select a desired screen lock from None, Swipe, Knock Code, Pattern, PIN and Password.NOTE
- Create a Google account before setting an unlock pattern and remember the Backup PIN you created when creating your pattern lock. Caution! If you haven't created a Google account on the phone and you forgot your PIN, Password, and the backup PIN, you need to perform a hard reset. But if you perform a hard reset, all user applications and user data will be deleted. Please remember to back up any important data before performing a hard reset.TIP! Smart Lock
You can use Smart Lock to make unlocking your phone easier. You can set it to keep your phone unlocked when you have a trusted Bluetooth device connected to it, when it's in a familiar location like your home or work, or when it recognises your face.Setting up Smart Lock
1 Tap > 2 Tap Display tab > Lock screen > Smart Lock. 3 Before you add any trusted devices, trusted places, or trusted face, you need to set up a screen lock (Knock Code, Pattern, PIN or Password).Your Home screen
Touch screen tips
Here are some tips on how to navigate on your phone. - Tap or touch - A single finger tap selects items, links, shortcuts and letters on the on-screen keyboard. - Touch and hold - Touch and hold an item on the screen by tapping it and not lifting your finger until an action occurs. - Drag - Touch and hold an item for a moment and then, without lifting your finger, move your finger on the screen until you reach the target position. You can drag items on the Home screen to reposition them. - Swipe or slide - To swipe or slide, quickly move your finger across the surface of the screen, without pausing when you first tap it (so you don't drag an item instead). - Double-tap - Double-tap to zoom on a webpage or a map. - Pinch-to-Zoom - Use your index finger and thumb in a pinching or spreading motion to zoom in or out when using the browser, Maps, or when viewing pictures. - Rotate the screen - From many applications and menus, the screen orientation adjusts to the device's physical orientation.NOTE
- Do not press too hard; the tap screen is sensitive enough to pick up a light, yet firm tap. - Use the tip of your finger to tap the option you want. Be careful not to tap any other buttons.Home screen
The Home screen is the starting point for many applications and functions. It allows you to add items like app shortcuts and Google widgets to give you instant access to information and applications. This is the default canvas and accessible from any menu by tapping .  1 Shows phone's status information, including the time, signal strength, battery status and notification icons. **2** **Widgets** are self-contained applications that can be accessed through the Apps drawer or on the Home screen. Unlike a shortcut, a Widget can function as an on-screen application. 3 Tap an icon (application, folder, etc.) to open and use it. 4 Indicates which Home screen canvas you are currently viewing. 5 Provides one-touch access to the function in any Home screen canvas. 6| Back Button | Returns to the previous screen. Also closes pop-up items, such as menus, dialogue boxes and the on-screen keyboard. |
| Home Button | Return to the Home screen from any screen. |
| Overview Button | Displays recently used applications. If you touch and hold this Button, it opens a menu of available options. |
| SIM Switch Button | Choose which SIM card you're going to use. Touch and hold to go to Dual SIM card settings. |
Extended Home screen
The operating system provides multiple Home screen canvases to provide more space for adding icons, widgets and more. - Slide your finger left or right across the Home screen to access additional canvases.Customizing the Home screen
You can customise your Home screen by adding apps and widgets and changing wallpapers.Adding items on your Home screen
1 Touch and hold the empty part of the Home screen. 2 In the Add Mode menu, select the item you want to add. You then see this added item on the Home screen. 3 Drag it to the desired location and lift your finger. TIP! To add an application icon to the Home screen from the Apps screen, touch and hold the application you want to add.Removing an item from the Home screen
- While on the Home screen, touch and hold the icon you want to remove > drag it to.Adding an app to the Quick Button Area
- From the Apps screen or on the Home screen, touch and hold an application icon and drag it to the Quick Button Area. Then release it in the desired location.Removing an app from the Quick Button Area
- Touch and hold the desired Quick Button, drag it toNOTE
- The Apps Button cannot be removed.Customizing app icons on the Home screen
1 Touch and hold an application icon until it unlocks from its current position, then release it. The editing icon appears in the upper-right corner of the application. 2 Tap the application icon again and select the desired icon design and size. 3 Tap OK to save the change.Returning to recently-used applications
1 Tap . App previews of recently used applications will be displayed. 2 Tap an app preview to open the application. -OR- Tap to return to your previous screen.Notifications panel
Notifications alert you to the arrival of new messages, calendar events and alarms, as well as ongoing events, such as when you are on a call. When a notification arrives, its icon appears at the top of the screen. Icons for pending notifications appear on the left, and system icons, such as Wi-Fi and battery strength are shown on the right.NOTE
- The available options may vary depending on the region or service provider. Opening the notifications panel
Swipe down from the status bar to open the notifications panel. To close the notifications panel, swipe the screen upwards or tap< .  Quick Settings Area Notifications 3 CLEAR Tap each quick setting button to toggle it on/off. Touch and hold the desired button to directly access the settings menu for the function. To see more toggle buttons, swipe left or right. Tap to remove, add or rearrange quick setting buttons. Current notifications are listed, each with a brief description. Tap a notification to view it. 3 Tap to clear all the notifications.Indicator icons on the Status Bar
Indicator icons appear on the status bar at the top of the screen to report missed calls, new messages, calendar events, device status and more.  The icons displayed at the top of the screen provide information about the status of the device. The icons listed in the table below are some of the most common ones.| Icon Description Icon Description | |||
| No SIM card inserted A song is currently playing | |||
| No network signal available Ringer silenced | |||
| Airplane mode is on Vibrate mode isOn | |||
| Connected to a Wi-Fi network Battey fully charged | |||
| Wired headset connected Battery is charging | |||
| Call in progress | Ψ | The phone is connected to a PC via a USB cable | |
| Missed call Downloading data | |||
| Bluetooth is on Uploading data | |||
| System warning GPS is on | |||
| An alarm is set Data is synchronizing | |||
| New text or multimedia message | Choose input method | ||
| Wi-Fi hotspot is active | |||
NOTE
- The icon's location in the status bar may differ according to the function or service.On-screen keyboard
You can enter text using the on-screen keyboard. The on-screen keyboard appears on the screen when you tap an available text entry field.Using the keypad and entering text
Tap once to capitalise the next letter you type. Double-tap for all caps. Tap to go to the keyboard settings. Touch and hold to change entering text method. Tap to enter a space. Tap to create a new line. Tap to delete the previous character.Entering accented letters
For example, to input "á", touch and hold the "a" button until the pop-up appears and displays related special characters. Without lifting the finger, drag your finger to the desired special character. Once it's highlighted, lift your finger.Special Features
Gesture shot
The Gesture shot feature allows you to take a picture with a hand gesture using the front camera.To take a photo
There are two methods for using the Gesture shot feature. - Raise your hand, with an open palm, until the front camera detects it and a box appears on the screen. Then close your hand into a fist to start the timer, allowing you time to get ready. -OR - Raise your hand, in a clenched fist, until the front camera detects it and a box appears on the screen. Then unclench your fist to start the timer, allowing you time to get ready. Glance View
When the phone screen is off, you can see the status bar, time and date by dragging your finger down on the screen. KnockON
The KnockON feature allows you to double-tap the screen to easily turn it on or off.To turn the screen on
1 Double-tap the centre of the Lock screen to turn the screen on. 2 Unlock the screen or access any of the available shortcuts or widgets.To turn the screen off
1 Double-tap an empty area of the Home screen or the Status Bar. 2 The screen will turn off.NOTE
- Tap on the centre area of the screen. If you tap on the bottom or the top area, the recognition rate may decrease.Knock Code
The Knock Code feature allows you to create your own unlock code using a combination of knocks on the screen. You can access the Home screen directly when the screen is off by tapping the same sequence on the screen.NOTE
- If you enter the wrong Knock Code 6 times, it will compulsorily take you to your Google account log in/backup PIN. - Use the fingertip instead of finger nail to tap the screen for turning it on or off. 1 Tap > > >Display tab>Lock screen>Select screen lock>Knock Code. 2 Tap the squares in a pattern to set your Knock Code. Your Knock Code pattern can be 6 to 8 taps.Unlocking the screen using the Knock Code
You can unlock the screen by tapping the Knock Code pattern you already set, when the screen turns off.Dual window
This feature allows you to multi-task by splitting up the screen into two, allowing you to use two compatible applications at the same time. 1 Tap > Dual window. 2 Tap or drag the app icon for the corresponding application you wish to use. : Tap to view the Dual window menu options, or drag to resize the split screens. : Switch two screens. View the app list. : Change the selected window to full screen. × : Close the currently selected app window.NOTE
- You can enable or disable Dual window through the Settings menu. 1 Tap > > General tab > Dual window. 2 Slide the toggle key to On or Off.Capture+
The Capture+ feature allows you to create memos and capture screen shots. You can use Capture+ to easily and efficiently create memos during a call, with a saved picture or on the current phone screen. 1 Tap and drag the Status Bar down and tap  2 Create a memo using the following options:| Tap to undo the most recent action. |
| Tap to redo the most recently deleted action. |
| Tap to insert text into your memo. |
| Tap to select the pen type and colour. |
| Tap to use the eraser to erase the pen marks on the memo. |
| Tap to crop the image of memo. |
| Tap to save the memo you've created. |
NOTE
- Please use a fingertip while using the Capture+ feature. Do not use your fingernail. 3 Tap to save the current memo to the QuickMemo+ or Gallery. Discard Capture+ - Tap View the Saved Memo - Tap > > and select the Capture+ album. -OR Tap > > and select the desired memo.Google account setup
The first time you open a Google application on your phone, you will be required to sign in with your existing Google account. If you do not have a Google account, you will be prompted to create one.Creating your Google account
1 Tap > > >General tab > Accounts & sync. 2 Tap ADD ACCOUNT > Google > Or create a new account. 3 Enter your first and last name, then tap NEXT. 4 Enter a username and tap NEXT. Your phone will communicate with Google servers and check for username availability. 5 Enter your password and tap NEXT. 6 Follow the instructions and enter the required and optional information about the account. Wait while the server creates your account.Signing into your Google account
1 Tap > > >General tab > Accounts & sync. 2 Tap ADD ACCOUNT > Google. 3 Enter your email address and tap NEXT. 4 After signing in, you can use Gmail and take advantage of Google services on your phone. 5 Once you have set up your Google account, your phone will automatically synchronise with your Google account on the web (if a data connection is available). After signing in, your phone will sync with your Google services, such as Gmail, Contacts, and Google Calendar. You can also use Maps, download applications from Play Store, back up your settings to Google servers, and take advantage of other Google services on your phone.IMPORTANT
- Some applications, such as Calendar, work only with the first Google Account you add. If you plan to use more than one Google Account with your phone, be sure to sign into the one you want to use with such applications first. When you sign in, your contacts, Gmail messages, Calendar events, and other information from these applications and services on the web are synchronised with your phone. If you don't sign into a Google Account during setup, you will be prompted to sign in or to create a Google Account the first time you start an application that requires one, such as Gmail or Play Store. - If you have an enterprise account through your company or other organization, your IT department may have special instructions on how to sign into that account.Connecting to Networks and Devices
Wi-Fi
You can use high-speed Internet access while within the coverage of the wireless access point (AP).Connecting to Wi-Fi networks
1 Tap > > > Networks tab > Wi-Fi. 2 Tap to turn Wi-Fi on and start scanning for available Wi-Fi networks. 3 Tap a network to connect to it. - If the network is secured with a lock icon, you will need to enter a security key or password. 4 The status bar displays icons that indicate Wi-Fi status.NOTE
- If you are out of the Wi-Fi zone or have set Wi-Fi to Off, the device may automatically connect to the Web using mobile data, which may incur data charges. TIP! How to obtain the MAC address Tap > > Networks tab > Wi-Fi > Advanced Wi-Fi> MAC address.Bluetooth
Bluetooth is a short-range communications technology that allows you to connect wirelessly to a number of Bluetooth devices, such as headsets and hands-free car kits, and Bluetooth-enabled handhelds, computers, printers, and wireless devices.NOTE
- LG is not responsible for the loss, interception or misuse of data sent or received via the Bluetooth feature. - Always make sure that you share and receive data with devices that are trusted and properly secured. - If there are obstacles between the devices, the operating distance may be reduced. - Some devices, especially those that are not tested or approved by Bluetooth SIG, may be incompatible with your device.Pairing your phone with another Bluetooth device
1 Tap > > >Networks tab > Bluetooth. 2 Tap OFF to turn Bluetooth on and start scanning for available Bluetooth devices. - If you want to detect the visible devices in range additionally, tap SEARCH. 3 Choose the device you want to pair with from the list. Once the paring is successful, your phone connects to the other device.NOTE
- Pairing between two Bluetooth devices is a one-time process. Once a pairing has been created, the devices will continue to recognise their partnership and exchange information. TIP! Please consult documentation included with Bluetooth device for information on pairing mode and passcode (typically 0 0 0 0 - four zeroes).Sending data via Bluetooth
1 Select a file or item such as a contact or media file. 2 Select the option for sending data via Bluetooth. 3 Search for and pair with a Bluetooth-enabled device.NOTE
- Due to different specifications and features of other Bluetooth-compatible devices, display and operations may be different, and functions such as transfer or exchange may not be possible with all Bluetooth compatible devices.Receiving data via Bluetooth
1 Tap > > >Networks tab > Bluetooth. 2 Tap OFF to turn Bluetooth on. 3 You will receive a request to accept a pairing attempt from the sending device. Be sure to select ACCEPT.Wi-Fi Direct
Wi-Fi Direct provides a direct connection between Wi-Fi enabled devices without requiring an access point.Turning on Wi-Fi Direct
1 Tap > > > Networks tab > Wi-Fi. 2 Tap > Advanced Wi-Fi > Wi-Fi Direct.NOTE
- When in this menu, your device is visible to other visible Wi-Fi Direct devices nearby.Transferring data between a PC and the device
You can copy or move data between a PC and the device.Transferring data
1 Connect your device to a PC using the USB cable that came with your phone. 2 Open the Notifications panel, tap the current connection type, and select Media device (MTP). 3 A window will pop-up on your PC, allowing you to transfer the desired data.NOTE
- The LG Android Platform Driver is required to be installed on your PC to be able to detect the phone. - Check the requirements for using Media device (MTP). Items Requirement| OS Microsoft Windows XP SP3, Vista or higher | |
| Window Media Player version | Windows Media Player 10 or higher |
Calls
Making a call
1 Tap > to open the dialer. 2 Enter the number using the dialer. To delete a digit, tap × 3 After entering the desired number, tap to place the call. 4 To end the call, tap TIP! To enter "+" to make international calls, touch and hold 0+Calling your contacts
1 Tap > to open your contacts. 2 Scroll through the contact list. You can also enter the contact's name in the Search field or scroll along the alphabet letters on the right edge of the screen. 3 In the list that is displayed, tap the contact you want to call.Answering and rejecting a call
- Swipe in any direction to answer the incoming call. - Swipe in any direction to decline an incoming call.NOTE
- Tap or swipe the Decline with message if you want to send a message to the caller.Making a second call
1 During your first call, tap > Add call and enter the number. 2 Tap to place the call. 3 Both calls are displayed on the call screen. Your initial call is locked and put on hold. 4 Tap the displayed number to toggle between calls. Or tap × to start a conference call. 5 To end all calls, tapNOTE
- You are charged for each call you make.Viewing your call logs
1 Tap > Call logs tab. 2 View a list of all dialed, received and missed calls.TIP!
- Tap any call log entry to view the date, time and duration of the call. - Tap > Delete all to delete all of the recorded items.Call settings
You can configure phone call settings, such as call forwarding, as well as other special features offered by your carrier. 1 Tap > to open the dialer. 2 Tap > Call settings and configure the desired options.Contacts
You can add contacts on your phone and synchronise them with the contacts in your Google Account or other accounts that supportyncingcontacts.Searching for a contact
1 Tap > to open your contacts. 2 Tap Search contacts and enter the contact name using the keyboard.Adding a new contact
1 Tap > and enter the new contact's number. 2 Tap > Add to Contacts > New contact. 3 If you want to add a picture to the new contact, tap the image icon. Choose Take photo or Select from Gallery. 4 Enter the desired information for the contact. 5 Tap SAVE.Favourites contacts
You can classify frequently called contacts as favourites.Adding a contact to your favourites
1 Tap > to open your contacts. 2 Tap a contact to view its details. 3 Tap the star at the top right of the screen. The star turns yellow.Removing a contact from your favourites list
1 Tap > Favourites tab. 2 Choose a contact to view its details. 3 Tap the yellow star at the top right of the screen. The star turns a dark colour and the contact is removed from your favourites.Creating a group
1 Tap > > Groups tab. 2 Tap > New group. 3 Enter a name for the new group. You can also set a distinct ringtone for the newly created group. 4 Tap Add members to add contacts to the group and tap ADD. 5 Tap SAVE to save the group.NOTE
- If you delete a group, the contacts assigned to that group will not be lost. They will remain in your contact list.Messaging
Your phone combines text and multimedia messaging into one intuitive, easy to use menu.Sending a message
1 Tap > 2 Enter a contact name or contact number into the To field. As you enter the contact name, matching contacts appear. You can tap a suggested recipient and add more than one contact.NOTE
- You may be charged for each text message you send. Please consult with your service provider. 3 Tap the text field and start entering your message. 4 Tap to open the options menu. Choose from any of the available options. TIP! You can tap to attach the file that you want to share with message. 5 Tap Send to send your message.TIP!
- The 160-character limit may vary from country to country depending on how the text message is coded and the language used in the message. - If an image, video, or audio file is added to a text message, it will be automatically converted into a multimedia message and you will be charged accordingly.NOTE
- When you get a text message during a call, there will be an audible notification.Conversation view
Messages exchanged with another party are displayed in chronological order so that you can conveniently see and find your conversations.Changing your messaging settings
Your phone's messaging settings are predefined to allow you to send messages immediately. You can change the settings based on your preferences. - Tap > > Settings.Managing email accounts
To open the Email application
The first time you open the Email application, a setup wizard opens to help you add an email account. - Tap > _____> Adding another email account: - Tap > >> Settings >+ . Changing an email general settings: - Tap > > > > > Settings > General settings. Deleting an email account: - Tap > > > Settings > Remove account > Select the account to delete > REMOVE > YES.Working with account folders
- Tap > > > > Show all folders. Each account has Inbox, Outbox, Sent and Drafts folders. Depending on the features supported by your account's service provider, you may have additional folders.Composing and sending email
1 Tap > > to create a new email. 2 Enter an address for the message's intended recipient. As you enter text, matching addresses will be offered from your contacts. Separate multiple addresses with semicolons. 3 Tap the Cc/Bcc field to copy or blind copy to other contacts/email addresses. 4 Tap the text field and enter your message. 5 Tap to attach the file you want to send with your message. 6 Tap to send the message.Camera and Video
Camera options on the viewfinder
You can use the camera or camcorder to take and share pictures and videos. Tap > >  - Hide/Display Options - Tap to hide/display the camera options on the viewfinder. Flash - Allows you to manage the camera's flash. Swap camera - Tap to swap between the rear camera lens and the front camera lens. Shot mode - Allows you to select the shot mode for the picture. Settings - Tap this icon to open the camera settings menu. Gallery - Tap to view the last photo or video you recorded. 7 Record - Tap to start recording. 8 Capture - Tap to take a photo. Back Button - Tap to exit the camera.NOTE
- Be sure to clean the protective lens cover with a microfiber cloth before taking pictures. A lens cover with smudges from fingers can cause blurry pictures with a "halo" effect.Using the advanced settings
In the camera viewfinder, tap to show the advanced options. Tap each icon to adjust the following camera settings.| 163 | Set the size of your picture and video. |
| Allows you to take pictures with voice commands. When on, you just say "Cheese", "Smile", "LG", etc. to take a picture. | |
| Set your camera's timer. This is ideal if you want to be a part of the picture or video. | |
| Allows you to take better pictures and record better videos by displaying a grid line for help with alignment. | |
| Set the storage location for your pictures and videos. Choose from IN (internal memory) and SD (memory card). This menu appears only when the SD card is inserted. | |
| Allows you to learn how a function works. This icon will provide you with a help guide. |
Taking a photo
1 Tap 0> ③> 2 Frame your subject on the screen. 3 A square around the subject indicates that the camera has focused. 4 Tap to take a photo. Your picture will be automatically saved to the Gallery.Once you have taken a photo
Tap the image thumbnail on the screen to view the last photo you took.| Tap to edit the photo. | |
| Tap to take another photo immediately. | |
| Tap to open the available sharing options. | |
| Tap to delete the photo. | |
| Tap to access additional options. | |
| ★ | Tap to add the photo to your favourites. |
Panorama mode
Allows you to take a panoramic picture. 1 Tap 0 > ① > 2 Tap Mode > 3 Tap to start taking the panoramic picture. 4 Pan your phone slowly in one direction. 5 Make sure that the focus area aligns with the blue guideline while taking the photo. 6 Tap to stop taking the panoramic picture.Recording a video
1 Tap 0 > 0 > 0 2 Frame your subject on the screen. 3 Tap to start recording the video. 4 The length of the recording is displayed on the top of the screen.NOTE
- Tap to take pictures while recording video. 5 Tap to pause recording video. You can resume recording again by tapping - OR - Tap to stop recording. Your video will be automatically saved to the Gallery.After recording a video
Tap the video thumbnail on the screen to view the last video you recorded.| Tap to record another video immediately. | |
| < | Tap to open the available sharing options (such as Messaging or Bluetooth) to share. |
| Tap to delete the video. | |
| : | Tap to access additional options. |
| ★ | Tap to add the video to your favorites |
Gallery
The Gallery application presents the pictures and videos in your storage, including those you've taken with the Camera application and those you downloaded from the web or other locations. 1 Tap > > to view the images stored in the storage. 2 Tap an album to open it and view its contents. (The pictures and videos in the album are displayed in chronological order.) 3 Tap a picture in an album to view it.NOTE
- Depending on the software installed, some file formats may not be supported. - Some files may not play properly due to their encoding.Viewing pictures
The Gallery displays your pictures in folders. When an application, such as E-mail, saves a picture, the download folder is automatically created to contain the picture. Likewise, capturing a screenshot automatically creates the Screenshot folder. Pictures are displayed by the date they were created. Select a picture to view it full screen. Scroll left or right to view the next or previous image.Zooming in and out
Use one of the following methods to zoom in on an image: - Double-tap anywhere to zoom in. - Spread two fingers apart on any place in the picture zoom in. Pinch in or double-tap the image to zoom out.Video options
1 Tap 0 > 0 > 0 2 Select the video you want to watch. | 1 / | Tap to pause/resume video playback. |
| 2 | Touch and hold to fast-forward in 3 second increments. Tap to fast-forward 10 seconds. |
| 3 | Touch and hold to rewind in 3 second increments. Tap to rewind 10 seconds. |
| 4 | Tap to adjust the video volume. |
| 5 / | Tap to lock/unlock the screen. |
| 6 | Tap to set the various effects. |
| ? | Tap to access additional options. |
NOTE
- While playing a video, slide the right side of the screen up or down to adjust the sound. - While playing a video, slide the left side of the screen up or down to adjust the brightness. - While playing a video, slide your finger from left to right (or vice versa) to fast-forward and rewind.Editing photos
While viewing a photo, tap Deleting photos/videos
Use one of the following methods: - While in a folder, tap , select the photos/videos and then tap DELETE. While viewing a photo, tapSetting wallpaper
While viewing a photo, tap > Set image as to set the image as wallpaper or assign it to a contact.NOTE
- Depending on the software installed, some file formats may not be supported. - If the file size exceeds the available memory, an error can occur when you open files.Multimedia
Music
Your phone has a music player that lets you play all your favorite tracks.Playing a song
1 Tap > > 2 Tap the Songs tab. 3 Select the song you want to play. 4 The following options are available. | 1 | II | Tap to pause playback. |
| Tap to resume playback. | ||
| 2 | Tap to skip to the next track in the album, playlist or shuffle list. Touch and hold to fast-forward. | |
| 3 | Tap to restart the current track or skip to the previous track in the album, playlist or shuffle list. Touch and hold to rewind. | |
| 4 | Tap to adjust the volume. | |
| 5 | Tap to set audio effects. | |
| 6 | Tap to play the current playlist in shuffle mode (tracks are played in random order). | |
| 7 | Tap to toggle through repeat all songs, repeat current song and repeat off. | |
| 8 | Tap to add the song to your favorites. | |
| 9 | Tap to open the current playlist. | |
| 10 | Tap to access additional options. |
NOTE
- Depending on the software installed, some file formats may not be supported. - If the file size exceeds the available memory, an error can occur when you open files. - Music file copyrights may be protected by international treaties and national copyright laws. Therefore, it may be necessary to obtain permission or a licence to reproduce or copy music. In some countries, national laws prohibit private copying of copyrighted material. Before downloading or copying the file, please check the national laws of the relevant country concerning the use of such material.Utilities
Clock
The Clock app gives you access to the Alarms, Timer, World clock and Stopwatch functions. Access these functions by tapping the tabs across the top of the screen or swiping horizontally across the screen. - Tap 0 > 0 > 0Alarms
The Alarms tab allows you to set alarms. 1 Tap > > Alarms tab. 2 Tap to add a new alarm. 3 Adjust the settings as necessary and tap SAVE.NOTE
- You can also tap an existing alarm to edit it.Timer
The Timer tab can alert you with an audible signal when a set amount of time has passed. 1 Tap > > Timer tab. 2 Set the desired time on the timer. 3 Tap Start to start the timer. 4 Tap Stop to stop the timer.World clock
The World clock tab allows you to easily check the current time in other cities around the world. 1 Tap > > World clock tab. Utilities 2 Tap and select the desired city.Stopwatch
The Stopwatch tab allows you to use your phone as a stopwatch. 1 Tap > > Stopwatch tab. 2 Tap Start to initiate the stopwatch. - Tap Lap to record lap times. 3 Tap Stop to stop stopwatch.Calculator
The Calculator app allows you to perform mathematical calculations using a standard or scientific calculator. 1 Tap > > 2 Tap the number buttons to enter numbers. 3 For simple calculations, tap the function you want to perform (+, -, x or ÷) followed by = .NOTE
- For more complex calculations, tapCalendar
The Calendar app allows you to track your schedule of events. 1 Tap 0 > 公 2 Tap the date you want to add an event to. Then tapVoice Recorder
The Voice Recorder app records audible files for you to use in a variety of ways.Recording a sound or voice
1 Tap > > 2 Tap to begin recording. 3 Tap to end the recording. 4 Tap to listen to the recording.NOTE
- Tap to access your recordings. You can listen to your saved recordings.Voice Search
Use this application to search webpages using voice. 1 Tap > > Google folder> 2 Say a keyword or phrase when Listening... appears on the screen. Select one of the suggested keywords that appear.NOTE
- This application may not be available depending on the region or service provider.Downloads
Use this application to see what files have been downloaded through the applications. - Tap 0 > 0 > 0NOTE
- This application may not be available depending on the region or service provider.FM Radio
Your phone has a built-in FM Radio so you can tune in to your favorite stations and listen on the go.      TIP! You must plug in your earphones in order to use them as an antenna.NOTE
- This application may not be available depending on the region or service provider.Web Browser
Internet
The internet gives you a fast, full colour world of games, music, news, sports, entertainment, and much more, right on your mobile phone.NOTE
- Additional charges apply when connecting to these services and downloading content. Check data charges with your network provider. - Tap O > ①>Using the Web toolbar
Scroll towards the top of the webpage to access the browser toolbar.| ← | Tap to go back one page. |
| → | Tap to go forward one page. |
| ◇ | Tap to go to the Home page. |
| 国 | Tap to open a new window. |
| 国 | Tap to access your bookmarks. |
Viewing webpages
Tap the address field, enter the web address and tap Go on the keyboard.Opening a page
To go to a new page, tap 1 > + . To go to another webpage, tap 2, scroll up or down, and tap the page to select it.Searching the web by voice
Tap the address field and then tap . When prompted, say a keyword and select one of the suggested keywords that appear.NOTE
- This feature may not be available depending on the region or service provider.Bookmarks
To bookmark the current webpage, tap > Add bookmark > SAVE. To open a bookmarked webpage, tap and select the desired bookmark.History
Tap l History tab to open a list of recently visited webpages. To clear all of your history, tap l YES.Chrome
Use Chrome to search for information and browse webpages. Tap > >NOTE
- This application may not be available depending on your region and service provider.Viewing webpages
Tap the address field, and then enter a web address or search criteria.Opening a page
To open a new page, tab > New tab. To go to another webpage, tap and tap the page to select it.Settings
The Settings application contains most of the tools for customizing and configuring your phone. All of the settings in the Settings application are described in this section.To open the Settings application
- Tap > touch and hold > System settings. -OR - - Tap 0 > 0 > 0Networks
< WIRELESS NETWORKS > Dual SIM card
You can configure Dual SIM settings. - SIM card 1 - Allows you to change the SIM card name and SIM card icon for SIM card 1. - Activate slot 1 - Checkmark to activate or deactivate the SIM card slot 1. - SIM card 2 - Allows you to change the SIM card name and SIM card icon for SIM card 2. - Activate slot 2 - Checkmark to activate or deactivate the SIM card slot 2. - SIM card colour theme - Allows you to select your desired colors. - Cost save mode - Every contact is added along with assigned SIM when adding in phone book. During calling, matching operator SIM is identified and the operation is completed using the matching operator SIM. This makes possible to use benefit from using same operator. - Mobile data - Checkmark to enable data access over the mobile network. - SIM card to use - You can change the default data network. All mobile packet services (Web, MMS, Email, etc) will use SIM selected on this value. When only one SIM card is inserted, the default data network is set as the inserted SIM and it is not allowed to change. - Data roaming - Checkmark to allow you to use mobile data connections when you're roaming outside your home network area.Wi-Fi
Turns on Wi-Fi to connect to available Wi-Fi networks.Bluetooth
Turns the Bluetooth wireless feature on or off to use Bluetooth.Mobile data
Displays the data usage and mobile data usage limit.Call
Configure phone call settings, such as call forwarding and other special features offered by your carrier.[SIM card 1/SIM card 2 Tab]
Voicemail - Allows you to select your carrier's voicemail service. - Fixed dialing numbers - Turn on and compile a list of numbers that can be called from your phone. You need your PIN2, which is available from your operator. Only numbers in the fixed dial list can be called from your phone. - Call forwarding - Allows you to set the call forwarding options. - Call barring - Locks incoming, outgoing or international calls. - Call duration - View the duration of calls, including Last call, Outgoing calls, Incoming calls and All calls. - Additional settings - Allows you to change the following settings. Caller ID: Allows you to set default operator settings to display your number in outgoing calls. Call waiting: If call waiting is activated, the handset will notify you of an incoming call while you are on a call (depending on your network provider).[Common Tab]
- Smart forward - Allows you to receive SIM2 calls if you are busy on SIM1 and vice versa. - Incoming voice call pop-up - Display incoming voice call pop-up when an app is in use. - Call reject - Allows you to set the call reject function. - Decline with message - When you want to reject a call, you can send a quick message using this function. This is useful if you need to reject a call during a meeting. - Auto answer - Set the time before a connected hands-free device automatically answers an incoming call. - Connection vibration - Vibrates your phone when the other party answers the call. - Save unknown numbers - Add unknown numbers to contacts after a call. - Power key ends call - Allows you to select your end call. - Silence incoming calls - Checkmark to allow you to flip the device to silence incoming calls.< CONNECTIVITY>
Tethering
- USB tethering - Allows you to share the internet connection with your computer via a USB cable. - Wi-Fi hotspot - Allows you to create a hotspot and share your connection. - Bluetooth tethering - Allows you to connect to other devices via Bluetooth. - Help - Displays Help information about USB tethering, Wi-Fi hotspot, and Bluetooth tethering.More
- Airplane mode - Airplane Mode (flight mode) allows you to use many of your phone's features, such as games, and music, when you are in an area where making or receiving calls or data use is prohibited. When you set your phone to Airplane Mode, it cannot send or receive any calls or access online data. - VPN - From your phone, you can add, set up, and manage virtual private networks (VPNs) that allow you to connect and access resources inside a secured local network, such as your corporate network. - Mobile networks - This menu allows you to configure various mobile network settings. - Printing - Allows you to print the content of certain screens (such as web pages displayed in Chrome) to a printer connected to the same Wi-Fi network as your Android device.Sound & notification
< BASIC > Sound profile Allows you to set your phone's sound profile. < SOUND > Volume Adjust the phone's volume settings to suit your needs and environment. SIM1 ringtone/SIM2 ringtone Allows you to set the ringtones for calls. Ringtone ID Allows you to compose ringtones based on device number of incoming call.Apps
Allows you to prevent apps from displaying notifications or set apps to show notifications with priority when Do not disturb is set to Priority only.Notification LED
Tap the switch to toggle it On or Off. On activates the LED light for the notifications you select, in the colour you set for each.< ADVANCED SETTINGS >
More
- SIM1 notification sound/SIM2 notification sound - Allows you to set the notification sound. You can also add a notification sound by tapping + in the upper-right corner of the screen. - Vibrate on tap - Checkmark to vibrate when tapping the Home touch buttons and during other UI interactions. - Sound effects - Tap to set the dial pad touch tones, touch sounds and screen lock sound. - Message/call voice notifications - Tap the Message/call voice notifications switch to toggle it On or Off. On allows your device to read out incoming calls and message events automatically.Display
< HOME & LOCK >
Home screen
- Select Home - Set Home or EasyHome as the default home. - Theme - Sets the screen theme for your device. You can download new themes from LG SmartWorld. - Wallpaper - Sets the wallpaper to use on your Home screen. - Screen swipe effect - Choose the desired type of effect to display when you swipe from one Home screen canvas to the next. - Allow Home screen looping - Displays the first screen after the last screen when scrolling the Home screen. - Help - Displays help information for the Home screen.Lock screen
- Select screen lock - Set a screen lock type to secure your phone. Opens a set of screens that guide you through drawing a screen unlock pattern. If you enabled a Pattern lock type when you turn on your phone or wake up the screen, you are asked to draw your unlock pattern to unlock the screen. - Smart Lock - Sets to keep your phone unlocked with trusted device or a place. - Wallpaper - Allows you to set your Lock screen wallpaper. - Shortcuts - Allows you to choose the shortcuts available on the lock screen. - Contact info for lost phone - Allows you to display the owner information on the lock screen in case the phone is lost. - Lock timer - Sets the amount of time before the screen automatically locks after the screen has timed out. - Power key instantly locks - Checkmark to instantly lock the screen when the Power/Lock key is pressed. This setting overrides the Security lock timer setting.Home touch buttons
Set the Home touch buttons displayed at the bottom of all screens. Set which keys are displayed, their position on the bar and what they look like. Font type Select the desired font type. Font size Select the desired font size.< BASIC SETTINGS >
Brightness
Adjust the screen brightness by using the slider.Auto-rotate screen
Set to switch orientation automatically when you rotate the phone.Screen timeout
Set the time delay before the screen automatically turns off.< ADVANCED SETTINGS >
More
- Daydream - Select the screen saver to display when the phone is sleeping while docked and/or charging. - Motion sensor calibration - Allows you to improve the accuracy of the tilt and speed of the sensor.General
Language & keyboard
Select the language for the text on your phone and for configuring the on-screen keyboard, including words that you've added to its dictionary. - Language - Choose a language to use on your phone. - Current keyboard - Allows you to select the default keyboard type. - LG Keyboard - Tap the Settings icon to change the LG Keyboard settings. - Google voice typing - Checkmark to select Google voice typing to enter data. Tap the Settings icon to change the Google voice settings. - Text-to-speech output - Tap to set the preferred engine or general settings for text-to-speech output. - Pointer speed - Adjust the pointer speed. - Reverse buttons - Reverse the mouse buttons to use primary button on right.Location
Turn on location service, your phone determines your approximate location using Wi-Fi and mobile networks. When you select this option, you're asked whether you consent to allowing Google to use your location when providing these services. - Mode - Sets the how your current location information is determined. - Camera - Checkmark to tag photos or videos with their locations. - Google Location History - Allows you to choose your location information settings as accessed by Google and its products.Accounts & sync
Use the Accounts & sync settings menu to add, remove, and manage your Google and other supported accounts. You also use these settings to control how and whether all applications send, receive, and sync data on their own schedules and whether all applications can synchronise user data automatically. Gmail™, Calendar, and other applications may also have their own settings to control how they synchronise data; see the sections on those applications for details. Tap ADD ACCOUNT to add new account.Accessibility
Use the Accessibility settings to configure accessibility plug-ins you have installed on your phone.- Vision
- TalkBack - Allows you to set up the TalkBack function which assists people with impaired vision by providing verbal feedback. - Message/call voice notifications - Tap to toggle it On or Off. On allows you to hear automatic spoken alerts for incoming calls and messages. - Screen shade - Checkmark to set the screen to a darker contrast. - Font size - Sets the font size. - Touch zoom - Allows you to zoom in and out by triple-tapping the screen. - Screen colour inversion - Checkmark to invert the colours of the screen and content. - Screen colour filter - Allows you to change the colours of screen and content. - Power key ends call - Checkmark so that you can end voice calls by pressing the Power/Lock Key.- Hearing
- Captions - Allows you to customise caption settings for those with hearing impairments. - Notification LED - Allows you to activate the LED light for incoming calls and notifications. - Flash alerts - Checkmark to set the flash to blink for incoming calls and notifications. - Turn off all sounds - Checkmark to turn off all device sounds. - Audio type - Sets the audio type. - Sound balance - Sets the audio route. Move the slider on the slide bar to set it.- Motor & cognition
- Touch feedback time - Sets the touch feedback time. - Touch assistant - Show a touch board with easy access to common actions. - Screen timeout - Sets the amount of time before the backlight turns off automatically. - Touch control areas - Allows you to select an area of the screen to limit touch activation to just that area of the screen.- Accessibility features shortcut
Allow you to access selected features quickly when triple-tapping the Home button.- Auto-rotate screen
Checkmark to allow the phone to rotate the screen depending on the physical phone orientation (portrait or landscape)..- Switch Access
Allows you to interact with your device using one or more switches that work like keyboard keys. This menu can be helpful for users with mobility limitations that prevent them from interacting directly with the your device.Shortcut key
Get quick access to apps by pressing the Volume Keys twice when the screen is off or locked.Security
Use the Security menu to configure how to help secure your phone and its data. - Content lock - Select lock types to lock files in for Gallery and memos for QuickMemo+. Choose from Password or Pattern. - Encrypt phone - Allows you to encrypt data on the phone for security. You will be required to enter a PIN or password to decrypt your phone each time you power it on. - Encrypt SD card storage - Encrypt SD card storage and keep data unavailable for other devices. - Set up SIM card lock - Sets the PIN to lock your SIM card and allows you to change the PIN. - Password typing visible - Checkmark to briefly show each character of passwords as you enter them so that you can see what you enter. - Phone administrators - View or deactivate phone administrators. - Unknown sources - Allow installation of non-Play Store applications. - Verify apps - Disallow or warn before installation of apps that may cause harm. Storage type - Hardware-backed.- Certificate management
- Trusted credentials - Checkmark to allow applications to access your phone's encrypted store of secure certificates and related passwords and other credentials. You use credential storage to establish some types of VPN and Wi-Fi connections. If you have not set a password for the secure credential storage, this setting is dimmed. Install from storage - Tap to install a secure certificate. - Clear credentials - Deletes all secure certificates and related credentials and erases the secure storage's own password. - Trust agents - Select apps to use without unlocking screen. - Screen pin - You can enable your device to only show a certain app's screen using screen pin. - Usage access for apps - Allows you to view usage information of apps on your phone.QuickCircle case
This menu allows you to select apps to be used directly on the cover in small view using QuickCircle. Keep in mind that turning on these QuickCircle case settings may result in irregular device behaviour.Dual window
Allows you to configure the Dual Window feature. - Auto-open - Checkmark to allow you to tap a link on the full screen or attachments from emails to open Dual window. - Help - Display tips for using Dual window.Date & time
Set your preferences for how the date and time is displayed.Storage & USB
You can monitor the used and available internal memory and portable storage in the device.Battery & power saving
- Battery usage - View battery usage. - Battery percentage on status bar - Checkmark to display the battery level percentage on the Status Bar next to the Battery icon. - Battery saver - Tap the Battery Saver switch to toggle it on or off. Sets the battery charge percent level that automatically turns on Battery Saver. Chooser from Immediately, 5% battery, and 15% battery. - Help - Display tips for using Battery saver.Memory
You can monitor the memory used averagely and the memory used by apps in the device.Apps
Allows you to view details about the apps installed on your phone, manage their data, and force them to stop.Default message app
This menu allows you to choose what messaging app to use as your default messaging app.Backup & reset
Change the settings for managing your settings and data. - LG Backup - Backs up all information on the device and restores it in the event of data loss or replacement. - Back up my data - Back up app data, Wi-Fi passwords, and other settings to Google servers. - Backup account - Displays the account that is currently being used to back up information. - Automatic restore - When reinstalling an app, restore backed up settings and data. - Network settings reset - Reset all network settings. - Factory data reset - Reset your settings to the factory default values and delete all your data. If you reset the phone this way, you are prompted to re-enter the same information as when you first started Android.About phone
View legal information, check phone status and software versions, and perform a software update.LG Bridge Application
LG Bridge is an application that helps you conveniently manage images, music, videos, documents, etc. saved on a LG mobile device on your PC. Also, you can update software of a mobile device or back up your files such as contacts and images to your PC.TIPS!
- You can see detailed instructions on how to use LG Bridge in Help menu after installing and opening the program. - Supported features may vary depending on the device. - The LG unified USB driver is a program required to connect an LG mobile phone to a PC. It is automatically installed when installing LG Bridge.Features of LG Bridge
Update software of a mobile device on your PC via USB Back up and restore the data of your mobile device via USB To download the LG Bridge software, please do the following: 1 Go to www.lg.com. 2 Go to SUPPORT > MOBILE SUPPORT > PC Sync. 3 Select the model information and click GO. 4 Scroll down, select the PC SYNC tab > Windows or Mac OS > DOWNLOAD to download LG Bridge.Minimum system requirements for LG Bridge installation
| Item Windows OS Mac OS | ||
| Operating System | Windows XP 32-bit(Service Pack 3)Windows Vista 32-bit/64-bitWindows 7 32-bit/64-bitWindows 8 32-bit/64-bitWindows 8.1 32-bit/64-bit | Mac OS X 10.7 or later(64-bit) |
| CPU 1 GHz processor or faster 1 GHz processor or faster | ||
| Memory 2 GB RAM or more 2 GB RAM or more | ||
| Graphics Card | 1024x768, 32-bit colour or higher | 1024x768, 32-bit colour or higher |
| Hard Disk At | least 500 MB of free space(additional space may be requireddepending on the amount of data to be stored) | At least 500 MB of free space (additional space may be required depending on the amount of data to be stored) |
| Required Software | LG unified driver, Windows MediaPlayer 10 or later | LG unified USB driver |
How to Connect Your Mobile Phone in LG Bridge
You can connect LG Bridge to another device using a USB cable.| Features Connection Type | |
| Software update Connecting USB cable | |
| LG backup (data backup/restoration) Connecting USB cable |
Phone software update
LG Mobile phone software update from the Internet
For more information about using this function, please visit http://www/lg.com/common/index.jsp select your country and language. This feature allows you to conveniently update the firmware on your phone to a newer version from the Internet without needing to visit a service centre. This feature will only be available if and when LG makes a newer firmware version available for your device. Because the mobile phone firmware update requires the user's full attention for the duration of the update process, please make sure you check all instructions and notes that appear at each step before proceeding. Please note that removing the USB data cable during the upgrade may seriously damage your mobile phone.NOTE
- LG reserves the right to make firmware updates available only for selected models at its own discretion and does not guarantee the availability of the newer version of the firmware for all handset models.LG Mobile Phone software update via Over-the-Air (OTA)
This feature allows you to conveniently update your phone's software to a newer version via OTA, without connecting using a USB data cable. This feature will only be available if and when LG makes a newer firmware version available for your device. You should first check the software version on your mobile phone: Settings > General tab > About phone > Common tab > Update Center > Software Update > Check now for update.NOTE
- Your personal data from internal phone storage—including information about your Google account and any other accounts, your system/application data and settings, any downloaded applications and your DRM licence—might be lost in the process of updating your phone's software. Therefore, LG recommends that you backup your personal data before updating your phone's software. LG does not take responsibility for any loss of personal data. - This feature depends on your network service provider, region and country.About this user guide
About this user guide
- Before using your device, please carefully read this guide. This ensures that you use your phone safely and correctly. - Some of the images and screenshots provided in this guide may appear differently on your phone. - Your content may differ from the final product or from software supplied by service providers or carriers. This content is subject to change without prior notice. For the latest version of this guide, please visit the LG website at www/lg.com. - Your phone's applications and their functions may vary by country, region or hardware specifications. LG cannot be held liable for any performance issues resulting from the use of applications developed by providers other than LG. - LG cannot be held liable for performance or incompatibility issues resulting from edited registry settings or modified operating system software. Any attempt to customise your operating system may cause the device or its applications to work incorrectly. - Software, audio, wallpaper, images, and other media supplied with your device are licensed for limited use. If you extract and use these materials for commercial or other purposes, you may be infringing copyright laws. As a user, you are fully are entirely responsible for the illegal use of media. - Additional charges may apply for data services, such as messaging, uploading, downloading, auto-syncing and location services. To avoid additional charges, select a data plan suitable to your needs. Contact your service provider to obtain additional details.Trademarks
- LG and the LG logo are registered trademarks of LG Electronics. - Bluetooth® is a registered trademark of Bluetooth SIG, Inc. worldwide. - Wi-Fi® and the Wi-Fi logo are registered trademarks of the Wi-Fi Alliance. - All other trademarks and copyrights are the property of their respective owners.Accessories
These accessories are available for use with the your phone. (Items described below may be optional.) - Travel adaptor - Quick Start Guide - Stereo headset USB cable - BatteryNOTE
- Always use genuine LG accessories. The supplied items are designed only for this device and may not be compatible with other devices. - The items supplied with the device and any available accessories may vary depending on the region or service provider.Troubleshooting
This chapter lists some problems you might encounter when using your phone. Some problems require you to call your service provider, but most are easy to fix yourself.| Message Possible causes Possible | le corrective measures | |
| SIM or USIM card error | There is no SIM or USIM card in the phone or it is inserted incorrectly. | Make sure that the SIM or USIM card is correctly inserted. |
| No network connection/Dropped network | Signal is weak or you are outside the carrier network. | Move toward a window or into an open area. Check the network operator coverage map. |
| Operator applied new services. | Check whether the SIM or USIM card is more than 6~12 months old. If so, change your SIM or USIM card at your network provider's nearest branch. Contact your service provider. | |
| Codes do not match | To change a security code, must need to confirm the new code by re-entering it. | If you forget the code, contact your service provider. |
| The two codes you entered do not match. | ||
| Message Possible causes Possible | Corrective measures | |
| No applications can be set | Not supported by service provider or registration required. | Contact your service provider. |
| Calls not available | Dialing error New network not authorised. | |
| New SIM or USIM card inserted. | Check for new restrictions. | |
| Pre-paid charge limit reached. | Contact service provider or reset limit with PIN2. | |
| Phone cannot be turned on | On/Off key pressed too briefly. | Press the On/Off key for at least two seconds. |
| Battery is not charged. | Charge battery. Check the charging indicator on the display. | |
| Charging error | Battery is not charged. | Charge battery. |
| Outside temperature is too hot or cold. | Make sure phone is charging at a normal temperature. | |
| Contact problem | Check the charger and its connection to the phone. | |
| No voltage Plug the charger into a different outlet. | ||
| Charger defective Replace the charger. | ||
| Wrong charger Use only original LG accessories. | ||
| Message Possible causes Possible | le corrective measures | |
| Number not allowed. | The Fixed dialling number function is on. | |
| Impossible to receive/send SMS & photos | Memory full | Delete some messages from your phone. |
| Files do not open | Unsupported file format | Check the supported file formats. |
| The screen does not turn on when I receive a call. | Proximity sensor problem | If you use a protection tape or case, make sure it has not covered the area around the proximity sensor. Make sure that the area around the proximity sensor is clean. |
| No sound Vibration mode | Check the settings status in the sound menu to make sure you are not in vibration or Do not disturb mode. | |
| Hangs up or freezes | Intermittent software problem | Try to perform a software update through the website. |