
Opimus L9 - Cellphone LG - Free user manual and instructions
Find the device manual for free Opimus L9 LG in PDF.

| Product type | Smartphone |
| Brand | LG |
| Model | Optimus L9 (LG-P705) |
| Dimensions (H x W x D) | 131.9 x 68.2 x 9.1 mm |
| Weight | 125 g |
| Screen | 4.7 inches IPS LCD, 540 x 960 pixels |
| Operating system | Android 4.0.4 Ice Cream Sandwich |
| Processor | TI OMAP 4430 dual-core 1 GHz |
| RAM | 1 GB |
| Internal storage | 4 GB (expandable via microSD card up to 32 GB) |
| Battery | Li-Ion 2150 mAh removable |
| Rear camera | 5 Megapixels with autofocus and LED flash |
| Front camera | VGA |
| Connectivity | Wi-Fi 802.11 b/g/n, Bluetooth 3.0, GPS, NFC |
| Network | GSM / HSPA |
| Sensors | Accelerometer, proximity, compass |
| Maintenance and cleaning | Clean the exterior with a dry cloth; do not use solvents; avoid moisture |
| Security | Lock by pattern, PIN or password; proximity sensor turns off screen during calls |
| Spare parts and repairability | Removable battery; repairs by qualified technician; conditional warranty |
| General information | Downloadable manual in PDF format; manual available in multiple languages |
Frequently Asked Questions - Opimus L9 LG
User questions about Opimus L9 LG
0 question about this device. Answer the ones you know or ask your own.
Ask a new question about this device
Download the instructions for your Cellphone in PDF format for free! Find your manual Opimus L9 - LG and take your electronic device back in hand. On this page are published all the documents necessary for the use of your device. Opimus L9 by LG.
USER MANUAL Opimus L9 LG
jbi jaii jaii jaii jaii jaii jaii jaii jaii jaii jaii jaii jaii jaii jaii jaii jaii jaii jaii jaii jaii jaii jaii jaii jaii jaii jaii jaii jaii jaii jaii jaii jaii jaii jaii
Joo
LG .Copyright ©2012 LG Electronics, Inc
Lg Group Lg
L 1
YouTube™ Gmail™ Google Maps™ Google™
Google, Play Store™, Google Talk™
. Inc
#
41.....jfoaioiwoal laihill 0
42.
43.
46.
47.
48....Google
49.
49. Wi-Fi
49. Wi-Fi
50
52.
54.... 1
- SIM
-
40.
- 71
-
72.
-
Wi-Fi 1234567890123456789012345678901234567890123456789012345678901234567890123456789012345678901234567890123456789
56....SmartShare
57....SmartShare
61 - 64.
#
- 84....
- 1u w gall J
USB jjuiy ugo Ciao - FM
-
89..LG SmartWorld
- 74.
75
75.
76.
76.
78.
- 82.
96
96.
98.
101
103.
105.
106....DivX
108.
109.
LG SmartWorld
- 90.....LG SmartWorld
91.
- Polaris Office
94
- 95.
JSSSASARJJSSAR JSSSASAR
LgL G aIg Jb SAR 11111111111
Commissio on Non-Ionizing
Jgolal
a 1
slll lll
Jdeag aLull jgall Jgclog
LG-P705 jgall jjps pi dai gill aal llll bia y i 128
aahpaa aalg SAR 111bll
Jl Jnll jaoao yu
Jiey jay all g
Radiation Protection (ICNIRP)
B D
.12
DASY4 0
(10) 0.762 0
(10) 0.534 0
.
.
RF
Jg
auiuiei
g aillkll al gaiil lal y jaa 3
iLg J g Lg J
jglg jglg jglg jglg
g jj jj 1
aaii i jaiy
y
golal
1 1 1 1 1 1 1 1 1 1 1 1 1 1 1 1 1 1 1 1 1 1 1 1 1 1 1 1
a
.
le gogg y jy Lioic 1jll J .
.
1
1 1
. 1 1 1 1 1 1 1 1 1 1 1 1 1 1 1 1 1 1 1 1 1 1 1 1 1 1 1 1 1 1 1
Jgol
iil
aigjis1 jg
i 1
i
i j 1
i
.
i
.
1 1
1
yio 1 yio 1 yio 1 yio 1 yio 1 yio 1 yio 1 yio 1 yio 1 yio 1 yio 1 yio 1 yio 1 yio 1 yio 1 yio 1 yio 1 yio 1 yio 1 yio 1 yio 1 yio 1 yio 1 yio 1 yio 1 yio 1
1 1
1 1
A
sui y gao s gaiy jn 10
lalj jy jy lla. bbl llls
. tlll
aaii aiee iia 1y jn jil gll n nn nnnn nnnn nnnn nnnn nnnn nnnn nnnn nnnn
ED = 1
A
3
J 1
ailll 1 Jdai jolc elikay la qbi jie 420
y aal l aal jn no nulic jll i
Jn glall g yglall c jlln no bjilly gall
A
a gialll lalill no ydlall piai sll k
s Android pbiy gaiy laq jlll g
no slll sllg all iic alglg jll
jLg jll gall llgiu Y alolll
()
1 1 1 1 1 1 1 1 1 1 1 1 1 1 1 1 1 1 1
gill n clll aie piai i 15k y LG PC" jssll qbiipai i 4s . "Suite
"LG PC Suite"
"LG PC Suite" JgJgJgJgJgJgJgJgJgJgJgJgJgJgJgJgJgJgJgJgJgJgJgJgJgJgJgJgJgJgJgJgJgJgJgJgJgJgJgJgJgJgJgJgJg
1
<Jgall 2 (LG-P705) jI
"LG PC Suite" 15
.
.
S OBC = S AOB + S_ BOC
. jll jglal (jol
jgl jgl jgl jgl jgl jgl jgl jgl jgl jgl jgl jgl jgl jgl jgl jgl jgl jgl jgl jgl jgl jgl jgl jgl jgl jgl jgl jgl jgl jgl jgl jgl jgl jgl jgl jgl jgl jgl jgl jgl jgl jgl jgl jgl jgl jgl jgl jgl jgl jgl jgl
S OBC = S BOC + S_ CBA
J 1
512
132
100 100 100 100 100 100 100 100 100 100 100 100 100 100 100 100 100 100 100 100 100 100 100 100 100 100
.LG
i
AMWJ 3 Window PC Sync
768LGPO2SUITE"LGPC"
"Suite
Win
Windows (Service pack 2) bit Windows 7 Vista 32 bit/64 bit
·jnnnll jit/64.10it
1 1
1
J 1 J 1 J 1 J 1 J 1 J 1 J 1 J 1 J 1 J 1 J 1 J 1 J 1 J 1 J 1 J 1 J 1 J 1 J 1 J 1 J 1 J 1 J 1 J 1 J 1 J 1 J 1 J 1 J 1 J 1 J 1 J 1 J 1 J 1 J
.
SIM
Jaiill a 5 Jgclalill l
i
lo.
aowd s gwo
aalwai yj jyia 2
J 1
c b jaiil g aialr yraill
a
jaiiee jaiill giaila -
()
s
Jawl 2g jolll Jr wll
aill laiuill Js jrc slkay. aill
joll uai Y! sle la gubi jiai. liii
. laiuill ail
aaii i 1
a
a 1
aJgJusie g dJyjill g Jaiibill aJl jn yjbjg. g Jd
aal 1 aie 1 1 1 1 1 1 1 1 1 1
a
Xg g a jilal j g g Jai
Jaiy jy jy jy Jy

clawy1 jro wll
aill 1Jgwl Jwll

J 1
J 1
aaii jai i 1yale
1
A
2
J 1
3
1
1
joo joo laiyio 1 Jb! aaii i ybiw
1jgo lgiioi
12
1
aai jn
1 4<4j
J 1
J 1
J 1
J 1
J 1
J 1
J 1
J 1
J 1
J 1
jlll lgl jlll jlll jlll jlll jlll jlll jlll jlll jlll jlll jlll jlll jlll jlll jlll jlll jlll jlll jlll jlll jlll jlll jlll jlll jlll jlll jlll jlll jlll jlll jlll jlll jlll jlll
J 15 J 15 J 15 J 15 J 15 J 15 J 15 J 15 J 15 J 15 J 15 J 15 J 15 J 15 J 15 J 15 J 15 J 15 J 15 J 15 J 15 J 15 J 15 J 15 J 15 J 15
a" a" 10000000000000000000000000000000000000000000000000000
Goo Goo Google 111 5 111
Jn Jn Jn Jn Jn Jn Jn Jn Jn Jn Jn Jn Jn
Goo 1000
Gmail jllw glll aol j p tll lill o s no s rclgglg g gll (s) . 111
Gmail TM aljuiu sliky jgdu JuswJ .Google
g g 1 y 1 s 1 1 1 1 1 1 1 1 1 1 1 1 1 1 1 1 1 1 1 1 1 1 1 1
Jollll Jw jI 1 wll 1

- a lLs
3 1
3.
aallso 1 jy aallssal cos uall j
4
1 1 1 1 1 1 1 1 1 1 1 1 1 1 1 1 1 1 1 1 1 1 1 1
#
aIgJyI - 11111111111111111111111111111111111111111111111111111111111111
Jill wall pia aialll cia 1c bai!
Clll

1.
2.
jgl 3
Jg 100000000000000000000000000000000000000000000000000000000000
slll y lallll 0d - aallll 0a
lllllg .rddlll lallll g.
aillso jgaiiiall
pgl lgsj- clllll alilss iie oiae) .slllso ie laa bii
i jn oioo e g slll (j
aJyI aJyI - aJyI aJyI bJyI
. cJallSall yI yJcJall JyI yJcJ all
JyR yJyR yJyR yJyR yJyR yJyR yJyR yJyR yJyR yJyR yJyR yJyR yJyR yJyR yJyR yJyR yJyR yJyR yJyR yJyR yJyR yJyR yJyR yJyR yJyR yJyR
. cJallSall JyR yJyR yJyR yJyR yJyR yJyR yJyR yJyR
. JIyR yJyR yJyR yJyR yJyR yJyR
. JIyR yJyR yJyR yJyR
. JIyR yJyR yJyR
. JIyR yJyR yJyR
. JIyR yJyR
. JIyR yJyR
. JIyR yJyR
. JIyR yJyR
. JIyR yJyR
. JIyR yJyR
. JIyR yJyR
. JIyR yJyR
. JIyR yJyR
. JIyR yJyR
. J1yR yJyR
. J1yR yJyR
. J1yR yJyR
. J1yR yJyR
. J1yR yJyR
. J1yR yJyR
. J1yR yJyR
. J1yR yJyR
#
y j 1 1
:
J 1
.
aBbuii all:cllll
J 1
(c)aallso
()
saw

aalaaal aaiall ciaa glbinai
aabio wallo
1 1
2 1
3 2
4 1
5
sow
class
aaiia aiai j
- clawykiiei kijl jll 1clawy i jiu si
aalaaal 2
2
aaii i 1
3 1.
2.
3
LG jy JgJ Gswal CSV
PC Suite
.
LGPC
. Suite
Jus 5 duiu) LG-P705 aie Juaill clawyiaol jaoiaioljall g jiala (USB
J 11 11 11
sagila
3 1
CJ 1
aai jy
aai jiaaaiaia jao
Lg PC Suite 1 LGPCSUITE
Android
.USB
< 1
.
Jilu JI
- MMS SMS LGPZ5
- + = + ①
aJ 1

J 1
Jll Jll Jll Jll Jll
ailllll laloo 1000 1500 1200 1200
aalal 0g jil pl
.
aiee eae
Jil
LG-P705 1
JilwJll JwJn no nSoo
.
1 1 1 1 1 1 1 1 1 1 1 1 1 1 1 1 1 1 1 1 1 1 1 1 1 1 1 1 1 1 1 1 1 1
blll
(MMS SMS) kssgss
aiee eae
1
:

slll 1
<
y
i
.000000000000000000000000000000000000000
J 1 J
slaal . 0000 - 0000
aaii iiaii aaii
1

j11 1.0000

Jrnnn nn nnnnnnnnnnnnnnnnnnnnnnnnnnnnnnnnnnnnnnnnnnnnnnnnnnnnnnnnnnnnnnnnnnnnnnnnnnnnnnnnnnnnnnnnnnnnnnnnnnnnnnnnnnn
.


aoliz
1

.

- 5 , 1 , 2 , 3
.
bllliee dlll llo
a
A
i 1
Lg 1
J 1
S 可以
-
. gill
.
a
i 1
a.o.o.o.
1J 1
Joc 10
L
jbcaiall 2y jbi jbi -
1 1 1 1 1 1 1 1 1 1 1 1 1 1 1 1 1 1 1 1 1 1 1 1 1 1 1 1 1 1 1 1 1 1 1 1 1 1 1
joo joo l oic baa aai gl oia joo: abo. GPS
e 1000
JISIISIO 1ISO
AIOIIOIIOIIOIIOIIOIIOIIOIIOIIOIIOIIOIIOIIOIIOIIOIIOIIOIIOIIOIIOIIOIIOIIOIIOIIOIIOIIOIIOIIOIIOIIOIIOIIOIIOIIOIIOIIOIIOIIOIIOIIOIIOIIOIIOIIOIIOIIOIIOIIOIIO
Wb
J 1

- a
gill gibaiil gill sall
1
J 120000000000000000000000000000000000000000000000000000000000
12 12 12 12
1
jaiil jie 1
1
ploJg
.
4.15
10
1
a
y
aal.
a


g g g g g g g g g g g g g g g g

Gmail
YouTube SmartShare
a

jll
S OBC = S COD + S_ BOC
1
1
2 1c
A
3
.
a

- a : a x,y,z x = y
J
5
Jg
6
0aJae aie 1
1
aaiiie 1
.
()
A
W
alil
-
m = 311
山
Jai Jai
1
Lgao 1c 2b2u bai -Juaal
a
.
aaii iie 1
Jiei wall, jbiall 1
1
.
1
201

奇及女 由 S_ b^ c
J 1

.
i 1

- jieji gill a
.

p 1
iilal 100000000000000000000000000000000000000
i
| USB d'ajaz Jahres Ja#i Ja# Ja# Ja# Ja# Ja# Ja# Ja# Ja# Ja# Ja# Ja# Ja# Ja# Ja# Ja# Ja# Ja# Ja# Ja# Ja# Ja# Ja# Ja# Ja# Ja# Ja# Ja# Ja# Ja# Ja# Ja# Ja# Ja# Ja# Ja# Ja# Ja# Ja# Ja# Ja# Ja# Ja# Ja# Ja# Ja# Ja# Ja# Ja# Ja# Ja# Ja# |
| LG-P705 1 .USB 2 2 Android Platform Driver Jahres Ja# Ja# Ja# Ja# Ja# Ja# Ja# Ja# Ja# Ja# Ja# Ja# Ja# Ja# Ja# Ja# Ja# Ja# Ja# Ja# Ja# Ja# Ja# Ja# Ja# Ja# Ja# Ja# Ja# Ja# Ja# Ja# Ja# Ja# Ja# Ja# Ja# Ja# Ja# Ja# Ja# Ja# Ja# Ja# Ja# Ja# Ja# Ja# Ja# J# |
| LG-P705 1 Ja# Ja# Ja# Ja# Ja# Ja# Ja# Ja# Ja# Ja# Ja# Ja# Ja# Ja# Ja# Ja# Ja# Ja# Ja# Ja# Ja# Ja# Ja# Ja# Ja# Ja# Ja# Ja# Ja# Ja# Ja# Ja# Ja# Ja# Ja# Ja# Ja# Ja# Ja# Ja# Ja# Ja# Ja# Ja# Ja# Ja# Ja# Ja# Ja# JA JA JA JA JA JA JA JA JA JA JA JA JA JA JA JA JA JA JA JA JA JA JA JA JA JA JA JA JA JA JA JA JA JA JA JA JA JA JA JA JA JA JA JA JA JA JA JA JA JA JA |
| . . . . . . . . . . . . . . . . . . . . . . . . . . . . . . . . . . . . . . . . . . . . . . . . . . . . . . . . . . . . . . . . . . . . . . . . . . . . . . . . . . . . . . . . . . . . . . . . . . . . . . . . . . . . . . . . . . . . . . . . . . . . . . . . . . . . . . . . . . . . . . . . . . . . . . . . . . . . . . . . . . . . . . . . . . . . . . . . . . . . . . . . . . . . . . . . . . . . . . . . . . ? . . . . . . . . . . . . . . . . . . . . . . . . . . . . . . . . . . . . . . . . . . . . . . . . . . . . . . . . . . . . . . . . . . . . . . . . . . . . . . . . . . . . . . . . . . . . . . . . . . . 2 3 4 5 6 7 8 9 10 11 12 13 14 15 16 17 18 19 20 21 22 23 24 25 26 27 28 29 30 31 32 33 34 35 36 37 38 39 40 41 42 43 44 45 46 47 48 49 50 51 52 53 54 55 56 57 58 59 60 61 62 63 64 65 66 67 68 69 70 71 72 73 74 75 76 77 78 79 80 81 82 83 84 85 86 87 88 89 90 91 92 93 94 95 96 97 98 99 100 101 102 103 104 105 106 107 108 109 110 111 112 113 114 115 116 117 118 119 120 121 122 123 124 125 126 127 128 129 130 131 132 133 134 135 136 137 138 139 140 141 142 143 144 145 146 147 148 149 150 151 152 153 154 155 156 157 158 159 160 161 162 163 164 165 166 167 168 169 170 171 172 173 174 175 176 177 178 179 180 181 182 183 184 185 186 187 188 189 190 191 192 193 194 195 196 197 198 199 200 201 202 203 204 205 206 207 208 209 210 211 212 213 214 215 216 217 218 219 220 221 222 223 224 225 226 227 228 229 230 231 232 233 234 235 236 237 238 239 240 241 242 243 244 245 246 247 248 249 250 251 252 253 254 255 256 257 258 259 260 261 262 263 264 265 266 267 268 269 270 271 272 273 274 275 276 277 278 279 280 281 282 283 284 285 286 287 288 289 290 291 292 293 294 295 296 297 298 299 300 301 302 303 304 305 306 307 308 309 310 311 312 313 314 315 316 317 318 319 320 321 322 323 324 325 326 327 328 329 330 331 332 333 334 335 336 337 338 339 340 341 342 343 344 345 346 347 348 349 350 351 352 353 354 355 356 357 358 359 360 361 362 363 364 365 366 367 368 369 370 371 372 373 374 375 376 377 378 379 380 381 382 383 384 385 386 387 388 389 390 391 392 393 394 395 396 397 398 399 400 401 402 403 404 405 406 407 408 409 410 411 412 413 414 415 416 417 418 419 420 421 422 423 424 425 426 427 428 429 430 431 432 433 434 435 436 437 438 439 440 441 442 443 444 445 446 447 448 449 450 451 452 453 454 455 456 457 458 459 460 461 462 463 464 465 466 467 468 469 470 471 472 473 474 475 476 477 478 479 480 481 482 483 484 485 486 487 488 489 490 491 492 493 494 495 496 497 498 499 500 501 502 503 504 505 506 507 508 509 510 511 512 513 514 515 516 517 518 519 520 521 522 523 524 525 526 527 528 529 530 531 532 533 534 535 536 537 538 539 540 541 542 543 544 545 546 547 548 549 550 551 552 553 554 555 556 557 558 559 560 561 562 563 564 565 566 567 568 569 570 571 572 573 574 575 576 577 578 579 580 581 582 583 584 585 586 587 588 589 590 591 592 593 594 595 596 597 598 599 600 601 602 603 604 605 606 607 608 609 610 611 612 613 614 615 616 617 618 619 620 621 622 623 624 625 626 627 628 629 630 631 632 633 634 635 636 637 638 639 640 641 642 643 644 645 646 647 648 649 650 651 652 653 654 655 656 657 658 659 660 661 662 663 664 665 666 667 668 669 670 671 672 673 674 675 676 677 678 679 680 681 682 683 684 685 686 687 688 689 690 691 692 693 694 695 696 697 698 699 700 701 702 703 704 705 706 707 708 709 710 711 712 713 714 715 716 717 718 719 720 721 722 723 724 725 726 727 728 729 730 731 732 733 734 735 736 737 738 739 740 741 742 743 744 745 746 747 748 749 750 751 752 753 754 755 756 757 758 759 760 761 762 763 764 765 766 767 768 769 770 771 772 773 774 775 776 777 778 779 780 781 782 783 784 785 786 787 788 789 790 791 792 793 794 795 796 797 798 799 800 801 802 803 804 805 806 807 808 809 810 811 812 813 814 815 816 817 818 819 820 821 822 823 824 825 826 827 828 829 830 831 832 833 834 835 836 837 838 839 840 841 842 843 844 845 846 847 848 849 850 851 852 853 854 855 856 857 858 859 860 861 862 863 864 865 866 867 868 869 870 871 872 873 874 875 876 877 878 879 880 881 882 883 884 885 886 887 888 889 890 891 892 893 894 895 896 897 898 899 890 891 892 893 894 895 896 897 898 899 890 891 892 893 894 895 896 897 898 899 890 891 892 893 8 |
1 1111111111111111111111111111
aie
1 4x
. gai < 2 3
$$ = - \frac {1}{2} a c g = 0 $$
$$ \therefore \quad j s ^ {2} y _ {1} \text {a l l} \quad \text {a l l} \quad \text {a l l} $$
$$ \therefore \text {a} _ {\text {a}} \text {a} _ {\text {a}} \text {a} _ {\text {a}} \text {a} _ {\text {a}} \text {a} _ {\text {a}} \text {a} _ {\text {a}} \text {a} _ {\text {a}} \text {a} _ {\text {a}} \text {a} _ {\text {a}} \text {a} _ {\text {a}} $$
$$ \dot {n} \dot {c} \log \dot {g} \tan \dot {g} \cos \dot {g} \sin \dot {g} $$
$$ \therefore \mathrm {d} \text {山} \mathrm {g} \mathrm {l l} $$
$$ \hat {g} \hat {d} \hat {d} \hat {d} \hat {d} \hat {d} \hat {d} $$
$$ < \text {c l a s s i b i l l} \text {b y g i l l} \text {a d e} < \text {m o l} 1 $$
$$ \rightarrow g ^ {a} \cdot 1 1 $$
2 1
3 1
$$ < \dot {a} c l \omega l / 4, \dot {a} \dot {l} \omega l $$
2 LG-
4 1
3
$$ \begin{array}{l} \text {s i g m a} \ \text {s i g m a} \ \text {s i g m a} \end{array} $$
$$ \overrightarrow {A} = \left(1, 0, - \frac {1}{2}, \frac {1}{2}, 0\right) $$
$$ < \text {c i l l} < \text {g i l l} < \text {d o c} < \text {w a l l} 1 $$
$$ \ddot {A} _ {\mathrm {i n t}} $$
8
a
8 2
Jg 1
-
- ( x,y) = ( ab + 1,2) ( ab + 3,4) .(Joc y)
3 个
4.16
4 5c
5
i j 1
i 1
8 9
7
Jgol
alal
Polaris Office 2000
Ae 10000000000000000000000000000000000000000000000000000000000000000000000000000000000000000000000
#
a
aannn
J 1 J 1 J 1 J 1 J 1 J 1 J 1
Jg 15 15 15
J 1111111111111111111111111111
-
a
.
.
A
a
a
a 45 J1s -4J
.
g j 1j-aaal
aal
a 2
1
山
MAC 1
a + b = 3
<
jai jai jai bui - auiu
d j 1
L 1
PIN j
8 8
aill bui 1 - aaiu
Lglaclgulwlll Jie 1
<
aill 1gwhb-ghwll
Lolololololololololololololololololololololololololololololololololololololololololololololololololololololololololololololol
aaiie 1
aalal alal aal alal
-
LED
SD
SD"SD
.
.
.
.
.
.
.
i i 1
i j 1
j 1
j 1
j 1
j 1
j 1
j 1
j 1
j 1
j 1
j 1
j 1
j 1
j 1
j 1
j 1
j 1
j 1
j 1
j 1
j 1
j 1
j 1
j 1
j 1
j 1
i j 1
i j 1
i j 1
i j 1
Google J Lwll
Cldoll 0g jgi 1c ggo
Jlaljll 1- jLilgs Jlal
G GPS
.
Goo
.
<
SIM 1 - SIM
. SIM PIN
i 1
1 111111111111111111111111
( A B) = x
Wi-Fi aaiy y jill sia g 111111111111111
1c 2
1 1
.
< buiil 1g ui>
.
i 1
bll lil y 1
Jgall aks -aia jgral
L
1
a
i 1
J 1
CA 1-
1
-SD
. SD
1
1
a
a
y
a 1
aalgall gll 5n
sJgagll 1dclp
JgglilSalyaalzaiI gillg
sloila 1c
y j 100
.
yii 1ie gbbill lilg y
jll lcbill
bua oaley - gaiall lily bua oale!
i 1
aill bua aiey 1.
aogaleall jlddss sio 1b
Android
(1)
JWi-Fi 45
Wi-Fi LG PC Suite
1
<
a 1
aai j 1
aaiinl aiibg jiuil 1iibiy:
g - USB
(MTP) bilwglia jao baa)
.USB
Jalil jy
.
PC Suite - Wi-Fi
LGPc
. Wi-Fi Suite
Jg 10000000000000000000000000000000000000000000000000000000000000000000
LGL 45 45
10000000000000000000000000000000000000000000000000000000000000000000
DivX :DIVXVIDEO Jg
a b w y l g j i n t y d y jll LLLLLLLLLLLLLLLLLLLLLLLLLLLLLLLLLLLLLLLLLLLLLLLLLLLLLLLLLLLLLLLLLLLLLLLLLLLLLLLLLLLLLLLLLLLLLL
LGLGJgall (OTA)
I! 100000000000000000000000000000000000000000000000000000000000000000000000000000000000000000
DivX DivX Certified 640x480
Rovi y y Corporation
DivX Certified
www.divx.com gJ. DivX
. DivX 1 J
j j: j DIX G
DivX Certified
. VOD) 000 DivX
. 000
. DivX VOD
. vod.divx. . com
#
(.)LG-P705 1

J 1
J. LG-P705

LiluJLG-P705
S OBC = S COD + S_ BOC
LGLG Lda p 1
JbI Jd y d
.
LgXgIgIgIgIg
slii li bii jsl wall jy. ilgai pl dai i ciil gai ai di jil sl wall jy jll l 2 y
| الإستعمال | ||
| الإستعمال الحرفية بطرير بطرير بطرير بطرير بطرير بطرير بطرير بطرير بطرير بطرير بطرير بطرير بطرير بطرير بطرير بطرير بطرير بطرير بطرير بطرير بطرير بطرير بطرير بطرير بطرير ب—————————————————————————————————————————————————————————————————————————————————————————————————————————————————————————————————————————————————————————————————————————————————————————————————————————————————————————————————————————————————————————————————————————————————————————————————————————————————————————————————————————————————————————————————————————————————————————————————————————————————————————————————————————————————————————————————————————————————————————————————————————————————————————————————————————————————————————————————————————————————————————————————————————————————————————————————————————–——————————————————————————————————————————————————————————————————————————————————————————————————————————————————————————————————————————————————————————————————————————————————————————————————————————————————————————————————————————————————————————————————————————————————————————————————————————…… | SIM مizu- SIM مizu- SIM مizu- SIM مizu- SIM مizu- SIM مizu- SIM مizu- SIM مizu- SIM مizu- SIM مizu- SIM مizu- SIM مizu- SIM مizu- SIM مizu- SIM مizu- SIM mizu- SIM mizu- SIM mizu- SIM mizu- SIM mizu- SIM mizu- SIM mizu- SIM mizu- SIM mizu- SIM mizu- SIM mizu- SIM mizu- SIM mizu- SIM mizu- SIM mizu- SIM mizu- SIM mizu- SIM mizu- SIM mizu- SIM mizu- SIM mizu- SIM mizu- SIM mizu- SIM mizu- SIM mizu- SIMmizu- SIMmizu- SIMmizu- SIMmizu- SIMmizu- SIMmizu- SIMmizu- SIMmizu- SIMmizu- SIMmizu- SIMmizu- SIMmizu- SIMmizu- SIMmizu- SIMmizu- SIMmizu- SIMmizu- SIMmizu- SIMmizu- SIMmizu- SIMmizu- SIMmizu- SIMmizu- SIMmizu- SIMmizu- SIM mizu- SIMmizu- SIMmizu- SIMmizu- SIMmizu- SIMmizu- SIMmizu- SIMmizu- SIMmizu- SIMmizu- SIMmizu- SIMmizu- SIMmizu- SIMmizu- SIMmizu- SIMmizu- SIMmizu- SIMmizu- SIMmizu- SIMmizu- SIMmizu- SIMmizu- SIMmizu- SIMmizu- SIM mizu- SIM mizu- SIMmizu- SIMmizu- SIMmizu- SIMmizu- SIMmizu- SIMmizu- SIMmizu- SIMmizu- SIMmizu- SIMmizu- SIMmizu- SIMmizu- SIMmizu- SIMmizu- SIMmizu- SIMmizu- SIMmizu- SIMmizu- SIMmizu- SIMmizu- SIMmizu- SIMmizu- SIM mizu- SIMmizu- SIM mizu- SIMmizu- SIMmizu- SIMmizu- SIMmizu- SIMmizu- SIMmizu- SIMmizu- SIMmizu- SIMmizu- SIMmizu- SIMmizu- SIMmizu- SIMmizu- SIMmizu- SIMmizu- SIMmizu- SIMmizu- SIMmizu- SIMmizu- SIMmizu- SIMmizu- SIMmizu- SIM mizu- SIM mizu- SIM mizu- SIMmizu- SIMmizu- SIMmizu- SIMmizu- SIMmizu- SIMmizu- SIMmizu- SIMmizu- SIMmizu- SIMmizu- SIMmizu- SIMmizu- SIMmizu- SIMmizu- SIMmizu- SIMmizu- SIMmizu- SIMmizu- SIMmizu- SIMmizu- SIMmizu- SIM mizu- SIMmizu- SIMmizu- SIM mizu- SIMmizu- SIMmizu- SIMmizu- SIMmizu- SIMmizu- SIMmizu- SIMmizu- SIMmizu- SIMmizu- SIMmizu- SIMmizu- SIMmizu- SIMmizu- SIMmizu- SIMmizu- SIMmizu- SIMmizu- SIMmizu- SIMmizu- SIMmizu- SIMmizu- SIM mizu- SIMmizu- SIM mizu- SIM mizu- SIMmizu- SIMmizu- SIMmizu- SIMmizu- SIMmizu- SIMmizu- SIMmizu- SIMmizu- SIMmizu- SIMmizu- SIMmizu- SIMmizu- SIMmizu- SIMmizu- SIMmizu- SIMmizu- SIMmizu- SIMmizu- SIMmizu- SIMmizu- SIMmizu- SIM mizu- SIM mizu- SIMmizu- SIM mizu- SIMmizu- SIMmizu- SIMmizu- SIMmizu- SIMmizu- SIMmizu- SIMmizu- SIMmizu- SIMmizu- SIMmizu- SIMmizu- SIMmizu- SIMmizu- SIMmizu- SIMmizu- SIMmizu- SIMmizu- SIMmizu- SIMmizu- SIMmizu- SIMmizu- SIM mizu- SIM mizu- SIM mizu- SIM mizu- SIMmizu- SIMmizu- SIMmizu- SIMmizu- SIMmizu- SIMmizu- SIMmizu- SIMmizu- SIMmizu- SIMmizu- SIMmizu- SIMmizu- SIMmizu- SIMmizu- SIMmizu- SIMmizu- SIMmizu- SIMmizu- SIMmizu- SIMmizu- SIM mizu- SIMmizu- SIMmizu- SIMmizu- SIM mizu- SIMmizu- SIMmizu- SIMmizu- SIMmizu- SIMmizu- SIMmizu- SIMmizu- SIMmizu- SIMmizu- SIMmizu- SIMmizu- SIMmizu- SIMmizu- SIMmizu- SIMmizu- SIMmizu- SIMmizu- SIMmizu- SIMmizu- SIMmizu- SIM mizu- SIMmizu- SIMmizu- SIM mizu- SIM mizu- SIMmizu- SIMmizu- SIMmizu- SIMmizu- SIMmizu- SIMmizu- SIMmizu- SIMmizu- SIMmizu- SIMmizu- SIMmizu- SIMmizu- SIMmizu- SIMmizu- SIMmizu- SIMmizu- SIMmizu- SIMmizu- SIMmizu- SIMmizu- SIM mizu- SIMmizu- SIM mizu- SIMmizu- SIM mizu- SIMmizu- SIMmizu- SIMmizu- SIMmizu- SIMmizu- SIMmizu- SIMmizu- SIMmizu- SIMmizu- SIMmizu- SIMmizu- SIMmizu- SIMmizu- SIMmizu- SIMmizu- SIMmizu- SIMmizu- SIMmizu- SIMmizu- SIMmizu- SIM mizu- SIMmizu- SIM mizu- SIM mizu- SIM mizu- SIMmizu- SIMmizu- SIMmizu- SIMmizu- SIMmizu- SIMmizu- SIMmizu- SIMmizu- SIMmizu- SIMmizu- SIMmizu- SIMmizu- SIMmizu- SIMmizu- SIMmizu- SIMmizu- SIMmizu- SIMmizu- SIMmizu- SIMmizu- SIM mizu- SIM mizu- SIMmizu- SIMmizu- SIM mizu- SIMmizu- SIMmizu- SIMmizu- SIMmizu- SIMmizu- SIMmizu- SIMmizu- SIMmizu- SIMmizu- SIMmizu- SIMmizu- SIMmizu- SIMmizu- SIMmizu- SIMmizu- SIMmizu- SIMmizu- SIMmizu- SIMmizu- SIMmizu- SIM mizu- SIM mizu- SIMmizu- SIM mizu- SIM mizu- SIMmizu- SIMmizu- SIMmizu- SIMmizu- SIMmizu- SIMmizu- SIMmizu- SIMmizu- SIMmizu- SIMmizu- SIMmizu- SIMmizu- SIMmizu- SIMmizu- SIMmizu- SIMmizu- SIMmizu- SIMmizu- SIMmizu- SIMmizu- SIM mizu- SIM mizu- SIM mizu- SIMmizu- SIM mizu- SIMmizu- SIMmizu- SIMmizu- SIMmizu- SIMmizu- SIMmizu- SIMmizu- SIMmizu- SIMmizu- SIMmizu- SIMmizu- SIMmizu- SIMmizu- SIMmizu- SIMmizu- SIMmizu- SIMmizu- SIMmizu- SIMmizu- SIMmizu- SIM mizu- SIM mizu- SIM mizu- SIM mizu- SIM mizu- SIMmizu- SIMmizu- SIMmizu- SIMmizu- SIMmizu- SIMmizu- SIMmizu- SIMmizu- SIMmizu- SIMmizu- SIMmizu- SIMmizu- SIMmizu- SIMmizu- SIMmizu- SIMmizu- SIMmizu- SIMmizu- SIMmizu- SIM mizu- SIMmizu- SIMmizu- SIMmizu- SIMmizu- SIM mizu- SIMmizu- SIMmizu- SIMmizu- SIMmizu- SIMmizu- SIMmizu- SIMmizu- SIMmizu- SIMmizu- SIMmizu- SIMmizu- SIMmizu- SIMmizu- SIMmizu- SIMmizu- SIMmizu- SIMmizu- SIMmizu- SIMmizu- SIM mizu- SIMmizu- SIMmizu- SIMmizu- SIM mizu- SIM mizu- SIMmizu- SIMmizu- SIMmizu- SIMmizu- SIMmizu- SIMmizu- SIMmizu- SIMmizu- SIMmizu- SIMmizu- SIMmizu- SIMmizu- SIMmizu- SIMmizu- SIMmizu- SIMmizu- SIMmizu- SIMmizu- SIMmizu- SIM mizu- SIMmizu- SIMmizu- SIM mizu- SIMmizu- SIM mizu- SIMmizu- SIMmizu- SIMmizu- SIMmizu- SIMmizu- SIMmizu- SIMmizu- SIMmizu- SIMmizu- SIMmizu- SIMmizu- SIMmizu- SIMmizu- SIMmizu- SIMmizu- SIMmizu- SIMmizu- SIMmizu- SIMmizu- SIM mizu- SIMmizu- SIMmizu- SIM mizu- SIM mizu- SIM mizu- SIMmizu- SIMmizu- SIMmizu- SIMmizu- SIMmizu- SIMmizu- SIMmizu- SIMmizu- SIMmizu- SIMmizu- SIMmizu- SIMmizu- SIMmizu- SIMmizu- SIMmizu- SIMmizu- SIMmizu- SIMmizu- SIMmizu- SIM mizu- SIMmizu- SIM mizu- SIMmizu- SIMmizu- SIM mizu- SIMmizu- SIMmizu- SIMmizu- SIMmizu- SIMmizu- SIMmizu- SIMmizu- SIMmizu- SIMmizu- SIMmizu- SIMmizu- SIMmizu- SIMmizu- SIMmizu- SIMmizu- SIMmizu- SIMmizu- SIMmizu- SIMmizu- SIM mizu- SIMmizu- SIM mizu- SIMmizu- SIM mizu- SIM mizu- SIMmizu- SIMmizu- SIMmizu- SIMmizu- SIMmizu- SIMmizu- SIMmizu- SIMmizu- SIMmizu- SIMmizu- SIMmizu- SIMmizu- SIMmizu- SIMmizu- SIMmizu- SIMmizu- SIMmizu- SIMmizu- SIMmizu- SIM mizu- SIMmizu- SIM mizu- SIM mizu- SIMmizu- SIM mizu- SIMmizu- SIMmizu- SIMmizu- SIMmizu- SIMmizu- SIMmizu- SIMmizu- SIMmizu- SIMmizu- SIMmizu- SIMmizu- SIMmizu- SIMmizu- SIMmizu- SIMmizu- SIMmizu- SIMmizu- SIMmizu- SIMmizu- SIM mizu- SIMmizu- SIM mizu- SIM mizu- SIM mizu- SIM mizu- SIM mizu- SIM mizu- SIM mizu- SIM mizu- SIM mizu- SIM mizu- SIM mizu- SIM mizu- SIM mizu- SIM mizu- SIM mizu- SIM mizu- SIM mizu- SIM mizu- SIM mizu- SIM mizu- SIM mizu- SIM mizu- SIM mizu- SIM mizu- SIM. SIM SIM SIM SIM SIM SIM SIM SIM SIM SIM SIM SIM SIM SIM SIM SIM SIM SIM SIM SIM SIM SIM SIM SIM SIM SIM SIM SIM SIM SIM SIM SIM SIM SIM SIM SIM SIM SIM SIM SIM SIM SIM SIM SIM SIM SIM SIM SIM SIM SIM SIM |
g
LG . LG Electronics, Inc 2012
LGG Group LGL
.
TMTalkGmailTMYouTubetm Maps TM
.Inc,JgS JnTm Play Store
ilpa
46.... 0d0o0000000000000000000000000000000000000000000000000
46.
47.
50.
51.
52.
53.
53. Wi-Fi
53. Wi-Fi 45
55.
57.
- 6
- 40..... 1
- 45.
71
74
74
74.
75. 43e 2go jubla oikw4j oikw jnubla Jaiil
76
77
77
78.
79.
79.
山
59.
60. Wi-Fi Cast j 100 Wi-Fi Direct
61............SmartShare
62....SmartShare j
68.
68.
68.
68.
69.
69.
70.
#
- 1115
- USB
94 - FM
96.
80
80.
81.
81.
82.
83.
83.
84.
84.
86.
89.
89.
106
- 45
- 111
114
115
118
119
120
98..LG SmartWorld
98... LG SmartWorld
99..... LG SmartWorld
101.
- Polaris Office
104
- 105.
Jg g Jn 0d
yie jil 100gale gao jlljw
0jdlalwJg jI gJrJyB 100000000000000000000000000000000000000000000000000000000000000000000000000000000
aalba 4y j yj sla Jaaallgsslal
a1^2 + a2^2
(SAR).LG-P705JLgJgJgJgJgJgJgJgJgJgJgJgJgJgJgJgJgJgJgJgJgJgJgJgJgJgJgJgJgJgJgJgJgJgJgJgJgJgJgJgJgJgJgJgJgJgJg
0.534 1 1 1 1 1 1 1 1 1 1 1 1 1 1 1 1 1 1 1 1 1
J 1 J 1 J 1 J 1 J 1 J 1 J 1 J 1 J 1 J 1 J 1 J 1 J 1 J 1 J 1 J 1 J 1 J 1 J 1 J 1 J 1 J 1 J 1 J 1 J 1 J 1 J 1 J 1 J 1 J 1 J 1 J 1 J 1 J 1 J
J 15000000000000000000000000000000000000000000000000000000000
·L 1s
J 1
.
J 1 J 1 J 1 J 1 J 1 J 1 J 1
J 1
-
s
jdi jdl jol jol jol jol jol
1
0
4b 1 1 1 1 1 1 1 1 1 1 1 1 1 1 1 1 1 1 1 1 1 1 1 1 1 1
1 1
.
1
jogg g jn o dss
1
.
1 45 45 45 45 45 45 45 45 45 45 45 45 45 45 45 45 45 45 45 45 45 45 45 45 45
J 1
Laiu gui 45 jin jn J Ld
1 111111111111111111111111111111111111111
Lai jai g jg jil sla pssu w j
jai l jg jg g jg jy jil
.2j
S ACD = S COD + S_ DCE
1 1
s
auiu jolrnnn labe jgl daiy
I ciw g w yol nni nla li.
labe cwl n aon an p 2000 1000
by cws gl aabj 51 .iiik j 4i
j.l. i j 1 j ii j 1
oai kai bai li iik oiai ul orn jali
law sl rna jzilis jy bsgi
Jlalai Jla Jz Jz Jz Jz Jz Jz Jz Jz Jz Jz Jz Jz Jz Jz Jz Jz Jz
15 45
.
g j g d 1 r
.
令A B
1 1
12g jil jil jil jil 45
.
·jol j 1
i j 1j j j j j j j j j j
·j 1
J 1
#
1 1
1 1
.
1 1 1 1 1 1 1 1 1 1 1 1 1 1 1 1 1 1 1 1 1 1 1 1 1 1 1 1 1 1 1 1 1 1 1 1 1 1 1 1 1 1
LGLgss
1 1 1 1 1 1 1 1 1 1 1 1 1 1 1 1 1 1 1 1 1 1 1 1 1 1 1 1 1 1 1 1 1
J 1
aai 1 j 1 jai jai jai
JbI. JjJj jJjJwJwJwJwJ 1Jgil. JyJyJyJyJyJyJyJyJyJy
jgo g jn oolgl jll
J 1 J 1
- 1
1 1
L
LG Electronics
·
4
G
.
·
·
.
Jg j g J 1
jogg jn oJaiu 1
1j 1j j
GPL. j 1234567890123456789012345678901234567890123456789012345678901234567890123456789012345678901234567890123456789
:
/http://opensource.lge.com
1 111111111111111111111111111
1
a
LG Electronics
LG-P705 Jg 1999/5/ECJg
j 1
http://www/lg.com/global/support/cedoc/RetrieveProductCeDOC.jsp
21 + u + 4q = 1 + uq dH
buaa glaLaa
()15+50:
()-45
15 10:
#
1 1
:la aai jai gai
aLi j < cLi< < aLi j <
ii
1 1
iiis 1
y Jy y Jy Jy
45 15
2
1,2,3,4,5,6 1,2,3,4,5,6 1,2,3,4,5,6
jai li jia 1
ai a ai 分母最小值为 k .
1
0000
la la la aolj j l c 1
J 1
o
1
J 1 J 1 J 1 J 1 J 1 J 1 J 1
LED
1
4 4
LGL
15 5
g. 1 j g/
j山

12g s 100000000000000000000000000000000000000000000000000000000000000000
4 la lalj j j 1. Jai j JStre
j 1
4g5 1y.
j1 j1 j1 caiy i 1000
i 1
o
laalaij y j 6
. 154 Lg J g .
Lg j J
LG j J
J
J
J
J
J
J
J
J
J
J
J
J
J
J
J
J
J
J
J
J
J
J
J
J
J
J
J
J
J
J
J
J
J
J
J
J
J
J
J
J
J
J
J
J
J
J
J
J
J
J
J
J
J
J
J
J
J
J
J
J
J
J
J
J
J
J
J
J
J
J
J
J
J
J
J
J
J
J
J
J
J
J
J
J
J
J
J
(LG PC Suite) 7
"LG PC Suite"
Sby 1j g0s Sss 2a 8o jSol laa 45
Wi-Fi USB
ol jdi gldRslac jdl g 1
.
"LG PC Suite"
…
i
.
0d 0dlaal gla aai jy bui yu jy
:
G oJrHome
y = - ( x - 2) ^2 + 9 = - x^2 + 4x + 5
:la aai jy g
aLi j<clai<laalj j<
1 > ( j + 1) < 2
2 = 2
()
0
oJy aolj yra Jg j 0aal Lg "LG PC Suite" aJy Jg
Si = aix_i
·
"LG PC Suite" 5
( xt^2 + x) ( xt^2 + x) = ( xt^2 + x) ^2
"LG PC Suite" 1 a 1 a 1 a 1 a 1 a 1 a
S = 1
即
( 0,13) ± 1
OE BC
a<01r 2
1rww.1g.com
.
jlyy
0o 000000000000000000000000000000000000000000000000000
·jylj jy1 10j:CPU
WINDOW PC Sync Window PC
S y n c
"LG PC Suite"
- LG Windows XP .bit(Service pack 2)
bit. /bit Windows Vista bit /bit Windows
jldalaii 8 USB
Lg PC suite USB
0
LG USB LG 1L G LG USB LG PC Suite"
JUUI JI. 100 USB JUR USB JUAI AS Dg W Lw
JUB
i 1
m microSD
J 1
. microSD
: 1
jLb< 000s j1jla jJg
aaii 1
5 = 7
.
- = ( x1,y1) , = ( x2,y2)
四
microSD
.15
microSD 1
jLb< 00s j1la jxclj
ii
10
i 1
J 1
- 1 J/ gol/ jg 15
J 1
oJn Jy
19
gac g aagaaa jaii J 100000000000000000000000000000000000000000000000000000
4y 1 y 1 1 1 1 1 1 1 1 1 1 1 1 1 1 1 1 1 1 1 1
J 1/1 J 1 1 1 1 1 1 1 1 1 1 1 1 1 1 1 1 1 1 1 1
J 1 J. j 1 1 1 1 1 1 1 1 1 1 1 1 1 1 1 1 1 1
0
jies
J LCD 1 1 1 1 1 1 1 1 1 1 1 1 1 1 1 1 1 1 1 1 1 1 1 1 1 1 1 1 1 1 1 1 1
g j 4
J 123456789000000000000000000000000000000000000000000000000000000000000000


0
s j 8
12 < a + 5 < 14
B 1 1 1 1 1 1 1 1 1 1 1 1 1 1 1 1 1 1 1 1 1 1 1 1 1 1
USB 1500000000000000000000000000000000000000000000000
1 1 1 1 1 1 1 1 1 1 1 1 1 1 1 1 1 1 1 1

J 1
J 1
J 1
J 1
J 1
J 1
J 1
J 1
J 1
J 1
J 1
J 1
J 1
J 1
J 1
J 1
J 1
J 1
J 1
J 1
J 1
J 1
J 1
J 1
J 1
J 1
o
1J 1 J 1 J 1 J 1 J 1 J 1 J 1 J 1 J 1 J 1 J 1 J 1 J 1 J 1 J 1 J 1 J 1 J 1 J 1 J 1 J 1 J 1 J 1 J 1 J 1 J 1 J 1 J 1 J 1 J 1 J 1 J 1 J 1 J 1 J
J 1 J 1 J 1 J 1 J 1 J 1 J 1 J 1 J 1 J 1 J 1 J 1 J 1 J 1 J 1 J 1 J 1 J 1 J 1 J 1 J 1 J 1 J 1 J 1 J 1 J 1 J 1 J 1 J 1 J 1 J 1 J 1 J 1 J 1 J
1
a aaii aai i 14
a1 = 23,a2 = - 43,b1 = 58,b2 = - 78
0d 1 2 1 2 1 2 1 2 1 2 1 2
[ \Leftrightarrow \frac{y}{x} = \frac{z}{w}]
J 1
![LG Opimus L9 - [ \Leftrightarrow \frac{y}{x} = \frac{z}{w}] - 1](/content/2026/04/624544/images/a3d0c1f1c192947dc948e5439db20290d7c06a0f1be54dc3d4e72f9462490795.jpg)
#
j00000000000000000000000000000000000000
1 1
1J 15
.1.2
golgiol
J 1 J 1 J 1 J 1 J 1 J 1 J 1 J 1 J 1 J 1 J 1 J 1 J 1 J 1 J 1 J 1 J 1 J 1 J 1 J 1 J 1 J 1 J 1 J 1 J 1 J 1 J 1 J 1 J 1 J 1 J 1 J 1 J 1 J 1 J
#
c1 = 12,c2 = 35,c3 = 48,c4 = 516.
1 1
(.
iW
. 1
WFiWi-Fi 1
gulal gla 4j j 100000000000000000000000000000
12x - 1 > 3 - 32x
J 1
Wi-Fi 山 Wi-Fi
WJFik
115 1
Wi-Fi
. Wf
LG-P705
j
1
4a 15
J 1
y
JWi-Fi 0dai j J
gjglalbii. jgl gai lai gls ol
1
10 1
1
Wi-I
.
aolj y jy 1 J 1 J a o
J 1
.
la olesg 1a
10 1
S 1 y j 8 g 8 8 8 8 8
s jw
oS w oS s jw bJy
.
J L a
1 1
.15 1234567890
oL 1000000000000000000000000000000000000000000000000000000

a
1gglg0dla <laaie<la
1
111 111 111 111 111 111 111 111 111 111 111 111 111 111 111 111 1
Wifi- Fi J
J j 1
J 1 J 1 J 1 J 1 J 1 J 1 J 1 J 1 J 1 J 1 J 1 J 1 J 1 J 1 J 1 J 1 J 1 J 1 J 1 J 1 J 1 J 1 J 1 J 1 J 1 J 1 J 1 J 1 J 1 J 1 J 1 J 1 J 1 J 1 J
1 1
- i5 12
J 1
JyB JyB JyB JyB JyB JyB JyB JyB JyB JyB JyB JyB JyB JyB JyB JyB JyB JyB JyB JyB JyB JyB JyB JyB JyB JyB JyB JyB JyB JyB JyB JyB JyB JyB J
la olesg 1a
Jaa Jlaa Caa aaa
:Wi-Fi
j<la<la
Ji<la 45g jI J 200s
1
AC^2 + D
y Windows 10 (Ubuntu)Linux
la.Windows 10
JolcsWindows Jolcs
JolcsWindows Jolcs
JolcsWindows Jolcs
JolcsWindows Jolcs
JolcsWindows Jolcs
JolcsWindows Jolcs
JolcsWindows Jolcs
JolcsWindows Jolcs
JolcsWindows Jolcs
JolcsWindows Jolcs
JolcsWindows Jolcs
JolcsWindows Jolcs
JolcsWindows Jolcs
JolcesWindows Jolcs
JolcsWindows Jolcs
JolcsWindows Jolcs
JolcsWindows Jolcs
JolcsWindows Jolcs
JolcsWindows Jolcs
JolcsWindows Jolcs
JolcsWindows Jolcs
JolcsWindows Jolcs
JolcsWindows Jolcs
JolcsWindows Jolcs
JolcsWindows Jolcs
JolcsWindows Jolces
JolcsWindows Jolcs
JolcsWindows Jolcs
JolcsWindows Jolcs
JolcsWindows Jolcs
JolcsWindows Jolcs
JolcsWindows Jolcs
JolcsWindows Jolcs
JolcsWindows Jolcs
JolcsWindows Jolcs
JolcsWindows Jolcs
JolcsWindows Jolcs
JolcsWindows Jolcs
JolcasWindows Jolcas
Wi-Fi
sla 45g jyj y
Wi-Fi
·451,45.1SSSUDWAIiFi
<laaijbjj<
1
00dJ 1 J 1 WlFi Jn
Wi-Fi
la olesg 1a 4y j
14g
J 235
J 235
J 235
J 235
J 235
J 235
J 235
J 235
Wi-Fi Cast jolalai
J 1
Android j45
Wi-Fi Wi-Fi 45
Wi-Fi wj j
S directed
Wif
. S
Wi-Fi Direct SmartShare
Wi-Fi Direct
Wifi-Fi Direct
Wi-Fi
Wi-Fi
Wi-Fi
Wi-Fi
Wi-Fi
Wi-Fi
Wi-Fi
Wi-Fi
Wi-Fi
Wi-Fi
Wi-Fi
Wi-Fi
Wi-Fi
Wi-Fi
Wi-Fi
Wi-Fi
Wi-Fi
Wi-Fi
Wi-Fi
Wi-Fi
Wi-Fi
Wi-Fi
Wi-Fi
Wi-Fi
Wi-Fi
Wi-Fi
Wi-Fi
Wi-Fi
Wi-Fi
Wi-Fi
Wi-Fi
Wi-Fi
Wi-Fi
Wi-Fi
Ji Jai Wi-Fi Direct
Wi-Fi Directed Wi-Fi
S 1
ii 1
<la<laJyj<Wi-Fi Direct <aS+
m = 311
1
S APQ = S AQP + S_ QPQ
la oles g la 4y juaai
sJyBwGgS LwS g 4
G y
Wi-Fi Direct J.
8
J.
J.
J.
J.
J.
J.
J.
J.
J.
< < < < aai j< Wi-Fi Direct < 45g w g j1
15:
SmartShare
S) DLNA jSmartShare 15 Sj 15 15
1 1 1 1 1 1 1 1 1 1 1 1 1 1 1 1 1 1 1 1 1 1 1 1 1 1 1 1 1 1 1 1 1 1 1 1 1 1 1 1 1 1
sJyIaHjD
.
1j 5
j 1. j 1
- iS 1
i 1
j 1
DLNA
SmartShare
8

12
iiS 1 iLaii gui
SmartShare

Sm
4
2
J 1
·
12 < < 35
la oikw g la 4y juaai
1
1
1 1
12 + 5 由( f( x)
1 1
0
1rJg<g.1JLJLJd 1
Gnss.2s0JLw gDg
4Sgl0JLWbB Wl y DjI
1JnJnJnJnJnJnJnJnJnJnJnJnJnJnJnJnJnJnJnJnJnJnJnJnJnJnJnJnJnJnJnJnJnJnJnJnJnJnJnJnJnJnJnJnJnJnJnJnJnJnJ n
g 1
J 1 J 1 J 1 J 1 J 1 J 1 J 1
s
J 1
1 1
Jai j
i j 1 1 1 1 1 1 1 1 1 1 1 1 1 1 1 1 1
aai
la jula
-
- 10.
J 10000000000000000000000000000000000000000000000000000000000000000000000000000
aai 1 jy jiu 1jui 1 jia 1i5 i5i
Jai
i 10000000000000000000000000000000000000000000000

.// =
m = 311
S_ OBC = 12 · CO · BC = 12 × CD × 3
i 1
la jula
b15 05iia 45 115 11ii- wai jiail
Lgai oduwul wai y Lg
Jiaiia 1a Jai aai 2d jg g
.
s1r2n j-aa
2g jor. 1iil laai
J 1
.
la Jai Jai la Jai -Jai
g 1s sla uai coa d j 1s uai
.150al 1
wliolgl0jai -wliolgl0jai
.
2J2R5Lac 28000000000000000000000000000000000000000
J 1
la aai 1a
ii
1
411 1234567890
45 1
1
joo joc1 gla 4yja - yla gla 4yja
().
j 1 1
()
aJolal 1000-
1 2
sai j 1i:0
J 1000
Jai Jai Jai Jai Jai
J 1
45()
()
#
J 1

1 1
1 1
.115 5jLwPbSs
1 115
1 15 1 Jy jai li yis aJl 1 S y j l kii I y ss j 1

1
12

1.215 1.215 1.215 1.215 1.215
12 .
d 1

1 1
J 1

- iS 1 J 1 1 1 1 1 1 1 1 1 1 1 1 1 1 1 1 1 1 1 1 1 1 1 1 1 1 1 1 1 1 1 1 1

- S
2g = 0.12
S APQ = S AQP + S_ QPQ
LG PC Suite 4aJr jy Jg 1
.2d d J
.215 S15 J
LG PC Suite 4j j
.
Lg-P705
sJwP (USB
LgJwR JyJyJyJyJyJyJyJyJyJyJy
a
(1)
aalilj jolldai 1r dglabla
jCSV JJl jy r gss
- iS Jua aJU 4
JL GPCuite 1 JI USB JL Android Jol
1 1
#
JUJ 1500000000000000000000000000000000000000000000
SMS j LG-P705 5 MMS
.
E 1
1 1
1 1
1 1
1 1
1 1
1 1
1 1

。
J 1
a 1200000000000000000000000000000000000000000000000
g0g2
S (SMS. MMS) 1
J J J J J J J J J J J J J J J J J J J J J J J J J J J J J J J J J J J J J J J J J J J J J J J J J J J J J J J J
j 15.02.02.SMS
gulal glalai jolalai
2gslgpa 4y gwlal gldai jodla
gdoj jia 1 gia k
1
J LG-P705
a
1J 1
118 118 118
#
J 1
Jn Jn Jn Jn Jn Jn Jn Jn Jn Jn Jn Jn Jn Jn Jn Jn Jn Jn Jn Jn Jn Jn Jn Jn Jn Jn Jn Jn Jn Jn Jn Jn Jn Jn Jn Jn Jn Jn Jn
< 0
15
g j 1 1 1 1 1 1 1 1 1 1 1 1
J 1
1
:山

< 0
.
- 12345678901234567890123456789012345678901234567890
Exchange IMAP POP:
1
Lai jilj 1r l jil jil jil jil jil jil jil jil jil jil jil jil jil jil jil jil jil jil jil jil jil jil jil jil jil jil jil jil jil jil jil jil jil jil jil jil jil jil jil jil jil jil
20
J 1
1
.
slaa
j
a
.
S
()
Sg 1
i00000000000000000000000000000000000000000
i j 1
.
1
·
<laai< 5jui
< 1
1
gss
i 1
e 1
.


=
J 1
J 1

m : x = 1 或 3x + 4y + 1 = 0
1 - kx > ( x - 1) ( x^2 - 3x) x^2 + 4x - 2 =
J 45 45
W L W J L W J L W J W J W J W J W J W J W J W J W J W J W J W J W J W J W J W J W J W J W J W J W J W J W J W J W J W J W J W J W J W J W J W J W J W J W J W J W J W J W J W J W J W J W J W J W J W J W
i 145i i j 1 1 1 1 1 1 1 1 1 1 1 1
sla sJdG 215 Jg j 1000000000000000000000000000000000000000000000000000000000000000
S_1 = 12 · AC · PD = 12 × CD × DE = 14
12
#
yai li
1
1 2
J 1 JiiS g jaii
1
1 1
J 1. 2.3.4.5.6.7.8.9.10.11.12.13.14.15.16.17.18.19.20.21.22.23.24.25.26.27.28.29.30.31.32.33.34.35.36.37.38.39.40.41.42.43.44.45.46.47.48.49.50.51.52.53.54.55.56.57.58.59.60.61.62.63.64.65.66.67.68.69.70.71.72.73.74.75.76.77.78.79.80.81.82.83.84.85.86.87.88.89.90
12
a

J 15

Gmail+
SmartShare Picasa
1
SNS
eai 45
SNS
#
s
.1 + u1 = 1 + u
0
.
2
20000000000000000000000000000000000000
.

. 4.15
1
gssssssssssssssssssssssssssssssssssssssssssssssssssssssssssssssssssssssssssssss
J 1 J 1 J 1 J 1 J 1 J 1 J 1 J 1 J 1
1 2 45 6 8 9 10
4
1 5
bùà égǔ
gio jil 1.25 ool ool bui pia jn yjai Ooal 0y - gll 8
G
S_n + 1 = 12( n^2 + 1) - 12( n^2 + 2) - 12( n^2 + 3) - ·s - 12( n^2 + 2n - 1)

1
1 1
SmartShare Gmail
y.2g 000000000000000000000000000000000000000000000000
2000 1
.2g 2
oJ 1 oJ 1 J 1 J 1 J 1 J 1 J 1 J 1 J
iis
LG Android Platform Driver
$$ \begin{array}{l} a _ {i} b _ {j} < \frac {1}{2} \sum_ {i = 1} ^ {n} \sum_ {j = 1} ^ {m} \sum_ {k = 1} ^ {n - 1} \sum_ {l = 1} ^ {m - 1} \sum_ {m = 1} ^ {n - 1} \ \mathrm {J u} \text {a i l} \varepsilon \mathrm {g} < \mathrm {J u} \text {a i l} < \mathrm {c l a s s} < \mathrm {L a} \mathrm {a l i} \ \left. \right.\left. \right.\left. \right.\left. \right.\left. \right.\left. \right.\left. \right.\left. \right.\left. \right.\left. \right.\left. \right.\left. \right.\left. \right.\left. \right.\left. \right.\left. \right.\left. \right.\left. \right.\left. \right.\left. \right.\left. \right.\left. \right.\left. \right.\left. \right.\left. \right.\left. \right.\left. \right.\left.\left.\left.\left.\left.\left.\left. \text {i} _ {\text {i}} ^ {\text {i}} = 1, 0, 0, 0, 0, 0, 0, 0, 0, 0, 0, 0, 0, 0, 0, 0, 0, 0, 0, 0, 0, 0, 0, 0, 0, 0, 0, 0, 0, 0, 0, 0, 0, 0, 0 \right) _ {\text {i}} ^ {\text {i}} = 1, 0, 0, 0, 0, 0, 0, 0, 0, 0, 0, 0, 0, 0, 0, 0, 0, 0, 0, 0, 0 \right) _ {\text {i}} ^ {\text {i}} = 1, 0, 0, 0, 0, 0, 0, 1, \right) _ {\text {i}} ^ {\text {i}} = 1, 0, 0, 0, 0, 1, \right) _ {\text {i}} ^ {\text {i}} = 1, 1, \right) _ {\text {i}} ^ {\text {i}} = 1, 1\right) _ {\text {i}} ^ {\text {i}} = 1, 1\right) _ {\text {i}} ^ {\text {i}} = \frac {1}{2} + \frac {1}{2} + \frac {1}{2} + \frac {1}{2} + \frac {1}{2} + \frac {1}{2} + \frac {1}{2} + \frac {1}{2} + \frac {1}{2} + \frac {1}{2} + \frac {1}{2} + \frac {1}{2} + \frac {1}{2} + \frac {3}{2} + \frac {3}{2} + \frac {3}{2} + \frac {3}{2} + \frac {3}{2} + \frac {3}{2} + \frac {3}{2} + \frac {3}{2} + \frac {3}{2} + \frac {3}{2} + \frac {3}{2} + \frac {3}{2} + \frac {3}{2} \ . \downarrow \downarrow \downarrow \downarrow \downarrow \downarrow \downarrow \downarrow \downarrow \downarrow \downarrow \downarrow \downarrow \downarrow \downarrow \downarrow \downarrow \downarrow \downarrow \downarrow \downarrow \downarrow \downarrow \downarrow \downarrow \downarrow \downarrow \downarrow \downarrow \downarrow \downarrow \downarrow \downarrow \downarrow (M T P) \ \end{array} $$
i 1
sla 4aas y gss
a
USB
1
sla sglgolglg j
j1j1
#
Gg LG-P705
1
0
0115 <la aolj j <
(SmartWorld (www.lgworld.com
115
L G 1
SmartWorld
LG SmartWorld
i j -a aai
j g j 45 10
.
1
2g 2g jg jg g aai -paaa
1 + u1 - 1 = ( 1 + u) u1 < 1 = u
. 1
()
LG SmartWorld
.
| la dali الله�� الله�� الله�� الله�� الله�� الله�� الله�� الله�� الله�� الله�� الله�� الله�� الله�� الله�� الله�� الله�� الله�� الله�� الله�� الله�� الله�� الله�� الله�� الله�� الله�� الله雄 الله�� الله�� الله�� الله�� الله�� الله�� الله�� الله�� الله�� الله�� الله�� الله�� الله�� الله�� الله�� الله�� الله�� الله�� الله�� الله�� الله�� الله�� الله�� الله�� الله腎 الله腎 الله腎 الله腎 الله腎 الله腎 الله腎 الله腎 الله腎 الله腎 الله腎 الله腎 الله腎 الله腎 الله腎 الله腎 الله腎 الله腎 الله腎 الله腎 الله腅 الله腎 الله腎 الله腎 الله腎 الله腎 الله腎 الله腎 الله腎 الله腎 الله腎 الله腎 الله腎 الله腎 الله腎 الله腎 الله腎 الله腎 الله腎 الله腎 الله腲 الله腎 الله腎 الله腎 الله腎 الله腎 الله腎 الله腎 الله腎 الله腎 الله腎 الله腎 الله腎 الfalls الfalls الfalls الfalls الfalls الfalls الfalls الfalls الfalls الfalls الfalls الfalls الfalls الfalls الfalls الfalls الfalls الfalls الfalls الfalls الfalls الfalls الfalls الfalls الfalls الfalls الfalls الfalls الfalls الfalls الfalls الfalls الfalls الfalls |
laolj
1 9 g j. d. w g o y 1 1
1 1 1
1 1
1 1
1 1
1 1
1 1
1 1
1 1
1 1
1 1
1 1
1 1
1 1
1 1
1 1
1 1
1 1
1 1
1 1
1 1
1 1
1 1
1 1
1 1
1 1
1 1
1
Polaris Office gllg jlll 1j 1j 1j 1j 1j 1j 1j 1j 1j 1j 1j
La Jda oJalu
1JnJnJnJnJnJnJnJnJnJnJnJnJnJnJnJnJnJnJnJnJnJnJnJnJnJnJnJnJnJnJnJnJnJnJnJnJnJnJnJnJn
10 45
45 45
J 1
a 1
J 1
<
1 1
S OBC = S COD + S_ BOC
#
s0000 000000000000000000000000000000
1
1j 1- jg0d j
m = 311
0j j 1 j j j j j j j j j j j j j j j j j j j j j j j j j j j j j j j j j j j j j j j j j j j j j j j j j j j j j j j j
Jaiolaiolj
<
J 1
j1i-
la li jy gLi 1- jd
i 120
.
- 1
J 1
- 15
aIwJl jilj1r jdi
y j 1 J 1 1 1 1 1 1 1 1 1 1 1 1 1 1 1
.
LGWi-Fi4545gJPC Suite
1
<j#
pji 4nni g oJgS OdaL1r gao cIc LbI
J 1
i
jLG 1
Lw g j l abl
http://update.lgmobile.com
1 4
J 1 -USB
la iJlu sJlu pKaa (jLb) jbi
USB (MTP)
1
4JL 10-2gJgJL
.USB JJ
PC Suite Wi-Fi
LGPC Suite
. Wl-Fi
#
45 111111111111111111111111111111111111111111
452Jg 1LG:4g
Baa Dg 1Rj j 1y
000000000000000000000000000000000000000000000000000
http://www/lg.com/common/index.
1 1 jsp
J 45 20000000000000000000000000000000000000000000000000000000000
L G
a 1000000000000000000000000000000000000000000000000000000000000000000000000
Demand (VOD) DivX VOD 50000000000000000000000000000000000000000000000000000000000000000000000000000000
DivX p 1234567890123456789012345678901234567890123456789012345678901234567890123456789012345678901234567890123456789
SgDivX. DivX Certified Rovi Corporation gJg j 1 1 1 1 1 1 1 1 1 1

DIVX DivX
DIVXVIDEO:DivX D#j DivXLLCgAs
Rovi 4221 4221 4221 4221 4221 4221 4221 4221 4221 4221 4221 4221 4221 4221 4221 4221 4221 4221 4221 4221 422
:DIVXVIDEO-ON-DEMAND DRRARDivX Certified mJgDdRrDivX Video-on-ss
aLgP705 1
(

JSL
S OBC = S COD + S BOC - S BOC
LG-P705
J 1
L
LG-P705
Jua 1 Jdil
在 Rt ABN 中:
4
LGLGJgljglb
.

Jr Jn Jn Jn Jn Jn Jn Jn Jn Jn Jn Jn Jn Jn Jn Jn Jn Jn Jn Jn Jn Jn Jn Jn Jn Jn Jn Jn Jn Jn Jn
| الله�� | ||
| مammen مammen مammen مammen مammen مammen مammen مammen مammen مammen مammen مammen مammen مammen مammen مammen مammen مammen مammen مammen مammen مammen مammen مammen مammen مammen مammen مammen مammen مammen مammen مammen مammen مammen مammen مammen مammen مammen مammen مammen مammen مammen مammen مammen مammen مammen مammen مammen مammen مammen مammen mahrnr | الله�� | الله�� |
1

| . . . . . . . . . . . . . . . . . . . . . . . . . . . . . . . . . . . . . . . . . . . . . . . . . . . . . . . . . . . . . . . . . . . . . . . . . . . . . . . . . . . . . . . . . . . . . . . . . . . . .. . . . . . . . . . . . . . . . . . . . . . . . . . . . . . . . . . . . . . . . . . . . . . . . . . . . . . . . . . . . . . . . . . . . . . . . . . . . . . . . . . . . . . . . . . . . . . . . . . . . . . . . . . . . . . . . . . . . . . . . . . . . . . . . . . . . . . . . . . . . . . . . . . . . . . . . . . . . . . . . . . . . . . . . . . . . . . . . . . . . . . . . . . . . . . . . . . . . . . . .. . . . . . . . . . . . . . . . . . . . . . . . . . . . . . . . . . . . . . . . . . . . . . . . . . . . . . . . . . . . . . . . . . . . . . . . . . . . . . . . . . . . . . . . . . . . . . .. . . . . . .. . . . . . . . . . . . . . . . . . . . . . . . . . . . . . . . . . . . . . . . . . . . . . . . . . . . . . . . . . . . . . . . . . . . . . . . . . . . . . . . . . . . . . . . . . . . . . . . . . . . ? . . . . . . . . . . . . . . . . . . . . . . . . . . . . . . . . . . . . . . . . . . . . . . . . . . . . . . . . . . . . . . . . . . . . . . . . . . . . . . . . . . . . . . . . . . . . . . . . . . . - - - - - - - - - - - - - - - - - - - - - - - - - - - - - - - - - - - - - - - - - - - - - - - - - - - - - - - - - - - - - - - - - - - - - - - - - - - - - - - - - - - - - - - - - - - - - - - - - - - - - - . . . . . . . . . . . . . . . . . . . . . . . . . . . . . . . . . . . . . . . . . . . . . . . . . . . . . . . . . . . . . . . . . . . . . . . . . . . . . . . . . . . . . . . . . . . . . . . . . . . - . . . . . . . . . . . . . . . . . . . . . . . . . . . . . . . . . . . . . . . . . . . . . . . . . . . . . . . . . . . . . . . . . . . . . . . . . . . . . . . . . . . . . . . . . . . . . . . . . . . 25 25 25 25 25 25 25 25 25 25 25 25 25 25 25 25 25 25 25 25 25 25 25 25 25 25 25 25 25 25 25 25 25 25 1 1 1 1 1 1 1 1 1 1 1 1 1 1 1 1 1 1 1 1 1 1 1 1 1 1 1 1 1 1 1 1 1 1 1 1 1 1 1 1 1 1 1 1 1 1 1 1 1 1 25 25 25 25 25 25 25 25 25 25 25 25 25 25 25 25 25 25 25 25 25 25 25 25 25 25 25 25 25 25 25 25 25 | ||
| الإستعمال | ||
| بانيور محيى سور. | بانيور رشز بعس محيى محيى سور. | |
| دانيور بعس بعس محيى محيى سور. | دانيور محيى سور. | |
| . . . . . . . . . . . . . . . . . . . . . . . . . . . . . . . . . . . . . . . . . . . . . . . . . . . . . . . . . . . . . . . . . . . . . . . . . . . . . . . . . . . . . . . . . . . . . . . . . . . . - . . . . . . . . . . . . . . . . . . . . . . . . . . . . . . . . . . . . . . . . . . . . . . . . . . . . . . . . . . . . . . . . . . . . . . . . . . . . . . . . . . . . . . . . . . . . . . . . . . . - . - - - - - - - - - - - - - - - - - - - - - - - - - - - - - - - - - - - - - - - - - - - - - - - - - - - - - - - - - - - - - - - - - - - - - - - - - - - - - - - - - - - - - - - - - - - - - - - - - - - - - - . . . . . . . . . . . . . . . . . . . . . . . . . . . . . . . . . . . . . . . . . . . . . . . . . . . . . . . . . . . . . . . . . . . . . . . . . . . . . . . . . . . . . . . . . . . . . . . . . . . ? . . . . . . . . . . . . . . . . . . . . . . . . . . . . . . . . . . . . . . . . . . . . . . . . . . . . . . . . . . . . . . . . . . . . . . . . . . . . . . . . . . . . . . . . . . . . . . . . . . . \- . . . . . . . . . . . . . . . . . . . . . . . . . . . . . . . . . . . . . . . . . . . . . . . . . . . . . . . . . . . . . . . . . . . . . . . . . . . . . . . . . . . . . . . . . . . . . . . . . . - - - - - - - - - - - - - - - - - - - - - - - - - - - - - - - - - - - - - - - - - - - - - - - - - - - - - - - - - - - - - - - - - - - - - - - - - - - - - - - - - - - - - - - - - - - - - - - - - - - - - - - - - - - - - - - - - - - - - - - - - - - - - - - - - - - - - - - - - - - - - - - - - - - - - - - - - - - - - - - - - - - - - - - - - - - - - - - - - - - - - - - - - - - - - - - - - - - - - - - - - - - - - - - - - - - - - - - - - - - - - - - - - - - - - - - - - - - - - - - - - - - - - - - - - - - - - - - - - - - - - - - - - - - - - - - - - - - - - - - - - - - - - - - - - - - - - - - - - - - |

DÉCLARATION DE CONFORMITÉ
This guide helps you to get started using your phone.
-
Some of the contents of this manual may not apply to your phone, depending on the software and your service provider.
-
This handset is not suitable for people who have a visual impairment due to the touch screen keyboard.
Copyright ©2012 LG Electronics, Inc. All rights reserved. LG and the LG logo are registered trademarks of LG Group and its related entities. All other trademarks are the property of their respective owners.
- Google™, Google Maps™, Gmail™, YouTube™, Google Talk™ and Play Store™ are trademarks of Google, Inc.
Contents
Guidelines for safe and efficient use ....6
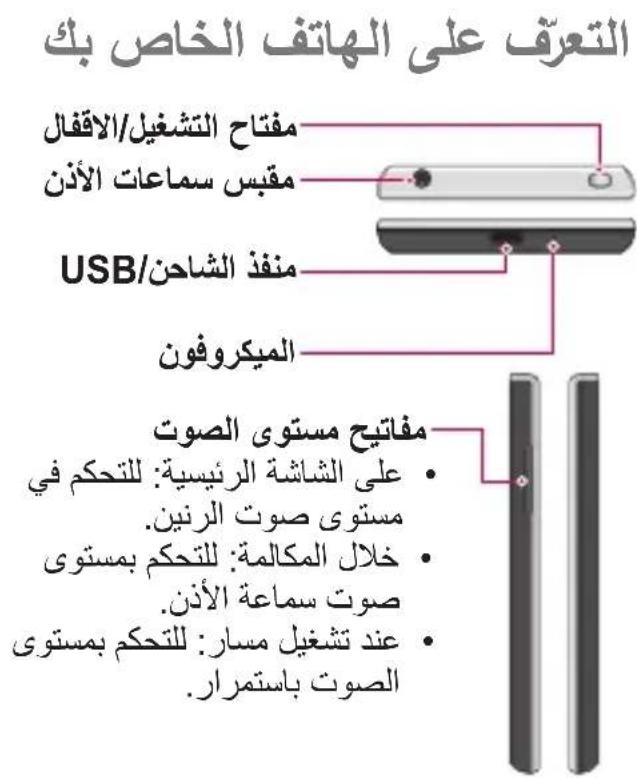
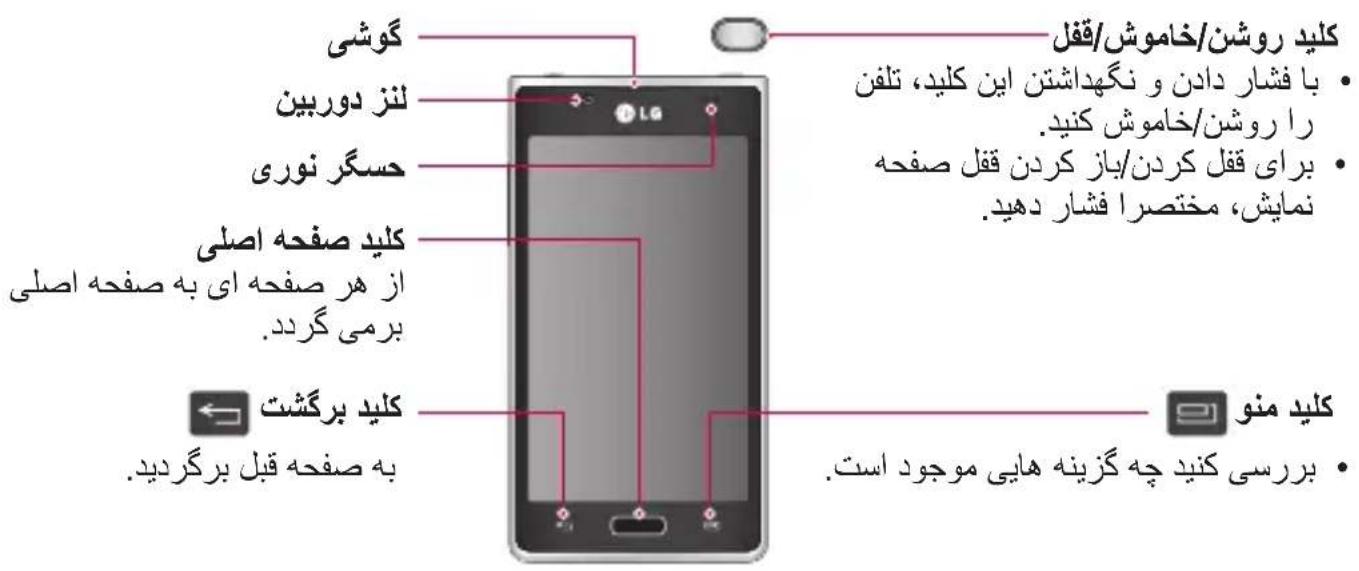
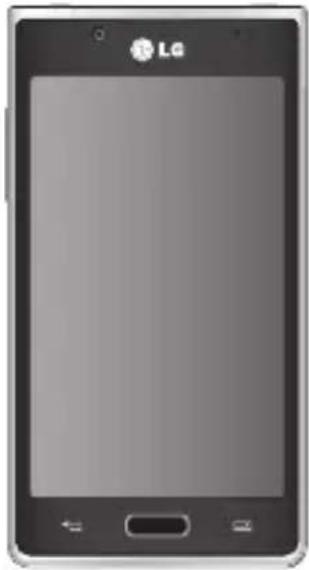
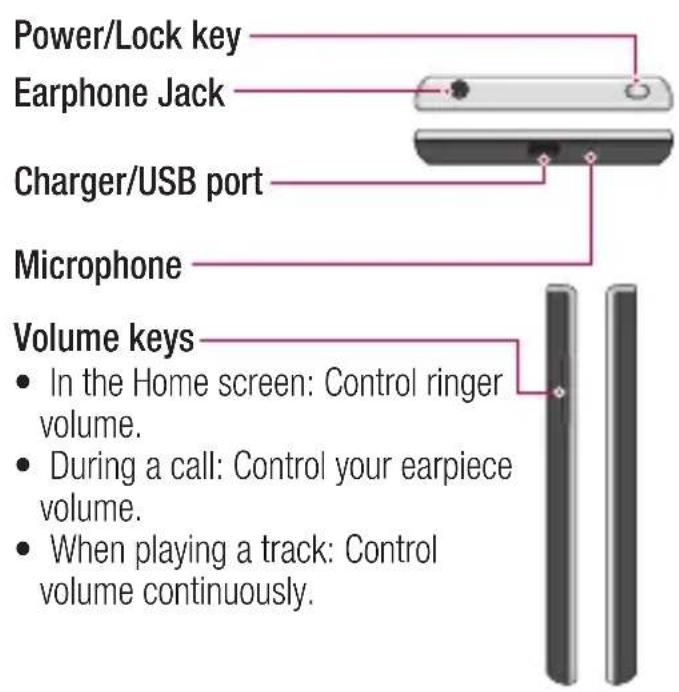
Getting to know your phone 18
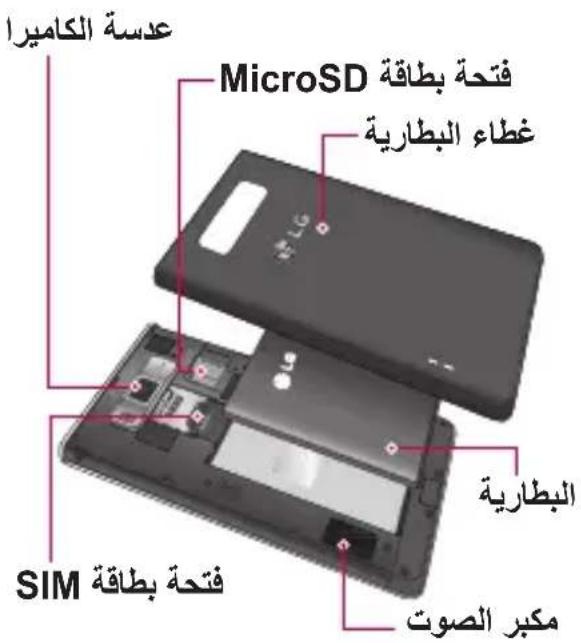
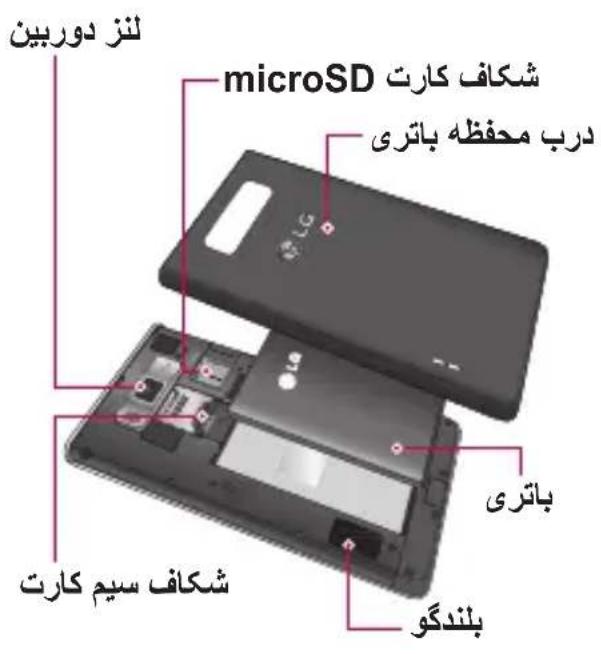
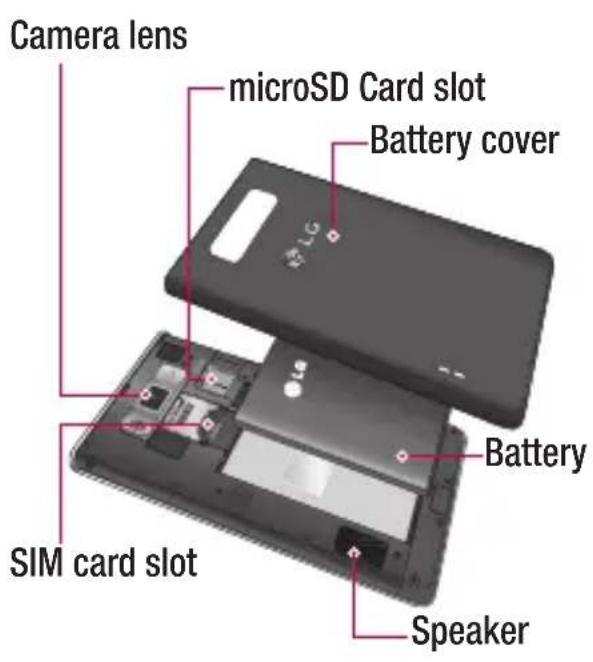
Device components 29
Installing the SIM card and battery 32
Charging your phone 34
Using the memory card 35
Locking and unlocking the screen 38
Secure your lock screen 39
Your Home screen 41
Touch screen tips 41
Home 42
Customising the Home screen 43
Returning to recently-used applications .....44
Notification drawer 44
Viewing the status bar 45
Onscreen keyboard 49
Entering accented letters 50
Google account set up 51
Connecting to Networks and Devices 52
Wi-Fi 52
Connecting to Wi-Fi networks 52
Bluetooth 53
Sharing your phone's data connection ....55
To rename or secure your portable
hotspot 57
Using the Wi-Fi Cast. 59
Enabling Wi-Fi Direct to share through
SmartShare 59
UsingSmartShare 61
Calls 65
Making a call 65
Calling your contacts 65
Answering and rejecting a call 65
Adjusting call volume 66
Making a second call 66
Viewing your call logs .67
Call settings 67
Contacts 70
Searching for a contact 70
Adding a new contact. 70
Favourite contacts 71
Moving contacts from your Old Device to your New Device 72
Messaging 73
Sending a message 73
Threaded box 74
Using Smilies 75
Changing your message settings 75
Contents
E-mail 76
Managing an email account 76
Email account screen 77
Working with account folders 77
Composing and sending email 77
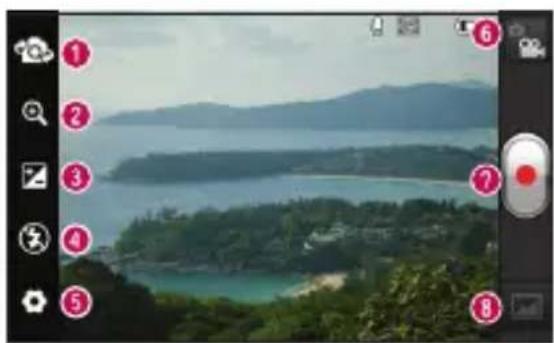
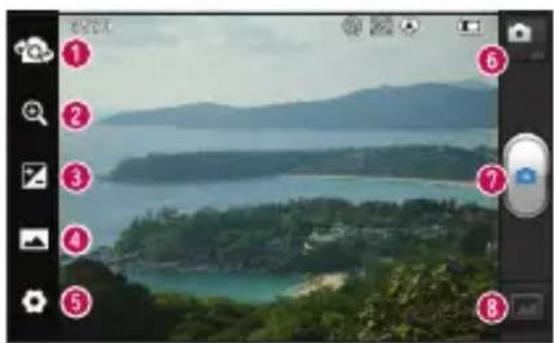
Camera 79
Getting to know the viewfinder 79
Taking a quick photo 80
Once you've taken the photo 80
Using the advanced settings 82
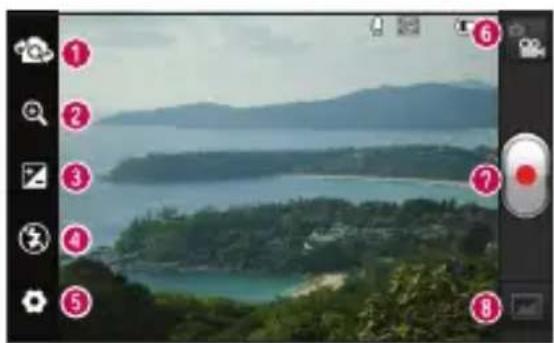
Video camera 85
Getting to know the viewfinder 85
Shooting a quick video 86
After shooting a video 86
Using the advanced settings 87
Adjusting the volume when viewing
a video 88
Multimedia 89
Gallery 89
Music Player 89
Transferring music files using USB mass
storage devices 89
Playing a song 90
FM Radio 92
Searching for stations 92
LG SmartWorld 94
How to Get to LG SmartWorld from Your
Phone 94
How to use LG SmartWorld 95
Utilities 96
Setting your alarm. 96
Using your calculator 96
Adding an event to your calendar 96
Polaris Office 98
The web 99
Browser 99
Using the web toolbar 99
Using options 100
Settings 101
WIRELESS & NETWORKS. 101
DEVICE 103
PERSONAL 106
SYSTEM 108
Phone software update 110
DivX Mobile 112
Accessories 113
Troubleshooting 114
Guidelines for safe and efficient use
Please read these simple guidelines. Not following these guidelines may be dangerous or illegal.
Exposure to radio frequency energy
Radio wave exposure and Specific Absorption Rate (SAR) information.
This mobile phone model LG-P705 has been designed to comply with applicable safety requirements for exposure to radio waves.
These requirements are based on scientific guidelines that include safety margins
designed to assure the safety of all persons, regardless of age and health.
-
The radio wave exposure guidelines employ a unit of measurement known as the Specific Absorption Rate, or SAR. Tests for SAR are conducted using standardised methods with the phone transmitting at its highest certified power level in all used frequency bands.
-
While there may be differences between the SAR levels of various LG phone models, they are all designed to meet the relevant guidelines for exposure to radio waves.
-
The SAR limit recommended by the International Commission on Non-Ionizing Radiation Protection (ICNIRP) is 2W/kg averaged over 10g of tissue.
- The highest SAR value for this model phone tested by DASY4 for use at the ear is 0.762W / kg (10g) and when worn on the body is 0.534W / Kg (10g).
- This device meets RF exposure guidelines when used either in the normal use position against the ear or when positioned at least 1.5cm away from the body. When a carry case, belt clip or holder is used for
body-worn operation, it should not contain metal and should position the product at least 1.5cm away from your body. In order to transmit data files or messages, this device requires a quality connection to the network. In some cases, transmission of data files or messages may be delayed until such a connection is available. Ensure the above separation distance instructions are followed until the transmission is completed.
Guidelines for safe and efficient use
Product care and maintenance

WARNING
Only use batteries, chargers and accessories approved for use with this particular phone model. The use of any other types may invalidate any approval or warranty applying to the phone and may be dangerous.
-
Do not disassemble this unit. Take it to a qualified service technician when repair work is required.
-
Repairs under warranty, at LG's discretion, may include replacement parts or boards that are either new or reconditioned, provided that they have functionality equal to that of the parts being replaced.
- Keep away from electrical appliances such as TVs, radios and personal computers.
- The unit should be kept away from heat sources such as radiators or cookers.
- Do not drop.
-
Do not subject this unit to mechanical vibration or shock.
-
Switch off the phone in any area where you are required to by special regulations. For example, do not use your phone in hospitals as it may affect sensitive medical equipment.
- Do not handle the phone with wet hands while it is being charged. It may cause an electric shock and can seriously damage your phone.
-
Do not charge a handset near flammable material as the handset can become hot and create a fire hazard.
-
Use a dry cloth to clean the exterior of the unit (do not use solvents such as benzene, thinner or alcohol).
- Do not charge the phone when it is on soft furnishings.
- The phone should be charged in a well ventilated area.
- Do not subject this unit to excessive smoke or dust.
- Do not keep the phone next to credit cards or transport tickets; it can affect the information on the magnetic strips.
Guidelines for safe and efficient use
- Do not tap the screen with a sharp object as it may damage the phone.
- Do not expose the phone to liquid or moisture.
- Use accessories like earphones cautiously. Do not touch the antenna unnecessarily.
-
Do not use, touch or attempt to remove or fix broken, chipped or cracked glass. Damage to the glass display due to abuse or misuse is not covered under the warranty.
-
Your phone is an electronic device that generates heat during normal operation. Extremely prolonged, direct skin contact in the absence of adequate ventilation may result in discomfort or minor burns. Therefore, use care when handling your phone during or immediately after operation.
Efficient phone operation
Electronics devices
All mobile phones may receive interference, which could affect performance.
- Do not use your mobile phone near medical equipment without requesting permission. Avoid placing the phone over pacemakers, for example, in your breast pocket.
- Some hearing aids might be disturbed by mobile phones.
- Minor interference may affect TVs, radios, PCs etc.
Road safety
Check the laws and regulations on the use of mobile phones in the area when you drive.
- Do not use a hand-held phone while driving.
- Give full attention to driving.
- Pull off the road and park before making or answering a call if driving conditions so require.
- RF energy may affect some electronic systems in your vehicle such as car stereos and safety equipment.
Guidelines for safe and efficient use
- When your vehicle is equipped with an air bag, do not obstruct with installed or portable wireless equipment. It can cause the air bag to fail or cause serious injury due to improper performance.
- If you are listening to music whilst out and about, please ensure that the volume is at a reasonable level so that you are aware of your surroundings. This is of particular importance when near roads.
Avoid damage to your hearing
Damage to your hearing can occur if you are exposed to loud sound for long periods of time. We therefore recommend that you do not turn on or off the handset close to your ear. We also recommend that music and call volumes are set to a reasonable level.
- When using headphones, turn the volume down if you cannot hear the people speaking near you, or if the person sitting next to you can hear what you are listening to.
NOTE: Excessive sound pressure from earphones can cause hearing loss.
Glass Parts
Some parts of your mobile device are made of glass. This glass could break if your mobile device is dropped on a hard surface or receives a substantial impact. If the glass breaks, do not touch or attempt to remove it. Stop using your mobile device until the glass is replaced by an authorised service provider.
Blasting area
Do not use the phone where blasting is in progress. Observe restrictions and follow any regulations or rules.
Potentially explosive atmospheres
- Do not use your phone at a refueling point.
- Do not use near fuel or chemicals.
- Do not transport or store flammable gas, liquid or explosives in the same compartment of your vehicle as your mobile phone or accessories.
Guidelines for safe and efficient use
In aircraft
Wireless devices can cause interference in aircraft.
- Turn your mobile phone off before boarding any aircraft.
- Do not use it on the ground without permission from the crew.
Children
Keep the phone in a safe place out of the reach of small children. It includes small parts which may cause a choking hazard if detached.
Emergency calls
Emergency calls may not be available on all mobile networks. Therefore you should never depend solely on your phone for emergency calls. Check with your local service provider.
Battery information and care
-
You do not need to completely discharge the battery before recharging. Unlike other battery systems, there is no memory effect that could compromise the battery's performance.
-
Use only LG batteries and chargers. LG chargers are designed to maximise the battery life.
- Do not disassemble or short-circuit the battery.
- Keep the metal contacts of the battery clean.
-
Replace the battery when it no longer provides acceptable performance. The battery pack may be recharged hundreds of times before it needs replacing.
-
Recharge the battery if it has not been used for a long time to maximise usability.
- Do not expose the battery charger to direct sunlight or use it in high humidity, such as in the bathroom.
- Do not leave the battery in hot or cold places, as this may deteriorate battery performance.
- There is risk of explosion if the battery is replaced with an incorrect type.
Guidelines for safe and efficient use
- Dispose of used batteries according to the manufacturer's instructions. Please recycle when possible. Do not dispose as household waste.
- If you need to replace the battery, take it to the nearest authorised LG Electronics service point or dealer for assistance.
-
Always unplug the charger from the wall socket after the phone is fully charged to save unnecessary power consumption of the charger.
-
Actual battery life will depend on network configuration, product settings, usage patterns, battery and environmental conditions.
- Make sure that no sharp-edged items such as animal's teeth or nails, come into contact with the battery. This could cause a fire.
DECLARATION OF CONFORMITY
Hereby, LG Electronics declares that this LG-P705 product is in compliance with the essential requirements and other relevant provisions of Directive 1999/5/EC. A copy of the Declaration of Conformity can be found at http://www/lg.com/global/support/cedoc/ RetrieveProductCeDOC.jsp
Ambient temperatures
Max: +50^ C (discharging), +45^ C (charging)
Min: -10°C
Notice: Open Source Software
To obtain the corresponding source code under GPL, LGPL, MPL and other open source licences, please visit http://opensource.lge.com/
All referred licence terms, disclaimers and notices are available for download with the source code.
Getting to know your phone
Before you start using the phone, please read this!
Please check to see whether any problems you encountered with your phone are described in this section before taking the phone in for service or calling a service representative.
1. Phone memory
When there is less than 10% of space available in your phone memory, your phone cannot receive new messages. You need to check your phone memory and delete some
data, such as applications or messages, to make more memory available.
To uninstall applications:
1 Touch >Apps tab > Settings > Apps from the DEVICE category.
2 Once all applications appear, scroll to and select the application you want to uninstall.
3 Touch Uninstall.
2. Optimising battery life
Extend your battery's life between charges by turning off features that you don't need to having running constantly in the background. You can monitor how applications and system resources consume battery power.
Extending your phone's battery life:
- Turn off radio communications you are not using. If you are not using Wi-Fi, Bluetooth or GPS, turn them off.
-
Reduce screen brightness and set a shorter screen timeout.
-
Turn off automaticyncing for Google Mail™, Calendar, Contacts and other applications.
- Some applications you have downloaded may reduce battery power.
To check the battery power level:
- Touch > Apps tab > Settings > About phone from the SYSTEM > Status
The battery status (charging or not charging) and level (percentage charged) is displayed at the top of the screen.
Getting to know your phone
To monitor and control how battery power is being used:
- Touch >Apps tab > Settings >
Power saver from the DEVICE > Battery use from the BATTERY INFORMATION
Battery usage time is displayed at the top of the screen. It tells you how long it has been since you last connected your phone to a power source or, if currently connected, how long the phone was last running on battery power. The screen shows the applications or services using battery power, listed in order from the greatest to smallest amount used.
3. Using folders
You can combine several app icons in a folder. Drop one app icon over another on a Home screen, and the two icons will be combined.
NOTE: After you open an app, you can usually adjust its settings by choosing items from its Menu icon near the top or bottom of the screen.
4. Before installing an open source application and OS

WARNING
If you install and use an OS other than the one provided by the manufacturer it may cause your phone to malfunction. In addition, your phone will no longer be covered by the warranty.

WARNING
To protect your phone and personal data, only download applications from trusted sources, such as Play Store™. If there are improperly installed applications on your phone, it may not work normally or a serious error may occur. You must uninstall those applications and all associated data and settings from the phone.
Getting to know your phone
5. Using the hard reset (Factory reset)
If your phone needs to be restored to its original condition, use hard reset to reboot your phone.
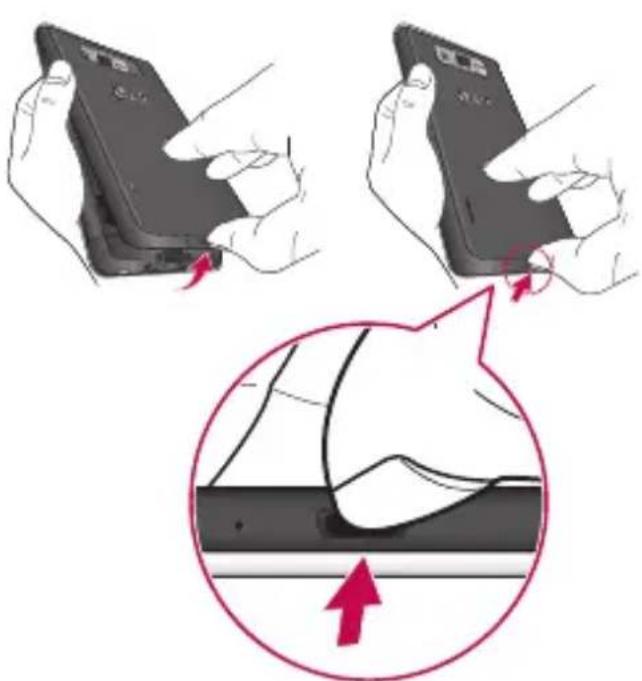
- When the phone is switched off, press and hold the Volume down key + Power key with your left hand.
- When the LED on the bottom of the phone lights up, touch and hold the Menu key with your right hand. You need to do this immediately, before the screen displays the LG logo. Make sure your left hand is still
holding the Volume down and Power keys. Then release the power key at vibration time.
- When the LG logo is displayed on the screen, continue to hold the keys for around 2 seconds, and then release all them at the same time, before the LG logo disappears.
Leave your phone for at least a minute while the hard reset is carried out. You will then be able to switch your phone back on.
Caution: If you perform a hard reset, all user applications and user data will be deleted. This cannot be reversed.
Remember to back up any important data before performing a hard reset.
6. Opening and switching applications
Multitasking is easy with Android because you can keep more than one application running at the same time. There's no need to quit an application before opening another. Use and switch between several open applications. Android manages each application, stopping and starting them as needed to ensure that idle applications don't consume resources unnecessarily.
To return to view list recently used applications:
Simply press and hold the Home key.
To stop applications:
1 Touch >Apps tab > Settings > Apps from the DEVICE > Running
2 Scroll and touch the desired application and touch Stop to stop it.
Getting to know your phone
7. Installing PC Software (LG PC Suite)
"LG PC Suite" PC Application is a program that helps you connect your device to a PC via a USB cable and Wi-Fi. Once connected, you can use the functions of your device from your PC.
With your "LG PC Suite" PC Application, You Can...
- Manage and play your media contents (music, movie, pictures) on your PC.
-
Send multimedia contents to your device.
-
Synchronises data (schedules, contacts, bookmarks) in your device and PC.
- Backup the applications in your device.
- Update the softwares in your device.
- Backup and restore the device.
- Play multimedia contents of your PC from other device.
NOTE: You can use the Help menu from the application to find out how to use your "LG PC Suite" PC application.
Installing "LG PC Suite" PC Application
"LG PC Suite" PC application can be downloaded from the webpage of LG.
1 Go to www.lg.com and select a country of your choice.
2 Go to Support > Mobile Phone Support > Select the Model (LG-P705).
3 Click PC Sync from Download, and click WINDOW PC Sync Download to download "LG PC Suite" PC software.
System Requirements for "LG PC Suite" PC software
- OS: Windows XP 32 bit(Service pack 2), Windows Vista 32 bit/64 bit, Windows 7 32 bit/64 bit
- CPU: 1 GHz or higher processors
- Memory: 512 MB or higher RAMs
- Graphic card: 1024 x 768 resolution, 32 bit color or higher
Getting to know your phone
- HDD: 100 MB or more free hard disk space (More free hard disk space may be needed depending on the volume of data stored.)
- Required software: LG integrated drivers
NOTE: LG Integrated USB Driver
LG integrated USB driver is required to connect an LG device and PC and installed automatically when you install "LG PC Suite" PC software.
8. Synchronising your phone to a computer via USB
NOTE: To synchronise your phone with your PC using the USB cable, you need to install LG PC Suite onto your PC. Please refer to previous pages to install LG PC Suite.
1 Use the USB cable to connect your phone to a USB port on your computer. Once connected, you will receive a notification that a USB connection has been made.
2 Open the notification drawer and touch USB connected.
3 Touch PC software to confirm that you want to transfer files between your phone's microSD card and the computer.
TIP! To use the microSD card on your phone again, you need to open the notification drawer and touch Charge only.
During this time, you can't access the microSD card from your phone, so you can't use applications that rely on the microSD card.
To disconnect your phone from the computer:
Open the notification drawer and touch > Charge only to disconnect your phone from the computer safely.
Getting to know your phone
9. Hold your phone upright
Hold your mobile phone vertically, as you would a regular phone. The LG-P705 has an internal antenna. Be careful not to scratch or damage the back of the phone, as this may affect performance.
While making/receiving calls or sending/ receiving data, avoid holding the lower part of the phone where the antenna is located. Doing so may affect call quality.
10. When the screen freezes
If the screen freezes or the phone does not respond when you try to operate it:
Remove the battery, reinsert it, then turn the phone on.
OR
Press and hold the Power/Lock key for 10 seconds to turn it off.
If it still does not work, please contact the service centre.
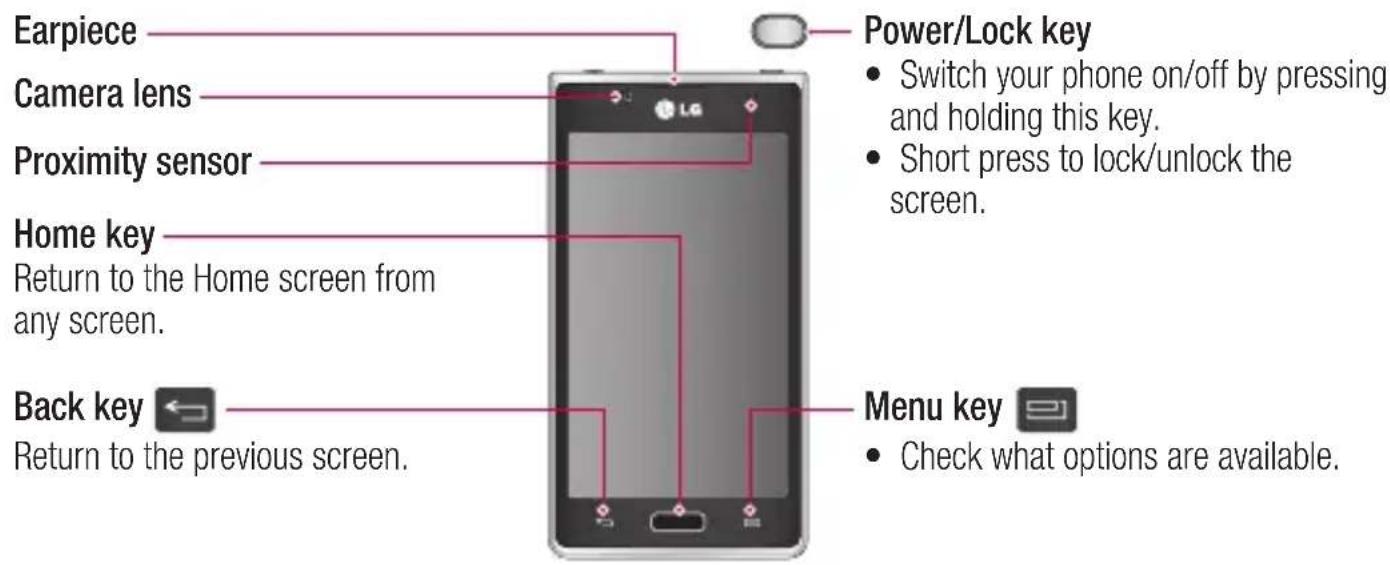
Device components
Getting to know your phone
NOTE: Proximity sensor
When receiving and making calls, the proximity sensor automatically turns the backlight off and locks the touch screen by sensing when the phone is near your ear. This extends battery life and prevents you from unintentionally activating the touch screen during calls.

WARNING
Placing a heavy object on the phone or sitting on it can damage the LCD and touch screen functions. Do not cover the LCD proximity sensor with protective film. This could cause the sensor to malfunction.
Getting to know your phone
Installing the SIM card and battery
Before you can start exploring your new phone, you'll need to set it up. To insert the SIM card and battery:
1 To remove the battery cover, hold the phone firmly in one hand. With your other hand, lift off the battery cover with your thumbnail as shown in figure.
NOTE: Put your thumbnail into the USB port hole and lift off the battery cover.
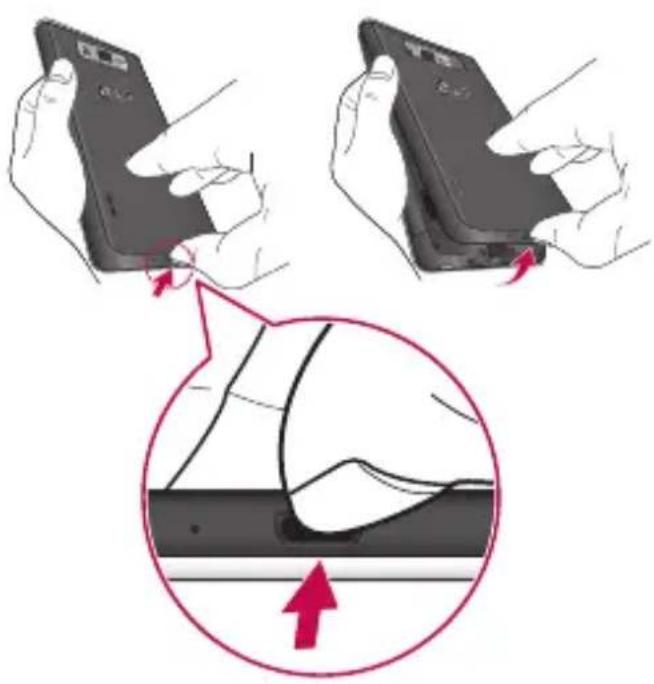
2 Slide the SIM card into the SIM card slot. Make sure the gold contact area on the card is facing downwards.
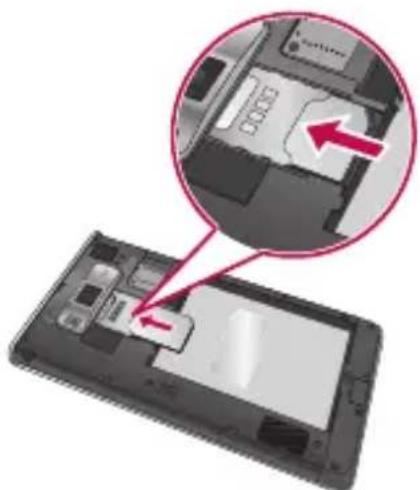
3 Insert the battery into place by aligning the gold contacts on the phone and the battery (1) and pressing it down until it clicks into place (2).
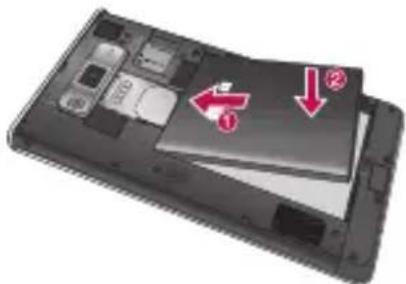
Getting to know your phone
4 Align the battery cover over the battery compartment (1) and press it down until it clicks into place (2).
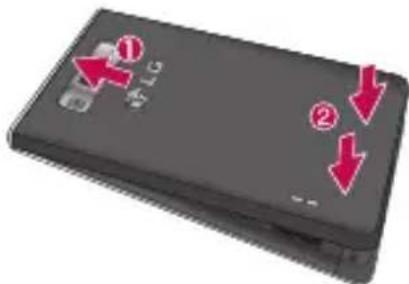
Charging your phone
The charger connector is at the bottom of the phone. Insert the charger and plug it into an electrical outlet.
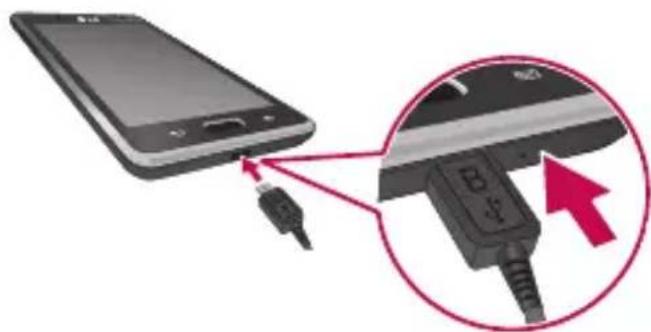
NOTE: The battery must be fully charged initially to improve battery lifetime.
NOTE: Do not open the battery cover during the charging your phone.
Using the memory card
To insert a memory card:
Insert the memory card into the slot.
Make sure the gold contact area is facing downwards.
To remove the memory card safely:
Touch >Apps tab > Settings > Storage from the DEVICE > Unmount SD card > OK.
Getting to know your phone

NOTE: The LG-P705 supports memory cards up to 32 GB.

WARNING
Do not insert or remove the memory card when the phone is on. Doing so may damage the memory card as well as your phone, and the data stored on the memory card may get corrupted.
To format the memory card:
Your memory card may already be formatted. If it isn't, you must format it before you can use it.
NOTE: All files on your memory card are deleted when it is formatted.
1 On the home screen, touch > Appst tab to open the menu.
2 Scroll and touch Settings > Storage from the DEVICE.
3 Touch Unmount SD card and touch OK to confirm it.
4 Touch Erase SD card > Erase SD card > Erase everything, then confirm your choice.
5 If you have set a pattern lock, input the pattern lock then select Erase everything.
NOTE: If there is content on your memory card, the folder structure may be different after formatting as all the files will be deleted.
Getting to know your phone
Locking and unlocking the screen
If you do not use the phone for a while, the screen is turned off and locked automatically. This helps to prevent accidental touches and saves battery power.
When you are not using the LG-P705, press the Power/Lock key to lock your phone.
If there are any programs running when you set lock screen, they may be still running in Lock mode. It is recommended that you exit all programs before entering Lock mode to avoid unnecessary charges (e.g. phone calls, web access and data communications).
To wake up your phone, press the Power/ Lock key . The lock screen will appear. Touch and slide the lock screen in any direction to unlock your home screen. The last screen you viewed will open.
Secure your lock screen
You can lock your screen so that only you can unlock it to access your phone.
To set an Unlock Pattern, PIN or Password for the first time:
- Touch >Apps tab > Settings > Lock screen from the DEVICE > Select screen lock > Swipe, None, Pattern, PIN or Password
NOTE:
Precautions to take when using pattern lock.
It is very important to remember the unlock pattern you set. You will not be able to access your phone if you use an incorrect pattern 5 times. You have 5 opportunities to enter your unlock pattern, PIN or password. If you have used all 5 opportunities, you can try again after 30 seconds.
Getting to know your phone
When you cannot recall your unlock pattern:
If you logged in to your Google account on the phone but failed to enter the correct pattern 5 times, tap the Forgot pattern? button. You are then required to log in with your Google account to unlock your phone. If you have not created a Google account on the phone or you forgot it, you have to perform a hard reset.
Your Home screen
Touch screen tips
Here are some tips on how to navigate around your phone.
Touch - To choose a menu/option or open an application, touch it.
Touch and hold - To open an options menu or grab an object you want to move, touch and hold it.
Drag - To scroll through a list or move slowly, drag across the touch screen.
Flick - To scroll through a list or move quickly, flick across the touch screen (drag quickly and release).
NOTE:
- To select an item, touch the centre of the icon.
- Do not press too hard; the touch screen is sensitive enough to pick up a light, firm touch.
- Use the tip of your finger to touch the option you want. Be careful not to touch any other keys.
Your Home screen
Home
Simply swipe your finger to the left or right to view the panels. You can customise each panel with Apps, Downloads, Widgets and Wallpapers.
NOTE: Some screen images may be different depending on your phone provider.
On your Home screen, you can view quick keys at the bottom of the screen. Quick keys provide easy, one-touch access to the functions you use the most.
Touch the Phone icon to bring up the touch screen dialpad to make a call.
Touch the Contacts icon to open your contacts.
Touch the Messaging icon to access the messaging menu. This is where you can create a new message.
Touch the Apps icon at the bottom of the screen. You can then view all your installed applications. To open any application, simply touch the icon in the applications list.
Customising the Home screen
You can customise your Home screen by adding Apps, Downloads, Widgets or Wallpapers. For more convenience using your phone, add your favourite widgets to the Home screen.
To add items on your Home screen:
1 Touch and hold the empty part of the Home screen.
2 In the Add Mode menu, select items you want to add. You will then see added items on the Home screen.
3 Drag it to the location you want and lift your finger.
To remove an item from the Home screen:
- Home screen > touch and hold the icon you want to remove > drag it to
TIP! To add an application icon to the Home screen from the Applications menu, touch and hold the application you want to add.
Your Home screen
Returning to recently-used applications
1 Touch and hold the Home key. The screen displays a pop-up with icons of applications you used recently.
2 Touch an icon to open the application. Or touch the Back key to return to your current application.
Notification drawer
The notification drawer runs across the top of your screen.
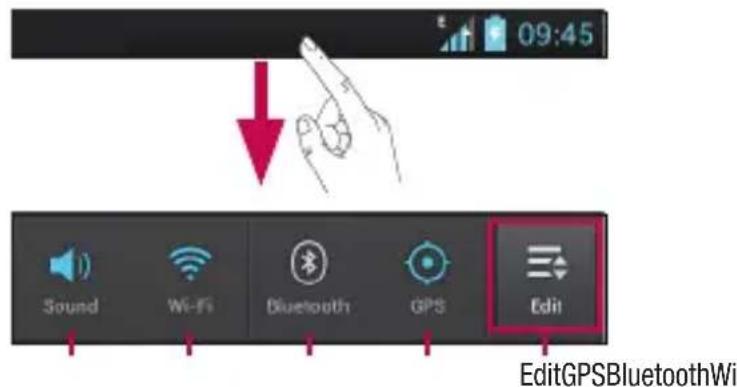
Touch and slide the notification drawer down with your finger.
Touch > to manage the Notifications. Here you can check and manage Sound profile, Wi-Fi, Bluetooth, GPS, Accounts & sync, Airplane mode, Auto-rotate screen, Brightness, Data enabled or Portable Wi-Fi hotspot.
Viewing the status bar
The status bar uses different icons to display phone information such as signal strength, new messages, battery life, active Bluetooth and data connections.

Your Home screen
Below is a table explaining the meaning of icons you're likely to see in the status bar.
| Icon | Description |
| No SIM card | |
| No signal | |
| Airplane mode | |
| Connected to a Wi-Fi network | |
| Power saver is on |
| Icon | Description |
| Wired headset | |
| Call in progress | |
| Call hold | |
| Speakerphone | |
| Phone microphone is muted | |
| Missed call | |
| Bluetooth is on | |
| System warning | |
| Alarm is set | |
| New voicemail | |
| Ringer is silenced |
| Icon | Description |
| Vibrate mode | |
| Battery fully charged | |
| Battery is charging | |
| Phone is connected to PC via USB cable | |
| Downloading data | |
| Uploading data |
Your Home screen
| Icon | Description |
| GPS is acquiring | |
| Receiving location data from GPS | |
| Data isSyncing | |
| New Gmail | |
| talk | New Google Talk message |
| New message |
| Icon | Description |
| Song is playing | |
| FM radio turned on in the background | |
| USB tethering is active | |
| Portable Wi-Fi hotspot is active | |
| Both USB tethering and portable hotspot are active |
Onscreen keyboard
You can enter text using the onscreen keyboard. The onscreen keyboard appears automatically on the screen when you need to enter text. To manually display the keyboard, simply touch a text field where you want to enter text.
Using the keypad & entering text
Tap once to capitalise the next letter you type. Double-tap for all caps.
Tap to switch to the numbers and symbols keyboard. You can also touch and hold this tab to view the Settings menu.
Tap to enter a space.
Tap to create a new line in the message field.
Tap to delete the previous character.
Your Home screen
Entering accented letters
When you select French or Spanish as the text entry language, you can enter special French or Spanish characters (e.g. "á").
For example, to input "á", touch and hold the "a" key until the zoom-in key grows bigger and displays characters from different languages.
Then select the special character you want.
Google account set up
When you first turn on your phone, you have the opportunity to activate the network, to sign into your Google Account and how you want to use some Google services.
To set up your Google account:
- Sign into a Google Account from the prompted set up screen.
OR
- Touch > Apps tab > select a Google application, such as Gmail > select New to create a new account.
If you have a Google account, touch Existing, enter your email address and
password, then touch Sign in.
Once you have set up your Google account on your phone, your phone automatically synchronises with your Google account on the web.
Your contacts, Gmail messages, Calendar events and other information from these applications and services on the web are synchronised with your phone. (This depends on your synchronisation settings.)
After signing in, you can use Gmail™ and take advantage of Google services on your phone.
Connecting to Networks and Devices
Wi-Fi
With Wi-Fi, you can use high-speed Internet access within the coverage of the wireless access point (AP). Enjoy wireless Internet using Wi-Fi, without extra charges.
Connecting to Wi-Fi networks
To use Wi-Fi on your phone, you need to access a wireless access point or "hotspot". Some access points are open and you can simply connect to them. Others are hidden or use security features; you must configure your phone to be able to connect to them.
Turn off Wi-Fi when you're not using it to extend the life of your battery.
NOTE: If you are out of the Wi-Fi zone or set Wi-Fi to OFF, additional charges may be applied by your mobile operator for mobile data use.
Turning Wi-Fi on and connecting to a Wi-Fi network
1 Touch >Apps tab > Settings > Wi-Fi from the WIRELESS & NETWORKS
2 Set Wi-Fi to ON to turn it on and start scanning for available Wi-Fi networks.
3 Tap Wi-Fi menu again to see a list of active and in-range Wi-Fi networks.
- Secured networks are indicated by a lock icon.
4 Touch a network to connect to it.
- If the network is open, you are asked to confirm that you want to connect to that network by touching Connect.
- If the network is secured, you are prompted to enter a password or other credentials. (Ask your network administrator for details)
5 The status bar displays icon that indicate Wi-Fi status.
Bluetooth
You can use Bluetooth to send data by running a corresponding application, not from the Bluetooth menu as on most other mobile phones.
Connecting to Networks and Devices
TIP! With LG-P705, you can enjoy Bluetooth high speed.
If the device you want to share files with also supports high speed Bluetooth, the files will automatically be transferred via the high-speed network. To use Bluetooth high speed data transfer, please make sure the Wi-Fi is OFF on your devices before use. The settings for Bluetooth high speed may be different depends on the device. Please check the device's settings with their service provider.
Turning on Bluetooth and pairing up your phone with a Bluetooth device
You must pair your device with another device before you connect to it.
1 Touch >Apps tab > Settings > Set Bluetooth to ON from the WIRELESS & NETWORKS
2 Tap Bluetooth menu again. Your phone will scan for and display the IDs of all available Bluetooth in-range devices. If the device you want to pair with isn't on the list, make sure the target device is set to be discoverable, then tap Search for
devices again.
3 Choose the device you want to pair up with from the list.
Once the paring is successful, your device will connect to the other device.
Sending pictures using Bluetooth
1 Select a Picture > > Bluetooth
2 Check whether Bluetooth is ON, then select Search for devices.
3 Choose the device you want to send data to from the list.
Sharing your phone's data connection
USB tethering and portable Wi-Fi hotspot are great features when there are no wireless connections available. You can share your phone's mobile data connection with a single computer via a USB cable (USB tethering). You can also share your phone's data connection with more than a single device at a time by turning your phone into a portable Wi-Fi hotspot.
When your phone is sharing its data connection, an icon appears in the status
Connecting to Networks and Devices
bar and as an ongoing notification in the notifications drawer.
For the latest information about tethering and portable hotspots, including supported operating systems and other details, visit http://www.android.com/tether.
To change Portable Wi-Fi hotspot settings:
- Touch > Apps tab > Settings >
- More from the WIRELESS & NETWORKS >
- Portable Wi-Fi hotspot > Choose options that you want to adjust
TIP!
If your computer is running Windows 7 or a recent distribution of some flavours of Linux (such as Ubuntu), you don't usually need to prepare your computer for tethering. But if you're running an earlier version of Windows or another operating system, you may need to prepare your computer to establish a network connection via USB. For the most current information about which operating systems support USB tethering and how to configure them, visit http://www.android.com/tether.
To rename or secure your portable hotspot
You can change the name of your phone's Wi-Fi network name (SSID) and secure its Wi-Fi network.
1 On the Home screen, touch > Appst tab > Settings
2 Touch More from the WIRELESS & NETWORKS and select Portable Wi-Fi hotspot.
3 Ensure Portable Wi-Fi hotspot is ticked.
4 Touch Configure Wi-Fi hotspot.
- The Configure Wi-Fi hotspot dialog box will open.
- You can change the network SSID (name) that other computers see when scanning for Wi-Fi networks.
- You can also touch the Security menu to configure the network with Wi-Fi Protected Access 2 (WPA2) security using a pre-shared key (PSK).
Connecting to Networks and Devices
- If you touch the WPA2 PSK security option, a password field is added to the Configure Wi-Fi hotspot dialog. If you enter a password, you will need to enter that password when you connect to the phone's hotspot with a computer or other device. You can set Open in the Security menu to remove security from your Wi-Fi network.
5 Touch Save.
ATTENTION!
If you set the security option as Open, you cannot prevent unauthorised usage of online services by other people and additional charges can be incurred. To avoid unauthorised usage, you are advised to keep the security option active.
Using the Wi-Fi Cast
You can share your music, picture and video content between users who use Android Phones connected via the same Wi-Fi & Wi-Fi Directed network.
Check your Wi-Fi & Wi-Fi Directed network in advance and make sure the users are connected to the same network.
1 Touch >Apps tab > Settings > More from the WIReLESS & NETWORKS > Wi-Fi Direct
2 Touch the Wi-Fi Direct checkbox to turn on.
3 Select a device to connect from the scanned device list.
4 Touch Connect.
Enabling Wi-Fi Direct to share through SmartShare
Wi-Fi Direct automatically scans nearby Wi-Fi Direct devices and the searched devices are listed as they are found and you can select a specific device to share multimedia data through Smart Share.
Wi-Fi Direct cannot be enabled while using other Wi-Fi functions.
Connecting to Networks and Devices
1 Touch >Apps tab > Settings > More from the WIRELESS & NETWORKS > Wi-Fi Direct
2 Select a device to connect from the scanned device list.
CREATE GROUP - Touch to activate group owner mode, which enables the legacy Wi-Fi devices to connect by scanning your phone. In this case you must enter the password that is set in Password.
NOTE: When your phone becomes a group owner, it will consume more battery power than when it is a client. Wi-Fi Direct connection does not provide Internet service. Additional costs may be incurred when connecting and using online services. Check data charges with your network provider.
Using SmartShare
SmartShare uses DLNA (Digital Living Network Alliance) technology to share digital content through a wireless network. Both devices must be DLNA certified to support this feature.
To turn SmartShare on and allow sharing contents
1 Touch >Apps tab >SmartShare
2 Press and select Settings.
3 Touch Discoverable checkbox to turn off.
- Touch Always accept request if you would like to automatically accept sharing requests from other devices.
- Touch Receive files if you would like to automatically allow upload files to my phone from other devices.
4 Under the My Shared Contents section, touch to checkmark the types of content you would like to share. Choose from Pictures, Videos and Music.
5 SmartShare is now activated and ready to share contents.
Connecting to Networks and Devices
To share contents from remote content library to other devices
Let your renderer device (e.g. TV) play multimedia contents from your remote content library (e.g. PC).
NOTE: Make sure that the DLNA functionality of your devices is properly configured (e.g. TV and PC).
1 Touch the top right button to or select the device from renderer lists.
2 Touch the top left button and select the device of the remote content library.
3 You can browse the content library.
4 Touch a content thumbnail or press the Menu key and select Play button.
To share contents from your phone to your renderer device(e.g. TV)
NOTE: Make sure that your renderer device is properly configured.
1 While browsing your pictures or videos using the Gallery application, touch to select files. Then you will be able to select multiple files to be shared.
2 Touch Share on the menu and select the SmartShare.
3 SmartShare is automatically launched with the selected files.
4 Select the device from renderer lists to play the files.
NOTE: Follow the similar steps to use the Music Player, Camera and Video player to share contents.
Notice: Check that your device is connected with your home network using Wi-Fi connection to use this application. Some DLNA enabled devices (e.g. TV) support only the DMP feature of DLNA and will not appear in the renderer device list. Your device might not be able to play some contents.
To download contents from remote content library
1 Touch >Apps tab > SmartShare
2 Touch the top left button and select the device of the remote content library.
Connecting to Networks and Devices
3 You can browse the content library.
4 Touch a content thumbnail then touch Download menu key.
Notice: A few types of contents are not supported.
To upload contents from my phone to remote content library
NOTE: Make sure that SD card is correctly mounted and the Receive files in settings menu is checked.
1 Touch >Apps tab >SmartShare
2 Touch the top left button and select My phone.
3 You can browse the content library.
4 Touch and hold a content thumbnail and then touch the Upload menu key.
5 Select a device of remote content library to be uploaded.
Notice: Some DLNA enabled devices do not support DMS upload functionality and will not be uploaded. A few types of contents are not supported.
Calls
Making a call
1 Touch to open the keypad.
2 Enter the number using the keypad. To delete a digit, touch the
3 Touch to make a call.
4 To end a call, touch the End icon
TIP! To enter "+" to make international calls, touch and hold 0.
Calling your contacts
1 Touch to open your contacts.
2 Scroll through the contact list or enter the first few letters of the contact you want to call by touching Search contacts.
3 In the list, touch the contact you want to call.
Answering and rejecting a call
When you receive a call in Lock state, hold and slide the to Answer incoming call. Hold and slide the to Decline an incoming call.
Calls
Hold and slide the Quick msg icon from the bottom if you want to send one.
TIP! Quick msg
You can send a message quickly using this function. This is useful if you need to reply the call through message during meeting.
Adjusting call volume
To adjust the in-call volume during a call, use the Volume up and down keys on the left-hand side of the phone.
Making a second call
1 During your first call, touch Menu > Add call and dial the number. Also, you can go recent dialled list by touching or can search contacts by touching and select the number you want to call.
2 Touch to make the call.
3 Both calls are displayed on the call screen. Your initial call is locked and put on hold.
4 Touch the displayed number to toggle between calls. Or touch Merge call to make a conference call.
5 To end active calls, touch End or press Home Key and slide the notification bar down and select End call icon
NOTE: You are charged for each call you make.
Viewing your call logs
On the Home screen, touch and choose the Call logs tab
View a complete list of all dialled, received and missed voice calls.
TIP! Touch any call log entry to view the date, time and duration of the call.
TIP! Press the Menu key, then touch Delete all to delete all the recorded items.
Call settings
You can configure phone call settings such as call forwarding and other special features offered by your carrier.
Calls
1 On the Home screen, touch
2 Touch Menu.
3 Tap Call settings and choose the options that you want to adjust.
Fixed dialing numbers - To turn on and compile a list of numbers that can be called from your phone. You'll need your PIN2, which is available from your operator. Only numbers within the fixed dial list can be called from your phone.
Voicemail service - Allows you to select your carrier's voicemail service.
Voicemail settings - If you are using your carrier's voicemail service, this option allows you to enter the phone number to use for listening to and managing your voicemail.
Save unknown numbers - Add unknown numbers to contacts after a call.
Call reject - Allows you to set the call reject function. Choose from Disabled, Reject calls on list or Reject all calls.
Quick messages - When you want to reject a call, you can send a quick message using this function. This is useful if you need to reject a call during a meeting.
Call forwarding - Choose whether to divert all calls, when the line is busy, when there is no answer or when you have no signal.
Call barring - Select when you would like calls to be barred. Enter the call barring password. Please check with your network operator about this service.
Call duration - View the duration of calls including all calls, dialled calls, received calls and last call.
Call costs - View the charges applied to your calls. (This service is network dependent; some operators do not support this function)
Additional settings - This lets you change the following settings:
Caller ID: Choose whether to display your number on an outgoing call.
Call waiting: If call waiting is activated, the handset will notify you of an incoming call while you are on the phone (depending on your network provider).
Contacts
Add contacts to your phone and synchronise them with the contacts in your Google account or other accounts that support contactyncing.
Searching for a contact
In the Home screen
1 Touch to open your contacts.
2 Touch Search contacts and enter the contact name using the keyboard.
Adding a new contact
1 Touch enter the new contact's number, then press the Menu key. Touch Add to contacts > Create new contact.
2 If you want to add a picture to the new contact, touch the image area. Choose from Take photo or Select from gallery.
3 Select the contact type by touching
4 Touch a category of contact information and enter the details about your contact.
5 Touch Save.
Favourite contacts
You can classify frequently called contacts as favourites.
Adding a contact to your favourites
1 Touch to open your contacts.
2 Touch a contact to view their details.
3 Touch the star to the right of the contact's name.
Removing a contact from your favourites list
1 Touch to open your contacts.
2 Touch the tab and choose a contact to view its details.
3 Touch the star to the right of the contact's name. The star turns grey and the contact is removed from your favourites.
Contacts
Moving contacts from your Old Device to your New Device
Export your contacts as a CSV file from your old phone to your PC using a PC sync program.
1 Install LG PC Suite on the PC first. Run the program and connect your Android mobile phone to the PC using a USB cable.
2 Select the. Go to File > Import and select the CSV file saved on your PC.
3 If the fields in the imported CSV file are different from those in LG PC Suite, you need to map the fields. After mapping the fields, click OK. The contacts are then added to LG PC Suite.
4 If LG PC Suite detects the connection of your LG-P705 phone (using the USB cable), click Sync or Sync contacts to synchronise the contacts saved on your PC with your phone.
Messaging
Your LG-P705 combines SMS and MMS into one intuitive, easy-to-use menu.
Sending a message
1 Touch on the home screen, and touch + to open a blank message.
2 Enter a contact name or contact number in the To field. As you enter the contact name, matching contacts appear. You can touch a suggested recipient. You can add multiple contacts.
NOTE: You will be charged for a text message for every person you send the message to.
3 Touch Enter message field and start to compose your message.
4 Press to open the Options menu. Choose from Add subject, Discard, Attach, Insert smiley and All messages.
5 Touch Send to send your message.
Messaging
6 The message screen opens, with your message after Recipient Name/Number. Responses appear on the screen. As you view and send additional messages, a message thread is created.
WARNING: The 160-character limit may vary from country to country depending on the language and how the SMS is coded.
WARNING: If an image, video or audio file is added to an SMS message, it is automatically converted into an MMS message and you are charged accordingly.
Threaded box
Messages (SMS, MMS) exchanged with another party can be displayed in chronological order so that you can conveniently see an overview of your conversation.
Using Smilies
Liven up your messages using Smilies. When writing a new message, press the Menu key, then choose Insert smiley.
Changing your message settings
Your LG-P705 message settings are predefined, so you can send messages immediately. You can change the settings based on your preferences.
You can use the Email application to read emails from services other than Google Mail.
The Email application supports the following account types: POP3, IMAP and Exchange.
Your service provider or system administrator can provide the account settings you need.
Managing an email account
The first time you open the E-mail application, a setup wizard opens to help you to set up an email account.
To add another email account:
- Touch >Apps tab > E-mail > in the account screen, touch > Settings > ADD ACCOUNT
After the initial setup, Email displays the contents of your inbox. If you have added more than one account, you can switch among accounts.
To change an email account's setting:
- Touch >Apps tab > E-mail > in the account screen, touch > Settings
To delete an email account:
- Touch >Apps tab > E-mail > in the account screen, touch > Settings > touch an account you want to delete > Remove account
Email account screen
You can touch an account to view its Inbox. The account from which you send email by default is indicated with a tick.
- Touch the folder icon to open the account folders.
Only the most recent emails in your account are downloaded to your phone.
Working with account folders
Each account has an Inbox, Outbox, Sent and Drafts folder. Depending on the features supported by your account's service provider, you may have additional folders.
Composing and sending email
To compose and send a message
1 While in the E-mail application, touch the
2 Enter an address for the message's intended recipient. As you enter text, matching addresses are offered from your Contacts. Separate multiple addresses with semicolon.
3 Add Cc/Bcc and add attachment files if required.
4 Enter the text of the message.
5 Touch the If you aren't connected to a network, for example, if you're working in airplane mode, the messages that you send are stored in your Outbox folder until
you're connected to a network again. If it contains any pending messages, the Outbox is displayed on the Accounts screen.
TIP! When a new email arrives in the inbox, you will receive a notification by sound or vibration. Tap the email notification to stop notifications.
Camera
Getting to know the viewfinder
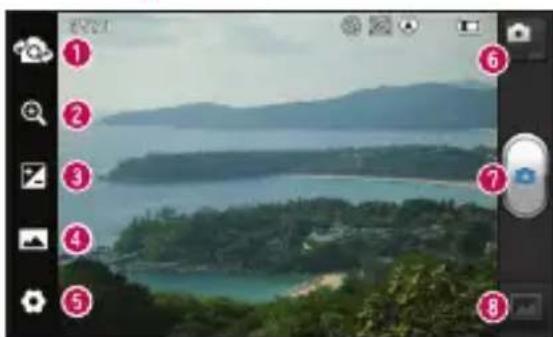
Switch lenses - Switch between the rear-facing camera lens and the front-facing camera lens.
Zoom - Zoom in or zoom out.
Brightness - This defines and controls the amount of sunlight entering the image.
Shot mode - Choose from Normal, Panorama or Continuous shot.
Settings - Touch this icon to open the Settings menu.
Video mode - Touch this icon to switch to video mode.
Taking a photo
Gallery - Touch to view the last photo you captured. This enables you to access your gallery and view saved photos within camera mode.
Camera
Taking a quick photo
1 Open the Camera application.
2 Hold the phone, point the lens towards the subject you want to photograph.
3 Touch the screen and a focus box will appear in the centre of the viewfinder screen.
4 When the focus box turns green, the camera has focused on your subject.
5 Click on the to capture the image.
Once you've taken the photo
Touch to view the last photo you captured.
Touch to share your photo using Bluetooth, E-mail, Gmail, Google+, Memo, Messaging, Picasa or SmartShare.
TIP! If you have an SNS account and set it up on your phone, you can share your photo with the SNS community.
View and edit the picture.
Select the image resolution. If you choose the high resolution, the file size will increase, which means you will be able to store fewer photos in the memory.
FX Improves colour qualities in different lighting conditions.
Applies artistic effects to the pictures.
Applies the additional options for pictures.
Touch to delete the image.
Touch to open the options.
Set image as - Touch to use the image as a Contact photo, Lockscreen Wallpaper or Wallpaper.
Move - Touch to move the image to other place.
Rename - Touch to edit the name of the selected picture.
Rotate left/right - To rotate left or right.
Crop - Crop your photo. Move your finger across the screen to select the area.
Camera
Slideshow - Auto review automatically shows you the picture you just recorded.
Details - Show the picture information.
Using the advanced settings
In the viewfinder, touch to open all advanced options.
-Restore all camera default settings.
- Touch whenever you want to know
how this function operates. This provides you with a quick guide.
Change camera settings by scrolling through the list. After selecting the option, touch the Back key.
- Allows you to turn on the flash when taking a photo in dark conditions.
- Focuses on the specific spot.
-
Select the image resolution. If you choose the high resolution, the file size will increase, which means you will be able to store fewer photos in the memory.
-
Finds the color and light settings. Applies artistic effects to the appropriate for the current environment. - Set a delay after the capture. Choose from Normal, Portrait, Landscape pressed. This is ideal if you want Sports, Sunset and Night. the photo.
ISO - The ISO rating determines the sensitivity of the camera's light sensor based services. Take pictures wherever the higher the ISO, the more sensitive you are and tag them with the locat camera is. This is useful in darker conditions to upload tagged pictures to a b when you cannot use the flash. that supports geotagging, you can see WB - Improves colour qualities in pictures displayed on a map. lighting conditions.
Camera
NOTE: This function is only available when GPS is active.

- It automatically shows you the picture just took.

- Select storage to save images.
TIP! When you exit the camera, some settings return to their defaults, such as white balance, colour tone, timer and scene mode. Check these before you take your next photo.
TIP! The Settings menu is superimposed over the viewfinder so, when you change elements of the image colour or quality, you see a preview of the image change behind the Settings menu.
Video camera
Getting to know the viewfinder

Switch lenses - Switch between the rear-facing camera lens and the front-facing camera lens.
Zoom - Zoom in or zoom out.
Brightness - This defines and controls the amount of sunlight entering the video.
- Flash - Allows you to turn on the flash when taking a photo in a dark place.
Settings - Touch this icon to open the settings menu.
Camera mode - Touch this icon to switch to camera mode.
Start recording
Gallery - Touch to view the last video you recorded. This enables you to access your gallery and view your saved videos from within video mode.
Video camera
Shooting a quick video
1 Touch the Camera mode button.
2 The video camera viewfinder appears on the screen.
3 Holding the phone, point the lens towards the subject you want to capture in your video.
4 Press the Record button once to start recording.
5 A red light appears at the top corner of the viewfinder with a timer showing the length of the video.
6 Touch on the screen to stop recording.
After shooting a video
Your captured video will appear on the Gallery. Touch to view the last video you captured.
Touch to play the video.
Touch to share the video Bluetooth, E-mail, Gmail, Messaging, SmartShare or YouTube.
Touch to delete the video you just made.
Confirm by touching OK. The viewfinder reappears.
Touch open the options.
Move - Touch to move the video to other place.
Rename - Tap to edit the name of the selected video.
Details - Tap to see a detailed information, such as the name, date, time, size and type.
Using the advanced settings
Using the viewfinder, touch to open all the advanced options.
-Restore all video camera default settings.
- Touch if you want to know how this function operates. This provides you with a quick guide.
Adjust the video camera setting by scrolling through the list. After selecting the option, touch the Back key.
Video camera
- Touch to set the size (in pixels) of the video you are recording.
WB - Improves colour qualities in different lighting conditions. - Choose a colour tone to use for your new view.
- Activate to use your phone's location-based services.
-
Choose Off to record a video without sound.
-
Auto review automatically shows you the video you just recorded.
- Select storage to save videos.
Adjusting the volume when viewing a video
To adjust the volume of a video while it is playing, use the volume keys on the left-hand side of the phone.
Multimedia
You can store multimedia files on a memory card for easy access to all your image and video files.
Gallery
Touch >Apps tab > Gallery. Open a list of catalogue bars that store all your multimedia files.
Music Player
Your LG-P705 has a built-in music player that lets you play all your favourite tracks. To access the music player, Touch > Appst tab > Music Player.
Transferring music files using USB mass storage devices
1 Connect the LG-P705 to a PC using a USB cable.
2 If you haven't installed LG Android Platform Driver on your PC, you need to change the settings manually. Choose >Apps tab > Settings > Connectivity > USB connection type, then select Media sync (MTP).
3 You can view the mass storage content on your PC and transfer the files.
Multimedia
Playing a song
1 In the Home screen, touch > Appst tab > Music Player.
2 Touch Songs.
3 Select the song you want to play.
| Touch to pause playback. | |
| Touch to resume playback. | |
| Touch to skip to the next track in the album, playlist or shuffle. |
| Touch to go back to the beginning of the song. Touch twice to return to the previous song. | |
| Touch to manage the music volume. | |
| Touch to set repeat mode. | |
| Touch to play the current playlist in shuffle mode. | |
| Touch to see the current playlist. | |
| Touch to see lyrics. This option is on only if the song includes the lyrics. |
To change the volume while listening to music, press the up and down volume keys on the left-hand side of the phone.
Touch and hold any song in the list. It displays Play, Add to playlist, Set as ringtone, Delete, Share, Search and Details as options.
NOTE: Music file copyrights may be protected by international treaties and national copyright laws.
Therefore, it may be necessary to obtain permission or a licence to reproduce or copy music.
In some countries, national laws prohibit private copying of copyrighted material.
Before downloading or copying the file, check the national laws of the relevant country concerning the use of such material.
Multimedia
FM Radio
Your LG-P705 has a built-in FM Radio so you can tune in to your favourite stations and listen on the go.
NOTE: You need to use your headphones to listen to the radio. Insert it into the headphone jack.
Searching for stations
You can tune in to radio stations by searching for them manually or automatically. They are then saved to specific channel numbers, so you don't have to find them again. You can store up to 48 channels on your phone.
Tuning in automatically
1 In the Home screen, touch > Appst tab > FM Radio.
2 Touch then select Auto scan.
3 During auto scanning, touch Stop if you want to stop scanning. Only scanned channels are saved before you stop scanning.
NOTE: You can also manually tune in to a station using the on-screen wheel.
TIP! To improve radio reception, extend the headset cord as this also functions as the radio antenna.
If you connect a headset not specifically made for radio reception, radio reception may be poor.
LG SmartWorld
LG SmartWorld offers an assortment of exciting content - games, applications, wallpaper and ringtones - giving LG phone users the chance to enjoy richer "Mobile Life" experiences.
How to Get to LG SmartWorld from Your Phone
1 Tap the icon to access LG SmartWorld.
2 Tap Sign in and enter ID/PW for LG SmartWorld. If you have not yet signed up, tap Register and get a LG SmartWorld
membership.
3 Download the content you want.
NOTE: What if there is no icon?
1 Using a mobile Web browser, access LG SmartWorld (www/lgworld.com) and select your country.
2 Download LG SmartWorld App.
3 Execute and install the downloaded file.
4 Access LG SmartWorld by tapping the icon.
How to use LG SmartWorld
- Participate in monthly LG SmartWorld promotions.
- Try the easy "Menu" buttons to find what you're looking for fast.
Categories - Find contents by category (e.g. Education, Entertainment, Games, etc).
Search - Search Content.
Apps for you - Recommended content based on your previous choices.
My Apps - List of downloaded/to-be updated contents.
Settings - Set Profile and Display.
Sign in - Set your ID and Password.
- Try other useful functions as well. (Content Detail screen)
NOTE: LG SmartWorld may not be available in all carriers or countries.
Utilities
Setting your alarm
1 Touch >Apps tab > Alarm/Clock >
2 After you set the time, the LG-P705 lets you know how much time is left before the alarm will sound.
3 Set Repeat, Snooze duration, Vibration, Alarm tone, Puzzle lock and Memo. Touch Save.
Using your calculator
1 Touch >Apps tab > Calculator
2 Touch the number keys to enter numbers.
3 For simple calculations, touch the function you want (+, -, x or ÷) followed by = .
4 For more complex calculations, touch, select the Advanced panel, then choose sin, cos, tan, log and so on.
Adding an event to your calendar
1 Touch >Apps tab > Calendar
2 Tap on the respective month that is displayed on the top left corner of the screen.
3 You can find the different view types of the Calendar (Day, Week, Month, Agenda).
4 Tap on the date you want to add event on.
5 Drag the view screen upwards and tap on the time slot you want to add event in.
6 Touch Event name then enter the event name.
7 Touch Location and enter the location. Check the date and enter the time you want your event to start and finish.
8 If you want to add a note to your event, touch Description and enter the details.
9 If you want to repeat the event, set REPEAT, and set REMINDERS, if necessary.
10 Touch Save to save the event in the calendar.
Utilities
Polaris Office
Polaris Office is a professional mobile office solution that lets users conveniently view various types of office documents, including Word, Excel and PowerPoint files, anywhere, anytime, using their mobile devices.
Touch >Apps tab > Polaris Office
Managing files
Polaris Office provides mobile users with convenient file management features, including copying, moving and pasting, and deleting files and folders right on the device.
Viewing files
Mobile users can now easily view a wide variety of file types, including Microsoft Office documents and Adobe PDF, right on their mobile devices. When viewing documents using Polaris Office, the objects and layout remain the same as in their original documents.
The web
Browser
Browser gives you a fast, full-colour world of games, music, news, sport, entertainment and much more, right on your mobile phone. Wherever you are and whatever you enjoy.
NOTE: Additional charges apply when connecting to these services and downloading content. Check data charges with your network provider.
Using the web toolbar
Touch to go back a page.
Touch to go forwards a page, to the page you connected to after the current one. This is the opposite of what happens when you press the Back key, which goes to the previous page.
Touch and hold, up and down to zoom in or out of browser.
+ Touch to add a new window.
Touch to add a favourite bookmarks.
The web
Using options
Press to view options.
Refresh - Update the current web page.
Save to Bookmarks - Add the current web page as bookmark.
Share page - Allows you to share the web page with others.
Find on page - Allows you to find letters or words on the current web page.
Request desktop site - Allows you to view the web page as desktop.
Save for offline reading - You can view the saved web page.
Settings - Displays Browser settings.
Settings
In the Home screen, touch >Apps tab > Settings.
WIRELESS & NETWORKS
Here you can manage Wi-Fi and Bluetooth. You can also set up mobile networks and switch to airplane mode.
Turn on Wi-Fi to connect to available Wi-Fi networks.
TIP! How to obtain the MAC address To set up a connection in some wireless networks with MAC filters, you may need to enter the MAC address of your LG-P705 into the router.
You can find the MAC address in the following user interface: Touch Appst tab > Settings > Wi-Fi > Advanced > MAC address.
Turns on Bluetooth to connect to Bluetooth devices.
Settings
< Data usage >
Displays the data usage and set mobile data limit.
You can configure phone call settings such as call forwarding and other special features offered by your carrier.
Airplane mode - After switching to airplane mode, all wireless connections are disabled.
Wi-Fi Direct - You can turn on or off.
Portable Wi-Fi hotspot - You can configure the portable Wi-Fi hotspot settings.
VPN settings - Displays the list of Virtual Private Networks (VPNs) that you've previously configured. Allows you to add different types of VPN.
Mobile networks - Set options for data roaming, network mode & operators, access point names (APNs) and so on.
NOTE: You must set a lock screen PIN or password before you can use credential storage.
DEVICE
Sound profile - You can choose the Sound, Vibrate only or Silent.
Volumes - You can manage the volume of music, video, games, other media, Ringtone & notifications.
Phone ringtone - Allows you to set your default incoming call ringtone.
Notification sound - Allows you to set your default notification ringtone.
Ringtone with vibration - Vibration feedback for calls and notifications.
Dial pad touch tones - Allows you to set the phone to play tones when using the dialpad to dial numbers.
Touch sounds - Allows you to set your phone to play a sound when you touch buttons, icons and other onscreen items that react to your touch.
Screen lock sound - Allows you to set your phone to play a sound when locking and unlocking the screen.
Settings
Brightness - Adjust the screen brightness.
Auto-rotate screen - Set to switch orientation automatically when you rotate the phone.
Screen timeout - Set the time for screen timeout.
Font size - Change the size of the display font.
Front key light - Set the front key LED time.
Set the Animation, Screen effect or Wallpaper.
< Lock screen >
Select screen lock - Set an unlock pattern to secure your phone. Opens a set of screens that guide you through drawing a screen unlock pattern. You can set a Swipe, Pattern, PIN instead of a Password or leave it as None.
When you turn on your phone or wake up the screen, you're asked to draw your unlock pattern to unlock the screen.
Wallpaper - You can select the Lock screen wallpaper from the wallpapers or gallery.
Owner info - Show owner info on lock screen.
INTERNAL STORAGE - View the internal storage usage.
SD CARD - Check total available SD card space. Touch Unmount SD card for safe removal. Erase SD card if you want to delete all data from the SD card.
Here, you can manage the battery and check the power saving items. Also, you can check the battery use.
You can view and manage the applications.
Settings
PERSONAL
< Accounts & sync >
Permits applications to synchronise data in the background, whether or not you are actively working in them. Deselecting this setting can save battery power and lowers (but does not eliminate) data usage.
< Location services >
Google's location service - If you select Google's location service, your phone determines your approximate location using Wi-Fi and mobile networks. When you
select this option, you're asked whether you consent to allowing Google to use your location when providing these services.
GPS satellites - If you select GPS satellites, your phone determines your location to street level accuracy.
Location & Google search - If you select google use your location to improve search results and other services.
Set up SIM card lock - Set up SIM card lock or change the SIM PIN.
Make passwords visible - Show password as you type.
Device administrators - View or deactivate device administrators.
Unknown sources - Default setting to install non-Market applications.
Trusted credentials - Display trusted CA certificates.
Install from storage - Choose to install encrypted certificates from your SD card.
Clear credentials - Remove all certificates.
Use the Language & input settings to select the language for the text on your phone and for configuring the on-screen keyboard, including words you've added to its dictionary.
< Backup & reset >
Change the settings for managing your settings and data.
Back up my data - Set to back up your settings and application data to the Google server.
Settings
Backup account - Set to back up your account.
Automatic restore - Set to restore your settings and application data when the applications are reinstalled on your device.
Factory data reset - Reset your settings to the factory default values and delete all your data. If you reset the phone in this way, you are prompted to reenter the same information as when you first started Android.
SYSTEM
< Date & time >
Use Date & time settings to set how dates are displayed. You can also use these settings to set your own time and time zone rather than obtaining the current time from the mobile network.
< Accessibility >
Use the Accessibility settings to configure accessibility plug-ins you have installed on your phone.
NOTE: Requires additional plug-ins.
< Connectivity >
USB connection type - You can set the desired mode (Charge only, Media sync (MTP), USB tethering or PC software).
Ask on connection - Ask USB connection mode when connecting to a computer.
PC Suite Wi-Fi connection - Checkmark this to use LG PC Suite with Wi-Fi connection.
Please note that Wi-Fi network should be connected for LG PC Suite via Wi-Fi connection from the WIRELESS & NETWORKS.
< About phone >
View legal information and check phone status and software version.
Settings
Phone software update
LG Mobile phone software update from the Internet
For more information about using this function, please visit http://update.lgmobile. com or http://www/lg.com/common/index. jsp select country and language.
This feature allows you to update the firmware on your phone to a newer version conveniently from the Internet without needing to visit a service centre. This feature will only be available if and when LG makes a newer firmware version available for your device.
As the mobile phone firmware update requires the user's full attention for the duration of the update process, please make sure you check all instructions and notes that appear at each step before proceeding. Please note that removing the USB data cable or battery during the upgrade may seriously damage your mobile phone.
NOTE: LG reserves the right to make firmware updates available only for selected models at its own discretion and does not guarantee the availability of the newer version of the firmware for all handset models.
LG Mobile Phone software update via Over-the-Air (OTA)
This feature allows you to update your phone's software to a newer version conveniently via OTA, without connecting with a USB data cable. This feature will only
be available if and when LG makes a newer firmware version available for your device.
First, you can check the software version on your mobile phone: Touch >Apps tab > Settings > About phone from System > Software update > Check now for update.
You can also delay the update by 1 hour, 4 hours, 8 hours or One day. In this case, the application will notify you to update when the time is up. You can also rearrange an update manually.
Settings
NOTE: This feature is dependent on your network service provider, region and country.
DivX Mobile DIVX
ABOUT DIVX VIDEO: DivX® is a digital video format created by DivX, LLC, a subsidiary of Rovi Corporation. This is an official DivX Certified® device that plays DivX video. Visit divx.com for more information and software tools to convert your files into DivX videos.
ABOUT DIVX VIDEO-ON-DEMAND: This
DivX Certified® device must be registered in order to play purchased DivX Video-on-Demand (VOD) movies. To obtain your registration code, locate the DivX VOD section in your device setup menu. Go to vod.divx.com for more information on how to complete your registration.
DivX Certified® to play DivX® video up to 640x480, including premium content DivX®, DivX Certified® and associated logos are trademarks of Rovi Corporation or its subsidiaries and are used under license.
Accessories
These accessories are available for use with the LG-P705. (Items described below may be optional.)
Travel adaptor Battery Stereo


headset
Data cable
Connect your LG-P705 and PC.

User Guide
Learn more about your LG-P705.
NOTE:
Always use genuine LG accessories.
- Failure to do this may void your warranty.
- Accessories may vary in different regions.
Troubleshooting
This chapter lists some problems you might encounter while using your phone. Some problems require you to call your service provider, but most are easy to fix yourself.
| Message Possible causes Possible corrective measures | ||
| SIM error | There is no SIM card in the phone or it is inserted incorrectly. | Make sure that the SIM card is correctly inserted. |
| No network connection/Losing network | Signal is weak or you're outside the carrier network. Operator applied new services. | Move towards a window or into an open area. Check the network operator coverage map. Check whether the SIM card is more than 6~12 months old. If so, change your SIM at your network provider's nearest branch. Contact your service provider. |
| Codes do not match | To change a security code, you will need to confirm the new code by re-entering it. The two codes you have entered do not match. | If you forget the code, contact your service provider. |
| Any application cannot be set | Not supported by service provider or registration required. | Contact your service provider. |
| Calls not available | Dialling error New SIM card inserted. Pre-paid charge limit reached. | New network not authorised. Check for new restrictions. Contact service provider or reset limit with PIN2. |
Troubleshooting
| Message Possible causes Possible corrective measures | ||
| Phone cannot be switched on | On/Off key pressed too briefly. Battery is not charged. Battery contacts are dirty. | Press the On/Off key down for at least two seconds. Charge battery. Check charging indicator on the display. Clean the battery contacts. |
| Charging error | Battery is not charged. Charge battery. | |
| Outside temperature is too hot or cold. | Make sure phone is charging at a normal temperature. | |
| Contact problem | Check the charger and connection to the phone. Check the battery contacts and clean them if necessary. | |
| No voltage Plug the charger into a different socket. | ||
| Charger defective Replace charger. | ||
| Wrong charger Only use original | LG accessories. | |
| Battery defective Replace battery. | ||
Troubleshooting
| Message Possible causes Possible corrective measures | ||
| Number not permitted | The Fixed dialling number function is on. | Check the Settings menu and turn the function off. |
| Impossible to receive / send SMS & picture | Memory full Delete some messages from the phone. | |
| Files not opening | Unsupported file format Check the file formats that can be supported. | |
| SD card not working | FAT16, FAT32 file system supported | Check SD card file system via card reader, or format SD card using the phone. |
| The screen does not turn on when I receive a call. | Proximity sensor problem | If you use any protection tape or case, check to see if it has covered the area around the proximity sensor. Make sure that the area around the proximity sensor is clean. |
| No sound Vibration mode | Check the settings status of the sound menu to make sure you are not in vibrate or silent mode. | |
| Hang up or freeze | Intermittent software problem | Remove the battery, insert it again and switch on the phone. Try to perform a software update via the website. |