
Iconic VP6025 - Vacuum Cleaner Concept - Free user manual and instructions
Find the device manual for free Iconic VP6025 Concept in PDF.



| Brand | Concept |
| Model | Iconic VP6025 |
| Product type | Cordless stick vacuum |
| Battery voltage | DC 21.6 V |
| Power | 265 W |
| Noise level | ≤80 dB |
| Battery capacity | 2000 mAh |
| Maximum runtime | 30 minutes |
| Full charge time | 5 hours |
| Battery type | Removable, lithium-ion |
| Dust bin capacity | Not specified (estimated 0.5 L) |
| Filter | Washable HEPA filter |
| Included accessories | Turbo brush, crevice tool, brush tool, wall mount, adapter, flexible hose, water bar and washable cloth (model VP6025) |
| Features | Power adjustment MIN/AUTO/MAX, dirt indicator, filter indicator, automatic dirt detection |
| Usage | Home use, hard floors and carpets |
| Maintenance and cleaning | Dust bin and filters washable with water, dry before reinstalling |
| Safety | Overheat protection, keep out of reach of children under 8 years old, unplug before maintenance |
| Spare parts and repairability | Removable battery, replaceable filters, repair by authorized center |
| Warranty | Manufacturer warranty (subject to compliance with instructions) |
| Weight | Not specified (estimated 2.5 kg) |
| Dimensions | Not specified |
| Power supply | Power adapter (included) |
Frequently Asked Questions - Iconic VP6025 Concept
User questions about Iconic VP6025 Concept
0 question about this device. Answer the ones you know or ask your own.
Ask a new question about this device
Download the instructions for your Vacuum Cleaner in PDF format for free! Find your manual Iconic VP6025 - Concept and take your electronic device back in hand. On this page are published all the documents necessary for the use of your device. Iconic VP6025 by Concept.
USER MANUAL Iconic VP6025 Concept
Rod and hand-held cordless vacuum cleaner
natural_image
Exterior view of a green vacuum cleaner with black handle and green body (no text or symbols visible)VP6020 / VP6025
CZ ROENSK PL HU LV DE FR IT ES
concept
CZ
PODĚKOVÁNÍ

concept
concept

POPIS DISPLEJE

natural_image
Two-step illustration showing a device being processed with granular material (no text or symbols)VYJMUTÍ PRACHOVÉ NÁDOBY
natural_image
Illustration of a hand holding a device with a mechanical component, showing a step-by-step assembly (no text or symbols present)DEMONTÁŽ FILTRU
natural_image
Three-step diagram showing piston-cylinder joint assembly with arrows indicating motion (no text or symbols)NABÍJENÍ
natural_image
Diagram of a vacuum cleaner with attached plug and connector, showing internal components (no text or symbols)
concept
concept

VYTÍRÁNÍ VP6025
natural_image
Mechanical assembly diagram showing a mechanical component before and after assembly, with no visible text or symbols.SERVIS
SK
concept
concept
SK
POPIS DISPLEJA

natural_image
Two-step illustration showing a hand mixer and a powder pile (no text or symbols)VYBRATIE NÁDOBY NA PRACH
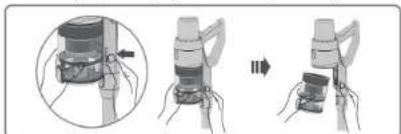
Stlačte tlačidlá na uvolnenie nádobky na prach a pohybom dolu a od spotrebíca vyberte nádobu na prach.
natural_image
Illustration of a mechanical device being adjusted for a lever, showing step-by-step assembly (no text or symbols)DEMONTÁŽ FILTRA
natural_image
Three-step diagram showing piston-cylinder joint assembly with directional arrows indicating motion (no text or labels)NAPÁJANIE
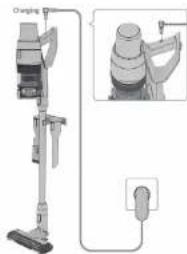
Adaptér zapojte do konektora nabijania na rukoväti spotrebiča. Po nabiti budu svietif vsetky čiarky na akumulåtore.
SK
concept
concept
PL
STIERANIE VP6025
natural_image
Mechanical assembly diagram showing a mechanical component before and after disassembly (no text or symbols)SERVIS
OPIS WYŚWIETLACZA

natural_image
Two-step illustration showing a device being processed with granular material (no text or symbols)WYJĘCIE POJEMNIKA NA KURZ
DEMONTAŻ FILTRÓW
natural_image
Three-step diagram showing engine cylinder assembly with internal components and directional arrows (no text or labels)ŁADOWANIE
natural_image
Illustration of a vacuum cleaner with attached plug and socket (no text or symbols)WYCIERANIE VP6025
natural_image
Mechanical assembly diagram showing a mechanical component before and after disassembly (no text or symbols)SERWIS
A KIJELZÖ LEÍRÁSA

natural_image
Two-step illustration showing a device being processed with granular material (no text or symbols)A PORTARTÁLY KIVÉTELE
natural_image
Illustration of a mechanical device being adjusted for a lever, showing step-by-step assembly (no text or symbols)A SZÜRÖ LESZERELÉSE
natural_image
Three-step mechanical assembly diagram showing piston and housing components (no text or labels)TÖLTÉS
natural_image
Diagram of a vacuum cleaner with attached electrical plug and wiring, showing internal components (no text or labels)VP6025 TÖRLÉSE
natural_image
Mechanical assembly diagram showing a pipe fitting before and after disassembly (no text or symbols)SZERVIZ
DISPLEJA APRAKSTS

Filtra statusa signalizešana – ja iedegas signallampiņa, jānotira filtri vai jānomaina tie.

Netirumu signallampina – iedegas, kad ierice konstate lielu daudzumu netirumu.

Akumulatora indikators - norāda akumulatora statusu.
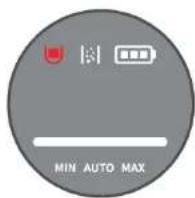
MIN Nelielam netirumu daudzumam.
natural_image
Two-step illustration showing a device being processed and then dried or dried, with no visible text or symbols.PUTEKLU TVERTNES IZNEMŠANA
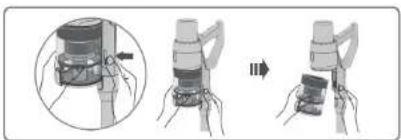
Nospiediet puteklu tvertnes atbrivošanas taustinu un virziet to lejup no ierices, lai iznemtu puteklu tvertni.
natural_image
Illustration of a mechanical device being handled with a handle, showing step-by-step assembly (no text or symbols)FILTRU NONEMŠANA
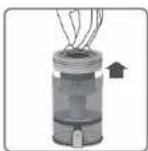
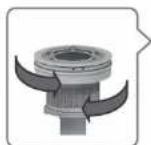
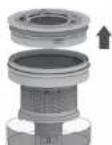
Iznemiet filtrus no puteklu tvertnes virzienă augšup. Pagrieziet lielo filtru pa kreisi un pagrieziet HEPA filtru pa labi, atdalot filtrus vienu no otra. Filtrus var noskalot ar údeni. Pirms ievietošanas atpakal puteklu tvertnė jaujiet filtriem nožut.
UZLÄDĘŚANA
VALYMAS VP6025
natural_image
Mechanical assembly diagram showing a device being rotated from left to right, with no visible text or symbols.TEHNISKÄ APKALPE
Thank you for purchasing a Concept product. We wish you much joy with your new appliance every day you use it. Please read the instruction manual carefully before Initial use. To refer to this manual any time you need to, we recommend you to keep it in a safe place. And please pass it to any future owner of the appliance.
| Technical specifications | |
| Battery voltage DC 21,6 V | |
| Input 265 W | |
| Sound level ≤80 dB | |
| Battery 2 000 mAh | |
| Max. operating hours 30 min | |
| Full charging time 5 hrs. | |
IMPORTANT SAFETY PRECAUTIONS
- Do not use the appliance in any other way than as described in this manual.
- Make sure the mains voltage and current protection correspond to the values on the rating plate of the charging station.
- Do not leave the appliance without supervision when it is turned on.
- When disconnecting the unit from the wall outlet, never pull the power cord, grasp the charger and disconnect it by removing it from the receptacle.
- Do not allow children or unauthorized people to handle the appliance, use it out of their reach.
- Pay extra attention if the appliance is used near children.
- Do not use the appliance as a toy.
- Do not use any accessories other than those recommended by the manufacturer.
- Do not use a charger with a damaged cord or plug and have it repaired immediately by an authorized service centre.
- Keep the appliance away from heat sources such as radiators, ovens and other, protect it from direct sunlight and humidity.
- Do not touch the appliance with wet hands.
-
Do not insert any objects into the openings. Do not use the appliance if any of the openings is clogged.
• Take extra caution when vacuuming on stairs. -
If the appliance intake is clogged, switch off the appliance and remove the dirt before switching on again.
- When attaching accessories during cleaning or in the event of a malfunction, switch off the appliance and disconnect the charger from wall socket.
- The appliance is only suitable for home use and is not intended for commercial use.
- Do not vacuum anything burning like cigarettes, matches or hot ash.
- Do not use the appliance in rooms with increased air humidity, do not vacuum flammable liquids such as petrol and do not use the appliance in rooms where these substances may be present.
- Never vacuum without vacuum cleaner filters. Every time you use the appliance, make sure the vacuum cleaner filters are properly installed.
- Do not immerse the power cord or the charger in water or any other liquid.
- Check the appliance and the charger cord for damage regularly.
- Never switch on a damaged appliance.
- Before cleaning and after use of the appliance, switch off the appliance and allow it to cool down.
- Before vacuuming, remove all large or sharp objects from the surface intended for vacuum cleaning, such objects may damage the vacuum cleaner filter.
- Do not use the appliance with dirty filters.
- Do not put the battery in fire or expose it to temperatures above 40 °C.
- Do not touch the moving parts of the appliance during operation.
- Do not repair the appliance yourself. Contact an authorized service centre.
- This appliance can be used by children aged from 8 years and above and persons with reduced physical, sensory or mental capabilities or lack of experience and knowledge if they have been given supervision or instruction concerning the use of the appliance in a safe way and understand the hazards involved. Cleaning and maintenance performed by the user must not be carried out by children unless they are at least 8 years old and under supervision.
- Children aged under 8 years of age must be kept away from the appliance and its power cord. Do not let children play with the appliance.
Damages from failure to follow the manufacturer's instructions are not covered by the warranty.
EN
concept
concept
EN
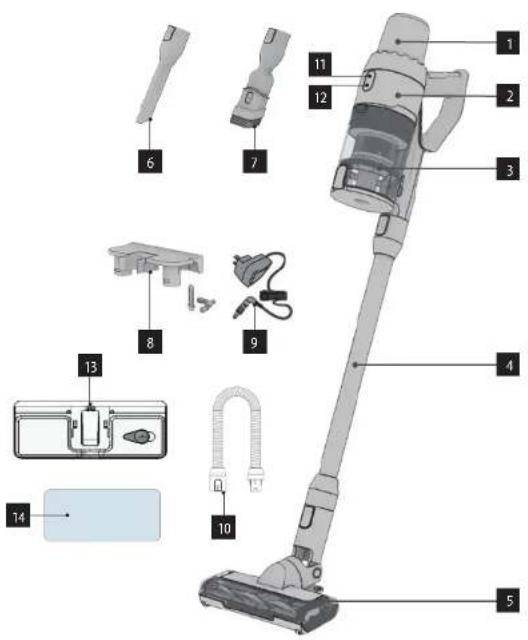
PRODUCT DESCRIPTION
1 Battery
2 Appliance body
3 Dust container
4 Suction tube
5 Turbo Brush
6 Slot nozzle
7 Slot nozzle with brush
8 Wall bracket
9 Adapter
10 Flexible hose
11 ON/OFF button
12 Power regulator
13 Water tank VP6025
14 Wiping cloth VP6025
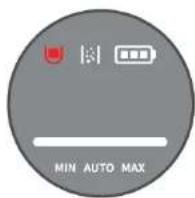
DISPLAY DESCRIPTION

Filter status indicator - If the indicator light comes on, the filters must be cleaned or replaced.

Dirt indicator light - The indicator light comes on when the appliance detects a large amount of dirt.

Battery indication - The indicator light indicates the battery status.
MIN For a small amount of dirt.
AUTO Automatically adjusts the suction power according to the amount of dirt. If it detects a large amount of dirt, it switches to the MAX mode, if it detects a small amount of dirt, it sets the suction power to MIN.
MAX Maximum power for a large amount of dirt.
OPERATING INSTRUCTIONS
Vacuum cleaner assembly
Always disconnect the plug out of the electrical outlet before assembling or removing accessories!
- Insert the suction tube into the hand-held unit of the vacuum cleaner, you will hear a click. To remove the tube from the hand-held unit, press the lock button and pull to disconnect.
- Insert the turbo brush into the suction tube, you will hear a click. To remove the turbo brush from the extension tube, press the lock button and pull to disconnect. The turbo brush can be connected to the hand-held unit in the same way.
BATTERY INSTALLATION
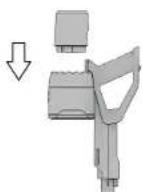
Insert the battery into the body of the hand-held unit and install it to prevent it from coming loose. The battery is placed correctly when you heard a sound. To release the battery, press the release buttons and pull to disconnect.
Note: To prolong the battery life, always charge the battery when the battery is nearly empty. Do not store or recharge the appliance in environment with temperatures below 0 °C or higher than 40 °C. These temperatures may damage the appliance. During the charging process, the temperature of the appliance may increase, this is normal. If you do not use the vacuum cleaner for more than 3 months, allow it to charge for 12 hours. Then place the vacuum cleaner in a dry and cool place.
USE
Before installing the battery, check if it is fully charged.
- Press the ON/OFF button to switch on the appliance.
- You can use the power regulator to change the appliance mode to MIN, AUTO, MAX.
- Press the ON/OFF button again to switch off the vacuum cleaner.
Note: We recommend using the maximum power of the hand-held unit in the case of a heavily soiled area or on carpets with medium or high pile.
ACCESSORIES
Select the accessories according to the nature of the surface to be cleaned.
Slot nozzle – suitable for wall corners, car cushioning, radiators, etc.
Slot nozzle with brush - suitable for bed linen, fabric, sofas, etc.
16
EN
concept
concept
EN
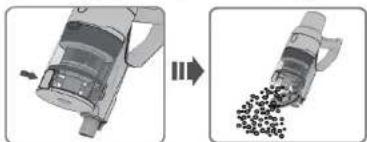
EMPTYING THE DUST CONTAINER
To empty the dust container, press the emptying button. Open the container, empty the dust and close the container cover.
natural_image
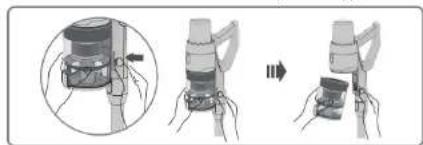
Two-step illustration showing a device being processed with granular material (no text or symbols)REMOVING THE DUST CONTAINER
Press the buttons to release the dust container and move down and away from the appliance to remove the dust container.
natural_image
Illustration of a hand holding a cylindrical device with a handle, showing a step-by-step assembly (no text or symbols present)REMOVING THE FILTER
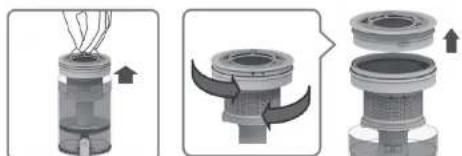
Remove the filters from the dust container upwards. Turn the coarse filter to the left and the HEPA filter to the right to separate the filters. The filters can be rinsed in water. Allow the filters to dry before placing back into the dust container.
natural_image
Three-step diagram showing mechanical assembly with arrows indicating direction (no text or symbols)CHARGING
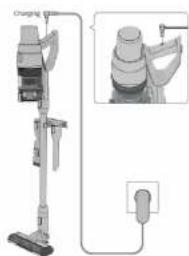
Plug the adapter into the charging connector on the appliance handle. After charging, all the bars on the battery will light up.
natural_image
Diagram of a vacuum cleaner with attached wiring and a close-up inset showing internal components (no text or symbols)WIPING VP6025
- Put the cleaning cloth on the water tank.
- Place the water container on the turbo brush.
Note.: Wet the cleaning cloth before wiping.
natural_image
Mechanical assembly diagram showing two stages of a mechanical component, one before and one after assembly (no text or symbols)SERVICE
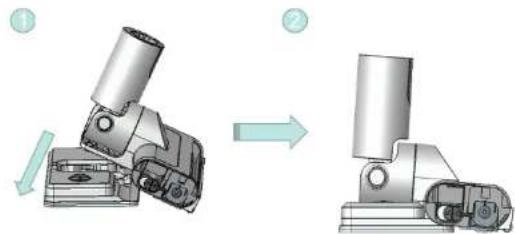
Extensive maintenance or repair, which requires access to internal parts of the product, has to be performed by a qualified service centre.
ENVIRONMENTAL CONCERNS
- Packaging materials and old appliances should be recycled.
- Packaging materials may be disposed of as sorted waste.
- Dispose the plastic bags made of polyethylene (PE) of as sorted waste.
Recycling of the appliance at the end of its lifespan

This appliance is labelled in accordance with European Directive 2012/19/EU concerning used electrical and electronic appliances (Waste Electrical and Electronic Equipment - WEEE). The symbol on the product or on its packaging indicates that this product may not be treated as household waste. Instead, it should be taken to the appropriate collection point for the recycling of electrical and electronic equipment. By ensuring this product is disposed of correctly, you will help prevent potential negative consequences for the environment and human health, which could otherwise be caused by inappropriate waste handling of this product. The disposal of such material has to be done according to the recycling regulations. For more detailed information about recycling of this appliance see the authorized local office or service for household waste disposal or the shop, where you purchased the appliance.

The product meets all the necessary requirements of the EU directives applicable to the specific product.
Changes in text, design, and technical specifications are subject to change without notice and we reserve the right to change them.
DE
concept
concept
DE
DANKSAGUNG
DE
concept
concept
DE
natural_image
Two-step illustration showing a device being processed with granular material (no text or symbols)natural_image
Illustration of a mechanical device being adjusted, showing a step from pinning to assembly (no text or symbols present)FILTERAUSBAU
natural_image
Three-step diagram showing mechanical assembly with arrows indicating direction (no text or symbols)EINSPEISUNG
natural_image
Diagram of a vacuum cleaner with attached electrical outlet and close-up view (no text or symbols)44
DE
concept
concept
FR
ABWISCHEN VP6025
natural_image
Mechanical assembly diagram showing two stages of a device with a cylindrical component being inserted (no text or symbols present)INSTANDHALTUNG
FR
concept
concept
FR
DESCRIPTION DE L'AFFICHAGE

natural_image
Two-step illustration showing a device being processed with granular material (no text or symbols)natural_image
Illustration of a mechanical device with hands and legs, showing a step-by-step assembly (no text or symbols)DÉMONTAGE DU FILTRE
natural_image
Three-step diagram showing mechanical assembly with arrows indicating direction (no text or symbols)CHARGER
natural_image
Diagram of a vacuum cleaner with attached electrical outlet (no text or labels)
FR
concept
concept
IT
ESSUYAGE VP6025
natural_image
Mechanical assembly diagram showing a mechanical component before and after assembly (no text or symbols)ENTRETIEN
natural_image
Two-step illustration showing a device being processed with granular material (no text or symbols)natural_image
Two-step diagram showing a mechanical component with internal structure and motion arrows (no text or symbols)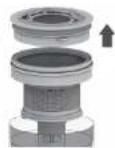
RICARICA
natural_image
Diagram of a vacuum cleaner with attached plug and socket, showing internal components (no text or labels)PULIZIA VP6025
natural_image
Mechanical assembly diagram showing two stages of a mechanical component, one before and one after assembly (no text or symbols)ASSISTENZA
natural_image
Two-step illustration showing a device being processed with granular material (no text or symbols)DESMONTAR EL COLECTOR DE POLVO
natural_image
Illustration of a mechanical device being adjusted for a lever, showing step-by-step assembly (no text or symbols)DESMONTAR EL FILTRO
natural_image
Three-step mechanical assembly diagram showing a piston-cylinder joint with internal components and directional arrows (no text or labels)CARGAR
natural_image
Diagram of a vacuum cleaner with attached electrical outlet (no text or symbols)LIMPIANDO VP6025
natural_image
Mechanical assembly diagram showing a mechanical component before and after assembly, with no visible text or symbols.SERVICIO
DESCRIEREA DISPLAYULUI

natural_image
Two-step illustration showing a device being processed with granular material (no text or symbols)SCOATEREA RECIPIENTULUI DE PRAF
natural_image
Illustration of a mechanical device being adjusted for a lever, showing step-by-step assembly (no text or symbols)DEMONTAREA FILTRULUI
natural_image
Three-step diagram showing mechanical assembly with arrows indicating motion (no text or symbols)ALIMENTARE
natural_image
Diagram of a cleaning machine with attached electrical plug and control panel (no text or symbols)STERGEREA VP6025
natural_image
Mechanical assembly diagram showing two stages of a mechanical component, one before and one after rotation (no text or symbols)SERVICE

- concept
- PODĚKOVÁNÍ
- POPIS DISPLEJE
- VYJMUTÍ PRACHOVÉ NÁDOBY
- DEMONTÁŽ FILTRU
- NABÍJENÍ
- VYTÍRÁNÍ VP6025
- SERVIS
- POPIS DISPLEJA
- VYBRATIE NÁDOBY NA PRACH
- DEMONTÁŽ FILTRA
- NAPÁJANIE
- STIERANIE VP6025
- OPIS WYŚWIETLACZA
- WYJĘCIE POJEMNIKA NA KURZ
- DEMONTAŻ FILTRÓW
- ŁADOWANIE
- WYCIERANIE VP6025
- SERWIS
- A KIJELZÖ LEÍRÁSA
- A PORTARTÁLY KIVÉTELE
- A SZÜRÖ LESZERELÉSE
- TÖLTÉS
- VP6025 TÖRLÉSE
- SZERVIZ
- DISPLEJA APRAKSTS
- PUTEKLU TVERTNES IZNEMŠANA
- FILTRU NONEMŠANA
- UZLÄDĘŚANA
- VALYMAS VP6025
- TEHNISKÄ APKALPE
- IMPORTANT SAFETY PRECAUTIONS
- PRODUCT DESCRIPTION
- DISPLAY DESCRIPTION
- OPERATING INSTRUCTIONS
- Vacuum cleaner assembly
- BATTERY INSTALLATION
- USE
- ACCESSORIES
- EMPTYING THE DUST CONTAINER
- REMOVING THE DUST CONTAINER
- REMOVING THE FILTER
- CHARGING
- WIPING VP6025
- SERVICE
- ENVIRONMENTAL CONCERNS
- Recycling of the appliance at the end of its lifespan
- DANKSAGUNG
- FILTERAUSBAU
- EINSPEISUNG
- ABWISCHEN VP6025
- INSTANDHALTUNG
- FR
- DESCRIPTION DE L'AFFICHAGE
- DÉMONTAGE DU FILTRE
- CHARGER
- ESSUYAGE VP6025
- ENTRETIEN
- RICARICA
- PULIZIA VP6025
- ASSISTENZA
- DESMONTAR EL COLECTOR DE POLVO
- DESMONTAR EL FILTRO
- CARGAR
- LIMPIANDO VP6025
- SERVICIO
- DESCRIEREA DISPLAYULUI
- SCOATEREA RECIPIENTULUI DE PRAF
- DEMONTAREA FILTRULUI
- ALIMENTARE
- STERGEREA VP6025
Brand : Concept
Model : Iconic VP6025
Category : Vacuum Cleaner