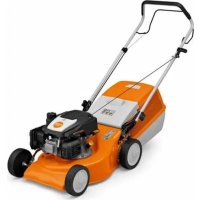
RM 248 - Lawn mower STIHL - Free user manual and instructions
Find the device manual for free RM 248 STIHL in PDF.


User questions about RM 248 STIHL
0 question about this device. Answer the ones you know or ask your own.
Ask a new question about this device
Download the instructions for your Lawn mower in PDF format for free! Find your manual RM 248 - STIHL and take your electronic device back in hand. On this page are published all the documents necessary for the use of your device. RM 248 by STIHL.
USER MANUAL RM 248 STIHL
natural_image
Exterior view of a grass lawn mower with visible blades and handle (no text or symbols)text_image
Labeled diagram of a lawn mower with numbered parts for identification1 Anwerfgriff
text_image
Technical diagram of a mechanical assembly with numbered components for identificationtext_image
Technical diagram showing a mechanical device with labeled parts and an inset detail view of a component.text_image
Technical diagram of a mechanical device with numbered components and cross-sectional viewstext_image
Technical diagram of a vehicle engine compartment with numbered parts for identificationtext_image
Technical diagram of a lawn mower with labeled component 1text_image
Technical diagram of a lawn mower with numbered parts and directional arrows indicating motion or movement.text_image
Technical diagram of a mechanical device with labeled parts and an inset showing a component with numbered parts 2, 4, 5, and 6.text_image
Technical diagram showing a mechanical device with labeled parts and an inset view of a lever mechanism.text_image
Technical diagram of a mechanical assembly with labeled parts a, b, and c, showing internal components and motion indicators.natural_image
Line drawing of a person wearing gloves holding a horizontal bar (no text or symbols)- 30 mm = Position 1
- 40 mm = Position 2
- 50 mm = Position 3
-
55 ~mm = Position 4
-
65 ~mm = Position 5
- 70 ~mm = Position 6
- 80 mm = Position 7
text_image
Technical diagram of a mechanical device with numbered components and directional arrows indicating motion or flow.natural_image
Line drawing of a person using a lawn mower to clean or adjust equipment (no text or symbols)text_image
Technical diagram showing two views of a mechanical component with labeled parts 1 and 2text_image
Diagram illustrating a mechanical or fluid handling process with labeled parts 2, 3, and 4, showing hand placement and fluid flow direction.natural_image
Line drawing of two people pulling a lawn mower with a tool, no text or symbols presenttext_image
Diagram showing two methods of lawn lawn: one with a curved arrow labeled '1' and another with a person pushing a cart on a pole.text_image
Technical diagram of a lawn mower with labeled parts and close-ups of mechanical componentstext_image
Technical diagram of a vehicle's internal components with numbered labels pointing to parts of the wheel and suspension system.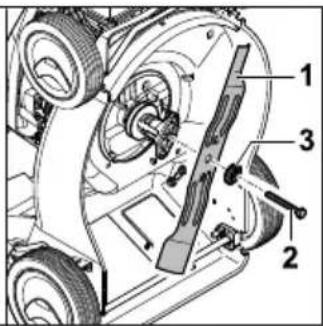
text_image
Technical diagram of a vehicle's internal components with numbered labels pointing to different parts.text_image
Technical diagram of a mechanical assembly with numbered parts labeled 1, 2, and 42 Guide to Using this Manual....19
3 Overview.... 19
4 Safety Precautions....20
5 Preparing the Lawn Mower for Operation. 25
6 Assembling the Lawn Mower.... 25
7 Refuelling the Lawn Mower....26
8 Adjusting the Lawn Mower for the User.... 26
9 Starting and Stopping the Engine...... 27
10 Checking the Lawn Mower....27
11 Operating the Lawn Mower....28
12 After Finishing Work....29
13 Transporting....29
14 Storing....29
15 Cleaning....29
16 Maintenance.... 30
17 Repairing....31
18 Troubleshooting.... 31
19 Specifications....32
20 Spare Parts and Accessories....32
21 Disposal.... 33
22 EC Declaration of Conformity.... 33
1 Introduction
Dear Customer,
Thank you for choosing STIHL. We develop and manufacture our quality products to meet our customers' requirements. The products are designed for reliability even under extreme conditions.
STIHL also stands for premium service quality. Our dealers guarantee competent advice and instruction as well as comprehensive service support.
STIHL expressly commit themselves to a sustainable and responsible handling of natural resources. This user manual is intended to help you use your STIHL product safely and in an environmentally friendly manner over a long service life.
2 Guide to Using this Manual English
We thank you for your confidence in us and hope you will enjoy working with your STIHL product.
Dr. Nikolas Stihl
IMPORTANT! READ BEFORE USING AND KEEP IN A SAFE PLACE FOR REFERENCE.
2 Guide to Using this Manual
2.1 Applicable Documents
This instruction manual constitutes original manufacturer's instructions in the sense of EC Directive 2006/42/EC.
Local safety regulations apply.
▶ In addition to this instruction manual, read, understand and keep the following documents:
– STIHL EVC 200.2 engine instruction manual
2.2 Warning Notices in Text

DANGER
■ This notice refers to risks which result in serious or fatal injury.
- Serious or fatal injuries can be avoided by taking the precautions mentioned.

WARNING
■ This notice refers to risks which can result in serious or fatal injury.
▶ Serious or fatal injuries can be avoided by taking the precautions mentioned.
NOTICE
■ This notice refers to risks which can result in damage to property.
▶ Damage to property can be avoided by taking the precautions mentioned.
2.3 Symbols in Text

This symbol refers to a chapter in this instruction manual.
3 Overview
3.1 Lawn Mower
text_image
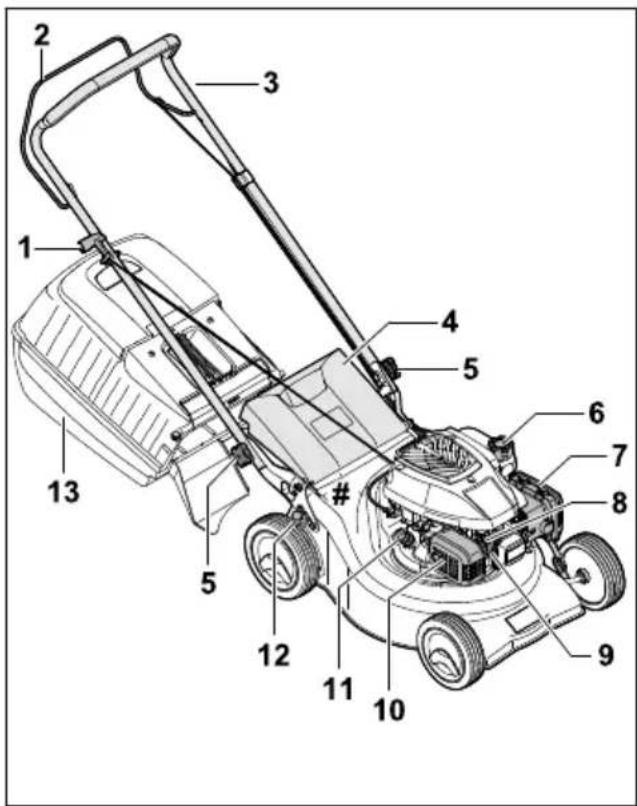
Labeled diagram of a lawn mower with numbered parts for identification1 Starter handle The starter handle is used to start the engine.
2 Control bar for mowing The control bar for mowing is used to start and stop the engine.
3 Handlebar The handlebar is used to hold, guide and transport the lawn mower.
4 Discharge flap The discharge flap closes off the discharge chute.
5 Star grip nut The star grip nut clamps the handlebar to the lawn mower.
6 Fuel tank cap The fuel tank cap seals the opening for adding petrol.
7 Filter cover The filter cover covers the air filter.
8 Spark plug The spark plug ignites the fuel/air mixture in the engine.
9 Spark plug socket The spark plug socket connects the ignition lead to the spark plug.
English 4 Safety Precautions
10 Muffler
The muffler reduces the lawn mower's noise level.
11 Engine oil cap
The engine oil cap seals the opening for adding engine oil.
12 Lever
The lever is used to set the cutting height.
13 Grass catcher box
The grass catcher box collects the mown grass.
# Rating plate with machine number
3.2 Symbols
The symbols can be on the lawn mower and have the following meaning:
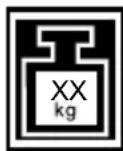
This symbol indicates the lawn mower weight.

LWA
Guaranteed sound power level in accordance with Directive 2000/14/EC in dB(A) for the purpose of comparing the sound emissions of products.

This symbol identifies the fuel tank cap.

This symbol identifies the engine oil cap.
4 Safety Precautions
4.1 Warning Symbols
The warning symbols on the lawn mower have the following meaning:

Follow the safety instructions and their measures.

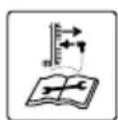
Read, understand and keep the instruction manual.
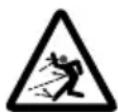
Observe the safety instructions on objects expelled at high speed by the lawn mower and their measures.

Do not touch a turning blade.
Detach the spark plug socket during transport, storage, maintenance or repair.
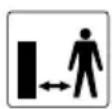
Maintain a safety distance.
4.2 Intended Use
The STIHL RM 248 or RM 253 lawn mower is used to mow grass.
WARNING
■ Failure to use the lawn mower as intended may result in serious or fatal injury to people and damage to property.
▶ Use the lawn mower as described in this instruction manual and in the engine instruction manual.
4.3 Requirements for the User
WARNING
■ Uninstructed users cannot recognise or evaluate the dangers posed by the lawn mower. This may result in serious or fatal injury to the user or other people.

▶ Read, understand and keep the instruction manual.
▶ If passing on the lawn mower to another person: provide them with the lawn mower and engine instruction manuals also.
▶ Make sure that the user meets the following conditions:
- The user is rested.
- The user is physically, sensorily and mentally capable of operating the lawn mower and working with it. If the user is physically, sensorily or mentally impaired, the machine must only be used under supervision or following instruction by a responsible person.
- The user can recognise and evaluate the dangers posed by the lawn mower.
- The user is aware that they are responsible for accidents and damage.
- The user is of legal age or the user is being trained under supervision in a profession in accordance with national regulations.
- The user has received instruction from a STIHL specialist dealer or a competent person before using the lawn mower for the first time.
- The user is not impaired by alcohol, medicines or drugs.
4 Safety Precautions English
▶ If anything is unclear: consult a STIHL specialist dealer.
4.4 Clothing and Equipment
WARNING
- Objects may be thrown up at high velocity while working. This may result in injury to the user. - Wear long trousers made from resistant material.
- Noise is produced when working. Noise may damage the hearing. - Wear hearing protection.
- Dust may be stirred up while working. Breathing in dust may be harmful to health and cause allergic reactions. - If dust is stirred up: wear a dust mask.
■ Unsuitable clothing may get caught in wood, briars and in the lawn mower. This may result in serious injury to the user. ▶ Wear close-fitting clothing. ▶ Remove scarves and jewellery.
■ The user may come into contact with the blade during cleaning, maintenance or transport. This may result in injury to the user. ▶ Wear work gloves made from resistant material. ▶ Wear sturdy, closed-toed footwear with high-grip soles.
■ Wearing unsuitable footwear may cause the user to slip. This may result in injury to the user.
■ Material particles may be expelled when sharpening the blade. This may result in injury to the user.
- Wear close-fitting safety glasses. Suitable safety glasses are tested in accordance with EN 166 or national regulations and available commercially with the corresponding marking. - Wear work gloves made from resistant material.
4.5 Work Area and Surroundings
WARNING
■ Bystanding people, children and animals cannot recognise or evaluate the dangers posed by the lawn mower and objects thrown up by the machine. This may result in serious injury to bystanding people, children and animals and damage to property.
- Keep bystanding people, children and animals out of the work area.
- Maintain a distance from objects. - Do not leave the lawn mower unattended. - Make sure that children cannot play with the lawn mower.
- Hot exhaust gases are emitted from the muffler when the engine is running. Hot exhaust gases may ignite easily inflammable materials and cause fires. - Keep the exhaust gas flow away from easily inflammable materials.
4.6 Safe Condition
4.6.1 Lawn Mower
The lawn mower is in safe condition when the following conditions are met:
- The lawn mower is free from damage.
– There is no petrol leaking from the lawn mower.
– The fuel tank cap is closed.
– There is no engine oil leaking from the lawn mower.
– The engine oil cap is closed.
- The lawn mower is clean.
- The controls are working and have not been modified.
- If mowing and the mown grass is to be collected in the grass catcher box: the grass catcher box is correctly attached.
- If mowing and the mown grass is to be ejected to the rear: the grass catcher box is detached and the discharge flap is closed.
– The blade is correctly attached.
– Genuine STIHL accessories for this lawn mower are attached.
– The accessories are correctly attached.
– Spring-loaded mechanisms are free from damage and working.
- The engine stops when the control bar for mowing is released.
WARNING
■ If not in safe condition, components may no longer operate correctly, safety devices may be disabled and fuel may leak. This may result in serous or fatal injury to people.
▶ Do not use a damaged lawn mower.
▶ If there is petrol leaking from the lawn mower: do not use the lawn mower and consult a STIHL specialist dealer.
▶ Close the fuel tank cap.
English 4 Safety Precautions
▶ If there is engine oil leaking from the lawn mower: do not use the lawn mower and consult a STIHL specialist dealer.
▶ Close the engine oil cap.
▶ If the lawn mower is dirty: clean the lawn mower.
- Do not tamper with the lawn mower and its safety systems.
▶ Tampering with the lawn mower which increases the power output or the engine speed is forbidden.
▶ If the controls are not working: do not use the lawn mower.
▶ Spring-loaded mechanisms may release stored energy.
▶ If mowing and the mown grass is to be collected in the grass catcher box: attach the grass catcher box as described in this instruction manual.
- Attach genuine STIHL accessories for this lawn mower.
- Attach the blade as described in this instruction manual.
▶ Attach accessories as described in this instruction manual or in the instruction manual for the accessories.
- Do not insert objects into the apertures in the lawn mower.
- Replace worn or damaged warning signs.
▶ If anything is unclear: consult a STIHL specialist dealer.
4.6.2 Blade
The blade is in safe condition when the following conditions are met:
- The blade and attachments are undamaged.
– The blade is not deformed. - The blade is correctly attached.
- The blade is correctly sharpened.
- The blade is burr-free.
– The blade is correctly balanced. - The minimum thickness and minimum width of the blade are not fallen below, 19.2.
- The sharpening angle is observed, 9.2.
WARNING
■ In unsafe condition, blade parts may come loose and be expelled. This may result in serious injury to people.
▶ Use an undamaged blade and attachments.
▶ Attach the blade correctly.
▶ Sharpen the blade correctly.
▶ If the minimum thickness or minimum width is fallen below: replace the blade.
▶ Have the blade balanced by a STIHL specialist dealer.
▶ If anything is unclear: consult a STIHL specialist dealer.
4.7 Fuel and Refuelling
WARNING
■ The fuel used for this lawn mower is petrol. Petrol is extremely inflammable. If petrol comes into contact with an open flame or hot objects, it may cause fires or explosions. This may result in serious or fatal injury to people and damage to property.
▶ Protect petrol from heat and fire.
▶ Do not spill petrol.
▶ If petrol is spilled: wipe up the petrol with a cloth and wait until all parts of the lawn mower are dry before attempting to start the engine.
▶ Do not smoke.
▶ Do not refuel in the vicinity of flames.
▶ Before refilling the tank, stop the engine and allow it to cool.
▶ If the tank needs to be emptied: do this out of doors.
▶ Start the engine at least 3 m away from the refuelling site.
▶ Never store the lawn mower with petrol in the tank inside a building.
■ Breathing in petrol fumes may result in poisoning.
▶ Do not breathe in petrol fumes.
▶ Refuel in a well-ventilated place.
■ The lawn mower warms up while working. The petrol expands and overpressure may occur in the fuel tank. Petrol may gush out when the fuel tank cap is opened. The gushing petrol may ignite. This may result in serious injury to the user.
- Allow the lawn mower to cool down before opening the fuel tank cap.
■ Clothing that comes into contact with petrol is highly inflammable. This may result in serious or fatal injury to people and damage to property.
▶ If clothing comes into contact with petrol: change clothing.
■ Petrol poses a risk to the environment.
▶ Do not spill fuel.
▶ Dispose of petrol in accordance with regulations and in an environmentally acceptable way.
■ If petrol comes into contact with the skin or eyes, this may cause irritation.
- Avoid contact with petrol.
4 Safety Precautions English
▶ In the event of contact with the skin: wash the affected areas with plenty of soap and water.
▶ In the event of contact with the eyes: rinse the eyes with plenty of water for at least 15 minutes and seek medical attention.
■ The lawn mower's ignition system generates sparks. Sparks may escape and cause fires and explosions in highly inflammable or explosive environments. This may result in serious or fatal injury to people and damage to property.
▶ Use the spark plugs described in the engine instruction manual.
▶ Screw in the spark plug and tighten.
▶ Press on the spark plug socket firmly.
■ The lawn mower may be damaged if it is refu-elled with petrol that is not suitable for the engine.
▶ Use fresh, good-quality unleaded petrol.
▶ Observe the specifications in the engine instruction manual.
4.8 Working
WARNING
■ The user may lose control of the lawn mower if they do not start the engine correctly. This may result in serious injury to the user.
- Start the engine as described in this instruction manual.
■ In certain situations, the user may no longer be able to concentrate on their work. This may result in the user stumbling, falling and becoming seriously injured.
▶ Work calmly and carefully.
▶ Only mow when visibility is good. Do not use the lawn mower if the light and visibility conditions are poor.
▶ Operate the lawn mower alone.
▶ Watch out for obstacles.
▶ Do not tilt the lawn mower.
▶ Work standing on the ground and maintain balance.
▶ If signs of fatigue occur: take a break.
▶ If mowing on a slope: mow across the slope.
▶ Do not work on slopes with an inclination greater than 25^ (46.6%).
▶ Use the lawn mower with particular care when working near slopes, terraces, ditches, rubbish piles and embankments.
- Plan your working times so that more severe physical strains over a longer period are avoided.
■ Exhaust fumes are produced when the engine is running. Breathing in exhaust fumes may result in poisoning.
▶ Do not breathe in exhaust fumes.
▶ Use the lawn mower in a well-ventilated place.
▶ If nausea, headaches, vision problems, hearing problems or dizziness occur: stop working and consult a doctor.
■ If the user is wearing hearing protection and the engine is running, their perception and assessment of noise may be limited.
▶ Work calmly and carefully.
■ The lawn mower is equipped with a motorstop device.
▶ Releasing the control bar for mowing causes the engine and blade to stop within 3 seconds.
■ The turning blade may cut the user. This may result in serious injury to the user.
▶ Detach the spark plug socket.

▶ Do not touch a turning blade.
▶ If the blade is blocked by an object: stop the engine. Only then remove the object.
■ If the lawn mower changes or starts to behave differently when working, it may not be in safe condition. This may result in serious injury to people and damage to property.
- Stop working and consult a STIHL specialist dealer.
■ The lawn mower may cause vibrations when working.
▶ Wear work gloves.
▶ Take breaks.
▶ If signs of a circulatory disturbance occur: consult a doctor.
■ Inspect the mowing area and look out for obstacles. If the blade hits a foreign object when working, the foreign object or parts of it may be thrown up at high velocity. This may result in injury to people and damage to property.
▶ Remove foreign objects such as stones, sticks, wires, toys or other foreign objects from the working area. Mark hidden objects that cannot be removed.
■ When the control bar for mowing is released, the blade continues to turn for a short time. This may result in serious injury to people.

- Wait until the blade is no longer turning.
▶ Do not detach the grass catcher box until the blade stops turning.
■ Sparks may be produced if the turning blade hits a hard object. Sparks may cause fires in highly flammable environments. This may result in serious or fatal injury to people and damage to property.
- Do not work in a highly flammable environment.
■ If the lawn mower is stopped on a sloping surface, it may unintentionally roll away. This may result in injury to people and damage to property.
▶ Only release the lawn mower if it is on a level surface and cannot roll away by itself.
■ If objects are attached to the handlebar, the additional weight may cause the lawn mower to tip over. This may result in injury to people and damage to property.
- Do not attach objects to the handlebar.
DANGER
■ If working near live wires, the blade may come into contact with the live wires and damage them. This may result in serious or fatal injury to the user.
▶ Do not work near live wires.
■ The user may be struck by lighting if working during a thunderstorm. This may result in serious or fatal injury to the user.
▶ Do not work during thunderstorms.
■ Working in the rain may cause the user to slip. This may result in serious or fatal injury to the user.
▶ Do not work when it is raining.
4.9 Transporting
WARNING
■ The lawn mower may tip over or move during transport. This may result in injury to people and damage to property.
▶ Stop the engine.

- Wait until the blade is no longer turning.
▶ Detach the spark plug socket.
- Secure the lawn mower on a suitable load floor with lashing straps, belts or a net so it cannot tip over and move.
■ The muffler and engine may be hot after the engine has been running. This may result in the user burning themselves when transporting the machine.
▶ Push the lawn mower.
■ The lawn mower is heavy. Attempting to carry the lawn mower without assistance may result in injury to the user.
▶ Wear work gloves.
▶ The lawn mower must be carried by two people.
4.10 Storing
WARNING
■ Children cannot recognise or evaluate the dangers posed by the lawn mower. There is a risk of serious injury to children.
▶ Stop the engine.
- Keep the lawn mower out of reach of children.
■ Moisture may cause corrosion of metal components. This may result in damage to the lawn mower.
- Keep the lawn mower clean and dry.
■ If the lawn mower is kept on a sloping surface, it may unintentionally roll away. This may result in injury to people and damage to property.
- The lawn mower should only be kept on level surfaces.
4.11 Cleaning, Maintenance and Repair
WARNING
■ The blade may unintentionally start to rotate if the engine is running during cleaning, maintenance or repair. This may result in serious injury to people and damage to property.
▶ Stop the engine.
▶ Wait until the blade is no longer turning.
▶ Detach the spark plug socket.
■ The muffler and engine may be hot after the engine has been running. This may result in people burning themselves.
- Wait until the muffler and engine have cooled down.
■ Abrasive cleaning agents, using a water jet for cleaning or sharp objects may result in dam-
5 Preparing the Lawn Mower for Operation English
age to the lawn mower or blade. If the lawn mower or blade is not cleaned correctly, components may no longer operate correctly and safety devices may be disabled. This may result in serious injury to people.
- Clean the lawn mower and blade as described in this instruction manual, 115.2.
■ If the lawn mower or blade is not maintained or repaired correctly, components may no longer operate correctly and safety devices may be disabled. This may result in serous or fatal injury to people.
▶ Replace worn or damaged parts.
▶ If the lawn mower needs to be maintained or repaired: consult a STIHL specialist dealer. - Maintain the blade as described in this instruction manual.
■ The user may cut themselves on sharp cutting edges during blade cleaning, maintenance or repair. This may result in injury to the user. - Wear work gloves made from resistant material.
■ The blade may become hot during sharpening. This may result in the user burning themselves.
▶ Wait until the blade has cooled down. - Wear work gloves made from resistant material.
5 Preparing the Lawn Mower for Operation
5.1 Preparing the Lawn Mower for Operation
The following steps must be performed before commencing work:
▶ Make sure that the following components are in safe condition:
- Lawn mower, 4.6.1.
- Blade, 4.6.2.
▶ Clean the lawn mower, 15.
▶ Check the blade, 10.2.
▶ Attach the handlebar, 6.1.
▶ Add engine oil, ☐6.3.
▶ Fold up the handlebar, 08.1.
▶ Refuel the lawn mower, 07.
▶ If mowing and the mown grass is to be collected in the grass catcher box: attach the grass catcher box, ☐.2.2.
▶ If mowing and the mown grass is to be ejected to the rear: detach the grass catcher box, 6.2.3.
▶ Set the cutting height, 11.2.
▶ Check the controls, 10.1.
▶ If the steps cannot be performed: do not use the lawn mower and consult a STIHL specialist dealer.
6 Assembling the Lawn Mower
6.1 Attaching the Handlebar
▶ Stop the engine.
- Place the lawn mower on a level surface.
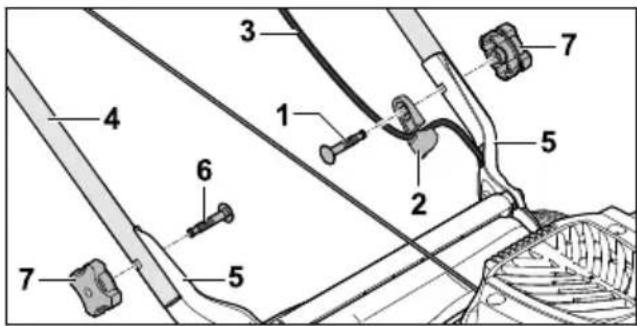
text_image
Technical diagram of a mechanical assembly with numbered components for identification- Insert screw (1) through cable guide (2).
▶ Attach cable (3) to cable guide (2).
▶ Hold handlebar (4) against the retainers (5) so the bores align.
▶ Push screws (1 and 6) through the bores from the inside to the outside.
▶ Screw on star grip nuts (7) and tighten.
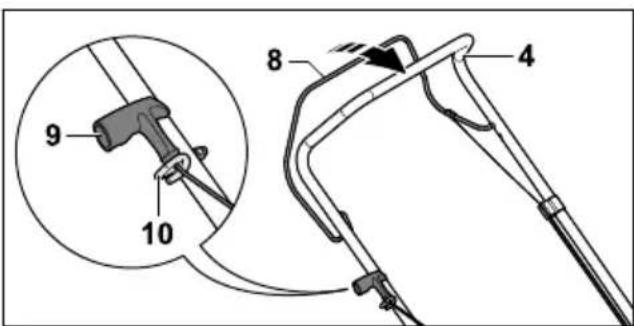
text_image
Technical diagram showing a mechanical component with numbered parts and an inset view of a connector detail.▶ Detach the spark plug socket.
- Press control bar for mowing (8) to handle-bar (4) and hold.
- Slowly pull starter handle (9) in the direction of starter rope guide (10).
- Hook starter handle (9) into starter rope guide (10).
▶ Release control bar for mowing (8).
▶ Re-attach the spark plug socket.
Handlebar (4) must not be dismantled again.
English 7 Refuelling the Lawn Mower
6.2 Assembling, Attaching and Detaching the Grass Catcher Box
6.2.1 Assembling the Grass Catcher Box
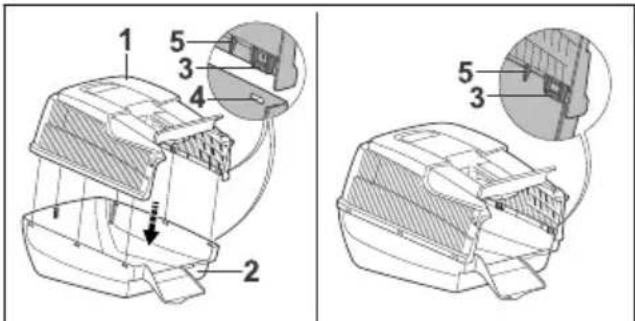
text_image
Technical diagram of a mechanical device with numbered components and cross-sectional views▶ Fit upper part of grass catcher box (1) onto lower part of grass catcher box (2).
Tabs (3) and guides (5) must be located on the inside. Tabs (3) must be level with openings (4).
▶ Press tabs (3) into openings (4) one after the other from back to front.
Tabs (3) engage audibly.
6.2.2 Attaching the Grass Catcher Box
▶ Stop the engine.
- Place the lawn mower on a level surface.
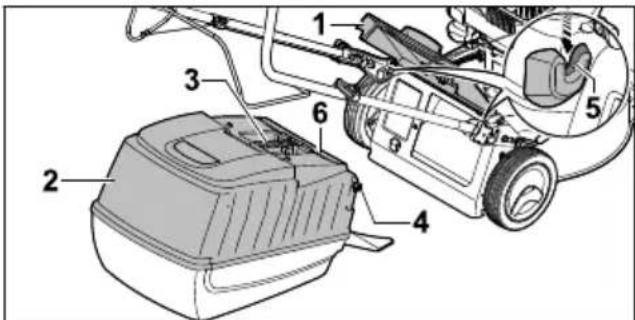
text_image
Technical diagram of a vehicle engine compartment with numbered parts for identification▶ Open discharge flap (1) and hold it open.
▶ Take hold of grass catcher box (2) by handle (3) and attach to mounts (5) using hooks (4).
Flap (6) must be closed.
▶ Set down discharge flap (1) on grass catcher box (2).
6.2.3 Detaching the Grass Catcher Box
▶ Stop the engine.
- Place the lawn mower on a level surface.
▶ Open the discharge flap and hold it open.
- Remove the grass catcher box upwards by the handle.
▶ Close the discharge flap.
6.3 Adding Engine Oil
The engine oil lubricates and cools the engine. The engine oil specification and capacity can be found in the engine instruction manual.
NOTICE
■ The lawn mower does not contain any engine oil on delivery. Starting the engine with no or too little engine oil may damage the lawn mower.
▶ Always check the engine oil level before starting and if necessary top up.
- Add the engine oil as described in the engine instruction manual.
7 Refuelling the Lawn Mower
7.1 Refuelling the Lawn Mower
NOTICE
■ The lawn mower may be damaged if the correct fuel is not used.
▶ See the engine instruction manual.
▶ Stop the engine.
- Place the lawn mower on a level surface.
- Clean the area around the fuel tank cap with a damp cloth.
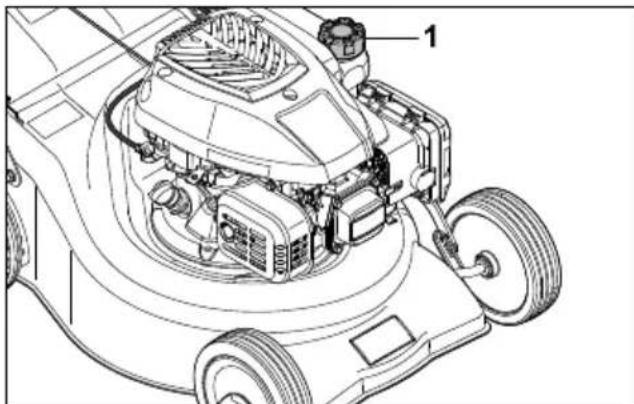
text_image
1▶ Turn fuel tank cap (1) anti-clockwise until it can be removed.
▶ Remove the fuel tank cap.
- Add fuel, stopping at least 15 mm short of the fuel tank brim.
- Place the fuel tank cap on the fuel tank.
▶ Turn the fuel tank cap clockwise and hand tighten.
The fuel tank is sealed.
8 Adjusting the Lawn Mower for the User
8.1 Folding Up the Handlebar
▶ Stop the engine.
▶ Detach the spark plug socket.
- Place the lawn mower on a level surface.
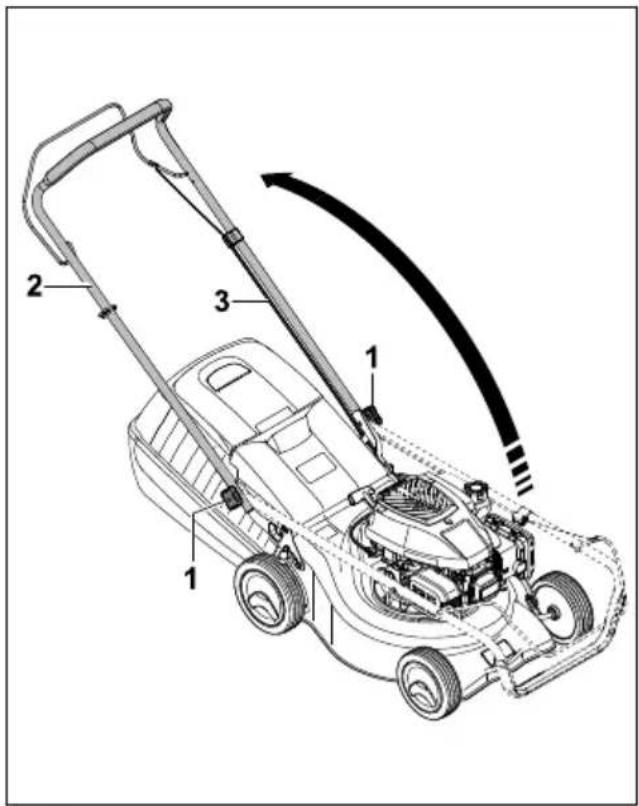
text_image
Technical diagram of a lawn mower with numbered parts and directional arrows indicating motion or movement.▶ Loosen star grips nuts (1) if they are tightened.
▶ Fold up handlebar (2), ensuring that cable (3) is not trapped.
- Firmly tighten star grip nuts (1).
Handlebar (2) is firmly attached to the lawn mower.
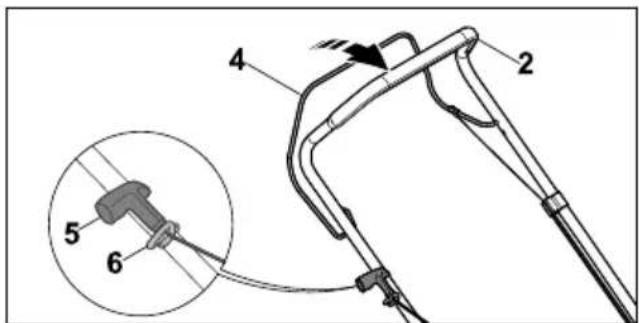
text_image
Technical diagram of a mechanical device with labeled parts and an inset showing a component with numbered parts 2, 4, 5, and 6.- Press control bar for mowing (4) to handle-bar (2) and hold.
- Slowly pull starter handle (5) in the direction of starter rope guide (6).
- Hook starter handle (5) into starter rope guide (6).
▶ Release control bar for mowing (4).
▶ Re-attach the spark plug socket.
8.2 Folding the Handlebar
The handlebar can be folded for space-saving transport or storage.
▶ Stop the engine.
▶ Detach the spark plug socket.
- Place the lawn mower on a level surface.
- Press the control bar for mowing to the handlebar and hold.
▶ Detach the starter handle from the starter rope guide and slowly guide back towards the engine.
▶ Release the control bar for mowing. - Hold the handlebar and loosen the star grip nuts.
▶ Fold down the handlebar forwards.
9 Starting and Stopping the Engine
9.1 Starting the Engine
- Place the lawn mower on a level surface.
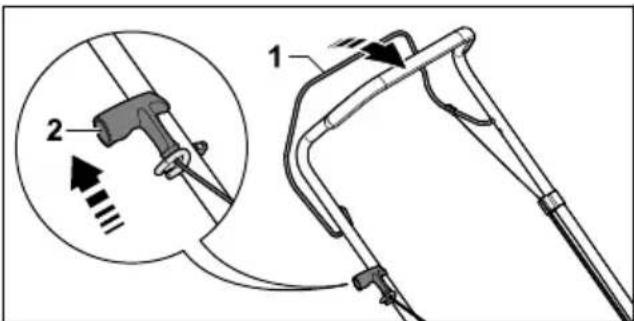
text_image
Technical diagram showing a mechanical device with labeled parts and an inset view of a lever mechanism.- Press control bar for mowing (1) to the handlebar with the left hand and hold.
- Slowly pull out starter handle (2) to the point of noticeable resistance with the right hand.
- Keep quickly pulling out and returning starter handle (2) until the engine is running.
▶ If the engine does not start: see the engine instruction manual.
9.2 Stopping the Engine
- Place the lawn mower on a level surface.
▶ Release the control bar for mowing. The engine stops.
Leave the user position.
10 Checking the Lawn Mower
10.1 Checking the Controls
Control bar for mowing
▶ Stop the engine.
▶ Pull the control bar for mowing fully in the direction of the handlebar and release again.
▶ If the control bar for mowing is stiff or does not spring back into the initial position: do not use the lawn mower and consult a STIHL specialist dealer.
The control bar for mowing is defective.
10.2 Checking the Blade
▶ Stop the engine.
▶ Detach the spark plug socket.
English 11 Operating the Lawn Mower
▶ Upend the lawn mower, 5.1.

text_image
Technical diagram of a mechanical assembly with labeled components and dimension annotations▶ Measure the following:
- Thickness a
-Widthb
- Sharpening angle c
▶ If the minimum thickness or minimum width is fallen below: replace the blade, 19.2.
▶ If the sharpening angle is not correct: sharpen the blade, 19.2.
▶ If anything is unclear: consult a STIHL specialist dealer.
11 Operating the Lawn Mower
11.1 Holding and Guiding the Lawn Mower
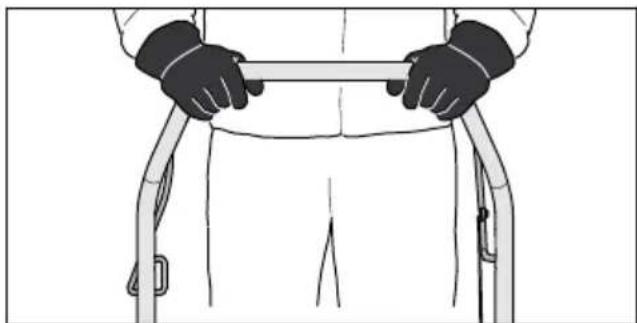
natural_image
Line drawing of a person wearing gloves holding a horizontal bar, standing on a curved surface (no text or symbols)- Hold the handlebar with both hands so the thumbs enclose the handlebar.
11.2 Setting the Cutting Height
Seven cutting heights can be set:
- 30 ~mm = position 1
- 40 mm = position 2
- 50 mm = position 3
- 55 mm = position 4
- 65 mm = position 5
- 70 mm = position 6
- 80 mm = position 7
The positions are indicated on the lawn mower.
Setting the cutting height
▶ Stop the engine.
The blade must not be turning.
- Place the lawn mower on a level surface.
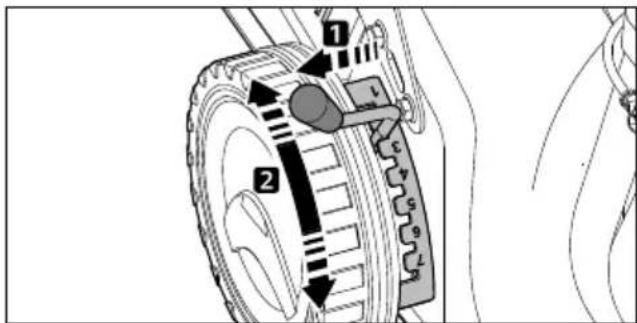
text_image
Technical diagram of a mechanical gear assembly with labeled parts and directional arrows indicating motion or movement.▶ Pull lever (1) from the notch and move to the desired position.
11.3 Mowing
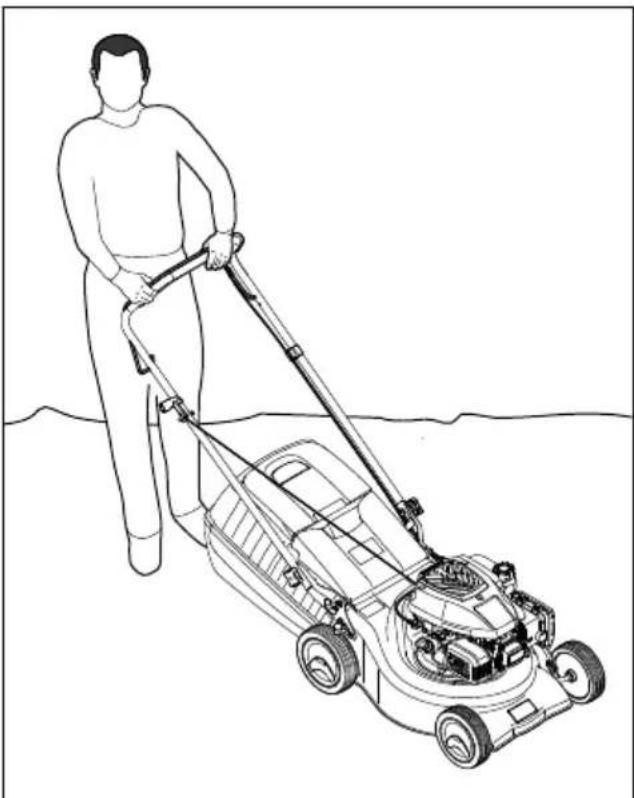
natural_image
Line drawing of a person using a lawn mower to clean or manage equipment (no text or symbols)- Push the lawn mower forwards slowly and in a controlled manner.
11.4 Emptying the Grass Catcher Box
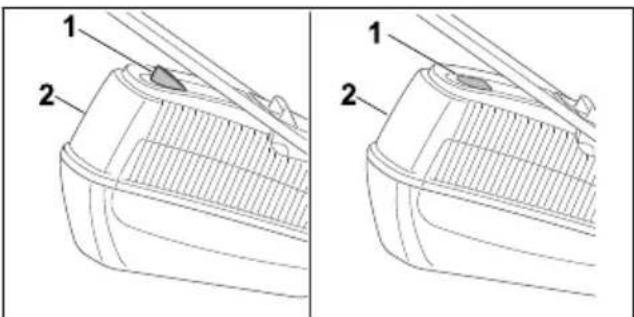
text_image
Technical diagram showing two views of a vehicle's front panel with labeled parts 1 and 2The flow of air generated by the blade raises level indicator (1). The flow of air stops when the grass catcher box is full. If the flow of air is too
12 After Finishing Work English
low, level indicator (1) returns to its resting state. This is a prompt to empty grass catcher box (2).
The functionality of level indicator (1) is restricted if the flow of air is impaired. External influences such as wet, dense or high grass, low cutting height, contamination or the like can impair the flow of air and the functionality of level indicator (1).
▶ If level indicator (1) drops to its resting state: empty grass catcher box (2).
▶ Stop the engine.
▶ Detach grass catcher box (2).
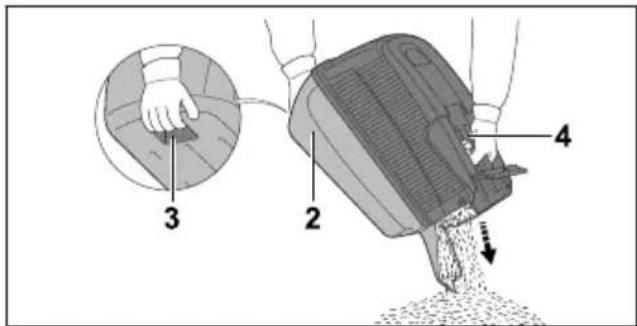
text_image
Diagram illustrating a mechanical or fluidic process with labeled components and directional arrows indicating flow or movement.- Hold grass catcher box (2) with one hand on handle (4) and the second hand on rear handle (3).
▶ Empty grass catcher box (2).
▶ Attach grass catcher box (2).
12 After Finishing Work
12.1 After Finishing Work
▶ Stop the engine.
▶ If the lawn mower is wet: allow the lawn mower to dry.
▶ Clean the lawn mower.
13 Transporting
13.1 Transporting the Lawn Mower
▶ Stop the engine.
The blade must not be turning.
▶ Detach the spark plug socket.
Pushing the lawn mower
- Push the lawn mower forwards slowly and in a controlled manner.
Carrying the lawn mower
▶ Wear work gloves made from resistant material.
▶ Detach the grass catcher box.
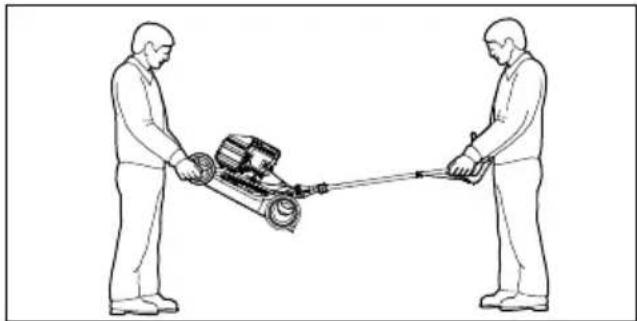
natural_image
Line drawing of two people pulling a cart with a pulley (no text or symbols)▶ If the lawn mower is being carried with the handlebar unfolded:
▶ One person holds the lawn mower by the housing using both hands and another person holds the handlebar using both hands.
▶ The lawn mower must be lifted and carried by two people.
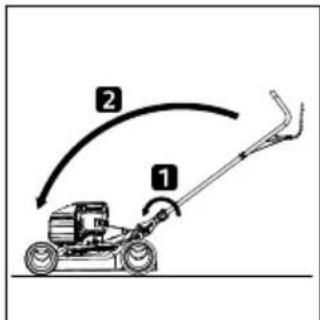
text_image
Diagram of a lawn mower with labeled parts 1 and 2 showing motion direction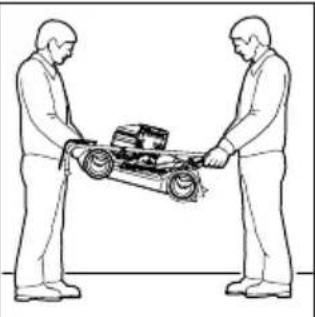
natural_image
Two men standing in a line drawing of a small robotic vehicle being handled by two others (no text or symbols visible)▶ If the lawn mower is being carried with the handlebar folded:
▶ Fold down the handlebar.
▶ One person holds the lawn mower by the housing using both hands and another person holds the handlebar using both hands.
▶ The lawn mower must be lifted and carried by two people.
Transporting the lawn mower in a vehicle
- Secure the lawn mower upright so that it does not tip over and cannot move.
14 Storing
14.1 Storing the Lawn Mower
- Stop the engine and allow it to cool down.
▶ Detach the spark plug socket. -
Store the lawn mower in accordance with the following conditions:
-
The lawn mower is out of reach of children.
- The lawn mower is clean and dry.
- The lawn mower cannot tip over.
- The lawn mower cannot roll away.
15 Cleaning
15.1 Upending the Lawn Mower
▶ Run the fuel tank empty.
The engine stops.
English 16 Maintenance
- Place the lawn mower on a level surface.
▶ Detach the grass catcher box.
▶ Set the cutting height to position 1, ☐1.2.
▶ Unhook the starter handle from the starter rope guide.
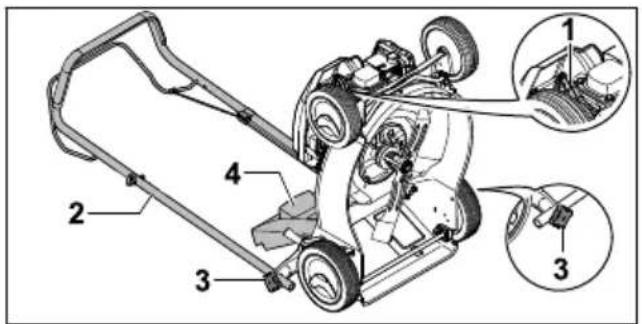
text_image
Technical diagram of a lawn mower with labeled parts and close-ups of mechanical components▶ Detach spark plug socket (1).
- Hold handlebar (2) and loosen star grip nuts (3).
▶ Set down handlebar (2) to the rear.
▶ Open discharge flap (4) and hold it open.
▶ Upend the lawn mower.
15.2 Cleaning the Lawn Mower
▶ Stop the engine.
- Allow the lawn mower to cool down.
▶ Detach the spark plug socket.
- Clean the lawn mower with a damp cloth.
▶ Clean the ventilation slots with a paintbrush.
▶ Upend the lawn mower.
▶ Clean the area around the blade and the blade with a stick, a soft brush or a damp cloth.
16 Maintenance
16.1 Maintenance Intervals
Maintenance intervals are dependent on the ambient conditions and the working conditions. STIHL recommends the following maintenance intervals:
Engine
- Maintain the engine as described in the engine instruction manual.
▶ Have the lawn mower inspected annually by a STIHL specialist dealer.
Lawn mower
16.2 Removing and Attaching the Blade
16.2.1 Removing the Blade
▶ Stop the engine.
▶ Detach the spark plug socket.
▶ Upend the lawn mower.
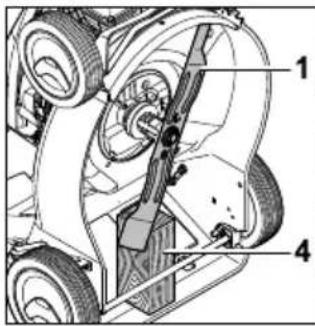
text_image
Technical diagram of a vehicle's internal components with numbered labels pointing to different parts.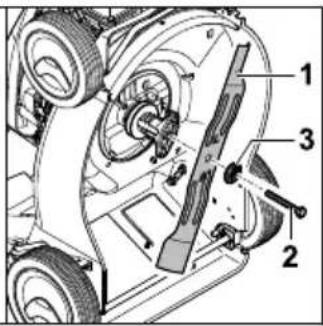
text_image
Technical diagram of a vehicle's internal components with numbered labels pointing to different parts.▶ Block blade (1) using a piece of wood (4).
▶ Unscrew screw (2) and remove together with washer (3).
▶ Remove blade (1).
▶ Discard screw (2) and washer (3).
Use a new screw and washer to attach blade (1).
16.2.2 Attaching the Blade
▶ Stop the engine.
▶ Detach the spark plug socket.
▶ Upend the lawn mower.
text_image
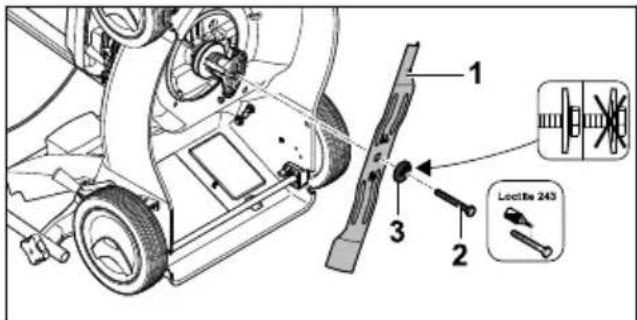
1 2 3 LockRis 243- Place new washer (3) on new screw (2).
- Apply Loctite 243 thread locker to the thread of screw (2).
▶ Position blade (1) so the raised areas on the contact area engage in the notches in blade (1).
▶ Screw in screw (2) together with washer (3).
text_image
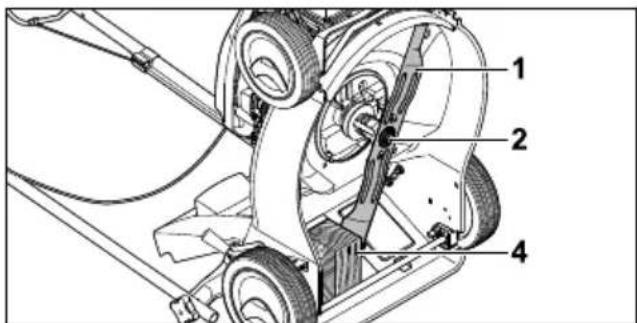
Technical diagram of a mechanical assembly with numbered parts labeled 1, 2, and 4▶ Block blade (1) using a piece of wood (4).
▶ Tighten screw (2) to 65 Nm.
16.3 Sharpening and Balancing the Blade
Sharpening and balancing the blade correctly requires a lot of practice.
17 Repairing English
STIHL recommends having the blade sharpened and balanced by a STIHL specialist dealer.

WARNING
■ The cutting edges of the blade are sharp. This may result in the user cutting themselves.
- Wear work gloves made from resistant material.
▶ Stop the engine.
▶ Detach the spark plug socket.
▶ Upend the lawn mower.
▶ Remove the blade.
▶ Sharpen the blade. Observe the sharpening angle and cool the blade, 9.2.
Bluing of the blade during sharpening is not permitted.
▶ Attach the blade.
▶ If anything is unclear: consult a STIHL specialist dealer.
17 Repairing
17.1 Repairing the Lawn Mower
The user should not repair the lawn mower or blade themselves.
▶ If the lawn mower or blade is damaged: do not use the lawn mower or blade and consult a STIHL specialist dealer.
▶ If warning signs are illegible or damaged: have the warning signs replaced by a STIHL specialist dealer.
18 Troubleshooting
18.1 Remedying Lawn Mower Faults
| Fault Cause Remedy | ||
| Engine cannot be started. | Control bar for mowing is not pressed. | ► Start engine as described in this instruction manual. |
| Fuel tank is empty. ► Refuel lawn mower. | ||
| Fuel line is blocked. ► Consult a STIHL specialist dealer. | ||
| Inferior, dirty or old fuel in the tank. ► Use fresh, good-quality unleaded petrol. | ||
| Air filter is dirty. ► Consult a STIHL specialist dealer. | ||
| Spark plug socket is detached from spark plug or ignition lead is not properly fastened to socket. ► Connect spark plug socket. ► Check connection between ignition lead and plug. | ||
| Spark plug is dirty, damaged or electrode gap is incorrect. ► Clean or replace spark plug. ► Adjust electrode gap. | ||
| Resistance at the blade is too great. ► Set a higher cutting height. ► Start engine in lower grass. | ||
| Engine difficult to start or engine power deteriorating. | Lawn mower housing is blocked. | Clean lawn mower. |
| Cutting height is set too low or rate of feed is too high. | Adapt cutting height or mow more slowly. | |
| Water in fuel tank and carburettor or carburettor is blocked. | Empty fuel tank, clean fuel line and carburettor. | |
| Fuel tank is contaminated. Consult a STIHL specialist dealer. | ||
| Air filter is dirty. Consult a STIHL specialist dealer. | ||
| Spark plug is dirty. Clean or replace spark plug. | ||
| Engine over-heating. | Engine oil level is too low. Add or change engine oil as described in the engine instruction manual. | |
| Cooling ribs are dirty. Clean lawn mower. | ||
| Lawn mower vibrates excessively. | Blade is damaged. Replace blade. | |
| Fault Cause Remedy | ||
| Blade is not correctly attached. Attach blade. | ||
| Grass is not being cut cleanly. | Blade is blunt or worn. Sharpen or replace blade. | |
19 Specifications
19.1 STIHL RM 248.1, RM 253.1 Lawn Mower
Engine type:
- RM 253.1 : 2.1 kW (2.8 HP) at 2800 rpm
Speed:
- RM 248.1 : 2800 rpm
- RM 253.1 : 2800 rpm
- Maximum fuel tank capacity: 900~cm^3 (0.9 l) Weight:
- RM 248.1 : 26 kg
- RM 253.1 : 27 kg
- Maximum grass catcher box capacity: 55 l Cutting width:
- RM 248.1 : 46 cm
- RM 253.1 : 51 cm
19.2 Blade
- Minimum thickness a: 2.0 mm
– Minimum width b: 55 mm - Sharpening angle c: 30^
19.3 Sound Values and Vibration Values
RM 248.1
The K value for the sound pressure level is 2 dB(A). The K value for the sound power level is 1.2 dB(A). The K value for the vibration values is 1,40 m/s ^2 .
- Sound pressure level L_pA measured in accordance with 2006/42/EC: 83 dB(A)
- Sound power level L_wA measured in accordance with 2000/14/EC: 95.5 dB(A)
- Vibration value a_hv measured in accordance with EN 12096, handlebar: 2,80 m/s ^2
RM 253.1
The K value for the sound pressure level is 2 dB(A). The K value for the sound power level is
1.4 dB(A). The K value for the vibration values is 2.20 m/s^2 .
- Sound pressure level L_pA measured in accordance with 2006/42/EC: 84 dB(A)
- Sound power level L_wA measured in accordance with 2000/14/EC: 96 dB(A)
- Vibration value a_hv measured in accordance with EN 12096, handlebar: 5.50 m/s ^2
For information on compliance with Employers' Vibration Directive 2002/44/EC see www.stihl.com/vib.
19.4 REACH
REACH is an EC regulation and stands for the Registration, Evaluation, Authorisation and Restriction of Chemical substances.
For information on compliance with the REACH regulation see www.stihl.com/reach.
20 Spare Parts and Accessories
20.1 Spare parts and accessories
STIHL These symbols indicate original STIHL spare parts and original STIHL accessories.
STIHL recommends the use of original STIHL spare parts and accessories.
Despite ongoing market observation, STIHL is unable to judge the reliability, safety and suitability of other manufacturers' spare parts and accessories; accordingly, STIHL cannot warrant for the use of those parts.
Original STIHL spare parts and original STIHL accessories are available from STIHL dealers.
20.2 Essential Spare Parts
STIHL assumes no liability for injury to people or damage to property resulting from the use of unauthorised attachments or spare parts.
- Blade, RM 248: 6350 702 0103
- Blade, RM 253: 6371 702 0102
- Blade fastening screw: 9008 319 9028
– Washer: 0000 702 6600
21 Disposal
21.1 Disposing of the Lawn Mower
Information on disposal is available from a STIHL specialist dealer.
▶ Dispose of the lawn mower, blade, petrol, engine oil, accessories and packaging in accordance with regulations and in an environmentally friendly manner.
22 EC Declaration of Conformity
22.1 STIHL RM 248.1, RM 253.1 Lawn Mower
STIHL Tirol GmbH
Hans Peter Stihl-Strasse 5
6336 Langkampfen
Austria
declares under our sole responsibility that
- design: lawn mower
- manufacturer's brand: STIHL
- type: RM 248.1, 253.1
serial number:
- RM 248.1: 6350
- RM 253.1: 6371
complies with the relevant provisions of Directives 2000/14/EC, 2006/42/EC, 2014/30/EU and 2011/65/EU and has been developed and manufactured in accordance with the versions of the following standards valid on the date of manufacture: EN ISO 5395-1, EN ISO 5395-2, EN ISO 14982.
Name and address of relevant, named location:
TÜV Rheinland LGA Products GmbH
Tillystrasse 2
D-90431 Nürnberg
The measured and guaranteed sound power levels were determined in accordance with Directive 2000/14/EC, Appendix VIII.
– Measured sound power level, RM 248.1:95.2 dB(A)
- Guaranteed sound power level, RM 248.1: 96 dB(A)
- Measured sound power level, RM 253.1: 96 dB(A)
- Guaranteed sound power level, RM 253.1: 97 dB(A)
The technical documents are stored in the Product Approval department at STIHL Tirol GmbH.
The year of manufacture and machine number are indicated on the lawn mower.
Langkampfen, 02.01.2020
STIHL Tirol GmbH
Matthias Fleischer, Head of Research and Development Division
Sven Zimmermann, Head of Quality Division
22.2 Importer for Great Britain
ANDREAS STIHL Ltd.
Stihl House
Stanhope Road
CAMBERLEY
SURREY GU15 3YT
Great Britain
Table des matières
1 Préface....33
2.1 Documents applicables
text_image
Labeled diagram of a lawn mower with numbered parts for identificationtext_image
Technical diagram of a mechanical assembly with numbered components for identificationtext_image
Technical diagram showing a mechanical component with numbered parts and an inset view of a bracket assembly.text_image
Technical diagram of a mechanical device with numbered components and cross-sectional viewstext_image
Technical diagram of an automotive engine compartment with numbered parts for identificationtext_image
Technical diagram of a lawn mower with labeled component 1text_image
Technical diagram of a lawn mower with numbered parts and directional arrows indicating motion or assembly.text_image
Technical diagram of a mechanical device with numbered components and an inset showing a component labeled 5 and 6.text_image
Technical diagram showing a mechanical device with labeled parts and an inset view of a lever mechanism.text_image
Technical diagram of a mechanical assembly with labeled components a, b, and c, showing internal components and motion indicators.natural_image
Line drawing of a person wearing gloves holding a horizontal bar, standing on a curved object (no text or symbols)text_image
Technical diagram of a mechanical gear system with labeled components and directional arrows indicating motion or movement.natural_image
Line drawing of a person using a lawn mower to clean water (no text or symbols)text_image
Technical diagram showing two views of a mechanical component with labeled parts 1 and 2text_image
Diagram illustrating a mechanical or material processing step with labeled components 2, 3, and 4, showing hand positioning and fluid flow.natural_image
Line drawing of two people pulling a lawn mower with a tool, no text or symbols presenttext_image
Diagram showing two methods of lawn lawn: one with a tool and arrow labeled '1', the other with a person pulling a cart.text_image
Technical diagram of a lawn mower with numbered parts and close-ups of mechanical componentstext_image
Technical diagram of a vehicle's internal components with numbered parts labeled 1 and 4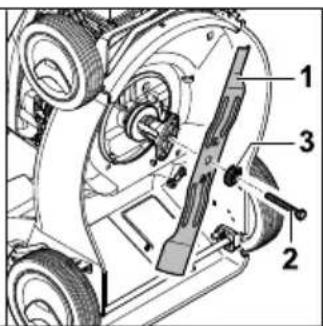
text_image
Technical diagram of a mechanical assembly with numbered components labeled 1, 2, and 3text_image
Technical diagram of a mechanical assembly with numbered parts labeled 1, 2, and 4text_image
Labeled diagram of a lawn mower with numbered parts for identificationtext_image
Technical diagram of a mechanical assembly with numbered components for identificationtext_image
Technical diagram of a mechanical device with numbered parts and an inset view showing a component labeled 9 and 10.text_image
Technical diagram of a mechanical device with numbered components and an inset showing a housing detail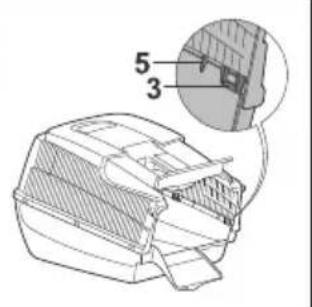
text_image
Technical diagram of a printer with labeled parts 3 and 5, showing internal structure and assemblytext_image
Technical diagram of a vehicle engine compartment with numbered parts for identificationnatural_image
Technical line drawing of a lawn mower with labeled components (no text or symbols present)text_image
Technical diagram of a lawn mower with numbered parts and directional arrows indicating motion or movement.text_image
Technical diagram of a mechanical device with numbered components and an inset showing a component labeled 5 and 6.text_image
Technical diagram showing a mechanical device with labeled parts and an inset view of a lever mechanism.text_image
Technical diagram of a mechanical assembly with labeled components and directional arrows indicating motion or force vectors.natural_image
Line drawing of a person wearing gloves holding a horizontal bar, standing on a chair (no text or symbols)text_image
Technical diagram showing mechanical components with numbered parts and directional arrows indicating motion or flownatural_image
Line drawing of a person using a lawn mower to clean or adjust equipment (no text or symbols)text_image
Technical diagram showing two views of a mechanical component with labeled parts 1 and 2text_image
Diagram illustrating a mechanical device with labeled parts and directional arrows indicating flow or movement.natural_image
Two men pulling a small plow with a cart, viewed from each other (no text or symbols)text_image
Diagram of a lawn mower with labeled parts and motion arrows indicating rotational motion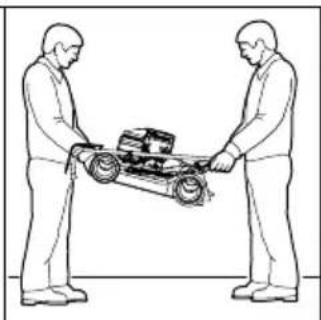
natural_image
Two men standing in opposite directions, one pulling a cart with a box on the other (no text or symbols visible)text_image
Technical diagram of a lawn mower with labeled parts and close-ups of mechanical componentstext_image
Technical diagram of a vehicle's internal components with numbered parts labeled 1, 2, 3, and 4text_image
Technical diagram of a mechanical assembly with numbered parts labeled 1, 2, and 4text_image
Labeled diagram of a lawn mower with numbered parts for identification1 Starthandgreep
text_image
Technical diagram of a mechanical assembly with numbered components for identificationtext_image
Technical diagram showing a mechanical component with numbered parts and an inset detail view labeled 9, 10.text_image
Technical diagram of a mechanical device with numbered components and an inset close-up view showing internal structure.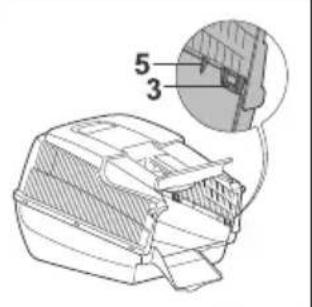
text_image
Technical diagram of a printer with labeled parts 3 and 5, showing internal structure and connection to a paper feeding component.text_image
Technical diagram of a vehicle engine compartment with numbered parts for identificationnatural_image
Technical line drawing of a lawn mower with labeled component (no text or symbols beyond label)text_image
Technical diagram of a lawn mower with numbered parts and directional arrows indicating motion or assembly.text_image
Technical diagram of a mechanical device with numbered components and an inset showing a component labeled 5 and 6.text_image
Technical diagram showing a mechanical device with labeled parts and an inset view of a component with arrows indicating motion or force.text_image
Technical diagram of a mechanical assembly with labeled parts a, b, and c, showing internal components and motion indicators.natural_image
Line drawing of a person holding a horizontal bar with hands, wearing gloves (no text or symbols)text_image
Technical diagram of a mechanical device with numbered components and directional arrows indicating motion or assembly.natural_image
Line drawing of a person using a lawn mower to clean or adjust equipment (no text or symbols)text_image
Diagram illustrating a mechanical device with labeled parts and directional arrows indicating flow or movement.natural_image
Line drawing of two people pulling a lawn mower together (no text or symbols)text_image
Diagram showing two methods of lawn lawn: one with a curved arrow labeled '1' and another with a person pushing a cart.text_image
Technical diagram of a lawn mower with numbered parts and close-ups of mechanical componentstext_image
Technical diagram of a vehicle's internal components with numbered labels pointing to parts of the body and wheel assembly.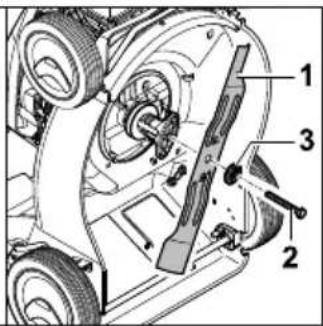
text_image
Technical diagram of a vehicle's internal components with numbered labels pointing to different parts.text_image
Technical diagram of a mechanical assembly with numbered components labeled 1, 2, and 4natural_image
Abstract black-and-white striped pattern with no text or symbols0478-111-9647-B