
Iconic Digital Advance - Vacuum Cleaner TAURUS - Free user manual and instructions
Find the device manual for free Iconic Digital Advance TAURUS in PDF.
| Product type | Cordless stick / hand vacuum |
| Brand | Taurus |
| Model | Iconic Digital Advance |
| Power supply | Built-in rechargeable lithium-ion battery |
| Charger | Mains connector (included), full charging time: 4 to 5 h (6 h for first charge) |
| Filter type | Container filter (E1) and EPA exhaust filter (E2), washable with cold water |
| Dust container capacity | Approximately 0.6 L (transparent for level visualization) |
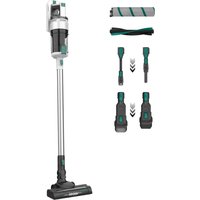
| Included accessories | Furniture and upholstery brush (A1), extra-long crevice tool (A2), telescopic tube (B), motorized brush with Fuzzy and Helix rollers (C), wall mount (K), cleaning tool (P) |
| Main functions | 2 suction speeds (button N), 5-LED charge indicator (F), automatic shut-off in case of overheating |
| Usage | Floor, carpet, furniture, upholstery, grooves and corners (with crevice tool) |
| Cleaning and maintenance | Empty the transparent container regularly; clean filters every 50 h of use; rollers are removable for cleaning |
| Safety | Do not vacuum liquids, do not use without filter, do not open the battery, store away from moisture and temperatures >40°C |
| Weight | Approximately 2.8 kg (with battery and accessories) |
| Dimensions (approx.) | 25 x 20 x 110 cm (tube extended) |
| Runtime | Approx. 30-40 min (varies by speed and accessory) |
| Repairability | Removable battery (buttons D), replaceable filters and rollers; parts available via Taurus authorized service |
| Warranty | Complies with current legislation, Taurus technical assistance |
Frequently Asked Questions - Iconic Digital Advance TAURUS
User questions about Iconic Digital Advance TAURUS
0 question about this device. Answer the ones you know or ask your own.
Ask a new question about this device
Download the instructions for your Vacuum Cleaner in PDF format for free! Find your manual Iconic Digital Advance - TAURUS and take your electronic device back in hand. On this page are published all the documents necessary for the use of your device. Iconic Digital Advance by TAURUS.
USER MANUAL Iconic Digital Advance TAURUS
Stick vacuum cleaner
Aspirateur balai
Bodenstaubsauger
Scopa elettrica
Aspirador vertical
Aspirador vertical
Steelstofzuiger
Szczotka odkurzacz
Ηλεκτρική σκούπα
natural_image
Line drawing of a vacuum cleaner with handle and base mount (no text or symbols)
natural_image
Technical line drawing of a vertical cylindrical device with a labeled point B (no text or symbols beyond label)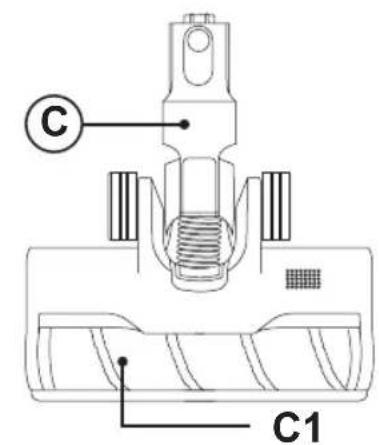
natural_image
Simple line drawing of a twisted rope or cable with a small circular mark at the end (no text or symbols)C2
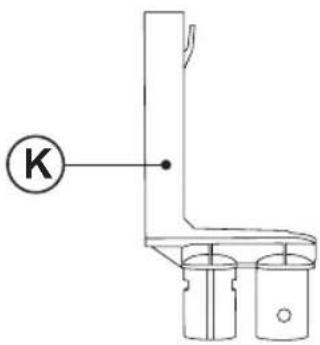
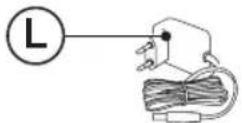
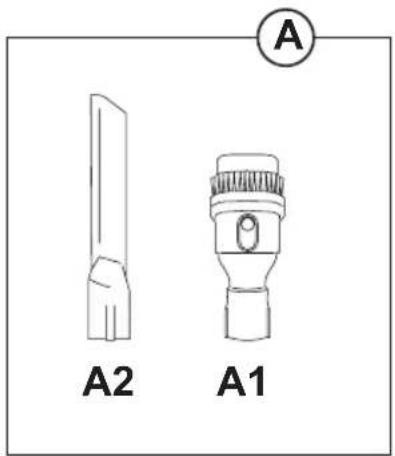
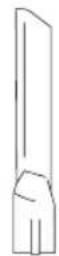
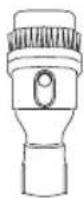
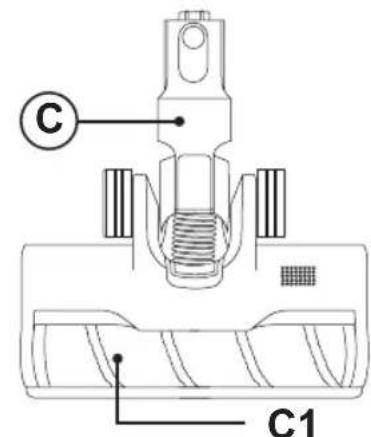
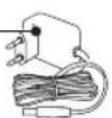
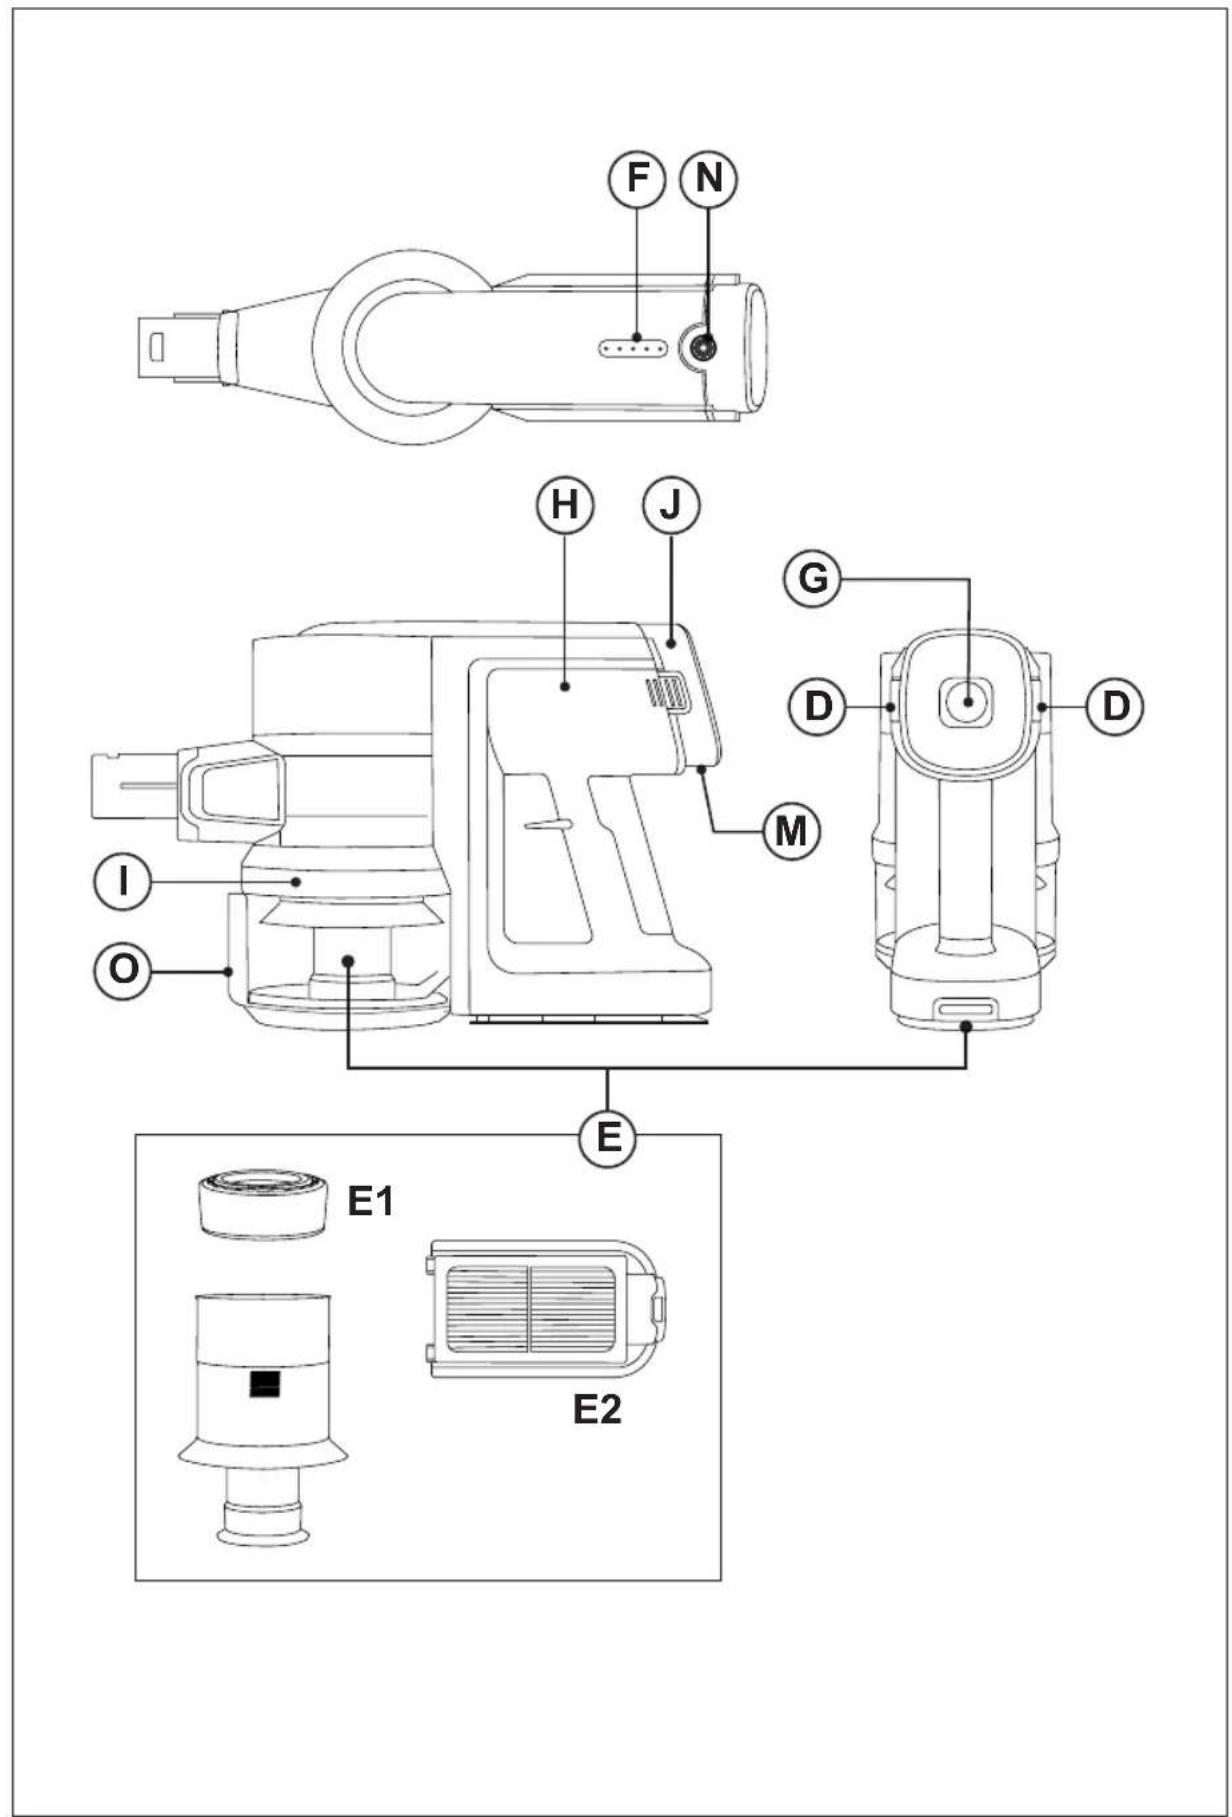
Fig.1 Fig.2
natural_image
Line drawing of a portable electric shaver with a power outlet, showing internal components and a black arrow indicating direction (no text or symbols)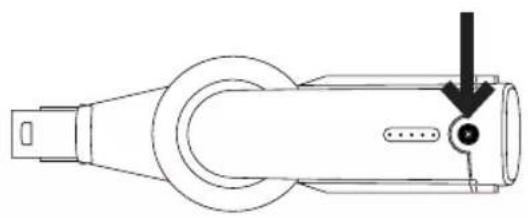
natural_image
Technical line drawing of a mechanical component with a black arrow pointing to a detail (no text or symbols present)Fig.3

Fig.4
natural_image
Technical line drawing of a mechanical device with an arrow indicating direction (no text or symbols present)Fig.5
natural_image
Line drawing of a mechanical device with a rotating arrow indicating rotation (no text or symbols)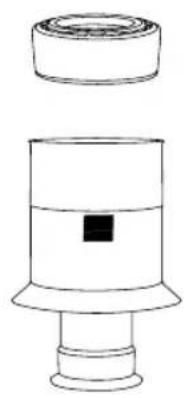
natural_image
Technical line drawing of a mechanical component with a cylindrical housing and a base, showing no text or symbols.Fig.6

natural_image
Technical line drawing of a mechanical device with a central shaft and mounting base (no text or symbols)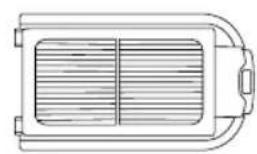
natural_image
Technical line drawing of a rectangular electronic component with internal channels (no text or symbols)Fig.7
flowchart
graph TD
    A["Shake Button"] --> B["Open Button"]
    B --> C["Reset Arrow"]
    C --> D["Unopen Button"]
natural_image
Technical line drawing of a mechanical component with threaded base and side view (no text or symbols)Español
ASPIRADOR ESCOBA ICONIC DIGITAL ADVANCE
DESCRIPCIÓN
A Accesorios:
A1 Lance and multiuse brush
A2 Extralong lance
B Extension tube
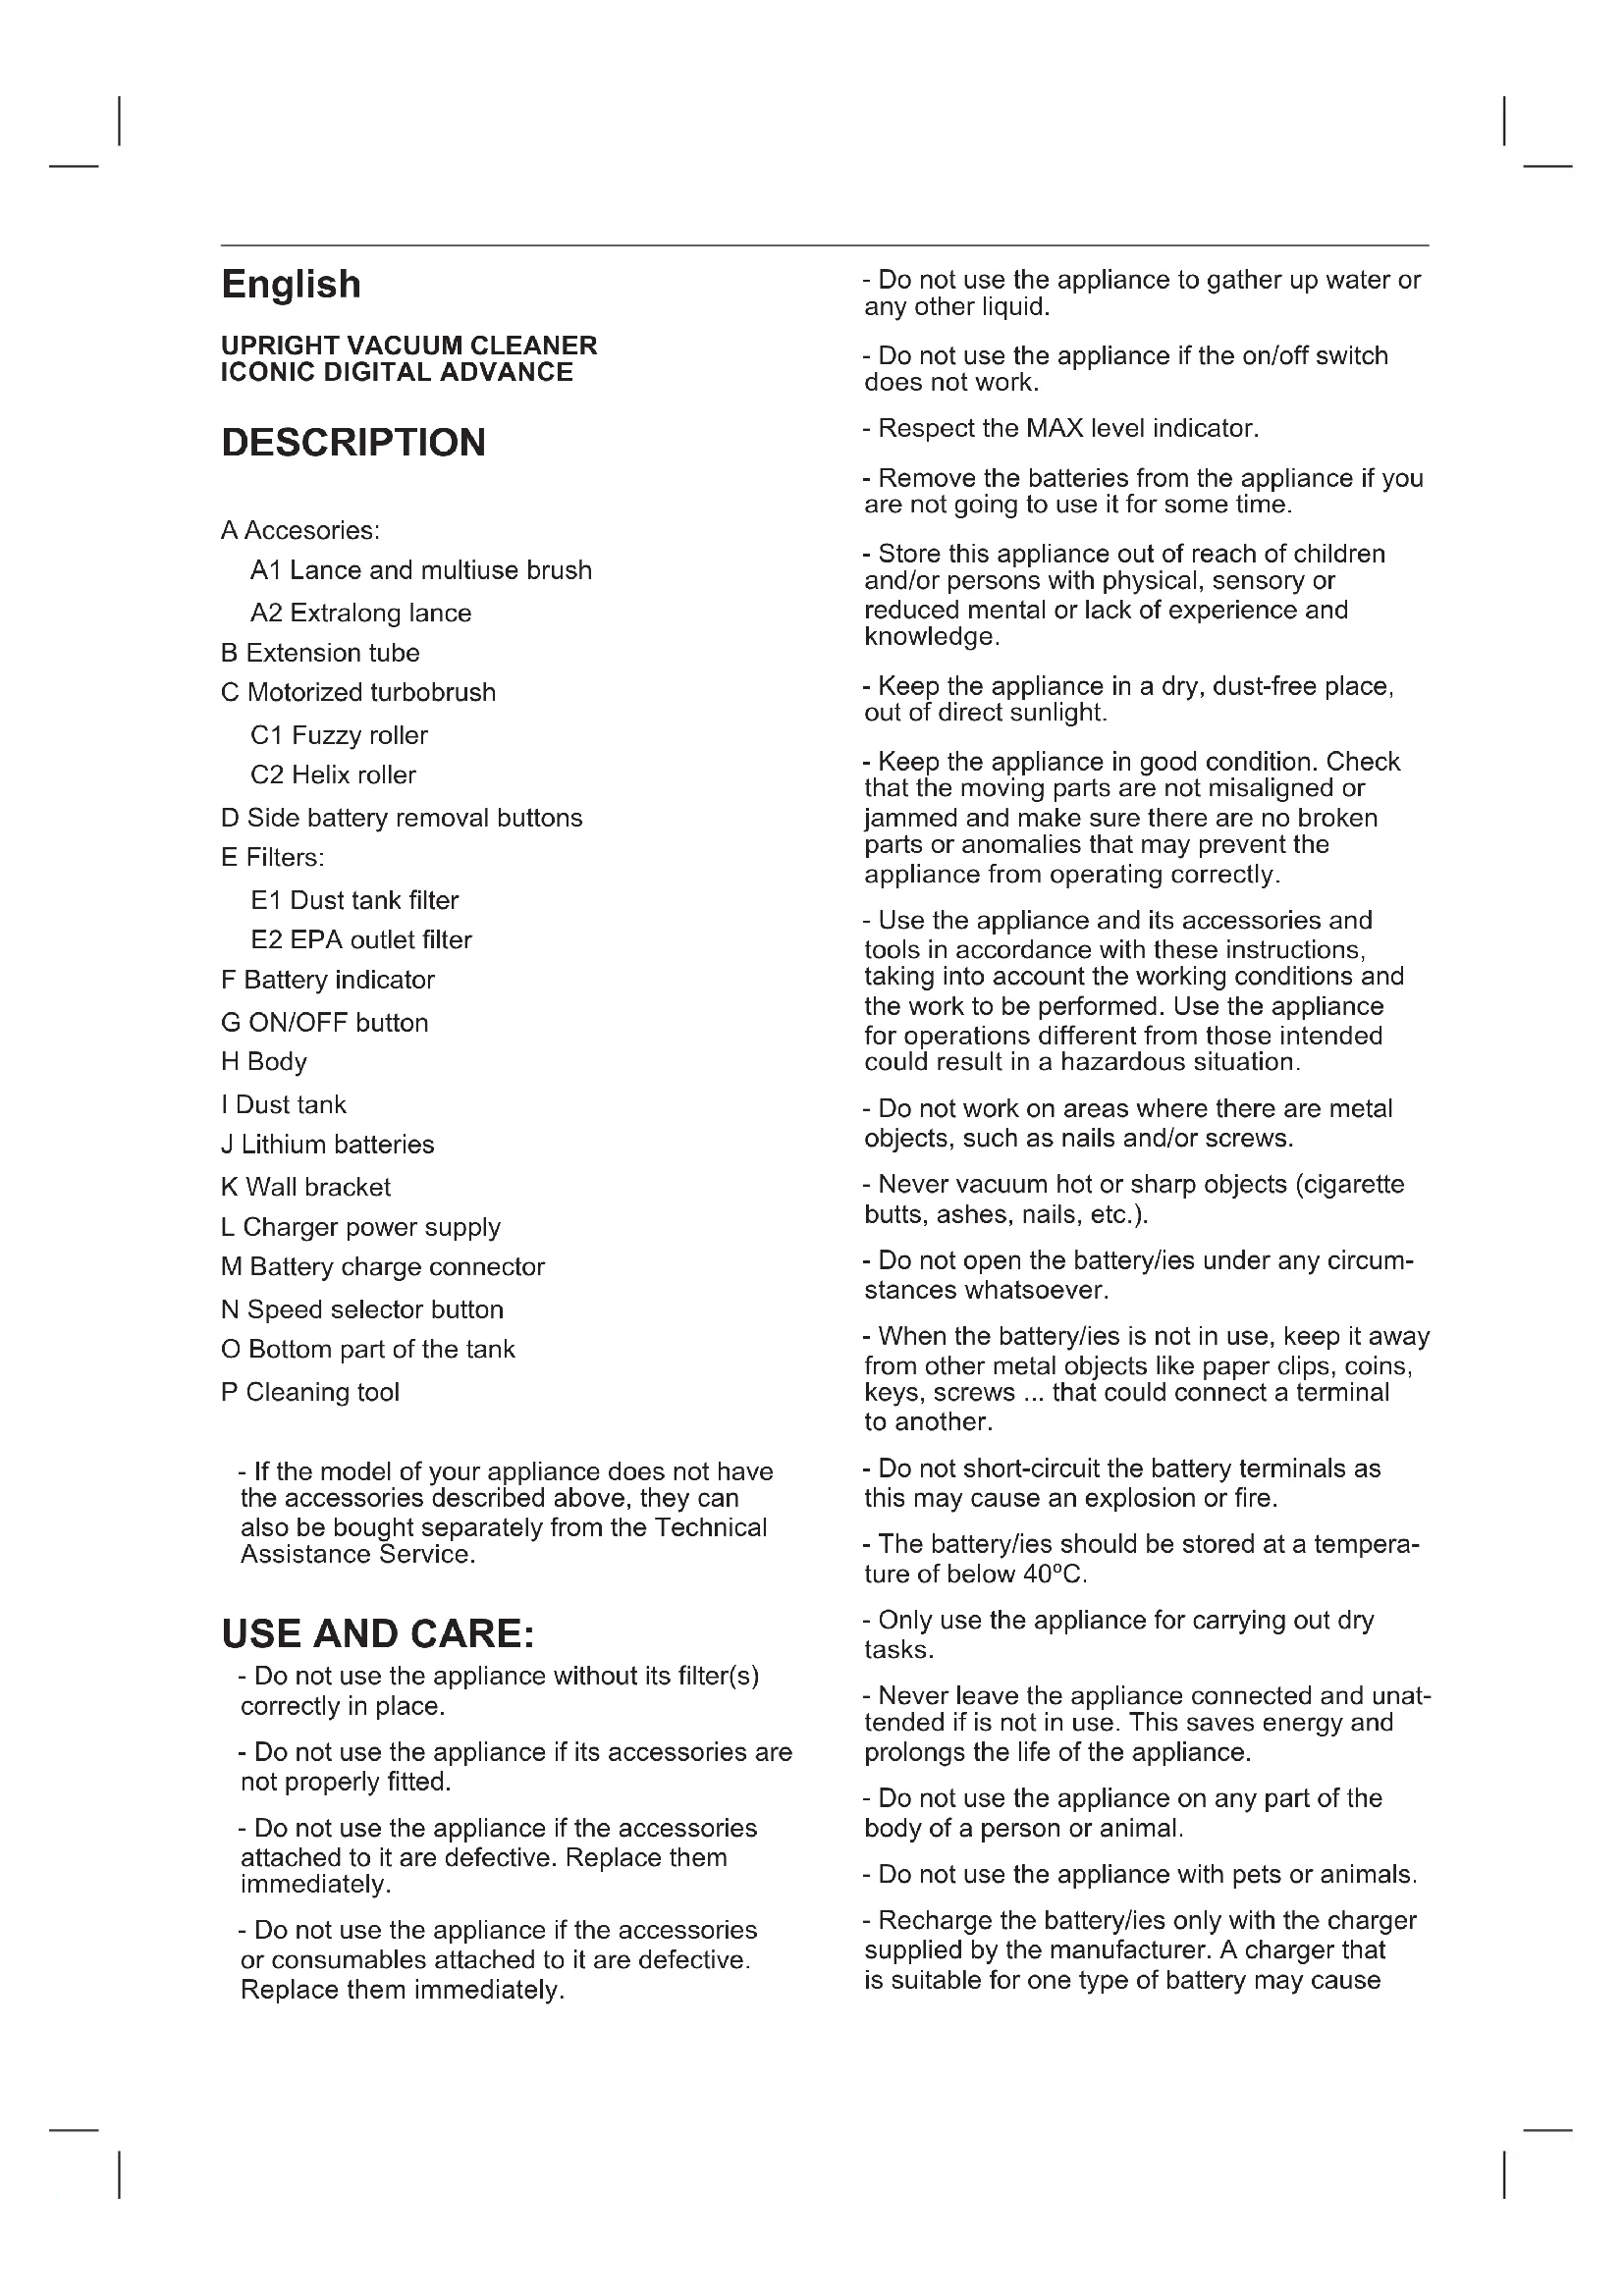
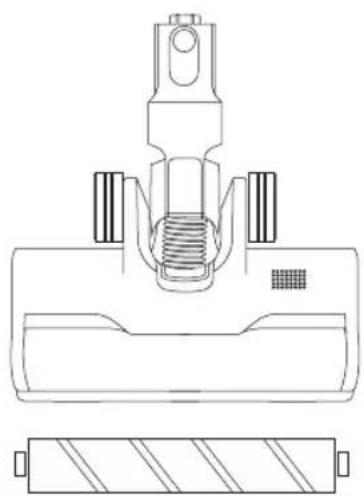
C Motorized turbobrush
C1 Fuzzy roller
C2 Helix roller
D Side battery removal buttons
E Filters:
E1 Dust tank filter
E2 EPA outlet filter
F Battery indicator
G ON/OFF button
H Body
I Dust tank
J Lithium batteries
K Wall bracket
L Charger power supply
M Battery charge connector
N Speed selector button
O Bottom part of the tank
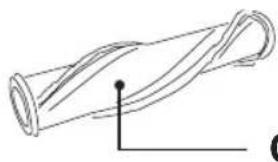
P Cleaning tool
- If the model of your appliance does not have the accessories described above, they can also be bought separately from the Technical Assistance Service.
USE AND CARE:
- Do not use the appliance without its filter(s) correctly in place.
- Do not use the appliance if its accessories are not properly fitted.
- Do not use the appliance if the accessories attached to it are defective. Replace them immediately.
- Do not use the appliance if the accessories or consumables attached to it are defective. Replace them immediately.
- Do not use the appliance to gather up water or any other liquid.
- Do not use the appliance if the on/off switch does not work.
- Respect the MAX level indicator.
- Remove the batteries from the appliance if you are not going to use it for some time.
- Store this appliance out of reach of children and/or persons with physical, sensory or reduced mental or lack of experience and knowledge.
- Keep the appliance in a dry, dust-free place, out of direct sunlight.
- Keep the appliance in good condition. Check that the moving parts are not misaligned or jammed and make sure there are no broken parts or anomalies that may prevent the appliance from operating correctly.
- Use the appliance and its accessories and tools in accordance with these instructions, taking into account the working conditions and the work to be performed. Use the appliance for operations different from those intended could result in a hazardous situation.
- Do not work on areas where there are metal objects, such as nails and/or screws.
- Never vacuum hot or sharp objects (cigarette butts, ashes, nails, etc.).
- Do not open the battery/ies under any circumstances whatsoever.
- When the battery/ies is not in use, keep it away from other metal objects like paper clips, coins, keys, screws ... that could connect a terminal to another.
- Do not short-circuit the battery terminals as this may cause an explosion or fire.
- The battery/ies should be stored at a temperature of below 40^ C.
- Only use the appliance for carrying out dry tasks.
- Never leave the appliance connected and unattended if is not in use. This saves energy and prolongs the life of the appliance.
- Do not use the appliance on any part of the body of a person or animal.
- Do not use the appliance with pets or animals.
- Recharge the battery/ies only with the charger supplied by the manufacturer. A charger that is suitable for one type of battery may cause
explosion or fire hazard when used with other battery/ies.
- Use the device only with the battery/ies for which has been specifically designed. The use of any other battery/ies can cause an explosion or fire hazard.
INSTALLATION
- Be sure to remove all packaging material from inside the appliance.
ASSEMBLING THE WALL BRACKET:
- The appliance has a wall bracket (K) which must be fixed to the wall.
- Fix the wall bracket as you think appropriate, using plugs, screws, and adhesive...
- Place the support by matching the holes with the rawlplugs and screw in firmly.
- Make sure that the bracket is firmly fixed; it should be able to support twice the weight of the appliance.
- Fit the appliance into the wall support.
CHARGING THE BATTERY
- Caution: A new battery is not fully charged and must therefore be charged before the appliance is used for the first time.
- Charge the battery at an atmospheric temperature of between 4 and 40°C.
- Plug the charger into the mains.
- A pilot light will come on to indicate that the charger is ready to begin charging the battery.
- Approximately 4 to 5 hours are needed for a complete charge of the battery. Never attempt to over-charge the battery (although it is recommended that the first charge of the battery be of 6 hours in duration).
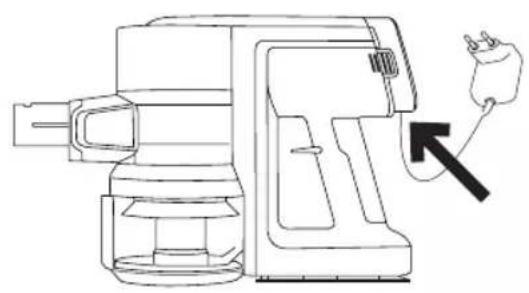
- Plug the charger of the vacuum cleaner (L) into the battery charging connector (M) of the appliance, located on the back of the appliance, under the battery. (Fig.1)
- NB: Do not use the appliance while it is connected to the charger.
HOW TO CHECK THE BATTERY'S CHARGE LEVEL:
- Start the appliance by pressing the start / stop button. (G)
-
If all five lights (F) light up it means a full charge level.
-
If only one pilot light lights up this means that the battery has very little power remaining.
- If no pilot light lights up, this means that the battery is completely flat.
- NB: For a long battery life, it is advisable to charge the battery, only, when it has run out completely.
ASSEMBLING THE BATTERY/S
- Caution: During the handling of batteries, do not touch both poles at the same time, as this will provoke the partial discharge of the stocked energy therefore affecting longevity.
- Put the battery in its compartment, respecting the polarity.
INSTRUCTIONS FOR USE
BEFORE USE:
- Make sure that product's packaging has been removed.
- Before using this product for the first time, it is important to make a full charge of batteries.
- Prepare the appliance according to the function you wish to use:
VACUUMING FUNCTION:
USE:
- Turn the appliance on, by using the on/off button.
- Select the desired speed by pressing the speed selector button (N), pressing once and twice according to the speed required at any time. (Fig.2)
FITTING AN ACCESSORY TO THE HAND VACUUM:
- The hand vacuum is designed in such a way that it allows the following accessories to be fitted: (use the combination that best meets your requirements). (Fig.3)
- Furniture brush: Equipped with a brush at the end, which brushes the surface as it is used.
- Crevice nozzle: Specially designed for getting into cracks and difficult corners.
ONCE YOU HAVE FINISHED USING THE APPLIANCE:
- Turn the appliance off using the on/off button.
- Remove the battery from the appliance if you are not intending to use the appliance during an extended period.
- Clean the appliance.
CLEANING
- Disconnect the battery charger from the mains and allow it to cool before undertaking any cleaning task.
- Clean the equipment with a damp cloth with a few drops of washing-up liquid and then dry.
- Do not use solvents, or products with an acid or base pH such as bleach, or abrasive products, for cleaning the appliance.
- Never submerge the appliance in water or any other liquid or place it under running water.
- Empty the dust box when it is full (observation facilitated by transparent windows), or when vacuuming power is notably reduced.
- Open the lid of the dust box and empty the contents into the appropriate waste disposal receptacle. (Fig.4)
- Close the lid of the dust box.
CHANGING THE FILTERS:
- Dust tank filter, it is advisable to be changed at least once a year or every 50 hours of the appliance's use.
- Air outlet HEPA filter (high efficiency air filter that efficiently retains spores, ash, sawdust, pollen...), it is advisable to change it a least once a year or after every 50 hours of use.
TO REMOVE THE FILTERS:
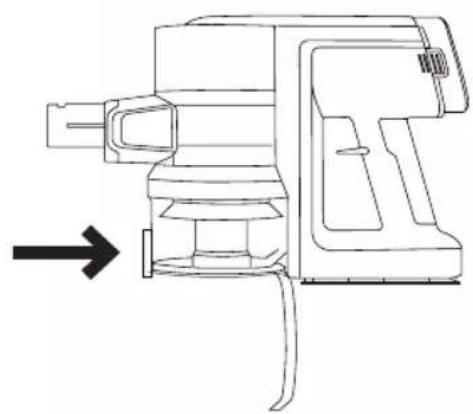
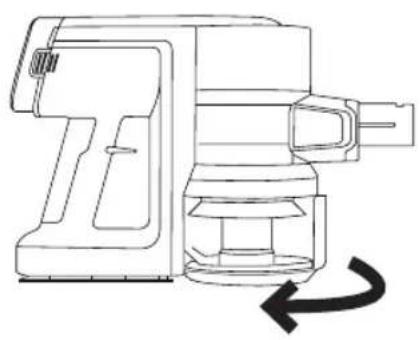
- Remove the filter from the tank, turning the bottom part of the tank (O) to the left and remove the cyclone from inside the tank by pulling it out. You can see that the filter is located inside the cyclone. (Fig.5)
- Remove the outlet EPA filter, open the cover by pressing the button to remove the outlet filter cover (M) (Fig.6).
- To assemble the filter, proceed in reverse order as explained in the previous section.
IMPORTANT: Filters washable with water, but they must be left to dry for at least 24 hours in the sun before using them again.
CLEANING THE ROTARY BRUSH (C1/C2):
- TO REMOVE THE BRUSH:
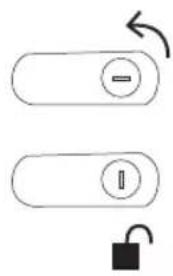
- TURN THE ROTATING BUTTON ON THE SIDE OF THE FITTING TO THE LEFT IN ORDER TO RELEASE THE BRUSH (FIG.7)
- TAKE OUT THE ROLLER AND CLEAN WITH THE CLEANING TOOL (P) INCLUDED IN THE PRODUCT.
- TO REASSEMBLE, FOLLOW THE ABOVE INSTRUCTIONS BUT IN REVERSE.
SUPPLIES:
- Supplies can be acquired from distributors and authorised establishments (such as filters, etc...) for your appliance model.
- Always use original supplies, designed specifically for your appliance model.
- These supplies are available in specialist shops.
HOW TO REMOVE THE BATTERIES FROM THE INTERIOR OF THE DEVICE:
- CAUTION: It is important that the batteries are fully discharged prior to its withdrawal from the apparatus.
- CAUTION: the appliance must be disconnected from the supply mains when removing the batteries.
TO REMOVE THE BATTERIES, ONCE THE LIFE OF THE APPLIANCE, PROCEED AS FOLLOWS:
- Safely remove the battery from its housing by pressing the two side buttons on the battery (D), located at the rear of the vacuum cleaner.
Français
ASPIRATEUR BALAI ICONIC DIGITAL ADVANCE
DESCRIPTION
A Accessoires
J Akumulatory litowe
W CELU USUNIĘCIA WAŁKÓW (C1/C2):
This product enjoys the recognition and protection of the legal guarantee in accordance with current legislation. To enforce your rights or interests you must go to any of our official technical assistance services.
You can find the closest one by accessing the following web link: http://taurus-home.com/
You can also request related information by contacting us.
You can download this instruction manual and its updates at http://taurus-home.com/
Français
GARANTIE ET ASSISTANCE TECHNIQUE
COUNTRY ADDRESS PHONE
| Algeria Zone d'Activite, N° 62, Constantine 213770777756 | ||
| Argentina Av. del Libertador 1298,(B1638BEY), Vicente López (Pcia. Buenos Aires) | 541153685223 | |
| Belgium Mariëndonkstraat 5, 5154 EG, Elshout 31620401500 | ||
| Benin 359 Av. Steinmetz, 1930, Cotonou 0299-21313798 | ||
| Bulgaria | 265,Okolovrasten Pat, Mladost 4, 1766, Sofia | 35929211120 / 35929211193 |
| Burkina Faso Avenue Bassawarga, 01 BP915, Ouagadougou 226 25301038 | ||
| Congo (Republic of) 98 Blvd General Charles de Gaulle, Pointe Noire 242066776656 | ||
| Cyprus | 20, Bethlehem Str. / P.O.Box 20430, 2033, Strovolos | 35722711300 |
| Czech Republic | Milady Horakove 357/4, 568 02, Svitavy | 420 461 540 130 |
| Democratic Republic of the Congo | AV. Pont Canale N° 3440, Kinshasa | 00243-991223232 |
| Equatorial Guinea | SN Av Patricio Lumumba y C/ Jesus B, Bata | 00240 333 082958 / 00240 333 082453 |
| Equatorial Guinea | Calle de las Naciones Unidas, PO box 762, Malabo | 240333082958 / 240333082453 |
| España Avda Barcelona, S/N, 25790 Oliana (Lleida) atencioncliente@taurus.es | 902 118 050 | |
| Ethiopia Lideta Sub City Kebele 10 H.NO 124, Addis Ababa | +251 11 5518300 | |
| France | Za les bas musats 18, 89100, Malay-le-Grand | 03 86 83 90 90 |
| Gabon | BP 574, Port-Gentil Centre-ville | 24101552689 / 24101560698 |
| Ghana | Ederick Place, Accra-Ghana | 302682448 / 302682404 |
| Gibraltar 11 Horse Barrack Lane, 54000, Gibraltar 00350 200 75397 / 00350 200 | ||
| 41023 | ||
| Greece Sapfous 7-9, 10553, Athens +30 21 0373 7000 | ||
| Guinea BP 206, GN, Conakry (224) 622204545 | ||
| Hong Kong Unit H,13/F., World Tech Centre, Hong kong (852) 2448 0116 / 9197 3519 | ||
| Hungary Késmárk utca 11-13, 1158, Budapest +36 1 370 4519 | ||
| India C-175, Sector-63, Noida, Gautam Budh Nagar - 201301, Delhi | (+91) 120 4016200 | |
| Ivory Coast 01 Rue Des Carrossiers-Zone 3, B.P 3747, Abidjan 01 (RCI) | 22521251820 / 225 21 353494 | |
| Jordan 28 Basman St Down town, Amman +962 6 46 222 68 | ||
| Kuwait | P.O. BOX 3379 hawally, 32034, Hawally | +965 2200 1010 |
| Lebanon Damascus Highway; Sciale Building, Jamhour | 9615922963 | |
| Luxembourg | Mariëndonkstraat 5, 5154 EG, Elshout 31620401500 | |
| Mali | BP E2900, Dravela Bolibana | 223227216 / 223227259 |
| Marruecos | Big distribution society 4 Rue 13 Lot. Smara Oulfa, Casablanca | (+212) 522 89 40 21 |
| Mauritania | 134 Avenue Gamal Abdener Ilot D, Nouakchott | 2225254469 / 2225251258 |
| Mexico Rosas Moreno N° 4-203 Colonia de San Rafael C.P. 06470 – Delegación Cuauhtémoc, Ciudad de México | (+52) 55 55468162 | |
| Montenegro | Rastovac bb, 81400, Niksic | +382 40 217 055 |
| Netherlands | Mariëndonkstraat 5, 5154 EG, Elshout 31620401500 | |
| Nigeria 8, Isaac; John Str,G.R.A Ikeja Lagos | 23408023360099 | |
| Paraguay | Denis Roa 155 c/ Guido Spano, Asunción | 21665100 |
| Peru | Calle los Negocios 428, Surquillo, Lima | (511) 421 6047 |
| Portugal Avenida Rainha D. Amélia, n°12-B, 1600-677, Lisboa | +351 210966324 | |
| Romania | Dudesti Pantelimon 23, 410554, Bucharest | 031.805.49.58 |
| Serbia | Rastovac bb, 81400, Niksic | +382 40 217 055 |
| Slovakia Milady Horakove 357/4, 568 02, Svitavy | 420 461 540 130 | |
| Southafrica | Unit 25 & 26, San Croy Office Park, Die Agora Road, Croydon, Kempton Park, 1619, Johannesburg | (+27) 011 392 5652 |
| Tunisia | 2, Rue de Turquie, Tunis | 21671333066 |
| Ukraine | Block 6, Ap Housing Estate Topol-2, B, 49000, Dnepropetrovsk | 380563704161 / 380563704161 |
| United Arab Emirates | P.O.BOX 8543, Dubai | 14506246200 |
| Uruguay | Luis Alberto de Herrera 3468, 11600, Montevideo | 598 2209 28 00 |
| Vietnam Lot 7 Ind. Zone for, Ha Noi | 84437658111 / 84437658110 | |


- Español
- ASPIRADOR ESCOBA ICONIC DIGITAL ADVANCE
- DESCRIPCIÓN
- USE AND CARE:
- INSTALLATION
- ASSEMBLING THE WALL BRACKET:
- CHARGING THE BATTERY
- HOW TO CHECK THE BATTERY'S CHARGE LEVEL:
- ASSEMBLING THE BATTERY/S
- INSTRUCTIONS FOR USE
- BEFORE USE:
- VACUUMING FUNCTION:
- USE:
- FITTING AN ACCESSORY TO THE HAND VACUUM:
- ONCE YOU HAVE FINISHED USING THE APPLIANCE:
- CLEANING
- CHANGING THE FILTERS:
- TO REMOVE THE FILTERS:
- CLEANING THE ROTARY BRUSH (C1/C2):
- - TO REMOVE THE BRUSH:
- - TURN THE ROTATING BUTTON ON THE SIDE OF THE FITTING TO THE LEFT IN ORDER TO RELEASE THE BRUSH (FIG.7)
- - TAKE OUT THE ROLLER AND CLEAN WITH THE CLEANING TOOL (P) INCLUDED IN THE PRODUCT.
- - TO REASSEMBLE, FOLLOW THE ABOVE INSTRUCTIONS BUT IN REVERSE.
- SUPPLIES:
- HOW TO REMOVE THE BATTERIES FROM THE INTERIOR OF THE DEVICE:
- TO REMOVE THE BATTERIES, ONCE THE LIFE OF THE APPLIANCE, PROCEED AS FOLLOWS:
- Français
- ASPIRATEUR BALAI ICONIC DIGITAL ADVANCE
- DESCRIPTION
- W CELU USUNIĘCIA WAŁKÓW (C1/C2):
- GARANTIE ET ASSISTANCE TECHNIQUE
Brand : TAURUS
Model : Iconic Digital Advance
Category : Vacuum Cleaner