
Retro Rocker - Loudspeaker ION - Free user manual and instructions
Find the device manual for free Retro Rocker ION in PDF.

| Product Type | Retro portable speaker with cassette player, radio, Bluetooth, USB/SD |
| Brand and Model | ION Retro Rocker |
| Dimensions (approx.) | 300 x 200 x 250 mm |
| Weight (approx.) | 3 kg |
| Power Supply | AC adapter (included) or 4 D alkaline batteries (not included) |
| Power Output | 20 W RMS |
| Audio Sources | Cassette, Radio (AM/FM/SW1/SW2), Bluetooth, USB, Micro SD, Auxiliary (3.5 mm) |
| Recording | To cassette, USB or SD from radio, internal microphone, Bluetooth, or auxiliary input |
| USB/SD Playback | Files played in alphabetical order, compatible formats MP3/WMA (not specified) |
| Bluetooth | Version 4.0, range 10 meters, simple pairing |
| Radio | AM, FM, shortwave (SW1, SW2) with telescopic antenna |
| Cassette | Play, record, fast forward, rewind, pause, stop |
| Sound Settings | Master volume, Tone (bass/treble) |
| Headphone Output | 3.5 mm jack, disables internal speakers |
| Auxiliary Input | 3.5 mm jack for external source |
| Maintenance and Cleaning | Clean the heads, pinch roller, and capstan every 10-20 hours with isopropyl alcohol |
| Precautions | Avoid moisture, shocks, sun exposure; store cassettes in a dry place |
| Spare Parts / Repairability | Contact ION support for assistance |
| Warranty | Limited warranty, see provided safety instructions |
Frequently Asked Questions - Retro Rocker ION
User questions about Retro Rocker ION
0 question about this device. Answer the ones you know or ask your own.
Ask a new question about this device
Download the instructions for your Loudspeaker in PDF format for free! Find your manual Retro Rocker - ION and take your electronic device back in hand. On this page are published all the documents necessary for the use of your device. Retro Rocker by ION.
USER MANUAL Retro Rocker ION
Thank you for purchasing the Retro Rocker. At ION, your entertainment is as important to us as it is to you. That's why we design our products with one thing in mind—to make your life more fun and more convenient.
Box Contents
Retro Rocker
Power Cable
Quickstart Guide
Safety & Warranty Manual
Support
For the latest information about this product (documentation, technical specifications, system requirements, compatibility information, etc.) and product registration, visit ionaudio.com.
For additional product support, visit ionaudio.com/support.
Setup
Items not listed under Introduction > Box Contents are sold separately.
Features
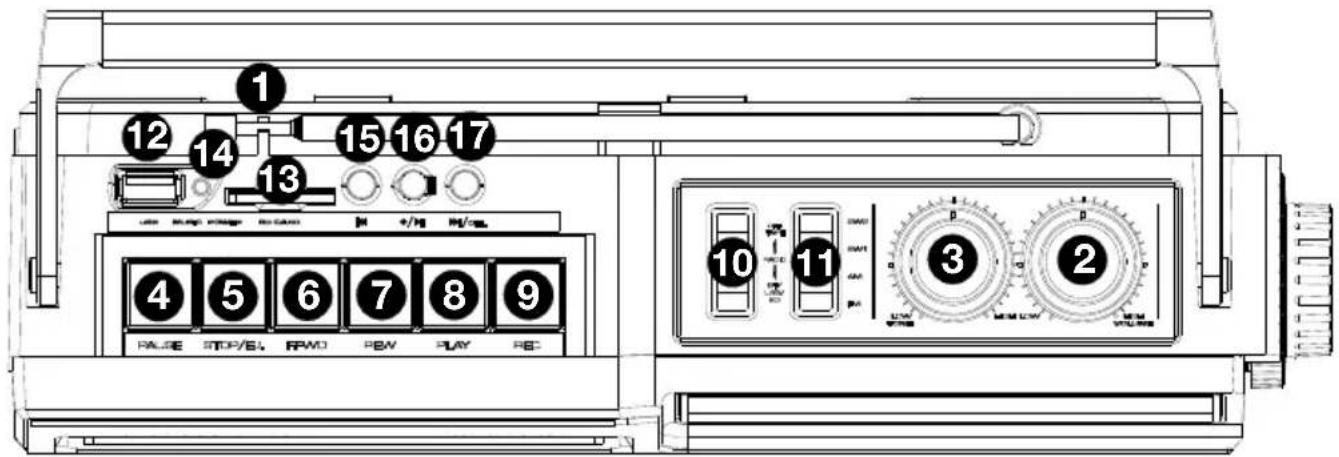
Front Panel
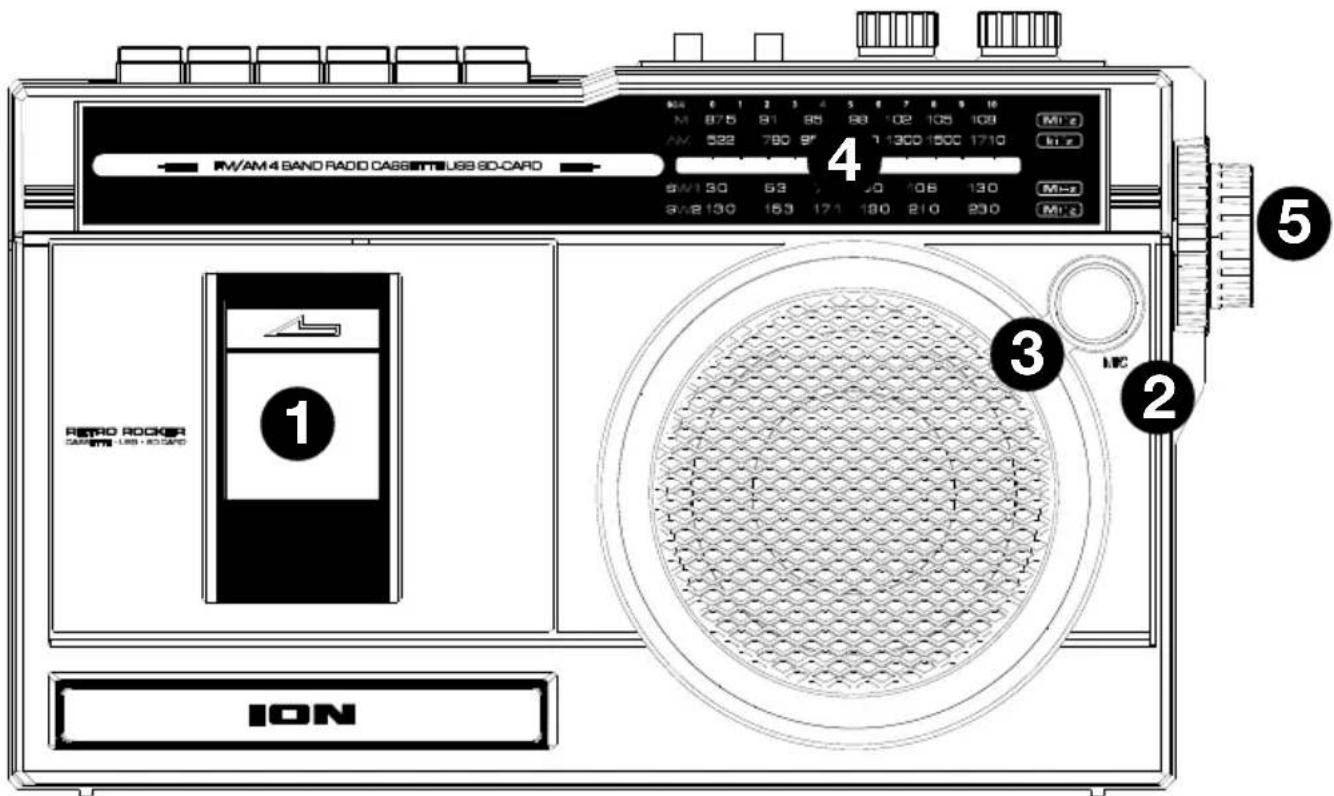
- Cassette Holder: Press the Stop/Eject button to open the cassette deck and insert a tape here.
- Internal Mic: Use this microphone to record external audio sources such as speech, live music, nature sounds, beatboxing, etc. to USB, SD, and cassette.
- Speaker: Listen to your audio source here.
Note: When headphones are connected to the Headphone Output, the internal speakers will be muted.
- Radio Channel Display: View the selected radio station here.
- Tuning Dial: Adjust this dial to tune in to a radio station.
Side Panel
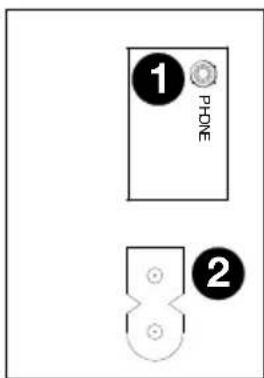
- Headphone Output: Connect your headphones to this 1/8" (3.5 mm) output. When using headphones, the internal speakers will be muted.
Note: When headphones are connected to the Headphone Output, the internal speakers will be muted.
- 2-Prong IEC Power Input: Connect the included power cable here.
Top Panel
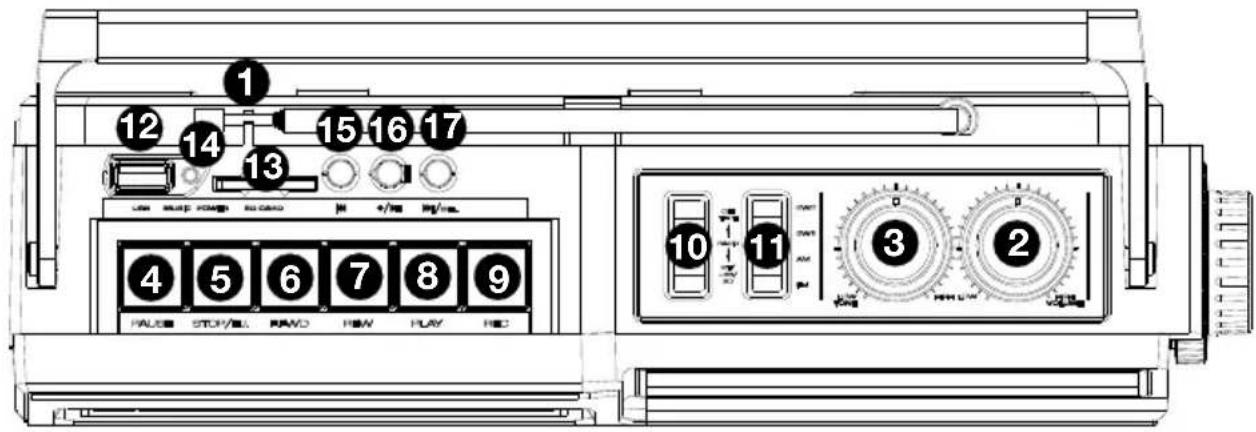
- Antenna: Adjust the antenna to get the best radio station reception.
- Volume: Adjust this to control the overall playback volume.
- Tone: Turn this knob to left of the center position to increase the bass frequencies. Turn this knob to right of the center position to increase the high frequencies.
- Pause: In Tape mode, press this button to pause the tape playback.
- Stop/Eject: In Tape mode, press this button to stop or eject a tape.
- Fast Forward: In Tape mode, press this button to fast forward the tape.
Note: The cassette mechanism will not auto-stop when fast forwarding. Press the Stop button after fast forwarding is completed.
- Rewind: In Tape mode, press this button to rewind the tape.
Note: The cassette mechanism will not auto-stop when rewinding. Press the Stop button after rewinding is completed. - Play: In Tape mode, press this button to play the tape.
Note: There will be a delay in playback for a few seconds after the Play button is pressed. - Record: In Tape mode, press the Record button to record to a tape.
- Mode: Adjust this switch to change the mode from Tape, Radio, and BT (Bluetooth)/USB/SD.
- Band: Adjust this switch to select AM, FM, SW1, or SW2.
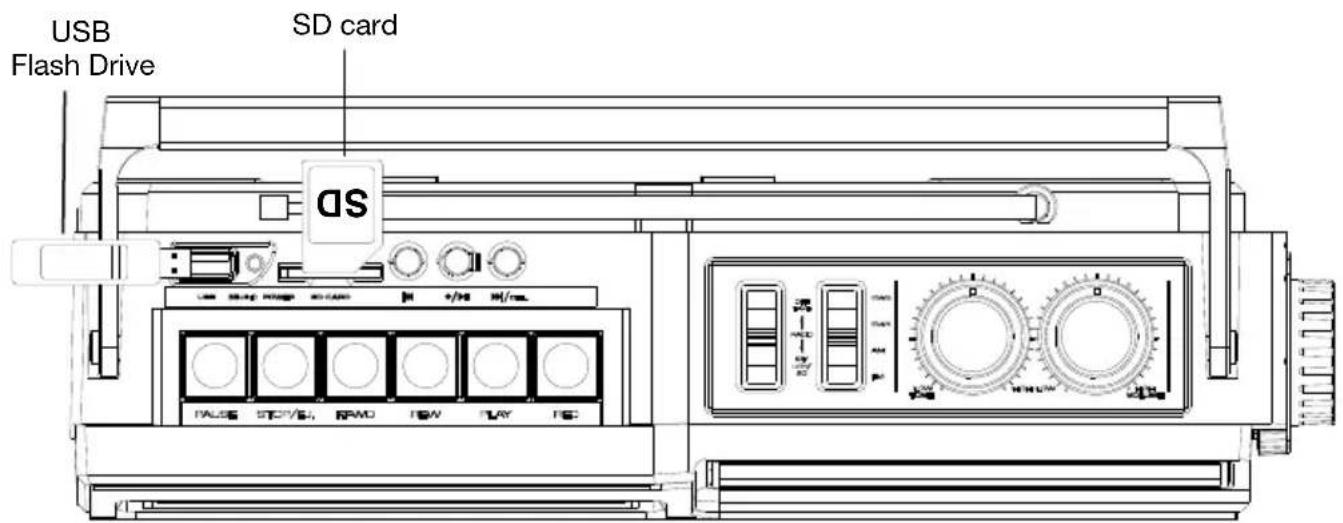
- USB Port: Connect your USB flash drive here to play music or record the audio from a tape, radio, or the internal microphone.
- SD Card Slot: Insert your SD card here to play music or record audio from a tape, radio, or the internal microphone.
- LED: The LED will illuminate solid blue when an SD card or USB flash drive is connected. The LED will flash blue when USB media is playing. The LED will be lit solid blue during Bluetooth playback.
- Previous Track: Press this button to go to the previous track.
- Record/Play/Pause: Press this button to play/pause a USB or SD card track. Press and hold this button to record the radio, tape, or internal mic source to a USB flash drive or SD card.
- Next Track/Delete Track: Press this button to go to the next track. Press and hold the Next Track button to delete the current USB or SD track.
Rear Panel
- Battery Compartment: Insert 4 new "D" size alkaline batteries (not included) to power the unit when not using AC power.
Operation
Recording
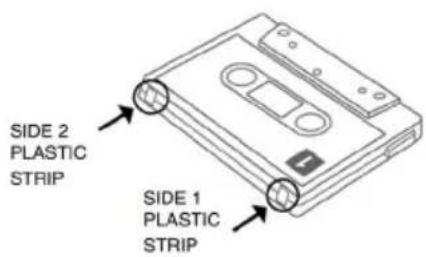
Note: Most cassettes feature a protective plastic strip which, when removed, will not allow any recording to be made to the cassette. When the plastic strip has been removed, the Retro Rocker's Record button will not function when attempting to record to the cassette. To record to a cassette which no longer has a plastic strip, use adhesive tape to cover the strip opening.
Recording from the Radio to Tape:
- Press Stop/Eject to open the cassette holder.
- Insert a blank tape and close the cassette holder.
- Set the Function switch to Radio.
- Set the Band switch to desired frequency band (AM, FM, SW1, or SW2).
- Adjust the Tune dial to select a radio station.
- Extend and adjust the antenna for best reception.
- Press the Record button to start recording.
- To stop recording, press Stop/Eject button.
Recording from the Internal Microphone to Tape:
- Press Stop/Eject to open the cassette holder.
- Insert a blank tape and close the cassette holder.
- Set the Function switch to Tape.
- Press the Record button to start recording.
- To stop recording, press Stop/Eject button.
Recording from Bluetooth to Tape:
- Set the Function switch to BT/USB/SD.
- Turn on your Bluetooth device. See the section Pairing a Bluetooth Device for setup details.
- Play your Bluetooth track.
- Press the cassette Record button to record to tape.
Recording from the Internal Microphone to a USB Flash Drive or SD Card:
- Insert a USB flash drive or SD card into the unit.
- Set the Function switch to USB.
- Press and hold the Record/Play/Pause button to start recording and speak into the internal microphone.
- Press and hold the Record/Play/Pause button to stop recording. The recorded audio will then playback automatically.
Recording from the Radio to a USB Flash Drive or SD Card:
- Insert the USB flash drive into the USB port or insert an SD card into the SD card slot.
Note: Only use either a USB flash drive or an SD card at a time, but not both when recording. The unit may not record properly if both a USB and an SD card is plugged in at the same time. - Set the Function switch to Radio.
- Set the Band switch to desired frequency band (AM, FM, SW1, or SW2).
- Adjust the Tune dial to select a radio station.
- Extend and adjust the antenna for best reception.
- To start recording, press and hold the Record/Play/Pause button.
- To stop recording, press and hold the Record/Play/Pause button.
Recording from Tape to a USB Flash Drive or SD Card:
- Press the Stop/Eject button to open the cassette holder.
- Insert a tape and close the cassette holder.
- Insert the USB flash drive into the USB port or insert an SD card into the SD card slot.
Note: Only use either a USB flash drive or an SD card at a time, but not both when recording. The unit may not record properly if both a USB and an SD card is plugged in at the same time. - Set the Function switch to Tape and press Play to playback the tape.
- To start recording, press and hold the Record/Play/Pause button. The LED will flash blue.
- To stop recording, press and hold the Record/Play/Pause button.
Playback
Playing a Tape:
- Press the Stop/Eject button to open the cassette holder.
- Insert a tape and close the cassette holder.
- Press the Play button to play the tape.
IMPORTANT! After extensive usage, tape heads can acquire oxide build-up, especially if the cassettes are old. To ensure best performance, use a tape head cleaner periodically.
USB Flash Drive Playback:
Note: If both a USB flash drive and SD card are inserted, the unit will default to using the USB flash drive.
Note: In USB mode, files are played in alphabetical order from what is on the root level, then alphabetical by folder, and then alphabetical by track name.
- Connect the USB flash drive to the USB port.
- Set the Function switch to USB.
- To skip a track, press and release the Next Track button.
- To fast forward a track, press and hold the Next Track button.
- To go to the previous track, press and release the Previous Track button.
- To rewind a track, press and hold the Previous Track button.
SD Card Playback:
Note: If both a USB flash drive and SD card are inserted, the unit will default to using the USB flash drive.
Note: In SD mode, files are played in alphabetical order from what is on the root level, then alphabetical by folder, and then alphabetical by track name.
- Insert the SD card into the SD card slot.
- Set the Function switch to USB.
- To skip a track, press and release the Next Track button.
- To fast forward a track, press and hold the Next Track button.
- To go to the previous track, press and release the Previous Track button.
- To rewind a track, press and hold the Previous Track button.
Listening to the Radio:
- Set the Function switch to Radio.
- Select the desired frequency band (AM, FM, SW1, or SW2).
- Select the desired radio station by turning the Tuning dial.
- Extend and adjust the antenna for best reception.
- Adjust the volume to the desired level.
Radio Reception:
For best radio reception and to avoid interference, follow these tips:
- Move Retro Rocker away from sources that can cause radio frequency interference, such as laptop power supplies, flat screen TVs, electric blankets, external hard drives, light dimmers, walls, and windows.
• Try listening to the radio at a park or other open outdoor space, away from tall buildings.
• Power Retro Rocker with quality, new alkaline batteries instead of a power cable. - For shortwave radio, in general, lower frequencies (SW1 set below 9 MHz) are better received at night and for a few hours surrounding dawn and dusk, and higher frequencies (SW2 at 13 MHz and up) are better received during the day.
Cassette Care
To avoid tape jamming, tape tangling, or playback issues, please follow these tips:
-
Check that there are no loose layers of tape visible through the cassette center window. If there are, manually wind up loose tape using a pencil or hexagonal barrelled ballpoint pen.
Note: If the cassette feels tight when manually winding, the tape may be jamming from ridges formed in the winding of the tape (visible through the center window). These may be removed, in most cases, by fast forwarding the cassette to the end, and then rewinding it to the beginning. -
When recording, use new high-quality, brand name tapes.
- Do not expose cassettes to direct sunlight, fluorescent lights, dust, or oils.
• Do not touch the surface of the tape.
• Before storing tapes, rewind or fast forward them to the end of a side. - Store tapes in a dry, temperate environment.
Tape Head Cleaning
For continued high performance from Retro Rocker, periodically clean the head, pinch roller, and capstan every 10-20 hours of operation.
To clean the tape deck:
- Power off Retro Rocker.
- Press the Stop/Eject button to open the cassette holder.
- Remove any tape in the deck.
- Moisten a new cotton swab with isopropyl alcohol (70-80%).
- Carefully rub the face of each head, pinch roller, and capstan with the moistened cotton swab.
- Let the cassette holder dry for 5-10 minutes before putting a tape back in it.
Pairing a Bluetooth Device
- Adjust the Function switch on Retro Rocker to the BT/USB/SD position.
Note: If an SD card and/or a USB flash drive is inserted, remove these in order to pair to a Bluetooth device. - Turn on your Bluetooth device.
- Navigate to your Bluetooth device's setup screen, find Retro Rocker and connect. A voice prompt will be heard saying "Bluetooth pairing" when pairing and "Bluetooth connected" when connected to your Bluetooth device.
Note: If your Bluetooth device prompts for a pairing code, enter "0000". - Press and hold the Play/Pause button to disconnect from a paired Bluetooth device. A voice prompt will be heard saying "Bluetooth disconnected" when disconnected from the Bluetooth device.
Troubleshooting
If the sound is distorted: Try lowering the volume control of your sound source. Also, try to reduce the overall volume of Retro Rocker using the Volume knob.
If there is too much bass: Try adjusting the tone or EQ control on your sound source to lower the bass level. This will allow you to play the music louder before clipping (distortion) occurs.
If there is poor AM reception: When you have a Bluetooth device that is connected, disconnect your Bluetooth device in order to listen to AM radio. To adjust AM reception, move the entire unit.
If you cannot connect your audio device to Retro Rocker via Bluetooth:
- Have your audio device (e.g., smartphone or tablet) and Retro Rocker as close together as possible while trying to connect. Make sure both the audio device and Retro Rocker are unobstructed by walls, furniture, etc.
- Reset the Bluetooth connection on Retro Rocker to disconnect Retro Rocker from any other audio device and restart the search process. If this does not work right away, power off Retro Rocker and then power it back on. See Pairing a Bluetooth Device for more information.
- Reset the Bluetooth connection on your audio device by turning Bluetooth off and back on. You can find this under the Bluetooth menu in the Settings for your phone or other audio device.
If this does not work, and you have connected to Retro Rocker before, find Retro Rocker in the list of available or previously connected devices in your audio device's Bluetooth menu, tap the "gear" or "i" icon located next to it and then select Unpair or Forget. Turn Retro Rocker off and back on and try pairing again once it reappears in your available devices list.
Note: If Retro Rocker has been paired to another audio device recently that is still within range, you may need to repeat this process with that audio device to fully disconnect.
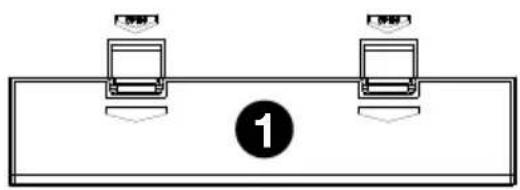
Panel superior
natural_image
Simple line drawing of two identical mechanical components mounted on a base plate, with a numbered circle at the bottom (no text or symbols)Fonctionnement
Enregistrement
Technical Specifications
| Output Power | 6 W (peak) |
| Frequency Response | 80 Hz–10 kHz |
| Driver | 4.0” (102 mm) full-range driver |
| Radio Frequency Range | 522–1710 kHz (AM), 87.5–108 MHz (FM)3.0–13.0 MHz (SW1), 13.0–23.0 MHz (SW2) |
| USB/SD Card File Types | .MP3, .WAV |
| USB/SD Card File System | FAT32 |
| USB/SD Card Maximum File Size | 32 GB |
| USB Charging Port | +5 V, 1 A |
| Power | 4 “D” alkaline batteries or power cableConnection: mini-IECInput Voltage: 120 VAC, 60 HzConsumption: 3 W |
| Dimensions(width x depth x height) | 12.0” x 4.1” x 7.5” / 305 x 105 x 190 mm |
| Weight | 4.0 lbs. / 1.8 kg |
Specifications are subject to change without notice. Bluetooth and wireless reception and range are affected by walls, obstructions, and movement. For optimal performance, place the product in the center of the room so it is unobstructed by walls, furniture, etc. Battery life may vary based on temperature, age, and volume usage of product.
Trademarks & Licenses
ION Audio is a trademark of inMusic Brands, Inc., registered in the U.S. and other countries. The Bluetooth word mark and logos are owned by the Bluetooth SIG, Inc. and any use of such marks by ION Audio is under license. All other product names, company names, trademarks, or trade names are those of their respective owners.
ionaudio.com
- Box Contents
- Support
- Setup
- Features
- Front Panel
- Side Panel
- Top Panel
- Rear Panel
- Operation
- Recording
- Recording from the Radio to Tape:
- Recording from the Internal Microphone to Tape:
- Recording from Bluetooth to Tape:
- Recording from the Internal Microphone to a USB Flash Drive or SD Card:
- Recording from the Radio to a USB Flash Drive or SD Card:
- Recording from Tape to a USB Flash Drive or SD Card:
- Playback
- Playing a Tape:
- USB Flash Drive Playback:
- SD Card Playback:
- Listening to the Radio:
- Radio Reception:
- Cassette Care
- Tape Head Cleaning
- To clean the tape deck:
- Pairing a Bluetooth Device
- Troubleshooting
- If you cannot connect your audio device to Retro Rocker via Bluetooth:
- Panel superior
- Fonctionnement
- Enregistrement
- Trademarks & Licenses
Brand : ION
Model : Retro Rocker
Category : Loudspeaker