
Stir Crazy 82306Q - Popcorn machine WestBend - Free user manual and instructions
Find the device manual for free Stir Crazy 82306Q WestBend in PDF.
| Product type | Electric popcorn machine with stirrer |
| Brand | WestBend |
| Model | Stir Crazy 82306Q |
| Capacity | 6 quarts or 8 quarts of popped popcorn (depending on model) |
| Power | 120 V~, 60 Hz, short detachable cord |
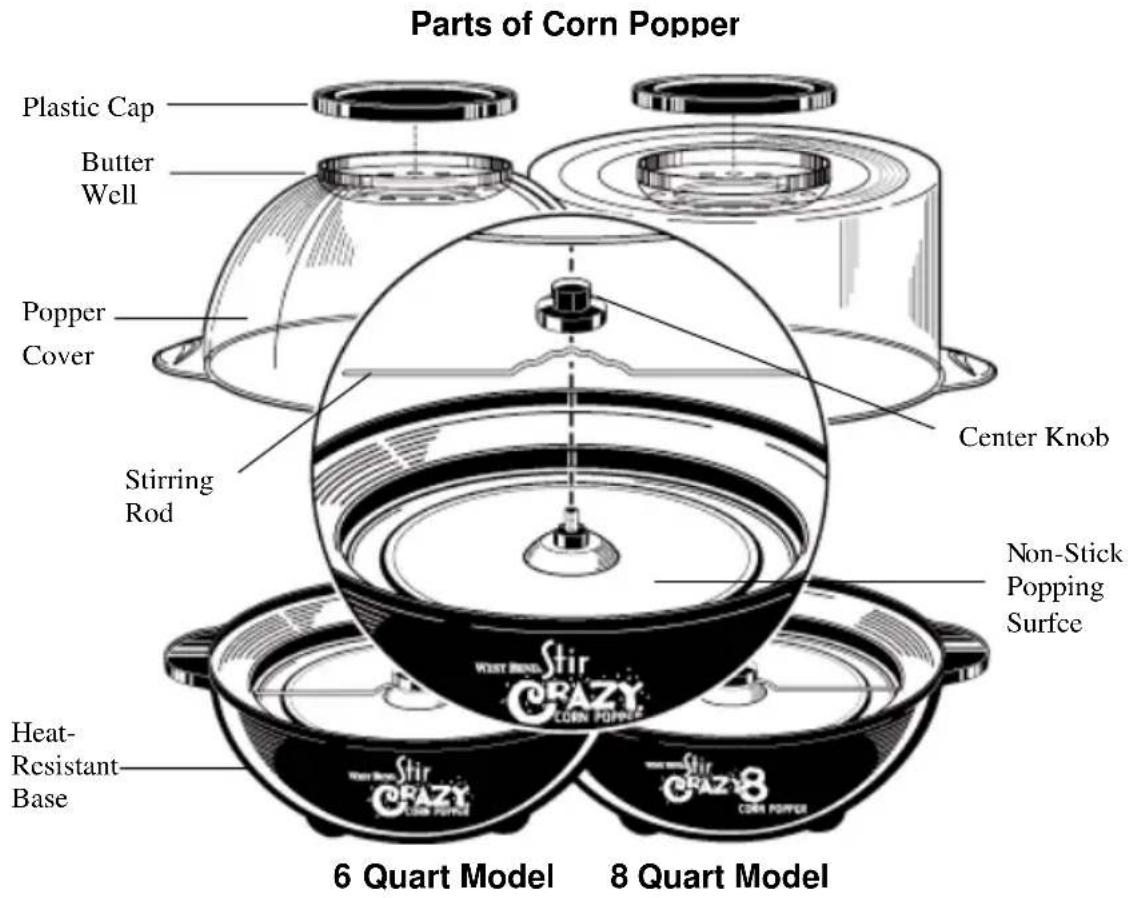
| Non-stick coating | Non-stick popping surface on the base |
| Stirrer | Removable stirrer with center knob to stir the corn |
| Butter compartment | Portion butter capacity with holes to drizzle corn during popping |
| Butter cap | Removable plastic cap to snap on after popping |
| Handles | Rectangular and round handles on lid and base |
| Fireproof base | Heat-resistant base for table use |
| Lid material | Plastic (dishwasher safe? No, hand wash recommended) |
| Cleaning | Hand wash, not dishwasher safe; soft sponge, no abrasive cleaner |
| Safety | Short anti-trip cord, manual shut-off (does not stop automatically) |
| Warranty | 1-year limited (parts and labor), valid in USA and Canada |
| Country of origin | Made in China (not explicitly stated but typical) |
| Included accessories | Lid, base, stirrer, butter cap, cord |
| Recommended use | Indoor household use only |
Frequently Asked Questions - Stir Crazy 82306Q WestBend
User questions about Stir Crazy 82306Q WestBend
0 question about this device. Answer the ones you know or ask your own.
Ask a new question about this device
Download the instructions for your Popcorn machine in PDF format for free! Find your manual Stir Crazy 82306Q - WestBend and take your electronic device back in hand. On this page are published all the documents necessary for the use of your device. Stir Crazy 82306Q by WestBend.
USER MANUAL Stir Crazy 82306Q WestBend
natural_image
Line drawing of three corn power cookers with branding (no text or symbols on the cookers themselves)Register this and other Focus Electrics products through our website:
www.focuselectrics.com
Important Safeguards....2
Heat Precautions....2
Electricity Precautions 3
Precautions For Use Around Children 4
Before Using The First Time .... 4
Using Your Stir Crazy ^® Corn Popper....5
Recipes 6
Cleaning the Corn Popper....7
Warranty....8
SAVE THIS INSTRUCTION MANUAL FOR FUTURE REFERENCE
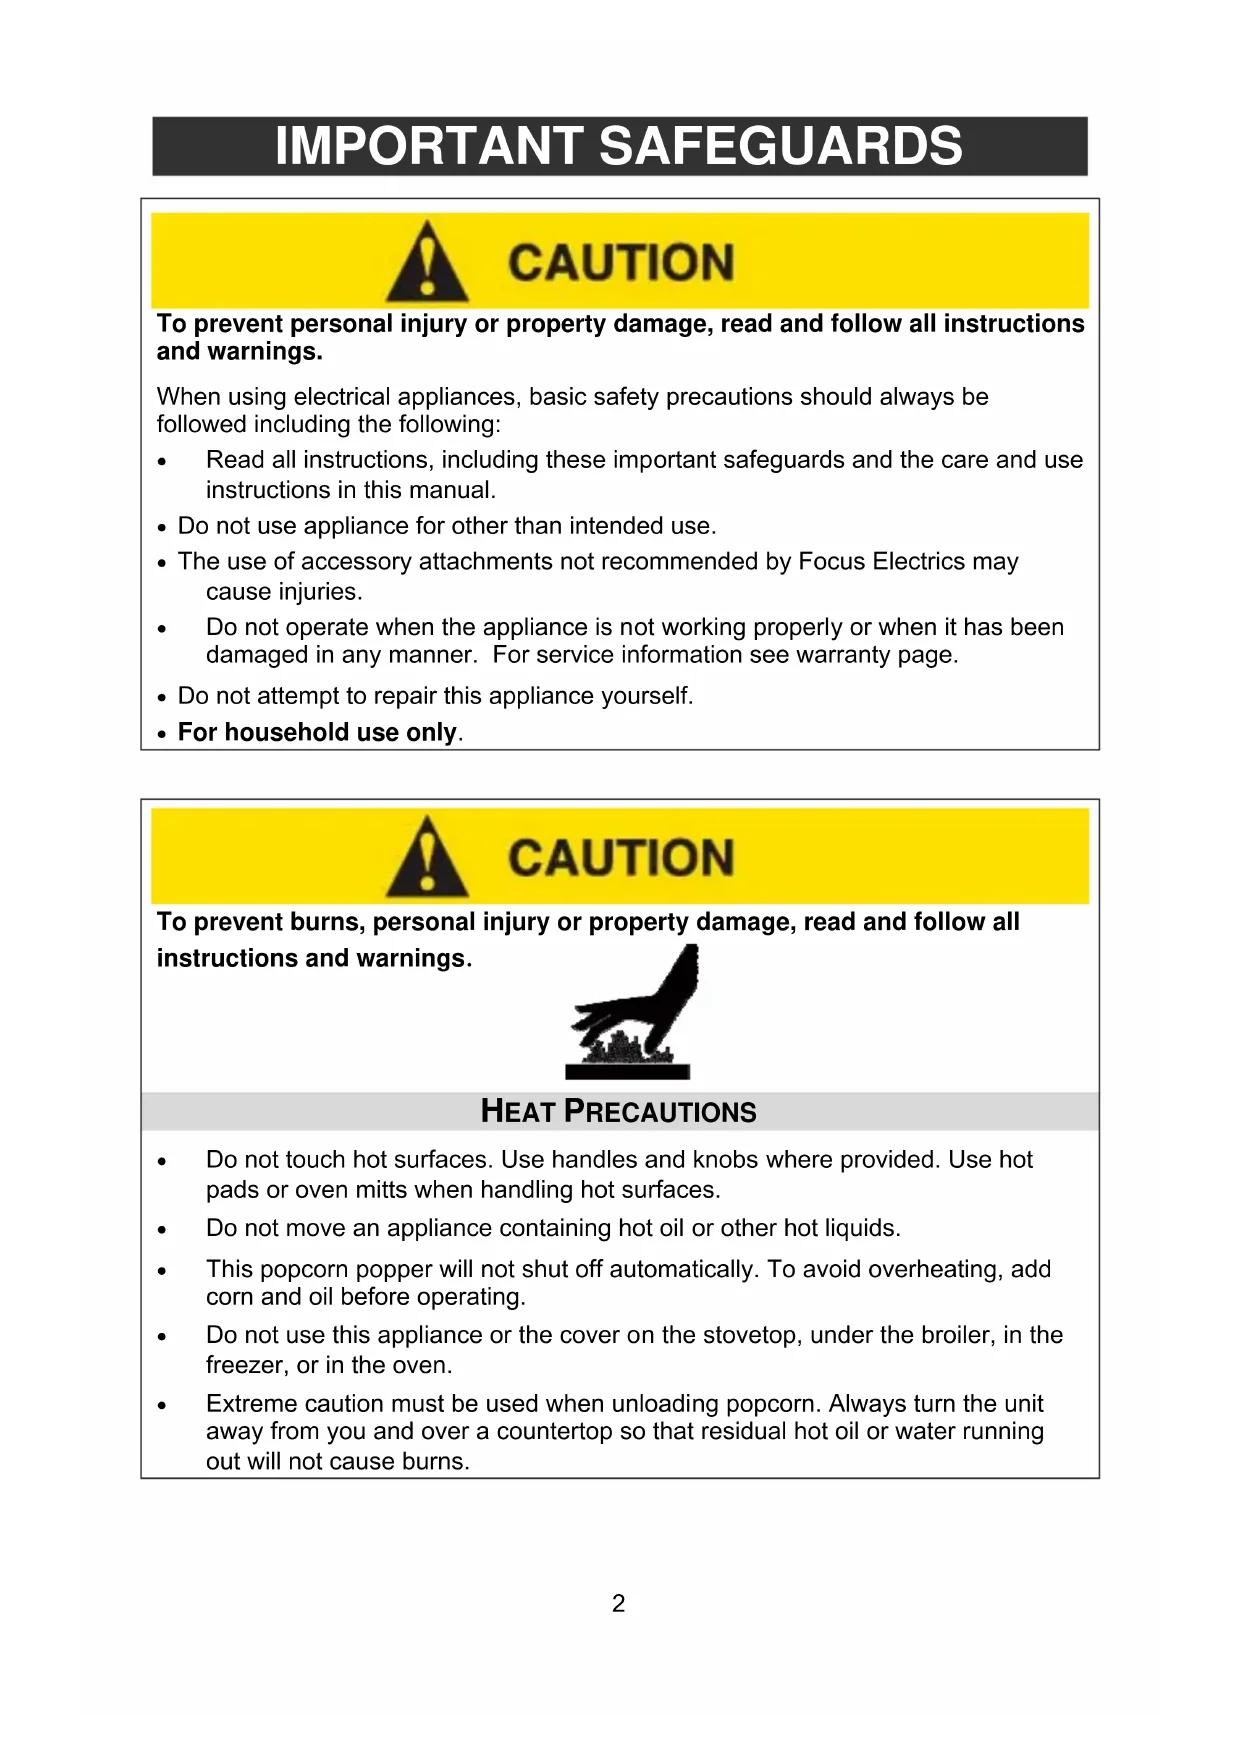
IMPORTANT SAFEGUARDS

CAUTION
To prevent personal injury or property damage, read and follow all instructions and warnings.
When using electrical appliances, basic safety precautions should always be followed including the following:
- Read all instructions, including these important safeguards and the care and use instructions in this manual.
- Do not use appliance for other than intended use.
- The use of accessory attachments not recommended by Focus Electrics may cause injuries.
- Do not operate when the appliance is not working properly or when it has been damaged in any manner. For service information see warranty page.
- Do not attempt to repair this appliance yourself.
• For household use only.

CAUTION
To prevent burns, personal injury or property damage, read and follow all instructions and warnings.

HEAT PRECAUTIONS
- Do not touch hot surfaces. Use handles and knobs where provided. Use hot pads or oven mitts when handling hot surfaces.
- Do not move an appliance containing hot oil or other hot liquids.
- This popcorn popper will not shut off automatically. To avoid overheating, add corn and oil before operating.
- Do not use this appliance or the cover on the stovetop, under the broiler, in the freezer, or in the oven.
- Extreme caution must be used when unloading popcorn. Always turn the unit away from you and over a countertop so that residual hot oil or water running out will not cause burns.

CAUTION
To prevent electrical shock, personal injury or property damage, read and follow all instructions and warnings.

ELECTRICITY PRECAUTIONS
- To protect against electric shock, do not immerse cord, plugs, or other electric parts in water or other liquids.
- Do not operate any appliance with a damaged cord or plug.
- Do not use this appliance outdoors.
• Always attach cord to appliance first, then plug cord into wall outlet. After popping, unplug cord from wall outlet. Let appliance cool before removing cord. - Do not leave appliance plugged in when it is not being used.
• Always unplug appliance from outlet before cleaning. Allow to cool before putting on or taking off parts and before cleaning. - Never leave appliance unattended when it is plugged into an outlet.
- A short power-supply cord is provided to reduce risks resulting from becoming entangled in or tripping over a longer cord.
- Longer detachable power-supply cords or extension cords are available and may be used if care is exercised in their use. While use of an extension cord is not recommended, if you must use one, the marked electrical rating of the detachable power-supply cord or extension cord should be at least as great as the electrical rating of the appliance. If the appliance is of the grounded type, the extension cord should be a grounding-type 3-wire cord. The cord should be arranged so that it will not drape over the counter top or tabletop where it can be pulled by children or tripped over.
- Do not use an outlet or extension cord if the plug fits loosely or if the outlet or extension cord feels hot.
- Keep the cord away from hot parts of the appliance and hot surfaces during operation.

CAUTION
To prevent burns or other personal injuries to children, read and follow all instructions and warnings.
PRECAUTIONS FOR USE AROUND CHILDREN
- Close supervision is necessary when this appliance is used by or near children.
- Do not allow cord to hang over any edge where a child can reach it. Arrange cord to avoid pulling, tripping or entanglement.
SAVE THESE INSTRUCTIONS
BEFORE USING THE FIRST TIME
- Wash popper cover and plastic cap in warm, soapy water, rinse thoroughly and dry.
- To clean stirring rod and non-stick surface of base, remove rod from base by unscrewing center knob, turning counter clockwise. Wipe rod and non-stick surface of popper base with a soapy cloth. Wipe with a damp cloth and dry.
- Replace stirring rod making sure the rod fits into notched area around screw. Secure with center knob.
- Your Stir Crazy ^® is now ready for use.
USING YOUR STIR CRAZY® CORN POPPER
Place popper base on flat, dry surface. The heat-resistant base allows for safe table use.
Preparing Popcorn
There are two models of the Stir Crazy ^® Corn Popper, one for making up to 6-quarts and the second for making up to 8-quarts of popcorn. Listed below are the proper amounts of oil, corn and butter (or margarine) to use for making various amounts of popcorn. Do not attempt to make 8 quarts of popcorn in the 6-quart model.
| Quarts of Popcorn Amount of Oil Amount of Corn Amount of Butter | |||
| 2 | 1 | Tablespoon | 13 Cup 1 Tables |
| 4 | 2 | Tablespoons | 23 Cup 2 Tables |
| 6 3 Tablespoons 1 Cup 3 Tablespoons | |||
| **8 3 Tablespoons | 114 Cups 3 Tablespoons | ||
**If using a gourmet/premium grade of corn, use less than amount of corn specified above. To yield 2 quarts of popcorn, use 14 cup corn; for 4 quarts of popcorn, use 12 cup; for 6 quarts of popcorn, use 34 cup; for 8 quarts of popcorn, use 1 cup. Use the same amounts of oil and butter specified above. **For 8-quart model only.
- Put proper amount of vegetable oil and corn into popper base. Do not add more corn or oil than recommended. Spread corn evenly over popping surface. Do not substitute butter, margarine, shortening, or lard for vegetable oil as these will burn or smoke excessively.
-
Place cover on popper base making sure handles of cover fit into handles of popper base. If buttered corn is desired, divide recommended amount of refrigerated butter into 6 equal-sized pats and place in a single layer over butter holes in butter well. (If unrefrigerated butter is used, add to butter well after the first kernel of corn pops.) Popcorn will be buttered as it pops. Do not place plastic cap on butter well until after corn is popped. If unbuttered corn is desired, do not add butter to the butter well and do not place cap onto butter well until after corn is popped.
-
Insert cord into popper base. Plug cord into a 120 volt AC outlet only. The stirring rod will rotate as long as the corn popper is plugged in. Do not shake popper during popping cycle. In 4 to 6 minutes (depending on quantity of corn being popped) the popping cycle will be completed. Unplug cord from wall outlet. Use a hot pad to remove cord from popper base.
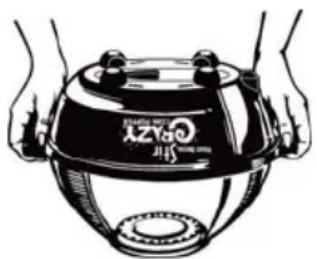
natural_image
Illustration of hands holding a black and white object resembling a gas stove or lamp (no text or symbols visible)-
If butter is not completely melted in butter well, use a pastry brush to push any remaining butter through the buttering holes.
-
Snap plastic cap securely onto butter well. This cap must be on cover before popper is inverted. Make sure handles of popper cover are placed into handles of popper base. Grasp handles firmly and turn popper upside down, turning popper away from you. Lift popper base away from cover, being careful of escaping steam.
-
Popcorn is now ready for serving. Sprinkle popcorn with salt if desired.
Popping Additional Batches of Popcorn - If you plan to pop more corn immediately, transfer popcorn from serving cover to another serving bowl. Follow steps 1 through 6 above.
RECIPES
Try some of our favorite recipes using the Stir Crazy ^® Corn Popper that we have included on the following pages to get you started.
| Stir Crazy® Crunch | |
| 2 Qts | Plain popcorn |
| ^3/_4 Cup | Sugar |
| ^3/_4 Cup | Packed brown sugar |
| ^1/_2 Cup Light corn syrup | |
| ^1/_2 Cup | Water |
| 1 Tsp | White vinegar |
| ^1/_2 Cup | Butter or margarine |
| ^1/_4 Tsp | Salt |
| 1 Cup Dry | roasted peanuts |
-
Prepare 4 quarts of unbuttered popcorn according to instructions. Place in large, buttered, heatproof bowl.
-
In a 2-quart saucepan, combine sugars, syrup, water, vinegar, butter and salt. Cook over low heat, stirring until sugar dissolves. Increase the heat setting to medium and cook syrup to 290^ F on candy thermometer, stirring frequently. Remove from heat and add peanuts. Pour over popcorn, tossing corn to coat well. Spread mixture into buttered 13x9x2 inch baking pan. When cool, break into pieces.
| Molasses Popcorn Balls | |
| 4 Qts | Plain popcorn |
| 1 Cup | Molasses |
| 1 Cup Sugar | |
| 12 Tsp | Salt |
| 1 Cup | Wheat germ |
-
Prepare 4 quarts of unbuttered popcorn according to instructions. Place in a large, buttered, heatproof bowl.
-
In a 2-quart saucepan, combine molasses, sugar and salt. Cook over low heat, stirring until sugar dissolves. Increase the heat setting to medium and cook syrup until it reaches 260^ F on a candy thermometer. In the meantime, heat wheat germ in a small skillet over low heat, stirring until warm. When syrup reaches 260^ F, stir in warm wheat germ. Pour syrup over popcorn, tossing to coat evenly.
-
With buttered hands, shape mixture into 14 to 16 orange-size balls. Allow balls to cool 1 hour.
| Sugar ‘N Spice Treat | |
| 4 Qts. | Plain popcorn |
| 13 Cup Butter or margarine | |
| 14 Cup | Sugar |
| 1 Tsp | Cinnamon |
| 14 Tsp | Salt |
- Prepare 4 quarts of unbuttered popcorn according to instructions. Place in buttered 13x9x2 inch baking pan.
- In a small saucepan, melt butter over low heat. Stir in sugar, cinnamon and salt. Mix well until sugar dissolves. Pour over popcorn, tossing to coat evenly.
- Bake in a preheated 300^ F oven for 10-minutes. Cool slightly before serving.
CLEANING YOUR STIR CRAZY® CORN POPPER
Clean Popper After Every Use - Your corn popper should be cleaned after each use. Always allow popper to cool before cleaning.
Cleaning Popper Cover - Wash cover and plastic cap in warm, soapy water with a dishcloth or sponge. Rinse thoroughly and dry. Do not use scouring pad or abrasive powder on cover as these could cause scratching.
Cleaning Stirring Rod - Remove stirring rod from base by unscrewing center knob. Wash rod and center knob with warm, soapy water using a dishcloth or sponge. Rinse thoroughly and dry. Replace stirring rod after cleaning base, making sure it fits into notched area around screw. Secure with center knob.
Cleaning Popper Base - Clean non-stick surface of base with a damp, soapy dishcloth, sponge or nylon-scouring pad such as Scotch Brite Cookware Scrub'n Sponge®. Wipe surface with a damp cloth and dry. Do not use abrasive scouring pads or powders on non-stick finish as scratching may occur. After consistent use, the non-stick finish may discolor. To remove discoloration, use a soft cloth saturated with lemon juice or vinegar and rub over finish. Then wipe the finish with a damp cloth and dry.
DO NOT PLACE POPPER COVER, PLASTIC CAP, STIRRING ROD, BASE, OR CORD IN AN AUTOMATIC DISHWASHER.
PRODUCT WARRANTY
Appliance 1 Year Limited Warranty
Focus Electrics, LLC (“Focus Electrics”) warrants this appliance from failures in the material and workmanship for one (1) year from the date of original purchase with proof of purchase, provided the appliance is operated and maintained in conformity with the provided Instruction Manual. Any failed part of the appliance will be repaired or replaced without charge at Focus Electrics’ discretion. This warranty applies to indoor household use only.
This warranty does not cover any damage, including discoloration, to any non-stick surface of the appliance. This warranty is null and void, as determined solely by Focus Electrics if the appliance is damaged through accident, misuse, abuse, negligence, scratching, or if the appliance is altered in any way.
THIS WARRANTY IS IN LIEU OF ALL IMPLIED WARRANTIES, INCLUDING WARRANTIES OF MERCHANTABILITY, FITNESS FOR A PARTICULAR PURPOSE, PERFORMANCE, OR OTHERWISE, WHICH ARE HERBY EXCLUDED. IN NO EVENT SHALL FOCUS ELECTRICS BE LIABLE FOR ANY DAMAGES, WHETHER DIRECT, INDIRECT, INCIDENTAL, FORSEEABLE, CONSEQUENTIAL, OR SPECIAL, ARISING OUT OF OR IN CONNECTION WITH THIS APPLIANCE.
If you think the appliance has failed or requires service within its warranty period, please contact the Focus Electrics Customer Service Department at (866) 290-1851 or e-mail us at service@focuselectrics.com. Return shipping fees are non-refundable. A receipt proving original purchase date will be required for all warranty claims. Hand-written receipts are not accepted. Focus Electrics is not responsible for returns lost in transit.
Valid only in USA and Canada
REPLACEMENT PARTS
Replacement parts, if available, may be ordered directly from Focus Electrics online at www.focuselectrics.com, or you may call or e-mail the service department at the number/e-mail address listed above, or by writing to us at:
Focus Electrics, LLC
Attn: Customer Service
P. O. Box 2780
West Bend, WI 53095
Be sure to include the catalog/model number of your appliance (located on the bottom/back of the unit) and a description and quantity of the part you wish to order. Along with this include your name, mailing address, Visa/MasterCard number, expiration date and the name as it appears on the card. Checks can be made payable to Focus Electrics, LLC. Call Customer Service to obtain purchase amount. Your state's sales tax and a shipping/processing fee will be added to your total charge. Please allow two (2) weeks for delivery.
This manual contains important and helpful information regarding the safe use and care of your new Focus Electrics product. For future reference, attach dated sales receipt for warranty proof of purchase and record the following information:
Date purchased or received as gift:
Where purchased and price, if known:
Item number and Date Code (shown bottom/back of product)
WEST BEND®
ÉCLATEUR DE MAÏS STIR CRAZY®
natural_image
Line drawing of three types of coffee poters with branding (CRAZY CORN POWER), no text or symbols present.natural_image
Illustration of hands holding a branded food appliance with a dome and glass (no text or symbols visible)Focus Electrics, LLC
Attn: Customer Service
P. O. Box 2780
West Bend, WI 53095
natural_image
Line drawing of three different food containers with visible branding (no text or symbols on the containers themselves)natural_image
Illustration of a hand holding a black appliance with 'GoCity' branding (no text or symbols on the device itself)Focus Electrics, LLC
Attn: Customer Service
P. O. Box 2780
West Bend, WI 53095


- IMPORTANT SAFEGUARDS
- CAUTION
- HEAT PRECAUTIONS
- ELECTRICITY PRECAUTIONS
- PRECAUTIONS FOR USE AROUND CHILDREN
- SAVE THESE INSTRUCTIONS
- BEFORE USING THE FIRST TIME
- USING YOUR STIR CRAZY® CORN POPPER
- Preparing Popcorn
- RECIPES
- CLEANING YOUR STIR CRAZY® CORN POPPER
- PRODUCT WARRANTY
- Appliance 1 Year Limited Warranty
- Valid only in USA and Canada
- REPLACEMENT PARTS
- WEST BEND®
- ÉCLATEUR DE MAÏS STIR CRAZY®
Brand : WestBend
Model : Stir Crazy 82306Q
Category : Popcorn machine