REF36FDFFZXNT - Fridge BERTAZZONI - Free user manual and instructions
Find the device manual for free REF36FDFFZXNT BERTAZZONI in PDF.
| Product Type | Refrigerator-Freezer |
| Brand | Bertazzoni |
| Model | REF36FDFFZXNT |
| Dimensions (height) | 69 7/8 in (177.5 cm) |
| Width | 35 7/8 in (91.1 cm) |
| Depth with handles | 31 1/16 in (78.9 cm) |
| Depth without doors | 24 3/8 in (61.9 cm) |
| Door configuration | 2 swing doors (refrigerator) + 2 drawers (freezer) |
| Defrost | Automatic (Total No Frost) |
| Water and ice dispenser | Yes (water, ice cubes, crushed ice) |
| Water filter | Yes (ref. Z300357, replace every 6 months) |
| Lighting | LED |
| Quattro Temp Zone | Yes (4 modes: meat/fish, beverages, cheese/deli, wine) |
| Ice maker | Yes (built-in) |
| Ambient temperature range | 55°F to 110°F (13°C to 43°C) |
| Warranty | 2 years limited |
Frequently Asked Questions - REF36FDFFZXNT BERTAZZONI
User questions about REF36FDFFZXNT BERTAZZONI
0 question about this device. Answer the ones you know or ask your own.
Ask a new question about this device
Download the instructions for your Fridge in PDF format for free! Find your manual REF36FDFFZXNT - BERTAZZONI and take your electronic device back in hand. On this page are published all the documents necessary for the use of your device. REF36FDFFZXNT by BERTAZZONI.
USER MANUAL REF36FDFFZXNT BERTAZZONI
1.1Warnings 4
1.2 Meanings of safety warning symbols 6
1.3 Electricity related warnings 6
1.4 Use warnings 6
1.5 Warnings regarding placement of items 7
1.6 Energy warnings 7
1.7 Warnings regarding disposal 8
2 INSTALLATION INSTRUCTIONS 10
2.1 Installation location 10
2.2 Leveling the refrigerator 10
2.3 Leveling the doors 11
2.4 Installing door handles 12
2.5 Adjusting the shelves 13
2.6 Installing the water filter 13
2.7 Connecting the water line 14
2.8 Changing the lights 15
3 APPEARANCE OVERVIEW 16
3.1 Key components 16
3.2 Functions 18
3.3 Ice/Water dispenser 21
3.4 Removing the refrigerator doors/drawers 22
4 MAINTENANCE AND CARE OF THE REFRIGERATOR 24
4.1 General cleaning 24
4.2 Cleaning the door bins 24
4.3 Cleaning the drawers 24
4.4 Cleaning the ice maker box 25
4.5 Defrosting 25
4.6 Out of operation 25
5 TROUBLESHOOTING 26
5.1 Service 26
6 ASSISTANCE 27
6.1 Two year limited warranty statement 27
1.1 Warnings

Warning: Fire hazard / Flammable materials
This appliance is intended for the storage of food items in residential settings. It may also be used in other similar settings such as staff kitchen areas in offices, shops and farmhouses and hospitality venues such as hotels, motels, and bed and breakfast establishments. It is NOT intended for commercial or industrial environments or to be used as storage for non-food or medical items.
This appliance is not intended for use by individuals (including children) with reduced physical, sensory or mental capabilities or lack of experience and knowledge unless they are supervised or have been given instruction concerning the use of the appliance by a person responsible for their safety. Children should be supervised to ensure that they do not play with the appliance.
If the supply cord is damaged, it must be replaced by the manufacturer, its service agent or a similarly qualified person in order to ensure against hazards.
Do not store explosive substances, such as aerosol cans with a flammable propellant, inside this appliance.
The appliance must be unplugged after use and before user maintenance is performed on it.

Warning
Keep ventilation openings in the enclosure where the appliance is housed or in the appliance itself free of obstructions.

Warning
Do not use mechanical devices or other means to accelerate the defrosting process (such as blow dryers, portable heaters, heat guns, hot water, etc.), other than those recommended by the manufacturer.

Warning
Do not damage the refrigerant circuit.

Warning
Do not use electrical appliances inside the unit's food storage compartments unless these are of a type recommended by the manufacturer.

Warning
Follow all local laws and regulations in order to properly dispose of the refrigerator, as the unit contains flammable materials and refrigerant.

Warning
When positioning the appliance, make sure that the power cord does not become trapped or damaged.

Warning
Do not use multiple outlet power strips or portable power supplies at the rear of the appliance.
Do not use extension cords or ungrounded two prong adapters.

Warning
Child entrapment hazard. Before you dispose of your refrigerator or freezer:
Remove the doors.
Leave the shelves in place so that children may not easily climb inside.
To prevent a child from becoming trapped, keep the appliance out of reach of children.
The refrigerator must not be connected to a power source before or during installation.
Refrigerant and the foam-blowing agent cyclopentane used in the appliance are flammable. Therefore, when scrapping the refrigerator, keep it away from any source of ignition and ensure it is disposed of by a qualified company with the proper equipment for recovering the refrigerant in compliance with state or federal requirements, so as to prevent environmental or any other type of harm.
Children should be supervised to ensure that they do not play with the appliance.
According to EN standard: This appliance may be used by children aged eight years or older, by persons with reduced physical, sensory or mental capabilities or who lack experience and knowledge, provided that they are supervised or have been given instruction concerning the safe use of the appliance and understand the hazards involved. Children may not perform cleaning or required maintenance without supervision. Children should not be allowed to load or unload refrigerating appliances.
To avoid contamination of foods, please heed the following instructions:
Opening the door for long periods can cause a significant increase in temperature inside the appliance compartments.
Perform regular cleaning of surfaces that may come into contact with food and of accessible drainage systems.
Clean water tanks if they have not been used for 48 hrs. Flush the water system connected to the water supply if water has not been used for 5 days.
Store raw meat and fish in suitable containers in the refrigerator, so that it does not come into contact with other food or drip onto it.
If the refrigerator is left empty for a long period, switch it off, defrost it, clean it, dry it, and leave the door open to prevent mold developing inside the appliance.

Warning
To avoid tipping hazards due to appliance instability, the appliance must be installed according to the instructions.
Minimum/Maximum inlet water pressure: 30-100 PSIG.

Warning
In order to be able to use the ice maker and water dispenser, the fridge must be connected only to a potable water supply.
1.2 Meaning of safety warning symbols
 Prohibition symbol Prohibition symbol | This is a prohibition symbol.Any incompliance with instructions marked with this symbol may damage the product or endanger the user's safety. |
 Warning symbol Warning symbol | This is a warning symbol.It is required to operate in strict observance of instructions marked with this symbol; or otherwise damage to the product or personal injury may be caused. |
 Caution symbol Caution symbol | This is a caution symbol.Instructions marked with this symbol require special caution. Insufficient caution may result in slight or moderate injury, or damage to the product. |
This manual contains a wealth of important safety information that users must heed.
1.3 Electricity related warnings

text_image
Diagram showing hand gesture, checkmark, and smiley face with a magnifying glass on the right sideDo not pull out the power cord plug by tugging on the refrigerator's power cord. Please grasp the plug firmly and pull out it of the outlet directly.
To ensure safe use, do not damage the power cord or use the power cord when it is damaged or worn.
natural_image
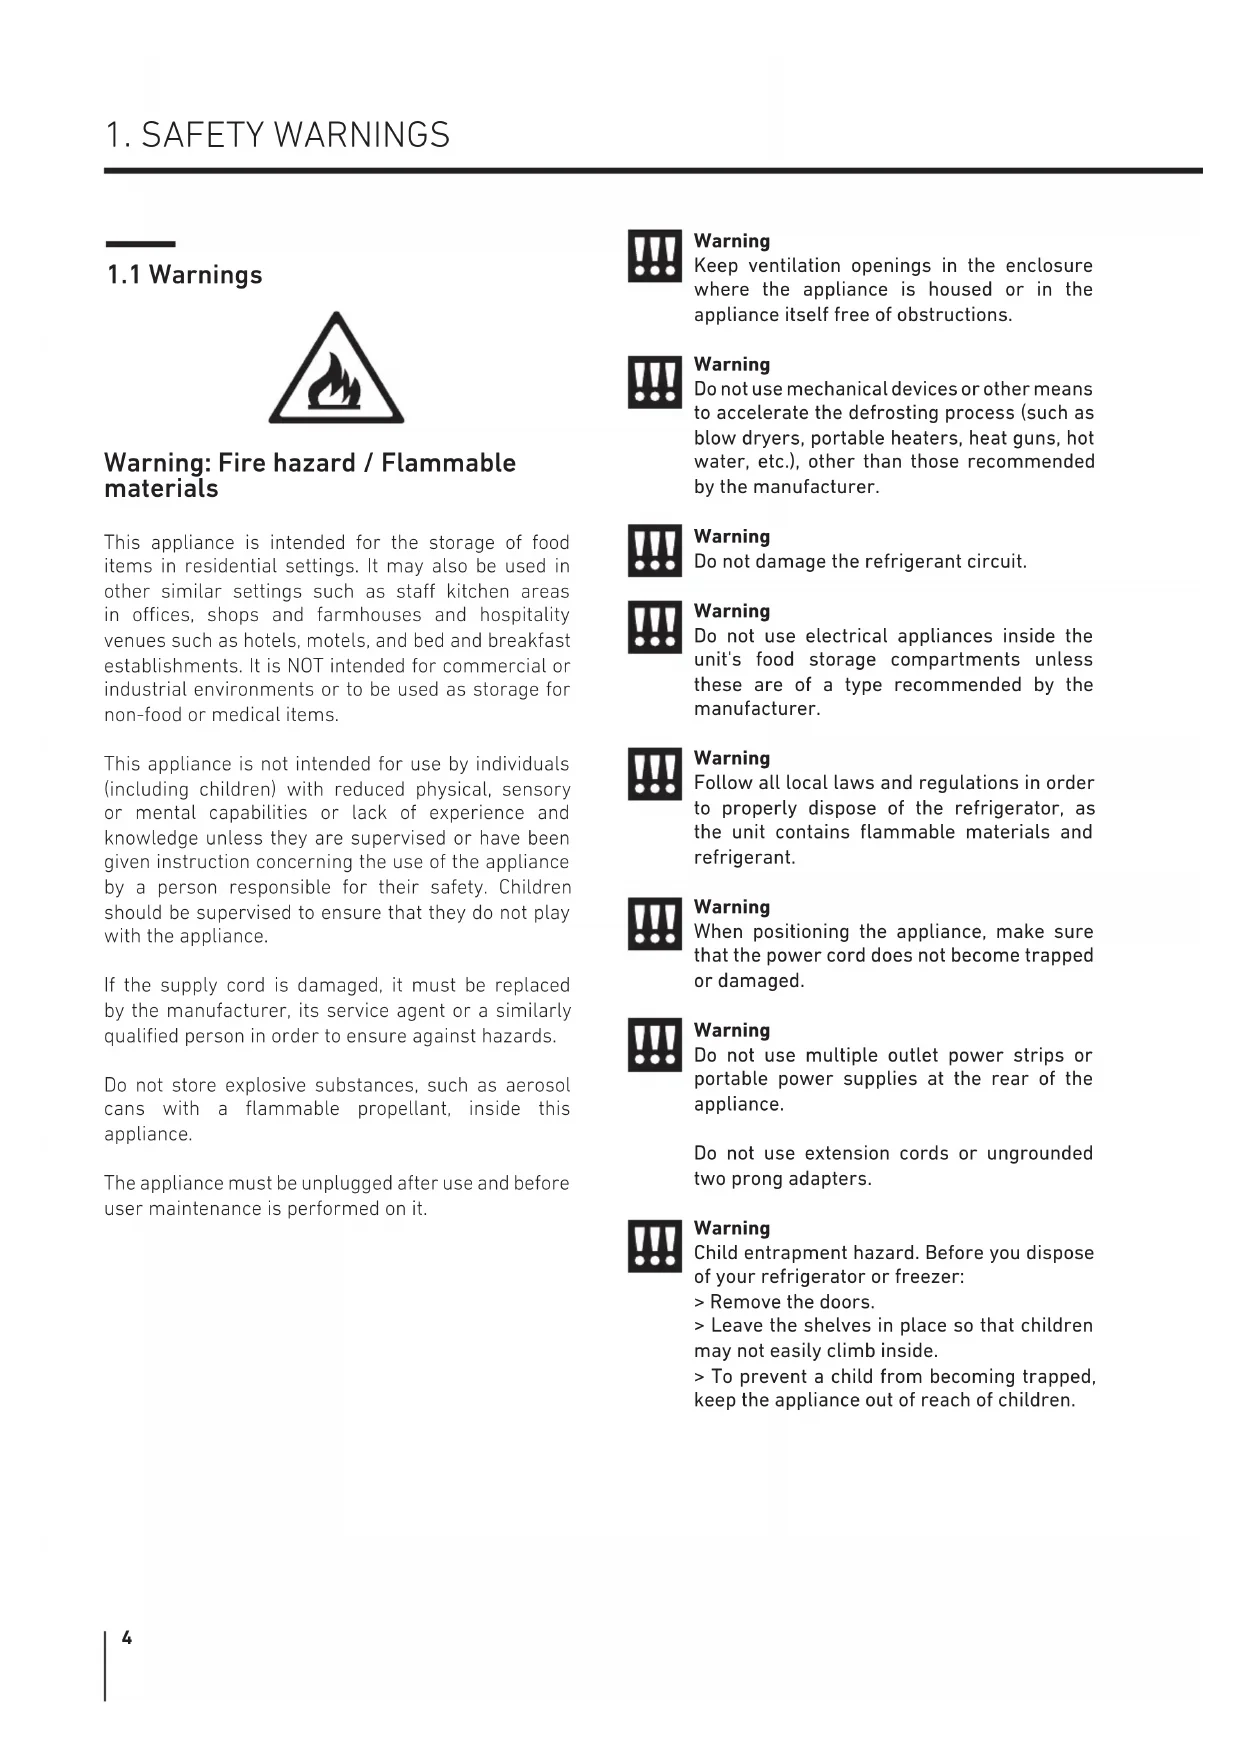
Simple line drawing of a plug with a circular socket and a warning symbol (no text or labels)Please use a dedicated non-GFCI or non-arc-fault protected power outlet that is not to be shared by any other electrical appliances. The power plug must be firmly seated in the outlet or else it could pose a fire hazard.
Please ensure that the power outlet's grounding electrode is equipped with a reliable grounding circuit.

natural_image
Simple line drawing of a room with a cabinet and a window, no text or symbols presentIn the event of a gas leak, please shut off the valve for the leaking gas and then open the doors and windows. Do not unplug the refrigerator or other electrical appliances. This could cause a spark that might ignite a fire.
natural_image
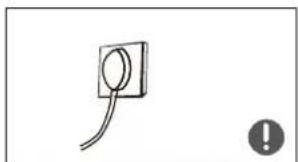
Simple line drawing of a refrigerator with a mounted appliance (no text or symbols)Do not use any electrical appliances on top of the refrigerator, unless these are of a type recommended by the manufacturer.
1.4 Use warnings
natural_image
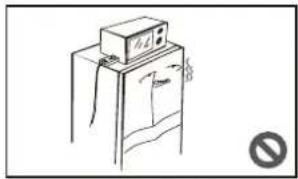
Simple line drawing of a refrigerator with tools and a prohibition symbol (no text or labels)Do not attempt to dismantle or reassemble the refrigerator and do not damage the refrigerant circuit; maintenance of this appliance must be performed only by a qualified Service technician.
A damaged power cord must be replaced by the manufacturer, its Service department or a qualified technician in order to ensure against hazards.
natural_image
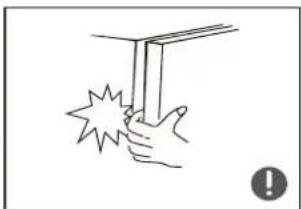
Simple line drawing of a hand holding a vertical object with a starburst effect, no text or symbols present.The space between the refrigerator doors and the internal compartments is small. Use caution to avoid accidental injuries to hands and fingers when reaching inside for items.
Close the refrigerator door gently to avoid causing items to fall over inside the appliance.
Do not touch or handle foods or containers, especially metal containers, in the freezer with wet hands when the refrigerator is in operation. Doing so may result in injury.

natural_image
Simple line drawing of a child climbing a staircase inside a storage cabinet (no text or symbols)Do not allow any child to climb into or on the refrigerator. They could suffocate or injure themselves falling.

natural_image
Simple line drawing of a trash can with a warning symbol (no text or labels)Do not place heavy objects on top of the refrigerator, because objects may fall off when closing or opening the door, potentially causing serious injury.
Disconnect the power supply in the event of a power failure and when cleaning the appliance. Do not reconnect the refrigerator to the power supply more than once within five minutes; otherwise the compressor could be damaged due to successive starts.
1.5 Warnings regarding placement of items

text_image
Illustration showing a hand holding a tray with labeled items including a bottle, boxes, and a cross symbol, with an exclamation mark and a warning icon.Do not put flammable, explosive, volatile or highly corrosive items in the refrigerator, as this may result in damage to the appliance or cause a fire.
Do not place flammable items near the refrigerator, as this may cause a fire.
text_image
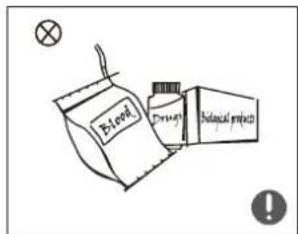
Lead Drain Biological processThis refrigerator is intended for household use and therefore for the storage of food; it must not be used for any other purpose (the storage of blood, medical supplies, biological materials, etc.).

text_image
Freezing chamber BeerDo not place beer, carbonated beverages or other fluids stored in pressurized containers in the unit's freezer compartments; the bottles or closed containers may crack due to freezing, causing damage to the appliance and other food items.
1.6 Energy warnings
1) Refrigerating appliances may not always operate consistently (the temperature can become too warm in the freezer or its contents might defrost) when they sit for an extended period of time in an environment where the ambient temperature is too far above or below the recommended ambient temperature in which the appliance was designed to be used.
2) Use all necessary precautions to prevent an undue rise in the temperature of frozen food while defrosting the freezer, such as wrapping the frozen food in several layers of newspaper or temporarily transferring items to a cooler. Rising temperatures could result in frozen foods defrosting when performing maintenance or cleaning, shortening the foods' storage life.
Energy saving tips
The appliance should be located in the coldest area of the room, away from heating appliances or heating ducts and out of direct sunlight.
Hot foods should be allowed to cool down to room temperature before they are placed in the refrigerator.
Overloading the refrigerator forces the compressor to run for a longer time.
Foods that take too long to freeze may lose quality or spoil.
Be sure to wrap foods properly or place them in dry containers before putting them in the refrigerator. This will prevent frost build-up inside the appliance.
Storage bins should not be lined with aluminum foil, wax paper, or paper towels. Liners interfere with cold air circulation, making the refrigerator less efficient.
Organize and label food to reduce the number of the times the door is opened and cut down on extended searches. Remove as many items as are needed at one time and close the door as soon as possible.
1.7 Warnings regarding disposal

Refrigerant and the foam-blowing agent cyclopentane used in the appliance are flammable.
Therefore, when scrapping the refrigerator, keep it away from any source of ignition and ensure it is disposed of by a qualified company with the proper equipment for recovering the refrigerant in compliance with state or federal requirements, so as to prevent environmental or any other type of harm.

When the refrigerator is recycled, take off the doors and remove the seals from the doors and shelves; store the doors and shelves in a suitable place to prevent child entrapment.
PROPER DISPOSAL OF THIS PRODUCT
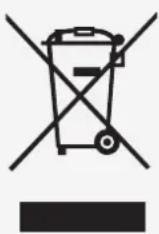
This marking indicates that this product should not be disposed of with other household waste. To prevent possible harm to the environment or human health from uncontrolled waste disposal, recycle it responsibly to promote the sustainable reuse of material resources. To return your used appliance, please use the return and collection systems or contact the retailer where the product was purchased. They can take this product for environmentally safe recycling.
Warning: Cancer and Reproductive Harm - www.P65Warnings.ca.gov
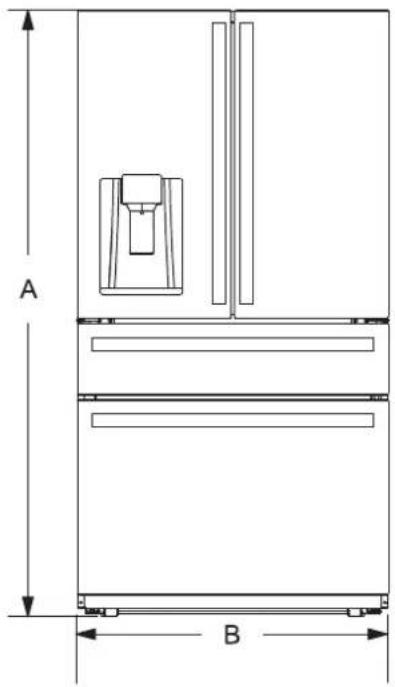
INSTALLATION DIMENSIONS
FRONT VIEW SIDE VIEW
text_image
A B
text_image
C D ETOP VIEW

text_image
E
text_image
F G
text_image
H lDimensions Size (inches)
| Height A 69" 7/8 | |
| Width B 35" 7/8 | |
| Depth without doors C 24" 3/8 | |
| Depth without handles D 29" | |
| Depth with handles E 31" 1/16 | |
| Depth with door open 90° F 43" 3/16 | |
| Width with door open 90° G 45" 1/16 | |
| Depth with door open 122° H 42" 3/16 | |
| Width with door open 122° I | 60" 5/8 |
2.1 Installation location
This refrigerator is designed for indoor, household use only.
Keep away from heat and avoid direct sunlight or positions near a heat source, like an oven or a radiator.
Do not position the refrigerator in a moist or damp location; otherwise rust may form and the insulating function of the electrical components and food storage compartments may be reduced.
Position the refrigerator in a dry and well-ventilated indoor area.
The floor must be level and sturdy (rotate the adjustable leg left or right to level if unstable).
The ambient temperature in the appliance's location should range between a minimum of 55°F and a maximum of 110°F. However, for more efficient energy usage and superior cooling, the recommended ambient temperature is between 60°F and 90°F.
For proper air circulation and electrical connection, allow a 3/4" clearance on either side and to the rear of the refrigerator. Allow a 3/8" clearance above the refrigerator.
Ensure that there is enough space to comfortably open the doors and drawers. When installing the refrigerator next to a fixed wall, take particular care to make sure that the door can swing open.
Precautions to take before installation:
Before beginning installation, make sure that the refrigerator is disconnected from the power supply.
Precautions must be taken to ensure that the handle has been securely attached, in order to prevent injury when opening the door.
2.2 Leveling the refrigerator
DIAGRAM OF THE LEVELING FEET
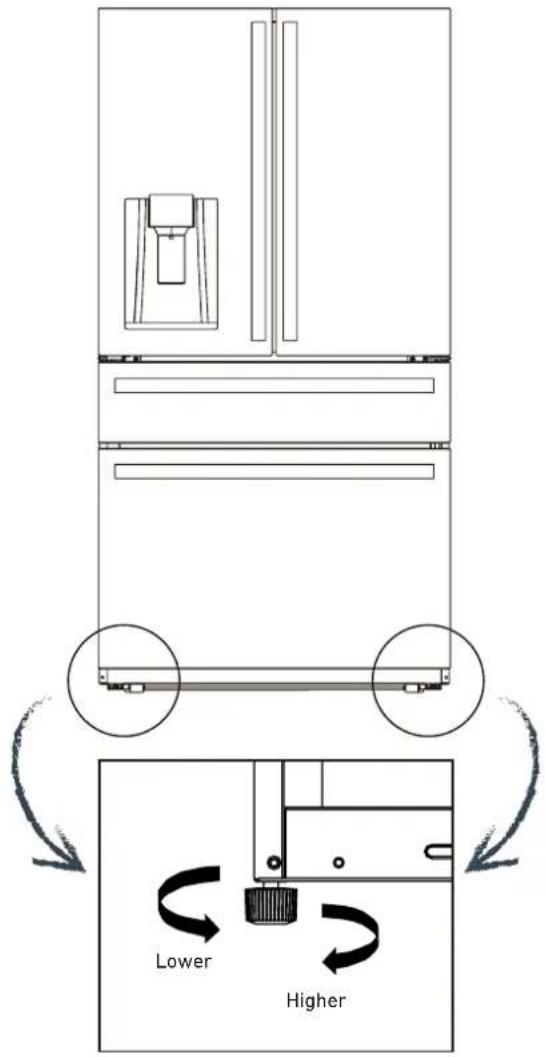
text_image
Lower Higher1) Before performing this operation, make sure that the refrigerator is disconnected from the power source.
Before adjusting the leveling feet, take precautions to prevent any bodily injury.
2) To learn how to level the refrigerator feet, see the figure above:
A. Turn the feet clockwise to raise the refrigerator.
B. Turn the feet counter-clockwise to lower the refrigerator.
C. Adjust the right and left feet to a horizontal level using the procedure above.
2.3 Leveling the doors
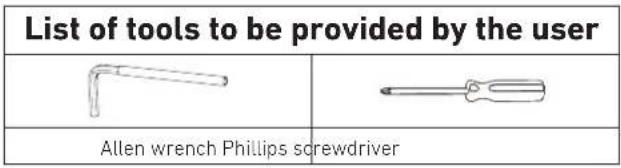
List of tools to be provided by the user

text_image
PliersDIAGRAM OF DOOR ADJUSTMENT

text_image
Not level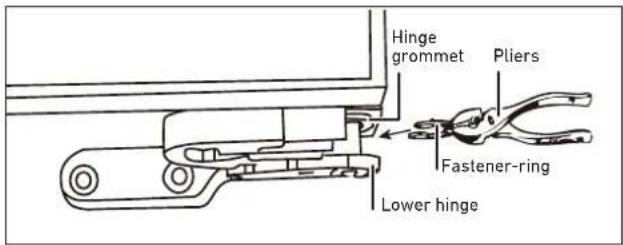
text_image
Hinge grommet Pliers Fastener-ring Lower hingePrecautions to take before this operation
1) Before performing this operation, make sure that the refrigerator is disconnected from the power source.
Before adjusting the door, take precautions to prevent any bodily injury.
2) Raise the lower door up to the level of the higher door.
3) Using pliers, insert the supplied fastener ring into the gap between the hinge-grommet and the lower hinge. The number of fastener rings you need to insert will depend on the gap. See the figure.
Take precautions to ensure that the handle does not fall and cause any injury.
text_image
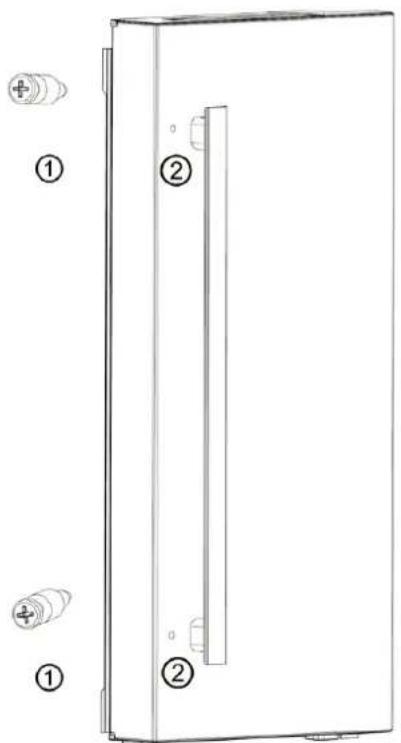
List of tools to be provided by the user Allen wrench Phillips screwdriverInstallation procedure
1) Take the bolts ① out of the accessories bag, then use the Phillips screwdriver to screw the bolts ② into the bolt holes ③ in the refrigerator doors. See Figure 8.
2) Put the handle on the door over the bolt ① and make sure the handle is flush with the door's surface. See Figure 9.
3) Secure the handle by rotating the handle screw
③ on the end, then check that the handle is firmly mounted by jiggling it gently.
4) Install the cap ④ over the handle screw hole to complete the installation.
text_image
Technical diagram of a device with labeled components, showing numbered parts and connectors.Figure 8

text_image
The hole The screw ③ ④ ③ ④Figure 9
text_image
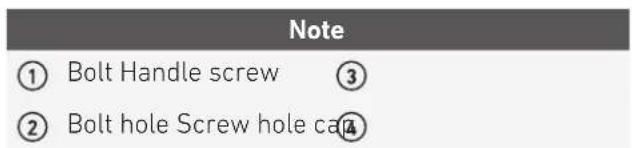
Note ① Bolt Handle screw ③ ② Bolt hole Screw hole ca④Before use, remove all packing materials, including bottom cushions, foam pads and tape from inside of the refrigerator; tear off the protective film on the doors and on the refrigerator body.
Allow the refrigerator to sit still for two hours before connecting it to the power supply and turning it on.
The refrigerator must run for 2-3 hours or for 4 hours or more in the summer, when the ambient temperature is high, before any fresh or frozen food can be put inside of it.
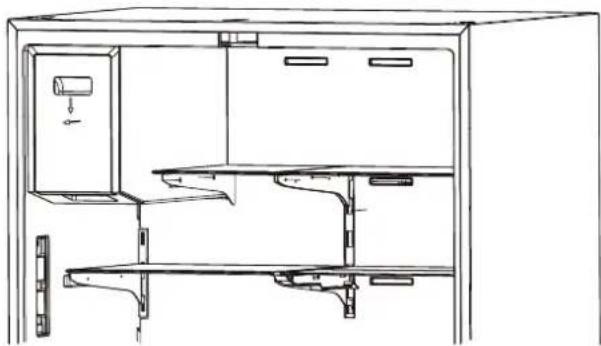
2.5 Adjusting the shelves

text_image
Upper end of fixed leg Lower end of fixed leg SlotThe shelves can be adjusted to a suitable height to accommodate the food you wish to store.
Please adjust the shelves by following the arrows shown in the diagram.
First raise the shelf upward, then tilt it upward to remove it. During installation, first put the upper end of the fixed leg into one of the upper slots on the support bracket, then put the lower end of the fixed leg into the third slot down from it, lower down on the support bracket.

text_image
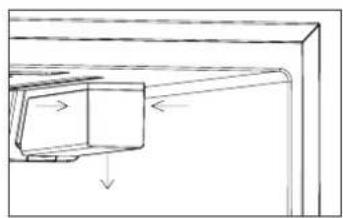
Diagram showing two hands holding a rectangular object with arrows indicating direction, labeled 1 and 2.Cleaning the door bins
Grasp the door bin using both hands then push it upwards to remove. See image above.
After washing the bin, reinstall it.
2.6 Installing the water filter
natural_image
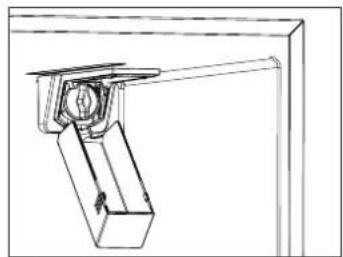
Technical line drawing of a mechanical assembly with directional arrows indicating movement (no text or symbols)1) When the refrigerator is used for the first time, press gently on both sides of the filter cover and pull it downwards to open. See image above.
natural_image
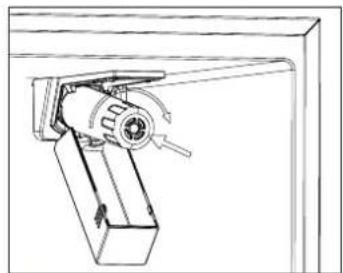
Technical line drawing of a mechanical bracket assembly (no text or symbols)2) Next, rotate the dust-proof cap counter-clockwise and remove it.
natural_image
Technical line drawing of a mechanical assembly with no visible text or symbols3) Remove the packaging, then slide the filter in until it reaches the stop and rotate clockwise until it locks securely into place.
4) When the filter symbol lights up on the display panel, it is time to replace the water filter. The procedure for removing the filter element is the same as that for removing the dust-proof cap.
5) It is recommended that the filter be replaced every six months. Make sure to shut off the connection to the water main before changing the filter and to follow the instructions provided above. Replacement water filters can be ordered at www.encompassparts.com, Part Number: Z300357.
6) If there is a centralized water filtration system in place, it is possible to use the ice maker and water dispenser without installing the water filter in the refrigerator. If this is the case, do not remove the dust-proof cap.
2.7 Connecting the water line
Water connection

WARNING
Risk of electric shock and damage to the appliance! Disconnect the appliance from the power source before performing any work on the water connection.
Only a qualified installation technician may connect the appliance to the water supply in accordance with plumbing and relevant water utility company regulations.
Connect the appliance to a potable water line only:
Minimum pressure:
0.20 MPa (2.06 bar, 30 PSIG)
Maximum pressure:
0.68 MPa (6.89 bar, 100 PSIG)
If the pressure is higher than 0.68 MPa (6.89 bar, 100
PSIG): Install a pressure limiter between the drinking water connection and the water line inlet.
The water should be connected only by a qualified plumber in accordance with local regulations established by the appropriate water utility company.
A cold water connection is required to operate the ice maker.
The water pressure must be between
0.20 MPa (2.06 bar, 30 PSIG) and
0.68 MPa (6.89 bar, 100 PSIG)
The installation must comply with local plumbing regulations.
A separate shut-off valve should be installed on the cold-water inflow.
The shut-off valve should not be located behind the appliance. It is recommended that you situate the shut-off-valve directly next to the appliance or in another easily accessible location.
When installing the water connection, be aware of the permissible installation area for the water line.
When connecting to the potable water line, use only water lines that are suitable for potable water. Comply with local regulations and connection conditions established by local water utility companies.
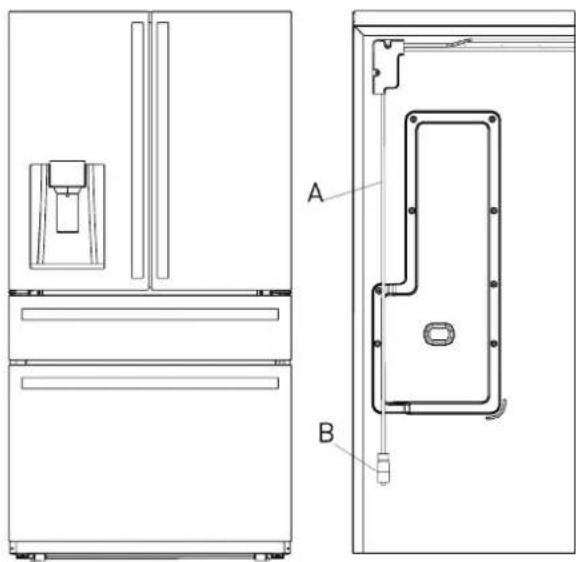
natural_image
Technical line drawing of a refrigerator showing front and side views (no text or symbols)Connecting the water line
Water line installation kits are available as an additional accessory from your dealer or at a local hardware store.
1) Shut off the main water supply line.
2) Install a 1/4" water line with a shut-off valve (UNS 7/16-24) that will remain accessible once the product is in place. Refer to local codes and instructions on the water line installation kit (not included).
3) Connect the newly installed water supply line (C) to the refrigerator's water inlet connector (B) then tighten using tool.
4) Gently tug on the water supply line to ensure it is securely installed, thus avoiding the risk of damage when pulling the unit out or pushing it back while cleaning.
5) Turn the main water supply line back on and check for leaks.
6) After connecting the water line, flush one gallon of water through the filter before drinking or using the water from your refrigerator. (Flush for approximately 5 minutes). To flush, press a large glass or cup against the water dispenser lever. Fill the glass, then empty it. Repeat until you have dispensed about one gallon of water.
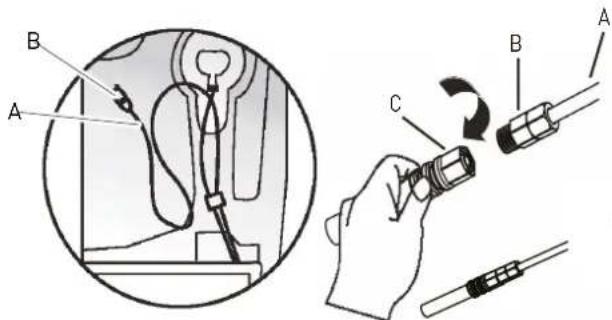
text_image
Technical diagram showing a hand holding a flashlight labeled A, B, and C, with a magnified inset of the device's cable assembly.2.8 Changing the lights
Any replacement or maintenance of the LED lights is intended to be performed by the manufacturer, its service agent or a similar qualified person.
3.1 Key components
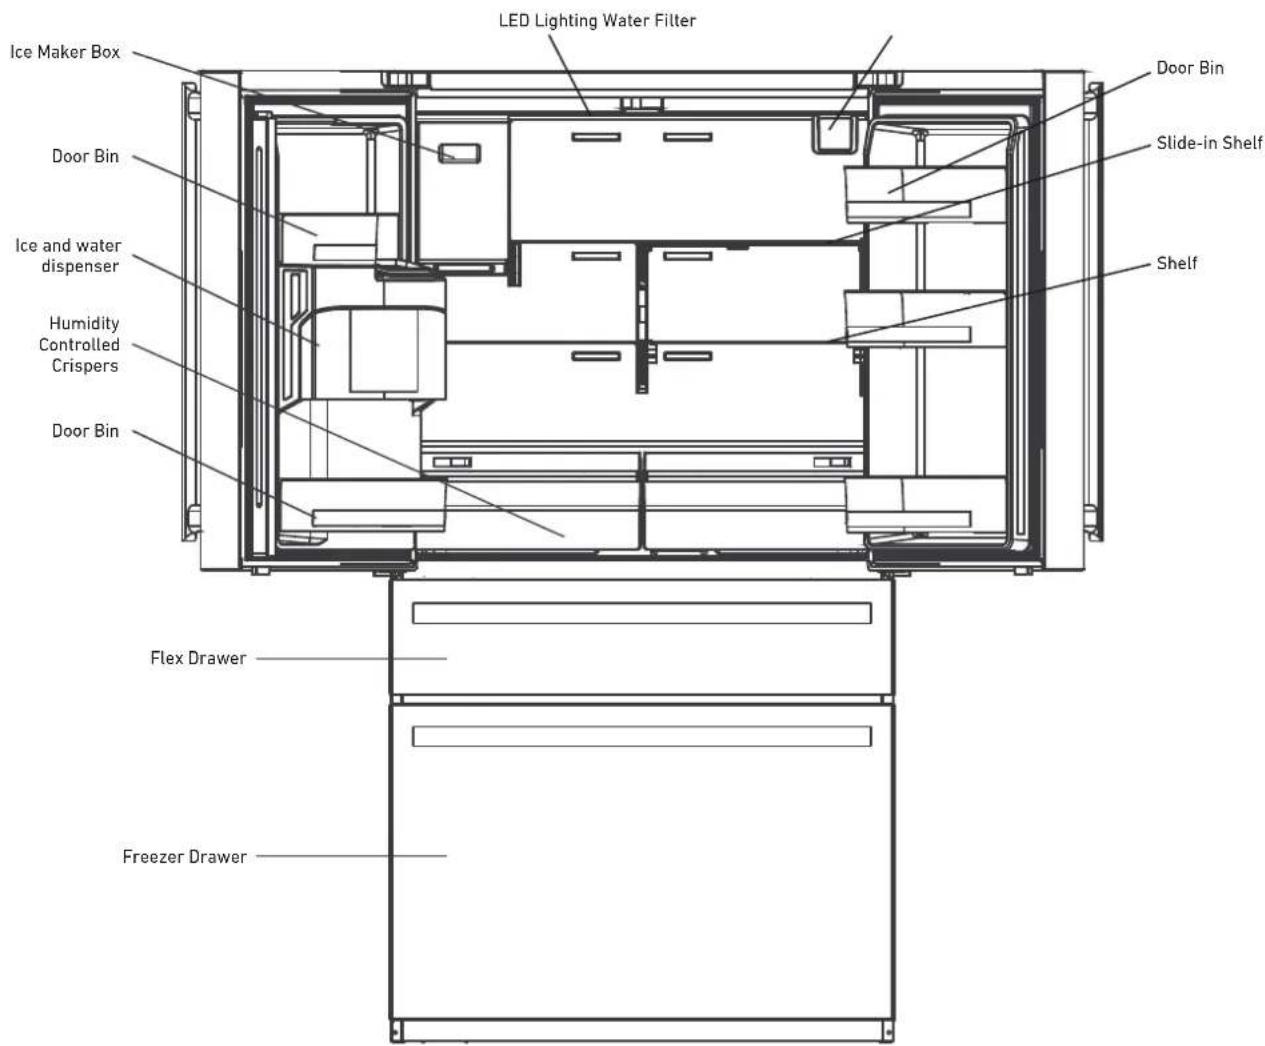
text_image
LED Lighting Water Filter Ice Maker Box Door Bin Ice and water dispenser Humidity Controlled Crispers Door Bin Flex Drawer Freezer Drawer Door Bin Slide-in Shelf Shelftext_image
Display screen Quattro Temp Zone drawer Upper freezer drawer Lower freezer drawerRefrigerator
The refrigerator is suitable for storing a wide variety of fruits, vegetables, beverages, and other foods consumed in the short term.
Cooked foods should not be put into the refrigerator until they have cooled down to room temperature.
Foods should be sealed in appropriate containers before being placed inside the refrigerator.
The glass shelves can be adjusted up or down to customize the storage space and ensure ease of use.
To optimize humidity control in the crisper drawers, slide the selector to the left for fruit (Low) and to the right for vegetables (High). The fruit or vegetable icon will indicate which setting has been selected.
Freezer Drawer
The freezer drawer may keep food fresh for a long time and is used primarily to store frozen foods.
The freezer drawer is suitable for storing meat, fish and frozen entrées and is intended for foods that will not be consumed in the short term.
It is recommended that you divide large cuts of meat into smaller portions for easier defrosting.
To prevent spoilage and foodborne illnesses, consume all foods before the expiration date.

Note:
Storage of too much food in the period immediately following the initial connection to power may adversely affect the appliance's freezing performance. Stored food should not block the air vents; as this will also adversely affect freezing performance.
The Quattro Temp Zone
The Quattro Temp Zone temperature setting can be selected from among the following: -1^/30^ , 1^/34^ , 3^/37^ and 5^/41^ . The appropriate mode can also be chosen based on the requirements of different foods, as described below:
MEAT & FISH mode is set at -1°C/30°F, suitable for meat and fish.
BEVERAGES mode is set at 1°C /34°F, suitable for beverages.
DELI mode is set at 3°C/37°F, suitable for cheese and cold cuts.
WINE mode is set at 5°C/41°F, suitable for wine.
As stainless steel conduction is fast and uniform, the food on the cooling plate can be chilled rapidly and evenly.
Water vapor will adhere to the cooling plate to form a mist, which will help keep the food moist and prevent it from drying out.
3.2 Functions

text_image
-88 °F P/°C No Off to OnOff FRIDGE TEMP Super Cool Sniff to OnOff FREEZER TEMP Super Pressure Sniff to OnOff QUATTRO TEMP ZONE ICE MAKER OnOff ECO MODE OnOff WATER FILTER Reset Flatten to OnOff LOCK/UNLOCK No Off to OnOff ① ABCDEFGHI ②DISPLAY SCREEN
① Temperature zone display
② Quattro Temp Zone Preset Temperature Modes
A) Temperature Decrease
B) Temperature Increase
C) Refrigerator Temperature/Super Cool
D) Freezer Temperature/Super Freeze
E) Quattro Temp Zone
F) Ice Maker On/Off
G) Eco Mode On/Off
H) Water Filter Reset
1) Lock/Unlock
Main control display on the Quattro Temp Zone drawer
When the power is on for the first time, the icons will be semi-bright; all icons will be displayed and scrolled from left to right. When the power is connected for the first time, the icons will be illuminated, the start-up chime will sound and the display will enter regular operation.
When the appliance is powered on for the first time, the refrigerator, freezer, and Quattro Temp Zone temperatures are set at 39°F, 0°F, and 37°F, respectively.
Under normal conditions, if no doors are opened and no buttons are pressed for 30 seconds, the display will be locked and will turn off after 30 seconds. If any button is pressed when the display is off, the display screen will light up and show the current status.
Ice/Water dispenser display and control
When the refrigerator is powered on for the first time, the dispenser display and controls will be fully displayed for 3 seconds before entering normal operation mode (the water dispensing function is the default option when the refrigerator is powered on for the first time).
Locking/Unlocking the display
To unlock the display panel buttons, press the LOCK/UNLOCK button and hold it for 3 seconds until a chime sounds, indicating that the appliance controls are unlocked. To lock the display panel, press the LOCK/UNLOCK button and hold it for 3 seconds.
Refrigerator temperature setting
Press the FRIDGE TEMP button to control the refrigerating temperature, and then press the "-" and "+" temperature control buttons to adjust the refrigerator's temperature. When the "-" button is pressed once, the temperature will drop by 1°C/1°F. After reaching 1°C/34°F, the temperature display will go back to 7°C/44°F. When the "+" button is pressed once, the temperature will rise by 1°C/1°F. After reaching 7°C/44°F, the temperature display will return to 1°C/34°F. The temperature setting will take effect after locking.
Quattro Temp Zone
Press the QUATTRO TEMP ZONE button to select one of the four preset temperature modes. At each touch the temperature mode switches: from MEAT & FISH ( -1^ C/ 30^ F) to BEVERAGES ( 1^ C/ 34^ F), to DELI ( 3^ C/ 37^ F), then to WINE ( 5^ C/ 41^ F). The corresponding temperature is shown on the Temperature Zone display. The settings will take effect after locking.
Freezer drawer
Press the FREEZER TEMP button to select the freezer drawer temperature, and then press the "-" and "+" temperature control buttons to adjust the temperature in the freezer drawer. When the "-" button is pressed once, the temperature will drop by 1°C/1°F. After reaching -22°C/-7°F, the temperature display goes back to -14°C/7°F. When the "+" button is pressed once, the temperature will rise by 1°C/1°F. After reaching -14°C/7°F, the temperature display returns to -22°C/-7°F. The setting will take effect after locking.
Temperature mode
To change the default temperature mode to Celsius or Fahrenheit, press the "+" and "-" buttons simultaneously and hold for 3 seconds.
Water/ice maker dispenser selection:
Touch the button to select the desired mode; the indicator light will come on.

Note:
Water dispenses immediately after the lever is pressed, and ice (cubed and crushed) dispenses 3 seconds after the lever is pressed.
Ice Maker On/Off
When the ice maker is turned on, the ICE MAKER ON/OFF light will come on; when the ice maker is turned off, the ICE MAKER ON/OFF light will turn off after a 3-second delay. Press the ICE MAKER button to turn on the ice maker; the corresponding symbol will light up. Press the ICE MAKER button a second time to turn off the ice maker; the symbol will no longer be lit. The change will take effect after locking.

Note:
The ice maker will dispense ice into the ice-making chamber when the ICE MAKER is on, even if the ice storage box is removed.
Replacing the water filter
Replace the water filter every 6 months or if there is a noticeable reduction in water flow. When the filter is used for more than 6 months and the WATER FILTER symbol flashes, press the WATER-FILTER button for 3 seconds to reset the reminder. The buzzer sounds 3 consecutive times.
Setting the boost modes
Super Cool:
Press and hold the FRIDGE TEMP button for 3 seconds to enter SUPER COOL mode; the fridge icon will turn blue. SUPER COOL mode will take effect after locking. When SUPER COOL mode is activated, the refrigerator temperature is automatically set at 1°C/34°F. When SUPER COOL mode is deactivated, the refrigerator temperature automatically returns to the temperature set before SUPER COOL mode was activated.
Super Freeze:
Press and hold the FREEZER TEMP button to enter SUPER FREEZE mode; the freezer drawer icon will turn blue. SUPER FREEZE mode will take effect after locking.; the freezer temperature is automatically set at -22^/-7^ . When SUPER FREEZE mode is deactivated, the freezer temperature automatically returns to the temperature set before activation of SUPER FREEZE mode.
ECO mode
Press the ECO MODE button to enter Eco mode; the symbol will light up and SUPER FREEZE mode is automatically canceled. The freezer temperature is adjusted to -14^/7^ and the refrigerator temperature to 7^/44^ . Press the ECO MODE button again to exit Eco mode. The symbol will no longer be lit; the freezer and refrigerator temperature will return to the temperature set before entering ECO mode. The change will take effect after locking.
Error codes
When there is an error, the digital temperature display zone will display an error code in locked mode. When multiple errors are detected, those error codes are displayed cyclically and an alarm chime sounds. Press any button to turn off the alarm chime (whether in locked or unlocked mode). After the issue is resolved, the error code will disappear from the digital display zone.
The anti-condensation heater strip
The anti-condensation heater strip can be turned on and off using a button combination: press and hold "ECO MODE" + "FREEZER TEMP" for 3 seconds. The Fahrenheit symbol will flash and, after the lock button is pressed, the anti-condensation heater strip will be turned off.
When the anti-condensation heater strip is off, it can be turned on again by pressing and holding "ECO MODE" + "FREEZER TEMP" for 3 seconds, until the Fahrenheit symbol is no longer flashing. The change will take effect after the lock button is pressed.
The anti-condensation heater strip is for inspection and maintenance convenience; users must not turn off the anti-condensation heater strip, as this could cause condensation to form.
Code Name
| EH | The humidity sensor has failed |
| F5 | The ice maker is failing to release ice |
| F4 | The ice maker sensor has failed |
| CC | The ice maker defrost sensor has failed |
| C9 | The sensor in the ice making chamber has failed |
| CA | Communication between the main control board and the ice making board has failed |
| F6 | Ice maker initialization has failed |
| E0 | Ice maker freezing initialization has failed |
| E1 | Refrigerator temperature sensor failure |
| E2 | Freezer temperature sensor failure |
| E3 | Quattro Temp Zone sensor failure |
| E4 | Refrigerator frost sensor failure |
| E5 | Freezer frost sensor failure |
| E6 | Communication between the display board and the main control board has failed |
| E7 | Ambient temperature sensor failure |
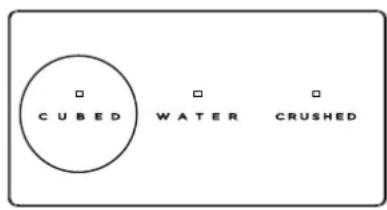
3.3 Ice/Water dispenser
The ice/water dispenser is located on the outside of the refrigerator door. You may select cubed ice, crushed ice, or cold water. The dispenser only works when the refrigerator door is closed.
1) FOR COLD WATER

text_image
CUBED WATER CRUSHED
natural_image
Simple line drawing of a hand holding a cup, with no text or symbols present.1) Press and hold the WATER button until the indicator light comes on.
2) Gently press a glass or cup against the lever until water is dispensed. To end, release the lever. See the images above.
2) FOR CRUSHED ICE

text_image
CUBED WATER CRUSHED
natural_image
Simple line drawing of a hand holding a cup, with no text or symbols present.1) Press and hold the CRUSHED button until the indicator light comes on.
2) Gently press a glass or cup against the lever until crushed ice is dispensed. To end, release the lever. See the images above.

Note:
Align the top of the glass or cup with the opening of the dispenser to prevent ice from spilling over the glass or cup and onto the floor.
3) FOR CUBED ICE
text_image
CUBED WATER CRUSHED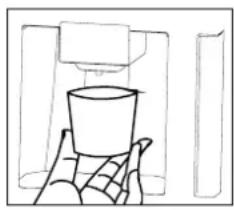
natural_image
Simple line drawing of a cup placed on a tray, no text or symbols present1) Press and hold the CUBED button until the indicator light comes on.
2) Gently press a glass or cup against the lever until cubed ice is dispensed. To end, release the lever. See the images above..

Note:
Align the top of the glass or cup with the opening of the dispenser to prevent ice from spilling over the glass or cup and onto the floor.
3.4 Removing the refrigerator doors/drawers
In some cases you may need to remove the doors and drawers to move the refrigerator through a doorway. The doors can be removed by the following the steps below.
DO NOT REMOVE THE DOORS/DRAWERS UNLESS IT IS NECESSARY.

text_image
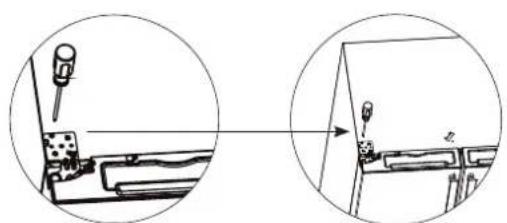
Water line locking ringFigure 1 Figure 2
1) Use a screwdriver to remove the 3 screws, and then remove the upper hinge cover of the left door. See Figure 1.
2) Press the water line locking ring into place, then pull the left door water line out of the connector by hand. See Figure 2.
natural_image
Diagram showing a mechanical assembly with two circular views (one open, one closed) and a tool inserted into a component, no text or symbols present.Figure 3
3) Use the screwdriver to unscrew the 3 screws and the 1 grounding screw securing the upper hinge, remove the plug terminal, then remove the left door. See Figure 3.
4) The right door has no grounding screw. Otherwise, follow the same steps as for the left door.
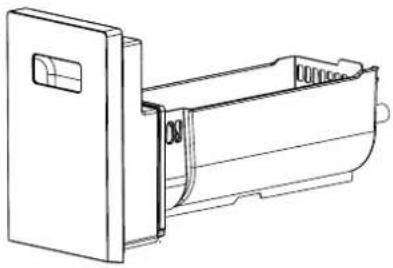
Removing the Quattro Temp Zone drawer
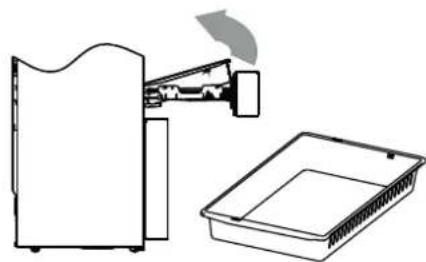
natural_image
Simple line drawing of a kitchen appliance with a tray and a handle (no text or symbols)Figure 4
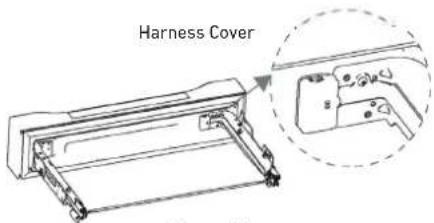
text_image
Harness CoverFigure 5
1) Open the Quattro Temp Zone drawer and pull it out as far as it will go.
2) Lift the near end of the tray by grasping both sides, one in each hand. See Figure 4.
3) Pull the whole tray towards you about 5/8" until the support claws of the slide rails are separated from the tray.
4) Remove the tray from the side rails.
5) Remove the harness cover with a screwdriver or other appropriate tool. See Figure 5.
6) Remove the harness clamp with a screwdriver and unplug the connecting terminal. See Figure 6.
7) Remove the screws on the left and right slide guide supports and have a second person hold the Quattro Temp Zone drawer for support.
8) Lift and angle the Quattro Temp Zone drawer, then pull with both hands to remove.
natural_image
Technical line drawing of a rectangular device with internal components and a separate view showing internal components (no text or symbols)Figure 6

text_image
Screws A B C
natural_image
Two technical line drawings of rectangular electronic components, one with a clip and the other with a triangular cover (no text or symbols)Figure 7
Removal of the stainless-steel cooling plate
1) Use a small flat-bladed screwdriver to pry up a corner of the cooling plate.
2) Lift one side with your hands and gently remove the plate (we recommend wearing work gloves). See Figure 7.
Removing the pull-out drawer
1) Open the freezer drawer as far as it will go.
2) Lift the near end of the pull-out drawer by grasping both sides of the drawer, one in each hand.
3) Pull the slide rails all the way out and push the pull-out drawer forward until the drawer is separated from the support claws on the slide rails. See Figure 8.
4) Remove the pull-out drawer from the side rails.

natural_image
Diagram of a device interior showing internal components and a fan (no text or symbols)Figure 8

natural_image
Line drawing of a pull-out drawer with no text or symbolsRemoving the freezer drawer
1) Open the freezer drawer as far as it will go.
2) Lift the near end of the freezer drawer by holding both sides of the drawer, one in each hand.
3) Pull the whole drawer towards you until the support claws on the slide rails are separated from the drawer.
4) Remove the freezer drawer from the side rails.
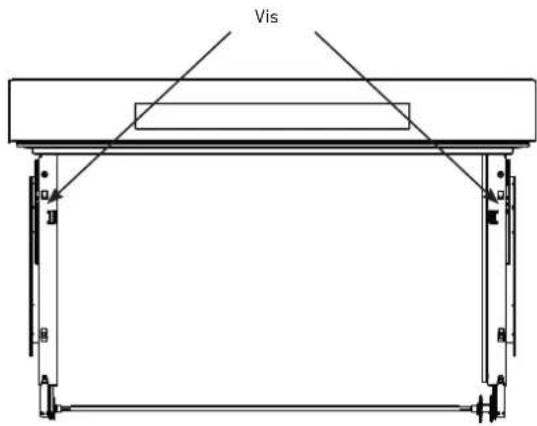
5) Remove the screws on the left and right side rails with a screwdriver and have a second person hold the freezer drawer for support. See Figure 9.
6) Lift the drawer to a suitable angle and pull forward with both hands to remove.
natural_image
Technical line drawing of a mechanical device with two views: top shows internal components, bottom shows front panel (no text or symbols)
text_image
ScrewsFigure 9
4.1 General cleaning
Regularly clean any dust and debris from behind the refrigerator and the floor to improve cooling performance and energy savings.
Check the door seal regularly to make sure there is no debris on it. Clean the door seal with a soft cloth dampened with soapy water or diluted detergent.
Regularly clean the interior of the refrigerator to prevent odors from forming.
Please unplug the power supply before cleaning the interior and remove all food, drinks, shelves, drawers, etc.
Use a soft cloth or sponge to clean the inside of the refrigerator using a mixture of two tablespoons of baking soda and a quart of warm water, then rinse with water and wipe clean. After cleaning, open the door and let the interior air dry before reconnecting the power supply.
For areas inside the refrigerator that are difficult to clean (such as narrow spaces, gaps, or corners), it is recommended that you wipe them down regularly with a soft rag, soft brush, etc., combined with some additional tools (such as wooden toothpicks) to ensure that no contaminants or bacteria build up in these areas.
Do not use soap, detergent, scouring powder, spray cleaner, etc., as these may cause odors in the refrigerator's interior or contaminate food.
Clean the door bins, shelves, and drawers with a soft cloth dampened with soapy water or diluted detergent. Dry with a soft cloth or allow to air dry.
Wipe the outer surface of the refrigerator with a soft cloth dampened with soapy water, detergent, etc., and then wipe dry.
Do not use hard brushes, metal scouring pads, wire brushes, abrasives (such as toothpaste), organic solvents (such as alcohol, acetone, banana oil, etc.), hot water, or acid or alkaline agents, which could damage the refrigerator's interior. Hot water and organic solvents such as benzene may warp or damage plastic parts.
Do not rinse directly with water or other liquids during cleaning, as this may result in short circuits or damage to electrical insulation.

PLEASE UNPLUG THE REFRIGERATOR TO DEFROST AND CLEAN
4.2 Cleaning the door bins

natural_image
Illustration of two hands holding a rectangular object with arrows indicating direction (no text or symbols)Use both hands to grasp and squeeze the bin, push it upwards, then remove. See image above.
After washing, reinstall the bin carefully.
4.3 Cleaning the drawers
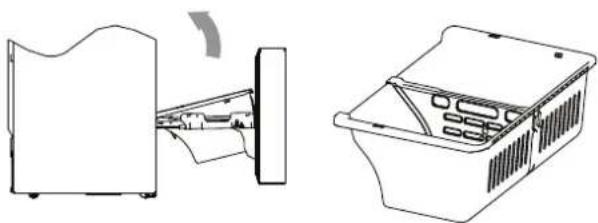
The Quattro Temp Zone drawer
Open the Quattro Temp Zone drawer as far as it will go, grasp the left and right sides of the drawer with both hands, lift the front end and apply a small amount of force to pull down the drawer about 9/16", until the drawer comes off of the slide rail. Lift the front of the drawer, hold it steady and move it horizontally towards the inside of the chamber, then rotate the drawer back and up to remove it. See the image below.
natural_image
Line drawing of a refrigerator with an open lid and a tray, showing no text or symbolsUpper freezer drawer
Open the freezer drawer as far as it will go, lift the front end of the internal upper freezer drawer, pull the slide rail towards the front, then push the drawer forward to separate it from the support clamp on the slide rail. Separate the drawer from the support clamps on the side slide rails using the same method.
Rotate the drawer back and up to remove it once the slide rail support is separated from the drawer.
See the image below.

natural_image
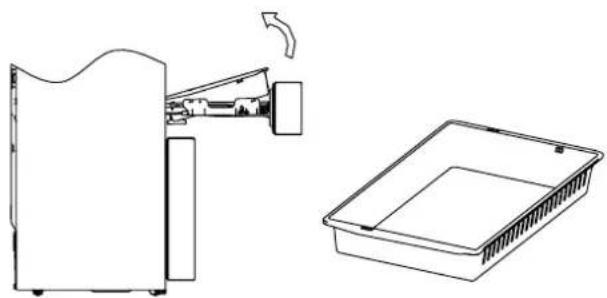
Diagram showing a device being processed into a storage unit, with no visible text or symbols.Lower freezer drawer
Open the freezer drawer as far as it will go, hold the lower drawer by its left and right sides, then lift the front end of the drawer to pull the whole drawer about 9/16" outwards, until the sliding rail support clamp is separated from the drawer; then rotate the drawer back and up to take it out.

natural_image
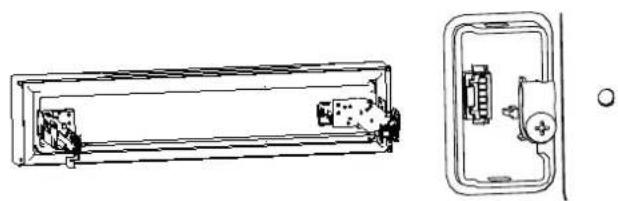
Line drawing of a refrigerator interior showing exterior, front, and side views (no text or symbols)4.4 Cleaning the ice maker box
When you need to use a lot of ice or to clean the ice storage box, you can remove the ice storage box. Be sure to replace the ice storage box before turning the ice maker back on.
natural_image
Technical line drawing of a cabinet or rack unit with internal compartments and mounting brackets (no text or symbols)Hold the ice storage box, press downward, and pull horizontally. See image above.
natural_image
Technical line drawing of a mechanical device with a door and internal casing (no text or symbols)2) Push the ice storage box back in after cleaning.

Note: Be sure to replace the ice storage box before the ice maker is turned back on.
4.5 Defrosting
The refrigerator has a Total No Frost cooling system and therefore has an automatic defrosting function. Frost which forms due to changes of seasons or temperature can be removed manually by disconnecting the appliance from domestic power or by wiping it with a dry cloth.
4.6 Out of operation
Power failure: In the event of a power failure, foods inside the refrigerator can be kept for several hours; during this time, avoid opening the door and do not put any more food into the appliance.
Not in use for an extended period of time: The appliance should be unplugged and then cleaned; the doors should be left open to prevent odors from forming.
Moving: Before the refrigerator is moved, remove all items from inside the appliance, secure glass shelves, drawers, etc., with tape and tighten the leveling feet; close the doors and secure them with tape. The appliance should not be set upside down or laid down horizontally and must not be subjected to vibrations; inclination during transport should be no more than 45°.
5.1 Service
Before calling for service, the following information may help you to determine the potential causes of concern. For further assistance, please contact your local dealer or check our website:
UNITED STATES
http://us.bertazzoni.com/care-service
CANADA
https://ca.bertazzoni.com/more/support
You can also write us via e-mail at: aftersaleservice@bertazzoni.com
| Appliance has no power | >Verify that the appliance is connected to a power source and securely plugged into the power outlet.>Verify that the power outlet has power; if not, check the circuit breaker box for a tripped circuit. |
| Odor from the refrigerator or freezer compartments | >Foods not securely sealed in containers.>Spoiled foods inside the appliance.>Appliance has not been properly cleaned, i.e., food and dirt have accumulated inside the unit. |
| Excessive compressor operation | >It is normal for the refrigerator to run for a long time in summer when the ambient temperature is high.>Too many food items have been placed inside the appliance, increasing energy demand.>Foods have not been properly cooled before being placed inside the appliance.>The doors are being opened too frequently. |
| Light does not turn on | >Verify that the appliance is connected to the power supply and that the light is not damaged.>Have the light replaced by a qualified service technician. |
| Doors do not close properly | >Food is obstructing door operation.>The refrigerator is not level. |
| Rattling noise | >Check that the floor and the refrigerator are level and that the appliance is not tilted.>Check that the water filter is securely installed. |
| Door does not seal properly | >Verify that door seals are clean and free of obstructions. |
| Water pan overflows | >There is too much food in the freezer or the food stored contains too much water, resulting in heavy defrosting.>The doors are not closed properly, resulting in frosting due to entry of air and increased water due to defrosting. |
| Hot housing | >Heat dissipation from the built-in condenser via the housing is normal.>When the housing becomes hot due to high ambient temperature or the storage of too much food, it is recommended that you provide proper ventilation to facilitate heat dissipation. |
| Surface condensation | >Condensation on the exterior surface and door seals of the refrigerator is normal when the ambient humidity is too high. Just wipe away the condensation with a clean towel. |
| Unusual noises | >Buzzing: The compressor may buzz during operation; the buzzing is particularly loud during start or stop. This is normal.>Gurgling: Refrigerant flowing inside of the appliance may produce gurgling noises, which is normal |
| Ice maker does not make ice | >After you install the water line and start the refrigerator, it takes 12 hours for ice making to begin.>Please turn on the ice making function.>Check whether the water pressure is between 30 and 100 PSIG and whether the water line is connected properly.>Check whether the water supply valve is open and whether the water line is obstructed.>Check whether the ice storage box is installed properly. |
| Ice dispenser does not work | >Check whether there is ice in the ice storage box.>If the ice dispenser is not used for an extended period of time, the ice will melt and stick together. Turn off the ice maker, empty the ice storage box, then put it back in place. Turn on the ice maker.>Check whether the water supply line is connected properly, the water supply valve is opened, and whether the water line is obstructed.>The ice dispenser can only be used when the refrigerator door is closed.>Check whether the ice storage box is installed. |
| Water dispenser does not work | >Confirm that the water supply line is connected properly, the water supply valve is opened and that the water line is not obstructed.>Confirm that either the water filter or the dust-proof cap is in place. |
| Water dispensing is too slow | >Check whether the water pressure is between 30-100 PSIG.>Please replace the water filter. |
| Water drips from the water dispenser | >It is normal for a few drops of water to drip from the water dispenser. However, if water keeps dripping, please check the water line connection. |
| The water tastes bad | >If the refrigerator is not used for more than four days, drain off at least one gallon of water>Replace the water filter and continue to follow the filter replacement schedule guidelines. |
6.1 Two year limited warranty statement
WHAT THIS LIMITED WARRANTY COVERS
The warranties provided by Bertazzoni SpA herein apply exclusively to Bertazzoni appliances and accessories sold as new products to the original owner by an authorized Bertazzoni distributor, retailer, dealer or service center and installed in the United States or Canada. The warranties provided herein are not transferable and are valid from the date of installation.
The Warranty coverage provided by Bertazzoni SpA ("Bertazzoni") in this statement applies exclusively to the original Bertazzoni appliance ("Product") sold to the consumer ("Purchaser") by an authorized Bertazzoni dealer/distributor/retailer, purchased and installed in the United States, District of Columbia, or Canada which has always remained within the country of original purchase (United States, District of Columbia, or Canada).
Warranty coverage is activated on the date of original retail purchase of the Product and has a duration of two (2) years.
Warranty coverage is non-transferrable.
In the event of parts replacement or entire product replacement, the replacement Product (or parts) shall assume the remaining original Warranty activated with original retail purchase document. This Warranty shall not be extended with respect to such replacement.
Bertazzoni SpA will repair or replace any component/part which fails or proves defective due to materials and/or workmanship within 2 years from the date of original retail purchase and under conditions of normal residential, non-commercial use.
Repair or replacement will be free of charge, including labor at standard rates and shipping expenses. Purchaser is responsible for making the Product reasonably accessible for service. Repair service must be performed by a Bertazzoni Authorized Service company during normal working hours. Labor performed at overtime or premium rates shall not be covered by Warranty.

IMPORTANT:
retain proof of original purchase to olish warranty period.
Bertazzoni's liability on any claim of any kind, with respect to the goods and/or services provided, shall in no event exceed the value of the goods or service or part thereof which gives origin to the claim.
30 Day Cosmetic warranty
Inspection of the product must be made by Purchaser at time of delivery.
Bertazzoni warrants that the Product is free from manufacturing defects in materials and workmanship for a period of thirty (30) days from date of original retail purchase of the Product.
This coverage includes:
Paint blemishes
Chips
Macroscopic finish defects
Cosmetic warranty does NOT cover:
issues resulting from incorrect transport, handling and/or installation (i.e: dents, broken, bowed or deformed structures or components, shattered glass components)
slight color variations in painted/enameled components
differences caused by natural or artificial lighting, location or other analogous factors
stains/corrosion/discoloration caused by external substances and/or environmental factors
labor costs, display, floor, B-stock, out-of-box, "as is" appliances and demo units.
HOW TO OBTAIN SERVICE
To receive warranty service, the Purchaser must contact Bertazzoni Service for problem determination and correct service procedures.
Model number, serial number and date of original retail purchase will be requested.

IMPORTANT:
retain proof of original purchase to blish warranty period.
If located in the USA
866 905 0010
https://us.bertazzoni.com/more/support
If located in CANADA
800 561 7265
https://ca.bertazzoni.com/more/support
WARRANTY EXCLUSIONS – WHAT IS NOT COVERED
Use of the Product in any non-residential, commercial application
Use of the Product for anything other than its intended scope
Repair service provided by other than a Bertazzoni authorized service agency.
Damage or repair service to correct service provided by an unauthorized agency or the use of unauthorized parts.
Installation not in accordance with local/state/city/county fire codes, electrical codes, gas codes, plumbing codes, building codes, regulations, or laws.
Defects or damage due to improper storage of the Product.
Defects or damage or missing parts on products sold out of the original factory packaging or from displays.
Service calls or repairs to correct the incorrect installation of the product and/or related accessories.
Replacement of parts/service calls to connect, convert or otherwise repair the electrical wiring and/or gas line to properly use the product.
Replacement of parts/service calls to provide instructions and education on the use the Product.
Replacement of parts/service calls to correct issues due to product usage in manner other than what is normal and customary for residential use.
Replacement of parts/service calls due to wear and tear such as gaskets, knobs, pan supports, shelving, cutlery baskets, buttons, touch displays, scratched or broken ceramic glass tops
Replacement of parts/service calls for lack of/improper maintenance such as but not limited to: residue build up, stains, scratches, discoloration, corrosion
Replacement of glass components and light bulbs if claim arises after 30 days from original retail purchase date.
Defects and damages arising from accidents, alteration, misuse, abuse, improper installation.
Defects and damages arising from transport, logistics and handling of the Product. Inspection of the product must be made at time of delivery. Any issues from handling, transport and logistics must be notified to selling dealer/delivery company after receipt and inspection.
Defects and damage arising from external forces beyond the control of Bertazzoni SpA including but not limited to wind, rain, sand, fires, floods, mud slides, freezing temperatures, excessive moisture or extended exposure to humidity, power surges, lightning, structural failures surrounding the appliance and other acts of God.
Products with altered/damaged/tampered serial number.
In no case shall Bertazzoni be liable or responsible for damage to surrounding property, including furniture, cabinetry, flooring, panels and other structures surrounding the Product.
Bertazzoni is not liable nor responsible for the Product if located in a remote area or an area where certified trained technicians are not reasonably available. Purchaser must bear any transportation and delivery costs of the Product to the nearest authorized Service center or for the additional displacement rates of a certified trained technician.
THERE ARE NO EXPRESS WARRANTIES OTHER THAN THOSE LISTED AND DESCRIBED ABOVE, AND NO WARRANTIES WHETHER EXPRESS OR IMPLIED, INCLUDING, BUT NOT LIMITED TO, ANY IMPLIED WARRANTIES OF MERCHANTABILITY OR FITNESS FOR A PARTICULAR PURPOSE, SHALL APPLY AFTER THE EXPRESS WARRANTY PERIODS STATED ABOVE, AND NO OTHER EXPRESS WARRANTY OR GUARANTEE GIVEN BY ANY PERSON, FIRM OR CORPORATION WITH RESPECT TO THIS PRODUCT SHALL BE BINDING ON BERTAZZONI. BERTAZZONI SHALL NOT BE LIABLE FOR LOSS OF REVENUE OR PROFITS, FAILURE TO REALIZE SAVINGS OR OTHER BENEFITS, TIME AWAY FROM WORK, MEALS, LOSS OF FOOD OR BEVERAGES, TRAVELING OR HOTEL EXPENSES, EXPENSES TO RENT OR PURCHASE APPLIANCES, REMODELLING/CONSTRUCTION EXPENSES IN EXCESS OF DIRECT DAMAGES WHICH ARE DEFINITIVELY CAUSED EXCLUSIVELY BY BERTAZZONI, OR ANY OTHER SPECIAL, INCIDENTAL OR CONSEQUENTIAL DAMAGES CAUSED BY THE USE, MISUSE OR INABILITY TO USE THIS PRODUCT, REGARDLESS OF THE LEGAL THEORY ON WHICH THE CLAIM IS BASED, AND EVEN IF BERTAZZONI HAS BEEN ADVISED OF THE POSSIBILITY OF SUCH DAMAGES. NOR SHALL RECOVERY OF ANY KIND AGAINST BERTAZZONI BE GREATER IN AMOUNT THAN THE PURCHASE PRICE OF THE PRODUCT SOLD BY BERTAZZONI AND CAUSING THE ALLEGED DAMAGE. WITHOUT LIMITING THE FOREGOING, PURCHASER ASSUMES ALL RISK AND LIABILITY FOR LOSS, DAMAGE OR INJURY TO PURCHASER AND PURCHASER'S PROPERTY AND TO OTHERS AND THEIR PROPERTY ARISING OUT OF THE USE, MISUSE OR INABILITY TO USE THIS PRODUCT SOLD BY BERTAZZONI NOT CAUSED DIRECTLY BY THE NEGLIGENCE OF BERTAZZONI.
THIS LIMITED WARRANTY SHALL NOT EXTEND TO ANYONE OTHER THAN THE ORIGINAL PURCHASER OF THIS PRODUCT, IS NON-TRANSFERABLE AND STATES YOUR EXCLUSIVE REMEDY.
Bertazzoni does not assume any responsibility for incidental or consequential damages. Some states do not allow the exclusion or limitation of incidental or consequential damages, so the above limitation or exclusion may not apply to you. This warranty gives you specific legal rights and you may also have other rights which may vary from state to state or province to province.
Any questions about this Limited Warranty may be directed to Bertazzoni Customer Care
If located in the USA:
866 905 0010
https://us.bertazzoni.com/more/support
If located in CANADA:
800 561 7265
https://ca.bertazzoni.com/more/support
1 AVERTISSEMENTS RELATIFS À LA SÉCURITÉ 32
text_image
Diagram showing hand gesture with checkmark and smiley face, alongside a separate hand holding a pencil and a smiling face on the right.natural_image
Simple line drawing of a plug with a bulb and a warning symbol (no text or labels)natural_image
Simple line drawing of a room with a cabinet and a window, no text or symbols presentnatural_image
Simple line drawing of a refrigerator with a digital display and a no-smoking symbol (no text or labels)natural_image
Simple line drawing of a refrigerator with tools and a prohibition symbol (no text or labels)natural_image
Hand holding a vertical object with a starburst effect, no text or symbols presentnatural_image
Illustration of a child climbing a ladder inside a refrigerator (no text or symbols)natural_image
Simple line drawing of a distressed, anthropomorphic object resembling a tower with boxes and a sad face (no text or symbols)text_image
Illustration showing a hand holding a tray with labeled items including a bottle, boxes, and a cross symbol, alongside a warning icon.text_image
Compartment de congélation BeerÉLIMINATION CORRECTE DU PRODUIT

text_image
Technical diagram of a door panel with labeled components and connectors, showing two numbered parts and mounting points.Image 8

text_image
Orifice Vis ③ ④ ③ ④Image 9
Remarque
natural_image
Technical line drawing of a mechanical assembly with directional arrows indicating movement (no text or symbols)natural_image
Technical line drawing of a mechanical bracket assembly (no text or symbols)natural_image
Technical line drawing of a mechanical assembly with a lever and base (no text or symbols)natural_image
Technical line drawing of a refrigerator with labeled components A and B (no text or symbols beyond labels)text_image
Technical diagram showing a hand holding a connector with labeled parts A, B, and C, alongside an exploded view of the device's internal components.Ruban chauffant anti-condensation
text_image
CUBED WATER CRUSHED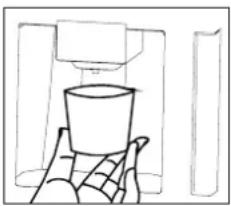
natural_image
Simple line drawing of a hand holding a cup, with no text or symbols present.text_image
CUBED WATER CRUSHED
natural_image
Simple line drawing of a hand holding a cup, with no text or symbols presenttext_image
CUBED WATER CRUSHED
natural_image
Simple line drawing of a hand holding a cup, with no text or symbols present.natural_image
Diagram showing two views of a mechanical device with a tool inserted, no text or symbols presentImage 3
natural_image
Diagram of a kitchen appliance with a lid and tray, showing a handle and cover (no text or symbols)Image 4

text_image
Cache de la fixationImage 5
natural_image
Technical line drawing of a mechanical device with internal components and housing (no text or symbols)Image 6
text_image
Vis A B A B
natural_image
Two technical line drawings of rectangular electronic components, one with a clip and the other with a triangular cover (no text or symbols)natural_image
Diagram of a device interior showing internal components and a curved top view (no text or symbols)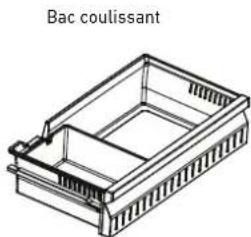
natural_image
Line drawing of a Bac coulissant container with internal compartments (no text or symbols)natural_image
Technical line drawing showing a device with internal components and a separate 3D view of the interior space (no text or symbols)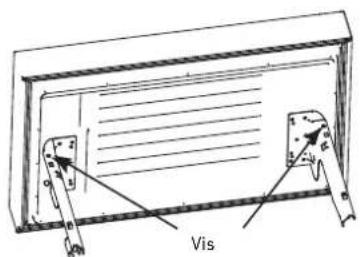
text_image
VisImage 9
natural_image
Illustration of two hands holding a rectangular object with arrows indicating direction (no text or symbols)natural_image
Line drawing of a refrigerator with an open lid and a side view showing the exterior portion (no text or symbols)natural_image
Diagram showing a device being processed into a storage unit, with no visible text or symbols.natural_image
Line drawing of a refrigerator interior showing exterior and front views (no text or symbols)natural_image
Technical line drawing of a cabinet or rack unit with internal compartments and mounting brackets (no text or symbols)natural_image
Technical line drawing of a mechanical device with a door and internal casing (no text or symbols)https://ca.bertazzoni.com/more/support
https://us.bertazzoni.com/more/support
https://ca.bertazzoni.com/more/support
EXCLUSIONS DE GARANTIE - CE QUE LA GARANTIE NE COUVRE PAS
https://us.bertazzoni.com/more/support
https://ca.bertazzoni.com/more/support
text_image
Diagram showing hand gesture with checkmark and smiley face, alongside a hand holding a pencil and a smiling face on the right.natural_image
Simple line drawing of a plug with a circular socket and a warning symbol (no text or labels)natural_image
Simple line drawing of a refrigerator with a hand placed on top, no text or symbols presentnatural_image
Simple line drawing of a cabinet with a front-mounted box and a hanging door (no text or symbols)natural_image
Simple line drawing of a refrigerator, battery pack, and tools (no text or symbols)natural_image
Hand holding a vertical object with a starburst effect, no text or symbols presentnatural_image
Simple line drawing of a child climbing a staircase inside a refrigerator (no text or symbols)natural_image
Simple line drawing of a cartoon character with a frowning expression, surrounded by boxes and a warning symbol (no text or labels)text_image
Illustration showing a hand holding a tray with labeled items including a bottle, boxes, and a cross symbol, alongside an exclamation mark.text_image
Lead Dred Natural producttext_image
Proportional Alicatestext_image
Technical diagram of a device with labeled components, showing numbered parts and connectors.Figura 8

text_image
El orificio El tornillo ③ ④ ③ ④Figura 9

natural_image
Pure technical line drawing of a mechanical component with arrows indicating direction (no text or symbols)natural_image
Technical line drawing of a mechanical bracket assembly (no text or symbols)natural_image
Technical line drawing of a mechanical assembly with no visible text or symbolsnatural_image
Technical line drawing of a refrigerator with labeled components A and B (no text or symbols beyond labels)text_image
Technical diagram showing a hand holding a connector with labeled parts A, B, and C, alongside an exploded view of the component.text_image
C U B E D W A T E R CRUSHED
natural_image
Simple line drawing of a hand holding a cup, with no text or symbols presenttext_image
CUBED WATER CRUSHED
natural_image
Simple line drawing of a hand holding a cup, with no text or symbols presenttext_image
CUBED WATER CRUSHED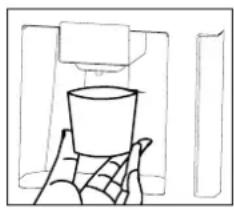
natural_image
Simple line drawing of a cup placed on a tray, no text or symbols presentnatural_image
Diagram showing a mechanical assembly with two circular views (one open, one closed) and a close-up of a component labeled 'Z' (no text or symbols present)Figura 3
natural_image
Simple line drawing of a kitchen appliance with a lid and tray, no text or symbols presentFigura 4

text_image
Tapa del arnésFigura 5
natural_image
Technical line drawing of a rectangular device with internal components and a separate view showing internal components (no text or symbols)Figura 6

text_image
Tornillos
natural_image
Two technical line drawings of rectangular electronic components, one with a clip and the other with a triangular cover (no text or symbols)Figura 7
natural_image
Diagram of a mechanical device with internal components and a curved arrow indicating motion (no text or symbols)Figura 8

natural_image
Isometric line drawing of a rectangular container with internal compartments (no text or symbols)natural_image
Technical line drawing of a refrigerator with internal compartments and storage bins (no text or symbols)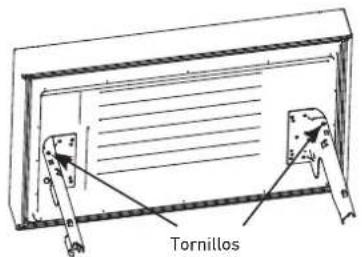
text_image
TornillosFigura 9
4.1 Limpieza general
natural_image
Illustration of two hands holding a rectangular object with directional arrows indicating movement or force (no text or symbols)natural_image
Line drawing of a kitchen appliance with a side view showing a handle and tray (no text or symbols)natural_image
Diagram showing a device with internal components and a separate storage unit (no text or symbols)natural_image
Line drawing showing a device being processed into a storage unit (no text or symbols present)natural_image
Technical line drawing of a cabinet or enclosure with internal compartments and mounting brackets (no text or symbols)natural_image
Technical line drawing of a mechanical device with a door and internal casing (no text or symbols)https://ca.bertazzoni.com/more/support
https://us.bertazzoni.com/more/support
https://ca.bertazzoni.com/more/support
EXCLUSIONES DE LA GARANTÍA – QUÉ NO CUBRE
https://us.bertazzoni.com/more/support
https://ca.bertazzoni.com/more/support