
BR700 - Weather Station Buienradar - Free user manual and instructions
Find the device manual for free BR700 Buienradar in PDF.

| Product Type | Weather station with wireless outdoor sensor |
| Brand | Buienradar |
| Model | BR700 |
| Power Supply (indoor unit) | 2 AA alkaline batteries 1.5 V (not included) or USB adapter 5 V DC |
| Power Supply (outdoor sensor) | 2 AA batteries 1.5 V (preferably lithium) |
| Recommended Batteries | Alkaline for indoor unit, lithium for outdoor sensor |
| Display | LCD with adjustable backlight (3 levels) |
| Indoor Temperature | 0 °C to 50 °C (accuracy ±1 °C from 0 to 40 °C, ±2 °C beyond) |
| Outdoor Temperature | -20 °C to 70 °C (accuracy ±1 °C from 0 to 40 °C, ±2 °C elsewhere) |
| Humidity (indoor/outdoor) | 20 %RH to 95 %RH (accuracy ±5 % from 40 to 80 %, ±8 % elsewhere) |
| Atmospheric Pressure | 600 hPa to 1100 hPa (accuracy ±5 hPa) |
| Radio Frequency | 433.92 MHz |
| Transmission Range | Up to 200 m in open field |
| Number of Supported Sensors | Up to 3 outdoor sensors (1 included) |
| Alarm Functions | Dual alarm with snooze function (5 min), adjustable temperature and humidity alarms |
| Weather Forecast | Based on barometric trend, displayed by icons (sunny, cloudy, rainy, snowy, stormy) |
| Moon Phases | Display of 8 moon phases |
| Backlight | Always on with adapter, temporary (10 s) on batteries; adjustable 3 levels |
| Cleaning | Soft cloth slightly damp, no solvents, special cloth for screen |
| Safety | Keep out of reach of children under 8 years, do not disassemble, avoid water and heat |
| Included Accessories | 1 weather station, 1 outdoor sensor, 1 USB cable, 1 instruction manual |
| Warranty | 24 months from date of purchase |
Frequently Asked Questions - BR700 Buienradar
User questions about BR700 Buienradar
0 question about this device. Answer the ones you know or ask your own.
Ask a new question about this device
Download the instructions for your Weather Station in PDF format for free! Find your manual BR700 - Buienradar and take your electronic device back in hand. On this page are published all the documents necessary for the use of your device. BR700 by Buienradar.
USER MANUAL BR700 Buienradar
1.4 DRAADLOZE BUITENSENSOR
5 LUCHTDRUK
5.1 TRENDWEERGAVE VAN LUCHTDRUK
WEERSTATION (BINNENUNIT):
30-40% & 80-90%: ±8%
30-40% & 80-90%: ±8%
Luchtdruk:
DRAADLOZE BUITENSENSOR
30-40% & 80-90%: ±8%
Opmerking:
1 INTRODUCTION....19
5 PRESSION D'AIR
5.1 AFFICHAGE DE LA TENDANCE DE LA PRESSION D'AIR
30-40% & 80-90%: ±8%
Pression d'air:
Placement: debout/au mur
support@commaxxgroup.com
9 ENTRETIEN
11 DÉCLARATION DE CONFORMITÉ
1 INTRODUCTION....34
1.1 General 34
1.2 Display-unit 34
1.3 Weather station.... 35
1.4 Wireless remote sensor 36
2 INSTALLATION 36
2.1 General 36
2.2 Setting the date and time 37
2.3 Alarm function (2 alarm setting) 37
2.3.1 Checking the alarm 37
2.3.2 Activating the alarm function 37
2.3.3 Setting alarm times 38
2.3.4 Alarm tone and snooze function....38
2.4 Pairing the weather station and wireless remote sensor 38
2.4.1 Pairing devices automatically.... 38
2.4.2 Manual signal reception 39
2.4.3 Channel selection/scan mode 39
2.5 Temperature....39
2.5.1 Celsius/Fahrenheit 39
2.5.2 Temperature and humidity alarm setting....39
2.5.3 Temperature and humidity trend 40
2.5.4 Max/Min display temperature and humidity 41
3 WEATHER FORECAST 41
3.1 Weather forecast explanation 41
3.2 Weather forecast symbols.... 41
4 MOON PHASE 41
5 AIR PRESSURE 42
5.1 Trend display of the air pressure....42
5.2 Checking air pressure history 42
6 BACKLIGHT 42
7 SPECIFICATIONS....42
8 TROUBLESHOOTING 44
9 MAINTENANCE 45
10 DISPOSAL OF THE DEVICE (ENVIRONMENT)....46
11 DECLARATION OF CONFORMITY 46
12 WARRANTY TERMS AND CONDITIONS 46
1 INTRODUCTION
1.1 GENERAL
Make sure to read the instruction manual carefully of this weather station BR700. This information will help you to familiarize yourself with your new weather station, to learn all of its functions and get advice in case of problems. Following the instructions can prevent damage to your device. We shall not be liable for any damage that occurs as a result of not-following of these instructions. Please keep this instruction manual for future reference.
ATTENTION:
- Please follow the instructions for operation.
- Please use the original or manufacturer specified attachments or accessories.
- Do not disassemble the product, so as to avoid safety hazards.
- Do not place any items on top of the product that may damage the product.
- Do not place the product near water source or in a damp place.
- Please terminate use immediately upon damage, which is caused as a result of improper use or repair by a non-factory approved technician.
- Do not place the product in places that are exposed to direct sunlight and high temperature such as radiator, electric heater, stove, etc.
- Keep the product away from strong electromagnetic waves, strong static electricity, or moisture and condensation.
- The BR700 is not a toy. Keep the indoor unit, outdoor unit and adapter out of reach of children under 8 years of age.
- Clean your device with a soft damp cloth. Do not use aggressive solvents or scouring agents.
1.2 DISPLAY-UNIT
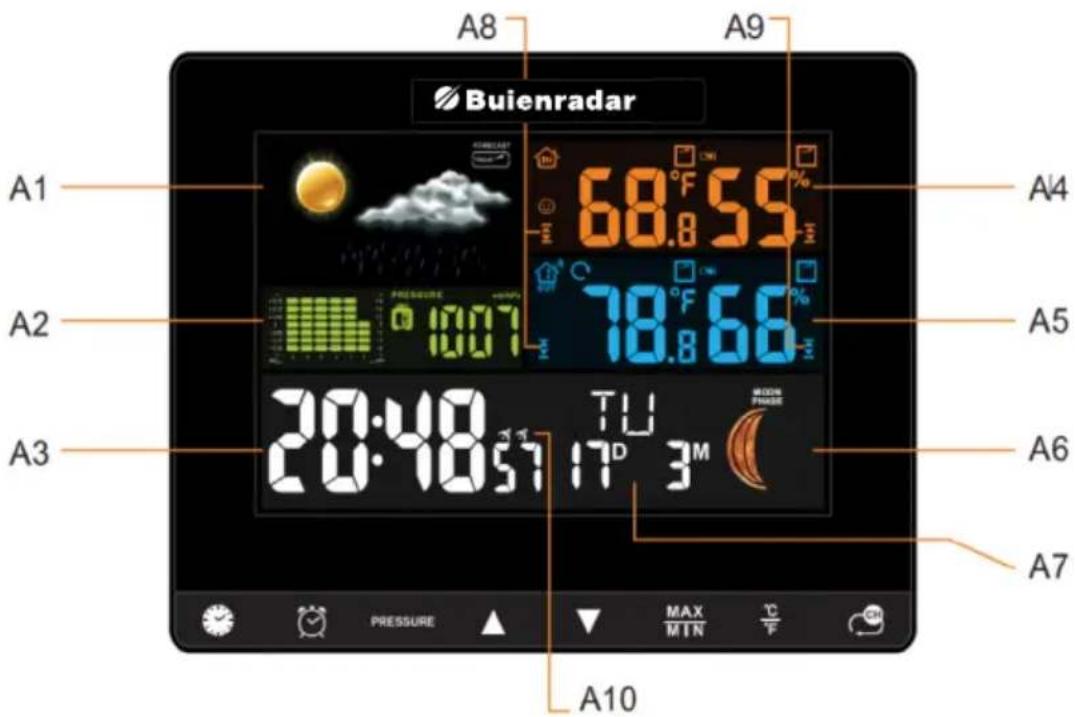
A1: Weather forecast
A2: Air pressure
A3: Time of day
A4: Indoor temperature and humidity
A5: Outdoor temperature and humidity
A6: Moon phase
A7: Date
A8: Temperature alarm
A9: Humidity alarm
A10: Alarm function
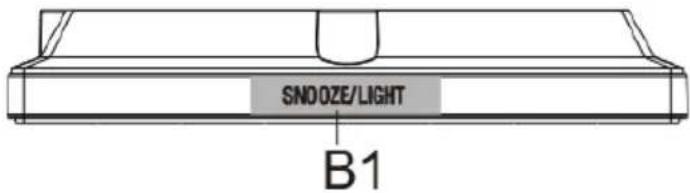
1.3 WEATHER STATION
B1: Snooze function/backlight

set time
(press for more than 2 sec. to set)

set alarm
(press for more than 2 sec. to set)

air pressure display history
up/down on setting


max. and min. values

Celsius/Fahrenheit
channel selection/scan function
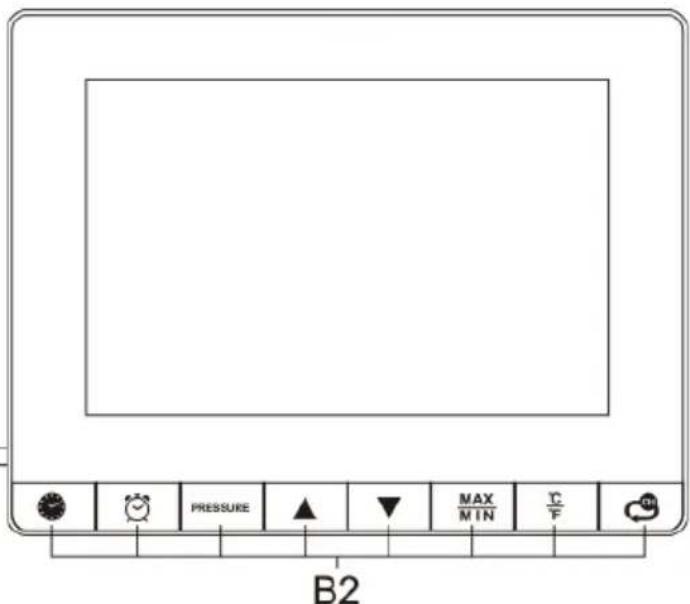
B2: front operation buttons
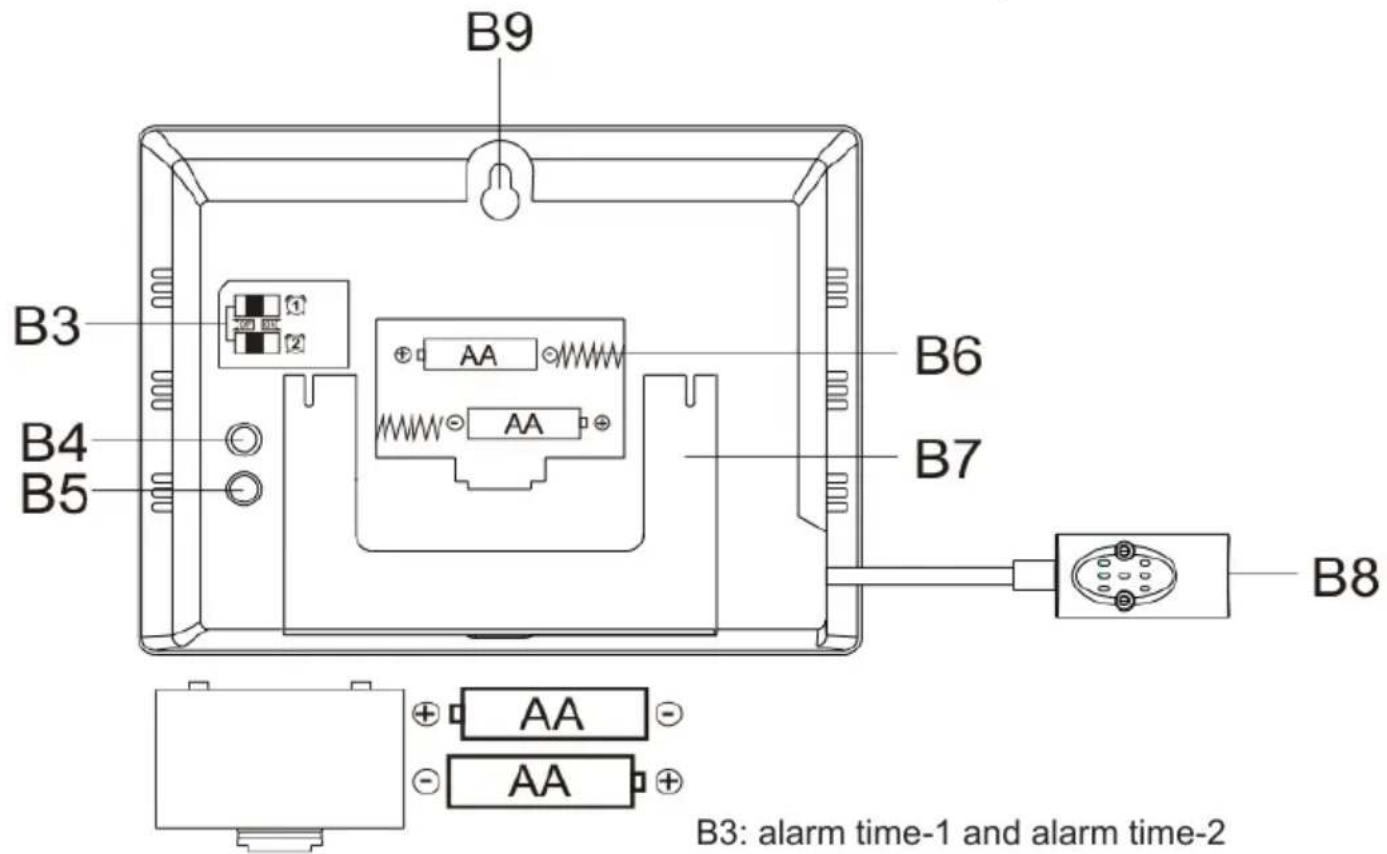
B3: alarm time-1 and alarm time-2
B4: setting temperature and humidity alarms
B5: logging wireless sensor
B6: battery compartment (2X alkaline 1,5V AA)
B7: foldable stand
B8: 5V DC adapter jack
B9: hole for wall mounting
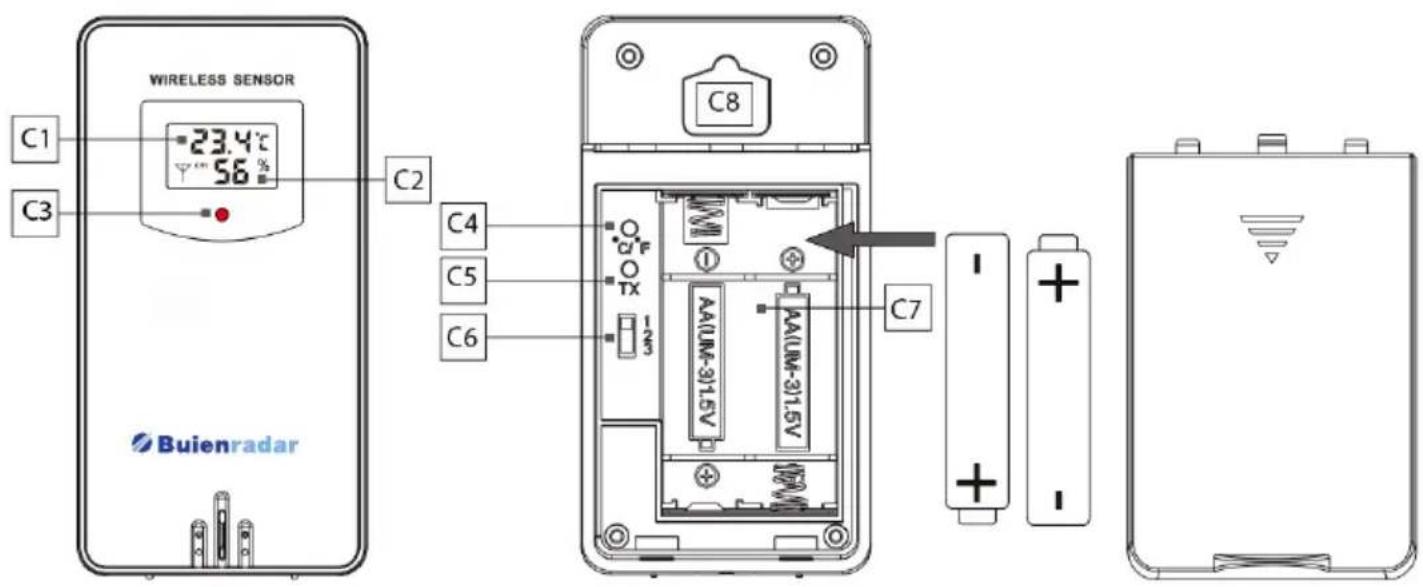
1.4 WIRELESS REMOTE SENSOR
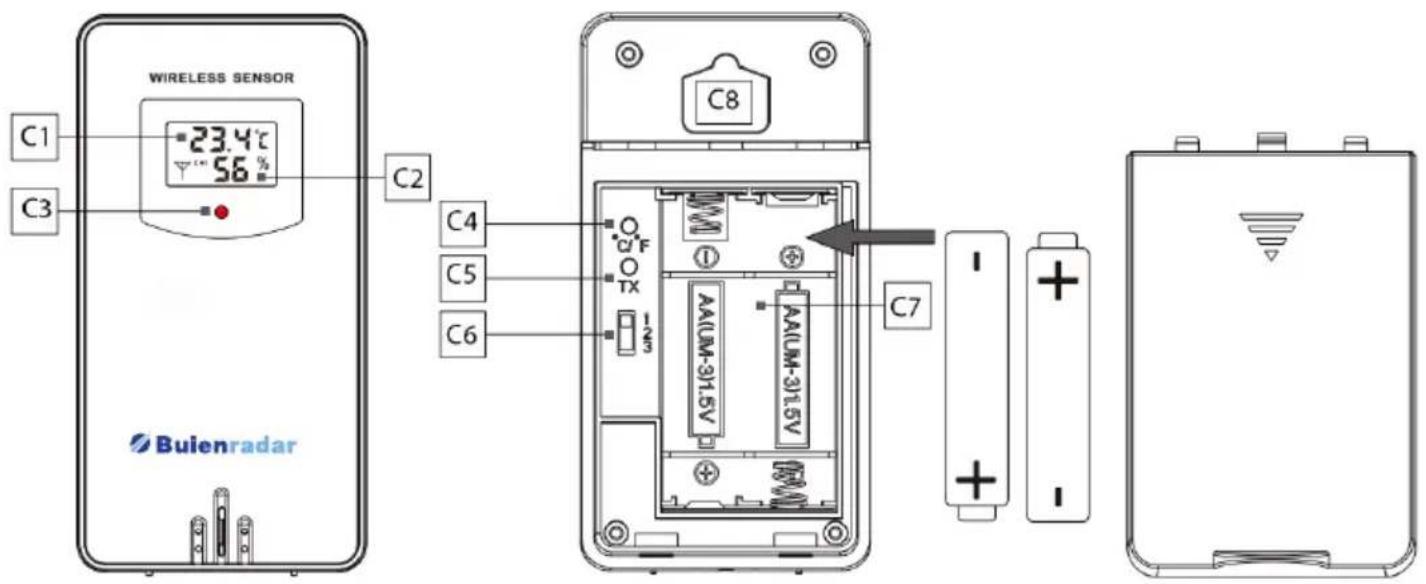
C1: temperature display
C2: humidity display
C3: transmission signal light. This lights up when the outdoor sensor sends data to the weather station.
C4: °C/°F button
C5: TX button: transmitting button to send a signal to the weather station in order to (re)link the units.
C6: channel selection 1,2,3
C7: battery compartment
C8: hanging hole for wall mounting
2 INSTALLATION
2.1 GENERAL
Open the battery compartment cover of the weather station and insert 2 alkaline 1,5V AA batteries. Note the correct polarity of the batteries [ “+” and “-” ]. Connect the 5V DC power adapter to power the weather station. The display will light up.
Open the battery compartment of the wireless remote sensor and insert preferably 2 lithium 1,5V AA batteries. Ensure correct polarity of the batteries [ “+” and “-” ].
Select the same channel for both the weather station and the wireless remote sensor. Only then can the weather station connect with the remote sensor. A connection will be established with the outdoor unit within 3 minutes. During this link, a blinking RF symbol · is visible. The measured humidity and temperature will be displayed.
For specific logon functions of the weather station and the wireless remote sensor see chapter 2.4 "Pairing weather station and wireless remote sensor".
2.2 SETTING THE DATE AND TIME
Set the date, time and other functions as follows.
Long press 📂 button for two seconds.
- The year display “2020” starts to flash. Press “▲” or “▼” to set the correct year.
Press
to confirm your setting.
- The month display starts to flash. Press “▲” or “▼” to set the correct month.
Press
to confirm your setting.
- The date display starts to flash. Press “▲” or “▼” to set the correct date.
Press
to confirm your setting.
"M" and "D" will be flashing, press "▲" or "▼" to set the date display to Month/
Date or Date/Month. Press to confirm your setting.
- The language selection for the day of the week starts to flash. Now use the “▲” or “▼” buttons to select a language. There are 7 languages available for the day of the week. Press the clock symbol to confirm your setting. ((EN (English), FR (French), IT (Italian), SP (Spanish), DU (Dutch), DA (Danish), GE (German)).
- The time displays either in 12 or 24 hour format. Press “▲” or “▼” to choose 12hr or 24hr. Press to confirm your setting.
- The hour display starts to flash. Press “▲” or “▼” to set the correct hour.
Press
to confirm your setting.
- The minute display starts to flash. Press “▲” or “▼” to set the correct minute.
Press
to confirm your setting.
- The weather icon display starts to flash. Press “▲” or “▼” to set the weather-icon. Please set the weather icon according to the local weather condition outside. Press to confirm your setting and complete the setup.
Note:
During the setup, if there is no operation of buttons within 20 seconds, the weather station will save the current setting and automatically return to normal display from manual setting mode.
2.3 ALARM FUNCTIONS (2 ALARMS)
2.3.1 Checking the alarm:
Press button.
Press 1x: display time of alarm 1
Press 2x: display time of alarm 2
Press 3x: display current time
2.3.2 Activating the alarm function:
When the switch of alarm 1 or alarm 2 on the back of the weather station is moved to "ON" position, the symbol or will appear on the screen. The alarm function is activated. When the switch of alarm 1 or alarm 2 on the back of the weather station is moved to "OFF" position, the symbol or will disappear from the screen. The alarm function is deactivated.
2.3.3 Setting the alarm times:
- Press and hold button for two seconds, the hour of alarm 1 starts to flash.
Press “▲” or “▼” buttons to set the required hour. Press to confirm your setting.
- The minute of alarm 1 starts to flash. Press “▲” or “▼” to set the required minute.
Press ☒ to confirm your setting.
- The hour of alarm 2 starts to flash. Press “▲” or “▼” to set the required hour.
Press ☒ to confirm your setting.
- The minute of alarm 2 starts to flash. Press “▲” or “▼” to set the required minute.
Press ☒ to save and complete the setup.
2.3.4 Alarm tone and snooze function:
The alarm will ring for 2 minutes, pressing any button except "SNOOZE/LIGHT" will stop the tone. The alarm will repeat at the same time the next day.
- While the alarm is ringing, touch "SNOOZE/LIGHT" to activate the snooze function. When the snooze function is activated, or will keep flashing on the display. The alarm will ring again in 5 minutes.
- When the snooze function is activated, press any button except "SNOOZE/LIGHT" to exit the snooze mode.
Note:
During the setup of the alarms, if there is no operation of buttons within 20 seconds, the weather station will save the current setting and automatically return to normal display.
2.4 PAIRING THE WEATHER STATION AND WIRELESS REMOTE SENSOR
2.4.1 Pairing devices automatically:
- Connect the weather station to power supply.
- Select a channel that permanently displays on the weather station. Press button to select channel 1, 2 or 3.
- Select the same channel for the wireless remote sensor: open the battery compartment to select the desired channel (1, 2 or 3). The signal light will illuminate once to indicate that the wireless remote sensor is transmitting signals.
- The RF signal icon will appear on the indoor unit display. This will flash for 3 minutes, indicating that the weather station is in reception mode and waiting for the outdoor wireless sensor to be connect.
- If the RF signal icon stops flashing after 3 minutes, press the "SENSOR" button for more than 2 seconds on the "SENSOR" button on the back of the weather station to reactivate the receiving mode of the weather station. The RF signal icon will flash again.
- It is possible to register 3 outdoor sensors. If multiple sensors are used simultaneously, repeat the above operations to connect them. Make sure these sensors are on different channels configured
- Press the button on the weather station to view the readings from each channel.
2.4.2 Manuel signal reception:
If there is no outdoor temperature showing on the weather station or there is no change in the temperature and humidity for a long time, it indicates that the weather station fails to receive signals from the wireless remote sensor, please take the following operations:
- Please ensure that the channels of the weather station and wireless remote sensor are the same.
- Press and hold the “SENSOR” button on the back of the weather station for a few seconds to re-enter the reception mode. A flashing RF antenna symbol will appear next to the channel.
- Press the "TX" button on the wireless outdoor sensor to transmit signals manually. This is indicated by the red light flashing shortly on the front panel.
Note:
If you use only one sensor and the channel of the weather station is not the same as the channel of the outdoor sensor, no outdoor information will appear on the display.
Place the remote sensor away from direct sunlight and rain. Possible mounting location: under an eave or a veranda.
2.4.3 Channel selection/scan mode:
This mode is applicable in case several wireless sensors are used at the same time.
- Press the button on the weather station until is displayed. In this mode, the outdoor measurements from channel 1 to channel 3 are automatically displayed every 5 seconds.
- To view the temperature and humidity on a fixed channel, press the button until disappears
2.5 TEMPERATURE
Press the “°C/°F” button on the indoor unit to select the unit for temperature display. For the outdoor wireless sensor, open the battery compartment and press the “°C/°F” button to switch between Celsius and Fahrenheit.
2.5.2 Setting temperature and humidity alarm:
Press “ALERT” on the back of the weather station to turn on or off the temperature and humidity alarm. The icon will appear or disappear on the screen. Select the channel on which you want to set the temperature and humidity alarm.
- Long press “ALERT” until and the outdoor temperature are flashing. Press “▲” or “▼” to set the required maximum outdoor temperature. Press “ALERT” to confirm your setting.
- When ▼ and the outdoor temperature are flashing, press “▲” or “▼” to set the required minimum outdoor temperature. Press “ALERT” to confirm your setting.
- When ▲ and the outdoor humidity are flashing, press “▲” or “▼” to set the required maximum outdoor humidity. Press “ALERT” to confirm your setting.
- When ▼ and the outdoor humidity are flashing, press “▲” or “▼” to set the required minimum outdoor humidity. Press “ALERT” to confirm your setting.
- When ▲ and the indoor temperature are flashing, press “▲” or “▼” to set the required maximum indoor temperature. Press “ALERT” to confirm your setting.
- When ▼ and the indoor temperature are flashing, press “▲” or “▼” to set the required minimum indoor temperature. Press “ALERT” to confirm your setting.
- When ▲ and the indoor humidity are flashing, press “▲” or “▼” to set the required maximum indoor humidity. Press “ALERT” to confirm your setting.
- When ▼ and the indoor humidity are flashing, press “▲” or “▼” to set the required minimum indoor humidity. Press “ALERT” to confirm your setting.
If you want to set the alert values of the other 2 channels, please press to change the channel and repeat the steps above.
If the temperature or humidity reaches the set alarm value, an alarm will sound for a few seconds. The corresponding temperature or humidity will continue to flash on the display. This alarm signal will be repeated every minute. If any button is shortly pressed on the front of the indoor unit, the alarm signal will no longer sound. When a new alarm condition is reached, the alarm will sound again. The temperature or humidity alarm can be turned on or off by shortly pressing the “ALERT” button on the back of the indoor unit. A too high or too low value is indicated by flashing arrow symbols.
Note:
The temperature and humidity alarms of 3 channels can be set separately. If a channel reaches the set alarm value, the weather station will give a sound signal.
2.5.3 Temperature and humidity trend:
The weather station monitors the current temperature and humidity change.
↑: the temperature/humidity is rising
↓: the temperature/humidity is falling
→: the temperature/humidity is remaining constant
2.5.4 Max/Min display temperature and humidity:
Press the MAX/MIN button repeatedly to display the highest and lowest measured values:
Press 1x to display the maximum temperature and humidity values
Press 2x to display the minimum temperature and humidity values.
Press 3x to return to the current temperature and humidity values.
To reset the maximum and minimum measured values, press and hold the MAX/MIN button for a few seconds.
3 WEATHER FORECAST
The weather station calculates the weather forecast based on the history recorded barometric pressure trend. The weather forecast cannot be compared with the professional weather services supported by satellites and high-performance computers. It provides an approximate indication of current developments. Please take the weather forecast from the professional weather station as authoritative.
3.2 WEATHER FORECAST SYMBOLS
The weather forecast is shown on the display in underneath symbols:

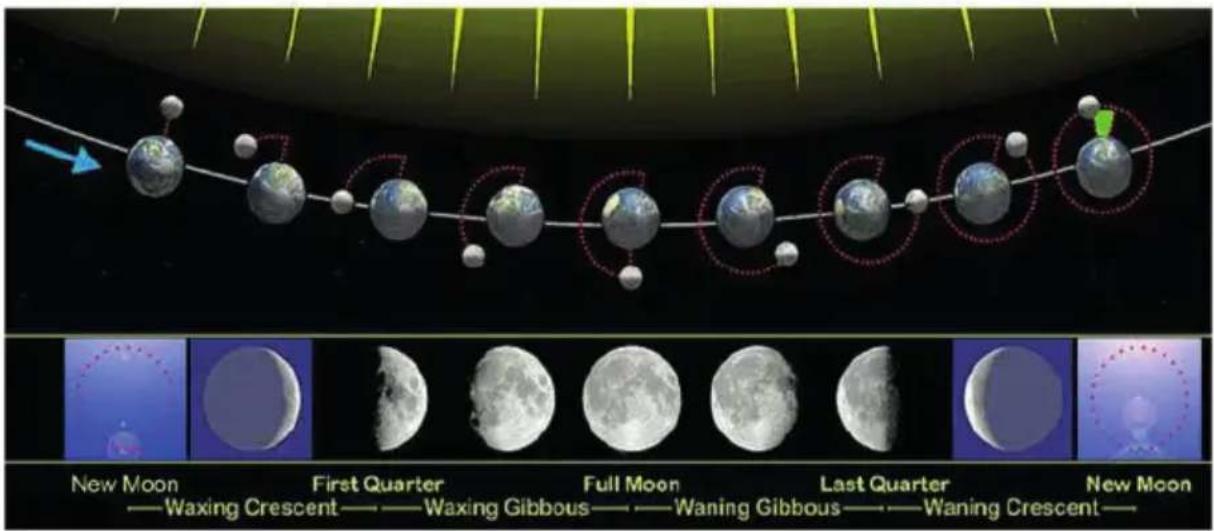
4 MOON PHASE
When the calendar is set, the weather station can display 8 different moon phases: New Moon, Waxing Crescent, First Quarter, Full Moon, Waning Gibbous, Last Quarter, Waning Crescent, New Moon
5 AIR PRESSURE
5.1 TREND DISPLAY OF THE AIR PRESSURE
The weather station measures the current relative air pressure.
↑: the air pressure is rising
↓: the air pressure is falling
→: the air pressure is remaining constant
5.2 CHECKING THE AIR PRESSURE HISTORY
Press "PRESSURE" to display the recorded air pressure values during the last 12 hours.
6 BACKLIGHT
Connect the weather station to the DC adapter and the backlight will always be on. The illumination has 3 brightness levels: Bright-Low-Off.
To adjust the brightness of the illumination, press the "SNOOZE/LIGHT" button.
If the unit is restarted or the power is interrupted, the previous manual settings will be lost. In case of power failure; please insert 2 alkaline 1,5V AA batteries into the weather station to save the settings.
Power consumption:
It is not recommended to power the weather station with batteries only.
If the weather station is battery operated only, you can briefly turn on the backlight by pressing the "SNOOZE/LIGHT" button.
7 SPECIFICATIONS
CONTENT WEATHER STATION BR700
1x user manual
1x weather station
1x wireless remote sensor
1x USB cable
WEATHER STATION (INDOOR UNIT)
General specifications
Placement: standing/wall-mounted
Power supply: 2 x alkaline 1,5V AA batteries (not included)
USB cable
Operating frequency: 433,92 MHz
Radiated Power: < 0 dBm
Supported sensors: 1 wireless outdoor sensor (included)
Month mode
Adjustable backlight
Specifications of time-related functions
Time display: UU:MM
Hour format: 12 hours AM / PM or 24 hours
Date format: DD / MM or MM / DD
Weekday language: EN / FR / IT / ES / NE / DA / GE
Dual alarm with snooze function
Indoor temperature:
unit: °C and °F
range: 0°C\~50°C
accuracy: 0^ 40^ : ±1^ 40^ 50^ : ±2^
Outdoor temperature:
unit: °C and °F
range: -20°C\~70°C
accuracy: 0^ 40^ : ±1^ -20^ 0^ \& 40^ 70^ : ±2^
Indoor humidity:
unit: %
range: 20%RH\~95%RH
accuracy: 40-80%: ±5% 30-40% & 80-90%: ±8%
Outdoor humidity:
unit: %
range: 20%RH\~95%RH
accuracy: 40-80%: ±5
30-40% & 80-90%: ±8%
Air pressure:
unit: hPa, inHg and mmHg
range: 600 hPa/mb\~1100 hPa/mb/17.72 in Hg \~ 32.48 in Hg
accuracy: ±5hPa
WIRELESS OUTDOOR SENSOR:
Placement: standing/wall mounting
Main power supply: preferably 2 lithium 1.5V AA batteries (Lithium batteries perform better in cold conditions)
Weather data: temperature, humidity, °C/°F switchable, 3 channels
Transmission interval: 60 seconds for temperature and humidity
RF transmission range: 200 metres in open area
Outside temperature: range: -40^ +70^
accuracy: 0°C\~40°C: ±1°C
-20°C\~0°C & 40°C\~70°C: ±2°C
Humidity: range: 1%RH\~99%RH
accuracy: 40-80%: ±5%
30-40% & 80-90%: ±8%
Remark:
If the temperature or humidity is below the specified values, LL.L will appear.
If the temperature or humidity is above the specified values, HH.H will appear.
8 TROUBLESHOOTING
| PROBLEMCAUSESOLUTION | ||
| The indoor and outdoor measurement values are different when you pair the two devices. | 1. Due to air currents in the same room, the display may vary.2. See tolerances in specifications. | |
| The weather forecast displayed on the weather station differs from the actual weather. | The weather station calculates the weather forecast for the next 12 hours based on the barometric pressure trend. | |
| The alarm goes off unexpectedly at night. | The time alarm function has been activated. | Check and reset the set alarms or disable the alarms. |
| The temperature or humidity alarm function has been activated. The temperature or humidity has reached the alarm level. | Reset the temperature or humidity alarms. | |
| The outdoor measurement values occasionally appear on the display. | Scan mode is active. | Press until the arrow icon disappears to end the scan mode. |
| No backlight. | The weather station is battery powered only. | 1. Press "SNOOZE/LIGHT" to temporarily activate the backlight for 10 seconds. 2. Plug in the adapter. Now the display is on continuously. |
| The adapter is connected, but the backlight is off. | Press "SNOOZE/LIGHT" to adjust the brightness of the backlight, bright-low-off. | |
| No information from the wireless remote sensor appears on the indoor unit. | The batteries of the wireless remote sensor are dead. | Replace the batteries (preferably use lithium batteries). |
| The channel displayed on the weather station is different from the channel wireless remote sensor. | Select the channel with the appropriate button On the sensor, select channel 1, 2 or 3. | |
| The weather station is not receiving signals from the wireless remote sensor. | 1. No coverage. External conditions may be affecting the call.2. Replace the batteries. 3. Re-register the wireless remote sensor. | |
| The outdoor temperature on the weather station is different from that on the wireless remote sensor. | The wireless remote sensors are exposed to the sun or rain. | Keep the wireless remote sensor away from direct sunlight and rain. |
| There is a delay or under-refraction of the transmission. | Wait until the wireless remote sensor sends signal again. | |
9 MAINTENANCE
Always remove the adapter from the wall socket before cleaning the indoor unit. If you make sure to install 2 backup batteries at the rear of the unit, you don't have to worry about losing any data. Clean the indoor unit with a moist cloth. Never use aggressive or abrasive cleaning products.
The outdoor unit may also be wiped down with a moist cloth.
The weather station requires no maintenance. However, we advise you to replace the battery at least once a year.
10 DISPOSAL OF THE DEVICE (ENVIRONMENT)
This product may not be discarded as normal household waste at the end of its life span, you must bring it to a collection point for the recycling of electric and electronic devices. Don't throw away exhausted batteries, but bring them to your local depot for Small Chemical Waste (SCW).

11 DECLARATION OF CONFORMITY
Hereby, Commaxx declares that the Buienradar © weather station BR700 is in compliance with directive 2014/53/EU. The full text of the EU declaration of conformity is available at the following internet address: http://DOC.hesdo.com/BR700-DOC.pdf
EN 301 489-3
EN 300 220-2
EN 50371
EN 60950
12 WARRANTY TERMS AND CONDITIONS
For the Buienradar © weather station BR700 you have a warranty of 24 months from the date of purchase. During this period, we guarantee the free repair of defects caused by material and workmanship errors.
All this subjected to the final assessment of the importer.
HOW TO HANDLE:
If you notice any defect, first refer to the user's manual. If the manual provides no definite answer, please contact the supplier of this weather station.
In the event of a defect, you may return the weather station with a clear description of your complaint and a dated purchase receipt to your supplier who will ensure a quick repair or otherwise send the product to the importer.
THE WARRANTY BECOMES NULL AND VOID:
In case of improper use, incorrect connections, leaking and/or incorrectly installed batteries. In case of unauthorised modifications and/or repairs performed by third parties. In case of incorrect transportation of the device without adequate packaging and when the device is not accompanied by a warranty card or proof of purchase.
All further liability, especially concerning any consequential damages, is excluded.
INHALTSVERZEICHNIS
1 EINFÜHRUNG 49
5 LUFTDRUCK
WETTERSTATION (INNENGERÄT)
30-40% & 80-90%: ±8%
30-40% & 80-90%: ±8%
Luftdruck:
30-40% & 80-90%: ±8%