
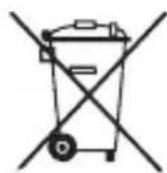
Maxiblend BL1161 - Blender TEFAL - Free user manual and instructions
Find the device manual for free Maxiblend BL1161 TEFAL in PDF.
| Product type | Blender |
| Brand | Tefal |
| Model | Maxiblend BL1161 |
| Power | 600 W |
| Power supply | 220-240 V, 50/60 Hz |
| Bowl capacity | 1.5 L |
| Speeds | 2 speeds + Pulse |
| Blade material | Stainless steel |
| Bowl material | Graduated plastic |
| Included accessories | Measuring cap, lid, mixing bowl, blade unit, seal |
| Optional accessories | Herb mill (seal, blade unit, bowl) |
| Safety | Safety lock, very sharp blades |
| Cleaning | Removable parts dishwasher safe (bowl, lid, measuring cap, mill) |
| Motor unit | Do not immerse, clean with a damp cloth |
| Dimensions (approx.) | 20 x 20 x 40 cm |
| Weight (approx.) | 2.5 kg |
Frequently Asked Questions - Maxiblend BL1161 TEFAL
User questions about Maxiblend BL1161 TEFAL
0 question about this device. Answer the ones you know or ask your own.
Ask a new question about this device
Download the instructions for your Blender in PDF format for free! Find your manual Maxiblend BL1161 - TEFAL and take your electronic device back in hand. On this page are published all the documents necessary for the use of your device. Maxiblend BL1161 by TEFAL.
USER MANUAL Maxiblend BL1161 TEFAL
- c1 Blade unit
- c2 Gasket
- c3 Graduated mixer jug
D Motor unit
E Speed selector
F Accessory (depending on model) : Universal mill
-f1 Sealing gasket
- f2 Mill blade unit
- f3 Universal mill bowl
The accessories contained in the model you have bought are represented on the label on the top of the packaging.
SAFETY INSTRUCTIONS
- Read the instructions for use carefully before using your appliance for the first time: the manufacturer shall accept no liability in the event of any use that does not comply with the instructions.
- This appliance is not designed to be used by persons (including children) with reduced physical, sensory or mental capacities, or lack of experience and knowledge, unless they have been given supervision or instructions concerning use of the appliance by a person responsible for their safety. Children should not be allowed to play with the appliance.
- It is designed to work with alternating current only. Please check that the supply voltage indicated on the name plate of the appliance corresponds to your electrical installation.
- This product has been designed for domestic use only. Any commercial use, inappropriate use or failure to comply with the instructions, the manufacturer accepts no responsibility and the guarantee will not apply.
- Be sure to unplug the appliance if you must leave it unattended, before inserting or removing accessories or before cleaning it. Never pull on the power cord to unplug the appliance.
- Do not use your appliance if it does not operate correctly, if it has been damaged or if the power cord or plug is damaged. To maintain safety, these parts must be replaced by an approved service centre (see list in the service booklet).
- Any maintenance other than routine cleaning and upkeep by customers must be carried out by an approved service centre.
- Do not immerse the appliance, cord or plug in liquid. The power cord must be kept out of the reach of children and must not be placed near or come into contact with the hot parts of the appliance, sources of heat or sharp corners.
- For your safety, only use accessories and spare parts that correspond to your appliance, sold by an approved service centre.
- The blades are very sharp: handle them with caution to avoid injury.
- Never use the blender or its accessories without ingredients and never pour boiling liquids into the jug.
- Always use the blender jug with its lid (B).
- Always pour the liquid ingredients into the jug first, before adding the solid ingredients, without exceeding the maximum level.
- Never place your fingers or any other object in the blender when the appliance is running.
-
Do not use the bowls as containers for freezing, cooking or sterilisation.
-
Do not use the blender for more than 3 minutes continuously.
- Place the blender on a flat, stable, heat-resistant, clean and dry worktop.
- Do not let long hair, scarves, ties, etc. hang over the blender jug or accessories when in operation.
- Do not use the blender outside in the open air.
- Do not remove the lid (B) before the blades have stopped completely.
- Never use this appliance for blending or mixing items other than food ingredients.
- Wait for the appliance to cool down to room temperature after each batch you process.
- Never use the blender or its accessories without ingredients and never pour boiling liquids (80C) into the juq.
- If the supply cord is damaged, it must be replaced by an approved service centre.
SAFETY LOCKING
The appliance can run only when the jug (C) or accessory (F) are correctly positioned and locked on the motor unit (D).
USING FOR THE FIRST TIME
CAUTION: The blades are extremely sharp; handle them with caution when using, emptying or cleaning the appliance.
- Before using your appliance for the first time, clean all the accessories (A, B, C and F) in warm soapy water, except for the motor unit (D).
- Make sure all the packaging has been removed before operating the appliance.
- Important note: Turn the speed selector (E) to "0" before placing the blender jug or accessories on the motor unit.
- The appliance starts only if the jug or accessory is correctly positioned and locked on its body.
- Do not operate the blender if the lid is not in place.
USING YOUR APPLIANCE
1. Mixer JUG:
- Moisten the gasket (c2) and position it correctly on the blade unit (c1): the 3 folds of the gasket must be visible once it is in place. If it is positioned in the other direction, you will not be able to lock the blade unit on the jug. (figure 1).
- Place the assembly (c1 + c2) on the base of the jug (c3). Lock it by rotating the blade unit through a quarter turn in the anticlockwise direction. (Figure 2).
-
Introduce the ingredients into the assembled jug without exceeding the maximum level indicated.
-
Fit the lid (B) to the mixer jug (C) and lock it by positioning it on the holes opposite the spout (figure 3).
Introduce the measuring cup (A) into the lid and press into place (figure 3). You are advised to hold the lid during operation.
- Place the mixer jug (C) on the body of the motor unit (D). The lock (open) is aligned in the slot on the motor unit (figure 3).
- Then rotate the mixer jug (C) through a turn the lock (closed) appears (figure 3).
- Dice all the ingredients before putting them into the mixer jug (C). It is best to start with liquids, without going over the maximum level shown on the jug (1.5L).
- Connect the appliance and start up by turning speed selector (E) to "Pulse," "1," or "2".
- To stop the appliance, bring the speed selector (E) to "0".
- Wait for the appliance back to a complete stop before removing the mixer jug (C).
- Remove the mixer jug (C) by unlocking it in opposite direction to installation.
2. Universal Mill:
- This universal mill (F) is equipped with a bowl (f3) that prevents access to the blades during use.
- Rotate the bowl (F) and pour the ingredients.
- Position the sealing gasket (f1) in its recess on the mill blade unit (f2) (figure 4). Position the mill blade unit (f2) on the bowl (f3), and lock the universal mill by rotating the blade unit (f2) through a turn in the clockwise direction (figure 5).
- Rotate the assembled universal mill (F) and position it on the motor unit (D). The lock (open) is aligned in the slot on the motor unit (D) (figure 6).
- Rotate the assembled universal mill (F) though a turn anticlockwise until the lock (closed) appears (figure 6).
- Connect the appliance and start up by turning speed selector (E) to "Pulse," "1," or "2".
- To stop the appliance, bring the speed selector (E) to "0".
- Wait for the appliance back to a complete stop before removing the universal mill (C).
- Remove the universal mill (F) by unlocking it in opposite direction to installation.
- Turn it over on the worktop before unlocking the mill blade unit (f2) from the bowl (f3) in the reverse order of the assembly. The blades are very sharp: handle them with caution to avoid injury. You can then collect the preparation in the bowl.
Remark: The colour of the bowl may change after blending certain very hard ingredients: cloves, cinnamon, etc...
Caution: leaks can occur if the accessory is not locked correctly.
| Ingredients Quantities Operating time | ||
| Dried red chilli 30g 33s | ||
| Black pepper 30g 1min30s | ||
| Dried shrimp 25g 30s | ||
| Roasted rice 40g 16s | ||
| Black sesame 30g 21s | ||
| Peanuts 50g 4s | ||
| Onions 100g 13s | ||
| Pork (cut into a small pieces) 140g 20s | ||
| Pormesan (cheese cut into a small pieces) 100g 13s |
CLEANING YOUR APPLIANCE
CAUTION: Handle them with caution: the blades of the blender jug and accessories are sharp.
- Unplug the appliance and remove the accessories
- Remove the jug and rinse it and its lid under running water.
- For easy cleaning, be sure to wash the removable parts in water and a little washing-up liquid immediately after use.
- The mixer jug (A, B, C) and universal mill (F) can be cleaned in the dishwasher in the top basket with the "ECO" or "LIGHTLY SOILED" programme.
To clean the motor unit (D), use a moist cloth. Dry it carefully. - Never put the motor unit (D) under water or under running water.
- Empty the mixer jug (C) or universal mill bowl (f3) before clean.
| Problems Causes Solutions | ||
| Product does not work. | The plug is not fitted correctly into the socket. | Plug the appliance into a socket and switch on. |
| The jug or accessory is not correctly positioned or locked on the motor unit. | Check that the jug or accessories are correctly positioned and locked onto the motor unit as shown in the figure in the manual. | |
| Excessive vibrations. | The product is not placed on a flat, stable, heat-resistant surface. | Place the product on a flat surface. |
| Volume of ingredients is too high. | Reduce the quantity of ingredients processed. | |
| Leak from the lid. | Volume of ingredients is too high. | Reduce the quantity of ingredients processed. |
| The lid is not correctly positioned. | Lock the lid correctly on the blender jug. | |
| Leak from the base of the blender unit | The gasket on the blade unit (f1) or (f2) is not positioned correctly or is missing. | Reposition the gasket on the blade unit (f1) or (f2) and lock it correctly onto the bowl (F3). |
| The blender jug gasket (c2) is not positioned correctly or is missing. | Reposition the gasket and lock the blade holder correctly. | |
| Impossible to lock the blade unit with the gasket (c1+c2) on the jug (c3) | The gasket (c2) is not positioned correctly. | Reposition the gasket, the 3 folds should be visible as shown in the Figure 1. |
| Leak from the base of the universal mill. | The sealing gasket (f1) on the blade unit (f2) is not positioned correctly or is missing. | Reposition the sealing gasket (f1) on the blade unit (f2) and lock it correctly onto the universal mill bowl (f3). |
| The blade does not turn easily. | Pieces of food too large or too hard. | Reduce the size or quantity of ingredients processed.Add liquid |
Your blender still does not work?
Contact an approved service centre (see list in service booklet).
You can customise your blender and obtain the following accessories from your usual dealer or from an approved service centre: Universal mill (F), or an additional blender jug (C).

- Disposal of the appliance and its packaging materials.
The packaging is comprised exclusively of materials that present no danger for the environment and which may therefore be disposed of in accordance with the recycling measures in force in your area.
For disposing of the device itself, please contact the appropriate service of your local authority.
End of life electrical and electronic products:
Your appliance is expected to last for many years. However, when the time comes to replace it, do not throw it into the bin, but take it to the recycling centre in your town (or to a waste reception centre where applicable).
Think of the environment!
Your appliance contains valuable materials which can be recovered or recycled.
Leave it at a local civic waste collection point.
HELPLINE:
If you have any product problems or queries, please contact our Customer Relations Team first for expert help and advice:
0845 602 1454 - UK
(01) 677 4003 - ROI
or consult our website - www.tefal.co.uk
A
B
C
-c1
-c2
-c3
D
E
F 100000000000000000000000000000000000000000000000000000
-f1
-f2
-f3[1]
777777777777777777777777777777
a
- 1
- 1
· - wannnnn nnnnnnnnnnnnnnnnnnnnnnnnnnnnnnnnnnnnnnnnnnnnnnnnnnnnnnnnnnnnnnnnnnnnnnnnnnnnnnnnnnnnnnnnnnnnnnnnnnnnnnnnnnnnnnnnnnnnnnnnnnnnnnnnnnnnnnnnnnnnnnnnnnnnnnnnn
- WwWwWwWwWwWwWwWwWwWwWwWwWwWwWwWwWwWwWwWwWwWwWwWwWwWwWwWwWwWwWwWwWwWwWwWwWwWwWwWwWwWwWwWwWwWwWwWwWwWwW
·nUyynnnnnnnnnnnnnnnnnnnnnnnnnnnnnnnnnnnnnnnnnnnnnnnnnnnnnnnnnnnnnnnnnnnnnnnnnnnnnnnnnnnnnnnnnnnnnnnnnnnnnnnnnnnnnnnnnnnnn
Wnwnnnn nn nnnnnnnnnnnnnnnnnnnnnnnnnnnnnnnnnnnnnnnnnnnnnnnnnnnnnnnnnnnnnnnnnnnnnnnnnnnnnnnnnnnnnnnnnnnnnnnnnnnnnnnnnnnnnnnnnnn
·Wnwnuunnnnnaaunnnn nn nnnnnnnnnnnnnnnnnnnnnnnnnnnnnnnnnnnnnnnnnnnnnnnnnnnnnnnnnnnnnnnnnnnnnnnnnnnnnnnnnnnnnnnnnnnnnnnnnnnnnnnnnnnnnnnnnnnnnnnnnnnnnnnnnnn
·
·
·launuwsaunna (B) nnnn
nnaaannnnnnaananaananaananaananaananaananaananaananaananaananaananaananaananaananaananaananaananaananaananaananaananaananaananaananaananaananaananaananaananaananaananaananaananaananaananaananaananaananaananaananaananaananaananaananaananaananaananaananaananaananaanara anaa
· -
wuJnunununununununununununununununununununununununun
-
3 w
·771 - ·nulunuununununununun
·wunannn (B) aonnuunuynnyauuunnu
·wWnWnWnWnWnWnWnWnWnWnWnWn
· - 100000000000000000000000000000000000000000000000000000
Wnannnnn nn nnnnnnnnnnnnnnnnnnnnnnnnnnnnnnnnnnnnnnnnnnnnnnnnnnnnnnnnnnnnnnnnnnnnnnnnnnnnnnnnnnnnnnnnnnnnnnnnnnnnnnnnnnn
山
(C)(F)(D)
nannrslvwnns
nHn:nuuunnnnnn nn nnnnnnnnnnnnnnnnnnnnnnnnnnnnnnnnnnnnnnnnnnnnnnnnnnnnnnnnnnnnnnnnnnnnnnnnnnnnnnnnnnnnnnnnnnnnnnnnnnnnnnnnnnnnnnnnnnnnnnnnnnnnnnnnnnnnnnnnnnnnnnnnnnnnn
·nnaa aananaananaananaananaananaananaananaananaananaananaananaananaananaananaananaananaananaananaananaananaananaananaananaananaananaananaananaananaananaananaananaananaananaananaananaananaananaananaananaananaananaananaananaananaananaananaananaananaananaananaanaraannaa
·
·:n:n(E)“0” nnaaun
·W72677777777777777777777777
·nnaaannnnnnnnnnnnnnnnnnnn
nslvnuu
1.
(c2)nunwnwann (c1):
- 100000000000000000000000000000000000000000000000000000000000000
- inurunuunuulunuunuunuunuunuunuunuunuunuunuunuunuunuunu
·(B)u(C)a(n)y(uynyuaayuunwuwuyu(3) (A)aunanun(3)
·vunauu(C)nuuuaa(D)(yunua) 6
- 1nnn nn n (C) uunzniin (snuuua) 6 ayarununauuuu uauu (sui 3)
- nnnnnaaannnnnnaan an naananaalunu (C) nnnnnnnaanennnnaan an nanauuu u7 anluunau
·Luuuunwuuuunrueaunwuuuunrueaunrueaunrueaunrueaunrueaunrueaunrueaunrueaunrueaunrueaunrueaunrueaunrueaunrueaunrueaunrueaunrueaunrueaunrueaunrueaunrueaunrueaunrueaunrueaunrueaunrueaa
Wnwnnnn nn nnnn nn nnnnnn nn nnnnnn nn nnnnnn nn nnnnnn nn nnnnnn nn nnnnnn nn nnnnnn nn nnnnnn nn nnnnnn nn nnnnnn nn nnnnnn nn nnnnnn nn nnnnnn nn nnnnnn nn nnnnnn nn nnnnnn nn nnnnnn nn nnnnnn nn nnnnnn nn nnnnnn nn nannnnn nn nannnnn nn nannnnn nn nannnnn nn nannnnn nn nannnnn nn nannnnn nn nannnnn nn nannnnn nn nannnnn nn nannnnn nn nannnnn nn nannnnn nn nannnnn nn nannnnn nn nannnnn nn nannnnn nn nannnnn nn nannnnn nn nannnnn nn nennnnn nn nannnnn nn nannnnn nn nannnnn nn nannnnn nn nannnnn nn nannnnn nn nannnnn nn nannnnn nn nannnnn nn nannnnn nn nannnnn nn nannnnn nn nannnnn nn nannnnn nn nannnnn nn nannnnn nn
·
naiu (C) nauw wauan an annnnnnuuun uau
2.
- 1.2.3.4.5.6.7.8.9.10.11.12.13.14.15.16.17.18.19.20.21.22.23.24.25.26.27.28.29.30.31.32.33.34.35.36.37.38.39.40.41.42.43.44.45.46.47.48.49.50.51.52.53.54.55.56.57.58.59.60.61.62.63.64.65.66.67.68.69.70.71.72.73.74.75.76.77.78.79.80
.
.1aJ2JgAeB
. 业
y
()
aX
10 1000000000000000000000000000000000000000000
.(D)
g21 0yJlss
J 1 J 1
(D)
J 1
.
"0"gall (E) aerll 1o : ola bdo
1
111 111
y
:
J 1420 Jolal
JooyI sii aLic g
g
i
iill Jss
:1
(c1):(c2)
-lll 15
(1)
a a 1 (c3) b c c c c c c c c c c c c c c c c c c c c c c c c c c c c c c c c c c c c c c c c c c c c c c c c c c c c c c c c c c
(2)
$$ \begin{array}{c} \text {a c y l l} \ : (\text {山} \text {d o l l}) \end{array} $$
$$ \ddot {a} l o l \dot {u} \ddot {a} u b $$
$$ \text {f 1 -} $$
$$ \mathrm {d i a b o l l} \text {a l j e c t s i g m a f 2 -} $$
$$ d o l. c i l l d i a b o l l \cdot l e g f 3 - $$
E F
$$ \omega \downarrow \downarrow \downarrow \downarrow \downarrow \downarrow $$
$$ \therefore \mathrm {L b} \dot {\mathrm {c}} $$
A
B
$$ b \downarrow \downarrow \downarrow \downarrow \downarrow \downarrow \downarrow \downarrow \downarrow \downarrow $$
$$ \therefore \text {j a} \text {i l l} \text {s} \text {a g} \quad C 1 - $$
$$ \omega_ {i} = \frac {\partial \omega}{\partial t} \cdot \vec {a} _ {i} \cdot \vec {a} _ {j} \cdot \vec {a} _ {k} \cdot \vec {a} _ {l} \cdot \vec {a} _ {m} \cdot \vec {a} _ {n} \cdot \vec {a} _ {o} $$
$$ \Delta_ {j} \rightarrow \Delta_ {j} \rightarrow \Delta_ {j} \rightarrow \Delta_ {j} \rightarrow \Delta_ {j} \rightarrow \Delta_ {j} \rightarrow \Delta_ {j} \rightarrow \Delta_ {j} \rightarrow \Delta_ {j} \rightarrow \Delta_ {j} \rightarrow \Delta_ {j} \rightarrow \Delta_ {j} \rightarrow \Delta_ {j} \rightarrow \Delta_ {i} \rightarrow \Delta_ {i} \rightarrow \Delta_ {i} \rightarrow \Delta_ {i} \rightarrow \Delta_ {i} \rightarrow \Delta_ {i} \rightarrow \Delta_ {i} $$
$$ \Delta \Delta \Delta \Delta \Delta \Delta \Delta \Delta \Delta \Delta \Delta \Delta \Delta \Delta \Delta \Delta \Delta \Delta \Delta \Delta \Delta \Delta \Delta \Delta \Delta \Delta \Delta \Delta \Delta \Delta \Delta \Delta \Delta \Delta \Delta \Delta \Delta \Delta \Delta \Delta \Delta \Delta \Delta \Delta \Delta \Delta \Delta \Delta \Delta \Delta \Delta $$
D
1 1
aJlJr
JL JIJI 1J LJIJI JILIJIJIJIJIJIJIJIJIJIJIJIJIJIJIJIJIJIJIJIJIJIJIJIJIJIJIJIJIJIJIJIJIJIJIJIJIJIJIJIJIJIJIJIJIJIJIJIJIJIJIJIJIJIJIJIJIJIJIJIJIJIJIJIJIJIJIJIJIJIJIJIJIJIJIJIJIJIJIJIJIJIJIJIJIJIJIJIJIJIJIJIJIJIJIJIJIJIJIJIJIJ

0kssgss
b000000000000000000000000000000000000000000000000000000000
:
i j k l a j k o k i a. 1234567890123456789012345678901234567890123456789012345678901234567890123456789012345678901234567890123456789
1ais
L
J 1
①
C

sasbs
sLgJyJyJyJyJyJyJyJyJyJyJyJyJyJyJyJyJyJyJyJy
0845 602 1454 - UK
(01) 677 4003 - ROI
Lai kLo Lw g Lg
www.tefal.co.uk
L. (C) 5b000000000000000000000000000000000000000000000
| ملاويات مصاني بوران | الله��ي علام | |
| العربية 33 | س ↘ 30 | س ↘ ↘ ↘ ↘ ↘ ↘ ↘ ↘ ↘ ↘ ↘ ↘ ↘ ↘ ↘ ↘ ↘ ↘ ↘ ↘ ↘ ↘ ↘ ↘ ↘ ↘ ↘ ↘ ↘ ↘ ↘ ↘ ↘ ↘ ↘ ↘ ↘ ↘ ↘ ↘ ↘ ↘ ↘ ↘ ↘ ↘ ↘ ↘ ↘ ↘ Ↄ |
| العربية 30 و 1 | س ← 30 | س ↕ ↕ ↕ ↕ ↕ ↕ ↕ ↕ ↕ ↕ ↕ ↕ ↕ ↕ ↕ ↕ ↕ ↕ ↕ ↕ ↕ ↕ ↕ ↕ ↕ ↕ ↕ ↕ ↕ ↕ ↕ ↕ ↕ ↕ ↕ ↕ ↕ ↕ ↕ ↕ ↕ ↕ ↕ ↕ ↕ ↕ ↕ ↕ ↕ ↕ ↊ |
| العربية 30 | س ↕ 25 | س ↕ ↕ ↕ ↕ ↕ ↕ ↕ ↕ ↕ ↕ ↕ ↕ ↕ ↕ ↕ ↕ ↕ ↕ ↕ ↕ ↕ ↕ ↕ ↕ ↕ ↕ ↕ ↕ ↕ ↕ ↕ ↕ ↕ ↕ ↕ ↕ ↕ ↕ ↕ ↕ ↕ ↕ ↕ ↕ ↕ ↕ ↕ ↕ Ↄ |
| العربية 16 | س ↕ 40 | بدر نبدر ندوده |
| العربية 21 | س ↕ 30 | س ↕ ↕ ↕ ↕ ↕ ↕ ↕ ↕ ↕ ↕ ↕ ↕ ↕ ↕ ↕ ↕ ↕ ↕ ↕ ↕ ↕ ↕ ↕ ↕ ↕ ↕ ↕ ↕ ↕ ↕ ↕ ↕ ↕ ↕ ↕ ↕ ↕ ↕ ↕ ↕ ↕ ↕ ↕ ↕ ↕ ↕ ↕ |
| العربية 4 | س ↕ 50 | بدر نزه |
| العربية 13 | س ↕ 100 | بزه |
| العربية 13 | س ↕ 100 | (عَزه بعکس KWیف پیره بيره) (بزه بعکس KWیف پیره بيره) |
o
Lai j 1j 1j g jg j 1j
1 1
.
slllssj
i
1
J (F) 480000000000000000000000000000000000000000
a 1
"LIGHTLY SOILED" U "ECO"
JlJIaIwS j,(D) goo
. 1.5 < 1.2 1.2 1.2 1.2 1.2 1.2
J 1 (D)
当 ASΔADB = SΔCOD 时.
(f3)LkAeBwAeKc(C)Jbgo
1
i 1j: j
sla: jla j
jglggsbglg j
(3J) 12000000000000000000000000000000000000000000000000000000000000000000000000000000000000000
2
J 2
J
J
J
J
J
J
J
J
J
J
J
J
J
J
J
J
J
J
J
J
J
J
J
J
J
J
J
J
J
J
J
J
J
J
J
J
J
J
J
J
J
J
J
J
J
J
J
J
J
J
J
J
J
J
J
J
J
J
J
J
J
J
J
J
J
J
J
J
J
J
J
J
J
J
J
J
J
J
J
J
J
J
J
J
J
J
J
J
J
J
J
J
J
J
J
J
J
J
J
J
J
J
J
J
J
J
J
J
J
J
J
J
J
J
J
J
J
J
J
J
J
J
J
J
J
J
J
J
J
J
J
J
J
J
J
J
J
J
J
J
J
. 3 j k b g 1
. 3 j k b g 1
. 3 j k b g 1
. 3 j k b g 1
. 3 j k b g 1
. 3 j k b g 1
. 3 j k b g 1
. 3 j k b g 1
. 3 j k b g 1
. 3 j k b g 1
. 3 j k b g 1
1
3 (c1) 20000000000000000000000000000000000000000000000000000000000000000000000000000000000000000000000
| E | S | A |
| F | J | B |
| g | c2- | C |
| f1- | c2- | |
| f2- | c3- | D |
y
iai sla
100000000000000000000000000000000000000000000000000000000000000000000000000000000000


Brand : TEFAL
Model : Maxiblend BL1161
Category : Blender