
960 - Protective case Nanuk - Free user manual and instructions
Find the device manual for free 960 Nanuk in PDF.

| Product type | Protective case |
| Brand | Nanuk |
| Model | 960 |
| Main material | NK-7 high-impact resin |
| Seal gasket | EPDM (rubber) deformation-resistant |
| Pressure valve | Automatic pressure release valve |
| Locking system | Double-action latches with sliding button |
| Foam type | Pick-and-pluck foam, multiple layers (for 915 and larger) |
| Warranty | Limited lifetime warranty (material and workmanship defects) |
| Recommended cleaning | Non-abrasive plastic cleaner, avoid brushes |
| Seal maintenance | Apply a plastic/rubber protectant for cars |
| Spare parts | Seal gasket available (contact Plasticase) |
| Impact resistance | Absorbs shocks during transport |
| Recommended use | Protection of sensitive equipment (photo, video, audio, etc.) |
| Manufacturer | Plasticase Inc. |
Frequently Asked Questions - 960 Nanuk
User questions about 960 Nanuk
0 question about this device. Answer the ones you know or ask your own.
Ask a new question about this device
Download the instructions for your Protective case in PDF format for free! Find your manual 960 - Nanuk and take your electronic device back in hand. On this page are published all the documents necessary for the use of your device. 960 by Nanuk.
USER MANUAL 960 Nanuk
Care and Use Guide | English p2
Thank you for purchasing this NANUK case.
Please read the directions below to learn how to properly use and care for your case.
O-ring seal
Your NANUK case is equipped with an EPDM gasket that has been designed to give superior performance and resist compressive deformation over time. To ensure a watertight seal, the gasket must be free of cuts, abrasions or tears. Debris or foreign material caught between the sealing rib on the bottom of the case and the gasket on the top of the case will prevent the case from sealing properly. Applying a coat of an automotive type surface protector is recommended to help prevent dirt and debris from sticking to the seal. If the seal becomes damaged a replacement seal can be ordered from Plasticase.
Cleaning
All NANUK cases are constructed of high impact NK-7 resin designed to absorb the shocks of transport. The surfaces of the case can easily be wiped clean with a non-abrasive cleaner approved for use on plastic. Avoid using brushes that could scratch the case. To keep your case looking like new we recommend using an automotive type surface protector.
Auto pressure equalizer
All NANUK cases are equipped with an automatic pressure release valve. This valve automatically equalizes the pressure on the inside of the case. To ensure correct operation, this valve does not require any maintenance, does not need to be rotated or adjusted, and must not be blocked.
Powerclaw ^™ latches
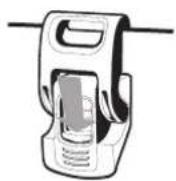
Opening Closing
1
Press down on the sliding button in the middle of the lower latch.
2
Hold the button down and pull the lower latch towards you to release the compressive force. Release the button and continue pulling on the lower latch until it reaches the end of its travel.
3
Release the lower latch and the upper latch should disengage; The case can now be opened. If the latch does not disengage automatically, press down on the lid and the latches will fall open. This may be required when the case is heavily loaded.


1
Pull the lower latch upwards until you can engage the upper latch onto the lid of the case.
2
Once the upper latch is engaged, push downward on the lower latch until the locking button engages with the lower half of the case.
3
An audible click will indicate that the latch is securely closed. If the latch is in the closed position but the button does not return to the locked position, ensure that there are no foreign objects or debris that are preventing the button from engaging into the locked position.
Customizable cubed foam is a simple and effective way to protect and organize your delicate items. If your case is equipped with cubed foam, follow the directions below to fit and protect your items.
1
Place your items on top of the foam leaving space between each item. The multilayer design of the foam* allows the layers of pre-scored foam to be tailored individually to accommodate taller items or to be used as separate levels to protect a larger amount of smaller items.
2
To ensure optimum protection for your equipment, it is important to keep all of your items within the pre-scored grid on the foam. This serves as a cushion if ever the case falls or is impacted.
3
Once you are satisfied with your layout you can mark the perimeter of the cutout with tooth picks. You can remove your items once you have indicated the perimeter. Begin by carefully removing the required foam squares as one piece within the indicated outline. If some foam cubes are removed by mistake they can be reattached by using a spray type adhesive. Removed foam blocks can be reused if necessary or modified to accommodate shallower items. A utility knife can be used to modify the foam cubes.
4
Once all the required foam is removed place your items in their respective compartments to verify fit. Your equipment is now protected!

natural_image
Line drawing of an open safety gear kit with internal compartments and a grid-patterned cover (no text or symbols)Limited Warranty and Disclaimer
Plasticase, Inc. ("Plasticase") warrants that the NANUK case accompanying this document (the "Case") will be free from defects in material and workmanship for the life of the Case, subject to the terms and conditions of this Limited Warranty and Disclaimer (the "Warranty").
- Returns The customer must contact Plasticase in the event that he or she believes the Case is defective and is covered by this Warranty in order to open a warranty claim. Call Plasticase at 1-800-783-6883 (Canada-USA) or +1-450-628-1006 (international) between 9:00 a.m. to 5:00 p.m. (Eastern Time), Monday through Friday to speak with a customer service representative. In some instances, it may be determined that parts can be easily installed by the customer and Plasticase reserves the right to ship replacement parts directly to the customer for installation. Other instances require the customer to pay for shipping the case to Plasticase at 1059 Boulevard des Entreprises Ouest, Terrebonne, QC J6Y 1V2, Canada, for inspection. If the Case is defective, determined solely by Plasticase after an inspection, the shipping costs will be refunded if proof of shipping is provided. No refunds of shipping costs will be made if the Case is not defective.
- Repair or Replacement Plasticase's obligation under this Warranty is limited, at its sole and exclusive option, to either the repair or replacement of the Case where a defect has been claimed and is determined by Plasticase to be present. Upon inspection by Plasticase, the Case or parts thereof that prove to be defective will be repaired or replaced at no charge, and the Case will be shipped back to the customer by Plasticase.
- Limitation of Warranty The Warranty herein applies only to the original customer and is conditional upon the customer giving prompt notice to Plasticase of any discovered defects. Plasticase shall not be responsible for any other defects or damage, including, but not limited to, any defects or damage caused by or resulting from: (a) alterations to the Case by anyone other than Plasticase; (b) accident; (c) damage due to an intentional or negligent act of a third party; (d) abuse or negligence; (e) wear and tear.; (f) mishandling; (g) failure to use the Case in a safe and reasonable manner, or (h) force majeure. If the Case, in the judgment of Plasticase, shows evidence of having been altered, modified or repaired without the authorization of Plasticase, the Warranty herein shall not apply. THE WARRANTY SET FORTH ABOVE IS EXCLUSIVE AND NO OTHER WARRANTY, WHETHER WRITTEN OR ORAL, IS EXPRESSED OR IMPLIED. PLASTICASE SPECIFICALLY DISCLAIMS THE IMPLIED WARRANTIES OF MERCHANTABILITY AND FITNESS FOR A PARTICULAR PURPOSE.
- Liability Plasticase's cumulative liability for damages of any kind whatsoever arising out of the use or possession of the Case, regardless of the form of action, whether in contract or tort, including negligence or strict liability, shall be limited to the purchase price of the Case. IN NO EVENT SHALL PLASTICASE BE LIABLE TO THE CUSTOMER OR ANY OTHER PARTY FOR EXEMPLARY, INDIRECT, SPECIAL, INCIDENTAL, CONTINGENT OR CONSEQUENTIAL DAMAGES ARISING OUT OF THE USE OR POSSESSION OF THE CASE, INCLUDING THE VALUE OF THE CONTENTS OF THE CASE, WHETHER OR NOT PLASTICASE HAS RECEIVED NOTICE OF THE POSSIBILITY OR CERTAINTY OR SUCH DAMAGES OR LOSSES. THESE LIMITATIONS SHALL APPLY NOTWITHSTANDING ANY FAILURE OF ESSENTIAL PURPOSE OF ANY LIMITED REMEDY.
natural_image
Line drawing of an open cylindrical object with internal compartments and a grid-patterned lid (no text or symbols)| Exterior dimensionsDimensions extérieuresDimensiones exteriores | Interior dimensionsDimensions intérieuresDimensiones interiores | Weight (empty)Poids (vide)Peso (vacío) | Lid depthProf. du couvercleProf. de la tapadera | Base depthProf. de la baseProf. de la base | |
| 310 | L5.9" × W4.3" × H1.7"L149mm × W110mm × H43mm | L5.2" × W3.0" × H1.1"L131mm × W77mm × H28mm | 0.4 lbs | 0.2kg | 0.2" | 6mm | 0.9" | 22mm |
| 320 | L6.3" × W4.7" × H2.2"L161mm × W118mm × H55mm | L5.9" × W3.3" × H1.5"L151mm × W85mm × H39mm | 0.6 lbs | 0.3kg | 0.3" | 9mm | 1.2" | 30mm |
| 330 | L7.4" × W5.1" × H2.6"L188mm × W130mm × H65mm | L6.7" × W3.8" × H1.9"L170mm × W96mm × H49mm | 0.8 lbs | 0.4kg | 0.5" | 13mm | 1.4" | 36mm |
| 903 | L9.1" × W6.8" × H3.8"L231mm × W173mm × H97mm | L7.4" × W4.9" × H3.1"L188mm × W124mm × H79mm | 1.3 lbs | 0.6kg | 0.5" | 13mm | 2.6" | 66mm |
| 904 | L10.2" × W7.9" × H4.5"L259mm × W201mm × H114mm | L8.4" × W6.0" × H3.7"L213mm × W152mm × H94mm | 1.6 lbs | 0.7kg | 0.8" | 20mm | 2.9" | 74mm |
| 905 | L12.5" × W10.1" × H6.0"L318mm × W257mm × H152mm | L9.4" × W7.4" × H5.5"L239mm × W188mm × H140mm | 3.3 lbs | 1.5kg | 1.4" | 36mm | 4.1" | 104mm |
| 910 | L14.3" × W11.1" × H4.7"L363mm × W282mm × H120mm | L13.2" × W9.2" × H4.1"L336mm × W234mm × H104mm | 3.0 lbs | 1.4kg | 1.3" | 33mm | 2.8" | 71mm |
| 915 | L15.8" × W12.1" × H6.8"L401mm × W307mm × H173mm | L13.8" × W9.3" × H6.2"L351mm × W236mm × H157mm | 4.4 lbs | 2.0kg | 2.1" | 53mm | 4.1" | 104mm |
| 920 | L16.7" × W13.4" × H6.8"L424mm × W340mm × H173mm | L15.0" × W10.5" × H6.2"L381mm × W267mm × H157mm | 5.1 lbs | 2.3kg | 2.1" | 53mm | 4.1" | 104mm |
| 925 | L18.7" × W14.8" × H7.0"L475mm × W376mm × H178mm | L17.0" × W11.8" × H6.4"L432mm × W300mm × H163mm | 6.2 lbs | 2.8kg | 2.1" | 53mm | 4.3" | 108mm |
| 930 | L19.8" × W16.0" × H7.6"L503mm × W406mm × H193mm | L18.0" × W13.0" × H6.9"L457mm × W330mm × H175mm | 7.1 lbs | 3.2kg | 2.1" | 53mm | 4.8" | 121mm |
| 935 | L22.0" × W14.0" × H9.0"L559mm × W356mm × H229mm | L20.5" × W11.3" × H7.5"L521mm × W287mm × H191mm | 11.6 lbs | 5.2kg | 2.1" | 53mm | 5.4" | 137mm |
| 940 | L21.7" × W16.9" × H8.5"L557mm × W429mm × H216mm | L20.0" × W14.0" × H8.0"L508mm × W356m × H203mm | 8.4 lbs | 3.8kg | 2.1" | 53mm | 5.9" | 150mm |
| 945 | L25.1" × W19.9" × H8.8"L638mm × W505mm × H224mm | L22.0" × W17.0" × H8.2"L559mm × W432mm × H208mm | 10.6 lbs | 4.8kg | 2.1" | 53mm | 6.1" | 155mm |
| 950 | L22.8" × W18.3" × H11.7"L579mm × W465mm × H297mm | L20.5" × W15.3" × H10.1"L521mm × W389mm × H257mm | 15.1 lbs | 6.8kg | 2.1" | 53mm | 8.0" | 203mm |
| 960 | L25.4" × W20.0" × H14.5"L645mm × W508mm × H368mm | L22.0" × W17.0" × H12.9"L559mm × W432mm × H328mm | 19.2 lbs | 8.7kg | 2.1" | 53mm | 10.8" | 274mm |
| 990 | L47.1" × W17.3" × H6.6"L1196mm × W440mm × H168mm | L44.0" × W14.5" × H6.0"L1118mm × W368mm × H152mm | 16.0 lbs | 7.3kg | 1.6" | 41mm | 4.4" | 111mm |
| 995 | L55.1" × W17.3" × H6.6"L1399mm × W440mm × H168mm | L52.0" × W14.5" × H6.0"L1321mm × W368mm × H152mm | 18.0 lbs | 8.2kg | 1.6" | 41mm 4.4" | 111mm |

plasticase

PROFESSIONAL PROTECTIVE CASES

natural_image
Silhouette of a child sitting inside an open suitcase with a diagonal line crossing through it, enclosed in a circle (no text or symbols)WARNING
Suffocation risk.
ATTENTION


Brand : Nanuk
Model : 960
Category : Protective case