
LK75C - Ice machine LG - Free user manual and instructions
Find the device manual for free LK75C LG in PDF.
| Product type | Automatic ice maker kit for refrigerator |
| Brand | LG |
| Model | LK75C |
| Ice production | 8 cubes per cycle, 64 to 128 cubes per 24 hours |
| Recommended water pressure | 20 - 120 psi (138 - 827 kPa) |
| Recommended freezer temperature | 0 °F (-18 °C) |
| Time before first production | 12 to 24 hours after installation |
| Installation | Inside the freezer compartment, requires connection to water supply |
| Power supply | Via the refrigerator (internal electrical connection) |
| Main functions | Automatic ice production, auto shut-off when bin is full |
| Maintenance | Clean ice bin regularly; turn off power during prolonged absence |
| Safety | Do not touch moving parts; unplug before any service |
| Spare parts and repairability | Replacement parts available through LG service; 1-year warranty parts and labor |
| General information | User and installation manual provided; installation time 20-60 minutes |
Frequently Asked Questions - LK75C LG
User questions about LK75C LG
0 question about this device. Answer the ones you know or ask your own.
Ask a new question about this device
Download the instructions for your Ice machine in PDF format for free! Find your manual LK75C - LG and take your electronic device back in hand. On this page are published all the documents necessary for the use of your device. LK75C by LG.
USER MANUAL LK75C LG
Standardization of Ice Maker
Kit LK65C and LK75C.
| DESCRIPTION: OWNER'S MANUAL Part No. MFL69347703 | |
| MODEL DESCRIPTION: | |
| Product: Top Mount Refrigerator Project: Icemaker SVC Kit manual | |
| Brand: LG Customer: | LGEUS & LGECI |
| PRINTING SPECIFICATION: | |
| 1. Trim Size (mm): 148 ± 2 (W), 210 ± 2 (H) | 4. Printing Method: Off Set |
| 2. Printing Color: Black | 5. Bindery Type: Saddle Stitch |
| 3. Paper Type: | 6. Language: English & French. |
| - Cover: Bond 63 gr | 7. Number of Pages: 32 |
| - Content: Bond 63 gr | 8. Number of Sheets: 8 |
| NOTES: | |
| 1. The part should not contain prohibited substances (Pb, Cd, Hg, Cr+6, PBB, PBDE) and should comply with standard LG (61)-A-9101. | |
| 2. Blank sheets should be distributed as follows: 1st Blank sheet after cover. | |
| 3. For Owner's Manuals with less than 100 pages the bindery type will be Saddle Stitch, those with more than 100 pages can use Perfect Bind. CONSIDERING NO VARIATION ON PRICE BETWEEN SADDLE STITCH AND PERFECT BIND. | |
| The Owner's Manual specification must be the same according to First Parts Approval (FPA). Owners Manual quality must not be modified. | |
Please read this manual carefully before operating
your product and retain it for future reference.
MODELS: LRTLS2403, LTCS20120, LTCS20020, LTCS20040
MANUEL D'UTILISATEUR
MACHINE À GLAÇONS (LK75C)
Copyright © 2021-2024 LG Electronics Inc. All rights reserved.
Only training and service purposes.
Important Safety Instructions 4
Before You Begin 5
Replacing the Ice Maker 5
Introduction to the Automatic Ice Maker 6
Contents of Kit 7
Icemaker Installation 8-9
Before You Begin 8
Tools You Will Need 8
Installation Instructions 8-9
Water Valve Installation 10-12
Before You Begin 10
Tools You Will Need 10
Installation Instructions 11-12
Fill Tube Installation 13
Before You Begin 13
Tools You Will Need 13
Installation Instructions 13
Care 14
When Should You Set the Icemaker 14
Switch to O (off)
Normal Sounds You May Hear 14
When you Go On Vacation 14
Troubleshooting Guide 15
LG ELECTRONICS CANADA, INC.
LG REFRIGERATOR LIMITED WARRANTY - Canada
WARRANTY: Should your LG Ice Maker Kit ("Product") fail due to a defect in material or workmanship under normal home use during the warranty period set forth below, LG Canada will at its option repair or replace the Product upon receipt of proof of original retail purchase. This warranty is valid only to the original retail purchaser of the product and applies only to a Product distributed in Canada by LG Canada or an authorized Canadian distributor. The warranty only applies to Products located and used within Canada.
LG Icemaker Kit Warranty Period
| WARRANTY PERIOD: (Note: If the original date of purchase cannot be verified, the warranty will begin ninety (90) days from the date of manufacture of the ice maker). | ||
| Product Parts Labor | ||
| Icemaker Kit 1 year 1 year [In-Home Service] | ||
- Replacement products and parts are warranted for the remaining portion of the original warranty period or ninety (90) days, whichever is greater.
- Replacement products and parts may be new or remanufactured.
- LG Authorized Service Center warranties their repair work for thirty (30) days.
LG CANADA'S SOLE LIABILITY IS LIMITED TO THE WARRANTY SET OUT ABOVE. EXCEPT AS EXPRESSLY PROVIDED ABOVE, LG CANADA MAKES NO AND HEREBY DISCLAIMS ALL OTHER WARRANTY AND CONDITIONS RESPECTING THE PRODUCT, WHETHER EXPRESS OR IMPLIED, INCLUDING, BUT NOT LIMITED TO, ANY IMPLIED WARRANTY OR CONDITION OF MERCHANTABILITY OR FITNESS FOR A PARTICULAR PURPOSE AND NO REPRESENTATIONS SHALL BE BINDING ON LG CANADA. LG CANADA DOES NOT AUTHORIZE ANY PERSON TO CREATE OR ASSUME FOR IT ANY OTHER WARRANTY OBLIGATION OR LIABILITY IN CONNECTION WITH THE PRODUCT. TO THE EXTENT THAT ANY WARRANTY OR CONDITION IS IMPLIED BY LAW, IT IS LIMITED TO THE EXPRESS WARRANTY PERIOD ABOVE. LG CANADA, THE MANUFACTURER OR DISTRIBUTOR SHALL NOT BE LIABLE FOR ANY INCIDENTAL, CONSEQUENTIAL, SPECIAL, DIRECT OR INDIRECT DAMAGES, LOSS OF GOODWILL, LOST PROFITS, PUNITIVE OR EXEMPLARY DAMAGES OR ANY OTHER DAMAGE, WHETHER ARISING DIRECTLY OR INDIRECTLY FROM ANY CONTRACTUAL BREACH, FUNDAMENTAL OR OTHERWISE, OR FROM ANY ACTS OR OMISSIONS, TORT, OR OTHERWISE.
This warranty gives you specific legal rights. You may have other rights which may vary from province to province depending on applicable provincial laws. Any term of this warranty that negates or varies any implied condition or warranty under provincial law is severable where it conflicts with provincial law without affecting the remainder of this warranty's terms.
THIS LIMITED WARRANTY DOES NOT COVER:
- Service trips to deliver, pick up, or install the product; instructing a customer on operation of the product; repair or replacement of fuses or correction of wiring, or correction of unauthorized repairs/installation.
- Failure of the product to perform during power failures and interruptions or inadequate electrical service.
- Damage caused by leaky or broken water pipes, frozen water pipes, restricted drain lines, inadequate or interrupted water supply or inadequate supply of air.
- Damage resulting from operating the Product in a corrosive atmosphere or contrary to the instructions outlined in the Product owner's manual.
- Damage to the Product caused by accidents, pests and vermin, lightning, wind, fire, floods, or acts of God.
- Damage resulting from the misuse, abuse, improper installation, repair, or maintenance of the Product. Improper repair includes use of parts not approved or specified by LG Canada.
- Damage or product failure caused by unauthorized modification or alteration, or use for other than its intended purpose, or resulting from any water leakage due to improper installation.
- Damage or Product failure caused by incorrect electrical current, voltage, commercial or industrial use, or use of accessories, components, or cleaning products that are not approved by LG Canada.
- Damage caused by transportation and handling, including scratches, dents, chips, and/or other damage to the finish of your product, unless such damage results from defects in materials or workmanship and is reported within one (1) week of delivery.
- Damage or missing items to any display, open box, discounted, or refurbished Product.
- Products with original serial numbers that have been removed, altered, or cannot be readily determined. Model and Serial numbers, along with original retail sales receipt, are required for warranty validation.
- Increases in utility costs and additional utility expenses.
- Replacement of consumable parts.
- Repairs when your Product is used in other than normal and usual household use (including, without limitation, commercial use, in offices or recreational facilities) or contrary to the instructions outlined in the Product owner's manual.
- Costs associated with removal of the Product from your home for repairs.
- The removal and reinstallation of the Product if it is installed in an inaccessible location or is not installed in accordance with published installation instructions, including the Product owner's and installation manuals.
17.
All costs associated with the above excluded circumstances shall be borne by the consumer.
| For complete warranty details and customer assistance, please call or visit our website:Call 1-888-542-2623 (24 hours a day, 365 days a year) and select the appropriate option from the menu or visit our website at http://www/lg.com | Write your warranty information below:Product Registration Information:Model:Serial Number:Date of Purchase: |
IMPORTANT SAFETY INSTRUCTIONS
This guide contains many important safety messages. Always read and obey.

This is the safety alert symbol. It alerts you to safety messages that inform you of hazards that can kill or hurt you or others, or cause damage to the product. All safety messages will be preceded by the safety alert symbol and the hazard signal word DANGER, WARNING, or CAUTION. These words mean:
DANGER
You will be killed or seriously injured if you do not follow instructions.
WARNING
You can be killed or seriously injured if you do not follow instructions.
CAUTION
Indicates an imminently hazardous situation which, if not avoided, may result in minor or moderate injury, or product damage only.
All safety messages will identify the hazard, tell you how to reduce the chance of injury and tell you what can happen if the instructions are not followed.
WARNING
IMPORTANT: Please read carefully all instructions before using.
To reduce the risk of fire, electric shock or injury to persons when using your product, basic safety precautions should be followed, including the following. Read all instructions before using this appliance.
- NEVER unplug your refrigerator by pulling on the power cord. Always grip the plug firmly and pull it straight out from the outlet.
- When moving your refrigerator away from the wall, be careful not to roll over or damage the power cord in any way.
- Do not crush or damage the water line.
- Keep fingers out of 'pinch point' areas; clearances between the doors and cabinet are necessarily small. Be careful when you open the doors when children are in the area.
- Unplug your refrigerator before cleaning or making any repairs.
NOTE: We strongly recommend that any servicing be performed by a qualified individual.
- The refrigerator-freezer should be positioned so that the power supply plug is accessible for quick disconnection if an accident happens.
- For personal safety, this appliance must be properly grounded. Have the wall outlet and the circuit checked by a qualified electrician to make sure the outlet is properly grounded.
- For refrigerators with an automatic icemaker, avoid contact with the moving parts of the ejector mechanism and with the heating element that releases the cubes. DO NOT place fingers or hands on the automatic ice making mechanism while the refrigerator is plugged in.
Read these instructions completely and carefully.
- IMPORTANT : Save these instructions for local servicer's use.
- IMPORTANT: ordinances.Observe all governing codes and
- Note to Installer: Be sure to leave these instructions with the consumer.
Note to Consumer: Keep these instructions for future reference. - Skill level: Installation of this appliance requires basic mechanical and electrical skills.
Completion time: 20~60 minutes - Proper installation is the responsibility of the installer.
- Product failure due to improper installation is not covered under the warranty.
Replacing the Icemaker
It is important that you use the water valve that came with this kit, even though your refrigerator may already have one installed.
The old valve will not allow enough water through to properly fill the icemaker and will cause damage.
WARNING
Personal Injury Hazard
Avoid contact with the moving parts.
DO NOT place fingers or hands on the automatic icemaking mechanism while the refrigerator is plugged in.
A newly installed refrigerator may take 12 to 24 hours to begin making ice.
The icemaker will produce 8 cubes per cycle, approximately 64-128 cubes in a 24 hour period, depending on freezer compartment temperature, room temperature, how frequently refrigerator doors are opened, and other use conditions.
If you wish to operate the refrigerator without connecting a water supply, set the icemaker switch to O (off).
When the refrigerator has been connected to the water supply, set the switch to I (on).
The icemaker will fill with water when it reaches the proper temperature. A newly installed refrigerator may take 12 to 24 hours to begin making ice cubes.
Discard the first few batches of ice to allow the water line to clear.
Be sure nothing interferes with the movement of the feeler arm.
When the bin fills to the level of the feeler arm, the icemaker will stop producing ice.
If ice is not used frequently, old ice cubes will become cloudy, taste stale and shrink.
CONTENTS OF KIT


ICEMAKER INSTALLATION
BEFORE YOU BEGIN
Read each step thoroughly before proceeding.
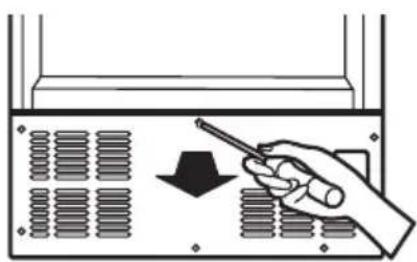
CAUTION: Unplug the refrigerator power cord from the outlet.
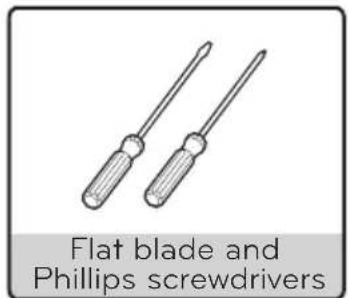
TOOLS YOU WILL NEED
INSTALLATION INSTRUCTIONS
1. TURN OFF THE ICEMAKER
Turn the icemaker switch to O (off). Leave the icemaker off until the refrigerator is connected to the water supply to prevent premature operation.
2. INSTALL THE ICEMAKER
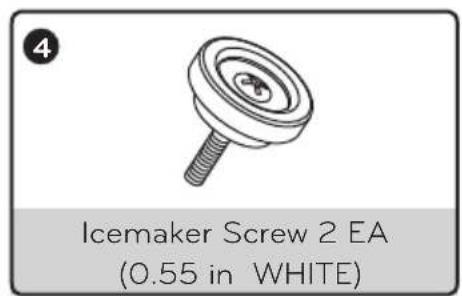
Before installing icemaker, remove the freezer shelf.
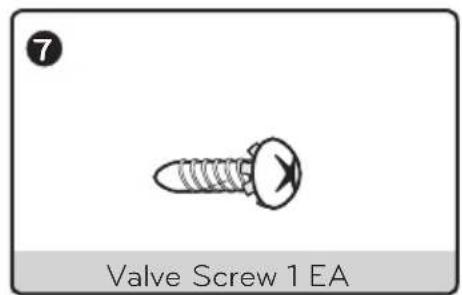
To mount the icemaker, insert the two icemaker screws provided through the holes at the base of the icemaker and into the slots located in the freezer left wall.
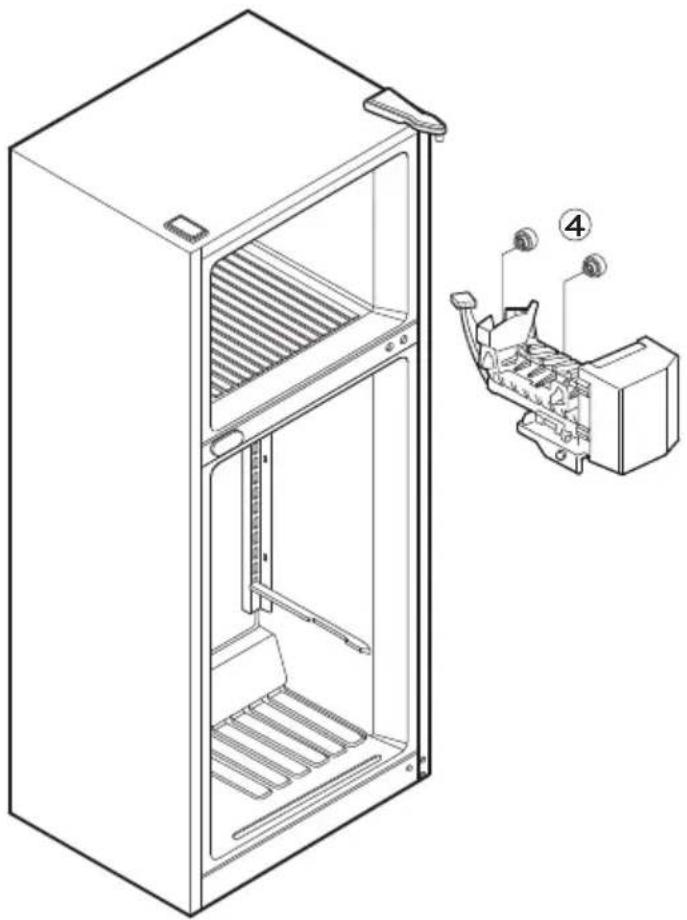
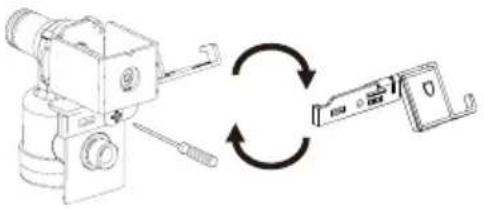
3. PLUG IN THE ICEMAKER
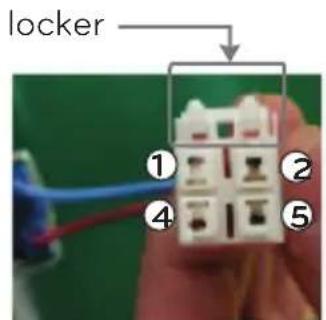
Remove the cover to connect the icemaker to the refrigerator.
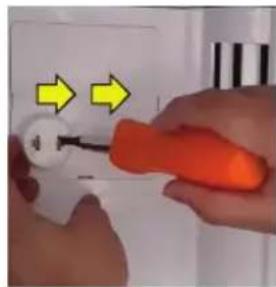
1st Step: Press to rel- 2nd Step: Press to release lease the tab on the the right tab and remove left. ve the cover.
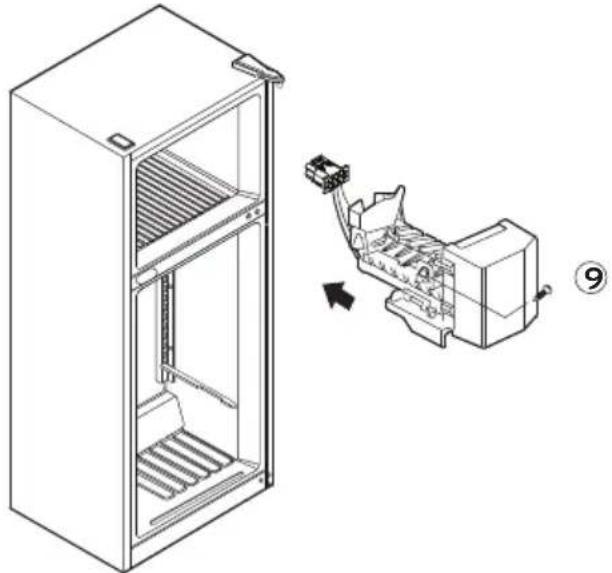
Plug the icemaker wire harness into the connector located in the freezer wall until you hear a click sound.
NOTE: Secure the icemaker to the freezer using 1.screw 9.
4. INSTALL THE ICE BUCKET
Before installing the ice bucket, install the freezer shelf.
Put the ice bucket directly under the icemaker (to the left and all the way to the rear of the shelf under the icemaker).
Make sure that the icemaker switch is set to O (off) position.
5. KEEP THIS MANUAL
BEFORE YOU BEGIN
Read each step thoroughly before proceeding.
CAUTION: Unplug the refrigerator power cord from the outlet.
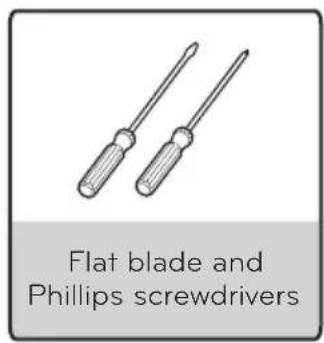
TOOLS YOU WILL NEED
Flat blade and Phillips screwdrivers
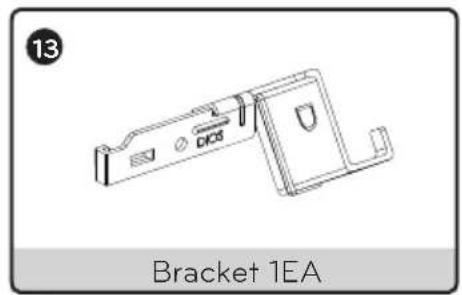
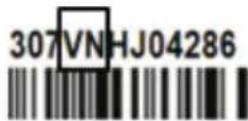
Replace Bracket (Only applies to serial numbers with "VN" on the label.)
Note : Check the serial number on the label attached to the freezer room.
SER.No./No.DE SERIE:
Note: The back of the VN model looks flat.

MR Type

MR model doesn't require a bracket change.
Skip this step.

VN Type
VN model requires a bracket change. Follow the steps below.
Loosen the screw, remove the bracket from the valve assembly, and replace the bracket on the valve assembly using a Phillips screwdriver.
INSTRUCTIONS
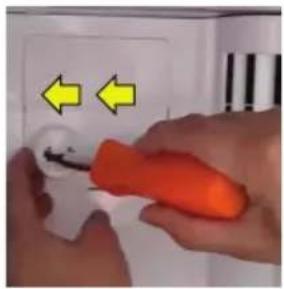
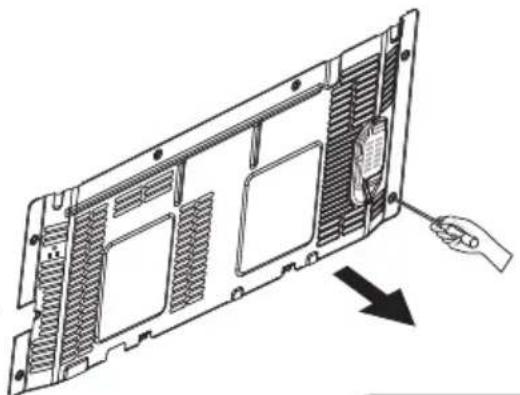
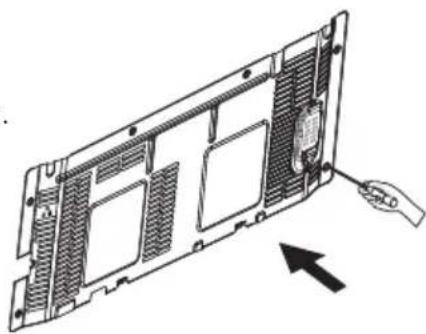
1. REMOVE THE BACK COVER
Remove the back cover of the refrigerator using a Phillips screwdriver.
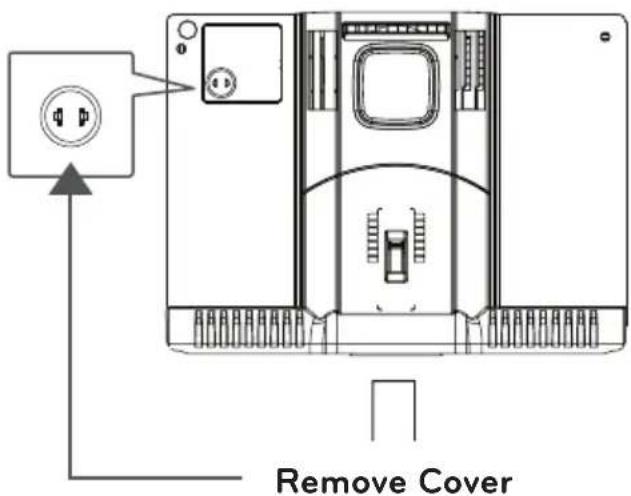
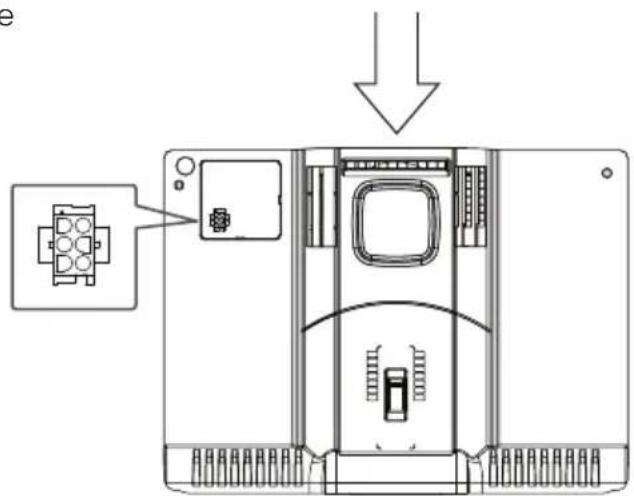
2. CONNE CT THE WATER VALVE WIRE HARNESS
Facing the back of the refrigerator, locate the wiring harness for the water valve at the lower right side. Plug the connector of the water valve harness onto the refrigerator terminals.
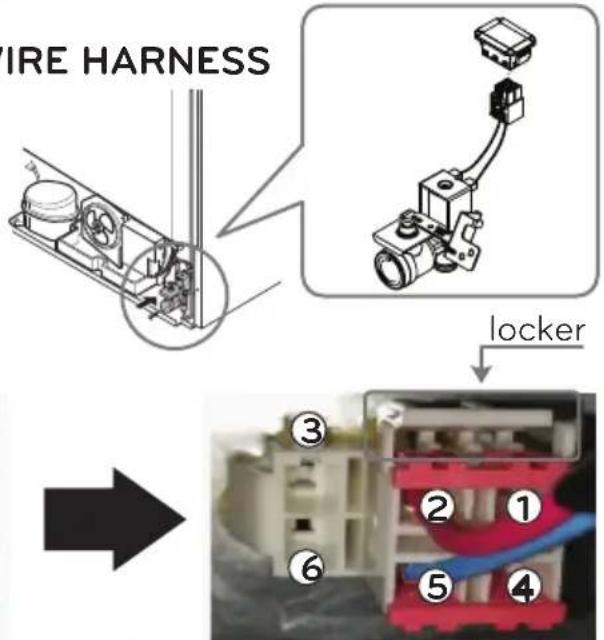
housing water valve
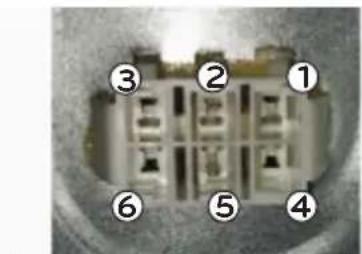
housing refrigerator bottom direction of combined
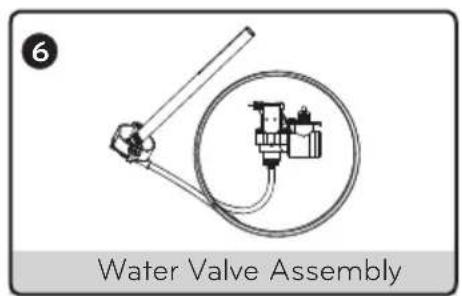
3. ATTACH THE WATER VALVE
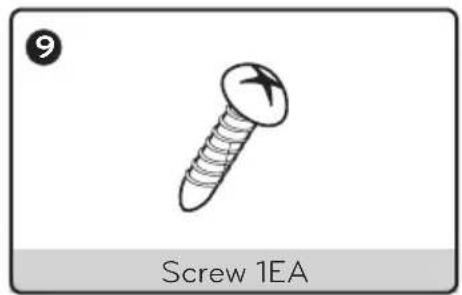
Fasten the water valve to the back of the refrigerator using one Phillips screw
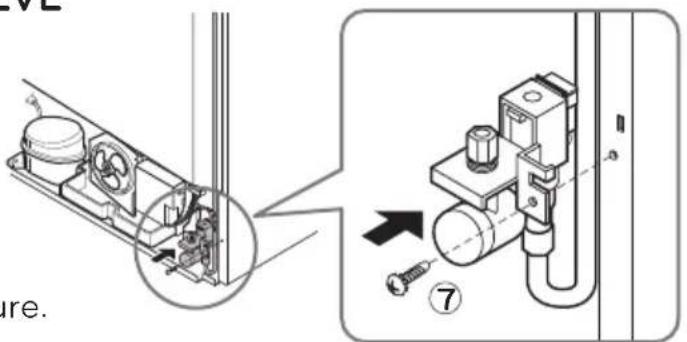
NOTE: Make sure the fill tube connection on water valve is secure.
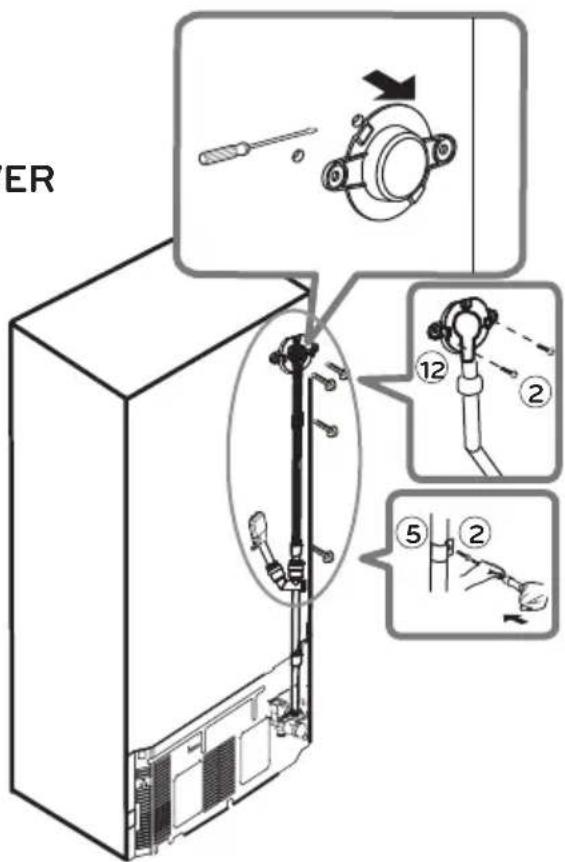
WATER VALVE INSTALLATION
4. REMOVE THE ICEMAKER FILL TUBE COVER
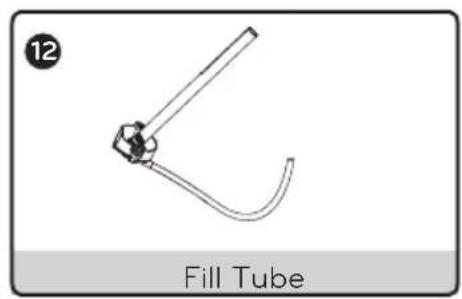
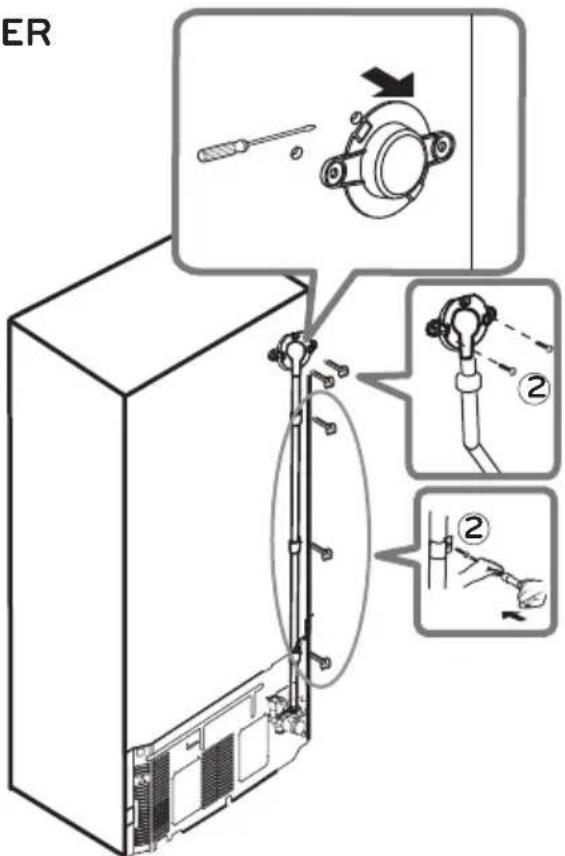
Remove and discard the icemaker fill tube opening cover located on the upper right side of the refrigerator; insert the icemaker fill tube ⑥ all the way into the opening until it stops.
5. SECURE THE FILL TUBE
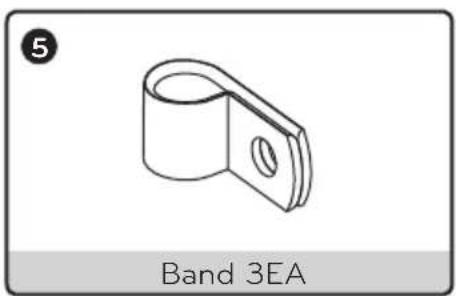
Locate the marks on the back of the cabinet where the fill tube ⑥ will be installed. Place the 5 screws ② on the marks and tap them with the screwdriver to make a small hole. Fasten the fill tube using the band ⑤ and the Phillips screws.
6. ATTACH THE BACK COVER
Fasten the back cover with the previously removed screws.
7 CONNECT TO WATER LINE.
To connect to the home water supply, refer to the Water Line Installation Instructions within the refrigerator's Owner's Manual.
Once the home water supply line is connected and turned on, be sure to turn the icemaker switch to the I (on) position.
The icemaker will require 12 to 24 hours for ice to be produced.
It is recommended to discard the first few batches of ice prior to using a batch for consumption.
FILL TUBE INSTALLATION
BEFORE YOU BEGIN
Read each step thoroughly before proceeding.
CAUTION: Unplug the refrigerator power cord from the outlet.
TOOLS YOU WILL NEED
INSTALLATION INSTRUCTIONS
(Apply only for model; LRTLS2403*)
1. REMOVE THE ICEMAKER FILL TUBE COVER
Remove and discard the icemaker fill tube opening cover located on the upper right side of the refrigerator; insert the icemaker fill tube 12 all the way into the opening until it stops.
2. SECURE THE FILL TUBE
Locate the marks on the back of the cabinet where the fill tube ⑫ will be installed. Place the 5 screws ② on the marks and tap them with the screwdriver to make a small hole. Fasten the fill tube using the band ⑤ and the Phillips screws.
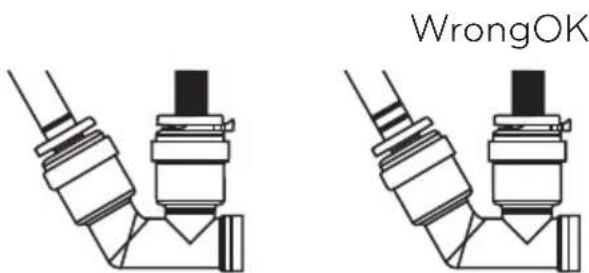
3. SECURE THE FILL TUBE
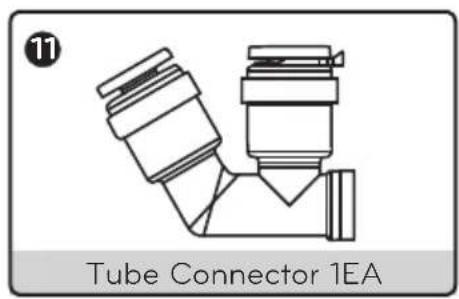
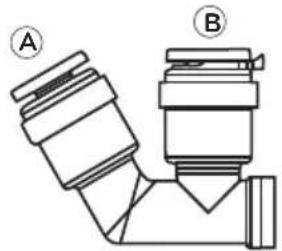
Position the tube connector 11 as shown. Insert the tube from the water valve (white) in the left opening A. Then remove the clip from around the right opening B, insert the icemaker fill tube (black), and reinsert to secure the tube
4. FILL TUBE INSTALLATION
Insert tubes until only one guideline is showing. Tug gently to make sure the tube is secure.
CARE
WHEN SHOULD YOU SET THE ICEMAKER SWITCH TO O (OFF)
- When the ice storage bin is removed for more than a few minutes.
- When the water supply will be shut off for several hours.
- When the refrigerator will not be used for several days.
NORMAL SOUNDS YOU MAY HEAR
- During use, you may hear an occasional "buzzing" noise coming from the back of your refrigerator. This is normal and occurs when the water valve is turned on to allow water to fill the ice tray. If the refrigerator is not connected to a water supply, this noise will still occur and damage can result from operating the icemaker without having a water supply line installed. To avoid unnecessary operating noises, and avoid damaging the icemaker, locate the icemaker switch and place it in the O (off) position.
- You may occasionally hear the sound of ice dropping into the ice bin, and running water during use as the icemaker refills.
WHEN YOU GO ON VACATION
Set the icemaker switch to the O (off) position, and shut off the watersupply line to the refrigerator.
If you anticipate that the temperature surrounding the refrigerator may drop below freezing, have a qualified plumber drain the water supply system to prevent property damage due to flooding from ruptured water lines or connections.
AUTOMATIC ICEMAKER DOES NOT WORK
Check if...
Then...
| Icemaker switch in the O (off) position. | Move the switch to the I (on) position. |
| Water supply turned off or not connected. | See Connecting the Water Line. |
| Freezer compartment too warm. | After installing icemaker, wait 24 hours for freezer to reach its set temperature.Recommended freezer temperature is 0 degrees F (-18°C). |
| Piled up cubes in the storage bin causes the icemaker to shut off. | Level cubes by hand. |
CUBES PRODUCED BY ICEMAKER ARE TOO SMALL
Check if...
Then...
| Water shutoff valve is not fully open or the water supply pressure is not adequate. | Check water supply for proper pressure. Recommended pressures is 20 -120 psi (138 - 827 kPa). |
ICE CUBES ARE FREEZING TOO SLOWLY
Check if...
Then...
| The doors have been left open. | Check to ensure doors are closed properly. |
| Temperature control not set cold enough. | Refer to refrigerator's Owner's Manual to the Control Panel Features for temperature adjustments. |
ICE CUBES HAVE A BAD TASTE OR ODOR
Check if...
Then...
| Ice storage bin needs cleaning. | Empty and thoroughly wash the ice bin. |
| Food transmitting odor/taste to ice cubes. | Cover or wrap food items to prevent the spread of odors. |
| Interior of refrigerator needs cleaning. | Refer to refrigerator's Owner's Manual. The Care and Cleaning section see General Cleaning Tips. |
TABLE DES MATIERES
Garantie 17
PRODUCT CODE:CODE DE PRODUIT
SER.No./No.DE SERIE
PATING CAPACITE NOMINALE
DEFROSTINGINPUT:
PRODUCTION DATE/CATE DE PRODUCTION
SER.No./No.DE SERIE:
Register your Product Online!
- MACHINE À GLAÇONS (LK75C)
- LG ELECTRONICS CANADA, INC.
- LG REFRIGERATOR LIMITED WARRANTY - Canada
- LG Icemaker Kit Warranty Period
- THIS LIMITED WARRANTY DOES NOT COVER:
- IMPORTANT SAFETY INSTRUCTIONS
- DANGER
- WARNING
- CAUTION
- Replacing the Icemaker
- Personal Injury Hazard
- CONTENTS OF KIT
- ICEMAKER INSTALLATION
- BEFORE YOU BEGIN
- TOOLS YOU WILL NEED
- INSTALLATION INSTRUCTIONS
- TURN OFF THE ICEMAKER
- INSTALL THE ICEMAKER
- PLUG IN THE ICEMAKER
- INSTALL THE ICE BUCKET
- KEEP THIS MANUAL
- Replace Bracket (Only applies to serial numbers with "VN" on the label.)
- INSTRUCTIONS
- REMOVE THE BACK COVER
- CONNE CT THE WATER VALVE WIRE HARNESS
- ATTACH THE WATER VALVE
- WATER VALVE INSTALLATION
- REMOVE THE ICEMAKER FILL TUBE COVER
- SECURE THE FILL TUBE
- ATTACH THE BACK COVER
- CONNECT TO WATER LINE.
- FILL TUBE INSTALLATION
- REMOVE THE ICEMAKER FILL TUBE COVER
- SECURE THE FILL TUBE
- SECURE THE FILL TUBE
- FILL TUBE INSTALLATION
- CARE
- WHEN SHOULD YOU SET THE ICEMAKER SWITCH TO O (OFF)
- NORMAL SOUNDS YOU MAY HEAR
- WHEN YOU GO ON VACATION
- AUTOMATIC ICEMAKER DOES NOT WORK
- CUBES PRODUCED BY ICEMAKER ARE TOO SMALL
- ICE CUBES ARE FREEZING TOO SLOWLY
- ICE CUBES HAVE A BAD TASTE OR ODOR
- TABLE DES MATIERES
Brand : LG
Model : LK75C
Category : Ice machine