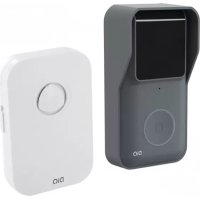
DiOBELLB11 - Doorbells DIO - Free user manual and instructions
Find the device manual for free DiOBELLB11 DIO in PDF.

| Product type | Connected doorbell |
| Brand | DIO |
| Model | DiOBELLB11 |
| Outdoor unit - Power supply | 3 AA/LR6 batteries (DC 4.5 V) |
| Indoor unit - Power supply | AC 100-240 V, 50/60 Hz (mains plug) |
| Outdoor unit - Dimensions (W x H x D) | 50.7 x 126.1 x 19.5 mm |
| Weight (outdoor unit, without batteries) | Approx. 90 g |
| Waterproof rating (outdoor unit) | IP44 |
| Wireless frequencies | 2.4 GHz (Wi-Fi) and 433.92 MHz |
| Wireless range | 80 m in open field |
| Camera resolution | 0.3 MP |
| Camera viewing angle | 60° |
| Number of melodies | 38 |
| Volume levels (chime) | Low (60-70 dB), Medium (70-80 dB), High (80-90 dB) |
| Standby power consumption (chime) | 0.5 Wh |
| Operating power consumption (chime) | 1.5 Wh |
| Operating temperature | -10°C to 50°C |
| Maximum humidity | < 90 % at 40°C |
| Main features | Smartphone notification, pairing via DiO One app, 38 melodies, volume adjustment, camera with night vision, motion detection |
| Care and cleaning | Wipe with a soft dry cloth; do not use abrasive products |
| Safety | Do not mix new and used batteries; keep batteries out of reach of children; do not open or repair yourself; use in accordance with CNIL regulations |
| Spare parts and repairability | Standard AA batteries; chime not user-repairable |
| General information | Guarantee according to seller's conditions; EU declaration of conformity available at chacon.com |
Frequently Asked Questions - DiOBELLB11 DIO
User questions about DiOBELLB11 DIO
0 question about this device. Answer the ones you know or ask your own.
Ask a new question about this device
Download the instructions for your Doorbells in PDF format for free! Find your manual DiOBELLB11 - DIO and take your electronic device back in hand. On this page are published all the documents necessary for the use of your device. DiOBELLB11 by DIO.
USER MANUAL DiOBELLB11 DIO
natural_image
Simple line drawing of a mobile phone with a bell icon on the front panel (no text or symbols)
natural_image
Black rectangular sign with a white bell icon in the center, enclosed in a rounded square border (no text or symbols)DiOBELL-B11
0. Contenu

1×2×1×
1×


1×

1x
1x
1. Introduction
natural_image
Simple line drawing of a device with a lock icon and three rays pointing outward (no text or symbols)natural_image
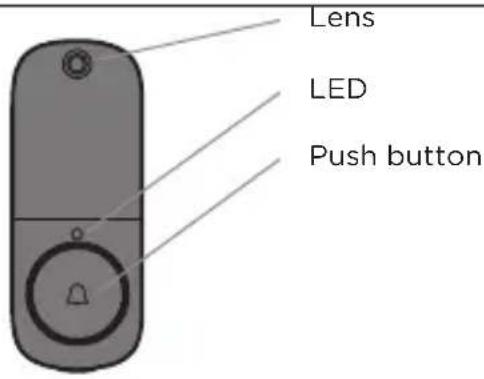
Illustration of a remote control device with three lines pointing to its sides (no text or symbols)Lentille
Indicateur LED
Bouton poussoir
DiOBELL-B11
natural_image
Diagram showing two remote control devices with a battery and a screwdriver, no text or symbols presentnatural_image
Simple line drawing of a device with two circular cutouts, one larger and one smaller, connected by an arrow (no text or symbols)natural_image
Simple line drawing of a vertical panel with a side view and a rectangular block, labeled with dimension '3' (no text or symbols beyond the label)text_image
Diagram showing three sequential steps of a device with labeled components and directional arrows, likely illustrating a mechanical or electrical setup.6. Réinitialisation
natural_image
Two identical remote control devices with a screwdriver inserted, shown from different angles (no text or symbols visible)natural_image
Diagram showing two remote control devices with a battery and a magnified view of the next device (no text or symbols present)natural_image
Simple line drawing of a device with two circular components and an open square (no text or symbols)natural_image
Simple line drawing of a vertical panel with a side view and a rectangular block, no text or symbols present.natural_image
Three-panel diagram showing a device with wires and connectors, connected to a wall-mounted device (no text or symbols present)6. Resetten
natural_image
Two grayscale images showing a device with a scroll wheel and a hand pointing at it, no text or symbols present.natural_image
Simple line drawing of a door with a lock icon and three rays extending outward (no text or symbols)natural_image
Diagram showing two remote control devices with a battery and a magnified view of the next device (no text or symbols present)natural_image
Simple line drawing of a device with two circular components and a square socket (no text or symbols)natural_image
Simple line drawing of a vertical panel with a side view and a rectangular block, labeled with dimension '3' (no text or symbols beyond the label)natural_image
Three-panel diagram showing a device with wires and connectors, connected to a wall-mounted device (no text or symbols present)6. Restablecimiento
natural_image
Two identical grayscale images showing a device with a scroll and a hand cursor, no text or symbols present.http://chacon.com/conformity


natural_image
Simple line drawing of a device with a lock icon and three rays pointing outward (no text or symbols)natural_image
Illustration of a remote control device with a dial and three lines pointing to it (no text or symbols)Lente da câmara
LED
Botão de pressão
DiOBELL-B11
natural_image
Diagram showing two remote control devices with a battery and a magnified view of the next device (no text or symbols present)natural_image
Simple line drawing of a device with two circular components and a square socket (no text or symbols)natural_image
Simple line drawing of a vertical panel with a side view and a circular object, labeled with the number 3 (no text or symbols beyond the label)natural_image
Three-panel diagram showing a device with wires and connectors, connected to a wall-mounted device (no text or symbols present)6. Reiniciar
natural_image
Two identical grayscale images showing a device with a scroll wheel and a finger pointing at it, connected by a screwdriver (no text or symbols visible)natural_image
Simple line drawing of a device with a lock icon and three rays pointing outward (no text or symbols)natural_image
Diagram showing two remote control devices with a battery and a magnified view of the next device (no text or symbols present)natural_image
Simple line drawing of a device with two circular components and a square socket (no text or symbols)natural_image
Simple line drawing of a vertical panel with a side view and a rectangular object, labeled with dimension '3' (no text or symbols beyond the label)natural_image
Three-panel diagram showing a device with wires and connectors, connected to a wall-mounted device (no text or symbols present)6. Ripristino
natural_image
Two identical remote control devices with a screwdriver inserted, showing no text or symbols.natural_image
Illustration of a remote control device with a scroll wheel and indicator lights, shown from two different angles (no text or symbols present)natural_image
Simple line drawing of a device with two circular cutouts, one larger and one smaller, connected by a double arrow (no text or symbols)natural_image
Simple line drawing of a vertical panel with a side view and a circular object, labeled with the number 3 (no text or symbols beyond the label)natural_image
Three-panel diagram showing a device with wires and connectors, connected to a wall-mounted device (no text or symbols present)6. Zurücksetzen
natural_image
Two identical hand-painted diagrams showing a device with a scroll and a screwdriver, no text or symbols present.Thank you for using this product.
- Please read all instructions carefully before using the product.
- Do not attempt to disassemble or repair the product yourself, otherwise the product will be out of warranty.
- This doorbell sends you a notification when the button is pressed. The chime also rings to let you know that someone is at the door. This is the most affordable doorbell in smart home security.
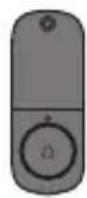
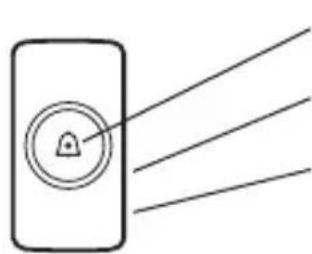
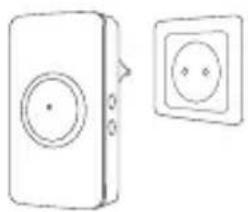
2. Description of the product
natural_image
Simple line drawing of a door with a lock and three rays pointing outward (no text or symbols)Operation indicator
Melody / learning button
Volume / reset button
Doorbell
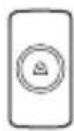
text_image
Lens LED Push buttonDiOBELL-B11
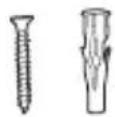
2.1 Installation of the outdoor unit battery
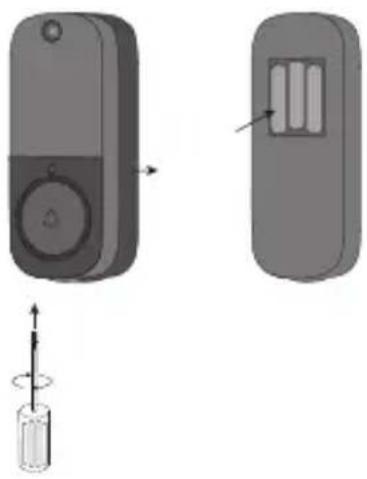
natural_image
Diagram showing two remote devices with a screwdriver inserted, one with a circular dial and arrow indicator (no text or symbols)- Remove the insulating tab before use.
- Remove the screw with a crosshead screwdriver to access the battery compartment.
- Insert the batteries, making sure that the polarity is correct (+/-)
- Close the compartment with the screw.
2.2 Indoor unit
natural_image
Simple line drawing of a device with two circular components and an open electrical socket (no text or symbols)Plug the chime into a suitable socket with a power rating of 110\~240V
3 Using the product
After plugging the indoor unit into your wall socket, there are only a few steps left to get your new chime operational.
- Press and hold the Ⓐ button on the side of the chime for approximately 3 seconds, the chime will emit a «Ding-Dong» sound to indicate that it has entered pairing mode.
- Now press the button on the doorbell camera, the chime will sound to indicate that the pairing has worked.
- Choose the volume and music of your choice and press the push button again to save your choice.
Note: You can associate up to 20 bells per chime.
4. Configuring the doorbell
A. Adding the doorbell in the app
Step 1 Connect your smartphone to the WiFi network
Step 2 Download the DiO One app from the Apple Store or the Android Play Store, depending on your device.
Step 3 Open the DiO One app and register when you use it for the first time.
Step 4 Follow the steps described in the app to add your doorbell.
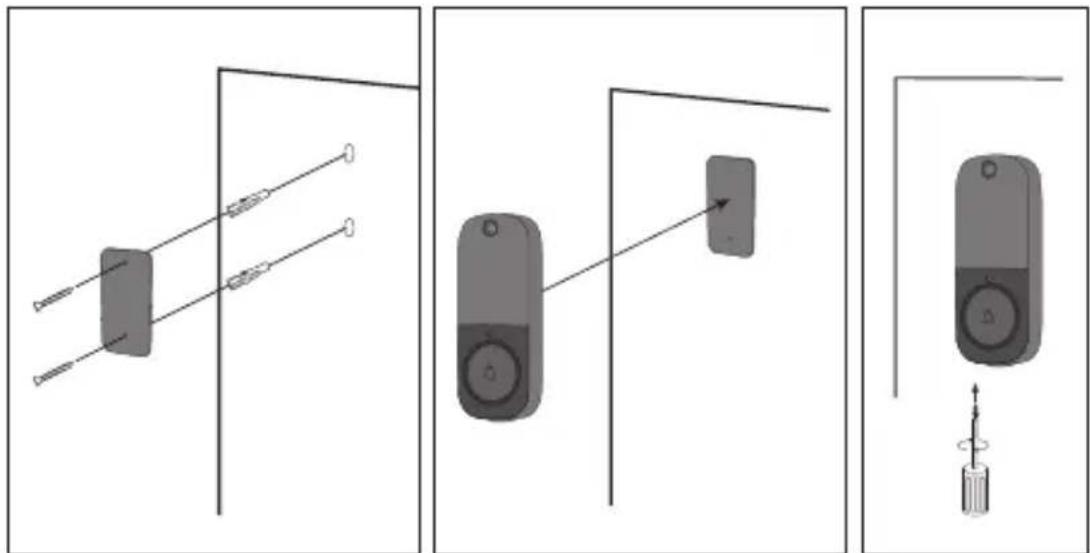
5. Wall installation of the outdoor unit
- Method 1: Push hard for 30s to fix the adhesive
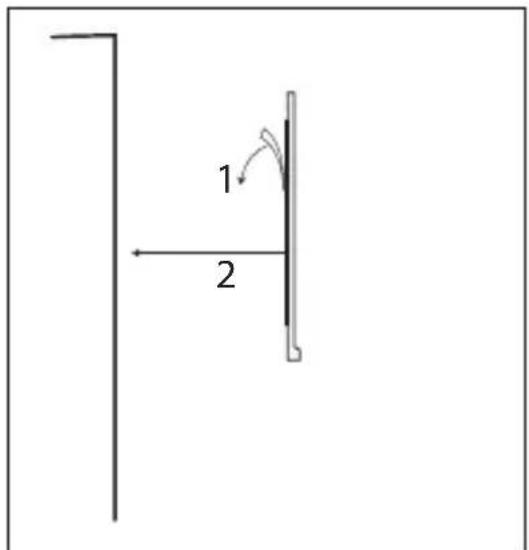
text_image
1 2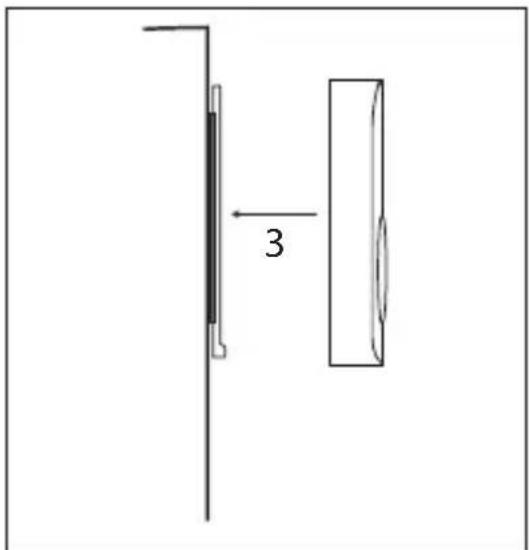
natural_image
Simple line drawing of a vertical panel with a side view and a rectangular block, labeled with dimension '3' (no text or symbols beyond the label)- Method 2: Fix the back plate of the doorbell to your wall with the screws, then add the other part to the plate, which you close with the screw on the bottom of the doorbell.
Note: Install the outdoor doorbell at a height of 1.15m - 1.4m to get the best pictures.
natural_image
Three-panel diagram showing a device with wires and connectors, connected to a wall-mounted device (no text or symbols present)6. Reset
6.1 Resetting the chime
Press and hold the Ⓞ button for approximately 5 seconds, a tone will sound to indicate that the code deletion is successful.
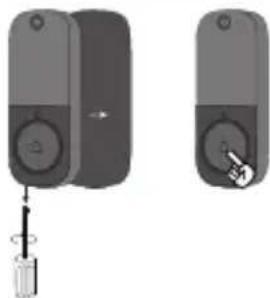
6.2 Resetting the doorbell
natural_image
Two grayscale images showing a device with a screwdriver inserted into a button, no text or symbols visible.Using a screwdriver, open the back panel of the doorbell and hold down the push button (front) for 15 seconds.
7. Explanation of the LED intensity on the doorbell
| Slow flashing Waiting for pairing (see point 4.). | |
| Fast flashing The doorbell receives the pairing information and starts to connect to the router | |
| LED off Standby mode. | |
| Dimming of the LED | Firmware update. |
8. Troubleshooting
- You press the push button, but its indicator light does not respond... What should I do?
a) Check if the batteries have been installed. b) Check if the batteries are completely worn out. If so, replace them as soon as possible.
NOTE: Do not mix new and used batteries. Replace all batteries at once.
- I can't pair my unit to my DiO application... What should I do?
a. Check if your WiFi network is working properly.
b. Restart the doorbell by reinstalling the batteries or reset the unit (see point 6.)
- FAQ : https://chacon.com/faq
9. Safety advice
- Do not mix new and used batteries.
- Please use only the type of batteries indicated in the manual.
- Do not leave used batteries lying around in the unit, as this may damage the unit.
- The indoor unit is not waterproof. Do not expose it to rain or immerse it in water.
- Do not attempt to disassemble or repair the product yourself.
- Please keep these instructions carefully.
- Incorrect use of the battery may damage nearby objects and risk fire or serious injury.
- Please keep batteries away from children.
- Recycle used batteries in accordance with environmental protection practices
10. Technical specifications
| Outdoor bell | |
| Battery DC 4.5V AA/LR6*3 | |
| Standby current 45μA | |
| Wireless frequency 2.4GHz+433MHz | |
| Wireless distance 80m (free field) | |
| Viewing angle of camera 60 | |
| Pixels 0.3 MP | |
| Optical distance 2S | |
| Autofocus 10 PCS | |
| Waterproof IP44 | |
| Operating temperature -10°C~50°C | |
| Relative humidity <90% at 40°C | |
| Dimension (W*H*D) 50.7*126.1*19.5 mm | |
| Indoor chime | |
| Power supply AC 100V~240V 50Hz~60Hz | |
| Standby power consumption 0.5Wh | |
| Power consumption in operation | 1.5Wh |
| Volume (30cm): Low 60-70dB / Medium: | 70-80dB/ High: 80-90dB |
| Melody 38 | |
| Demodulation OOK | |
| Wireless frequency 433.92MHz±250KHz | |
| Wireless distance 80m (free field) | |
| Operating temperature -10~50°C | |
11. Support
www.chacon.com/support
For indoor use only
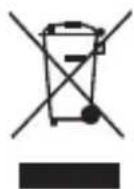
Don't throw batteries or out of order products with the household waste (garbage). The dangerous substances that they are likely to include may harm health or the environment. Make your retailer take back these products or use the selective collect of garbage proposed by your city.

Hereby, Chacon, declares that the radio equipment type 'DiOBELL-B11' is in compliance with the Directive 2014/53/EU.
The full test of the EU declaration of conformity is available at the following Internet address: http://chacon.com/conformity


www.chacon.com
Chacon S.A. - Avenue mercator 2 - 1300 Wavre