
Row 1.0 - Rowing Machine VirtuFit - Free user manual and instructions
Find the device manual for free Row 1.0 VirtuFit in PDF.
| Product type | Folding rower |
| Brand | VirtuFit |
| Model | Row 1.0 |
| Use | Home |
| Maximum user weight | 115 kg |
| Power supply | 4 AA 1.5V batteries |
| Resistance | Adjustable by handle |
| Display | Electronic console with SCAN, TIME, COUNT, TOTAL COUNT, CALORIES, COUNT/MIN functions |
| Folding | Yes, with locking pin and flat ring |
| Operating temperature | 10°C to 35°C |
| Storage temperature | 5°C to 45°C |
| Lubrication | Annually with non-acid petroleum jelly or silicone spray |
| Cleaning | After each use, dust regularly |
| Safety | Use on a flat surface, clear space of 1 to 2 m behind, tight clothing |
| Warranty | Excluded for lack of maintenance or unofficial repair |
| Reparability | Repairs by a professional technician |
| Automatic console shutdown | After 4 minutes without signal |
| Assembly | Step-by-step instructions (steps 1 to 6), minimum 2 people |
| Batteries | AA, replace if display is weak or unreadable |
| Exercise guidelines | Warm-up, stretching, cool-down |
Frequently Asked Questions - Row 1.0 VirtuFit
User questions about Row 1.0 VirtuFit
0 question about this device. Answer the ones you know or ask your own.
Ask a new question about this device
Download the instructions for your Rowing Machine in PDF format for free! Find your manual Row 1.0 - VirtuFit and take your electronic device back in hand. On this page are published all the documents necessary for the use of your device. Row 1.0 by VirtuFit.
USER MANUAL Row 1.0 VirtuFit
natural_image
Technical line drawings of various mechanical components and parts, including motor, lever, and switch (no text or labels)STEP 01
STEP 02
STEP 03
STEP 04
STEP 05
STEP 06
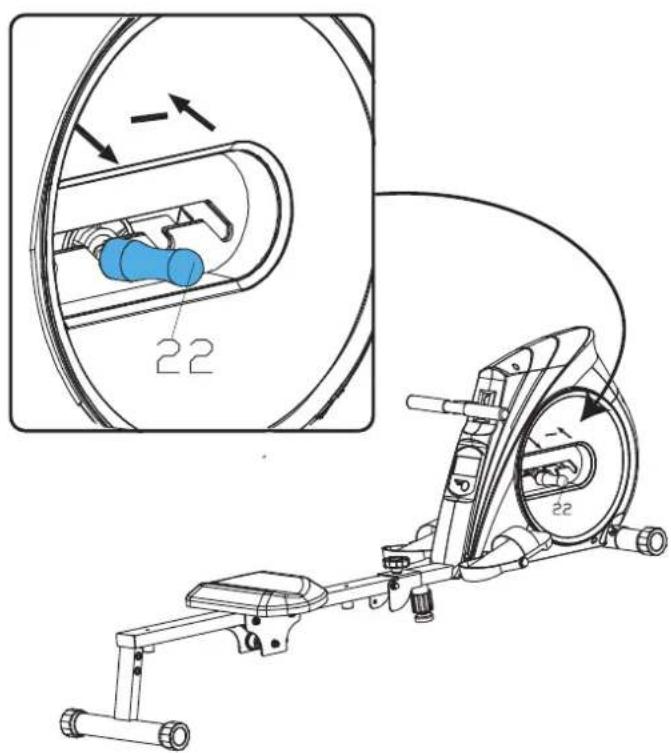
FIG. A

FIG. B

natural_image
Line drawing of a person bending forward with hands raised (no text or symbols)1
natural_image
Line drawing of a person sitting cross-legged, holding their head in thought (no text or symbols)2
natural_image
Line drawing of a person performing a seated stretch or exercise (no text or symbols)3
natural_image
Line drawing of a person in athletic attire performing a forward bend gesture (no text or symbols)4
natural_image
Line drawing of a person performing a stretching exercise with arms raised (no text or symbols)5
INDEX
| Safety instructions | 08 | |||
| Guarantee | 08 | |||
| Assembly instructions 09 | ||||
| Adjusting | 09 | |||
| Folding instructions 09 | ||||
| Maintenance | 09 | |||
| Troubleshooting | 10 | |||
| Error codes | 10 | |||
| Console | 10 | |||
| Training guidelines | 10 | |||

SAFETY INSTRUCTIONS
WARNING
Consult your doctor before you start exercising. This is particularly important for people with health problems. Please read all instructions before using the machine. VirtuFit assumes no responsibility for injury or property damage resulting from the use of this equipment. Please read this manual carefully before assembling and/or using the machine.
- Make sure that the machine is properly assembled and that all nuts and bolts are tight before using it.
• Assemble the machine with at least two people. - Lubricate all moving parts annually with petroleum jelly (acid-free) or silicone spray.
- Do not wear loose clothing to avoid getting caught in moving parts.
• Install and use the unit on a solid, level surface.
• Always wear clean sports shoes when using the appliance. - Keep children and pets away from the appliance when in use.
- Maintain your balance when using the device.
- Do not place your fingers or other objects in the moving parts.
- Before exercising, consult your physician to determine the appropriate frequency, duration and intensity of exercise for your age and physical condition. Stop exercising immediately if you experience nausea, shortness of breath, fainting, headache,
chest pain, tightness or any other discomfort.
- Do not hold the machine by the seat when moving.
• This machine should only be used by one person at a time. - This machine is designed for domestic use and the maximum user weight is 115 kg.
• Leave 1-2 metres of space behind the machine to avoid accidents. - Place the machine on a clean, flat surface. Do not place it on a thick carpet, as this may hinder the ventilation of the machine. Do not place the machine outdoors or near water.
- Keep the storage area dry, clean and level to prevent damage. Do not use the device for any purpose other than training.
- Use the device only in an environment where the ambient temperature is between 10°C and 35°C. Store the device only in an environment where the temperature is between 5°C and 45°C.
GUARANTEE
Warranty claims are excluded if the cause of the defect is the result of:
- Maintenance and repair work not carried out by an official dealer.
- Improper use, negligence and/or poor maintenance.
- Failure to maintain the appliance in accordance with the manufacturer's instructions.
ASSEMBLY INSTRUCTIONS (STEP 01-06)
Missing parts: If any parts are missing from the packaging, carefully check the polystyrene foam and the appliance itself. Some parts (bolts, screws, etc.) are already attached to the unit.
Error message: Make sure that all cables are carefully attached. The aluminium feet of the console are very sensitive and must be kept straight. If the console gives an error message after the machine has been mounted, the aluminium feet of the console may be bent. Straightening the aluminium feet may make the error message disappear.
Hex head bolts: Make sure that the hex head spanner is pushed into the bolt before applying force. This will prevent the head of the socket bolt from turning.
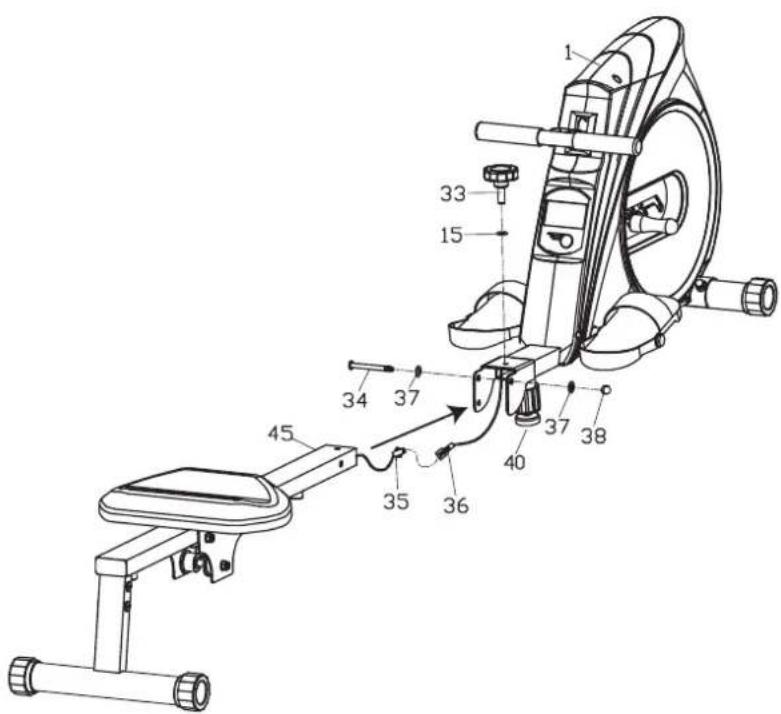
ADJUSTING
Resistance knob
To adjust the resistance, use the handle as shown in the figure.
NOTE! It is recommended that you begin training at a level that matches your needs. Remember to start slow and easy and work your way up to the desired level.
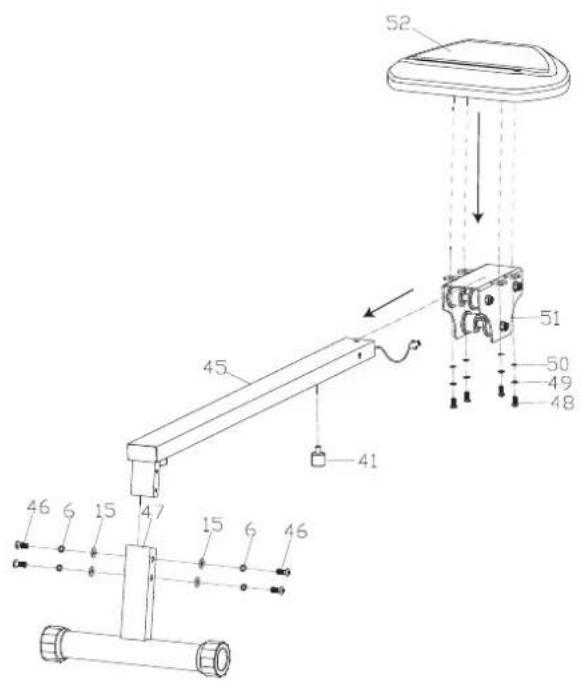
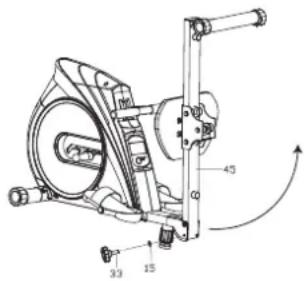
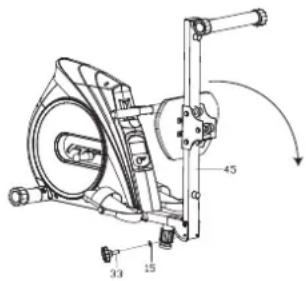
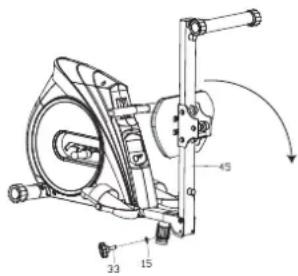
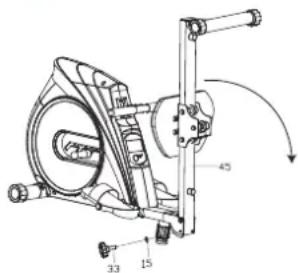
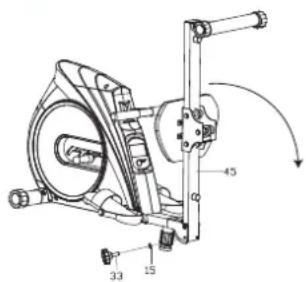
FOLDING INSTRUCTIONS
NOTE! Store the device in a dry area away from children. Make sure that the device is stable and safe so that it cannot fall over on animals or children
Folding (1)
Unscrew the locking pin (33). Remove the locking pin and flat ring (15) and simultaneously fold up the rails. Refit the locking pin (33) with the flat ring (15).
Unfolding (2)
Unscrew the locking pin (33). Remove the locking pin and flat ring (15) and simultaneously unfold the rail towards the ground. Replace the locking pin (33) with the flat washer (15).
1
2
MAINTENANCE
Safe and efficient use can only be achieved if the appliance is properly installed and maintained. It is your responsibility to ensure that the appliance is maintained regularly. Parts that have been used and/or damaged must be replaced before the appliance is used again. The appliance should only be used and stored indoors. Long-term exposure to weather and temperature/humidity changes can have a serious impact on the electrical components and moving parts of the unit. Always unplug the power cord from the unit before cleaning or servicing it.
Daily maintenance
- Clean and remove sweat and moisture after each use.
- Check that the unit is free of dust and dirt.
- Do not use aggressive cleaning agents and keep the device away from moisture.
Semi-annual maintenance
- Clean and remove sweat and moisture after each use.
- Check that the unit is free of dust and dirt.
- Do not use aggressive cleaning agents and keep the device away from moisture.
CAUTION! All repairs must be performed by a professional technician, unless otherwise specified by the supplier or manufacturer.
Cleaning
General cleaning of the machine will prolong its life. Keep the machine clean by dusting it regularly.
Regular maintenance extends the life of your machine and prevents accidents! For more information, please visit https://www.virtufit.nl/service/faq/
CAUTION! Wear clean shoes to reduce the risk of soiling the machine.
Battery
AA BATTERIES
The display uses AA batteries, which are replaceable on the back of the display. The batteries must be inserted correctly.
If the screen is unreadable or only parts of the image work, proceed as follows:
- Remove the batteries and wait 15 seconds.
- Replace the batteries correctly.
Tips on using the battery
- Remove the batteries from the screen when they are empty or when the camera will not be used for a long period of time.
- Do not recharge, disassemble or dispose of batteries in fire.
-
Pay close attention to the + and - when inserting the batteries.
When replacing batteries, it is recommended to replace all batteries, do not mix old and new batteries. -
It is recommended to use alkaline batteries, they have a longer life than normal batteries.
- Batteries should be replaced when the display loses brightness or stops showing.
Battery replacement
- If the display is not accurate, it is recommended to replace the batteries.
- Use 4 x 1.5 AA batteries for power.
TROUBLESHOOTING
Console does not work: If there is no signal when pedalling, check that the cable is correctly connected.
The console does not show any values: Check that the sensor and console cables are properly attached and undamaged. If this does not solve the problem, carefully bend the sensor.
The rowing machine beeps: Check that all bolts and nuts are tight. Spray silicone spray if necessary. Also check the wheels under the seat.
CONSOLE (FIG. A)
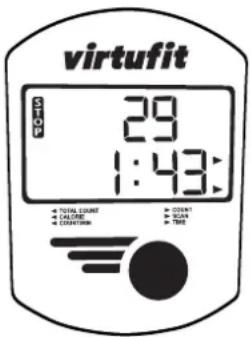
- MODE Press the MODE button to select the desired function.
• SCAN The following functions are displayed in the SCAN position: TIME, COUNT, TOTAL COUNT, CALORIES, COUNT/MINUS SCAN - COUNT Counts the rowing time from the beginning to the end of the exercise.
- COUNT Counts the number of strokes from start to finish.
- TOTAL COUNT Counts the total number of strokes from start to finish.
- CALORIES Counts the total number of calories from the beginning to the end of the rowing.
- COUNT/MIN Displays the current strokes per minute or the frequency per minute.
AUTO ON/OFF & AUTO START/STOP
If there is no signal for 4 minutes, the display will automatically turn off. When you start rowing or press the button, the monitor is on.
CAUTION! Keep the console out of direct sunlight. Dry the surface of the console if it is covered with sweat droplets. Do not lean on the console. Touch the screen only with your fingertips. Do not let fingernails or other sharp objects touch the screen.
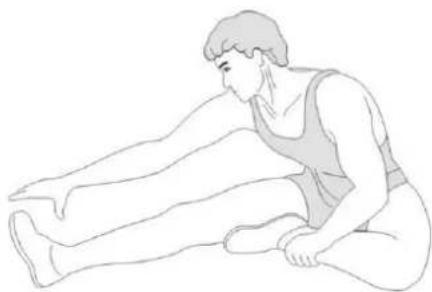
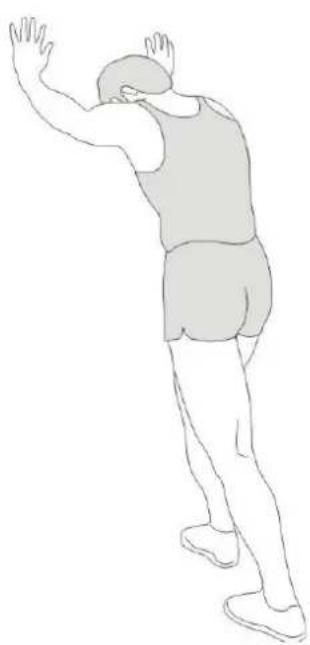
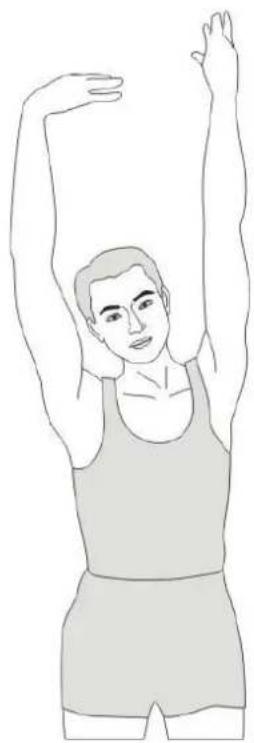
TRAINING GUIDELINES (FIG. B, 1-5)
A successful training program includes a warm-up, the actual training and a cool-down. Perform the complete training program at least twice, but preferably three times a week and keep a rest day between training sessions. After a few months, the intensity of the training can be increased, for example to four or five times a week.
The warm-up
The purpose of a warm-up is to prepare the body for training and to reduce the risk of injury. Warm up your body for two to five minutes before starting a cardio or strength training session. Do exercises that increase the heart rate and warm up the working muscles. Examples of
ENGLISH
virtufit
this type of activity are running, jogging, jumping jacks, skipping and running in place.
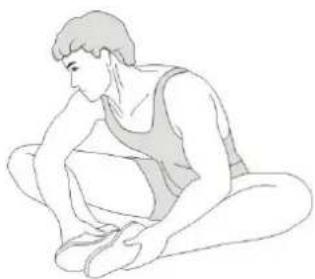
Stretching
Stretching while the muscles are warm is very important after a good warm-up and cool-down. It reduces the risk of injury. Stretching exercises should be held for 15-30 seconds. Here are some examples of stretching exercises:
- Toe touch (Fig. B-1)
• Inner thight stretch (Fig. B-2) - Hamstring stretch (Fig. B-3)
• Achilles stretch (Fig. B-4) - Side stretch (Fig. B-5)
Cooling down
The purpose of the cool-down is to return the body to its (near) normal resting position at the end of the workout. A good cool-down slowly reduces your heart rate and promotes recovery.
INHOUD
2
ONDERHOUD
2
WARTUNG
2
ENTRETIEN
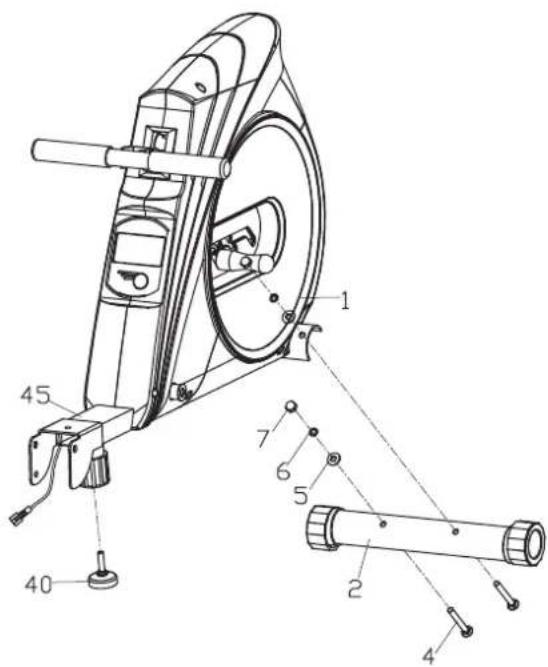
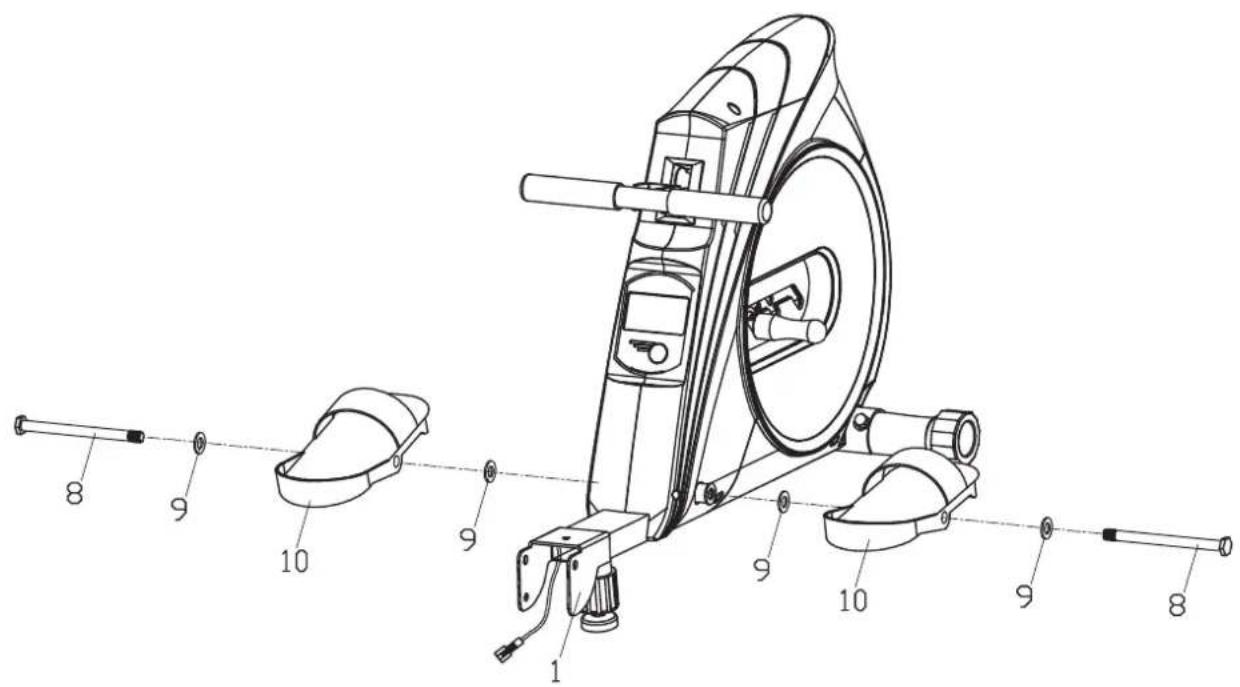
| 1 Mainframe 1 | ||
| 2 Front stabilizer 1 | ||
| 3 End cap 4 | ||
| 4 Bolt M8*65 2 | ||
| 5 Arc washer d8*1.5*□20*R30 2 | ||
| 6 Spring washer D8 6 | ||
| 7 Nut M8 2 | ||
| 8 Bolt □12.5*130*M12*16 2 | ||
| 9 Flat washer D13*□26*2 4 | ||
| 10 Pedal | 2 | |
| 11 Screw ST4.2*18 | 10 | |
| 12 Computer | 1 | |
| 13 L/R Chain cover | 1 pr | |
| 14 Bolt M8*62 | 4 | |
| 15 Flat washer D8*□19*1.5 | 19 | |
| 16 Bushing □12*□8.5*10.5 | 4 | |
| 17 Bearing 608 | 4 | |
| 18 Wheel | 2 | |
| 19 Idler wheel | 2 | |
| 20 Fixed sleeve | 1 | |
| 21 Nulon nut M8 | 7 | |
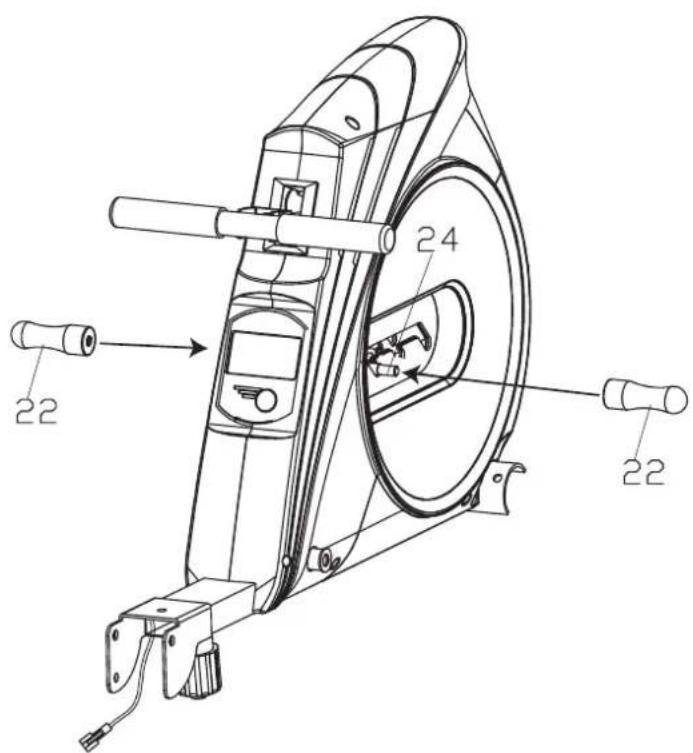
| 22 Handlebar | 2 | |
| 23 End cap | 3 | |
| 24 Axle M10*□12*95 | 1 | |
| 25 Bearing □32*□12*11 2 | ||
| 26 Wheel | 1 | |
| 27 U-shaped washer | 1 | |
| 28 Rope lock | 2 | |
| 29 Plug | 2 | |
| 30 Handlebar | 1 | |
| 31 Foam grip | 2 | |
| 32 Rope | 1 | |
| 33 Bolt | 1 | |
| 34 Bolt M10x80 | 1 | |
| 35 Sensor wire | 1 | |
| 36 Extended wire | 1 | |
| 37 Flat washer D10*□20*1.5 | 2 | |
| 38 Nut M10 | 1 | |
| 39 | End cap | 1 |
| 40 | Adjustable support leg | 1 |
| 41 | Cushion pad | 2 |
| 42 | Sensor | 1 |
| 43 | Screw ST3*10 | 2 |
| 44 | End cap | 1 |
| 45 | Rail tube | 1 |
| 46 | Screw M8*16 | 4 |
| 47 | Rear support frame | 1 |
| 48 | Bolt M6*15 | 4 |
| 49 | Spring washer D6 4 | |
| 50 | Flat washer D6 | 4 |
| 51 | Saddle post | 1 |
| 52 | Saddle | 1 |
| 53 | Bolt M8*90 | 3 |
| 54 | Wheel | 6 |
| 55 | Bushing ☐12*☐8*20 | 3 |
| 56 | Bearing 12 | |
virtufit
COMPANY INFORMATION
For an ongoing service request or to purchase parts, please visit; service@virtufit.nl. Always state the service number (ITS number) with a question about the current application for a quick and efficient settlement. A service request must always be submitted via the service form. So the request not to request service via info@virtufit.nl.
Do you have a problem with your VirtuFit fitness equipment and would you like to submit a service request? Then scan the QR code on the right and fill in our service form.

VIRTUFIT
Twekkelerweg 263
7553 LZ Hengelo
The Netherlands
info@virtufit.nl

- SAFETY INSTRUCTIONS
- WARNING
- GUARANTEE
- Warranty claims are excluded if the cause of the defect is the result of:
- ASSEMBLY INSTRUCTIONS (STEP 01-06)
- ADJUSTING
- Resistance knob
- FOLDING INSTRUCTIONS
- Folding (1)
- Unfolding (2)
- MAINTENANCE
- Daily maintenance
- Semi-annual maintenance
- Cleaning
- Battery
- AA BATTERIES
- If the screen is unreadable or only parts of the image work, proceed as follows:
- Tips on using the battery
- Battery replacement
- TROUBLESHOOTING
- CONSOLE (FIG. A)
- AUTO ON/OFF & AUTO START/STOP
- TRAINING GUIDELINES (FIG. B, 1-5)
- The warm-up
- ENGLISH
- virtufit
- Stretching
- Cooling down
- INHOUD
- ONDERHOUD
- WARTUNG
- ENTRETIEN
Brand : VirtuFit
Model : Row 1.0
Category : Rowing Machine