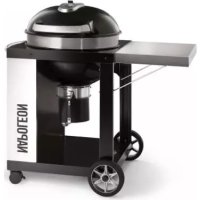
PRO22CART2 - Barbecue Napoleon - Free user manual and instructions
Find the device manual for free PRO22CART2 Napoleon in PDF.


| Product Type | Charcoal Barbecue |
| Brand | Napoleon |
| Model | PRO22CART2 |
| Cooking Diameter | 22 inches (56 cm) |
| Fuel | Charcoal |
| Cooking Methods | Direct and Indirect |
| Recommended Briquette Count (Direct Cooking) | 50 briquettes |
| Recommended Briquette Count (Indirect Cooking) | 25 per side |
| Lid and Bowl Material | Steel with Porcelain Enamel Finish |
| Cooking Grids Material | Porcelain Enameled Cast Iron or Steel Rods |
| Air Intake Vents | On lid and base, adjustable |
| Drip and Ash Drawer | Removable |
| Central Air Deflector | Included (removable) |
| Side Shelves | Not specified, but present on cart |
| Lid and Bowl Warranty | Limited Lifetime |
| Plastic Handles Warranty | 10 years |
| Porcelain Enameled Cast Iron Cooking Grids Warranty | 5 years |
| Other Components Warranty | 2 years |
| Usage | Outdoor only, on non-combustible surface |
| Recommended Clearances | 5 feet (1.5 m) from combustible materials |
| Maintenance | Clean ash drawer after each use, clean interior and exterior regularly |
| Safety | Do not use indoors, do not use gasoline, keep children away, do not move when hot |
| Country of Manufacture | Not specified, designed in Canada |
Frequently Asked Questions - PRO22CART2 Napoleon
User questions about PRO22CART2 Napoleon
0 question about this device. Answer the ones you know or ask your own.
Ask a new question about this device
Download the instructions for your Barbecue in PDF format for free! Find your manual PRO22CART2 - Napoleon and take your electronic device back in hand. On this page are published all the documents necessary for the use of your device. PRO22CART2 by Napoleon.
USER MANUAL PRO22CART2 Napoleon
ASSEMBLY USE AND CARE MANUAL
THIS GRILL MUST ONLY BE USED OUTDOORS IN A WELL-VENTILATED SPACE
RETAIN THIS MANUAL FOR FUTURE REFERENCE
OUTDOOR CHARCOAL GRILL

NAPOLEON
APPLY SERIAL NUMBER LABEL FROM CARTON

Serial No. XXXXXX000000 MODEL NO.

natural_image
3D rendering of a NAPoleon grill with a dome-shaped top and wheels, no visible text or symbols on the device itself.DO NOT DISCARD
NK22CK-C

WARNING
Do not try to light this appliance without reading the "LIGHTING" instruction section of this manual.

DANGER
Burning charcoal gives off carbon monoxide. Do not burn charcoal inside homes, garages, tents, vehicles or any enclosed areas.

WARNING! Failure to follow these instructions exactly could result in a fire causing serious injury or death.
Napoleon Group of Companies
214 Bayview Dr., Barrie, Ontario, Canada L4N 4Y8
Phone: 1-705-726-4278 Fax: (705)-727-4282
www.napoleongrills.com
Customer Solutions: 1-866-820-8686 or grills@napoleonproducts.com
THANK YOU FOR CHOOSING NAPOLEON
NAPOLEON products are designed with superior components and materials, and are assembled by trained craftsmen who take great pride in their work. This grill has been thoroughly inspected by a qualified technician before packaging and shipping to ensure that you, the customer, receive the quality product you expect from NAPOLEON.
We at Napoleon are dedicated to you, “our valued customer”. It is our goal to provide you with the necessary tools for an unforgettable grilling experience. This manual is provided to assist you in assuring your new grill is assembled, installed, maintained and cared for properly. It is important to read and understand this entire manual before operating your new grill to ensure you fully understand all the safety precautions and features your grill has to offer. By carefully following these instructions, you will enjoy years of trouble-free grilling. If this product fails to meet your expectations, for any reason, please call our customer solutions department at 1-866-820-8686 between 9 AM and 5 PM (Eastern Standard Time) or visit our Website at www.napoleongrills.com.

Napoleon Charcoal Grill President's Limited Lifetime Warranty
NAPOLEON warrants that components in your new NAPOLEON product will be free from defects in material and workmanship from the date of purchase, for the following period:
Porcelain lid and bowl Lifetime
Plastic handles 10 years
Porcelain-enameled cast iron cooking grids 5 years
plus5
| Rod | cooking | grids | 2 | years | |
| Rod | charcoal | grates | 2 | years | |
| All | other | parts | 2 | years | |
plus5 indicates a period of extended warranty coverage whereby the replacement part will be made available to the consumer for an additional 5 years at 50% of the current retail price.
Conditions and Limitations
NAPOLEON warrants its products against manufacturing defects to the original purchaser only, provided that the purchase was made through an authorized NAPOLEON dealer and is subject to the following conditions and limitations:
This factory warranty is non-transferable and may not be extended what-so-ever by any of our representatives. This limited warranty does not cover damages caused by misuse, lack of maintenance, grease fires, hostile environments, accident, alterations, abuse or neglect and parts installed from other manufacturers will nullify this warranty. Discoloration to plastic parts from chemical cleaners or UV exposure is not covered by this warranty.
This limited warranty further does not cover any scratches, dents, painted finishes, corrosion or discoloring by heat, abrasive and chemical cleaners, nor chipping on porcelain enamel parts.
Should deterioration of parts occur to the degree of non-performance (rusted through or burnt through) within the duration of the warranted coverage, a replacement part will be provided.
After the first year, with respect to this President's Limited Lifetime Warranty NAPOLEON may, at its discretion, fully discharge all obligations with respect to this warranty by refunding to the original warranted purchaser the wholesale price of any warranted but defective part(s).
NAPOLEON will not be responsible for the installation, labor or any other costs or expenses related to the re-installation of a warranted part, and such expenses are not covered by this warranty.
Notwithstanding any provision contained in this President's Limited Lifetime Warranty NAPOLEON's responsibility under this warranty is defined as above and it shall not in any event extend to any incidental, consequential, or indirect damages.
This warranty defines the obligation and liability of NAPOLEON with respect to the NAPOLEON charcoal grill and any other warranties expressed or implied with respect to this product, its components or accessories are excluded.
NAPOLEON neither assumes, nor authorizes any third party to assume, on its behalf, any other liabilities with respect to the sale of this product.
NAPOLEON will not be responsible for: over firing, blow outs caused by environmental conditions such as strong winds, or inadequate ventilation,
Any damages to the charcoal grill due to weather damage, hail, rough handling, damaging chemicals or cleaners will not be the responsibility of NAPOLEON.
The bill of sale or copy will be required together with a serial number and a model number when making any warranty claims from NAPOLEON.
NAPOLEON reserves the right to have its representative inspect any product or part prior to honoring any warranty claim.
NAPOLEON shall not be liable for any transportation charges, labor costs, or export duties.
!
WARNING! Failure to follow these instructions could result in property damage, personal injury or death. Read and follow all warnings and instructions in this manual prior to operating grill.
Safe Operating Practices
- Read the entire instruction manual before operating the grill.
• Under no circumstance should this grill be modified. - Follow lighting instructions carefully when operating grill.
- Do not light charcoal with lid closed.
- Do not lean over grill when lighting.
- Do not use gasoline, alcohol, or other highly volatile fluids to ignite charcoal. Use ONLY charcoal starter fluid approved for lighting charcoal. Make sure that any fluids that have drained through the bottom of the grill are removed before lighting the charcoal.
- Charcoal starter fluid should never be added to hot or even warm coals.
- After use and before lighting, charcoal starter fluid should be capped and stored a safe distance away from the grill, at least 25ft (7.6m).
- Keep children and pets away from hot grill, DO NOT allow children to climb inside cabinet.
- Do not leave the grill unattended while in use.
- Do not move grill when hot or operating.
- This grill must not be installed in or on recreational vehicles and/or boats.
- This grill must only be stored outdoors in a well-ventilated area and must not be used inside a building, garage, screened in porch, gazebo or any enclosed area.
- Maintain proper clearance to combustibles, 5ft (1.5m) to all sides. This clearance is also recommended near vinyl siding or panes of glass. The grill must not be used on combustible surfaces (wooden or composite decks or porches).
- At all times keep the ventilation openings of the enclosure free and clear from debris.
- Do not operate unit under any combustible construction.
- Do not operate this grill under any overhead construction such as roof coverings, carports, awnings or overhangs.
- Do not locate in windy settings. High winds adversely affect the cooking performance of the grill.
- The lid is to be closed during the preheat period.
- The ash/grease tray must be in place when using the grill.
- Clean the ash/grease tray regularly to avoid build-up, which may lead to grease fires.
- Do not use the side shelves to store lighters, matches or any other combustibles.
• The grill should be on level ground at all times.
- Do not use water to control flare-ups or extinguish coals, as it may damage your grill's finish.
- To control flare-ups, slightly close the vents on your grill. To completely extinguish coals/fire, close all vents and lid completely.
- Use proper grilling tools with long, heat-resistant handles.
- Use barbecue mitts or hot pads to protect hands while cooking or adjusting the vents.
- Do not remove ashes from grill until all charcoal is completely burned out and fully extinguished. Allow ample time to cool.
- Remaining coal and ashes are to be removed from grill and stored in a non-combustible metal container. Allow to remain in metal container 24 hours before disposing of.
- Keep electrical supply cords away from water or heated surfaces.
- California Proposition 65: The burning of charcoal creates by-products, some of which are on the list as substances known by the State of California to cause cancer or reproductive harm. When cooking with charcoal, always ensure adequate ventilation to the unit, to minimize exposure to such substances.
Lighting Instructions
DIRECT COOKING

natural_image
Top-down view of a circular container filled with black granular material, no text or symbols visibleINDIRECT COOKING

natural_image
Top-down view of a circular industrial or processing unit with internal grating and two dark granular components (no text or symbols visible)Charcoal Usage
| Grill Diameter Cooking Method Charcoal Recommended | ||
| 22" (56cm) Direct Cooking 50 | ||
| 22" (56cm) InDirect Cooking 25 per side | *(add 8 per side for each additional hour of cooking time) | |
*Charcoal recommendations are approximate, longer cooking times require additional charcoal to be added. As well, colder, windy temperatures will require additional charcoal to reach ideal cooking temperatures.

WARNING! Open lid.
WARNING! Locate the grill outdoors on a solid, level, non-combustible surface. Never use grill on wooden or other surfaces that could burn.
WARNING! Do not lean over grill when lighting charcoal.
WARNING! Ashpan must be in place during lighting and anytime during use.
| DIRECT COOKING METHOD INDIRECT COOKING METHOD | |
| 1. Fully open the vent on the lid and base. Remove the grill lid and remove the cooking grill | 1. Fully open the vent on the lid and base. Remove the grill lid and remove the cooking grill. |
| 2. Ensure the ash pan is cleaned out from the previous use and then re-install. | 2. Ensure the ash pan is cleaned out from the previous use and then re-install. |
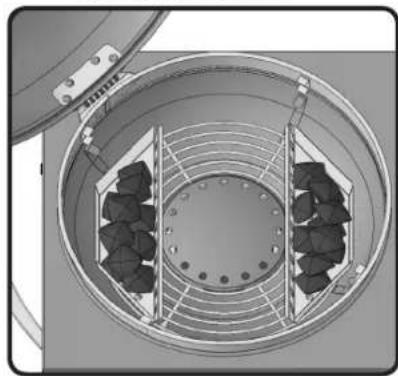
| 3. The grill can be used either with our without the center air deflector. The deflector will ensure more even temperatures and will slow the rate of burn in the center of the grill. Use either the Ultrachef Charcoal Starter (not included) following the instructions included in the manual, or place lighter cubes or lightly crumpled newspaper on and around the air deflector. Place the charcoal in a cone shaped pile in the center of the unit on the newspaper or lighter cubes. | 3. Remove the center air deflector and place a drip pan. Place the optional charcoal baskets on either side of the drip pan. Use either the Ultrachef Charcoal Starter (not included) following the instructions included in the manual, or place lighter cubes or lightly crumpled newspaper in the charcoal baskets. Place the charcoal in the baskets onto the newspaper or lighter cubes. |
| 4. Light the newspaper or lighter cubes. Once fully lit, close the lid and allow the charcoal to burn until it is covered in a light grey ash (approximately 20 minutes). | 4. Light the newspaper or lighter cubes. Once fully lit, close the lid and allow the charcoal to burn until it is covered in a light grey ash (approximately 20 minutes). |
| 5. Using tongs with long heat resistant handles, spread the coals to evenly cover the entire grate (including the center air deflector). | |


Starter fluid can be used to light the charcoal, but it is not the preferred method. It can be messy and may leave a chemical taste on the food if not completely burned off prior to cooking. Once lit, never add additional starter fluid to the grill. Store the bottle at least, 25 ft (7.6m) away from the grill when operating.
Charcoal Starter Safe Operating Practices WARNING!
- For outdoor use only.
- Do not use the Charcoal Starter unless it is placed on a firm, level charcoal grate and the charcoal grill is on a firm, level, non-combustible surface.
- Do not place the Charcoal Starter on any combustible surface unless the Charcoal Starter is completely cool.
- Do not use lighter fluid, gasoline or self lighting charcoal in the Charcoal Starter.
- Only use the Charcoal Starter to light charcoal for charcoal grills.
• Always wear protective gloves when handling the Charcoal Starter.
- Keep children and pets away from the Charcoal Starter at all times.
- Do not use the Charcoal Starter in high winds.
- Do not leave the Charcoal Starter unattended while in use.
- Do not lean over the Charcoal Starter when lighting.
- Never use the Charcoal Starter for other than intended use. Do not use the Charcoal Starter to prepare food.
- Use extreme caution when pouring hot coals out of the Charcoal Starter.
Using the Charcoal Starter
- Turn the Charcoal Starter upside down.
- Crumple two full sheets of newspaper and stuff them into the bottom of the Charcoal Starter.
- Turn the Charcoal Starter right side up and place it in the centre of the charcoal grate.
- Add appropriate amount of charcoal but do not over fill.
• Light a match, and insert into one of the bottom air vents to ignite the newspaper. - When the top layer of charcoal has a light coating of grey ash, wearing protective gloves carefully pour the hot charcoal onto the charcoal grate (direct cooking method) or place into the charcoal baskets (indirect method).
- Once the hot charcoal is placed into the grill, spread the charcoal out evenly using tongs with long heat resistant handles.
CHARCOAL STARTER

natural_image
3D rendering of a metallic mug with handle and perforated slots (no text or symbols)
Charcoal Cooking Guide
Charcoal is the traditional way of cooking that we are all familiar with. The glowing briquettes emit infrared energy to the food being cooked, with very little drying effect. Any juices or oils that escape from the food drip down onto the charcoal and vaporize into smoke giving the food its delicious grilled taste. The bottom line is that Napoleon's charcoal grill produces searing heat for juicier, tastier steaks, hamburgers and other meats. For cooking times and tips refer to the Charcoal Grilling Chart.
The following grilling chart is meant to be a guideline only. Cooking times are affected by such factors as altitude, outside temperature, wind, and desired doneness, which will be reflected in your cooking time. Use a meat thermometer to ensure foods are adequately cooked.
Charcoal Grilling Chart
| Food Direct/Indirect Heat | Cooking Time Helpful Suggestions | ||
| Steak 1 in. (2.54cm) thick | Direct heat 6-8 min.- Medium When selecting meat for grilling, ask for marbled fat distribution. The fat acts as a natural tenderizer while cooking and keeps it moist and juicy. | ||
| Hamburger 1/2 in (1.27cm) thick | Direct heat 6-8 min.- Medium Preparing hamburgers to order is made easier by varying the thickness of your patties. To add an exotic taste to your meat, try adding hickory-flavored woodchips to the charcoal. | ||
| Chicken pieces D | direct heat approx 2 min. per side. Indirect heat for the remaining 18-20 min. | 20-25 min. The joint connecting the thigh and the leg from the skinless side should be sliced 3/4 of the way though for the meat to lay flatter on the grill. This helps it to cook faster and more evenly. To add a trademark taste to your cooking, try adding mesquite-flavored woodchips to the charcoal. | |
| Pork chops Direct heat 10-15 min. Trim off the excess fat before grilling.Choose thicker chops for more tender results. | |||
| Spare ribs Direct heat for 5 min. Indirect heat to finish | 1.5-2 hrs. turning often | Choose ribs that are lean and meaty. Grill until meat easily pulls away from the bone. | |
| Lamb chops | Direct heat | 25-30 min. | Trim off the excess fat before grilling.Choose extra thick chops for more tender results. |
| Hot dogs | Direct heat | 4-6 min. | Select the larger size wieners. Slit the skin lengthwise before grilling. |
Cooking Instructions
Initial Lighting: When lit for the first time, the grill emits a slight odor. This is a normal temporary condition caused by the "burn-in" of internal paints and lubricants used in the manufacturing process and does not occur again. Simply burn the grill on high for approximately 30 minutes with the lid and base vents fully open.
Grill Use: We recommend preheating the grill by operating it with the lid closed for approximately 20 minutes. The coals are ready when they have a light coating of grey ash. Food cooked for short periods of time (fish, vegetables) can be grilled with the lid open. Cooking with the lid closed ensures higher, more even temperatures that will reduce cooking time and cook the food more evenly. When cooking very lean meat, such as chicken breast or lean pork, the grids can be oiled before preheating to reduce sticking. Cooking meat with a high degree of fat content may create flare-ups. Either trim the fat or reduce temperatures to inhibit this. Should a flare-up occur, move food away from flames; reduce the heat (reduce vent opening). Leave the lid open.
As a general rule, plan on using about 50 briquettes to cook 2 lb. (1kg) of meat. If cooking for more than 30 to 40 minutes, additional briquettes must be added to the fire. When the weather is cold or windy, you will need more briquettes to reach ideal cooking temperatures.
Adding Charcoal During Cooking: Use caution when adding charcoal to the grill. Flames may flare up when coals come in contact with fresh air. Stand back a safe distance and use a long-handled heat-resistant cooking tongs to add additional charcoal briquettes. There are flaps on either side of the cooking grid that provide access to the charcoal grate.

WARNING! Never add charcoal starter fluid to hot or warm coals. Once charcoal is ignited no more fluid is required.
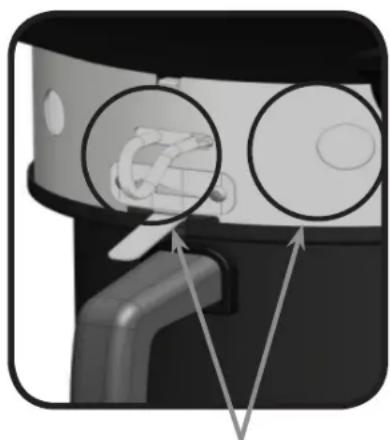
Operating The Vents: Lid vents on a covered grill are usually left open to allow air into the grill. Air increases the burning temperature of the coals. You can regulate the grill's temperature by moving the vent slide to the right or left. Closing the vents either partially or completely will help to cool down the coals. Do not completely close the air vents and the lid vent unless you are trying to cool down or extinguish a flame.

natural_image
Close-up of a mechanical component with circular annotations highlighting internal features (no text or symbols)Vent Open
natural_image
Close-up of a mechanical device with circular components and directional arrows indicating motion or assembly (no text or symbols)Vent Closed
After Use Safety

WARNING! To protect yourself and your property from damage, carefully follow these safety precautions.
- Close the grill lid and all vents to extinguish fire.
• Always allow the grill to cool completely before handling. - Never leave coals and ashes in grill unattended. Make sure coals and ashes are completely extinguished before removing.
- Use a metal spatula or scoop to remove remaining coals and ashes from grill. Place them in a non-combustible metal container and completely saturate with water. Leave in container an additional 24 hours before disposing.
Maintenance / Cleaning Instructions
It is recommended that the ashtray/drippan be emptied out after each use.
WARNING! Ensure the grill is cool and all coals are completely extinguished prior to removing any part from your grill.
WARNING! Always wear protective gloves and safety glasses when cleaning your grill.
WARNING! Do not use pressure washer to clean any part of the grill.
WARNING! To avoid the possibility of burns, maintenance should be done only when the grill is cool. Avoid unprotected contact with hot surfaces. Clean grill in an area where cleaning solutions will not harm decks, lawns, or patios. Do not use oven cleaner to clean any part of this grill. Do not use a self-cleaning oven to clean cooking grids or any other parts of the grill. Barbecue sauce and salt can be corrosive and will cause rapid deterioration of the grill components unless cleaned regularly.
Grids And Warming Rack: The grids and warming rack are best cleaned with a brass wire brush during the pre-heating period. Steel wool can be used for stubborn stains.
Cleaning Inside The Grill: Remove the cooking grids. Use a brass wire brush to clean loose debris from the bowl and the insides of the lid. Scrape the inside of the bowl with a putty knife or scraper, and use a wire brush to remove ash. Sweep all debris from inside the grill into the removable ash/drip pan. If desired you can wash the inside of the grill with a mild detergent and water. Rinse well with clear water and wipe dry.
WARNING! Accumulated grease is a fire hazard. Clean the drip pan after each use to avoid grease buildup.
Ash/Drip Pan: Ashes, grease and excess drippings pass through to the ash/drip pan, located beneath the charcoal grill, and accumulate. To clean, slide the pan free of the grill. Never line the pan with aluminum foil, sand or any other material as this could prevent the grease from flowing properly. The pan should be scraped out with a putty knife or scraper, and all the debris brushed into a non-combustible metal container. Wash the ash/drip pan with a mild detergent and water. Rinse well with clear water and wipe dry.
Cleaning The Outer Grill Surface: Do not use abrasive cleaners or steel wool on any painted, porcelain or stainless steel parts of your Napoleon Grill. Doing so will scratch the finish. Exterior grill surfaces should be cleaned with warm soapy water while the metal is still warm to the touch. To clean stainless surfaces, use a stainless steel or a non-abrasive cleaner. Always wipe in the direction of the grain. Over time, stainless steel parts discolor when heated, usually to a golden or brown hue. This discoloration is normal and does not affect the performance of the grill. Porcelain enamel components must be handled with additional care. The baked-on enamel finish is glass-like, and will chip if struck. Touch-up enamel is available from your Napoleon Grill dealer.
Troubleshooting
| Problem Possible Causes Solution | ||
| Low heat / Low flame. | Improper preheating. | Allow charcoal to burn until covered with a light grey ash. (usually 20-25min). |
| Not enough airflow. | Open Vents. | |
| Low charcoal. | Add more charcoal to the charcoal tray. | |
| Lid being opened to frequently. | Allow food to cook with the lid closed. Every time the lid is removed, the temperature drops. This leads to lower temperatures and longer cooking times. | |
| Excessive flare-ups/uneven heat. | Improper preheating. | Preheat grill with lid closed for 20 - 25 mins and spread coals around evenly. |
| Excessive grease and ash build up in ash/drip pan. | Clean ash/drip pan regularly. Do not line pan with aluminum foil. Refer to cleaning instructions. | |
| “Paint” appears to be peeling inside lid or hood. | Grease build up on inside surfaces. | This is not a defect. The finish on the lid is porcelain, and will not peel. The peeling is caused by hardened grease, which dries into paint-like shards that will flake off. Regular cleaning will prevent this. See cleaning instructions. |
Charcoal Grilling In Review
Lighting Your Grill
- Before cooking for the first time, we recommend burning on high for 30 minutes with the lid and base vents fully open. This will burn off any lubricants used in the manufacturing process.
- Fully open the vent on the lid and base each time you light your grill.
- Ensure the ash pan is cleaned out from the previous use and then re-install.
- The grill can be used either with our without the center air deflector. The deflector will ensure more even temperatures and will slow the rate of burn in the center of the grill.
- Use either the Ultrachef Charcoal Starter (not included) following the instructions included in the manual, or place lighter cubes or lightly crumpled newspaper on and around the air deflector. Place the charcoal in a cone shaped pile in the center of the unit (direct cooking method) or the optional charcoal baskets (indirect method).
- Once fully lit, close the lid and allow the charcoal to burn until it is covered in a light grey ash (approximately 20 minutes), arrange the charcoal using tongs with heat resistant handles according to the cooking method you are going to use.
- Starter fluid can be used to light the charcoal, but it is not the preferred method. It can be messy and may leave a chemical taste on the food if not completely burned off prior to cooking. Once lit, never add additional starter fluid to the grill. Store the bottle at least 25ft (7.6m) away from the grill when operating.
- Additional smoke flavour can be achieved by adding smoker chips which are available in a variety of flavours through your Napoleon dealer.
Cooking With Your Grill
- We recommend preheating the grill by operating it with the lid closed for approximately 20 minutes. The coals are ready when they have a light coating of grey ash.
- As a general rule plan on using about 50 briquettes to cook 2 lb. (1kg) of meat. If cooking for more than 30 to 40 minutes, additional briquettes must be added to the fire. When the weather is cold or windy, you will need more briquettes to reach ideal cooking temperatures.
- Use caution when adding charcoal to the grill. Flames may flare up when coals come in contact with fresh air. Stand back a safe distance and use a long-handled heat-resistant cooking tongs to add additional charcoal briquettes.
- Lid vents on a covered grill are usually left open to allow air into the grill. Air increases the burning temperature of the coals. You can regulate the grill's temperature by moving the vent slide to the right or left.
- Allow food to cook with the lid closed. Every time the lid is removed, the temperature drops. This leads to lower temperatures and longer cooking times.
- Closing the vents either partially or completely will help to cool down the coals. Do not completely close the air vents and the lid vent unless you are trying to cool down or extinguish a flame.
- The cooking grid can be oiled before preheating to reduce sticking.
- Use a meat thermometer to ensure foods are adequately cooked.
Grill Clean Up
- Close the grill lid and all vents to extinguish fire.
• Always allow the grill to cool completely before handling. - Never leave coals and ashes in grill unattended. Make sure coals and ashes are completely extinguished before removing.
- Use a metal spatula or scoop to remove remaining coals and ashes from grill. Place them in a non-combustible metal container and completely saturate with water. Leave in container an additional 24 hours before disposing.
- Use a brass wire brush to clean loose debris from the bowl and the insides of the lid.
- Wash the inside of the grill with a mild detergent and water. Rinse well with clear water and wipe dry.
- Porcelain enamel components must be handled with additional care. The baked-on enamel finish is glass-like, and will chip if struck. Touch-up enamel is available from your Napoleon Grill dealer.
KEEP YOUR RECEIPT AS PROOF OF PURCHASE TO VALIDATE YOUR WARRANTY.
Ordering Replacement Parts
Warranty Information
MODEL:
DATE OF PURCHASE:
SERIAL NUMBER:
(Record information here for easy reference)
Before contacting the Customer Solutions Department, check the NAC Website for more extensive cleaning, maintenance, troubleshooting and parts replacement instructions at www.napoleongrills.com. Contact the factory directly for replacement parts and warranty claims. Our Customer Solutions Department is available between 9 AM and 5 PM (Eastern Standard Time) at 1-866-820-8686 or fax at 1-705-727-4282. To process a claim, we must be provided with the following information:
- Model and serial number of the unit.
- Part number and description.
- A concise description of the problem ('broken' is not sufficient).
- Proof of purchase (photocopy of the invoice).
In some cases the Customer Solutions Representative could request to have the parts returned to the factory for inspection before providing replacement parts. These parts must be shipped prepaid to the attention of the Customer Solutions Department with the following information enclosed:
- Model and serial number of the unit.
- A concise description of the problem ('broken' is not sufficient).
- Proof of purchase (photocopy of the invoice).
- Return Authorization Number - provided by the Customer Solutions Representative.
Before contacting Customer Solutions Representative, please note that the following items are not covered by the warranty:
• Costs for transportation, brokerage or export duties.
• Labor costs for removal and reinstallation.
• Costs for service calls to diagnose problems.
• Discoloration of stainless steel parts.
- Part failure due to lack of cleaning and maintenance, or use of improper cleaners (oven cleaner).

Notes
MANUEL D'ASSEMBLAGE, D'UTILISATION ET D'ENTRETIEN
CE GRIL DOIT ÊTRE UTILISÉ UNIQUEMENT À L'EXTÉRIEUR DANS UN ENDROIT BIEN AÉRÉ
CONSERVEZ CE MANUEL POUR CONSULTATION ULTÉRIEURE
GRILL AU CHARBON DE BOIS POUR L'EXTÉRIEUR

NAPOLEON
APPOSEZ LÉTIQUETTE DU NUMERO DE SERIE DU CARTON

natural_image
3D rendering of a NaPoleon grill with a dome-shaped top and wheels, no visible text or symbols on the device itself.NE PAS JETER
NK22CK-C

AVERTISSEMENT
Napoleon Group of Companies
214 Bayview Dr., Barrie, Ontario, Canada L4N 4Y8
Phone: 1-705-726-4278 Fax: (705)-727-4282
www.napoleongrills.com
Customer Solutions: 1-866-820-8686 or grills@napoleonproducts.com
MERCI D'AVOIR CHOISI NAPOLÉON
natural_image
Top-down view of a circular metal sieve containing dark granular material, with no visible text or symbols.CUISSON INDIRECTE

natural_image
Top-down view of a circular industrial or processing unit with internal grating and two dark granular components (no visible text or symbols)natural_image
3D rendering of a metallic mug with handle and perforated slots (no text or symbols)natural_image
Close-up of a mechanical component with highlighted parts and directional arrows (no text or symbols)OUVERT VENT

natural_image
Close-up of a mechanical device with two circular components and directional arrows indicating motion or assembly (no text or symbols)FERMÉ VENT

natural_image
3D rendering of a Napoleon grill with a dome-shaped top and wheels, no visible text or symbols on the device itself.NIET WEGGOOIEN
NK22CK-C

WAARSCHUWING
Napoleon Group of Companies
214 Bayview Dr., Barrie, Ontario, Canada L4N 4Y8
Phone: 1-705-726-4278 Fax: (705)-727-4282
www.napoleongrills.com
Customer Solutions: 1-866-820-8686 or grills@napoleonproducts.com
BEDANKT VOOR HET KIEZEN VAN NAPOLEON
natural_image
Top-down view of a circular metal container filled with dark granular material, no text or symbols visibleINDIRECT KOKEN
natural_image
Top-down view of a circular industrial or processing unit with two internal compartments filled with coal blocks, no visible text or symbols.WAARSCHUWING! Open deksel.
natural_image
3D rendered image of a metal mug with handle and perforated slots (no text or symbols)
natural_image
Close-up of a mechanical component with circular annotations highlighting internal features (no text or symbols)natural_image
Close-up of a kitchen appliance with a magnified view showing internal components (no text or symbols visible)Houtskool grillen in herhaling
natural_image
3D rendering of a Naoleon grill with a dome-shaped top and wheels, no visible text or symbols on the device itself.BITTE SORGFÄLTIG
AUFBEWAHREN
NK22CK-C
DE

ACHTUNG
Napoleon Group of Companies
214 Bayview Dr., Barrie, Ontario, Canada L4N 4Y8
Phone: 1-705-726-4278 Fax: (705)-727-4282
www.napoleongrills.com
Customer Solutions: 1-866-820-8686 or grills@napoleonproducts.com
natural_image
Top-down view of a circular container filled with black granular material, no text or symbols visiblenatural_image
Top-down view of a circular industrial or mechanical device with internal grating and two dark granular components (no text or symbols visible)natural_image
3D rendering of a metallic mug with handle and perforated slots (no text or symbols)natural_image
Close-up of a mechanical component with circular annotations highlighting internal features (no text or symbols)natural_image
Close-up of a mechanical device with internal components and directional arrows indicating motion (no text or symbols)natural_image
3D rendering of a NaPoleon grill with wheels and a dome top (no text or symbols on the device itself)NO SE DESHAGA
-DE ESTE DOCUMENTO
NK22CK-C

ADVERTENCIA
Napoleon Group of Companies
214 Bayview Dr., Barrie, Ontario, Canada L4N 4Y8
Phone: 1-705-726-4278 Fax: (705)-727-4282
www.napoleongrills.com
Customer Solutions: 1-866-820-8686 or grills@napoleonproducts.com
GRACIAS POR ELEGIR NAPOLEON
natural_image
Top-down view of a circular metal grate with granular material inside, no text or symbols visibleCOCCIÓN INDIRECTA

natural_image
Top-down view of a circular industrial fan with internal blades and a central hub (no text or symbols visible)natural_image
3D rendering of a metallic mug with handle and perforated slots (no text or symbols)natural_image
Close-up of a mechanical component with circular annotations highlighting internal features (no text or symbols)natural_image
Close-up of a mechanical device with circular arrows indicating motion or force direction (no text or symbols)natural_image
3D rendering of a Thompson grill with a dome-shaped top and wheels, no visible text or symbols on the device itself.
NK22CK-C
WARNING
Napoleon Group of Companies
214 Bayview Dr., Barrie, Ontario, Canada L4N 4Y8
Phone: 1-705-726-4278 Fax: (705)-727-4282
www.napoleongrills.com
Customer Solutions: 1-866-820-8686 or grills@napoleonproducts.com
natural_image
Top-down view of a circular metal sieve with black granular material inside, no text or symbols visible
natural_image
Top-down view of a circular industrial or processing unit with internal grating and two dark granular components (no text or symbols visible)natural_image
3D rendering of a gray metal mug with handle and hole holes (no text or symbols)natural_image
Close-up of a device's internal components with magnified circular detail (no text or symbols visible)
natural_image
Close-up of a mechanical device with circular arrows indicating motion or force direction (no text or symbols)CAUTION! During unpacking and assembly we recommended you wear work gloves and safety glasses for your protection. Although we make every effort to make the assembly process as problem free and safe as possible, it is characteristic of fabricated steel parts that the edges and corners might be sharp and could cause cuts if handled incorrectly.
Getting Started
- Remove all cart panels, hardware, and grill head from carton. Raise lid and remove any components packed inside. Use the parts list to ensure all necessary parts are included.
- Do not destroy packaging until the grill has been fully assembled and operates to your satisfaction.
- Assemble the grill where it is to be used, lay down cardboard or a towel to protect parts from being lost or damaged while assembling.
- Most stainless steel parts are supplied with a protective plastic coating that must be removed prior to using the grill. The protective coating has been removed from some of the parts during the manufacturing process and may have left behind a residue that can be perceived as scratches or blemishes. To remove the residue, vigorously wipe the stainless steel in the same direction as the grain.
- Follow all instructions in the order that they are laid out in this manual.
- Two people are required to lift the grill head onto the assembled cart.

If you have any questions about assembly or grill operation, or if there are damaged or missing parts please call our Customer Solutions Department at 1-866-820-8686 between 9 AM and 5 PM (Eastern Standard Time).

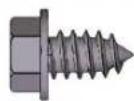
4 x N570-0080 (#14 x 1/2")

3/8"(10mm)

Flex the s ener bracket and insert into the slots in the posts as illustrated.
natural_image
Technical diagram of a mechanical assembly with mounting holes and structural components (no text or symbols)
Correct Assembly Assemblée Correcte Correcte Installatie Korrekte Montage Ensamble correcto Korrekt montering

natural_image
Mechanical component diagram showing a flanged pin and housing (no text or symbols)
natural_image
Pure mechanical component diagram without any text, numbers, or symbols
Incorrect Assembly Assemblée Incorrecte Incorrecte Installatie Inkorrekte Montage Ensamble incorrecto Felaktig montering

natural_image
3D rendered mechanical component with a U-shaped bracket and flange (no text or symbols visible)www.napoleongrills.com
www.napoleongrills.com

2 x N450-0043


natural_image
Technical illustration of a toy car chassis with wheels and a gavel, showing assembly details (no text or symbols)
Fold tabs to lock in place.
natural_image
Diagram showing a curved arrow interacting with a rectangular object on a textured surface (no text or symbols)www.napoleongrills.com

7 x N570-0080 (#14 x 1/2")
3/8"(10mm)

Two people are required for this step.
natural_image
3D rendering of a NAPOLEON industrial machine with wheels and a central chamber (no text or symbols on the device itself)
natural_image
Technical illustration of a NAP electric cart with wheels and internal components, shown from an exploded view (no text or symbols)82

www.napoleongrills.com

3 X 570-0097 (M3)

natural_image
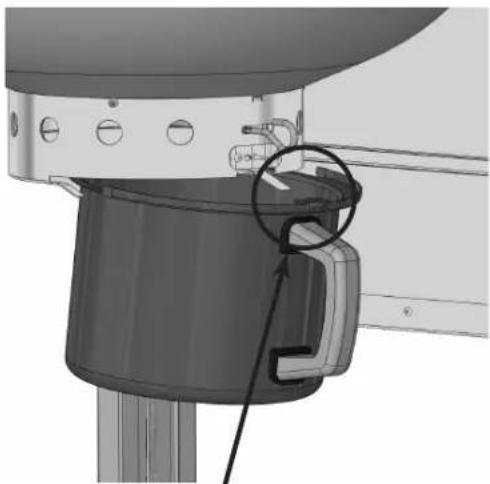
3D rendering of a metal pot with a circular perforated lid and handle, shown from two different angles (no text or symbols)Ensure slot in the base engages the clip in the air vent as illustrated.
natural_image
Technical diagram of a dome-shaped device with a circular component and warning symbol (no text or labels present)84


natural_image
Simple 3D line drawing of a bent tool with a labeled dimension (4mm) on the left side (no other text or symbols)
natural_image
Technical illustration of a kettlebell with a close-up view showing internal components (no text or symbols)
natural_image
Technical illustration of a mechanical component with pins and tools, no visible text or symbols

www.napoleongrills.com
natural_image
Mechanical assembly diagram showing a cylindrical component with a highlighted section and directional arrow (no text or symbols)
natural_image
Close-up of a mechanical component with a circular annotation highlighting a specific part (no text or symbols visible)
Ensure slot in drip pan engages clip in base as illustrated.
natural_image
Close-up of a kitchen appliance with a hand holding a handle and a circular inset showing a button or lever mechanism (no text or symbols visible)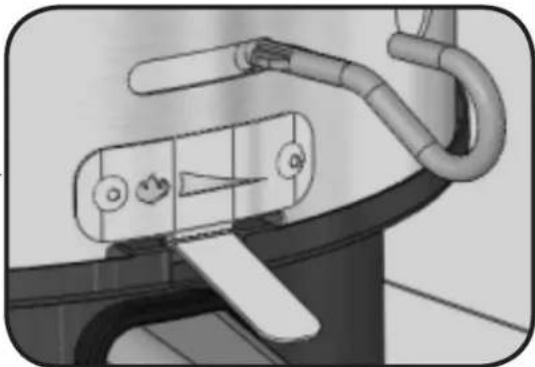
natural_image
Close-up of a mechanical device with attached pipes and a handle (no visible text or symbols)Parts List
| Item | Part # Description | ||
| 1 N325-0073 lid handle / poignée de couvercle x | |||
| 2 | N655-0141 | support lid handle left / support de la poignée du couvercle gauche | x |
| 3 | N655-0142 | support lid handle right / support de la poignée du couvercle droite | x |
| 4 Z570-0029 10-24 x 35mm screw / vis 10-24 x 35mm x | |||
| 5 N685-0011 temperature gauge / jauge de température x | |||
| 6 W450-0005 logo spring clips / pinces à ressort du logo x | |||
| 7 N335-0057K lid / couvercle x | |||
| 8 N080-0270 hinge lower / charnière inférieure x | |||
| 9 | N080-0271 | hinge upper / charnière supérieure | x |
| 10 | N570-0098 | screw, hinge / vis charnière | x |
| 11 | N655-0143 | stiffener plate hinge / plaque de charnière | x |
| 12 | N570-0042 | 10-24 x 3/8" screw / vis 10-24 x 3/8" | x |
| 13 | N735-0010 | lock washer / rondelle à ressort | x |
| 14 | N305-0080-BK2FL | cooking grid main / grille de cuisson principle | x |
| 15 | N305-0081-BK2FL | cooking grid side / grille de cuisson latéral | x |
| 16 | N325-0076 | handle cooking grid / grille de cuisson poignée | x |
| 17 | N570-0093 M4 x 8mm screw / vis M4 x 8mm x | ||
| 18 | N500-0043 | reflector plate / déflecteur d'air | x |
| 19 | N305-0077 | charcoal grate / grille à charbon de bois | x |
| 20 | N010-0674K base / base x | ||
| 21 | N010-0692 | middle ring assembly base / anneau de base assemblée | x |
| 22 | N570-0097 M3 screw / vis M3 x | ||
| 23 | N450-0032 nut M4 / écrou M4 x | ||
| 24 | N590-0207 | basket charcoal / panier à briquettes | x |
| 25 | N010-0734 | air support inner / appui aérien intérieur | x |
| 26 | N010-0735 | air support outer / appui aérien extérieure | x |
| 27 | N215-0010 | ash deflector / déflecteur de cendres | x |
| 28 | N710-0075-BK1HG | drip pan - ash collector /tiroir d'égouttement - récipient à cendres | x |
| 29 | N655-0132 | support ash pan handle / support pour poignée du récipient à cendres | x |
| 30 | N325-0071 | ash pan handle / poignée du récipient à cendres | x |
| 31 | N570-0082 | 1/4-20 x 5/8" screw / vis 1/4-20 x 5/8" | x |
| 32 | N735-0003 | washer, lock 1/4" / rondelle de blocage 1/4" | x |
| 33 | N325-0070 | wire handle / poignée de fil | x |
| 34 | N450-0036 nut M5 / écrou M5 x | ||
| 35 | N010-0691P | bottom shelf assembly / ablettes inférieur | x |
| 36 | Z130-0002 | caster / roulette | x |
| 37 | N010-0689P | post assembly / assemblée poteau | x |
| 38 | N655-0138P | stiffener cart support / raidisseur | x |
| 39 | N475-0288 | front cart panel / panier panneau avant | x |
| 40 | N570-0080 | #14 x 1/2" screw / vis #14 x 1/2" | x |
| 41 | N500-0046P | base retainer plate / plaque de retenue de base | x |
| 42 | Z570-0030 | carriage bolt 1/4-20 x 5/8" | x |
| 43 | N450-0027 | 1/4" - 20 nut / écrou 1/4" - 20 | x |
| 44 | N735-0001 | insulated washer / rondelle isolé | x |
| 45 | N010-0690 | shelf assembly front cart / tablette latérale | x |
| N430-0002 | magnetic catch / loquet magnétique | x | |
| 46 | N160-0021 | wire clip shelf assembly / clip fil | x |
| 47 | N080-0279 | bracket wire support shelf / support d'étagère | x |
| 48 | N325-0075 | cart assembly handle / poignée du chariot | x |
| 49 | N555-0037 | pivot rod shelf / la tige de pivot | x |
| 50 | Z735-0008 | washer / rondelle | x |
| 51 | Z570-0032 | M4 x 10mm screw / vis M4 x 10mm | x |
Parts List
| Item | Part # Description | ||
| 52 N655 | -0155 stiffener plate hinge / plaque de charnière x | ||
| 53 N015 | -0010 axle / essieu x | ||
| 54 Z745 | -0001 wheel / roue x | ||
| 55 N450 | -0043 axle cap / enjoliveur x | ||
| 56 Z570 | -0029 screw 10-24 x 35 mm / vis 10-24 x 35mm x | ||
| 55110 tool hook bracket / crochet à ustensiles ac | |||
| 68911 vinyl cover / housse en vinyle ac |
x - standard x - compris x - standard x - estándar x - standard
Notes

- ASSEMBLY USE AND CARE MANUAL
- THIS GRILL MUST ONLY BE USED OUTDOORS IN A WELL-VENTILATED SPACE
- RETAIN THIS MANUAL FOR FUTURE REFERENCE
- OUTDOOR CHARCOAL GRILL
- NAPOLEON
- WARNING
- DANGER
- THANK YOU FOR CHOOSING NAPOLEON
- Napoleon Charcoal Grill President's Limited Lifetime Warranty
- Conditions and Limitations
- !
- Safe Operating Practices
- Lighting Instructions
- WARNING! Open lid.
- Charcoal Starter Safe Operating Practices WARNING!
- Using the Charcoal Starter
- Charcoal Cooking Guide
- Cooking Instructions
- After Use Safety
- Maintenance / Cleaning Instructions
- Charcoal Grilling In Review
- Lighting Your Grill
- Cooking With Your Grill
- Grill Clean Up
- Ordering Replacement Parts
- (Record information here for easy reference)
- GRILL AU CHARBON DE BOIS POUR L'EXTÉRIEUR
- AVERTISSEMENT
- MERCI D'AVOIR CHOISI NAPOLÉON
- WAARSCHUWING
- BEDANKT VOOR HET KIEZEN VAN NAPOLEON
- WAARSCHUWING! Open deksel.
- Houtskool grillen in herhaling
- ACHTUNG
- ADVERTENCIA
- GRACIAS POR ELEGIR NAPOLEON
- Getting Started
Brand : Napoleon
Model : PRO22CART2
Category : Barbecue