UXT5230ADS - Basket KITCHENAID - Free user manual and instructions
Find the device manual for free UXT5230ADS KITCHENAID in PDF.
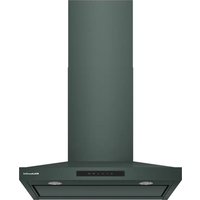
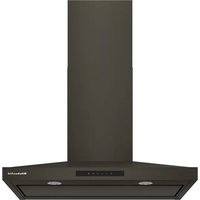
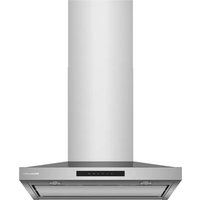
| Product Type | Under Cabinet Range Hood |
| Brand | KitchenAid |
| Model | UXT5230ADS (also UXT5236AD*) |
| Electrical Supply | 120 V, 60 Hz, 15 A (standard estimate) |
| Number of Speeds | 3 (Low, Medium, High) |
| Lighting | Yes, with on/off switch |
| Bulb Type | Standard (replacement available at specialty stores) |
| Filters | Washable metal filters (clean frequently) |
| Grease Cup | Yes, removable for hand or dishwasher cleaning |
| Self-Cleaning Function | No (available only on models UXT5430/5436) |
| Surface Care | Soapy water and soft cloth; non-abrasive detergents |
| Installation | By a qualified installer (do not do it yourself) |
| Warranty | 1 year parts and labor from date of purchase |
| Customer Service (United States) | 1-800-688-9900 |
| Customer Service (Canada) | 1-800-688-2002 |
| Safety Instructions | Do not operate without filters; do not dispose of flammable objects |
| Manufacturer Number | MK5500 |
| Width | 76.2 cm (30 inches) - model estimate |
Frequently Asked Questions - UXT5230ADS KITCHENAID
User questions about UXT5230ADS KITCHENAID
0 question about this device. Answer the ones you know or ask your own.
Ask a new question about this device
Download the instructions for your Basket in PDF format for free! Find your manual UXT5230ADS - KITCHENAID and take your electronic device back in hand. On this page are published all the documents necessary for the use of your device. UXT5230ADS by KITCHENAID.
USER MANUAL UXT5230ADS KITCHENAID
Safety Instructions....1
Controls & Features.... 2
Maintenance....3-6
Warranty....7
USE AND CARE GUIDE
Read all Instructions before Installing and operating this appliance
MODELS: UXT5230AD* UXT5236AD*
IMPORTANT SAFETY NOTICE
WARNING
Installation
The installation in this manual is intended for qualified installers, service technicians or persons with similar qualified background. DO NOT attempt to install this appliance yourself. Injury could result from installing the unit due to lack of appropriate electrical and technical background.
All electrical wiring must be properly installed, insulated and grounded. Overly accumulated grease in old duct work should be cleaned out or duct work should be replaced if necessary to avoid the possibility of a grease fire. Check all joints on duct work to insure proper connection and all joints should be properly taped.
Operations
Read all instructions in this manual before operating the appliance. Save these instructions for future reference.
Always leave safety grills and filters in place. Without these components, operating blowers could catch on to hair, fingers and loose clothing.
NEVER dispose cigarette ashes, ignitable substances, or any foreign objects into blowers.
NEVER leave cooking unattended. When frying, oil in the pan can easily overheat and catch fire. The risk of self combustion is higher when the oil has been used several times.
Cleaning
The saturation of greasy residue in the blower and filters may cause increased flammability. Keep unit clean and free of grease and residue build-up at all times to prevent possible fires.
Filters must be cleaned periodically and free from accumulation of cooking residue (see cleaning instructions inside). Old and worn filters must be replaced immediately. Do not operate blowers when filters are removed. Never disassemble parts to clean without proper instructions. Disassembly is recommended to be performed by qualified personnel only. Call our service center for removal instructions. 1-800-688-9900 (USA), 1-800-688-2002 (Canada)
The manufacturer declines all responsibility in the event of failure to observe the instructions given here for installation, maintenance and suitable use of the product. The manufacturer further declines all responsibility for injury due to negligence and the warranty of the unit automatically expires due to improper maintenance.
CONTROLS & FEATURES
2
CONTROLS & FEATURES

text_image
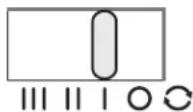
① Speed Selection ② Lights On/Off1 Speed Selection
This switch controls the speed of the blower. The first position is low speed, the second is medium speed, and the third is high speed.
② Lights On/Off
Turn lights on or off by moving this switch.
MAINTENANCE
CLEANING
Surface Maintenance:
Clean periodically with hot soapy water and clean cotton cloth. Do not use corrosive or abrasive detergent, or steel wool/scouring pads which will scratch and damage surface.
For heavier soil use a liquid degreasing cleaner.
After cleaning, you may use non-abrasive stainless steel polish/ cleaners, to polish and buff out the stainless luster and grain. Always scrub lightly, with clean cotton cloth, and with the grain. Do not use any product containing chlorine bleach. Do not use "orange" cleaners.
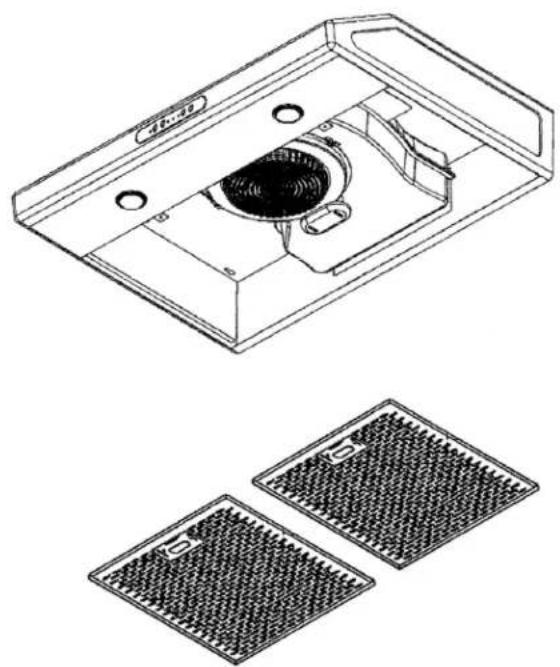
natural_image
Technical line drawing of a device housing with internal components and two separate grid-like panels (no text or symbols)MAINTENANCE
4
CLEANING
Residue Cup:
Residue and grease from cooking will collect in the residue cup located inside the range hood, behind the perforated diffuser panels. Periodically, clean out residue in cup. Clean by hand or in a dishwasher. Spray degreasing detergent and leave to soak if heavily soiled.
Dry residue cup and re-install before using hood.
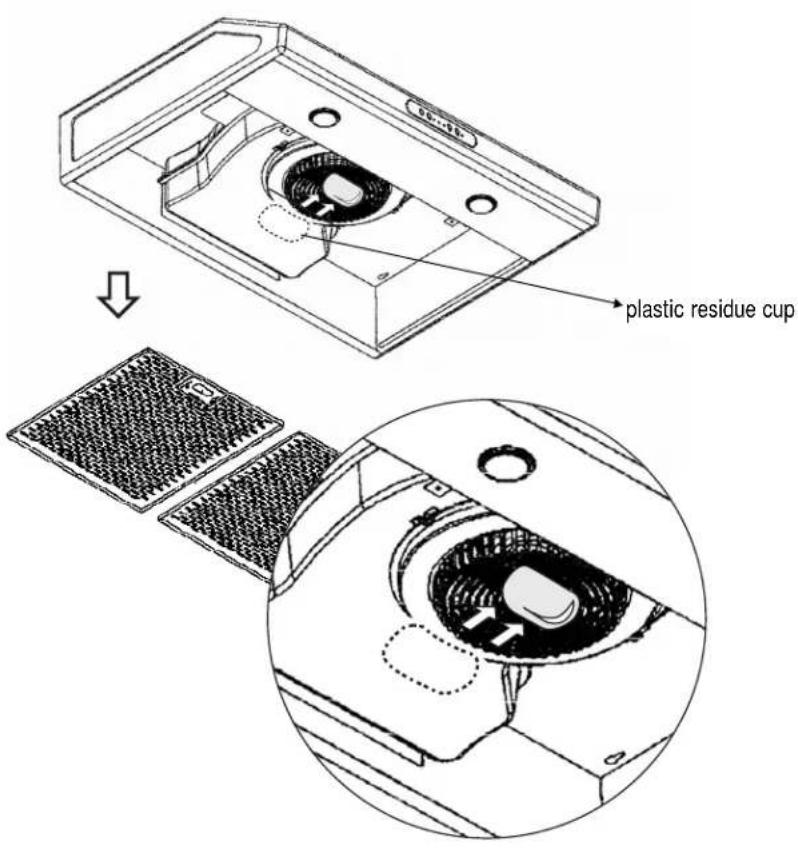
text_image
plastic residue cupCLEANING AND MAINTENANCE
SELF CLEAN FEATURE
Using Self Cleaning:

WARNING: Use only non-corrosive & non-abrasive grease cutting detergents. DO NOT USE OVEN CLEANERS.
Models UXT5230AD* & UXT5236AD* hoods are designed with a self cleaning feature. The centrifugal blower system automatically liquefies cooking residue accumulated in its internal housing, and deposits the residue in the cleaning cup. Nevertheless, grease from cooking can also dry and adhere in the internal housing. Running the self clean function periodically will flush out accumulated residue in the range hood's internal housing.
Cleaning Frequency:
Cleaning should be completed approximately once a month under normal use.
Detergent:
Non-corrosive, non-abrasive grease cutting spray detergents are recommended.
Self Clean:
Turn blower on lowest speed for cleaning.
With nozzle on 'spray', squirt the grease cutting detergent through the safety grill, directly onto blower blades 10-15 times.
Allow self cleaning to complete for 5 minutes, turn blower off.
Remove cleaning cup. Clean w/ mild detergent or in dishwasher under normal wash cycle.
(If desired, repeat above steps with water to rinse out detergent)
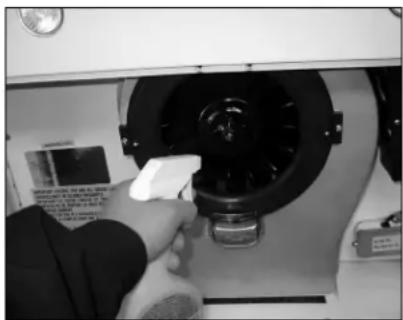
natural_image
Person using a handheld tool to clean or store items around a microscope (no visible text or symbols)set to lowest speed:
MAINTENANCE
LIGHTS
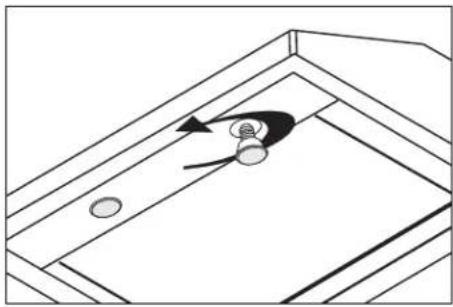
Replacing Light Bulbs

CAUTION: Light bulb becomes extremely hot when turned on. DO NOT touch bulb until switched off and cooled. Touching hot bulbs could cause serious burns.
Make sure all power is turned off and bulbs are cool.
Remove by turning bulb counter clockwise.
If bulbs are difficult to turn due to prolonged use, firmly attach a glass suction cup approx. the diameter of the bulb and turn.
Replacement bulbs are available at lighting or home stores. Purchase type 40R16 mini-floodlight bulbs.
Or to order bulbs, please call our service center: 1-800-688-9900 (USA) or 1-800-688-2002 (Canada)
natural_image
Diagram of a room interior with ceiling and window, showing a cursor pointing at a circular object (no text or symbols)Warranty:
Full One Year Warranty - Parts and Labor For one (1) year from the original retail purchase date, any part which fails in normal home use will be repaired or replaced free of charge.
Canadian Residents
The above warranties only cover an appliance installed in Canada that has been certified or listed by appropriate test agencies for compliance to a National Standard of Canada unless the appliance was brought into Canada due to transfer of residence from the United States to Canada.
The specific warranties expressed above are the ONLY warranties provided by the manufacturer. These warranties give you specific legal rights, and you may also have other rights which vary from state to state.
What is Not Covered By These Warranties:
- Conditions and damages resulting from any of the following:
a. Improper installation, delivery, or maintenance.
b. Any repair, modification, alteration, or adjustment not authorized by the manufacturer or an authorized servicer.
c. Misuse, abuse, accidents, or unreasonable use.
d. Incorrect electric current, voltage, or supply.
e. Improper setting of any control.
-
Warranties are void if the original serial numbers have been removed, altered, or cannot be readily determined.
-
Light bulbs.
-
Products purchased for commercial or industrial use.
-
The cost of service or service call to:
a. Correct installation errors.
b. Instruct the user on the proper use of the product.
c. Transport the appliance to the servicer.
- Consequential or incidental damages sustained by any person as a result of any breach of these warranties. Some states do not allow the exclusion or limitation of consequential or incidental damages, so the above exclusion may not apply.
If You Need Service
- Call the dealer from whom your appliance was purchased or call Maytag Services ^SM , Maytag Customer Assistance at 1-800-688-9900 USA and 1-800-688-2002 CANADA to locate an authorized servicer.
- Be sure to retain proof of purchase to verify warranty status. Refer to WARRANTY for further information on owner's responsibilities for warranty service.
- If the dealer or service company cannot resolve the problem, write to Maytag Services ^SM , Attn:CAIR®Center, P.O. Box 2370, Cleveland, TN 37320-2370, or call 1-800-688-9900 USA or 1-800-688-2002 CANADA.
U.S. customers using TTY for deaf, hearing impaired or speech impaired, call 1-800-688-2080.
NOTE: When writing or calling about a service problem, please include the following information:
a. Your name, address and telephone number;
b. Model number and serial number;
c. Name and address of your dealer or servicer;
d. A clear description of the problem you are having;
e. Proof of purchase (sales receipt)
- User's guides, service manuals and parts information are available from Maytag Services ^SM , Maytag Customer Assistance.
HOTTE DE CUISINIÈRE
Dimensions: 30" & 36"
L'UTILISATEUR
GUIDE
TABLE DES MATIÈRES
MODELES: UXT5230AD* UXT5236AD*
AVIS DE SÉCURITÉ IMPORTANT

AVERTISSEMENT
Installation
natural_image
Person using a handheld tool to clean or inspect a circular mechanical component (no visible text or symbols)40R16 mini-floodlight bulbs.
natural_image
Diagram of a mechanical or architectural component with arrows indicating motion or force direction (no text or symbols)Garantie:
natural_image
Technical line drawing of a device housing with internal components and two separate grid-like panels (no text or symbols)MANTENIMIENTO
4