
DDEF02213BD13 - Heating DANBY - Free user manual and instructions
Find the device manual for free DDEF02213BD13 DANBY in PDF.
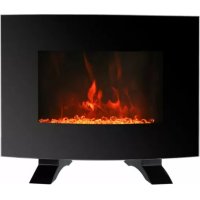


| Brand | Danby |
| Model | DDEF02213BD13 |
| Product type | Electric fireplace with heater |
| Power supply | 120 V ~ 60 Hz |
| Installation | Wall-mounted or freestanding (feet included) |
| Heating modes | Low or high |
| Adjustable thermostat | Yes, by dial |
| Timer | From 0.5h to 7.5h in 0.5h increments |
| Flame colors | 10 colors |
| Ember bed colors | 10 colors |
| Brightness levels | 5 levels |
| Remote control included | Yes, with CR2025 battery |
| Control panel | Yes, touch with indicator lights |
| Front material | Glass |
| Ember bed | Faux log set or clear crystals (included) |
| Minimum safety clearance | 50 cm sides and bottom, 100 cm top |
| Safety device | Overheat protection with auto shut-off and reset |
| Cleaning | Soft damp cloth, no alcohol or abrasives |
| User serviceable parts | None (maintenance-free interior) |
| Warranty | 18 months functional parts, 30 days plastic parts |
Frequently Asked Questions - DDEF02213BD13 DANBY
User questions about DDEF02213BD13 DANBY
0 question about this device. Answer the ones you know or ask your own.
Ask a new question about this device
Download the instructions for your Heating in PDF format for free! Find your manual DDEF02213BD13 - DANBY and take your electronic device back in hand. On this page are published all the documents necessary for the use of your device. DDEF02213BD13 by DANBY.
USER MANUAL DDEF02213BD13 DANBY
ELECTRIC FIREPLACE WITH HEATER
Owner's Manual....1 - 14
FOYER ELECTRIQUE AVEC CHAUFFAGE
DANBY PRODUCTS INC., FINDLAY, OHIO, USA 45840
www.Danby.com

2022.08.18
Important Safety Information
READ AND FOLLOW ALL SAFETY INSTRUCTIONS
- WARNING: Read and understand this entire owner's manual, including all safety information, before plugging in or using this fireplace. Failure to do so could result in fire, electric shock or serious personal injury.
- CAUTION: Keep this owner's manual for future reference.
- CAUTION: Risk of electric shock. Do not open or try to repair the fireplace yourself.
- This fireplace may get hot when in use. To avoid burns, do not let bare skin touch hot surfaces.
- Keep combustible materials, such as furniture, pillows, bedding, paper, clothes and curtains at least 3 feet from the front of the fireplace and keep them away from the sides, top and rear. Do not place towels or other objects on the fireplace.
- Extreme caution is necessary when any heater is used by or near children or invalids and whenever the heater is left operating and unattended.
- The fireplace is not intended for use in bathrooms, laundry areas, showers or swimming pools and similar locations. Never locate the fireplace where it may fall into a bathtub or other water container. To protect against electrical hazards, do not immerse the power cord in water or other liquids.
- Do not touch the control panel or plug with a wet hand.
• Always use on a dry, level surface.
- Do not use outdoors.
• Always use in an upright position.
- Do not attempt to repair or adjust any electrical or mechanical functions on this fireplace. Doing so will void your warranty. The inside of the fireplace does not contain any user serviceable parts.
- Do not insert or allow foreign objects to enter any ventilation or exhaust opening as this may cause an electric shock or fire or damage to the fireplace.
SAVE THESE INSTRUCTIONS!
- WARNING: To reduce the risk of fire or electric shock, do not use this fireplace with any solid-state speed control devices.
- Do not operate any fireplace with a damaged power cord or after the fireplace malfunctions, has been dropped or damaged in any manner. Return the fireplace to an authorized service facility for examination, electrical or mechanical adjustment or repair.
- Do not run the power cord under carpeting. Do not cover the power cord with throw rugs, runners or similar coverings. Arrange the power cord away from traffic areas where it will not be tripped over.
- To prevent possible fire, do not block the air intakes or exhaust in any manner. Do not use the fireplace on soft surfaces like a bed or thick carpeting where the air intakes may become blocked.
- This fireplace has hot and arcing or sparking parts inside. Do not use the fireplace in areas where gasoline, paint, explosive and/or flammable liquids are used or stored. Keep the fireplace away from heated surfaces and open flames.
- To avoid fire or shock hazard, plug the fireplace directly into a 120 V AC electrical outlet. Never use an extension cord or power strip.
- To disconnect the fireplace, turn the controls to off and then remove the plug from the outlet. Pull firmly on the plug, do not unplug by pulling on the cord.
- Always unplug the fireplace before moving or cleaning it. Unplug the fireplace when it is not in use.
- Use only for intended household use as described in this manual. Any other use not recommended by the manufacturer may cause fire, electric shock or injury to persons. The use of attachments is not recommended.
SAVE THESE INSTRUCTIONS!
OPERATING INSTRUCTIONS
OVERHEAT SAFETY FEATURE
This fireplace is equipped with an overheat safety feature. When the fireplace's internal components reach a certain temperature that could cause overheating and possible fire, the fireplace will automatically shut off. Operation can only resume when the user resets the fireplace.
To reset the fireplace, ensure the power is turned off, unplug the unit and wait 15 to 20 minutes for the internal components to cool down.
Follow the instructions for use to return the fireplace to normal functioning.
WARNING: It is normal for the power cord to feel warm to the touch; however, a loose fit between the outlet and the plug may cause overheating of the plug. If this occurs, try inserting the plug into a different outlet. Contact a qualified electrician to inspect the original outlet for damage.
INCLUDED ACCESSORIES
• Electric fireplace with heater - Remote control - Clear crystals • Wall hanging bracket • Wall hanging bracket hardware: - 4 x 45 mm screws x3 - Three screw expansion brackets - 4 x 12 mm screws x2 - Two feet - 4 x 16 mm screws x8 (to assemble feet)
OPERATING INSTRUCTIONS
FEATURES
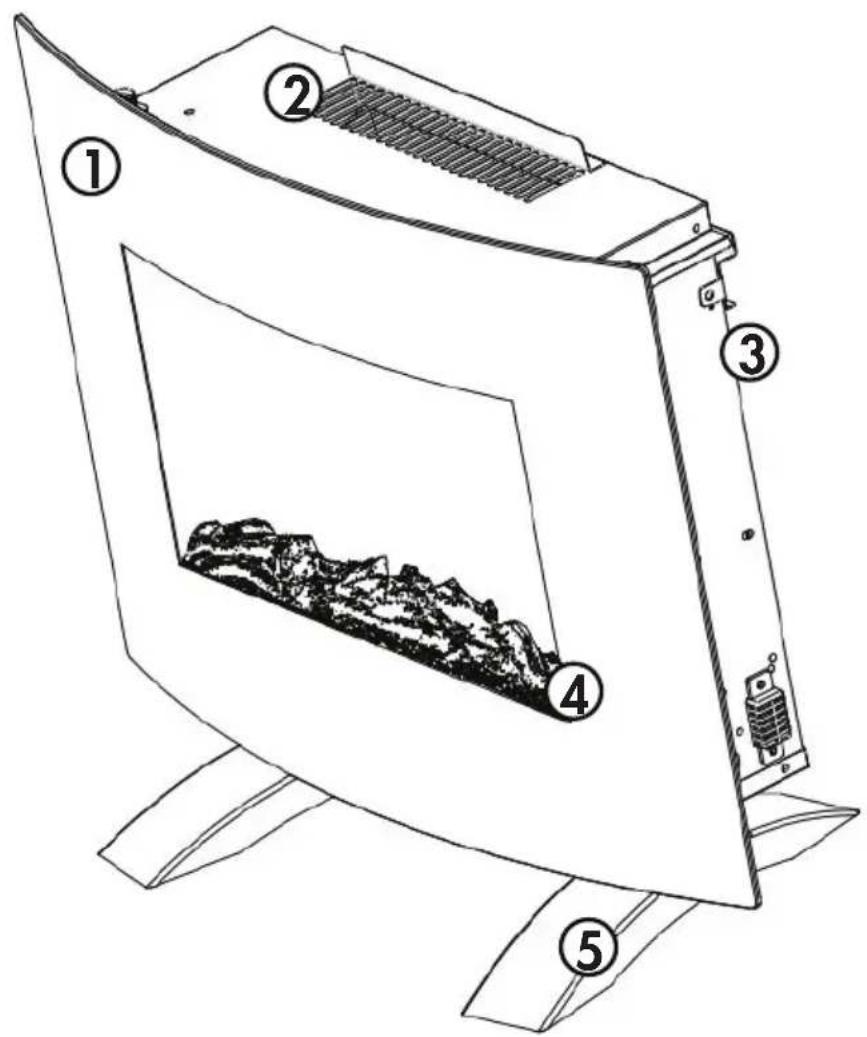
- Glass
- Air outlet
- Wall hanging bracket holder
- Ember bed
- Free standing feet
IMPORTANT WARNING
Do not leave this appliance unattended in a space where people or animals who cannot react to a malfunction are located. A malfunction can cause extreme overheating or death in an enclosed, unattended space.
OPERATING INSTRUCTIONS
CONTROL PANEL
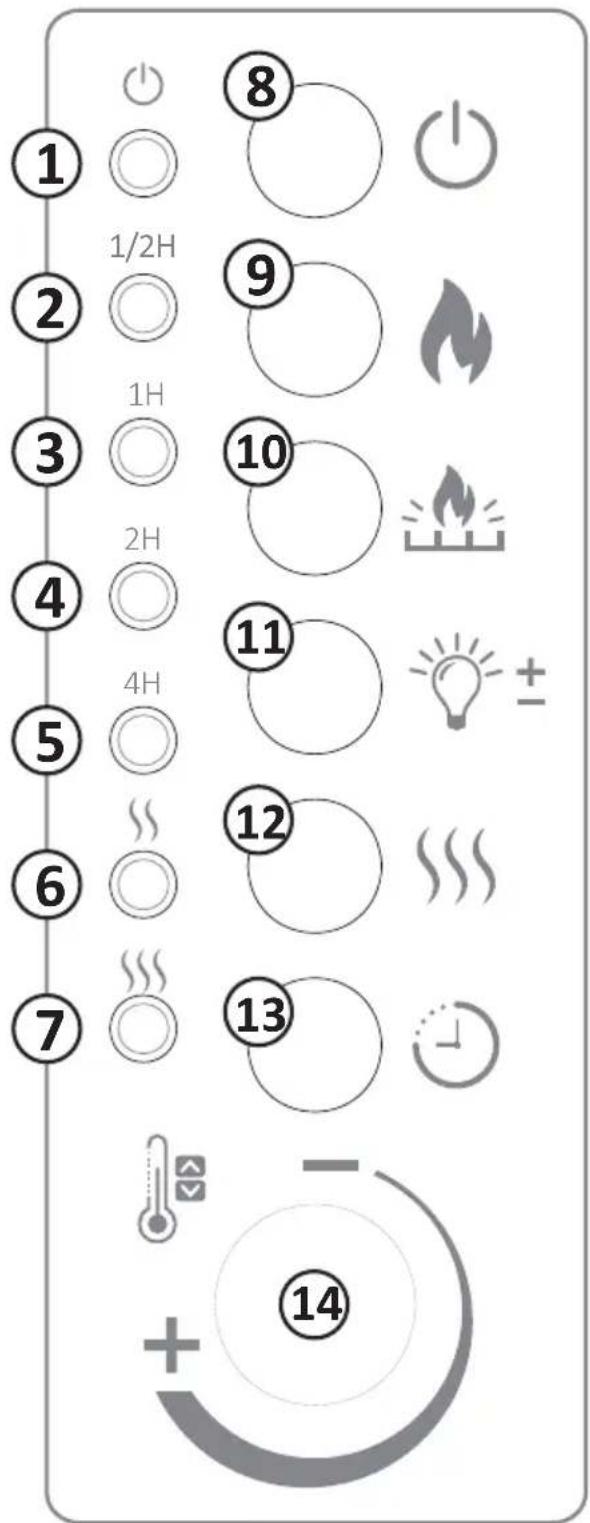
- Power indicator light: Illuminates to show the fireplace is turned on.
- 1/2 hour timer indicator light
- 1 hour timer indicator light
- 2 hour timer indicator light
- 4 hour timer indicator light
- Low heat indicator light: Illuminates when low heat mode is set.
- High heat indicator light: Illuminates when high heat mode is set.
- Power button: Press to turn the fireplace on or off.
- Flame button: Press to turn the flame on or off and to change the flame colour. There are 10 flame colours. Press and hold for 5 seconds to set the colours to cycle continuously.
- Ember bed button: Press to turn the carbon bed on or off and to change the colour. There are 10 ember colours. Press and hold for 5 seconds to set the colours to cycle continuously.
- Light button: Press to adjust the flame brightness. There are 5 brightness levels.
- Heater button: Press repeatedly to select low or high heat mode. The adjacent indicator light will illuminate to display the chosen mode.
- Timer button: Press repeatedly to set the timer. The timer will turn the fireplace off after the chosen time. The timer can be set in 1/2 hour increments up to 7.5 hours. The adjacent indicator lights will illuminate to display the chosen setting.
- Thermostat button: Turn to set the temperature. The thermostat can only be set from the control panel on the fireplace.
OPERATING INSTRUCTIONS
REMOTE CONTROL
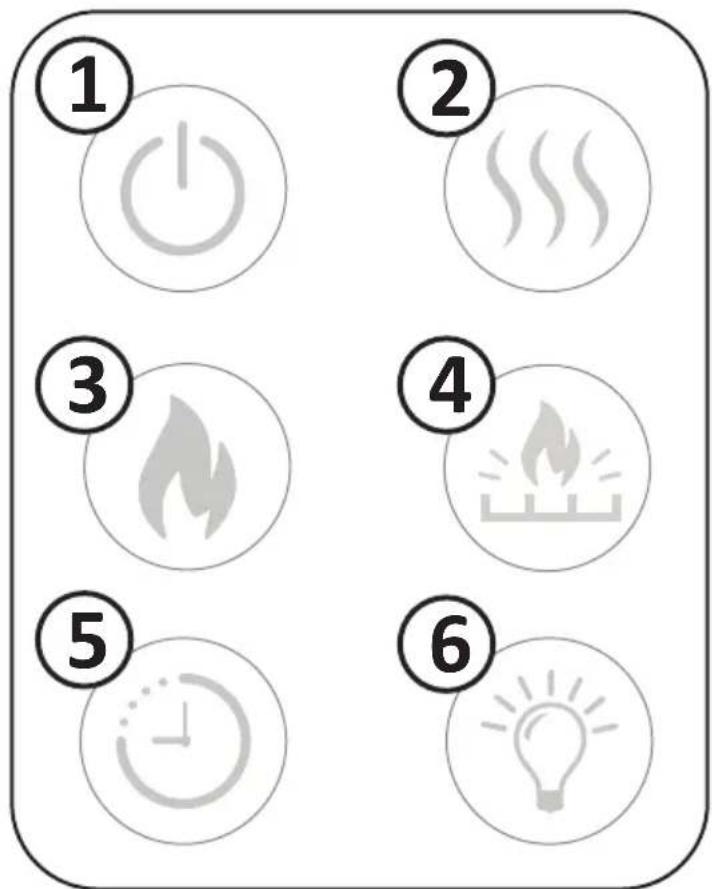
- Power button: Press to turn the fireplace and flame on or off.
- Heater button: Press repeatedly to select low or high heat mode.
- Flame button: Press to turn the flame on or off and to change the flame colour.
- Ember bed button: Press to turn the carbon bed on or off and to change the colour.
- Timer button: Press repeatedly to set the timer. The timer will turn the fireplace off after the chosen time. The timer can be set in 1/2 hour increments up to 7.5 hours.
- Light button: Press to adjust the flame brightness. There are 5 brightness levels.
OPERATING INSTRUCTIONS
REMOTE CONTROL BATTERY
This remote control uses one CR2025 battery.
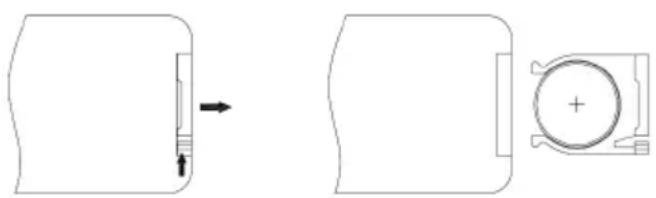
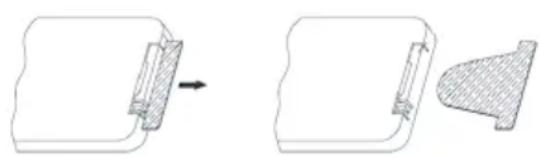
To remove the battery, push the latch on the battery compartment upwards and then pull the battery tray out.
To replace the battery, place the new battery in the battery tray and push it gently into the remote control until it clicks into place.
WARNING: Never dispose of batteries in fire. Failure to observe this precaution may result in an explosion. Dispose of batteries at your local hazardous material processing center.
If the fireplace will not be used for a long time, remove the batteries to prevent corrosion. Store the remote control in a safe place.
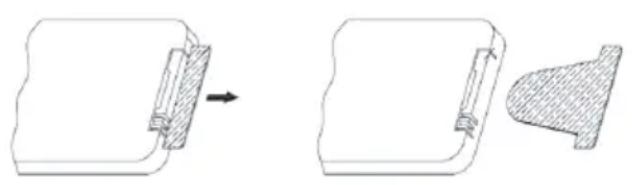
Remove the insulating film from the battery compartment before using the remote control.
WARNING:
- Keep batteries out of children's reach. Discard them carefully.
- Do not allow children to play with batteries.
- Never put button batteries in or near your mouth for any reason, they are slippery and easy to swallow accidentally.
OPERATING INSTRUCTIONS
INSTRUCTIONS FOR USE
- Remove the insulating film from the remote control battery compartment.
- Ensure the power is turned off.
- Decide which installation method to use and install the fireplace as directed.
- Plug the fireplace directly into a 120V AC electrical outlet.
- Turn the fireplace on by pressing the power button.
- Press the heater button to set low or high heat mode.
- Turn the thermostat dial to set the desired temperature. The fireplace will remain on until the set temperature is reached and it will then cycle on and off to maintain the set temperature.
- Turn the fireplace off by pressing the power button. When the power is turned off the heating element will stop working immediately but the fan will continue to run for 30 seconds or until the fireplace has cooled.
Important
When the heat feature is used for the first time, a slight odor may be present. This is normal and should not occur again unless the fireplace is not used for an extended period of time.
It is normal for the fireplace to cycle on and off as it maintains the set temperature.
For the fireplace to function properly, the set temperature must be higher than the ambient temperature in the room. If the fireplace does not seem to be heating, increase the set temperature to engage the heating element.
INSTALLATION INSTRUCTIONS
PREPARATION
WARNING: This product includes glass. Always use extreme caution when handling glass. Failure to do so could result in personal injury or property damage.
Remove all parts and hardware from the carton and place them on a clean, soft, dry surface.
WARNING: Make sure all parts are dry and the power cord and plug are not damaged. See the Important Instructions section.
The fireplace can be wall-mounted or placed on a solid, level surface when the free standing feet are assembled. The fireplace must be plugged into a 120V 60Hz electrical outlet.
FREE STANDING FOOT ASSEMBLY
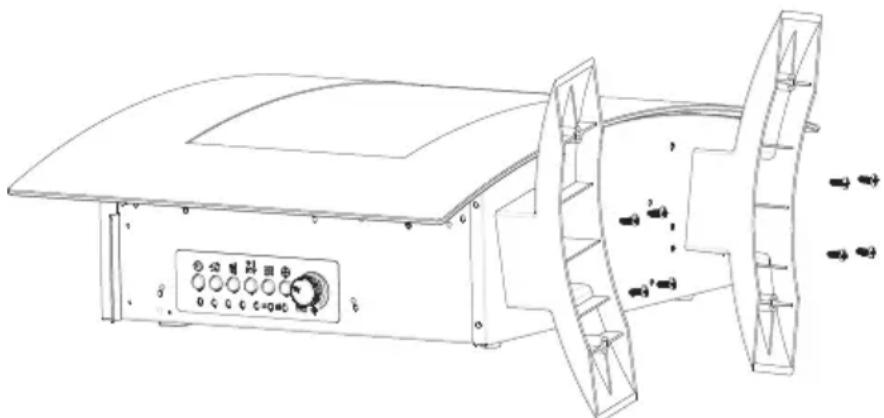
Place the fireplace carefully on its back. Place the fireplace on a blanket or soft surface to avoid scratching the unit or flooring.
Attach the free standing feet using eight 4 x 16 mm screws as shown. Place upright on a solid, level surface and plug into a 120V 60Hz electrical outlet.
Note: If you attach the solid feet for freestanding installation, you do not need to install the wall bracket onto the back of the fireplace.
INSTALLATION INSTRUCTIONS
WALL MOUNTED INSTALLATION
Find a safe location to install the fireplace. To prevent fire there must be a minimum clearance of 50 cm (20 inches) on the sides and bottom and 100 cm (40 inches) on the top of the unit.
Choose a location near an outlet so an extension cord is not required. Do not position the fireplace directly below a power outlet.
WARNING: Prior to wall mounting, check the wall to ensure that there are no wires, pipes or similar in the area where holes will be drilled.
WARNING: Ensure the fireplace is unplugged prior to installation, moving and assembling.
WARNING: This fireplace cannot be recessed into a hollow wall cavity. Mountings must be secured to a solid wall surface such as plaster board or drywall that is supported by studs spaced no more than 24 inches (60 cm) apart.
Note: Ensure the feet are not installed before attempting a wall installation.
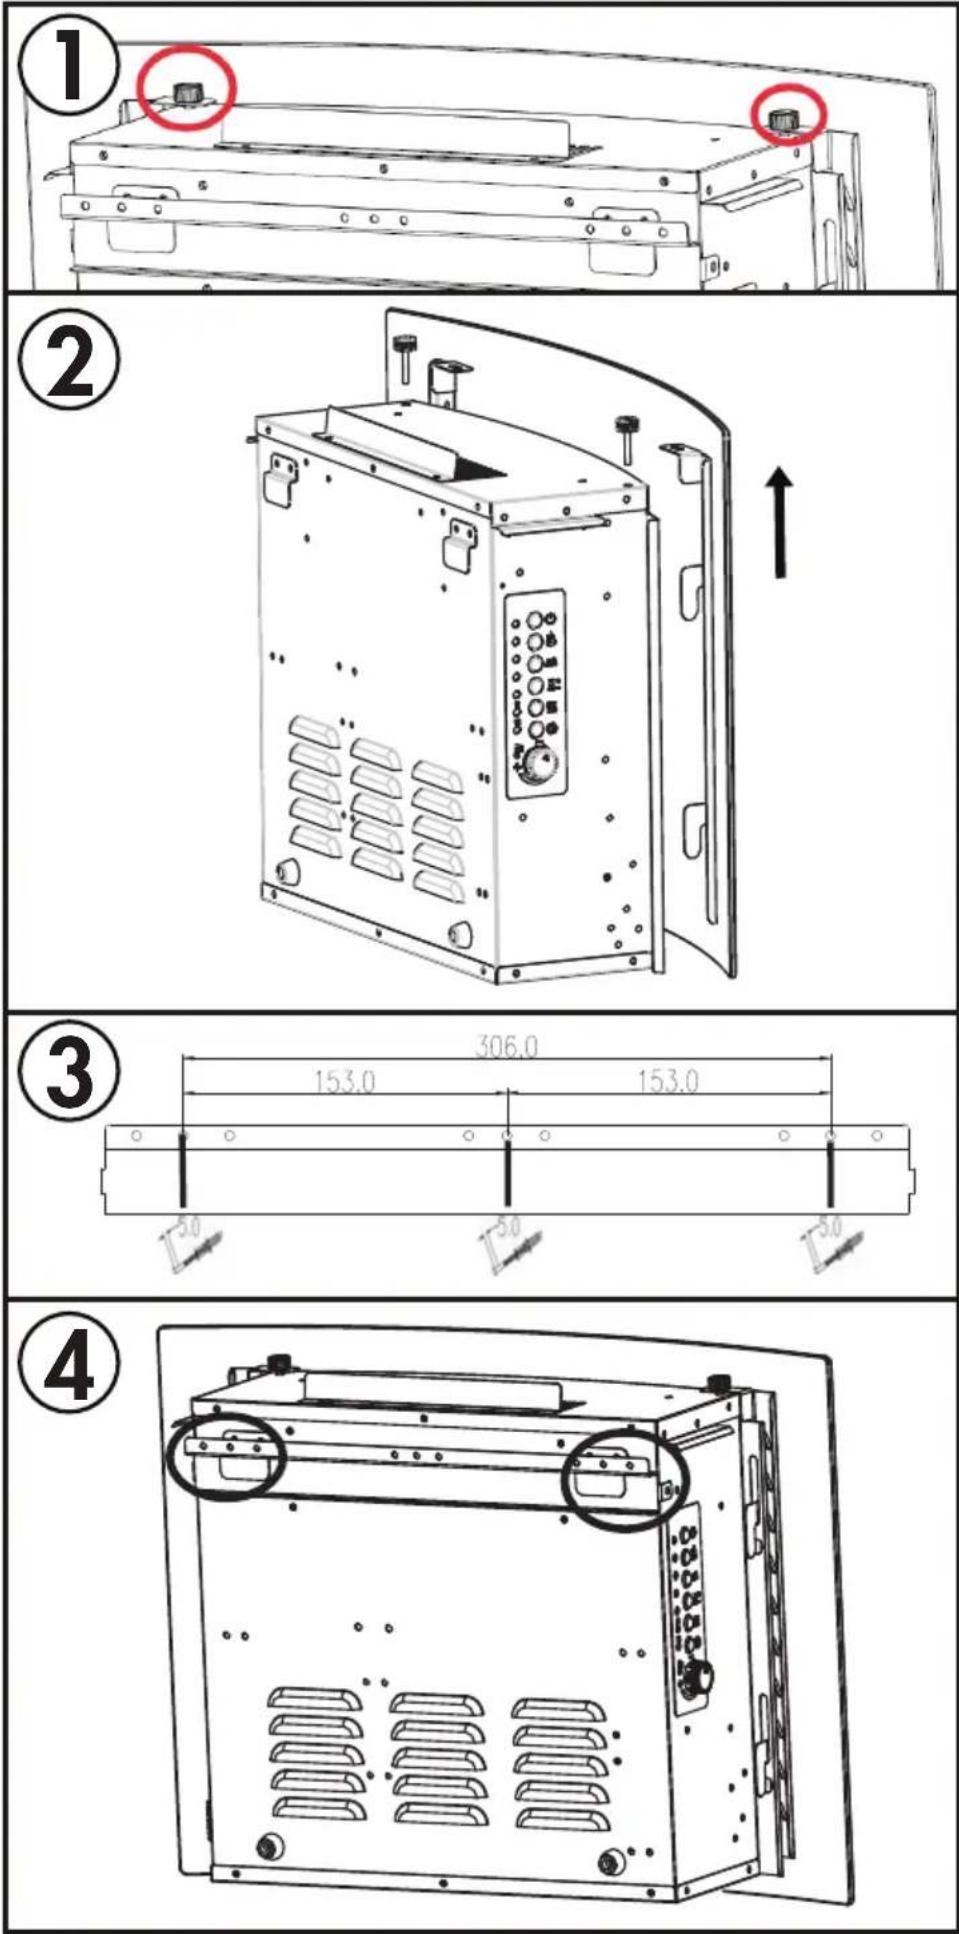
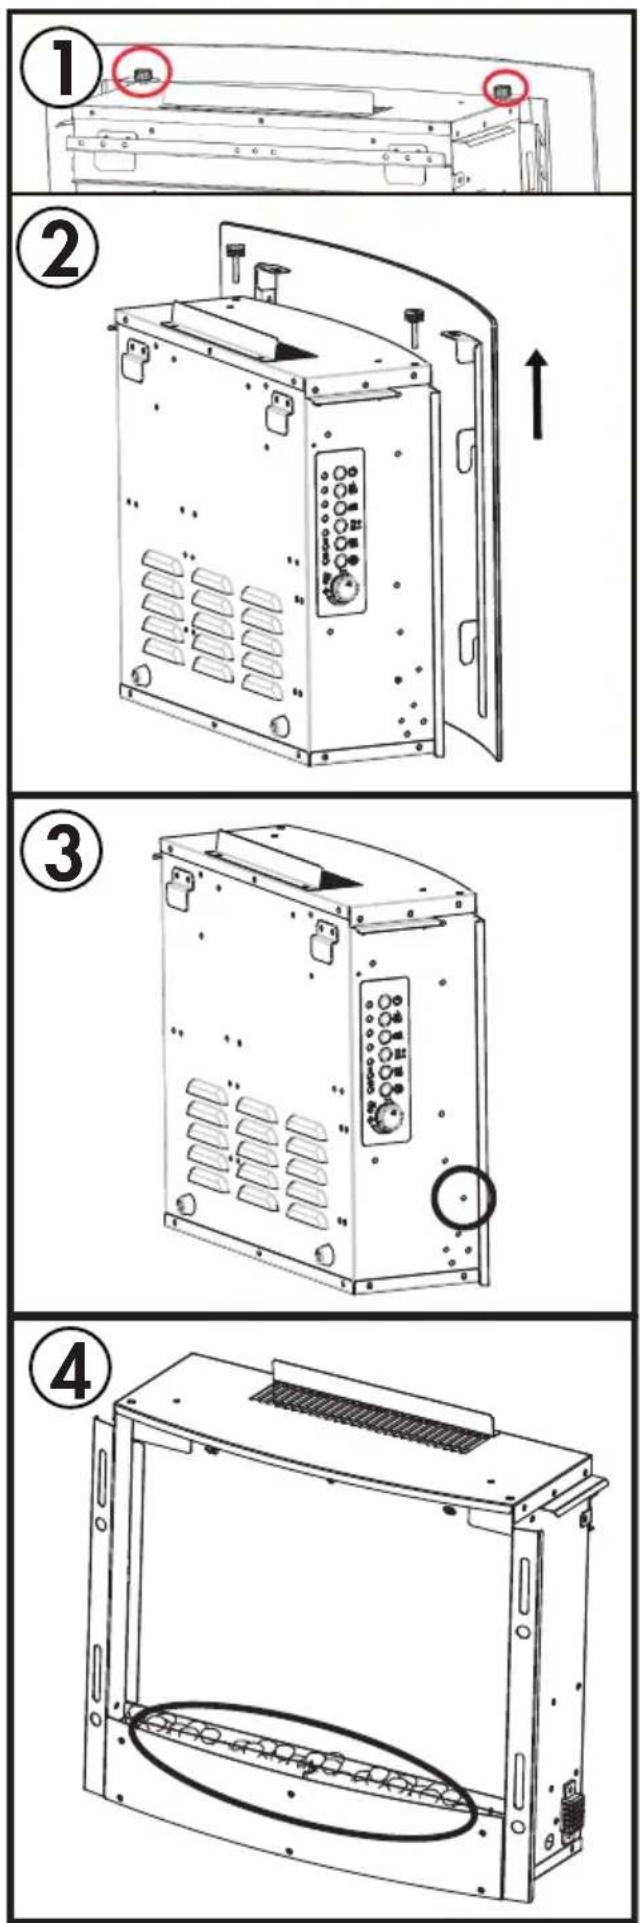
- The glass should be removed before installation. Remove the two thumbscrews on the top left and top right side of the glass.
- Lift the glass panel upward to remove it.
- Attach the wall hanging bracket to the wall using three 4 x 45 mm screws and three supplied screw expansion brackets. The screws should be evenly spaced across the available locations in the wall bracket. Ensure that at least one screw enters a wall stud.
- Lift the fireplace into position using two people. Ensure that the tabs on the back of the fireplace securely engage with the slots provided. Use two 4 x 12 mm screws to attach the fireplace to the wall hanging bracket. The screws can be found in the accessory bag and one should be used on each side of the panel.
- Replace the glass on the front of the fireplace, ensuring the locating tabs engage securely in their corresponding slots and that the thumbscrews are tightened.
INSTALLATION INSTRUCTIONS
INSTALLATION INSTRUCTIONS
EMBER BED INSTALLATION
WARNING: The next step involves glass. Always use extreme caution when handling glass. Failure to do so could result in personal injury or property damage.
This fireplace will come with the faux log bed pre-installed. To change to the provided clear crystals, follow the steps below.
- The glass should be removed before installation. Remove the two thumbscrews on the top left and top right side of the glass.
- Lift the glass panel upward to remove it.
- Remove the two thumbscrews from each side of the faux log bed.
- Remove the faux log bed and replace the screws. Spread the clear crystals onto the ember bed.
- Replace the glass on the front of the fireplace, ensuring the locating tabs engage securely in their corresponding slots and that the thumbscrews are tightened.
CARE & MAINTENANCE
CLEANING
- Ensure the power is turned off and the fireplace is unplugged.
- Allow the fireplace to completely cool before attempting any cleaning.
- The outer shell may be cleaned with a soft, damp cloth. A mild detergent can be used if necessary. After cleaning, dry the fireplace with a soft cloth. Do not let liquid enter the fireplace.
- Wait until the fireplace is completely dry before using.
WARNING: Do not immerse the fireplace in water or allow water to enter the fireplace.
WARNING: Do not use alcohol, gasoline, abrasive powders, furniture polish or rough brushes to clean the fireplace. This may cause damage or deterioration to the surface of the fireplace.
TROUBLESHOOTING
If the fireplace will not operate, check the following:
- Check that the power cord is plugged into a 120 V AC electrical outlet. Do not use extension cords.
- Check that the power indicator light on the control panel is illuminated to show that the fireplace is getting power from the outlet.
- Check if the battery in the remote control needs to be replaced.
- Unplug the fireplace, wait 15 minutes for the internal components to reset and then plug it back in.
STORAGE
LIMITED "CARRY IN" WARRANTY
This quality product is warranted to be free from manufacturer's defects in material and workmanship, provided that the unit is used under the normal operating conditions intended by the manufacturer.
This warranty is available only to the person to whom the unit was originally sold by Danby Products Limited (Canada) or Danby Products Inc. (U.S.A.) (hereafter "Danby") or by an authorized distributor of Danby, and is non-transferable.
TERMS OF WARRANTY
Plastic parts are warranted for thirty (30) days from the date of purchase, with no extensions provided.
First 18 months: During the first eighteen (18) months, any functional parts of this product found to be defective will be repaired or replaced, at the warranter's option, at no charge to the original purchaser.
To obtain service: Contact the dealer where the unit was purchased, or contact the nearest authorized Danby service depot, where service must be performed by a qualified service technician. If service is performed on the unit by anyone other than an authorized service depot, all obligations of Danby under this warranty shall be void.
It is the responsibility of the purchaser to transport the appliance to the nearest authorized service depot. Transportation charges to and from the service location are not covered by this warranty and are the responsibility of the purchaser.
Nothing within this warranty shall imply that Danby will be responsible or liable for any spoilage or damage to food or other contents of this appliance, whether due to any defect of the appliance, or its use, whether proper or improper.
EXCLUSIONS
Except as provided herein, there are no other warranties, conditions, representations, or guarantees, express or implied, made or intended by Danby or its authorized distributors, and all other warranties, conditions, representations, or guarantees, including any warranties, conditions, representations, or guarantees under any Sale of Goods Act or like legislation or statute, are hereby expressly excluded. Except as provided herein, Danby shall not be responsible for any damages to persons or property, including the unit itself, howsoever caused, or any consequential damages arising from the malfunction of the unit. By the purchase of the unit, the purchaser hereby agrees to indemnify and hold harmless Danby from any claim for damages to persons or property caused by the unit.
GENERAL PROVISIONS
No warranty or insurance herein contained or set out shall apply when damage or repair is caused by any of the following:
1) Power failure. 2) Damage in transit or when moving the appliance. 3) Improper power supply such as low voltage, defective house wiring, or inadequate fuses. 4) Accident, alteration, abuse, or misuse of the appliance such as inadequate air circulation in the room or abnormal operating conditions (i.e., extremely high or low room temperature). 5) Use for commercial or industrial purposes (i.e., if the appliance is not installed in a domestic residence). 6) Fire, water damage, theft, war, riot, hostility, acts of God such as hurricanes, floods, etc. 7) Service calls resulting in customer education. 8) Improper installation (i.e., building-in of a free standing appliance or using an appliance outdoors that is not approved for outdoor application, including but not limited to: garages, patios, porches, or anywhere that is not properly insulated or climate controlled).
Proof of purchase date will be required for warranty claims; retain bills of sale. In the event that warranty service is required, present the proof of purchase to our authorized service depot.
KEEP THESE INSTRUCTIONS!
KEEP THESE INSTRUCTIONS!
OPERATING INSTRUCTIONS
OVERHEAT SAFETY FEATURE
IMPORTANT WARNING
OPERATING INSTRUCTIONS
REMOTE CONTROL
OPERATING INSTRUCTIONS
REMOTE CONTROL BATTERY
WARNING:
OPERATING INSTRUCTIONS
USER MANUAL
INSTALLATION INSTRUCTIONS
WALL MOUNTING
INCLUDED ACCESSORIES
IMPORTANT WARNING
WARNING:
Guelph, Ontario, Canada
1-800-263-2629
Danby Products Inc.
Findlay, Ohio, U.S.A.

DANBY PRODUCTS LIMITED, ONTARIO, CANADA N1H 6Z9 DANBY PRODUCTS INC., FINDLAY, OHIO, USA 45840
*Trademarks of Danby Products Limited and/or its subsidiaries * Marques de commerce de Danby Products Limited et / ou de ses filiales * Marcas comerciales de Danby Products Limited y / o sus subsidiarias
Printed in China
Printed in China
Printed in China
- IMPORTANT SAFETY INFORMATION
- READ AND FOLLOW ALL SAFETY INSTRUCTIONS
- SAVE THESE INSTRUCTIONS
- OPERATING INSTRUCTIONS
- OVERHEAT SAFETY FEATURE
- INCLUDED ACCESSORIES
- FEATURES
- IMPORTANT WARNING
- CONTROL PANEL
- REMOTE CONTROL
- REMOTE CONTROL BATTERY
- WARNING
- INSTRUCTIONS FOR USE
- IMPORTANT
- INSTALLATION INSTRUCTIONS
- PREPARATION
- FREE STANDING FOOT ASSEMBLY
- WALL MOUNTED INSTALLATION
- EMBER BED INSTALLATION
- CARE & MAINTENANCE
- CLEANING
- TROUBLESHOOTING
- STORAGE
- LIMITED "CARRY IN" WARRANTY
- TERMS OF WARRANTY
- EXCLUSIONS
- GENERAL PROVISIONS
- KEEP THESE INSTRUCTIONS
- USER MANUAL
- WALL MOUNTING
Brand : DANBY
Model : DDEF02213BD13
Category : Heating