
RKCO223 - Oven KITCHENAID - Free user manual and instructions
Find the device manual for free RKCO223 KITCHENAID in PDF.
| Product type | Countertop Oven |
| Brand | KitchenAid |
| Model | RKCO223 |
| Capacity | 0.6 cu ft (0.018 m³) |
| Cavity depth | 12 in (30.2 cm) |
| Power supply | 120 V, 60 Hz, 1440 W |
| Plug type | 3-prong grounded plug |
| Functions | Baking, broiling, toasting, reheating |
| Convection cooking | Yes, automatic in bake mode |
| Maximum temperature | 450 °F (232 °C) approx |
| Timer | Up to 60 minutes, continuous operation up to 4 h |
| Auto shutoff | Yes, after 4 hours of continuous operation |
| Oven rack | Reversible, 2 positions, capacity up to 6 slices |
| Broiler pan | Included with broiler rack |
| Crumb tray | Removable, hand wash |
| Interior coating | Nonstick |
| Door | Tempered glass with stainless steel handle |
| Cleaning | Manual recommended, non-abrasive sponge |
| Warranty | 1 year with hassle-free replacement |
| Included accessories | Oven rack, broiler pan with rack, crumb tray |
Frequently Asked Questions - RKCO223 KITCHENAID
User questions about RKCO223 KITCHENAID
0 question about this device. Answer the ones you know or ask your own.
Ask a new question about this device
Download the instructions for your Oven in PDF format for free! Find your manual RKCO223 - KITCHENAID and take your electronic device back in hand. On this page are published all the documents necessary for the use of your device. RKCO223 by KITCHENAID.
USER MANUAL RKCO223 KITCHENAID
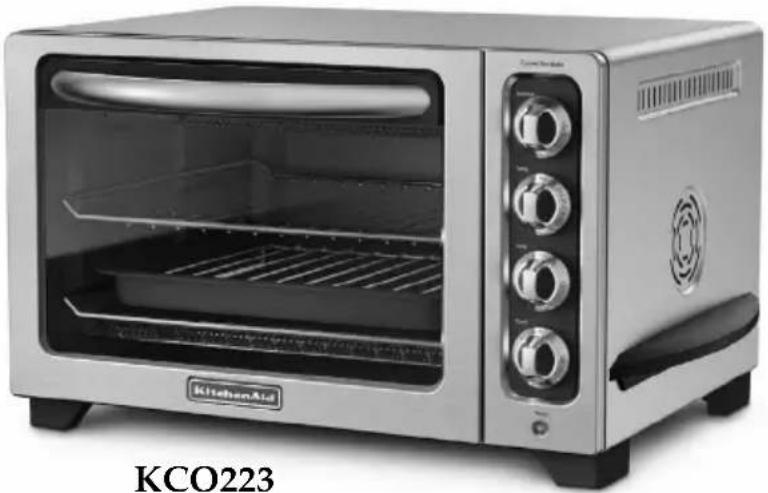
natural_image
Exterior view of a KCO222 electric cooktop oven (no signage or text on the appliance itself)KCO222
natural_image
Exterior view of a KCO223 kitchen aerial stove with open doors and control knobs (no visible text or symbols on the device itself)W10321639B
KITCHENAID® COUNTERTOP OVEN SAFETY....3
ELECTRICAL REQUIREMENTS ....5
KITCHENAID® COUNTERTOP OVEN FEATURES....6
KITCHENAID® COUNTERTOP OVEN CONTROLS ....8
Countertop Oven Features....9
PREPARING THE KITCHENAID® COUNTERTOP OVEN FOR USE......10
KITCHENAID® COUNTERTOP OVEN USE .....11
Understanding Positions of the oven rack.....11
Baking (and Reaheating) with the Countertop Oven 12
Broiling (and Top Browning) with the Countertop Oven....12
Toasting with the Countertop Oven....13
Warming (Plus Keeping Warm and Heating) with the Countertop Oven....13
Countertop Oven Use Tips ....14
Food Cooking Tips....14
Choosing Bakeware for Countertop Oven Use:....15
KITCHENAID® COUNTERTOP OVEN CARE ...15 Cleaning Your Countertop Oven....15
TROUBLESHOOTING....16
PROOF OF PURCHASE AND PRODUCT REGISTRATION ....16
WARRANTY....17
Hassle-Free Replacement Warranty – 50 United States and District of Columbia.....18
Hassle-Free Replacement Warranty – Canada....18
How to Arrange for Warranty Service in Puerto Rico....18
How to Arrange for Service after the Warranty Expires – All Locations.....18
How to Arrange for Service Outside These Locations ....19
How to Order Accessories and Replacement Parts ....19
TABLE DES MATIÈRES
CONSIGNES DE SÉCURITÉ DU FOUR DE COMPTOIR....21
SPÉCIFICATIONS ÉLECTRIQUES ......23
CARACTÉRISTIQUES DU FOUR DE COMPTOIR KITCHENAID ^ ......24
COMMANDES DU FOUR DE COMPTOIR KITCHENAID ^ ......26
KITCHEN AID® COUNTERTOP OVEN SAFETY
Your safety and the safety of others are very important.
We have provided many important safety messages in this manual and on your appliance. Always read and obey all safety messages.

natural_image
Warning symbol: black triangle with exclamation mark (no text or numbers)This is the safety alert symbol.
This symbol alerts you to potential hazards that can kill or hurt you and others.
All safety messages will follow the safety alert symbol and either the word "DANGER" or "WARNING." These words mean:
DANGER
WARNING
You can be killed or seriously injured if you don't immediately follow instructions.
You can be killed or seriously injured if you don't follow instructions.
All safety messages will tell you what the potential hazard is, tell you how to reduce the chance of injury, and tell you what can happen if the instructions are not followed.
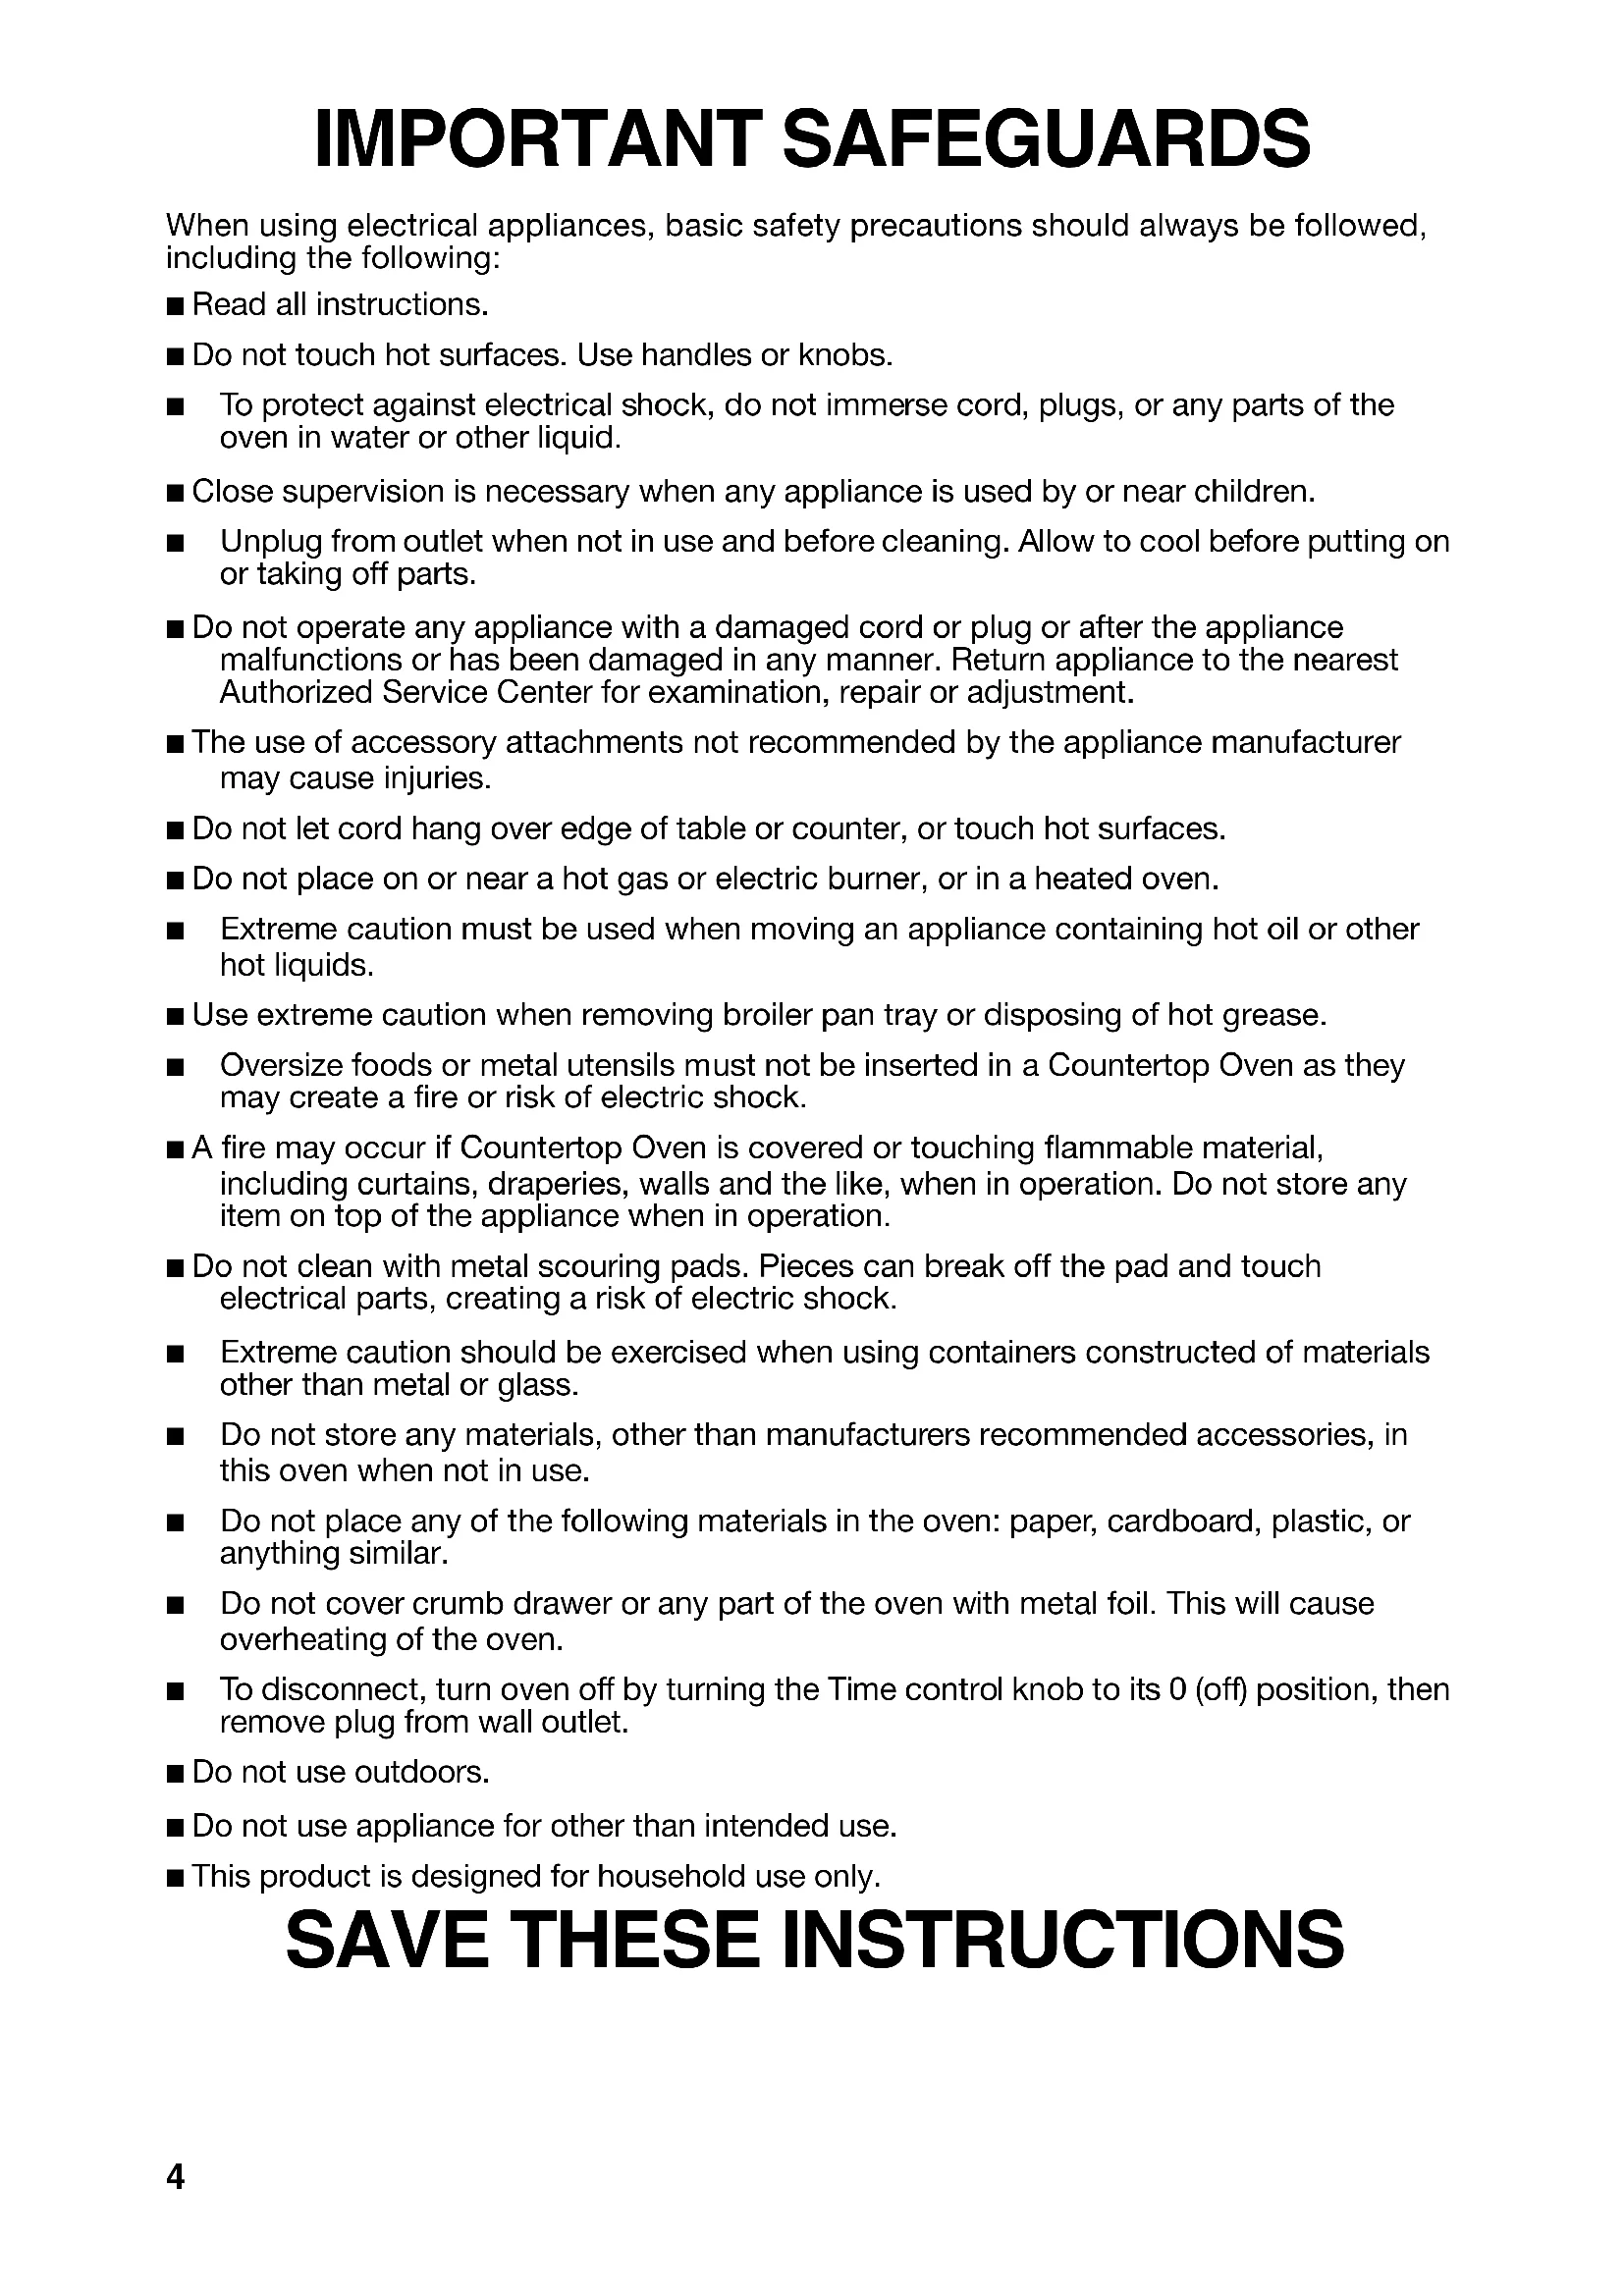
IMPORTANT SAFEGUARDS
When using electrical appliances, basic safety precautions should always be followed, including the following:
■ Read all instructions.
■ Do not touch hot surfaces. Use handles or knobs.
■ To protect against electrical shock, do not immerse cord, plugs, or any parts of the oven in water or other liquid.
■ Close supervision is necessary when any appliance is used by or near children.
■ Unplug from outlet when not in use and before cleaning. Allow to cool before putting on or taking off parts.
■ Do not operate any appliance with a damaged cord or plug or after the appliance malfunctions or has been damaged in any manner. Return appliance to the nearest Authorized Service Center for examination, repair or adjustment.
■ The use of accessory attachments not recommended by the appliance manufacturer may cause injuries.
■ Do not let cord hang over edge of table or counter, or touch hot surfaces.
■ Do not place on or near a hot gas or electric burner, or in a heated oven.
■ Extreme caution must be used when moving an appliance containing hot oil or other hot liquids.
■ Use extreme caution when removing broiler pan tray or disposing of hot grease.
■ Oversize foods or metal utensils must not be inserted in a Countertop Oven as they may create a fire or risk of electric shock.
■ A fire may occur if Countertop Oven is covered or touching flammable material, including curtains, draperies, walls and the like, when in operation. Do not store any item on top of the appliance when in operation.
■ Do not clean with metal scouring pads. Pieces can break off the pad and touch electrical parts, creating a risk of electric shock.
■ Extreme caution should be exercised when using containers constructed of materials other than metal or glass.
■ Do not store any materials, other than manufacturers recommended accessories, in this oven when not in use.
■ Do not place any of the following materials in the oven: paper, cardboard, plastic, or anything similar.
■ Do not cover crumb drawer or any part of the oven with metal foil. This will cause overheating of the oven.
■ To disconnect, turn oven off by turning the Time control knob to its 0 (off) position, then remove plug from wall outlet.
■ Do not use outdoors.
■ Do not use appliance for other than intended use.
■ This product is designed for household use only.
SAVE THESE INSTRUCTIONS
ELECTRICAL REQUIREMENTS
WARNING

Electrical Shock Hazard
Plug into a grounded 3 prong outlet.
Do not remove ground prong.
Do not use an adapter.
Do not use an extension cord.
Failure to follow these instructions can result in death, fire, or electrical shock.
Voltage: 120 volts, AC only.
Hertz: 60 Hz
NOTE: This countertop oven has a 3-prong grounded plug. To reduce the risk of electrical shock, this plug will fit in an outlet only one way. If the plug does not fit in the outlet, contact a qualified electrician. Do not modify the plug in any way.
Do not use an extension cord. If the power supply cord is too short, have a qualified electrician or technician install an outlet near the appliance.
A short power supply cord (or detachable power supply cord) should be used to reduce the risk resulting from becoming entangled in or tripping over a longer cord.
Longer detachable power supply cords or extension cords are available and may be used if attention is exercised in their use.
If a longer detachable power supply cord or extension cord is used:
■ The marked electrical rating of the cord set or extension cord should be at least as great as the electrical rating of the appliance.
■ The cord should be arranged so that it will not drape over the countertop or tabletop where it can be pulled on by children or tripped over unintentionally.
If the appliance is of the grounded type, the extension cord should be a grounding-type 3-wire cord.
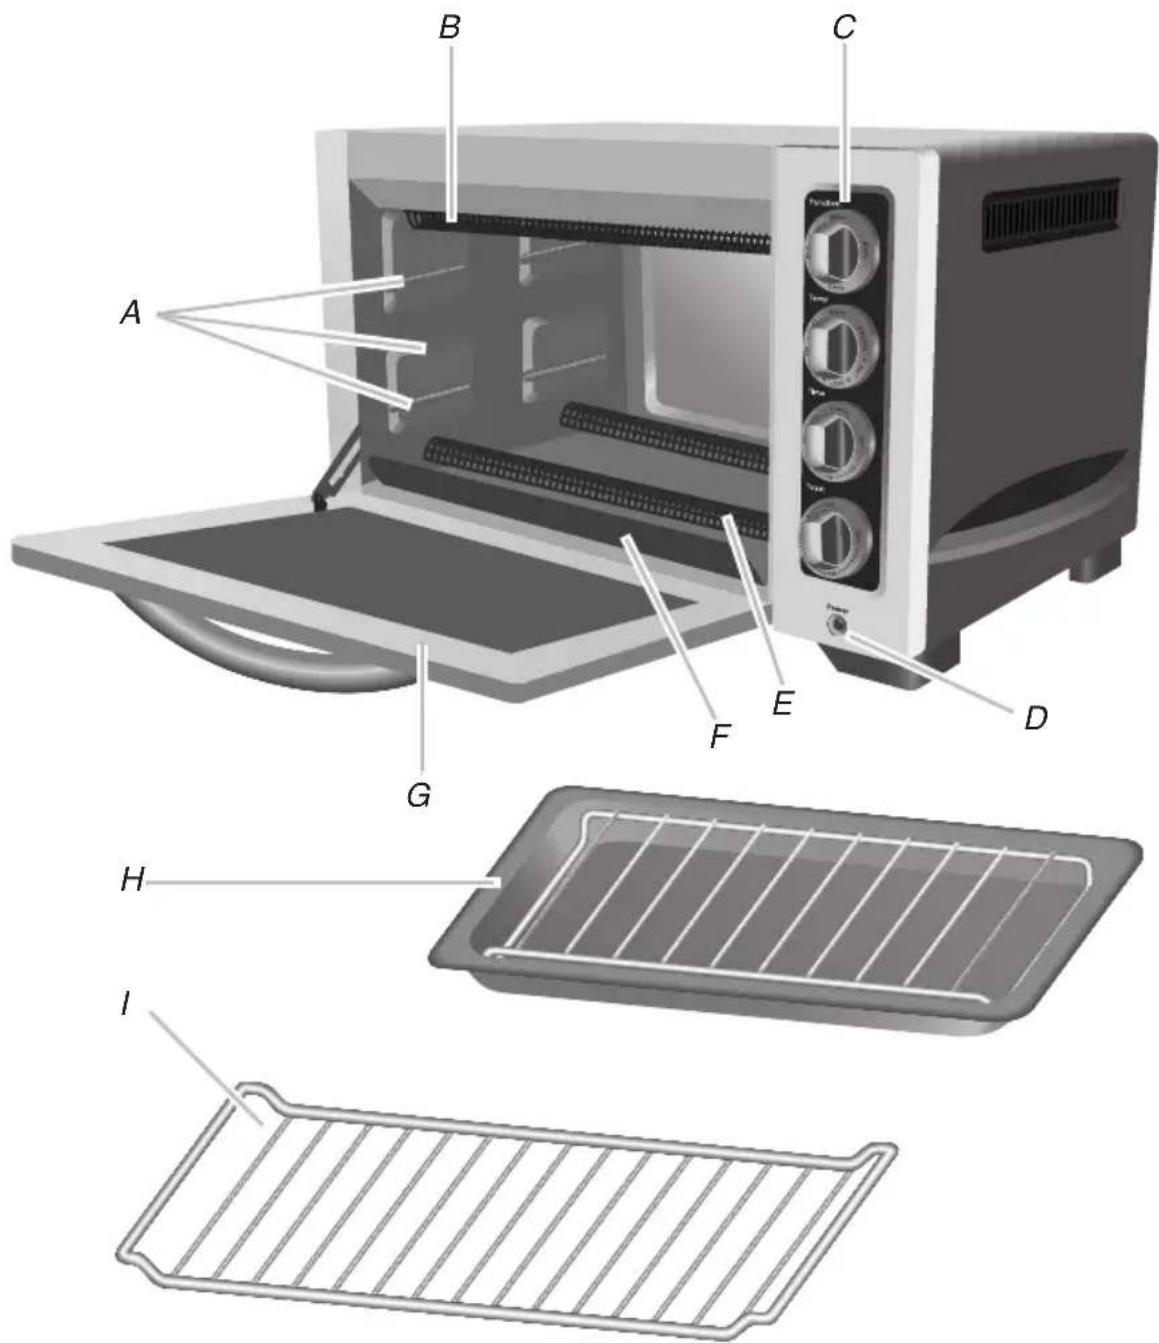
KITCHEN AID® COUNTERTOP OVEN FEATURES
12" (30.2 cm) Standard Model KCO22 Features
A. Rack-positioning slots
B. Upper cooking elements
C. Countertop oven controls: Function, Temp, Time and Toast
D. Power on indicator light
E. Lower cooking elements
F. Removable crumb tray
G. Countertop oven door
H. Broiler pan with grill
- 2 position countertop oven rack; up or down (2)
12" (30.2 cm) Convection Bake Model KCO223 Features
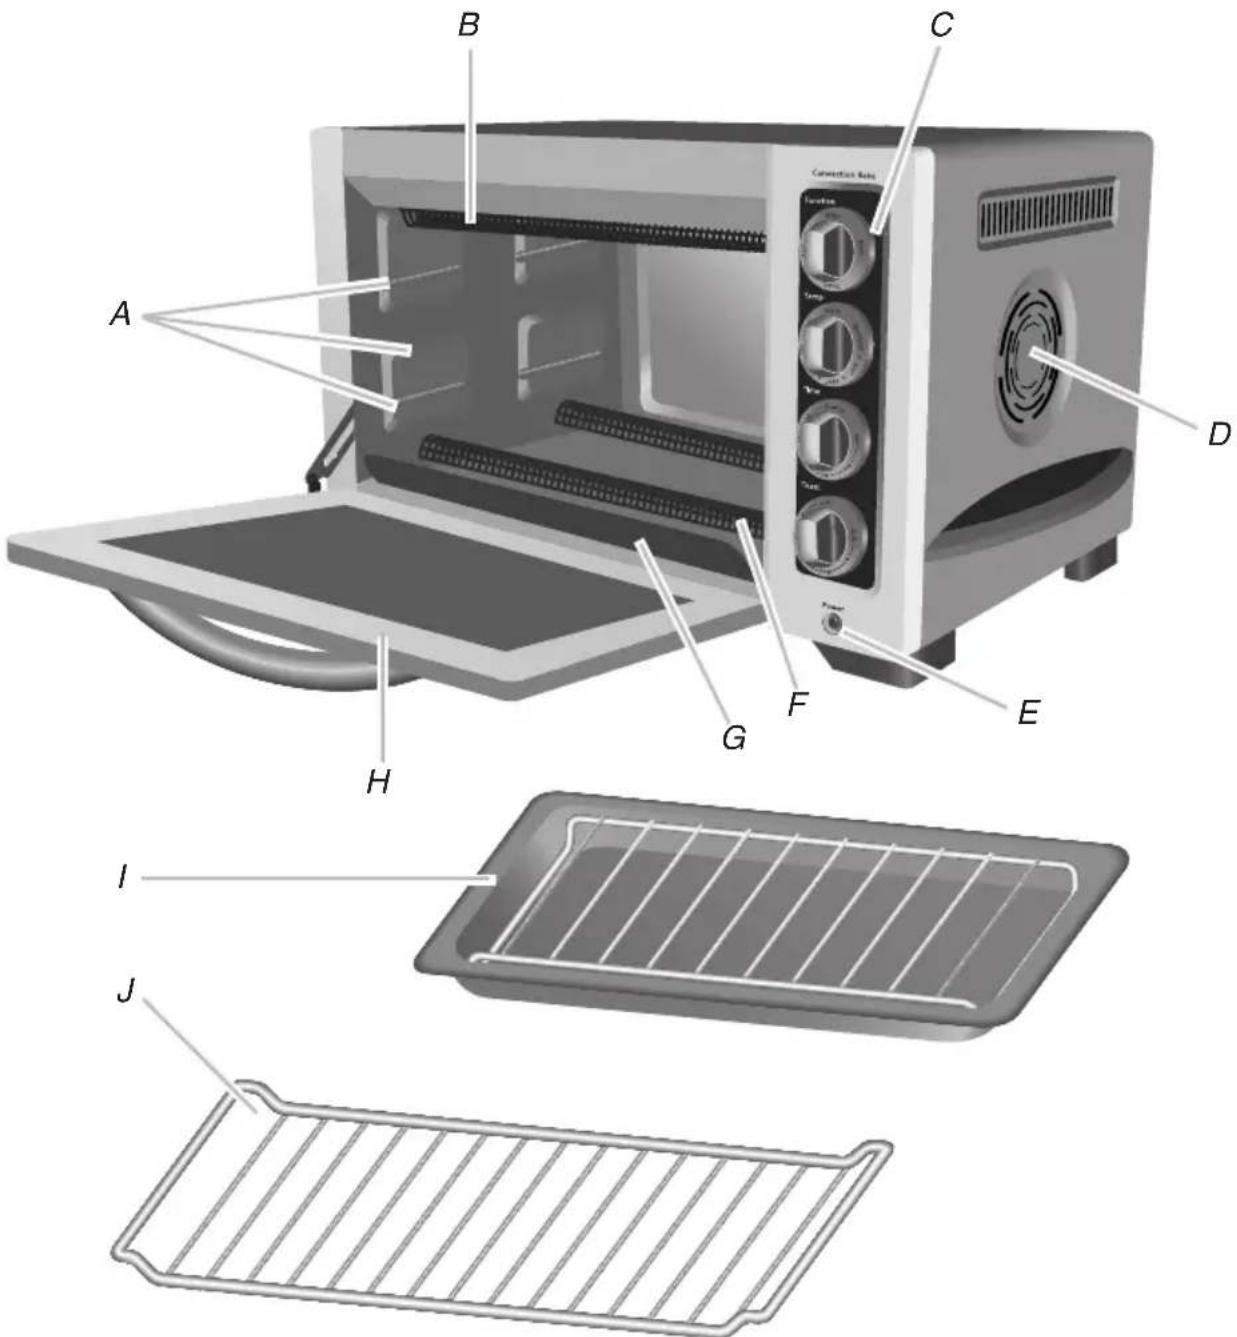
A. Rack-positioning slots
B. Upper cooking elements
C. Countertop oven controls: Function, Temp, Time and Toast
D. Convection Bake fan
E. Power on indicator light
F. Lower cooking elements
G. Removable crumb tray
H. Countertop oven door
I. Broiler pan with grill
J. 2 position countertop oven rack; up or down (2)
KITCHENAID® COUNTERTOP OVEN CONTROLS
This manual covers different models. The appearances of the items shown here may not match those of your model.
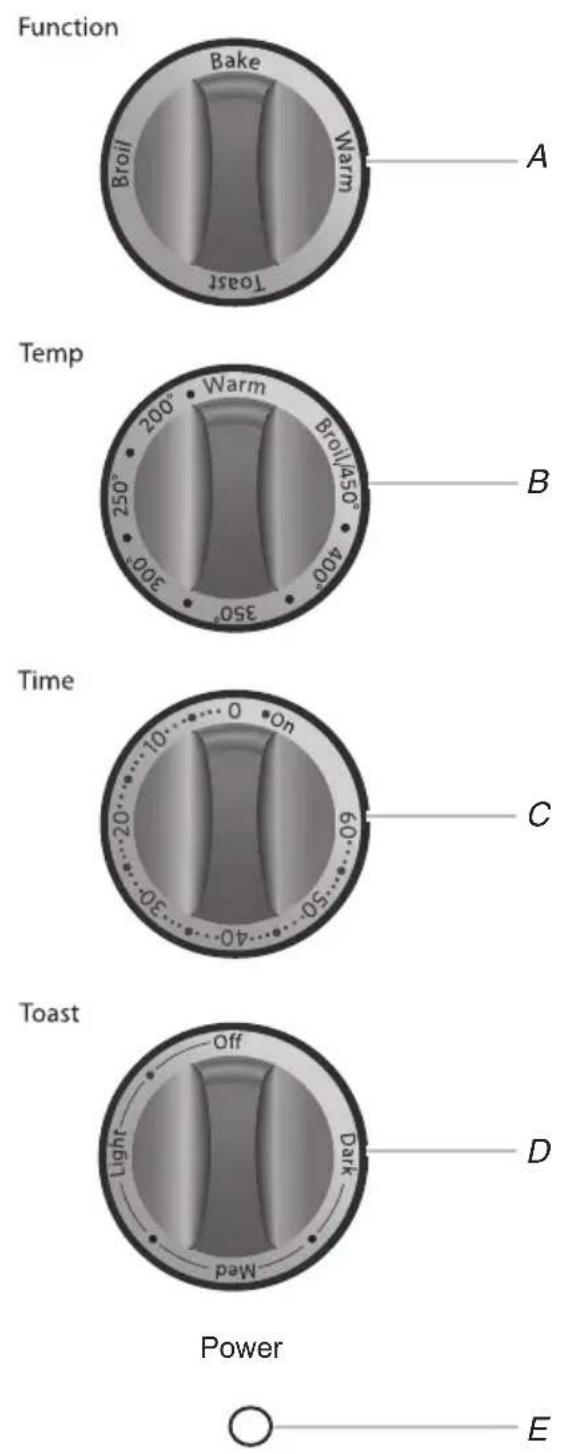
A. Function control knob
B. Temperature control knob
C. Time control knob
D. Toast control knob
E. Power on indicator light
Countertop Oven Features
This manual covers different models. The appearances of the items shown here may not match those of your model.
Cooking Elements
Four cooking elements produce up to 1440 watts for baking, broiling, toasting, and warming for even heating.
Control Panel
Four large knobs have versatile settings for Function, Temperature, Time and Toast. The Power on indicator light glows blue when the oven is operating.
Broil Pan with Grill
An easy-to-clean broil pan is used with a special grill for baking, broiling, and warming. The broil pan with grill can be placed directly on the oven rack in the desired location for cooking.
Countertop Oven Racks
The 6-slice capacity racks are reversible for optimal cooking positions.
Countertop Oven Cavity
The 12" (30.2 cm) deep, 0.6 cu. ft (0.018 cu. m) oven cavity features a nonstick coating for ease of cleaning.
Toast Timer Control
For more accurate toasting; dark, medium or light. The timer control bell will sound when the desired toasting selection is ready.
Cook Timer
The countertop oven has a cook timer that can be used for up to 60 minutes of continuous cooking.
Constant "On" Feature
The constant “on” feature allows extended cooking time up to 4 hours. Turn the Time control knob to the left to enable the constant “on” feature. The constant “on” feature can be used in combination with the Bake, Broil or Warm functions. Turn the Time control knob to “0” to turn “off” the constant “on” feature.
NOTE: The oven has a 4 hour auto shutoff feature. If the constant “on” feature is being used, the oven will automatically shut off after 4 hours and the power on indicator light will flash rapidly.
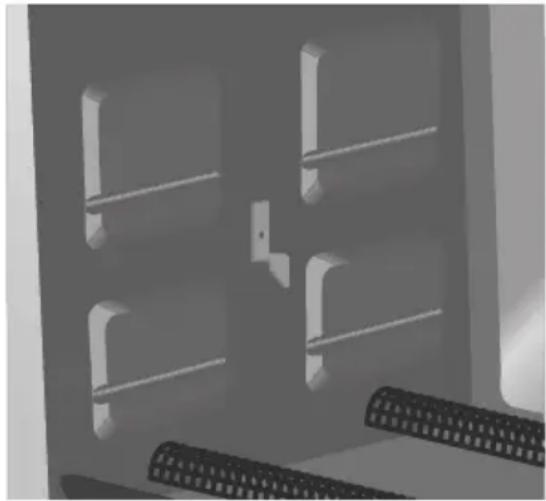
Rack-Positioning Slots
Upper, middle and lower slots along the oven sides, combined with the reversible oven rack, can hold the food in up to 6 cooking positions. The middle rack position slot contains a rack stop.
natural_image
3D rendered mechanical components with no visible text or symbolsRemovable Crumb Tray
The Crumb tray is located inside the oven and can be accessed by opening the oven door for cleaning. Hand washing is recommended.
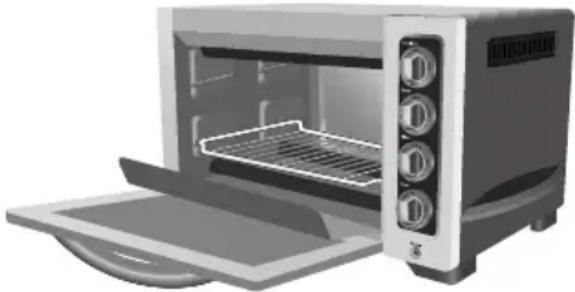
natural_image
Illustration of a microwave oven with three rotary knobs and a grating tray (no text or symbols)Countertop Oven Door
The durable metal-framed door has a large stainless steel handle and a see-through, tempered glass window.
Countertop Oven Cabinet
Stylish stainless steel top and control panel are matched to painted side panels.
Convection Bake Feature (model KCO223 only)
An automatic Convection Bake feature on model KCO223 will operate only when the Bake function is selected. The Convection Bake function will continuously circulate heat while baking.
Heated air is generated and circulates heat at the desired temperature by the built-in fan. For better cooking results use the right cooking pan to allow for proper air circulation.
PREPARING THE KITCHENAID® COUNTERTOP OVEN FOR USE
Before First Use:
- Place the countertop oven on a dry, flat, level surface such as a countertop or table.
- Be sure the sides, back and top of the oven are at least 4" (10.16 cm) away from any walls, cabinets or objects on the counter or table.
- Remove all accessories and wash in hot, sudsy water. Dry thoroughly before placing in the oven.
- Remove all packaging materials and labels, if present.
NOTE: Upon first use, the oven may produce light smoke. This is normal.
Before Each Use:
- Remove all items not required for the next cooking procedure.
WARNING

Electrical Shock Hazard
Plug into a grounded 3 prong outlet.
Do not remove ground prong.
Do not use an adapter.
Do not use an extension cord.
Failure to follow these instructions can result in death, fire, or electrical shock.
- Plug into a grounded 3 prong outlet. The countertop oven should be the only appliance operating on the circuit.
- The countertop oven is now ready to use.
KITCHEN AID® COUNTERTOP OVEN USE
Understanding Positions of the oven rack
Food cooks uniformly as warmed air moves around the oven rack. Up to 6 slices of bread may be placed directly on the rack for toasting. This unique 6-position rack also holds the broil pan with grill, baking pans or dishes, and standard bakeware. Here is a guide to adjusting your oven rack for optimal cooking performance.
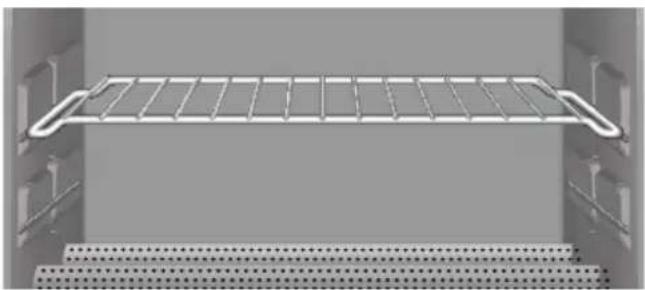
natural_image
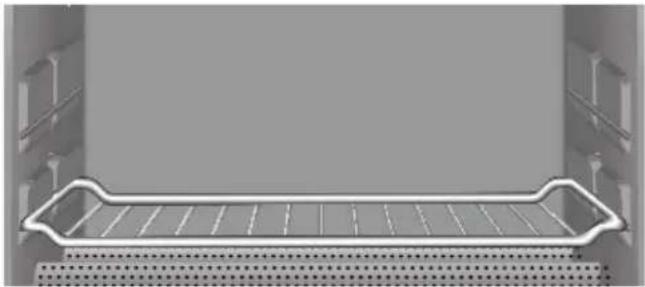
Interior view of a stainless steel rack with two side grilles, no text or symbols visiblePosition A Position B
Use the upper slots along countertop oven walls. Slide in the countertop oven rack, using a rack-up orientation.
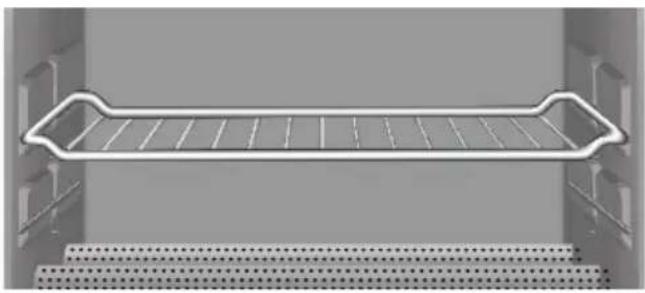
natural_image
Interior view of a storage rack with horizontal metal frame and perforated base (no text or symbols)Use the upper slots along countertop oven walls. Slide in the countertop oven rack, using a rack-down orientation.

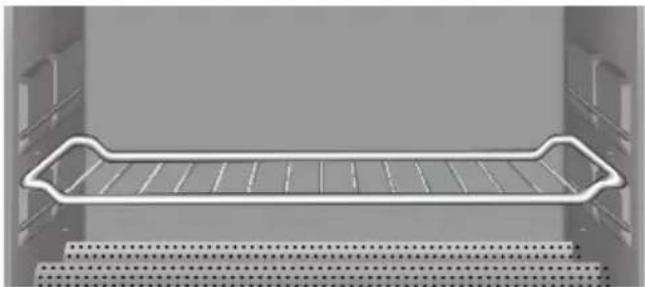
natural_image
Interior view of a storage rack with metal frame and perforated base (no text or symbols)Position C Position D
Use the middle slots along countertop oven walls. Slide in the countertop oven rack, using a rack-up orientation. The middle rack position contains a rack stop.
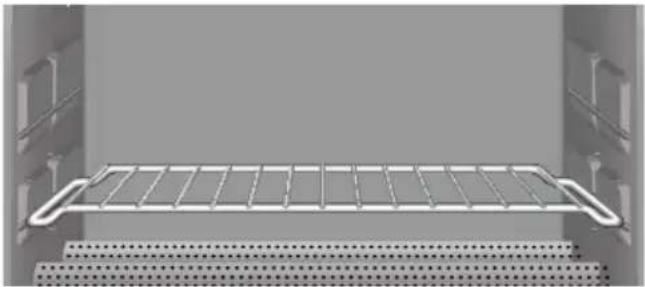
natural_image
Interior view of a refrigerated storage unit with horizontal metal tray and perforated base (no text or symbols)Use the middle slots along countertop oven walls. Slide in the countertop oven rack, using a rack-down orientation. The middle rack position contains a rack stop.
natural_image
3D rendering of a metal rack with perforated base, no text or symbols visiblePosition E Position F
Use the lower slots along countertop oven walls. Slide in the countertop oven rack, using a rack-up orientation.
natural_image
3D rendering of a rectangular metal tray with grid pattern, no text or symbols visibleUse the lower slots along countertop oven walls. Slide in the countertop oven rack, using a rack-down orientation.
Baking (and Reaheating) with the Countertop Oven
Both the top and bottom cooking elements will cycle on and off while baking in order to maintain the desired oven temperature. For Convection Bake model KCO223, the convection fan will only run when the Bake function is selected to circulate heat at the desired oven temperature. The Convection Bake function does what a conventional oven does to bake and roast but generally in a shorter amount of time. For better cooking results use the right cooking pan to allow for proper air circulation. Recipes will vary and cooking time will need to be monitored for desired results.
Recommended Rack Positions:
When first using the oven, position the oven rack as shown by Position C (middle slot, rack up) in the “Understanding Positions of the Oven Rack” section. Then, adjust as needed for your cooking situation. Remember to allow space for food to rise.
To Bake:
- Place the rack in a low position so that the food to be baked or heated will be in the center of the oven.
- Close door.
- Turn the Function control knob to BAKE.
-
Turn the Temperature control knob to the right to the desired temperature. Bake according to package or recipe instructions (usually 350^ F – 425^ F [ 177^ C – 218^ C]).
-
Preheat the oven for 5 minutes for baking (and reheating) by turning the Time control knob to the right past the 10-minute position, then moving it back to the first dot (5-minute position). After 5 minutes, the bell will sound and the oven will automatically shut off.
- Place the food in the center of the rack and close the door.
- Turn the Time control knob to the right to the desired time. When the time has elapsed, the bell will sound and the oven will automatically shut off. Turn the Time control knob to "0" (off) if food is removed before the time has elapsed.
- For cook times longer than 60 minutes, use the Constant "On" feature.
Broiling (and Top Browning) with the Countertop Oven
Only the top cooking elements will heat when this oven function is selected.
Recommended Rack Positions:
Use the upper slots along oven walls. Position the oven rack as shown in Position B (top slot, rack down) in the "Understanding Positions of the Oven Rack" section. Place the broil pan with grill (with food) on oven rack.
NOTE: Food to be broiled should be at least 1" (2.5 cm) from the cooking elements on the top of the oven. For delicate foods such as fish or chicken, or for less browning, place the rack in a lower position.
To Broil:
- Place the food to be broiled on the grill with broil pan, and then close the oven door. The countertop oven does not have an open door broil feature. The door must be closed when broiling.
- Set the Function control knob to BROIL.
-
Turn the Temperature control knob to the right to BROIL/450°.
-
Turn the Time control knob to the right to the desired time.
- Monitor the broiling progress.
- When broiling food on both sides, set the Time control knob for the time desired for one side. When the bell sounds, the oven will automatically shut off. Open the countertop oven door. Use a pot holder to pull the rack and pan about halfway out of the oven. Turn the food, slide the rack and pan back into the countertop oven, and close the door. Turn the Time control knob to a desired time for the other side.
- When the time elapses, a bell will sound and the oven will automatically shut off.
- If food is to be removed before the bell sounds, turn the Time control knob to "0" (off) to shut off the countertop oven. Then, remove the food.
Toasting with the Countertop Oven
Both the top and bottom cooking elements will heat when this function is selected.
Recommended Rack Positions:
Use the lower slots along oven walls. Position the oven rack as shown in Position E (bottom slot, rack up) in the "Understanding Positions of the Oven Rack" section.
To Toast
- For best results, place the bread to be toasted directly on the rack.
- Toast up to six slices of bread. When toasting only one or two slices of bread, center the bread in the oven.
- Close the countertop oven door.
- Turn the Function control knob to the TOAST setting.
- Turn the Temperature control knob to the right to the BROIL/450° setting.
- Turn the Toast control knob to the right to the desired toast color; Dark, Medium or Light. Toast ready bell will not sound unless the control knob is turned past the first dot before turning the control to the LIGHT icon.
TIP: For more consistent results, preheat oven for 5 minutes prior to first batch of toast. First batch of toast is typically lighter than the selected setting on a cold oven. Preheating the countertop oven or adding more time to first batch yields more accurate toasting on first batch.
- The bell will sound and the oven will automatically shut off when the countertop oven has finished toasting.
- Turn the Toast time control knob to "0" (off) if toast is removed before the bell sounds.
- Adjust Time control knob settings as needed to get desired results.
NOTE: It is normal for condensation to form on the door when toasting moist or fresh breads.
IMPORTANT: Countertop oven will operate only if the Toast function is selected and the Toast timer is used to select time. The Time control knob does not work with the Toast function.
Warming (Plus Keeping Warm and Heating) with the Countertop Oven
Only the lower cooking elements will heat when this function is selected.
Recommended Positions:
Select the rack-positioning slots, oven rack, and broil pan with grill positions to match the size of food being heated. When first using the oven, position the oven rack as shown in Position E (bottom slot, rack up) in the “Understanding Positions of the Oven Rack” section. Adjust as needed for your cooking situation.
To Warm:
- Turn the Function control knob to the WARM setting.
- Turn the Temperature control knob to a desired setting. Warm is the lowest temperature setting available.
- Turn the Time control knob to a desired setting.
Countertop Oven Use Tips
Setting very short times
When setting timer for 5 minutes or less, turn the Time control knob beyond the 10-minute mark. Then, turn the knob back to the desired time.
Are guesstimates OK?
Experience will teach you how much time to use for toasting various kinds of bread. Frozen, dark or whole-grain breads require a longer time. Fresh, soft or white breads require a shorter time.
For foods that melt
When cooking small pieces of foods or foods that will melt, use the broil pan. This will keep food from falling onto the cooking elements.
To minimize cleanup
Spray the broil pan with nonstick cooking spray for easier cleanup when cooking wet or sticky foods. Wash pan thoroughly after each use to avoid buildup of cooking spray.
Size limits for food
For best results, food and/or oven-safe containers (see "Food Cooking Tips" section) must fit into the countertop oven without touching the cooking elements or inside walls of oven. The door must close completely.
When oven is off
Turn the Temperature control knob to WARM, or minimum setting, when countertop oven is not in use.
For extended use
When cooking for a long time at high temperatures, you may detect a slight odor from the oven insulation materials. This is normal.
Food Cooking Tips
■ Check food cooking progress through the clear, tempered glass door window. Your countertop oven will be more energy efficient if you open the door less often.
■ If top of food item browns too fast, lower the rack position or reduce oven temperature. If bottom of food item browns too fast, raise rack position or reduce oven temperature.
■ Be sure all foods and/or containers fit in the countertop oven without touching cooking elements or keeping door from closing.
■ Remove all plastic and/or paper wrappers from foods before cooking.
■ Use only loosely covered oven-safe containers. Airtight containers may cause food to boil over or splatter.
■ Follow package directions when preparing frozen or packaged foods. Preheating the oven is not necessary.
■ Oven surfaces can become hot during cooking. Touch only the door handle and knobs during oven operation.
■ Do not place items on top or near countertop oven while in use.
■ Replace cardboard, glass or plastic lids with aluminum foil for use in the countertop oven.
Choosing Bakeware for Countertop Oven Use:
■ The broil pan included with the oven is suitable for items such as cookies, rolls, biscuits, nachos and pork chops.
■ A variety of standard baking dishes, such as a 9" (22.9 cm) round or square cake pan, a 6 cup (1.5 L) muffin pan, small baking sheets, and 1 and 2 qt (0.95 mL and 1.9 L) round, square and rectangular casserole dishes, may be used. The oven door must close completely.
- Choose bakeware made of metal, oven-safe glass, ceramic or silicone.
■ Use lowest oven rack position when using deep, oven-safe glass or ceramic containers and allow at least 1" (2.5 cm) airspace between the top of the container and the upper cooking elements.
■ Do not use glass lids. If a cover is desired, use a loosely fitted sheet of aluminum foil shiny side up or down.
■ Many convenience foods are packaged in nonmetallic containers suitable for use in microwave ovens. Check package directions to determine whether the container is suitable for use in a regular oven.
KITCHENAID® COUNTERTOP OVEN CARE
Cleaning Your Countertop Oven
■ Make sure the Time control knob is in the 0 (off) position. Then, unplug from the wall socket before cleaning.
■ Allow oven and accessories to cool completely before cleaning.
■ Do not use abrasive cleaners or metal scouring pads. They could scratch the surface.
■ Wipe the outside of the oven with a clean, damp cloth and dry thoroughly. A nonabrasive liquid cleaner may be used for stubborn stains. Rinse and dry thoroughly.
■ Hand washing is recommended for racks and pan. Remove all items from the countertop oven. Wash the rack, broil pan, and grill in hot, sudsy water. Rinse and dry thoroughly. To clean the crumb tray, slide it out of the oven and brush off crumbs. Wipe with a damp cloth and dry thoroughly.
NOTE: The oven rack, broil pan and grill are dishwasher safe, but hand washing is recommended.
■ To remove baked-on stains, scrub with a paste made from baking soda and water. Rinse and dry thoroughly.
■ The walls on the inside of the oven have a nonstick coating for easy cleaning. Remove heavy spatter after use with a nylon or polyester mesh pad, sponge or cloth dampened with warm water. Dry with a paper towel or soft, dry cloth.
IMPORTANT: Do not use cleaning agents, cleansers or metal scouring pads on the inner oven coating as they may reduce its effectiveness.
TROUBLESHOOTING
■ If your countertop oven should fail to operate, check the following:
WARNING

Electrical Shock Hazard
Plug into a grounded 3 prong outlet.
Do not remove ground prong.
Do not use an adapter.
Do not use an extension cord.
Failure to follow these instructions can result in death, fire, or electrical shock.
Is the countertop oven plugged into a grounded 3 prong outlet?
■ Is the fuse in the circuit to the countertop oven in working order? If you have a circuit breaker box, make sure the circuit is closed. Try unplugging the countertop oven, then plug it back in.
■ Upper cooking elements visibly glow, but bottom cooking elements do not.
The upper cooking elements use higher power for better browning performance. The lower cooking elements are on, but may not visibly glow like the upper cooking elements. This is normal and your countertop oven is working properly.
■ Power on light is flashing rapidly.
The oven has a 4 hour auto shutoff feature. If the constant on feature is being used, the oven will automatically shut off after 4 hours and the power on indicator light will flash rapidly.
■ If the problem cannot be corrected:
See the “KitchenAid Warranty and Service” sections. Do not return the countertop oven to the retailer – retailers do not provide service.
PROOF OF PURCHASE AND PRODUCT REGISTRATION
Always keep a copy of the sales receipt showing the date of purchase of your countertop oven. Proof of purchase will assure you of in-warranty service.
Before you use your countertop oven, please fill out and mail your product registration card packed with the unit. This card will enable us to contact you in the unlikely event of a product safety notification and assist us in complying with the provisions of the Consumer Product Safety Act. This card does not verify your warranty. Please complete the following for your personal records:
Model Number
Serial Number
Date Purchased
Store Name and Location
KITCHENAID® COUNTERTOP OVEN WARRANTY
| Length of Warranty: KitchenAid Will Pay For: | KitchenAid Will Not Pay For: | |
| 50 United States, the District of Columbia, Canada, and Puerto Rico:One-year limited warranty from date of purchase. | 50 United States, the District of Columbia and Canada:Hassle-free replacement of your countertop oven. See the following page for details on how to arrange for replacement.ORIn Puerto Rico:The replacement parts and repair labor costs to correct defects in materials and workmanship. Service must be provided by an Authorized KitchenAid Service Center. To arrange for service, follow the instructions in the “How to Arrange for Warranty Service in Puerto Rico.” | A. Repairs when countertop oven is used in other than normal single family home use.B. Damage resulting from accident, alteration, misuse or abuse or use with products not approved by KitchenAid.C. Replacement parts or repair labor costs for countertop oven when operated outside the country of purchase. |
DISCLAIMER OF IMPLIED WARRANTIES; LIMITATION OF REMEDIES IMPLIED WARRANTIES, INCLUDING TO THE EXTENT APPLICABLE WARRANTIES OF MERCHANTABILITY OR FITNESS FOR A PARTICULAR PURPOSE, ARE EXCLUDED TO THE EXTENT LEGALLY PERMISSIBLE. ANY IMPLIED WARRANTIES THAT MAY BE IMPOSED BY LAW ARE LIMITED TO ONE YEAR, OR THE SHORTEST PERIOD ALLOWED BY LAW. SOME STATES AND PROVINCES DO NOT ALLOW LIMITATIONS OR EXCLUSIONS ON HOW LONG AN IMPLIED WARRANTY OF MERCHANTABILITY OR FITNESS LASTS, SO THE ABOVE LIMITATIONS OR EXCLUSIONS MAY NOT APPLY TO YOU.
IF THIS PRODUCT FAILS TO WORK AS WARRANTED, CUSTOMER'S SOLE AND EXCLUSIVE REMEDY SHALL BE REPAIR OR REPLACEMENT ACCORDING TO THE TERMS OF THIS LIMITED WARRANTY. KITCHENAID AND KITCHENAID CANADA DO NOT ASSUME ANY RESPONSIBILITY FOR INCIDENTAL OR CONSEQUENTIAL DAMAGES. This warranty gives you specific legal rights and you may also have other rights which vary from state to state or province to province.
Hassle-Free Replacement Warranty – 50 United States and District of Columbia
We're so confident the quality of our products meets the exacting standards of KitchenAid that, if your countertop oven should fail within the first year of ownership, KitchenAid will arrange to deliver an identical or comparable replacement to your door free of charge and arrange to have your original toaster returned to us. Your replacement unit will also be covered by our one year limited warranty. Please follow these instructions to receive this quality service.
If your KitchenAid ^® countertop oven should fail within the first year of ownership, simply call our toll-free Customer Satisfaction Center at 1-800-541-6390 Monday through Friday, 8 a.m. to 8 p.m. (Eastern Time), or Saturday, 10 a.m. to 5 p.m. Give the consultant your complete shipping address. (No P.O. Box numbers, please.)
When you receive your replacement countertop oven, use the carton and packing materials to pack up your original countnertop oven. In the carton, include your name and address on a sheet of paper along with a copy of the proof of purchase (register receipt, credit card slip, etc.).
Hassle-Free Replacement Warranty – Canada
We're so confident the quality of our products meets the exacting standards of the KitchenAid® brand that, if your countertop oven should fail within the first year of ownership, KitchenAid Canada will replace your countertop oven with an identical or comparable replacement. Your replacement unit will also be covered by our one year limited warranty. Please follow these instructions to receive this quality service.
If your KitchenAid ^® countertop oven should fail within the first year of ownership, take the countertop oven or ship collect to an Authorized KitchenAid Service Centre.
In the carton include your name and complete shipping address along with a copy of the proof of purchase (register receipt, credit card slip, etc.). Your replacement countertop oven will be returned prepaid and insured. If you are unable to obtain satisfactory service in this manner call our toll-free Customer eXperience Centre at 1-800-807-6777.
Or write to us at:
Customer eXperience Centre
KitchenAid Canada
200 - 6750 Century Ave.
Mississauga, ON L5N 0B7
How to Arrange for Warranty Service in Puerto Rico
Your KitchenAid ^® countertop oven is covered by a one-year limited warranty from the date of purchase. KitchenAid will pay for replacement parts and labor costs to correct defects in materials and workmanship. Service must be provided by an Authorized KitchenAid Service Center.
Take the countertop oven or ship prepaid and insured to an Authorized KitchenAid Service Center. Your repaired countertop oven will be returned prepaid and insured. If you are unable to obtain satisfactory service in this manner, call toll-free 1-800-541-6390 to learn the location of a Service Center near you.
How to Arrange for Service after the Warranty Expires – All Locations
Before calling for service, please review the "Troubleshooting" section.
For service information in the 50 United States, District of Columbia, and Puerto Rico,
call toll-free 1-800-541-6390.
Or write to:
Customer Satisfaction Center
KitchenAid Portable Appliances
P.O. Box 218, St. Joseph, MI 49085-0218
Or contact an Authorized Service Center near you.
For service information in Canada, call toll-free 1-800-807-6777.
Or write to:
Customer eXperience Centre
KitchenAid Canada
200 - 6750 Century Ave.
Mississauga, ON L5N 0B7
How to Arrange for Service
Outside These Locations
Consult your local KitchenAid dealer or the store where you purchased the countertop oven for information on how to obtain service.
For service information in Mexico, call the KitchenAid ^® line 01-800-002-2767
How to Order Accessories and Replacement Parts
To order accessories or replacement parts for your countertop oven in the 50 United States, District of Columbia, and Puerto Rico,
call toll-free 1-800-541-6390 Monday through Friday, 8 a.m. to 8 p.m. (Eastern Time), or Saturday, 10 a.m. to 5 p.m.
Or write to: Customer Satisfaction Center KitchenAid Portable Appliances P.O. Box 218 St. Joseph, MI 49085-0218
To order accessories or replacement parts for your countertop oven in Canada,
call toll-free 1-800-807-6777.
Or write to: Customer eXperience Centre KitchenAid Canada 200 - 6750 Century Ave. Mississauga, ON L5N 0B7
To order accessories or replacement parts for your countertop oven in Mexico, For service information in Mexico, call the KitchenAid® line 01-800-002-2767
Notes
CONSIGNES DE SÉCURITÉ DU FOUR DE COMPTOIR
natural_image
3D rendered mechanical component with four vertical slots and a central mounting bracket (no text or symbols)Ramasse-miettes amovible
natural_image
Interior view of a stainless steel rack with two side handles, showing internal structure and mounting brackets (no text or symbols)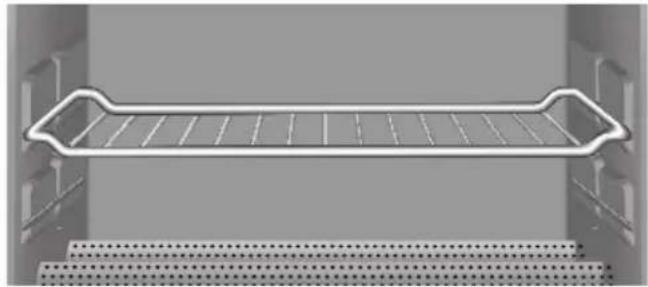
natural_image
Interior view of a storage rack with horizontal and vertical metal bands (no text or symbols)Position A Position B
natural_image
Interior view of a storage rack with metal grating and perforated base (no text or symbols)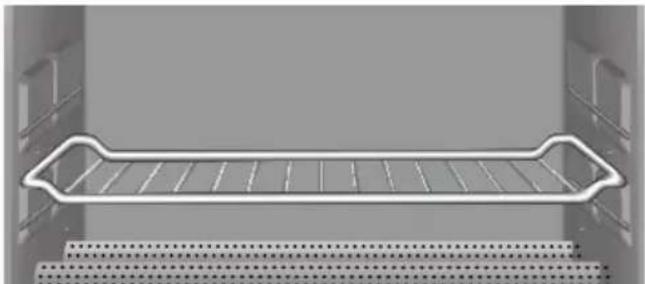
natural_image
Interior view of a storage rack with perforated metal bands (no text or symbols)Position C Position D
natural_image
Exterior view of a metal rack with perforated base (no text or symbols)Position E Position F
natural_image
Interior view of a storage tray with metal frame and perforated base (no text or symbols)Customer Satisfaction Center
KitchenAid Portable Appliances
P.O. Box 218
St. Joseph, MI 49085-0218
natural_image
Warning symbol with exclamation mark inside triangle (no text or numbers)natural_image
3D rendered mechanical components with no visible text or symbolsBandeja para migajas removable
natural_image
Illustration of a microwave oven with open lid and control panel (no text or symbols)Puerta del horno para mostrador
natural_image
Interior view of a stainless steel rack with two side supports and a perforated base (no text or symbols)natural_image
Interior view of a storage rack with perforated metal plate (no text or symbols)natural_image
3D rendering of a metal rack with grid pattern, no text or symbols visiblenatural_image
3D rendering of a horizontal metal rack or shelf with a dotted floor base (no text or symbols visible)natural_image
Exterior view of a modern office building (no signage)natural_image
3D rendering of a rectangular metal tray with perforated base and side supports (no text or symbols)Customer eXperience Centre
KitchenAid Canada
200 - 6750 Century Ave.
Mississauga, ON L5N 0B7
Customer Satisfaction Center
KitchenAid Portable Appliances
P.O. Box 218, St. Joseph, MI 49085-0218
Customer eXperience Centre
KitchenAid Canada
200 - 6750 Century Ave.
Mississauga, ON L5N 0B7
Customer Satisfaction Center
KitchenAid Portable Appliances
P.O. Box 218
St. Joseph, MI 49085-0218
Customer eXperience Centre
KitchenAid Canada
200 - 6750 Century Ave.
Mississauga, ON L5N 0B7
- TABLE DES MATIÈRES
- KITCHEN AID® COUNTERTOP OVEN SAFETY
- Your safety and the safety of others are very important.
- DANGER
- WARNING
- IMPORTANT SAFEGUARDS
- SAVE THESE INSTRUCTIONS
- ELECTRICAL REQUIREMENTS
- KITCHEN AID® COUNTERTOP OVEN FEATURES
- KITCHENAID® COUNTERTOP OVEN CONTROLS
- Countertop Oven Features
- Cooking Elements
- Control Panel
- Broil Pan with Grill
- Countertop Oven Racks
- Countertop Oven Cavity
- Toast Timer Control
- Cook Timer
- Constant "On" Feature
- Rack-Positioning Slots
- Removable Crumb Tray
- Countertop Oven Door
- Countertop Oven Cabinet
- Convection Bake Feature (model KCO223 only)
- PREPARING THE KITCHENAID® COUNTERTOP OVEN FOR USE
- Before First Use:
- Before Each Use:
- KITCHEN AID® COUNTERTOP OVEN USE
- Understanding Positions of the oven rack
- Baking (and Reaheating) with the Countertop Oven
- Recommended Rack Positions:
- To Bake:
- Broiling (and Top Browning) with the Countertop Oven
- To Broil:
- Toasting with the Countertop Oven
- To Toast
- Warming (Plus Keeping Warm and Heating) with the Countertop Oven
- Recommended Positions:
- To Warm:
- Countertop Oven Use Tips
- Setting very short times
- Are guesstimates OK?
- For foods that melt
- To minimize cleanup
- Size limits for food
- When oven is off
- For extended use
- Food Cooking Tips
- Choosing Bakeware for Countertop Oven Use:
- KITCHENAID® COUNTERTOP OVEN CARE
- Cleaning Your Countertop Oven
- TROUBLESHOOTING
- PROOF OF PURCHASE AND PRODUCT REGISTRATION
- Hassle-Free Replacement Warranty – 50 United States and District of Columbia
- Hassle-Free Replacement Warranty – Canada
- How to Arrange for Warranty Service in Puerto Rico
- How to Arrange for Service after the Warranty Expires – All Locations
- For service information in the 50 United States, District of Columbia, and Puerto Rico,
- For service information in Canada, call toll-free 1-800-807-6777.
- How to Arrange for Service
- Outside These Locations
- How to Order Accessories and Replacement Parts
- CONSIGNES DE SÉCURITÉ DU FOUR DE COMPTOIR
- Position A Position B
- Position C Position D
- Position E Position F
- Bandeja para migajas removable
- Puerta del horno para mostrador
Brand : KITCHENAID
Model : RKCO223
Category : Oven