
75500 - Juicer WestBend - Free user manual and instructions
Find the device manual for free 75500 WestBend in PDF.


| Product type | Juice extractor |
| Brand | WestBend |
| Model | 75500 |
| Power supply | 120 V AC only |
| Speeds | 2: I (low) for soft fruits, II (high) for firm fruits and vegetables |
| Materials | ABS plastic; stainless steel micro-mesh blade |
| Dimensions (L x W x H) | 25 x 20 x 30 cm (estimated) |
| Weight | Approximately 2 kg |
| Warranty | 1 year limited (parts and labor) |
| Main functions | Juice extraction from fruits and vegetables; high-speed rotation, juice/pulp separation |
| Maintenance and cleaning | Removable parts are dishwasher safe (top rack); wipe motor base with a damp cloth; do not immerse motor base |
| Safety | Double safety locking system (motor will only start if all parts are properly assembled) |
| Spare parts and repairability | No user-serviceable parts; replacement parts available through customer service |
| Included accessories | Food pusher, cleaning brush, pulp container, pouring spout |
| Usage | Household use only; do not use outdoors |
| Power cord | Short (to prevent tripping hazard); polarized plug |
Frequently Asked Questions - 75500 WestBend
User questions about 75500 WestBend
0 question about this device. Answer the ones you know or ask your own.
Ask a new question about this device
Download the instructions for your Juicer in PDF format for free! Find your manual 75500 - WestBend and take your electronic device back in hand. On this page are published all the documents necessary for the use of your device. 75500 by WestBend.
USER MANUAL 75500 WestBend
natural_image
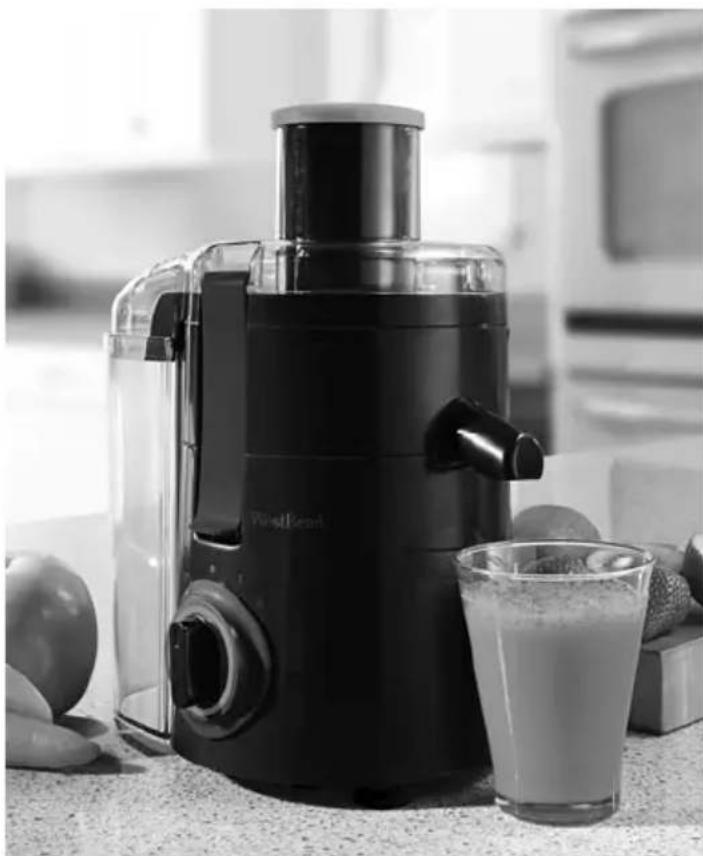
Black-and-white photo of a FastJet juiceizer with a glass of juice and fruit on a table, no visible text or symbols.Register this and other Focus Products Group International products through our website: www.registerfocus.com
Product registration is not required to activate warranty.
Important Safeguards 2
Before Using for the First Time .... 3
Assembling Your Juice Extractor ....3
Using Your Juice Extractor....4
Juicing Guidelines 5
Cleaning Your Juice Extractor 6
Troubleshooting 7
Warranty 8
SAVE THIS INSTRUCTION MANUAL FOR FUTURE REFERENCE
IMPORTANT SAFEGUARDS

CAUTION
To prevent personal injury or property damage, read and follow all instructions and warnings.
When using electrical appliances, basic safety precautions should always be followed including:
- Read all instructions.
- To protect against fire, electric shock, and injury to persons do not immerse cord, plugs, or other electric parts in water or other liquids.
- Close supervision is necessary when this appliance is used by or near children.
- Always unplug from outlet when not in use and before cleaning. Allow to cool before putting on or taking off parts and before cleaning.
- Do not operate any appliance with a damaged cord or plug, after the appliance malfunctions, or has been damaged in any manner. For service information see warranty page. This appliance contains no user-serviceable parts.
- The use of accessory attachments not recommended by Focus Products Group International may cause fire, electric shock, or injury.
- Do not use this appliance outdoors.
- Do not let cord hang over the edge of the table or counter, or touch hot surfaces.
- Do not place on or near a hot gas or electric burner, or in a heated oven.
- Plug cord into wall outlet. To disconnect, turn any control to "off," then remove plug from wall outlet.
- Do not use appliance for other than intended use.
- Do not attempt to repair this appliance yourself.
- A short power-supply cord is provided to reduce risks resulting from becoming entangled in or tripping over a longer cord.
- Longer extension cords are available, but care must be exercised in their use. While use of an extension cord is not recommended, if you must use one, ensure that the marked electrical rating of the extension cord is equal to or greater than that of the appliance. If the plug is of the grounded type, the extension cord must be a grounding-type 3-wire cord. To avoid pulling, tripping or entanglement, position the extension cord so that it does not hang over the edge of the counter, table or other area where it can be pulled on by children or tripped over.
- This appliance has a polarized plug (one blade is wider than the other). To reduce the risk of electric shock, this plug is intended to fit into a polarized outlet only one way. If the plug does not fit fully into the outlet, reverse the plug. If it still does not fit, contact a qualified electrician. Do not attempt to modify the plug in any way.
- Do not use an outlet or extension cord if the plug fits loosely or if the outlet or extension cord feels hot.
- Avoid contact with moving parts.
-
Cease operation if the motor is laboring. If the juice extractor is run for too long, overloaded, or not turned off and cleaned if the motor is laboring your motor may burn out and the warranty is voided.
-
Blades are sharp. Use extreme caution during assembly, while operating, disassembly and cleaning.
- Do not use if parts are broken, cracked, chipped, or loose.
- Do not leave appliance unattended while it is operating.
- Do not remove any parts from base until the motor has stopped completely.
- For household use only.
SAVE THESE INSTRUCTIONS
BEFORE USING FOR THE FIRST TIME
Please check all packaging material carefully before discarding. Accessory parts may be contained within the packaging material.
Thoroughly wash all parts, except the motor base, in warm, soapy water. Rinse and dry thoroughly. The removable parts may be washed in the dishwasher, TOP RACK ONLY. Inspect all parts for damage and discontinue use if any part is damaged.
DO NOT IMMERSE THE MOTOR BASE IN WATER OR ANY OTHER LIQUID.
Caution: Follow these important steps to assemble the juice extractor. This appliance is equipped with a dual safety-lock system. It will not start until all parts are assembled correctly. Always unplug the appliance from electrical outlet before assembling, removing, or cleaning. Never place motor or cord in water or other liquids.
ASSEMBLING YOUR JUICE EXTRACTOR
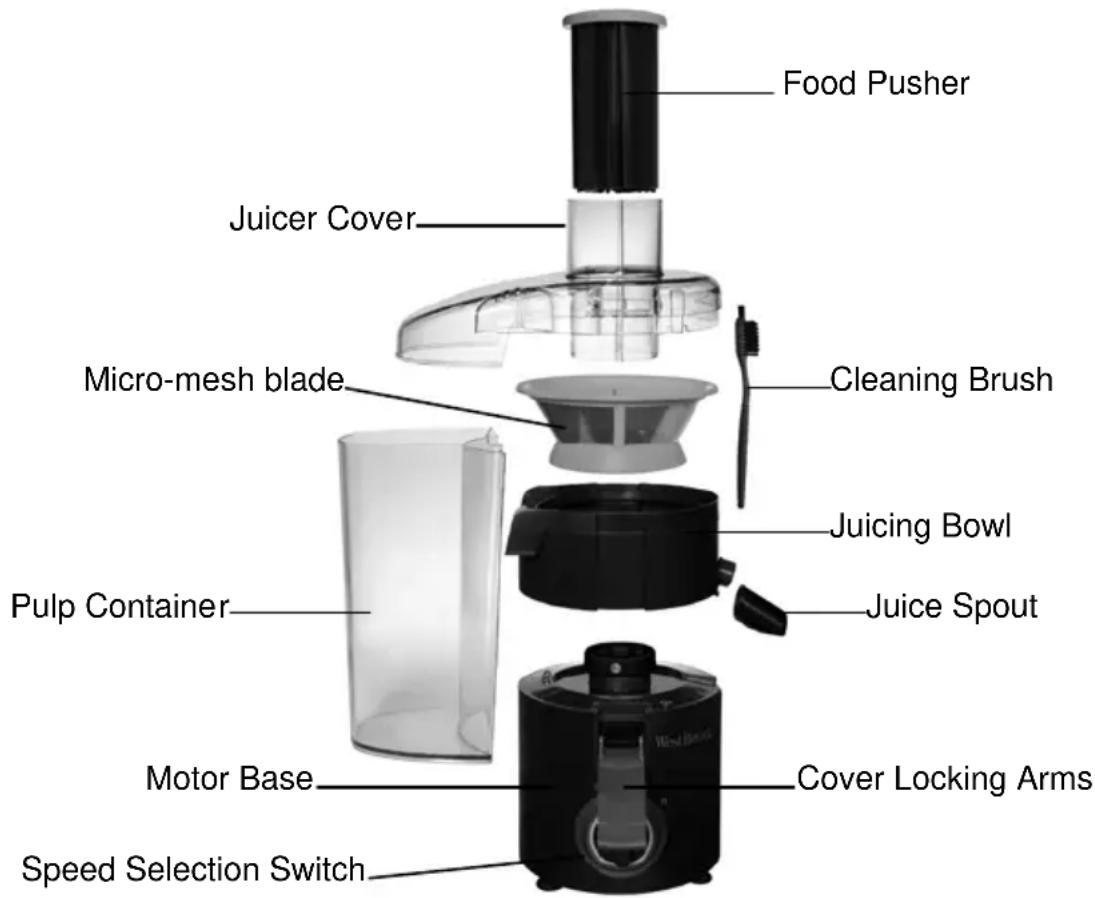
Note: When assembling, you should not need to force any of the parts into place. When the parts are properly aligned they will easily fit into place. Using excessive force could damage the parts.
- Place the appliance on a dry, level, heat-resistant surface, away from any edge.
- Assemble the juice spout to the juicing bowl by placing the spout over the outlet on the juicing bowl, with the hole facing down, and push until firmly seated. Place the juicing bowl over the motor base aligning the juice spout over the notch in the motor base and the grooves in the bowl with the locking arms. Press down until it sits flat.
- Place the micro-mesh blade into the juicing bowl. Rotate if necessary to align with the motor coupler and press down firmly until the micro-mesh blade is tight, level, and sits just below the top of the juicing bowl. CAUTION: There are many small sharp blades in the bottom of the micro-mesh blade for processing the fruits and vegetables. Use care when handling the micro-mesh blade to reduce the risk of injury and/or damage to the appliance.
- Center the juicer cover over the juicing bowl. Swing the cover locking arms up into the grooves in the juicer cover and press down to snap in place. Make sure the cover locking arms are locked securely into place on both sides of the juicer cover. If the cover locking arms are not locked in place, the juice extractor will not operate.
- Slide the pulp container into place under the pulp outlet chute of the juicer cover.
- Insert the food pusher down the juicer cover. Place a 5" cup below the juice spout to collect juice. We advise placing a dishrag or paper towel below your cup to catch any drips or possible spatter.
- Plug cord into a 120 volt AC electric outlet only.
- Your juice extractor is now ready to use.
- Turn the juice extractor on for a few seconds using "P" (pulse) switch position to ensure everything is functioning and all safety switches have been activated. If the juicer will not turn on, unplug from electrical outlet, disassemble, and check the alignment of all the parts to ensure they are properly positioned. Note: Do not run the juicer dry for more than a few seconds as extended periods of dry operation could cause damage to the juicer.
- Place the appliance on a dry, level, heat-resistant surface, away from any edge. Note: Do not operate this appliance where dust or flour can be suctioned up into the vent openings, as this will cause damage to the appliance.
- Assemble the juice extractor according to the "Assembling Your Juice Extractor" instructions.
- Prepare your fruit and vegetables by washing, and if necessary, cutting down to a size which will fit into the feed chute of the juicer cover. Remove any tough skins, pits, or seeds before juicing. Do not force any fruits or vegetables into the feed chute, always make sure pieces will fit easily to prevent jamming.
- Plug the cord into a 120 volt AC electric outlet only.
-
Turn the juicer on by selecting a speed; “I” (low) or “II” (high). Refer to the “Juicing Guidelines” section of this manual for recommended speed selection.
-
While the motor is running, remove the food pusher and begin to place food into the food chute. Add food then insert the food pusher down into the food chute, slowly pushing the food down into the blade. Do not add too much at one time. Note: For maximum extraction, use a slow, steady, downward pressure on the food pusher. CAUTION: To reduce the risk of injury, never use your fingers or any item other than the food pusher to push the food down into the micro-mesh blade.
Juice should begin to flow out of the juice spout. If the juice does not start flowing as expected, make sure the juice spout is unblocked. Note: If the motor base appears to be laboring try one of the following:
a. Reduce the amount of pressure and speed on the food pusher.
b. Turn juicer to “●” (off), unplug and clean any obstructions.
Continue to add more food until the desired amount of juice has been extracted.
Note: The juicer should not be operated continuously for an extended period of time; never more than two minutes. For the best juice extraction and to help extend the life of the juicer, turn the juicer to “●” (off) after one to two minutes of continuous juicing. Clean the juicer cover and micro-mesh blade and empty the pulp container if necessary before resuming.
- When all food in the juicing bowl has been processed and juice is no longer flowing freely from the juice spout, turn the juicer to “●” (off). Wait for a few seconds until the juice stops flowing before removing the cup from under the spout.
- Unplug the juicer, disassemble and clean all parts according to the instructions provided in the "Cleaning Your Juice Extractor" section of this manual. Note: For easier clean-up, rinse all the parts immediately after juicing to keep juice residue from drying on parts.
JUICING GUIDELINES
• Always wash all fruits and vegetables before juicing.
- For best juicing results, refrigerate fruits and vegetables prior to juicing.
- Using firm fruits and vegetables works best for juicing. Soft or overripe produce tends to leave very wet pulp and clogs the micro-mesh blade.
- Fresh juice is a product of fresh foods and contains no preservatives. To maintain freshness and greatest vitamin content, consume as soon as possible after juicing to prevent oxidation and loss of nutrients.
- Certain foods should have the skin removed (peeled) before juicing if the skins are too tough or not palatable. Examples include; citrus fruits, melons, kiwi, and pineapples. Pineapples should always be cored.
- Always pit foods with hard seeds, pits, or stones. Examples include; cherries, peaches, and plums. Citrus fruit seeds cause a bitter taste and should be removed prior to juicing.
- Pomegranate arils work well, but be sure to remove them from the peel and the inner membrane of the pomegranate.
- Soft textured foods such as oranges, grapes, berries, and strawberries should be juiced at “I” (low). Firmer foods such as apples, celery, carrots, and leafy greens should be juiced at “II” (high).
- Soft or over-ripe fruit can clog the juicer. If this happens, turn the motor base “●” (off), unplug from electrical outlet, disassemble, and clean the parts.
- Loose or leafy vegetables should be bundled together or combined with more substantial type food for best results.
- Wheat grass can be juiced, but must first be wrapped in a leafy vegetable, such as lettuce or spinach leaves, before juicing.
- Do not attempt to juice high-starch fruits and vegetables, such as papayas, bananas, mangoes, avocados, and figs. These do not provide juices.
- It is recommended to juice low-water-content fruits and vegetables, like greens, garlic, and broccoli before high-water-content fruits and vegetables like cucumber, melon, and grapes. This will aid in pushing the low-water-content into the container.
- Add sugar, salt, or other ingredients to the juice if desired and enjoy!
- There are many great juicing recipes online and juicing can be a very creative process where the only limitation is your imagination.
- Always be sure to cease operation if the motor is laboring. If the juice extractor is run for too long, overloaded, or not turned off and cleaned if the motor is laboring your motor may burn out and the warranty is voided.
- For best taste, always stir your juice before serving to combine all the juices.
CLEANING YOUR JUICE EXTRACTOR
Use caution when cleaning the micro-mesh blade.
- Switch motor base "●" (off) and unplug from the electrical outlet.
- Disassemble the juicer. Note: The juicing bowl may have liquid remaining in the bottom. Carefully lift up the juicing bowl to remove the bowl and micro-mesh blade together. Empty liquid contents into the sink. Gently push up on the micro-mesh blade from the bottom and grab by the orange rim to avoid touching the blades. While we do not recommend it, the micro-mesh blade can be removed first, without removing the juicing bowl. Use two hands to carefully pull up on the edge of the micro-mesh blade. CAUTION: There are many small, sharp blades on the micro-mesh blade. To reduce the risk of injury, use extreme care when removing and handling the micro-mesh blade.
- Pay particular attention to properly cleaning the micro-mesh blade which is constructed of a very fine, filter mesh that must be clean and open for proper operation and juicing extraction. Rinse loose pulp from the mesh, then scrub the micro-mesh blade with the included brush. Do not use a metal brush, dishcloth, scouring pad, or sponge. Hold the micro-mesh blade up to the light to ensure the mesh is clean and open. CAUTION: To reduce the risk of injury, do not use the appliance if the micro-mesh blade exhibits excessive wear or damage. Inspect the micro-mesh blade after each cleaning.
- Wash all loose parts, except the motor base in warm, soapy water, rinse thoroughly and dry. All parts except the motor base can be washed in the top rack of the dishwasher. The motor base can be wiped clean with a damp cloth. CAUTION: Never put the motor base in water or other liquid as damage will occur.
Note: Some fruits and vegetables can stain the plastic parts. To reduce the chance of staining, rinse and clean all parts immediately after juicing. If staining occurs, soak parts in water containing 10% lemon juice. Never soak the parts in bleach or other harsh chemicals.
This appliance has no user-serviceable parts.
TROUBLESHOOTING
MOTOR DOES NOT OPERATE WHEN SWITCHED ON:
No power:
- Check the power source.
Not assembled correctly:
- One of the parts may not be assembled (positioned, aligned or seated) correctly and the safety switches are not activated. Make sure all the parts are assembled correctly and the cover is locked in place.
Motor overheated:
- Check to ensure the micro-mesh blade, juicer cover, or pulp container are not clogged.
- Check to ensure powder, dust, or liquid has not been suctioned up into the motor through the vents on the bottom.
- The juice extractor was run for too long, overloaded, or not turned off and cleaned. If this has happened, the warranty is voided.
MOTOR STALLS:
Too aggressive:
- Allow a few seconds for the motor to get up to full speed before adding food.
- Reduce the pressure and speed of the food introduction.
Clogged juicer:
- Soft fruit, over-ripe fruit or leafy vegetables can clog the juicer. If this happens, clean the juicer according to the cleaning instructions and try blending with firmer fruit or vegetables.
Excess pulp buildup in the micro-mesh blade and cover:
- Check to ensure the micro-mesh blade is properly cleaned and the filter mesh is clear of debris.
PULP TOO WET OR NO JUICE OUTPUT:
Juice spout is clogged:
- Check to ensure the juice spout is clean and open.
Excessive pulp buildup:
- Clean the micro-mesh blade, juicer cover and juicing bowl.
- Slow down the juicing process by putting less pressure on the food pusher.
JUICER LEAKS:
- Check to ensure all the parts have been cleaned and assembled correctly.
- Check to ensure the juice spout is open and not clogged.
JUICE SPATTERING:
- Use a cup that is 5 inches tall with a wide opening. If your cup is not tall enough or wide enough, there may be excess spattering. For easier cleanup, place a dishrag or paper towel below your cup.
PRODUCT WARRANTY
Appliance 1 Year Limited Warranty
Focus Products Group International, LLC (“the Company”) warrants this appliance from failures in the material and workmanship for one (1) year from the date of original purchase with proof of purchase, provided that the appliance is operated and maintained in conformity with the Instruction Manual. Any failed part of the appliance will be repaired or replaced without charge at the Company’s discretion. This warranty applies to indoor household use only.
This warranty does not cover any damage, including discoloration, to any non-stick surface of the appliance. This warranty is null and void, as determined solely by the Company, if the appliance is damaged through accident, misuse, abuse, negligence, scratching, or if the appliance is altered in any way.
THIS WARRANTY IS IN LIEU OF ALL IMPLIED WARRANTIES, INCLUDING WARRANTIES OF MERCHANTABILITY, FITNESS FOR A PARTICULAR PURPOSE, PERFORMANCE, OR OTHERWISE, WHICH ARE HEREBY EXCLUDED. IN NO EVENT SHALL THE COMPANY BE LIABLE FOR ANY DAMAGES, WHETHER DIRECT, INDIRECT, INCIDENTAL, FORSEEABLE, CONSEQUENTIAL, OR SPECIAL ARISING OUT OF OR IN CONNECTION WITH THIS APPLIANCE.
If you think the appliance has failed or requires service within its warranty period, please contact the Customer Care Department at (866) 290-1851, or e-mail us at customercare@focuspg.com. A receipt proving the original purchase date will be required for all warranty claims, hand written receipts are not accepted. You may also be required to return the appliance for inspection and evaluation. Return shipping costs are not refundable. The Company is not responsible for returns lost in transit.
Valid only in USA and Canada
REPLACEMENT PARTS
Replacement parts, if available, may be ordered directly from the Company several ways. Order online at www.westbend.com, e-mail customercare@focuspg.com, over the phone by calling (866) 290-1851, or by writing to:
Focus Products Group International, LLC.
Attn: Customer Care Dept.
P. O. Box 2780
West Bend, WI 53095
To order with a check or money order, please first contact Customer Care for an order total. Mail your payment along with a letter stating the model or catalog number of your appliance, which can be found on the bottom or back of the appliance, a description of the part or parts you are ordering, and the quantity you would like. Your check should be made payable to Focus Products Group International, LLC.
Your state/province's sales tax and a shipping fee will be added to your total charge. Please allow two weeks for processing and delivery.
This manual contains important and helpful information regarding the safe use and care of your product. For future reference, attach dated sales receipt for warranty proof of purchase and record the following information:
Date purchased or received as gift: ____
Where purchased and price, if known: ____
Item number and Date Code (shown bottom/back of product): ____
NOTES
WestBend®
EXTRACTEUR DE JUS
Mode d'Emploi
natural_image
Black-and-white photo of a FastJet brand juice maker with a glass of juice and fruit on a table (no visible text or symbols)Accumulation excessive de pulpe:
Focus Products Group International, LLC.
Attn: Customer Care Dept.
P. O. Box 2780
West Bend, WI 53095
natural_image
Black-and-white photo of a FastJet juiceizer with a glass of juice and fruit on a table, no visible text or symbols.Focus Products Group International, LLC.


- SAVE THIS INSTRUCTION MANUAL FOR FUTURE REFERENCE
- IMPORTANT SAFEGUARDS
- CAUTION
- To prevent personal injury or property damage, read and follow all instructions and warnings.
- SAVE THESE INSTRUCTIONS
- BEFORE USING FOR THE FIRST TIME
- JUICING GUIDELINES
- CLEANING YOUR JUICE EXTRACTOR
- Use caution when cleaning the micro-mesh blade.
- TROUBLESHOOTING
- MOTOR DOES NOT OPERATE WHEN SWITCHED ON:
- No power:
- Not assembled correctly:
- Motor overheated:
- MOTOR STALLS:
- Too aggressive:
- Clogged juicer:
- Excess pulp buildup in the micro-mesh blade and cover:
- PULP TOO WET OR NO JUICE OUTPUT:
- Juice spout is clogged:
- Excessive pulp buildup:
- JUICER LEAKS:
- JUICE SPATTERING:
- PRODUCT WARRANTY
- Appliance 1 Year Limited Warranty
- Valid only in USA and Canada
- REPLACEMENT PARTS
- NOTES
- WestBend®
- EXTRACTEUR DE JUS
- Accumulation excessive de pulpe:
Brand : WestBend
Model : 75500
Category : Juicer