
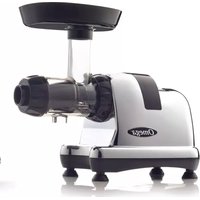
CUBE300 - Juicer OMEGA - Free user manual and instructions
Find the device manual for free CUBE300 OMEGA in PDF.
| Brand | Omega |
| Model | CUBE300 |
| Product type | Masticating juicer |
| Rated voltage | 120 V |
| Rated frequency | 50/60 Hz |
| Motor power | 200 W |
| Rotation speed | 80 rpm |
| Power cord length | 1.6 m (63 in) |
| Main functions | Juice extraction, homogenization, nut butter preparation, sorbets, pasta, baby food, chopping, coffee grinding |
| Included accessories | Juice cone with filter, homogenization cone, 6 nozzles, strainer, cleaning brush, pusher, juice and pulp bowls |
| Safety | Reset switch, thermal protection, safety lock, automatic jam shutdown |
| Maintenance and cleaning | Removable parts washable in soapy water; cleaning brush included for easy maintenance |
| Spare parts and repairability | Spare parts available; modular design for easy disassembly and replacement |
| General information | Compact design with integrated accessory storage; versatile use for solid and liquid foods |
| Warranty | Limited manufacturer's warranty (refer to website for details) |
Frequently Asked Questions - CUBE300 OMEGA
User questions about CUBE300 OMEGA
0 question about this device. Answer the ones you know or ask your own.
Ask a new question about this device
Download the instructions for your Juicer in PDF format for free! Find your manual CUBE300 - OMEGA and take your electronic device back in hand. On this page are published all the documents necessary for the use of your device. CUBE300 by OMEGA.
USER MANUAL CUBE300 OMEGA
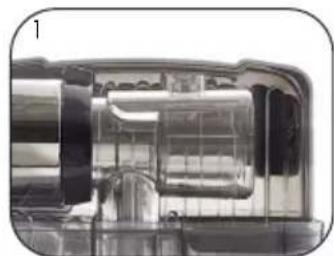
natural_image
Close-up of a transparent cylindrical device with internal components, no visible text or symbols
CUBE300
USER MANUAL
LOW SPEED MASTICATING JUICER AND NUTRITION SYSTEM
MODE D'EMPLOI
EXTRACTEUR DE JUS BROYEUR À ROTATION LENTE ET SYSTÈME DE NUTRITION
MANUAL DEL USUARIO
CONGRATULATIONS on the purchase of your new Omega product.
At Omega, we strive to develop technologically advanced machines that help deliver nutrition and flavor of the highest kind and closest to nature's purest form.
We are driven by you, our brand supporters. Your enthusiasm helps us continue to reinventandrenewourlineofjuicers,highspeedblendersandbeverageequipment.
Our team at Omega thanks you for supporting us for over 50 years!
www.omegajuicers.com/omega-warranty-registration
RECIPES, VISIT:
www.omegajuicers.com/recipes
CUSTOMER SERVICE:
Visit www.omegajuicers.com/contact-omega-juicers
After using your Omega, we kindly ask you to rate the machine on
www.OmegaJuicers.com
TABLE OF CONTENTS
02 - 03 Important Safeguards
04 - 05 Know Your Omega
06 - 07 Juicing and Homogenizing Components
08 - 09 Switch Operation Mode and Assembly for Use
10 - 11 Assembly for Juicing
12 - 13 Assembly for Homogenizing
14 - 16 How to Prepare
17 - 18 Disassembly
19-20 Storage
22 - 23 Accessory Storage
24 - 25 Helpful Hints
26 - 27 Product Specifications
28 - 55 French
56 - 83 Spanish
84 - 85 Notes

IMPORTANT SAFEGUARDS
©
Omega
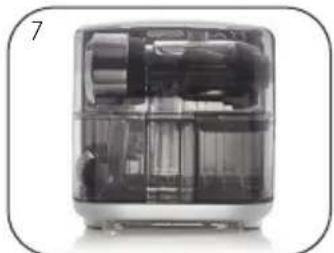
KNOW YOUR OMEGA
KNOW YOUR OMEGA
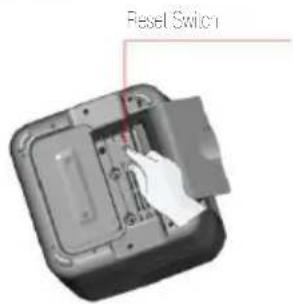
This product uses a reset switch and thermal cutter to protect the motor
If the unit stops running during operation, press the reset switch on the bottom at the unit.
If the unit will still not operate, unoug, wait for 30 minutes, and try again.
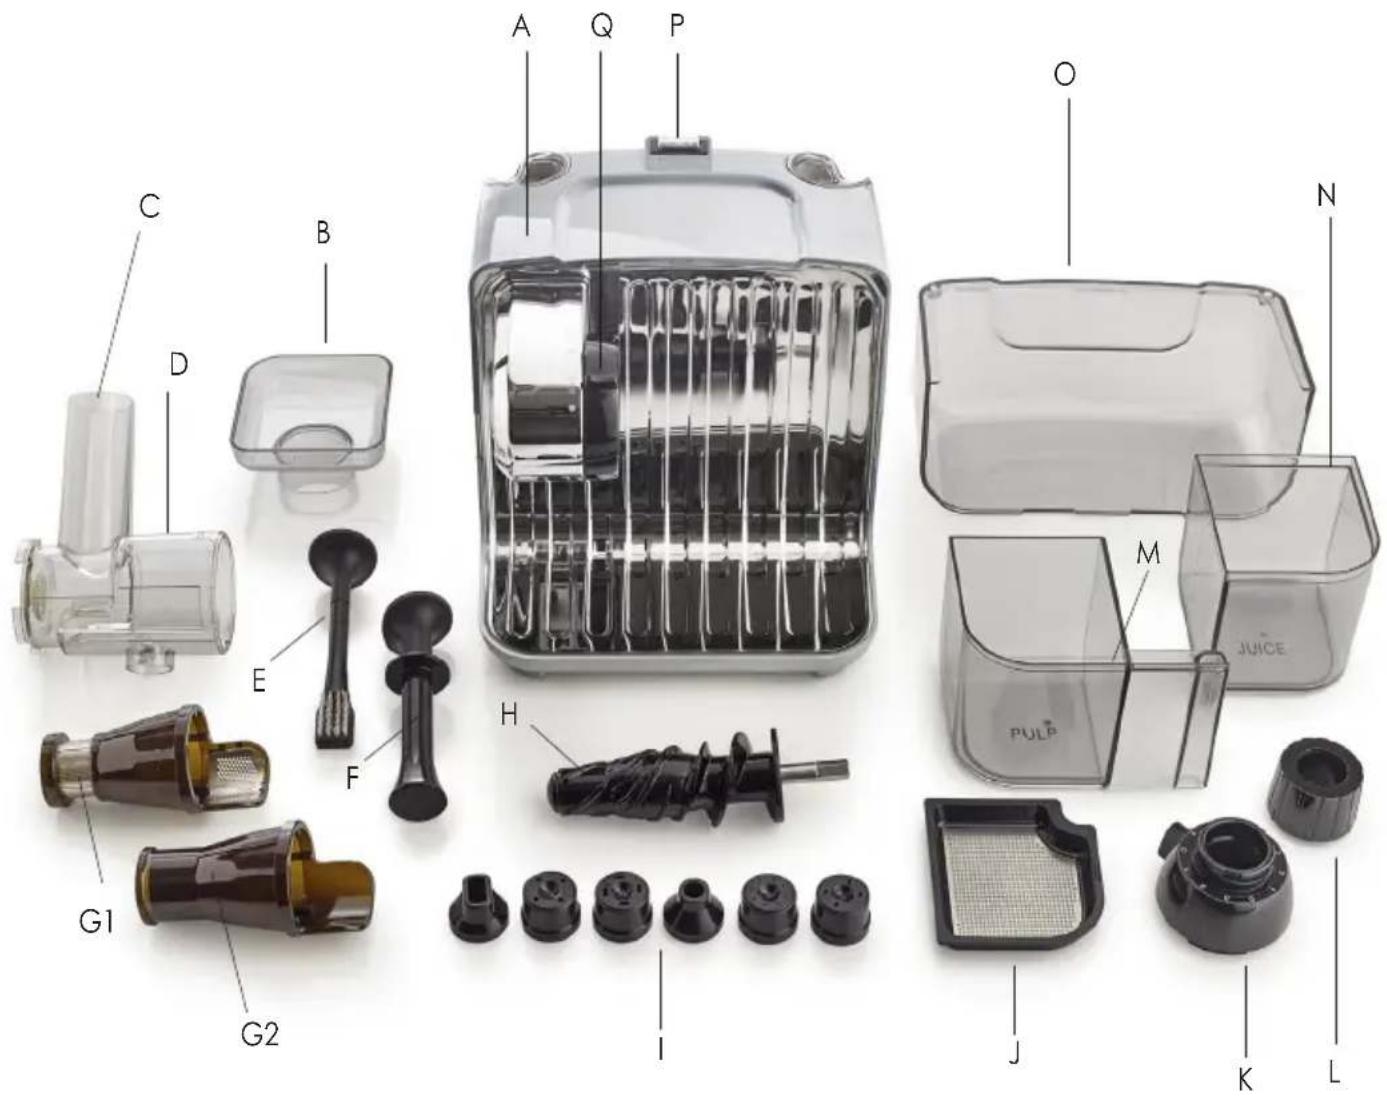
A Housing
B Hopper
C Chute
D Drum
E Cleaning Brush
F Plunger
G1 Juice Cone (with screen)
G2 Homogenizer Cone
H Auger
1 Nozzles
J Sieve
K Adjustable End Cap
L Adjustable Pressure Cap
M Pulp Container
N Juice Container
Front Cover
P Switch Mode
Q Locking Clip
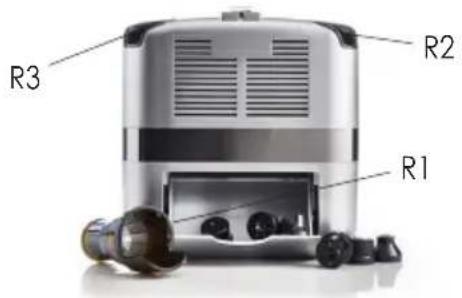
R1 Storage of (G2) & (I)
R2 Storage of (F)
R3 Storage of (E)

JUICING
AND
HOMOGENIZING COMPONENTS
JUICING AND HOMOGENIZING COMPONENTS
FOR JUICING & NUT MILKS

1 Hopper
3 Auger
5 Adjustable End Cap
2 Chute / Drum
4 Juice Cone with Screen
6 Adjustable Pressure Cap
FOR NUT BUTTERS, FRUIT SORBETS, BABY FOOD, MINCING AND EXTRUDING
WARNING: When homogenizer cone is being used, adjustable pressure cap must be detached as indicated on the picture. Otherwise, it will damage the parts.

1 Hopper
3 Auger
5 (6) Nozzle Options
2 Chute / Drum
4 Homogenizer Cone
6 Adjustable End Cap
For mincing only, do not use the nozzle options.

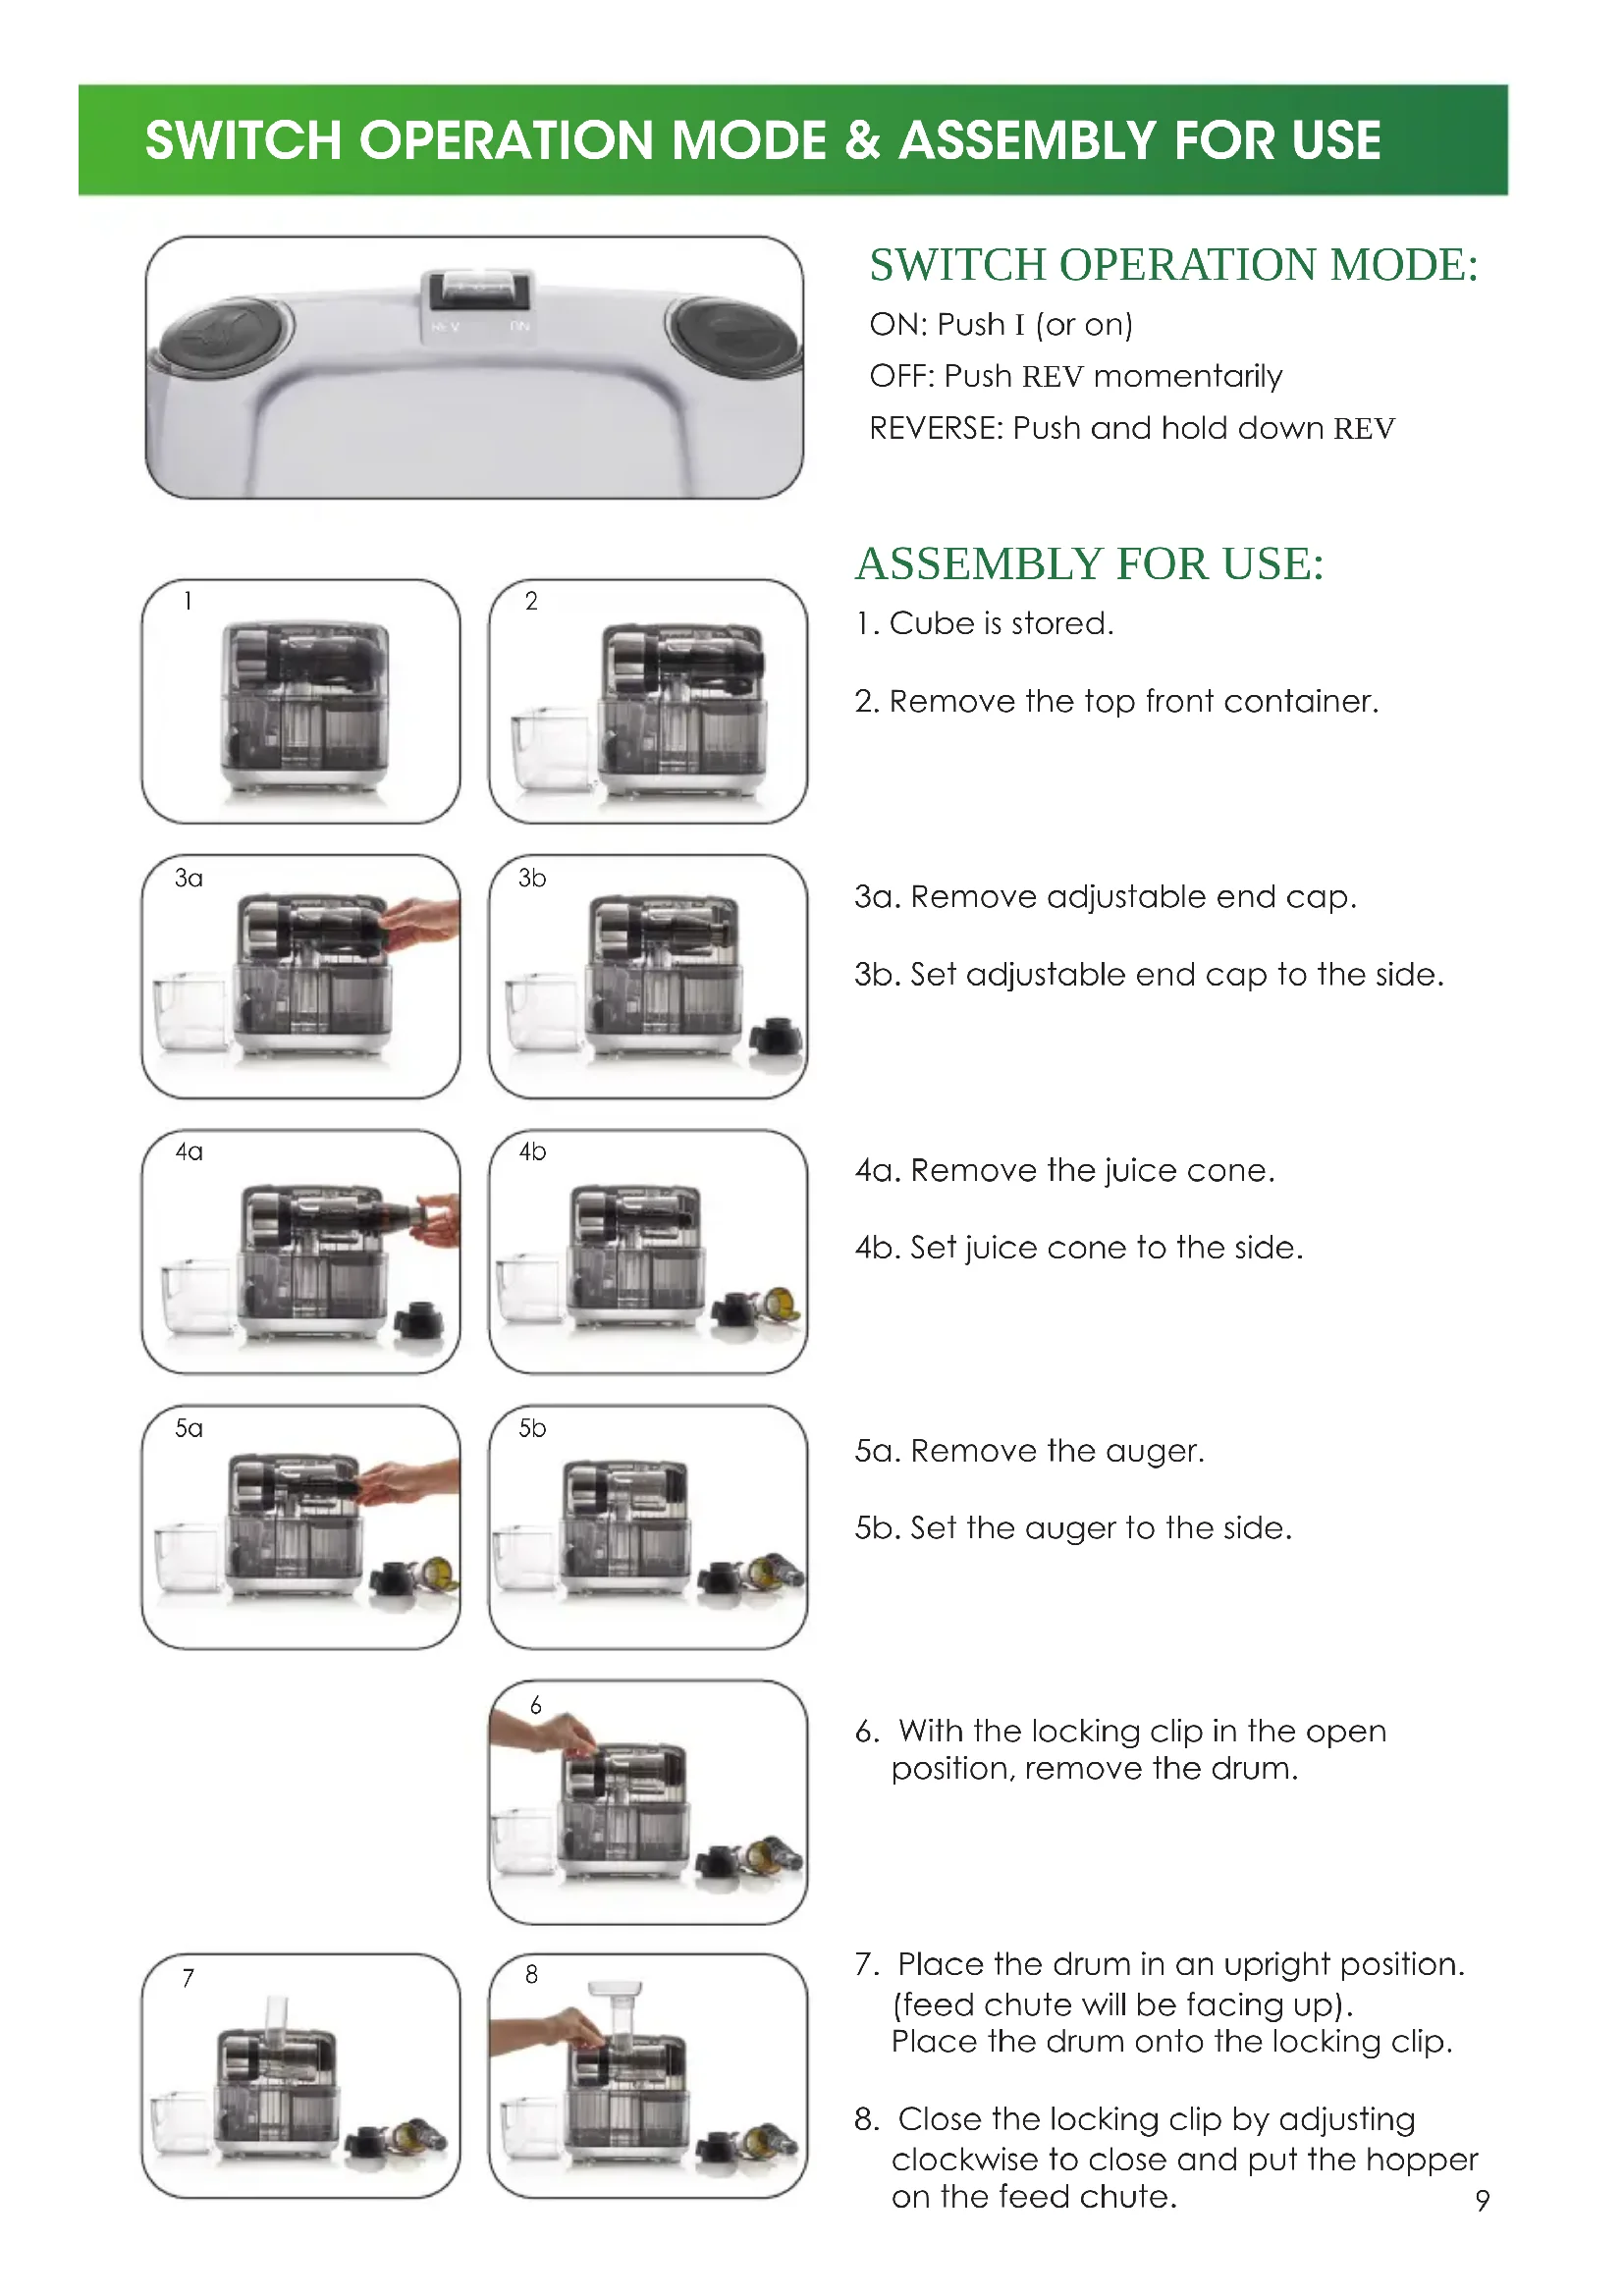
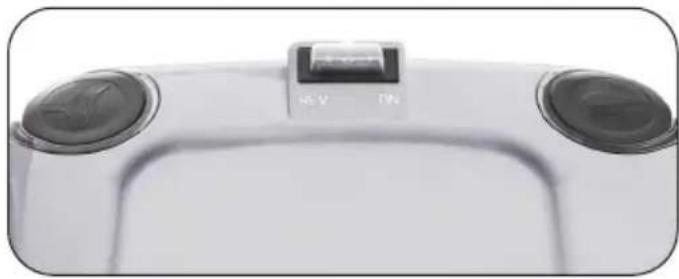
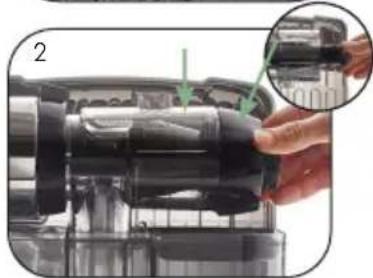
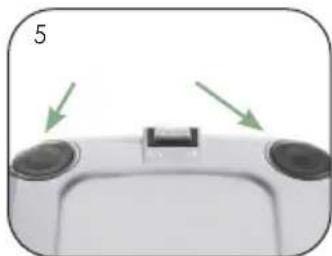
SWITCH OPERATION MODE & ASSEMBLY FOR USE
SWITCH OPERATION MODE & ASSEMBLY FOR USE
natural_image
Close-up of a white electronic device with two circular buttons and a central display (no visible text or symbols)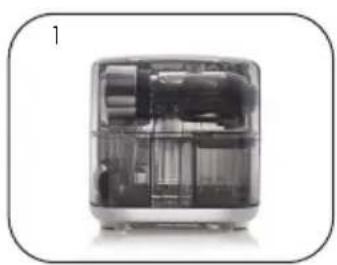
natural_image
Exterior view of a modern office building (no signage)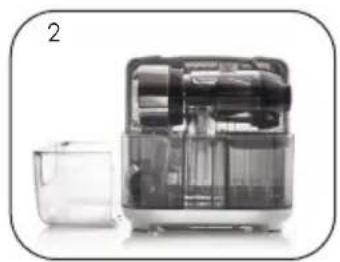
natural_image
Exterior view of a modern kitchen appliance with internal components (no visible text or symbols)
natural_image
Close-up of a hand placing a transparent container into a digital kitchen appliance, with a smaller glass container nearby (no visible text or symbols)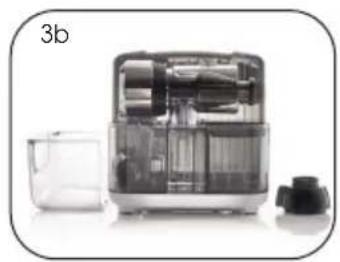
natural_image
Exterior view of a modern kitchen appliance with water filter and control unit (no visible text or symbols)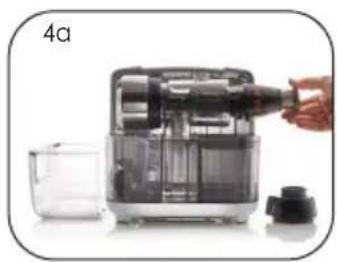
natural_image
Close-up of a hand pouring liquid into a digital kitchen appliance, with a small container nearby (no visible text or symbols)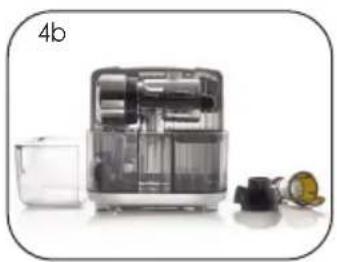
natural_image
Exterior view of a modern kitchen appliance with internal components and a small container (no visible text or symbols)
natural_image
Product photo of a hand placing a container into an open kitchen appliance, with a small container nearby (no visible text or symbols)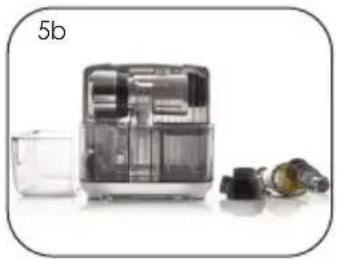
natural_image
Product photo of a smart water purifier with internal compartments and accessories (no visible text or symbols)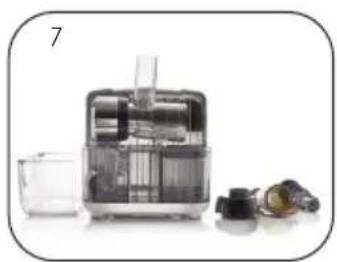
natural_image
Exterior view of a modern office building (no signage)
natural_image
Hand placing a transparent container into a digital kitchen appliance, with other items nearby (no visible text or symbols)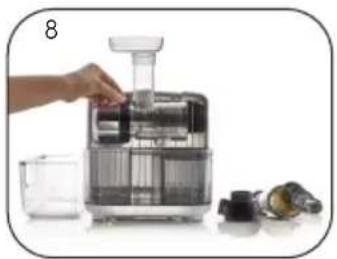
natural_image
Hand placing a small electronic device into a clean, transparent container with a lid and glass nearby (no visible text or symbols)OFF: Push REV momentarily
REVERSE: Push and hold down REV
ASSEMBLY FOR USE:
-
Cube is stored.
-
Remove the top front container.
3a. Remove adjustable end cap.
3b. Set adjustable end cap to the side.
4a. Remove the juice cone.
4b. Set juice cone to the side.
5a. Remove the auger.
5b. Set the auger to the side.
-
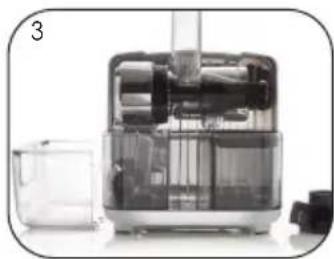
With the locking clip in the open position, remove the drum.
-
Place the drum in an upright position. (feed chute will be facing up). Place the drum onto the locking clip.
-
Close the locking clip by adjusting clockwise to close and put the hopper on the feed chute.
Omega
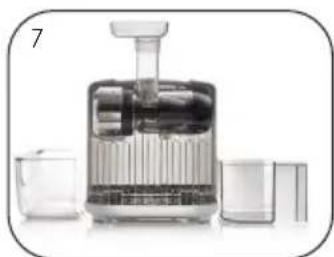
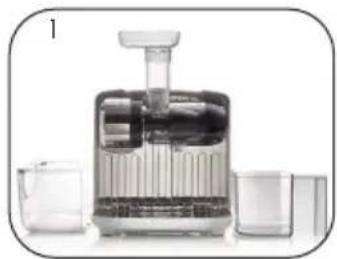
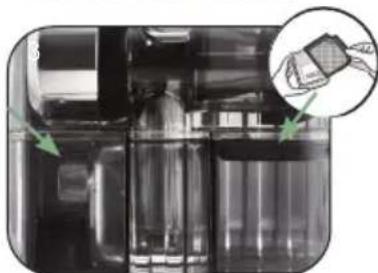
ASSEMBLY FOR JUICING
ASSEMBLY FOR JUICING

natural_image
Interior view of a modern kitchen appliance with transparent casing and internal components (no visible text or labels)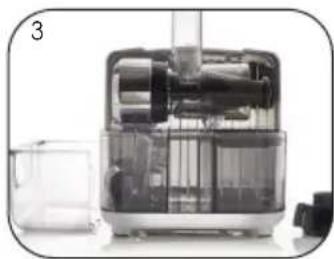
natural_image
Exterior view of a modern kitchen appliance with water filter and control panel (no visible text or symbols)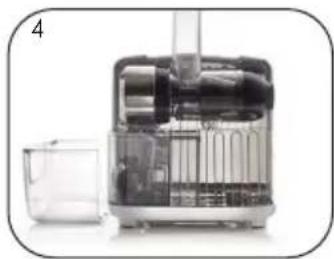
natural_image
Cross-sectional view of a mechanical device with internal components and a separate container (no visible text or symbols)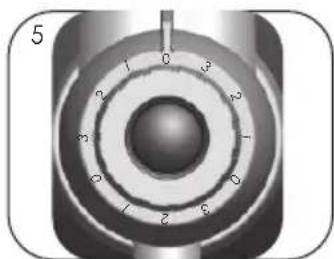
natural_image
Close-up of a mechanical knob or dial with numbered segments (0–3) and a central hub, no visible text or symbols beyond the number 5.
natural_image
Illustration of a hand using a digital juice machine with a magnified inset showing the tip of the device (no text or symbols present)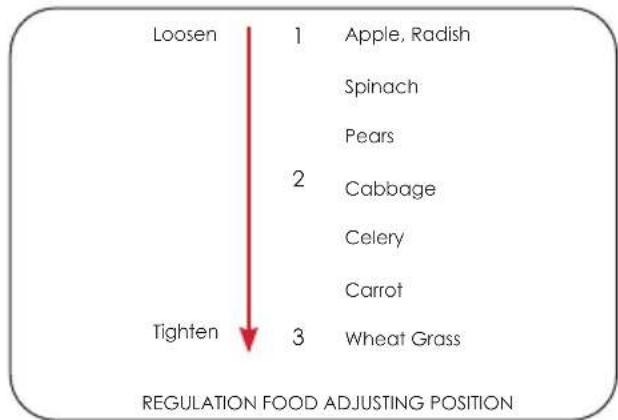
- Follow steps 1-6 in Assembly.
- Place auger into the drum. Straight in, until the auger clicks into place.
- Insert the juicing screen over the auger. Make sure the screen is on the innermost section of the auger, and facing down.
- Place the adjustable end cap onto the end of the drum. Adjust counterclockwise to lock into place.
- Place the adjustable pressure cap onto the adjustable end cap and turn it counter-clockwise until it locks firmly onto the adjustable end cap. The bumps on the adjustable end cap should line up with 0.
- Place the juice bowl and pulp bowl under the respective output. When ready to pour juice into a glass, place the sieve on the juice bowl for additional straining.
Correct Position of Adjustable End Cap:
According to the water content and residue hardness of the fruits to select the adjustable knob position. Tightening and loosening the knob to controls water content of the residue to get the most juice yield. When the food has more water and the residue is more soft. You can loosen the knob to ensure the smooth slag to got maximum juice yield.

ASSEMBLY FOR HOMOGENIZING
ASSEMBLY FOR HOMOGENIZING
natural_image
Exterior view of a modern kitchen appliance with glass and water compartments (no visible text or symbols)-
Follow steps 1-7 in Assembly.
-
Place auger into the drum. Straight in, until the auger clicks into place.
natural_image
Exterior view of a modern office building (no signage)- Insert the homogenizer cone over the auger. The extended part of the homogenizer cone should be facing down.

natural_image
Six black plastic mechanical components arranged in two rows (no text or symbols visible)- Select the nozzle
natural_image
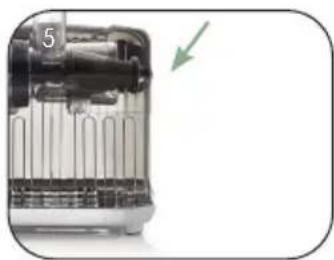
Cross-sectional view of a kitchen appliance with visible internal structure and a green arrow indicating direction (no text or symbols)- Place the selected nozzle inside the homogenizer.

natural_image
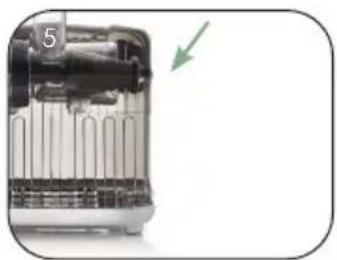
Cross-sectional view of a device with internal components and a green arrow indicating a specific part (no text or symbols visible)- Screw the adjustable end cap onto the end of the drum.
natural_image
Product photo of a glass water dispenser with liquid and three smaller containers (no visible text or symbols)- Place the pulp bowl at the end of the chute to begin homogenizing.

HOW TO PREPARE
JUICE: FRUITS AND VEGETABLES
JUICE: WHEATGRASS AND GREENS
NUT BUTTERS
MILK: ALMOND, COCONUT, SOY, ETC
SORBETS & DESSERTS
PASTA & BREADSTICKS
MINCING & CHOPPING
BABY FOOD
COFFEE GRINDER
©
MILK: ALMOND, COCONUT, SOY, ETC
• Refer to Page 12, Assemble for juicing (using the juice screen).
- Nut milks consist of almonds, pecans, cashews, hazelnuts, etc. You can also make coconut milk and soy milk.
- Soak nuts for 4-8 hours in water.
- Spoon the soaked nuts (and some of the soaking water) down the feed chute. Pour the pulp down the chute again with more soaking water, for a second grinding, more flavor and a creamier texture. You can either stop after the second process or repeat for a third time.
SORBETS / DESSERTS
• Refer to Page 12, Assembly for Homogenizing. Use the ROUND nozzle.
- Make all-natural sweet, frozen treats without the added fat, sugar and calories.
- Thaw frozen fruit for 5-10 minutes. Feed thawed fruit into the feed chute, process and serve.
- Popular frozen fruit sorbets include banana, cherry, blackberry, blueberry, raspberry, strawberry, melon, kiwi, mango, pear, pineapple, peach, grape, orange, and more!
- You can also make frozen lemonades and ice creams with all-natural ingredients.
Recipes can be found on www.OmegaJuicers.com.
PASTA & BREADSTICKS
• Refer to Page 12, Assembly for Homogenizing.
- This machine can to extrude pasta; not make pasta. Make dough by hand or use a mixer.
- Sprinkle a small amount of flour on the pasta, on the Omega hopper and inside the drum to prevent sticking.
- Add water to the dough if it becomes too dry.
To extrude pasta:
- Decide which style of noodle you prefer and place the appropriate nozzle on the drum.
- Shape the pasta dough into balls or tubes that are slightly smaller than the Omega hopper opening.
- Process dough through the Omega. A consistent feeding of dough without any gaps will give you longer noodles as pasta exits. Pasta may be cut with a scissor or a knife to desired length.
- Freshly made pasta should be put in boiling water. Fresh pasta will cook faster than packaged pasta. If you want to make the pasta more flavorful, add spinach, basil or sundried tomatoes. Leftover vegetable juice or pulp may also be mixed into dough for added flavor.
To make breadsticks:
- Use the round nozzle.
- Shape the dough into balls or tubes that are slightly smaller than the Omega hopper opening.
- Process dough through the Omega. A consistent feeding of dough without any gaps. Dough may be cut with a scissor or a knife to desired length.
- Fresh dough sticks should be back immediately for freshness.
MINCING & CHOPPING
• Refer to Page 12, Assembly for Homogenizing. Use the ROUND nozzle.
- Use as a food processor to make marinades, salsas, soups and sauces.
- Chop or grind meat, fish, herbs, soaked rice and beans. Remove any fat from the meat or poultry if not desired in the finished product. Bone and scale fish before processing.
BABY FOOD
• Refer to Page 12, Assembly for Homogenizing. Use the ROUND nozzle.
- Making homemade baby food with your Omega is very rewarding knowing you are giving your baby fresh produce that is nutritious and easily digestible. This also gives your baby regular chances to experience a wide variety of textures and tastes without artificial preservatives or additives.
- Start by cooking the vegetable or fruit. Either steam, bake, or boil. Steaming maintains the most nutrients.
- For Fruits: apples, pears, peaches, plums, mangoes and strawberries, all puree well.
- For Vegetables: potatoes, carrots, yams, broccoli and squash, all puree well.
- Spoon the cooked vegetable/fruit down the chute. If steamed or boiled vegetable or fruit add some of the cooked liquid. Adding the liquid helps preserve any nutrients that may have released into the water during cooking.
COFFEE GRINDER
• Refer to Page 12, Assembly for Homogenizing. Use the ROUND nozzle.
- Place coffee beans into the chute at a slow steady pace. The beans will come out finely ground. Do not add too many beans at a time. There should be no need to grind the beans twice.
- If the coffee bean has a high oil content, you may want to dry the bean out overnight in order to process it easier.

DISASSEMBLY
natural_image
Illustration of a multi-step food drinker with clear liquid and glass cups (no text or labels)
natural_image
Hand using a hand mixer machine to smooth the liquid, with clear glass and small cups nearby (no text or symbols visible)
natural_image
Product photo of a hand mixer with clear internal components and glass cups (no visible text or labels)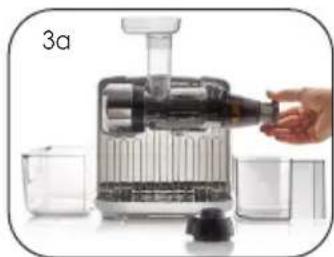
natural_image
Hand pouring liquid into a small machine (no visible text or symbols)
natural_image
Product photo of a mechanical device with transparent casing and accessories (no visible text or symbols)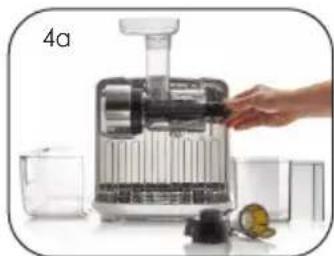
natural_image
Close-up of a hand operating a small glass grainer with a wooden handle, next to a small container and other items (no visible text or symbols)
natural_image
Exterior view of a modern office building (no signage)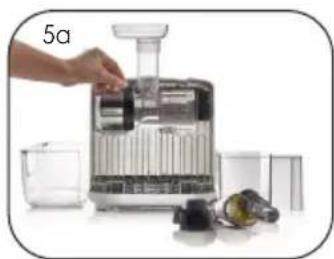
natural_image
Product photo of a hand using a digital food brush to clean or prepare it, with no visible text or symbols.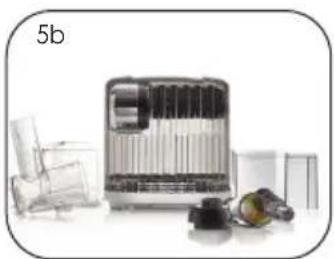
natural_image
Product photo of a medical or laboratory equipment kit with glassware and a labeled part '5b' (no visible text or symbols on main subject)- Remove the juice bowl and the pulp bowl.
2a. Adjust the tension adjust knob clockwise to release it from the adjustable end cap. Remove.
2b. Set adjustable end cap to the side.
3a. Remove the juicing cone (or homogenizer cone) by pulling it straight out.
3b. Set juice cone to the side.
4a. Remove the auger by pulling it straight out.
4b. Set the auger to the side.
- Remove the hopper from the top of the feed chute by pulling it up and off.
5a. To remove the drum, adjust the locking clip counter-clockwise to OPEN. This will release the drum.
5b. Set the hopper and drum to the side.

STORAGE
natural_image
Cross-sectional view of a mechanical assembly (no visible text or symbols)- With the locking clip in the OPEN position, place the drum on the lock knob, upside down, as shown in picture. Close the locking clip.
natural_image
Close-up of a hand inserting a black plastic component into a device (no text or symbols visible)- Insert the auger, juice cone and adjustable end cap into the drum, as shown in picture.
natural_image
Close-up of a transparent container with internal compartments and a magnified inset showing a hand holding a textured object (no text or symbols visible)- Place sieve, adjust the adjustable pressure cap and hopper in the pulp container and juice container, as shown in picture.
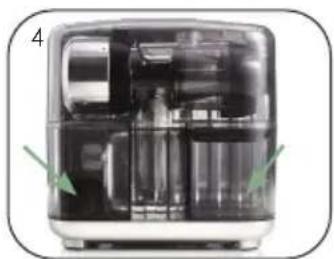
natural_image
Cross-sectional view of a water purifier unit with internal compartments and green arrows indicating flow direction (no text or symbols)- Place the pulp bowl on the left; juice bowl on the right, as shown in picture.
natural_image
Top-down view of a gaming controller with two control buttons and a central screen (no text or symbols visible)- Insert the plunger and cleaning brush in the proper storage hole, on the top rear of the juice cube, as shown in picture.

natural_image
Close-up of a transparent cylindrical device with internal components and a green arrow indicating direction (no visible text or symbols)- Place the front cover on top of the hopper assembly.
natural_image
Exterior view of a modern office building (no signage)- Your cube is ready for storage, as shown in picture.
Omega
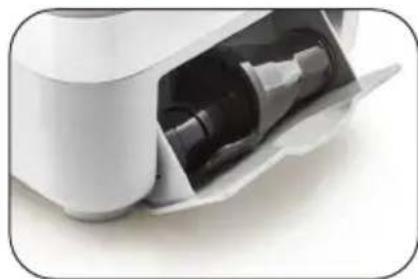
ACCESSORY STORAGE
ACCESSORY STORAGE
natural_image
Close-up of a white electronic device with a black plastic component inserted, showing internal structure (no text or symbols visible)On the back of the Omega Juice Cube is a storage area for the nozzles and the homogenizing cone.
To store, place the six nozzles and homogenizing cone in the storage as featured here.

natural_image
Close-up of a stainless steel kitchen appliance with ventilation grille and central button (no visible text or symbols)Then close the storage area.
Omega
HELPFUL HINTS
CHOOSING THE RIGHT MATERIAL
Juicing Screen
Apples, oranges, pears, grapes, ginger, tomatoes, kiwi Fruit, strawberries, avocados, aloe plant pine tree leaves, kale, radishes, beet tops, (fruit) spinach, carrots, yams, wheat grass
Homogenizer Cone
Red/green pepper, garlic, ginger, herbs, soaked rice and beans, pasta, spaghetti, noodle, dumpling, nut butters and homogenizing and (frozen fruits)
HELPFUL HINTS
- The included sieve, which fits the pulp and juice bowl, may be needed after processing items that have more pulp or foam for your taste. It should be used at the end of the juicing process by pouring all of the prepared juice through the sieve.
- While extracting juice from unpeeled fruits and vegetables, we recommend you thoroughly wash and peel your fresh ingredients to remove accumulated chemicals.
- Cut fruit or vegetables into pieces so that juice may be extracted more thoroughly.
- Turn on the machine and let it run without interruption until all the juice has been extracted.
- When using a combination of soft and firm produce, alternate the items. It is best to start with the softer items and to finish with the firmer items.
- If the pulp in the drum starts to clog, turn off the machine and empty the drum set. Reassemble and resume normal operation.
- Do not juice anything that will change the taste in a negative way. (Example: orange rind)
- Items that are traditionally thrown away for meals may be juiced. (Example: carrot stems)
- Soft produce will process more easily if refrigerated.
- Items like ginger, lemon and beet may be added for taste. They should all be used according to your taste. Although they are listed in many of our recipes, they are optional. Make drinks that suit your personal taste or health needs.
- After placing the last piece of fruit or vegetable into the hopper, keep the machine running for a few seconds longer to ensure the machine has extracted the last drops of juice.
- Clean all parts that come into contact with juice after each use of the Juice Cube.
- Small quantities of wheatgrass/greens will be easier to push down the feed chute. Do not overfill the feed chute.
- When juicing items like wheatgrass/greens, some juice may exit into the pulp bowl and not the juice bowl, this is normal. This may occur until the ejection area is filled with pulp.
- Allow most of the juice to exit before pushing the next item in.
- When using a small item or piece of an item for taste, insert that item during the first half of the juicing process. If inserted at the end. The full taste may not come through.

PRODUCT SPECIFICATIONS
PRODUCT SPECIFICATIONS
Product Name JUICE CUBE
Model Name CUBE300
Rated Voltage 120 V
Rated Frequency 50/60 Hz
Rated Power Consumption 200 Watts
Motor 80 RPM
Cord Length 63" (1.6 m)
Motor
Weight 20 lbs. (9.1 kg)
Dimension 10.43" Width (265 mm)
10.24" Length (260 mm)
10.24" Height (260 mm)
Also Available CUBE302 220-240 V / 50-60 Hz

Félicitations!
SERVICE À LA CLIENTÈLE : Visitez le www.omegajuicers.com/contact-omega-juicers
natural_image
Close-up of a white electronic device with two circular buttons and a central display (no visible text or symbols)MODE DE FONCTIONNEMENT DE L'INTERRUPTEUR :
natural_image
Exterior view of a modern office building (no signage)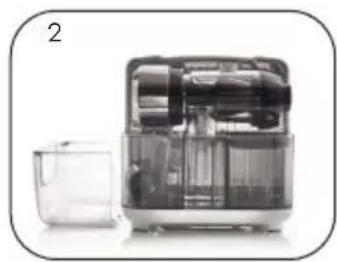
natural_image
Exterior view of a modern kitchen appliance with transparent casing and internal compartments (no visible text or symbols)natural_image
Close-up of a hand placing a transparent container into a black appliance, next to a smaller glass container (no visible text or symbols)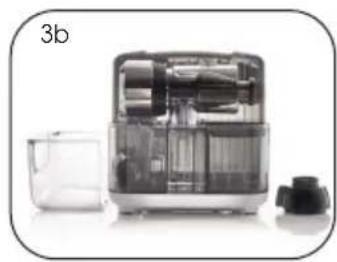
natural_image
Exterior view of a modern kitchen appliance with water filter and control unit (no visible text or symbols)natural_image
Close-up of a hand pouring liquid into a digital kitchen appliance, with a small container nearby (no visible text or symbols)
natural_image
Product photo of a smart water purifier with open lid and internal components (no visible text or symbols)natural_image
Product photo of a hand placing a container into an open kitchen appliance, with a small container and a yellow lamp nearby (no visible text or symbols)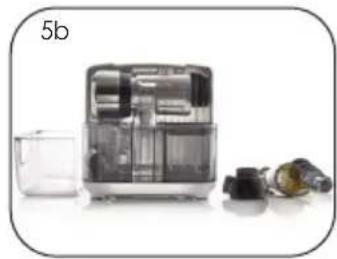
natural_image
Product photo of a water purifier with clear internal compartments and accessories (no visible text or symbols)natural_image
Exterior view of a modern office building (no signage)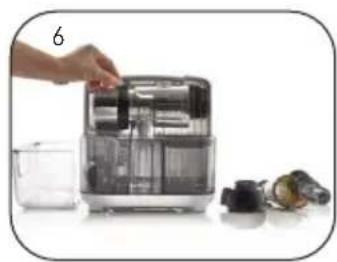
natural_image
Hand placing a component into a clear water heater with water tank nearby (no visible text or symbols)natural_image
Hand placing a whiteboard into a modern digital juice machine with glass and black accessories nearby (no visible text or symbols)natural_image
Interior view of a modern kitchen appliance with water tank and glass container (no visible text or symbols)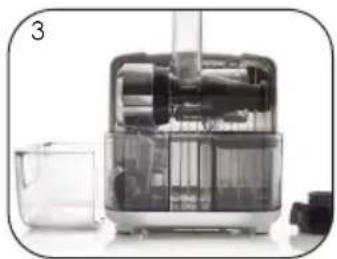
natural_image
Exterior view of a modern kitchen appliance with glass and water compartments (no visible text or symbols)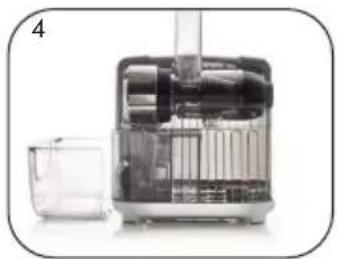
natural_image
Cross-sectional view of a mechanical device with internal components and a smaller container (no visible text or symbols)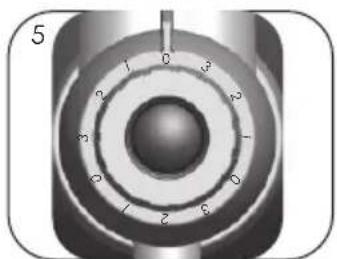
natural_image
Close-up of a mechanical knob or dial with numbered segments (0–7) and a central hub, no visible text or symbols beyond the number 5.
natural_image
Illustration of a hand using a precision instrument to clean or adjust a surface, with an inset showing the same component (no text or symbols present)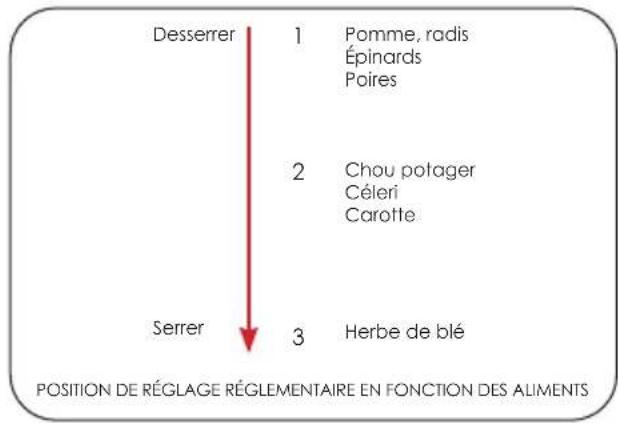
natural_image
Exterior view of a modern kitchen appliance with glass and water compartments (no visible text or symbols)natural_image
Exterior view of a modern kitchen appliance with glass and water compartments (no visible text or symbols)natural_image
Six black plastic mechanical components arranged in two rows (no text or symbols visible)- Choisissez la buse
natural_image
Cross-sectional view of a kitchen appliance with visible internal structure and a green arrow pointing to a component (no text or symbols)natural_image
Cross-sectional view of a mechanical device with internal components and a green arrow indicating a specific part (no text or symbols visible)natural_image
Close-up of a transparent cylindrical device with internal components, next to three small containers (no visible text or symbols)natural_image
Illustration of a multi-step food drinker with clear liquid and glass cups (no text or labels)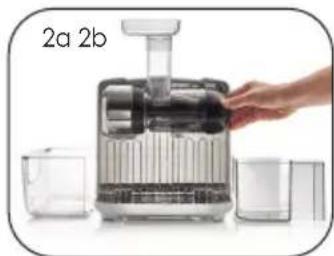
natural_image
Hand using a hand mixer machine to smooth the liquid, with clear glass and small cups nearby (no text or symbols visible)
natural_image
Product photo of a hand mixer with clear internal components and glass cups (no visible text or labels)
natural_image
Close-up of a hand pouring liquid into a clear glass grainer with control panel, next to small containers (no visible text or symbols)
natural_image
Product photo of a mechanical device with transparent casing and accessories (no visible text or symbols)
natural_image
Close-up of a hand using a small glass grainer to handle a wooden board, with no visible text or symbols.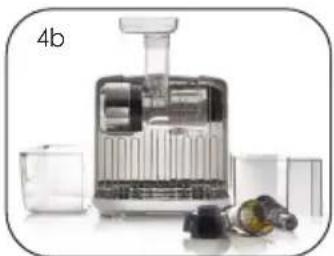
natural_image
Exterior view of a modern office building (no signage)
natural_image
Product photo of a modern kitchen juicer with hand placing lid, surrounded by cleaning items (no visible text or symbols)
natural_image
Product photo of a medical or laboratory equipment kit with glass and mechanical components (no visible text or symbols)natural_image
Cross-sectional view of a mechanical device showing internal components (no visible text or symbols)
natural_image
Close-up of a hand inserting a device into a black cylindrical component, with no visible text or symbols.
natural_image
Close-up of a mechanical device with internal components and a magnified inset showing a hand holding a component (no visible text or symbols)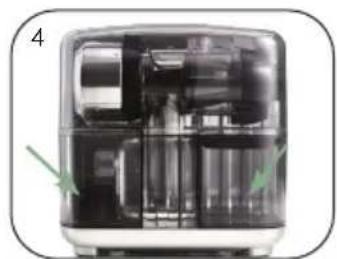
natural_image
Cross-sectional view of a water purifier or washing machine with internal components and green arrows indicating flow direction (no text or symbols)
natural_image
Top-down view of a device's front panel with two circular buttons and a central display (no text or symbols visible)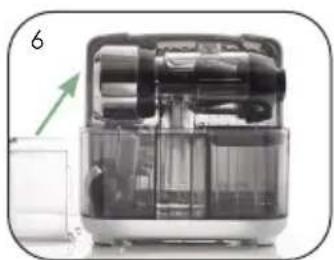
natural_image
Cross-sectional view of a smart water purifier device with internal components and a green arrow indicating direction (no text or symbols)
natural_image
Exterior view of a modern kitchen appliance with transparent casing and internal compartments (no visible text or symbols)natural_image
Close-up of a white electronic device with a black plastic component inserted, showing internal structure (no visible text or symbols)natural_image
Close-up of a stainless steel kitchen appliance with ventilation grille and central button (no visible text or symbols)CARACTÉRISTIQUES DU PRODUIT
CARACTÉRISTIQUES DU PRODUIT
Poids 9.1 Kg (20 lbs)
Dimensions externes 265 mm Width (10.43")
260 mm Length (10.24")
260 mm Height (10.24")
CUBE302 220-240 V / 50-60 Hz

¡Felicidades!
www.omegajuicers.com/omega-warranty-registration
PARA RECETAS, VISITE: www.omegajuicers.com/recipes
PARA SERVICIO AL CLIENTE:
Visite www.omegajuicers.com/contact-omega-juicers
www.OmegaJuicers.com
TABLA DE CONTENIDO
CONOCE TU PRODUCTO OMEGA
CONOCE TU PRODUCTO OMEGA

K Tapa terminal ajustable
L Tapón de presión
natural_image
Close-up of a white electronic device with two circular buttons and a central display (no visible text or symbols)natural_image
Exterior view of a modern office building (no signage)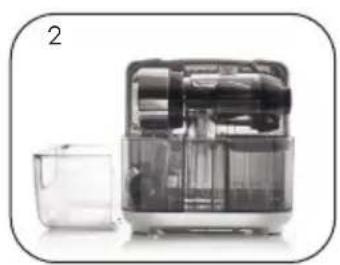
natural_image
Exterior view of a modern kitchen appliance with internal compartments and a smaller storage unit (no visible text or symbols)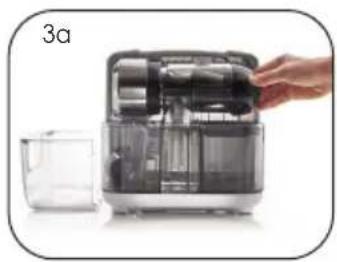
natural_image
Close-up of a hand placing a transparent container into a black appliance, next to a smaller glass container (no visible text or symbols)
natural_image
Product photo of a smart water purifier with clear internal components and a small container (no visible text or symbols)
natural_image
Close-up of a hand pouring liquid into a digital kitchen appliance, with a small container nearby (no visible text or symbols)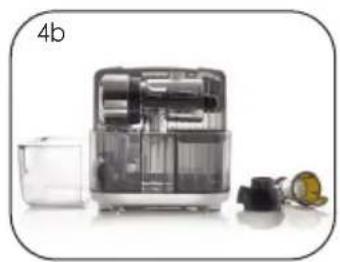
natural_image
Product photo of a water purifier with open lid, clear internal chamber, and accessories (no visible text or symbols)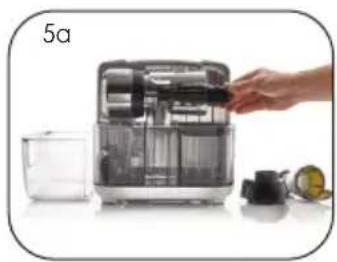
natural_image
Product photo of a hand placing a container into an open kitchen appliance, with a small container nearby (no visible text or symbols)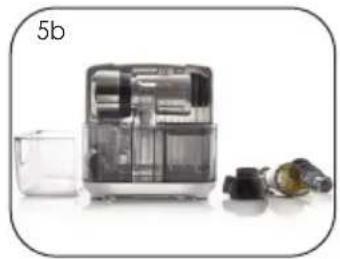
natural_image
Product photo of a water purifier with internal compartments and accessories (no visible text or symbols)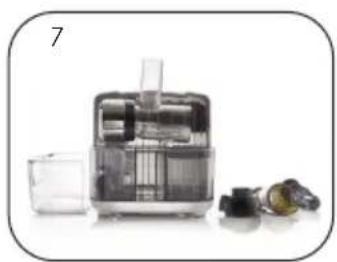
natural_image
Exterior view of a modern office building (no signage)
natural_image
Hand placing a transparent container into a water-filled appliance with a small inset image of a device (no visible text or symbols)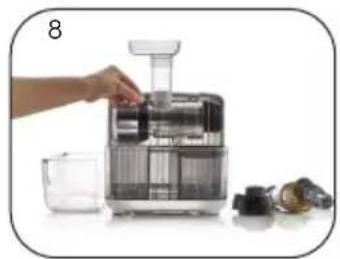
natural_image
Hand placing a small container into a clear glass tea machine (no visible text or symbols)ENSAMBLAJE PARA EL USO
natural_image
Interior view of a modern kitchen appliance with water purification unit and side table (no visible text or labels)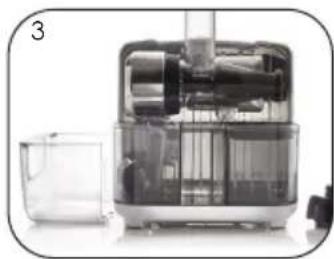
natural_image
Exterior view of a modern kitchen appliance with glass and metal casing (no visible text or symbols)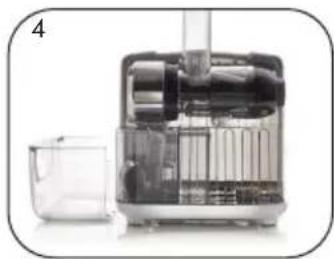
natural_image
Cross-sectional view of a mechanical device with internal components and a smaller transparent container (no visible text or symbols)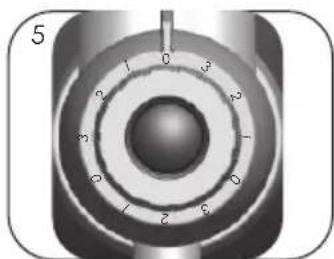
natural_image
Close-up of a mechanical knob or dial with numbered segments (0–7) and a central hub, no visible text or symbols beyond markings.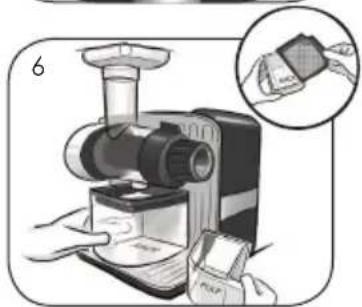
natural_image
Illustration of a hand using a digital juice brush with a magnified inset showing the tip of the brush (no text or symbols present)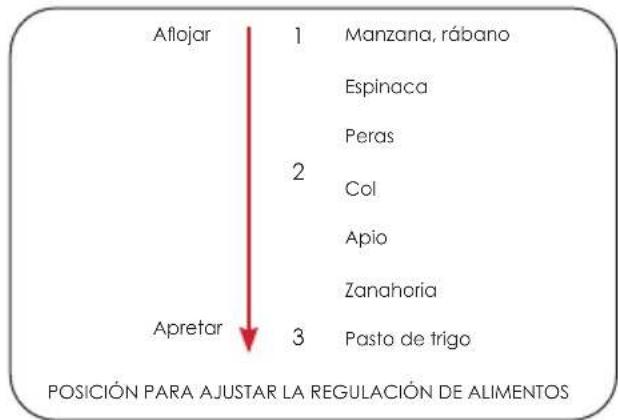
natural_image
Interior view of a modern kitchen appliance with transparent casing and internal components (no visible text or labels)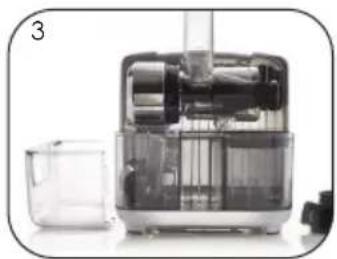
natural_image
Exterior view of a modern kitchen appliance with glass casing and water bath (no visible text or symbols)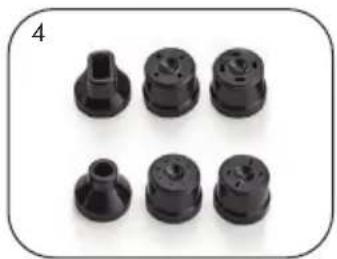
natural_image
Six black plastic mechanical components arranged in two rows (no text or symbols visible)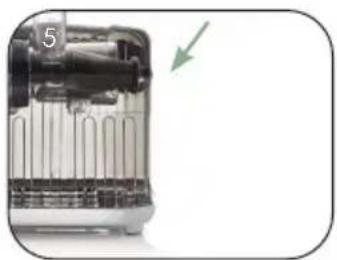
natural_image
Cross-sectional view of a kitchen appliance with visible internal structure and a green arrow indicating direction (no text or symbols)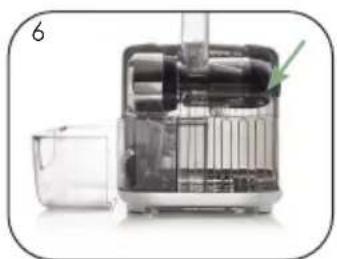
natural_image
Cross-sectional view of a mechanical device with internal components and a green arrow indicating a specific part (no text or symbols visible)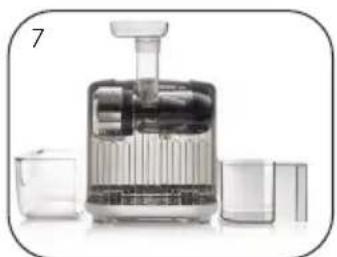
natural_image
Product photo of a glass water dispenser with liquid and three smaller containers (no visible text or labels)natural_image
Illustration of a multi-step food drinker with clear liquid and glass cups (no text or labels)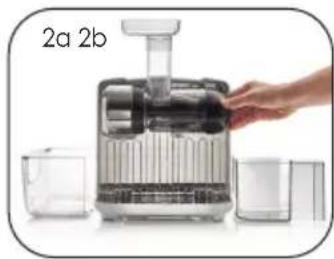
natural_image
Hand pouring liquid into a small glass tea machine (no text or symbols visible)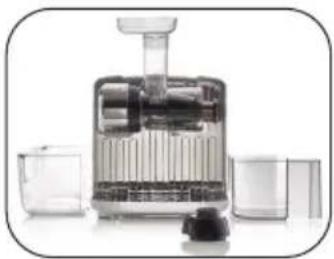
natural_image
Product photo of a hand mixer with clear internal components and glass cups (no visible text or labels)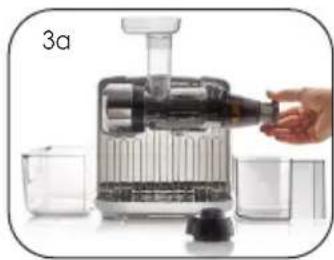
natural_image
Hand pouring liquid into a digital juicer with clear glass and beaker nearby (no text or symbols visible)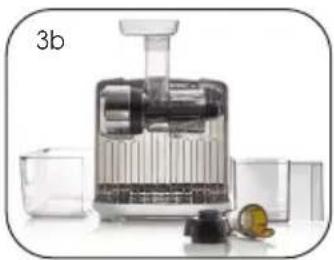
natural_image
Product photo of a glass and water dispenser with mechanical components, no visible text or symbols
natural_image
Close-up of a hand operating a small electronic device with a clear glass lid, next to a smaller container and a small fruit (no visible text or symbols)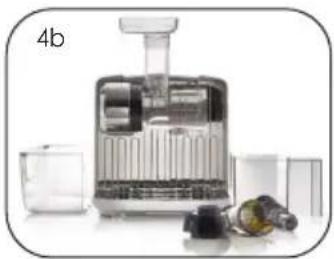
natural_image
Product photo of a small kitchen blender with open lid and accessories (no visible text or symbols)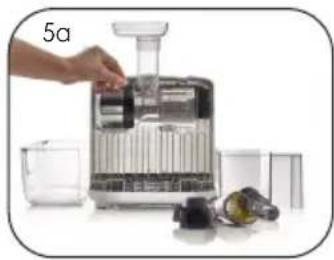
natural_image
Product photo of a hand cleaning a small electronic device with tools and containers (no visible text or symbols)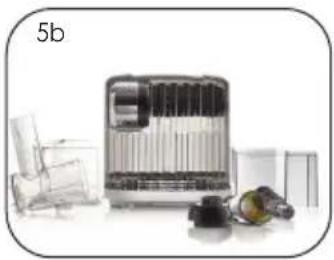
natural_image
Product photo of a portable air conditioner unit with accessories and a label '5b' (no visible text or symbols on main subject)natural_image
Cross-sectional view of a mechanical device showing internal components and housing (no visible text or symbols)
natural_image
Close-up of a hand inserting a device into a black cylindrical component, with no visible text or symbols.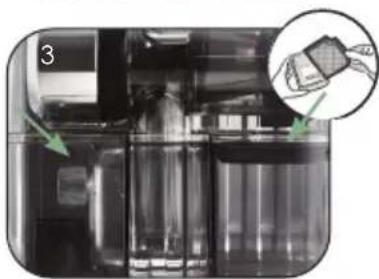
natural_image
Close-up of a mechanical component with a magnified inset showing a hand holding a cylindrical part (no text or symbols visible)
natural_image
Cross-sectional view of a device showing internal components and labeled parts (no readable text or symbols)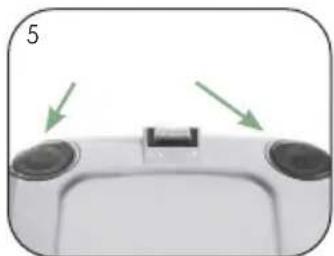
natural_image
Top-down view of a device with two circular buttons and a central display (no text or symbols visible)
natural_image
Cross-sectional view of a smart water purifier device with internal components and a green arrow indicating direction (no text or symbols)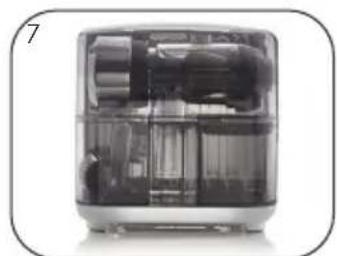
natural_image
Exterior view of a modern stainless steel water purifier unit (no visible text or symbols)natural_image
Close-up of a white electronic device with a black plastic component inserted, showing internal structure (no text or symbols visible)natural_image
Close-up of a modern kitchen appliance with a rectangular vent and ventilation grille (no visible text or symbols)Discover the complete line of Omega brand professional products at
www.OmegaJuicers.com
NOURISSEZ VOTRE CORPS
www.OmegaJuicers.com
NUTRA SU CUERPO
Enriquezca su alma
www.OmegaJuicers.com

- CUBE300
- USER MANUAL
- MODE D'EMPLOI
- MANUAL DEL USUARIO
- TABLE OF CONTENTS
- IMPORTANT SAFEGUARDS
- Omega
- KNOW YOUR OMEGA
- JUICING
- AND
- HOMOGENIZING COMPONENTS
- JUICING AND HOMOGENIZING COMPONENTS
- FOR NUT BUTTERS, FRUIT SORBETS, BABY FOOD, MINCING AND EXTRUDING
- SWITCH OPERATION MODE & ASSEMBLY FOR USE
- ASSEMBLY FOR USE:
- ASSEMBLY FOR JUICING
- Correct Position of Adjustable End Cap:
- ASSEMBLY FOR HOMOGENIZING
- HOW TO PREPARE
- MILK: ALMOND, COCONUT, SOY, ETC
- SORBETS / DESSERTS
- PASTA & BREADSTICKS
- To extrude pasta:
- To make breadsticks:
- MINCING & CHOPPING
- BABY FOOD
- COFFEE GRINDER
- DISASSEMBLY
- STORAGE
- ACCESSORY STORAGE
- HELPFUL HINTS
- CHOOSING THE RIGHT MATERIAL
- Juicing Screen
- Homogenizer Cone
- PRODUCT SPECIFICATIONS
- Félicitations!
- MODE DE FONCTIONNEMENT DE L'INTERRUPTEUR :
- CARACTÉRISTIQUES DU PRODUIT
- ¡Felicidades!
- TABLA DE CONTENIDO
- CONOCE TU PRODUCTO OMEGA
- ENSAMBLAJE PARA EL USO
- NOURISSEZ VOTRE CORPS
- NUTRA SU CUERPO
Brand : OMEGA
Model : CUBE300
Category : Juicer