
BKS 1410 - Vacuum Cleaner BEKO - Free user manual and instructions
Find the device manual for free BKS 1410 BEKO in PDF.
| Product type | Canister vacuum cleaner |
| Brand | Beko |
| Model | BKS 1410 |
| Nominal power | 1800 W |
| Maximum power | 2000 W |
| Supply voltage | 220-240 V ~ 50 Hz |
| Protection class | II |
| Dust bag type | Paper or cloth (optional) |
| Motor protection filter | Washable (every 6 months) |
| Exhaust filter | Washable (every 6 months) |
| Telescopic tube | Metal, adjustable in length |
| Combination brush | Adjustable for carpet and hard floor |
| Small brush | For furniture and frames |
| Crevice tool | For hard-to-reach areas |
| Air slider | Adjustable on the handle |
| Full bag indicator | Yes (visual) |
| Cable winder | Automatic with button |
| Power regulator | On the appliance |
| Included accessories | Combination brush, small brush, crevice tool |
Frequently Asked Questions - BKS 1410 BEKO
User questions about BKS 1410 BEKO
0 question about this device. Answer the ones you know or ask your own.
Ask a new question about this device
Download the instructions for your Vacuum Cleaner in PDF format for free! Find your manual BKS 1410 - BEKO and take your electronic device back in hand. On this page are published all the documents necessary for the use of your device. BKS 1410 by BEKO.
USER MANUAL BKS 1410 BEKO
natural_image
Two compact vacuum cleaner units, one purple and one orange, shown against a plain white background (no text or symbols visible)BKS 1410
BKS 1420
EN TR FR RU KK
BS MK SQ SR TH
01M-8934193200-3017-06
01M-8934203200-3017-06
01M-8837053200-3017-01
01M-8837043200-3017-01
beko
Please read this user manual first!
Dear Customer,
Thank you for preferring a Beko product. We hope that you get the best results from your product which has been manufactured with high quality and state-of-the-art technology. Therefore, please read this entire user manual and all other accompanying documents carefully before using the product and keep it as a reference for future use. If you handover the product to someone else, give the user manual as well. Follow all warnings and information in the user manual.
Explanation of symbols
Throughout this user manual the following symbols are used:

Important information or useful hints about usage.

Warning for hazardous situations with regard to life and property.

Protection class for electric shock.

This product has been produced in environmentally friendly, modern facilities.
CONTENTS
ENGLISH 4-11
TÜRKÇE 12-20
FRANÇAIS 21-30
РУССКИЙ 31-40
KAZAKH 41-50
BOSNIAN 51-59
МАКЕДОНСКИ 60-69
SHQIPTARE 70-79
СРПСКИ 80-88
Inu 89-97
1 Important safety and environmental instructions
This section contains safety instructions that will help protect from risk of personal injury or property damage.
Failure to follow these instructions invalidates the granted warranty.
1.1 General safety
• This appliance complies with the international security standards.
- This appliance can be used by the children who are at the age of 8 or over and by the people who have limited physical, sensory or mental capacity or who do not have knowledge and experience, provided that they are supervised or they understand the instructions with regard to safe use of the product and potential dangers. Children should not play with the appliance. Cleaning and maintenance works should not be performed by children unless they are supervised by an adult.
- Do not use it if the power cable or the appliance itself is damaged. Contact an authorized service.
- Your mains power supply should comply with the information supplied on the rating plate of the appliance.
- The mains supply of the appliance must be secured with a minimum 16 A fuse.
- Do not use the appliance with an extension cord.
- In order to prevent the power cable from getting damaged, make sure that it doesn't get stuck, twisted or rub against sharp surfaces.
- Do not touch the appliance or its plug when it is plugged if your hands are damp or wet.
- Do not pull the power cable when unplugging the appliance.
- Do not vacuum flammable materials and when vacuuming cigarette ashes make sure that it got cold.
1 Important safety and environmental instructions
- Do not vacuum water or other • Do not use the appliance liquid materials. without filters; otherwise it
- Protect the appliance from can get damaged.
rain, humidity and heat sources. - Never use the appliance in or near to combustible or inflammable places and materials.
- When vacuuming the stairs, the appliance should be located below the user.
- If your store the package material, keep it out of the reach of children.
- Unplug the appliance before cleaning and maintenance.
- Do not dip the appliance or i cable in water to clean it.
- Check the hose of the appliance regularly. Do not use if it is damaged and contact an authorized service.
- Do not attempt to dismantle the appliance.
- Only use the original parts parts recommended by the manufacturer.
- If heavily used for clean dust such as cement or grout the dust indicator will lit earlier then expected, in such case replace the dust bag even it is empty.
2 Compliance with the WEEE Directive and disposal of waste products
This product does not include harmful and prohibited materials specified in the "Regulation for Supervision of the Waste Electric and Electronic Appliances" issued by the Ministry of Environment and Urban Planning. This appliance conforms to the WEEE regulation. This product has been manufactured with high quality parts and materials which can be reused and are suitable for recycling. Therefore, do not dispose the product with normal domestic waste at the end of its service life. Take it to a collection point for the recycling of electrical and electronic equipment. Ask the local authority in your area for these collection points. Contribute to the preservation of environment and natural sources by taking the used products to the recycling points.
13 Package information
Package of the product is made of recyclable materials in accordance with our National Legislation. Do not dispose of the packaging materials together with the domestic or other wastes. Take them to the packaging material collection points designated by the local authorities.
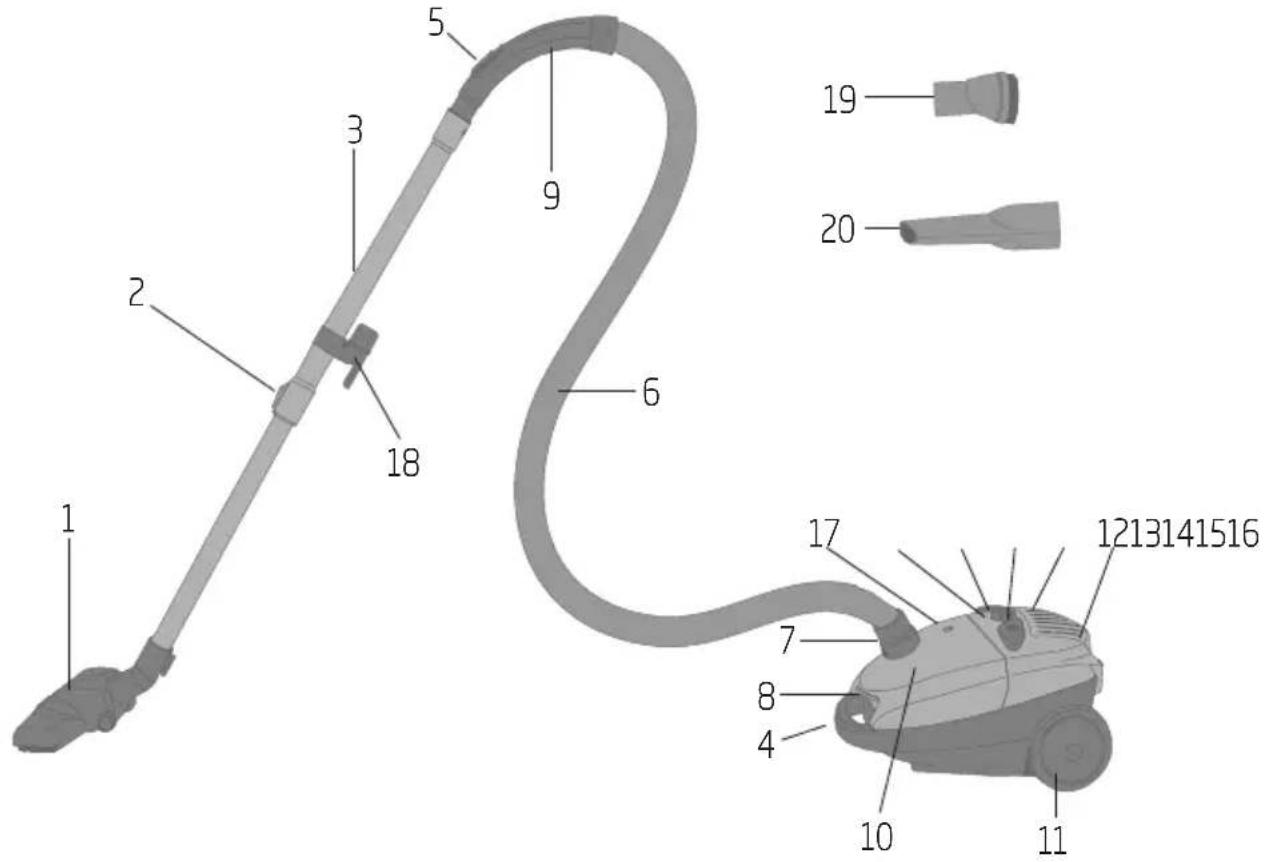
2 Your vacuum cleaner
2.1 Overview
text_image
1 2 3 5 9 18 6 17 7 8 4 10 11 19 20 1213141516- Parquetry carpet brush
- Height adjustment switch
- Metal telescopic pipe
- Carriage handle
- Air slider
- Elastic vacuum hose
- Flexible connection adaptor for flexible hose
- Front cover release button
- Cleaning handle
- Front cover
- Rear wheels
- Brush holder
- Air outlet filter lid
- Pushbutton for switching on and off
- Suction power adjustment switch
- Cable winding button
- Dust bag full indicator
- Park adaptor Accessories
- Small brush
- Crevice tool
2.2 Technical data
Power supply : 220-240 V\~, 50 Hz
Power nom : 1800 W
Rights to make technical and design changes are reserved.
The values which are declared in the markings affixed on your product or the other printed documents supplied with it represent the values which were obtained in the laboratories pursuant to the pertinent standards. These values may vary according to the usage of the appliance and ambient conditions.
3 Individual parts / accessories
3.1 Intended use
The appliance was designed to be used in houses, and is not fit for industrial use.
3.2 Flexible hose
Flexible hose (7) is the connection between the appliance and metal telescopic pipe.
- Insert the flexible hose with flexible connection port (7) into the suction intake (8) on the appliance until it fits securely.
- Attach the other end of the flexible hose (Cleaning handle) onto the metal telescopic pipe.
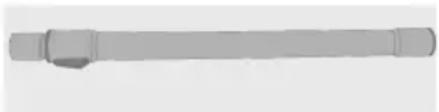
3.3 Multi step metal telescopic pipe
- Metal telescopic pipe (3). You can adjust this by sliding the lock switch forwards and extending the pipe to the required length.
- Release the lock switch to lock the pipe.
natural_image
3D rendered image of a cylindrical mechanical component with stepped ends and a small protrusion (no text or symbols)3.4 Brush
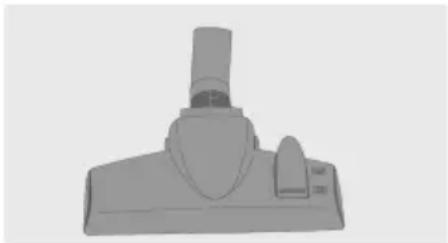
The vacuum cleaner is supplied with a high quality multi-floor brush whose height can be adjusted according to the thickness of the carpet.
Suitable for all types of carpets as well as hard floors and is adjustable by foot.
- Push the multi-floor brush (1) onto the telescopic pipe (3).
- Alter the switch on the multi-floor brush depending on the carpet thickness.
natural_image
3D rendered model of a mechanical component with a conical top and base (no text or symbols)3.5 Small brush
Use small brush (19) to clean furniture and picture frames. It can rotate up to 90^ .
- Push the small brush directly onto the cleaning handle (9).
- Push the small brush onto the metal telescopic pipe (3) to obtain a better reach.

natural_image
3D rendered image of a gray conical object with a tapered top and side edge (no text or symbols)3.6 Narrow crevice tool
Use the narrow crevice tool (20) to clean places which are narrow and difficult to reach.
- Push the narrow crevice tool directly onto the cleaning handle (9).
- Push the narrow crevice tool onto the metal telescopic pipe (3) to obtain a better reach.

natural_image
3D rendered image of a gray mechanical component with no visible text or symbols4 Preparation and usage
Make sure that the supply voltage indicated on the rating plate (under the appliance) conforms to the local supply voltage.
4.1 Preparation
Your appliance is supplied with a dust bag already fitted. Once you have assembled the individual parts the appliance is ready to use.
- Push the plug-in contact of the elastic hose (6) in the socket (8) provided on the dust container until it latches into place.

WARNING: To remove the elastic hose (6) press the side release buttons on the plug-in contact and then pull out the hose.
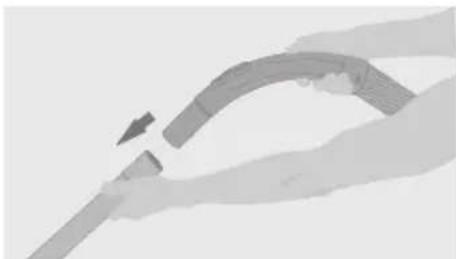
- Attach the other end of the flexible hose onto the metal telescopic pipe (3).
natural_image
Illustration of a curved pipe or pipe joint with an arrow indicating direction (no text or symbols)- Attach the required brush or accessories to the lower end of the metal telescopic pipe (3).

WARNING: Fit together all the plug-in connections with a push and turn movement and undo them with a pull and turn movement.
4.2 Switching on and off
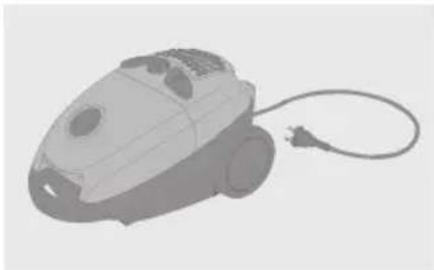
- Pull out the required length of power cord.
natural_image
Illustration of a vacuum cleaner with attached cable (no text or symbols)
WARNING: The maximum cable length is indicated by a red mark. Never try to pull out the power cord beyond the red mark.
- Plug the power cord plug into the wall socket.
- Switch on the appliance by pressing pushbutton (14).
- Set the required suction power with control switch (15).
- After use, press (14) button to switch off the appliance and remove the power cord plug from the socket.

WARNING: If the appliance is not being used, always disconnect the mains plug at the wall socket.
4 Preparation and usage
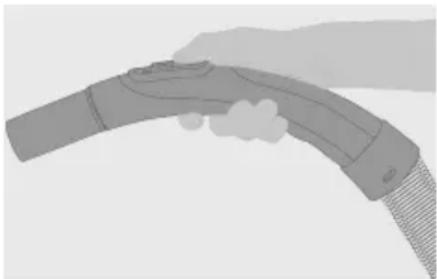
4.3 Air slider
You can adjust the air slider (5) on the cleaning handle with your thumb. If the slider (5) is closed completely, max. suction power is attained.
In some cases such as cleaning upholstery, fabric or plush carpets, it may be necessary to decrease the suction power. If this is the case, open the air slider as required.
natural_image
Illustration of a curved cable or connector with a textured handle and base, no text or symbols present.4.4 Dust bag full indicator
This indicator (17) shows the fullness level of the dust bag. If the indicator shows a fullness level above 50%, you must change the dust bag.
4.5 Rewind power cord
- Unplug the power cord plug from the wall socket.
- Hold the power cord in one hand, and press and hold the button (16).
- Carefully guide the power cord back into the appliance.

WARNING: Always rewind the power cord with care as pressing one side of the button (16) and a high rewinding speed can cause unforeseeable cable movements.
5 Cleaning and maintenance
Switch off and unplug the appliance, before cleaning it.

WARNING: Never use gasoline, solvent, abrasive cleaning agents, metal objects or hard brushes to clean the appliance.
5.1 Changing the dust bag
If the indicator (17) on the dust container changes to red you must change the dust bag.
- Unplug the power cord plug from the wall socket.
- Open the dust container by pressing the front cover release button (8) and lift up the cover.
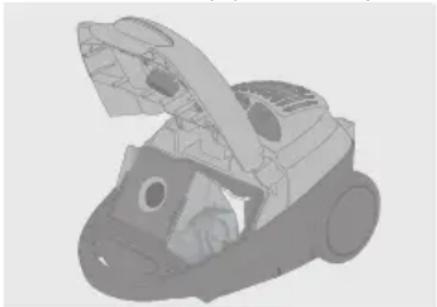
natural_image
3D rendered model of a vacuum cleaner with open lid and internal components (no text or symbols)-
Push the filter bracket forward.
-
Seal the dust bag by pushing the tab of the cardboard reinforcement into the opening.
-
Dispose of the sealed dust bag.

WARNING: Do not try to empty and reuse the dust bag.
-
Insert a new dust bag in the bracket.
-
Close the cover of the dust container.

WARNING: Test the appliance after changing the dust bag. If the indicator (17) is still red, the tools, hoses or filter are blocked (see following section).

WARNING: Never start up the appliance without a dust bag. The cover of the dust container cannot be closed unless a dust bag has been inserted.
5.2 Cloth dust bag
If you are using cloth dust bags instead of paper ones, you may empty and reuse the bag several times.
• Cleaning the cloth dust bag:
- Hold the cloth dust bag upside down over a trash can. Push the clips sideways to remove it.
- Shake the dust bag to pour its content into the trash can.
- Wash the cloth bag by hand in lukewarm water. Leave it to dry after washing and do not use it unless it is dry.
- Push the clips under the dust bag to close the bag.
- If you are using a cloth dust bag, we recommend you to wash the motor protection filter every six months in cold water. Ensure that the filter is completely dry before installing it back to the appliance.
5.3 Cleaning or replacing the filter

WARNING: The dust bag and filter must be inserted before starting up the appliance as otherwise the motor will be damaged.
5 Cleaning and maintenance
5.4 Cleaning the dust container filter (motor protective filter)
- Open the dust container by pressing the release button (8) of the dust container and lifting up the cover.
- Pull the dust bag out of the bracket, remove and seal it.
- Pull out the filter.
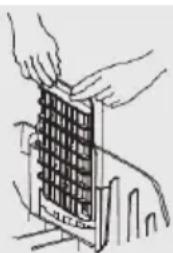
natural_image
Illustration of hands installing or adjusting a grid-like object on a mechanical component (no text or symbols visible)- Shake out the filter, then wash it in hot soapy water, rinse well and leave to air dry.

WARNING: Never wash the filter in the washing machine or dry it with a hair dryer.

WARNING: Ensure the filter is completely dry before you install it back into the vacuum cleaner.
- If necessary replace with a new filter and install it into the vacuum cleaner.
- Change the dust bag.
5.5 Cleaning the exhaust filter
- Press the release button (on the rear of the appliance) and pull up the filter bracket to remove it.
- Remove the filter from the filter bracket.
- Shake out the filter, then wash it in hot soapy water, rinse well and leave to air dry.

WARNING: Never wash the filter in the washing machine or dry it with a hair dryer.

WARNING: Ensure the filter is completely dry before you install it back into the vacuum cleaner.
- Carefully replace all the parts.

WARNING: The filter in the dust container should be changed every six months or sooner if necessary.

WARNING: The exhaust air filter should be replaced every six to nine months or sooner if necessary.

WARNING: Washing the filter frequently results in filter wear and tear.
5.6 Storage
- If you do not intend to use the appliance for a long time, store it carefully.
• Pull the appliance's plug out. - Keep the appliance out of the reach of children.
natural_image
3D rendered image of a cylindrical mechanical component with a protruding shaft (no text or symbols visible)3.4 Fırça
natural_image
3D rendered model of a mechanical component with a conical top and flange (no text or symbols)3.5 Küçük fırça
natural_image
3D rendering of a gray funnel-shaped object with a tapered tip and rounded base (no text or symbols)3.6 Dar ağızlı uç
natural_image
3D rendered image of a gray cylindrical object with a tapered end (no text or symbols)natural_image
Illustration of a hand holding a curved object with an arrow indicating motion (no text or symbols)natural_image
Illustration of a vacuum cleaner with a power cord (no text or symbols)
natural_image
Illustration of a curved mechanical or electronic component with layered structure (no text or symbols)natural_image
3D rendered model of a robotic vacuum cleaner with exposed internal components (no text or symbols)natural_image
Illustration of hands installing or adjusting a grid-patterned object on a surface (no text or symbols visible)natural_image
Simple 3D rendering of a cylindrical mechanical part with a pointed tip (no text or symbols)3.4 Brosse
natural_image
3D rendered mechanical component with a cylindrical top and base (no text or symbols visible)3.5 Petite brosse
natural_image
3D rendering of a gray conical object with a tapered tip, resembling a funnel or horn (no text or symbols)natural_image
3D rendered image of a mechanical component with no visible text or symbolsnatural_image
Illustration of a hand holding a curved pipe or tube, with an arrow indicating direction (no text or symbols present)natural_image
Illustration of a vacuum cleaner with attached cable (no text or symbols)
natural_image
Illustration of a curved mechanical or electrical component with a textured base and handle (no text or symbols)natural_image
3D rendered mechanical component with open lid and internal cavities (no text or symbols)natural_image
Line drawing of hands installing or adjusting a grid device into a container (no text or symbols)natural_image
3D rendered image of a cylindrical mechanical component with a small protrusion (no text or symbols)3.4 Щетка
natural_image
3D rendered mechanical component with a cylindrical protrusion and base mount (no text or symbols)3.5 Маленькая щетка
natural_image
3D rendering of a gray conical object with a tapered top and flared side (no text or symbols)3.6 Щелевая насадка
natural_image
Abstract grayscale illustration of a curved pipe or pipe with an arrow indicating direction (no text or symbols)natural_image
3D rendered image of a gray mechanical component with a tapered end and flange (no text or symbols)natural_image
Illustration of a vacuum cleaner with attached power cord (no text or symbols)
natural_image
Illustration of a curved cable or connector with a textured base and smoke trail (no text or symbols)natural_image
3D rendered model of a mechanical device with transparent casing and internal components (no text or symbols visible)natural_image
Illustration of hands installing or adjusting a grid-patterned object on a surface (no text or symbols visible)Flexible hose (7) is the connection between the appliance and metal telescopic pipe.
natural_image
3D rendering of a cylindrical mechanical component with stepped ends and a small protrusion (no text or symbols)3.4 Кылшак
natural_image
3D rendered image of a mechanical component with a cylindrical top and base (no text or symbols visible)3.5 Кіші қылшақ
natural_image
3D rendering of a gray funnel-shaped object with a tapered end (no text or symbols)natural_image
3D rendered image of a gray mechanical component with no visible text or symbolsnatural_image
Illustration of a hand holding a curved pipe or pipe fitting with an arrow indicating motion (no text or symbols)natural_image
Illustration of a vacuum cleaner with a power cord (no text or symbols)
natural_image
Illustration of a hand holding a flexible hose with a cotton swab (no text or symbols)natural_image
Illustration of hands holding a grid-based object on a surface, no text or symbols visiblenatural_image
3D rendered image of a cylindrical mechanical component with a protruding shaft (no text or symbols visible)3.4 Četka
Usisivač posjeduje veoma kvalitetnu četku za različite podove koja se može podješavati prema debljini tepiha.
natural_image
3D rendered mechanical component with a cylindrical top and base (no text or symbols visible)3.5 Mala četka
Koristite malu četku (19) za čišćenje namještaja i ramova za slike. Ona se može rotirati do 90°.
- Postavite malu četku direktno na držač za čišćenje (9).
- Postavite malu četku na metalnu teleskopsku cijev (3) da biste imali veći domet.

natural_image
3D rendering of a gray conical pipe fitting (no text or symbols)3.6 Uzak nastavak za usisavanje
natural_image
3D rendered image of a gray mechanical component with a tapered end and flanged tip (no text or symbols)natural_image
Abstract grayscale illustration of a curved, ribbon-like shape with an arrow indicating motion (no text or symbols)- Pričvrstite potrebnu cijev ili dodatak na donji kraj metalne teleskopske cijevi (3).

UPOZORENJE: Pričvrstite sve konekcije guranjem i okretanjem, a kada skidate djelove, povlačite ih uz okretanje.
natural_image
Illustration of a vacuum cleaner with attached cable (no text or symbols)
natural_image
Illustration of a curved cable or hose with a textured handle and a small cloud-like shape on the side (no text or symbols)4.4 Indikator pune kese za prašinu
Ovaj indikator (17) pokazuje nivo napunjenosti kese za prašinu. Ako indikator pokazuje da je kesa puna više od 50%, morate zamjeniti kesu za prašinu.
natural_image
3D rendered model of a robotic vacuum cleaner with exposed internal components (no text or symbols)natural_image
Illustration of hands installing or adjusting a grid-like object on a surface (no text or symbols visible)- Istresite filter, zatim ga operite u toploj vodi sa sapunicom, dobro isperite i ostavite da se osuši na vazduhu.

UPOZORENJE: Nikada ne perite filter u veš mašini i ne sušite ga fenom za kosu.

- If you do not intend to use the appliance for a long time, store it carefully.
- Pull the appliance's plug out.
- Keep the appliance out of the reach of children
natural_image
3D rendering of a cylindrical mechanical component with a protruding end (no text or symbols visible)3.4 Четка
natural_image
3D rendered image of a mechanical component with a cylindrical top and base (no text or symbols visible)3.5 Мала четка
natural_image
3D rendering of a gray conical object with a tapered tip and rounded side (no text or symbols)natural_image
3D rendered image of a gray mechanical component with a tapered end (no text or symbols)natural_image
Illustration of a hand holding a curved pipe or pipe fitting with an arrow indicating motion (no text or symbols)natural_image
Illustration of a vacuum cleaner with attached power cord (no text or symbols)
ПРЕДУПРЕДУВАЊЕ:
natural_image
Illustration of a curved mechanical or electrical component with a textured base and a small circular feature (no text or symbols)4.4 Индикатор за полна кеса за прав
natural_image
3D rendered model of a robotic vacuum cleaner with exposed internal components (no text or symbols)natural_image
Illustration of hands installing or adjusting a grid-like structure (no text or symbols visible)natural_image
3D rendered image of a cylindrical mechanical component with stepped ends and a small protrusion (no text or symbols)3.4 Furça
natural_image
3D rendered model of a mechanical component with a cylindrical top and base (no text or symbols)3.5 Furça e vogël
natural_image
3D rendering of a gray conical object with a tapered top and flared side (no text or symbols)natural_image
3D rendered image of a cylindrical mechanical component with a tapered end (no text or symbols)natural_image
Illustration of a hand holding a curved pipe or pipe fitting with an arrow indicating direction (no text or symbols)natural_image
Illustration of a vacuum cleaner with attached cable (no text or symbols)
natural_image
Illustration of a curved mechanical or electrical component with a textured base and handle (no text or symbols)natural_image
3D rendered illustration of a vacuum cleaner with open lid and internal components (no text or symbols)natural_image
Line drawing of hands installing or adjusting a grid-patterned device (no text or symbols)natural_image
3D rendered image of a cylindrical mechanical component with a protruding shaft (no text or symbols visible)3.4 Četka
natural_image
3D rendered mechanical component with a cylindrical top and flange (no text or symbols visible)3.5 Mala četka
Koristite malu četku (19) za čišćenje nameštaja i ramova za slike. Ona se može rotirati do 90°.
- Postavite malu četku direktno na držač za čišćenje (9).
- Postavite malu četku na metalnu teleskopsku cev (3) da biste imali veći domet.

natural_image
3D rendering of a gray conical object with rounded edges and a flat top (no text or symbols)3.6 Uzak nastavak za usisavanje
natural_image
3D rendered image of a gray cylindrical object with a tapered end and flared top (no text or symbols)natural_image
Illustration of a robotic arm gripping a tool, with no visible text or symbols- Pričvrstite potrebnu cev ili dodatak na donji kraj metalne teleskopske cevi (3).

UPOZORENJE: Pričvrstite sve konekcije guranjem i okretanjem, a kada skidate delove, povlačite ih uz okretanje.
natural_image
Illustration of a vacuum cleaner with attached power cord (no text or symbols)
natural_image
Illustration of a curved mechanical or electrical component with a textured base and handle (no text or symbols)4.4 Indikator pune kese za prašinu
natural_image
3D rendered model of a robotic vacuum cleaner with exposed internal components (no text or symbols)Uzbekistan St. Chhattis, Thailand, Malaysia
natural_image
3D rendered image of a cylindrical mechanical component with a small protrusion (no text or symbols)3.4 IIUSV
natural_image
3D rendered model of a mechanical component with a conical top and base (no text or symbols visible)3.5 แปรงเล็ก
natural_image
3D rendered image of a conical mechanical component (no text or symbols)natural_image
3D rendered image of a tapered mechanical component with no visible text or symbolsnatural_image
Illustration of a hand holding a curved object with an arrow indicating motion (no text or symbols)natural_image
Illustration of a vacuum cleaner with attached cable (no text or symbols)
natural_image
Illustration of a curved cable or connector with a textured sleeve (no text or symbols)natural_image
3D rendered model of a robotic vacuum cleaner with exposed internal components (no text or symbols)natural_image
Line drawing of hands installing or adjusting a grid-patterned device (no text or symbols)natural_image
Illustration of a faucet and a water-filled container with droplets, no text or symbols presentnatural_image
Illustration of two vacuum cleaner units with coiled tubing (no text or symbols)
natural_image
3D rendered mechanical component with internal structure and mounting holes (no text or symbols)natural_image
Illustration of a curved mechanical or electronic component with textured surface (no text or symbols)natural_image
Illustration of a hand holding a curved object with an arrow indicating motion (no text or symbols)natural_image
Illustration of a vacuum cleaner with a power cord (no text or symbols)تحذير
natural_image
3D rendered image of a cylindrical mechanical component with a protruding shaft (no text or symbols visible)فرشاة
natural_image
3D rendered mechanical component with a cylindrical top and flange (no text or symbols visible)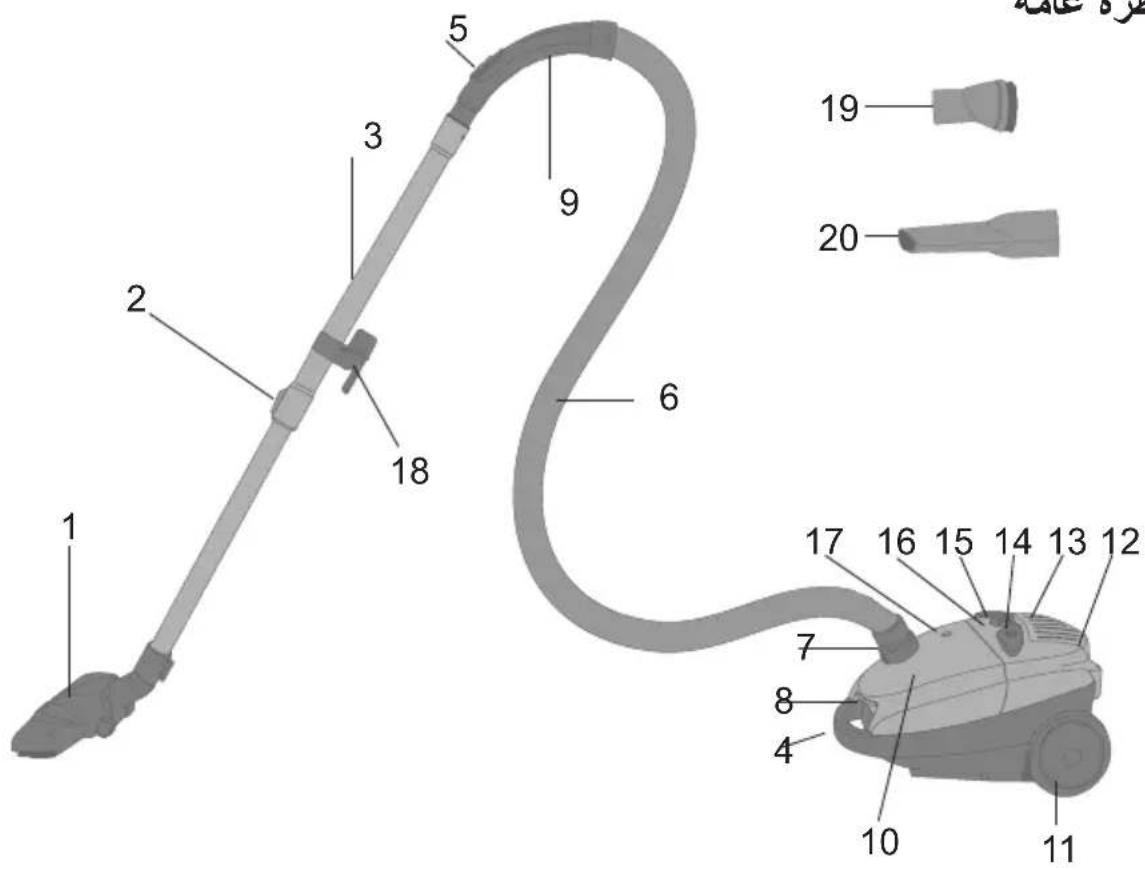
text_image
Labeled diagram of a vacuum cleaner with numbered parts and component details2.1 نظرة عامة
10 Bangkok Apartments
11 العجلات الخلفية
12 حامل الفرشاة