
SU10H3020P - Vacuum Cleaner SAMSUNG - Free user manual and instructions
Find the device manual for free SU10H3020P SAMSUNG in PDF.

| Product Type | Stick Vacuum |
| Brand | Samsung |
| Model | SU10H3020P |
| Power Supply | Corded, 120 V ~ 60 Hz |
| Plug Type | Polarized plug |
| Suction Power | Adjustable via air vent |
| Motorized brush | Yes, with on/off switch and overload limiter |
| Dust sensor | Optional (green/red) |
| Dustbin | Transparent, removable with carrying handle |
| Pre-motor filter | Washable, clean every 1 to 2 months |
| Exhaust filter | Not washable, replace if necessary |
| Included accessories | 2-in-1 accessory, mini mechanical brush (optional), furniture brush (optional) |
| Usage | Indoors only, dry surfaces |
| Safety | Overload limiter, automatic shut-off, thermal protection |
Frequently Asked Questions - SU10H3020P SAMSUNG
User questions about SU10H3020P SAMSUNG
0 question about this device. Answer the ones you know or ask your own.
Ask a new question about this device
Download the instructions for your Vacuum Cleaner in PDF format for free! Find your manual SU10H3020P - SAMSUNG and take your electronic device back in hand. On this page are published all the documents necessary for the use of your device. SU10H3020P by SAMSUNG.
USER MANUAL SU10H3020P SAMSUNG
Vacuum Cleaner user manual
* Please read the User Manual thoroughly before operating the vacuum.
* For indoor use only.
English
imagine the possibilities
Thank you for purchasing a Samsung product.
YOUR VACUUM CLEANER
07
07 Product view
08 Carton contents
BEFORE USING THE VACUUM CLEANER
09
09 Assemble the vacuum cleaner
10 Stowing the power cord
11 Operating the On/Off Switch
12 Operating the Motorized brush On / Off Switch
12 Resetting the overload protector
13 Using the air tap
13 Using the vacuum's handle (The dust bin handle)
13 Operating the dust sensor (Option)
14 Using the accessory
MAINTENANCE
15
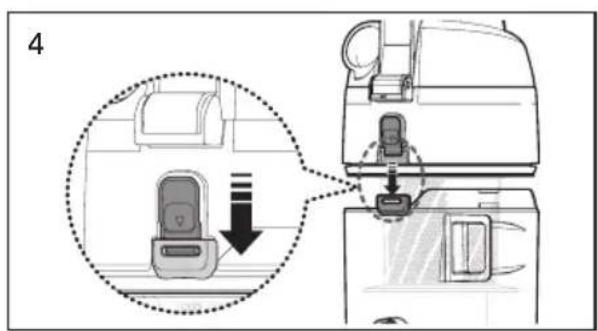
15 Emptying the dust bin
15 Cleaning the grille
16 Cleaning the premotor filter
17 Cleaning the exhaust filter
18 Checking the brush
18 Checking for clogs
19 Mini turbo brush (Optional)
TROUBLESHOOTING
20
SAFETY INFORMATION

Before operating the appliance, please read this manual thoroughly and retain it for your reference.

Because the following operating instructions cover various models, the characteristics of your vacuum cleaner may differ slightly from those described in this manual.
CAUTION/WARNING SYMBOLS USED
| WARNING | Indicates that a risk of death or serious injury exists. |
| CAUTION | Indicates that a risk of personal injury or material damage exists. |
OTHER SYMBOLS USED
 | Indicates something you must NOT do. |
 | Indicates instructions you must follow. |
 | Indicates that you must disconnect the power plug from the socket. |

This vacuum cleaner is designed for household use only.
Do not use this vacuum cleaner to clean building waste or debris.
Clean the filters regularly to prevent fine dust from collecting in them.
Do not use this vacuum cleaner with any of the filters removed.
Failure to meet these requirements could cause injury, damage the vacuum cleaner and void your warranty.
State of California Proposition 65 Warning (US only)

This product contains chemicals known to the State of California to cause cancer and birth defects or other reproductive harm.
imPortant Safety inStrUCtionS
When using an electrical appliance, you should always follow these basic precautions:
reaD aLL inStrUCtionS Before USinG yoUr UPriGHt VaCCUm
Warning – to reDUCe tHe riSK of fire, eLeCtrlC SHoCK, or inJUry:
- Do not leave the vacuum cleaner unattended when it is plugged in. Unplug it from the outlet when your are not using it and before servicing.
- Do not use outdoors or on wet surfaces.
- Do not allow the vacuum to be used as a toy. Pay close attention when the vacuum is used by or near children.
- Use only as described in this manual. Use only the manufacturer's recommended attachments.
- Do not use with a damaged cord or plug. If the vacuum is not working as it should, has been dropped, damaged, left outdoors, or dropped into water, bring it to a service center.
- Do not pull or carry the vacuum by the cord, use the cord as a handle, close a door on the cord, or pull the cord around sharp edges or corners.
Do not run the vacuum over the cord. Keep the cord away from heated surfaces. - Do not unplug by pulling on the cord. To unplug, grasp the plug, not the cord.
- Do not handle the plug or vacuum with wet hands.
- Do not put any object into openings or vents. Do not use with any
opening blocked.
Keep free of dust, lint, hair, and anything that may reduce air flow.
- Keep hair, loose clothing, fingers, and all parts of your body away from openings and moving parts.
- Turn off all controls before unplugging.
- Use extra care when cleaning on stairs.
- Do not use to pick up flammable or combustible liquids, such as gasoline, or use in areas where they may be present.
- Do not pick up anything that is burning or smoking, such as cigarettes, matches, or hot ashes.
- Do not use without the dirt cup and/or filters in place.
- Do not use the vacuum cleaner in an enclosed space filled with vapors given off by oil base paint, paint thinner, some moth proofing substances, flammable dust, or other explosive or toxic materials.
- Store your vacuum cleaner indoors, in a cool and dry area.
- Use only on dry, indoor surfaces.
- Do not touch the brush drum when it is rotating.
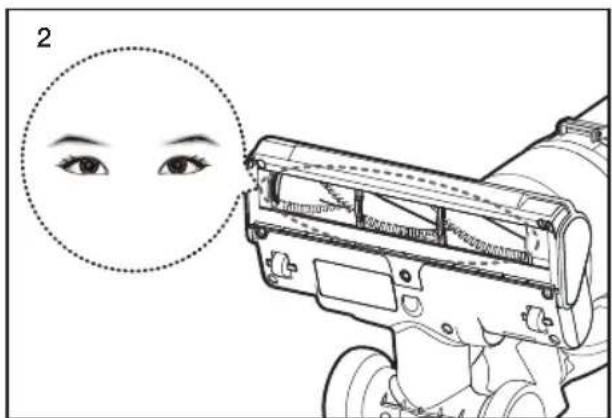
- Keep suction away from your face when using nozzles and pipe.
- Do not pull the power cord around sharp corners and do not allow it to become trapped.
- This appliance can be used by children aged from 8 years and above and people with reduced physical, sensory or mental capabilities or lack of experience and knowledge if they have been given supervision or instruction concerning use of the appliance in a safe way and understand the hazards involved. Children shall not play with the appliance. Cleaning and user maintenance shall not be done by children without supervision. Children should be supervised to ensure that they do not play with the vacuum.
- You must remove the plug from the socket-outlet before cleaning or performing maintenance on the vacuum.
- If the power cord is damaged, it must be replaced by the manufacturer or its service agent or a similarly qualified person.
-
Do not pick up hard or sharp objects such as glass, nails, screws, coins, etc.
-
Always turn off the vacuum before connecting or disconnecting the motorizes brush.
- Don't touch the exhaust vent when the exhaust temperature is hot.
- Please do not spray water directly to the exterior of product for the maintenance.
- Please do not clean with flammable spray such as benzene, thinner, alcohol, volatile substances and dust remover for the maintenance.
- When you use a flammable spray such as dust remover or natural gas leaks, please open the windows for ventilation and do not touch your hands to the wall outlet.
- Please contact the manufacturer or service center for a replacement
SAVE THESE INSTRUCTIONS
PoLariZeD PLUG inStrUCtionS
- To reduce the risk of electric shock, this appliance has a polarized plug (one blade is wider than the other).
This plug will fit in a polarized outlet only one way.
If the plug does not fit fully in the outlet, reverse the plug.
If it still does not fit, contact a qualified electrician to install a proper outlet.
Do not modify the plug in any way.
Your vacuum cleaner
PRODUCT VIEW
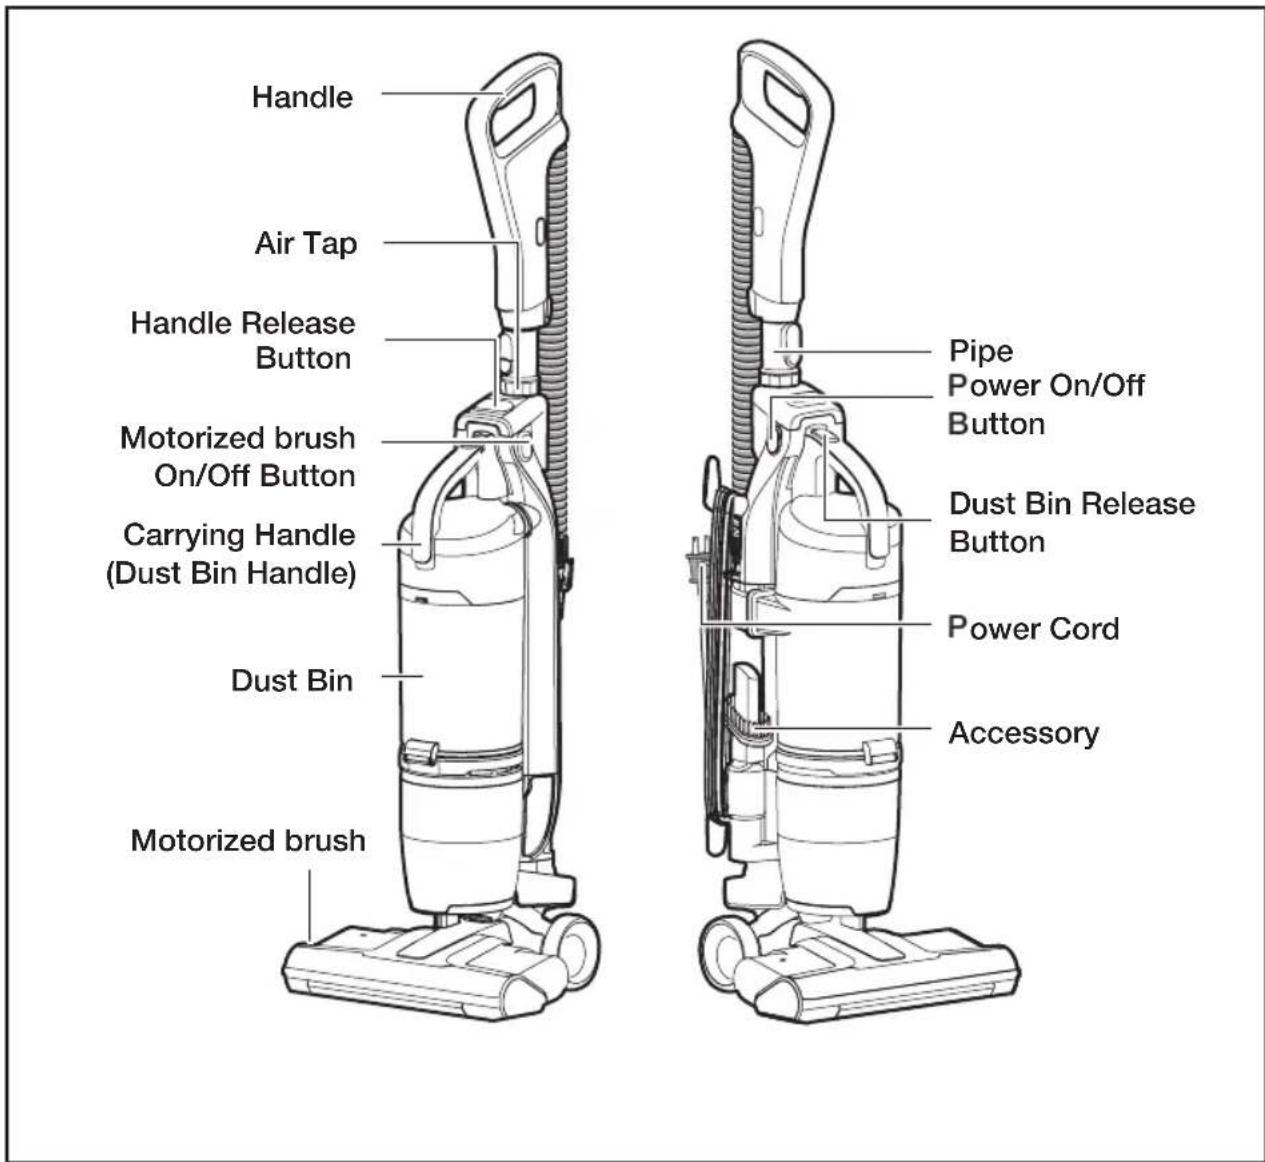

Do not plug in your vacuum cleaner until you are familiar with all instructions and operating procedures.

Plastic film can be dangerous. To avoid the danger of suffocation, keep the film away from babies and children.
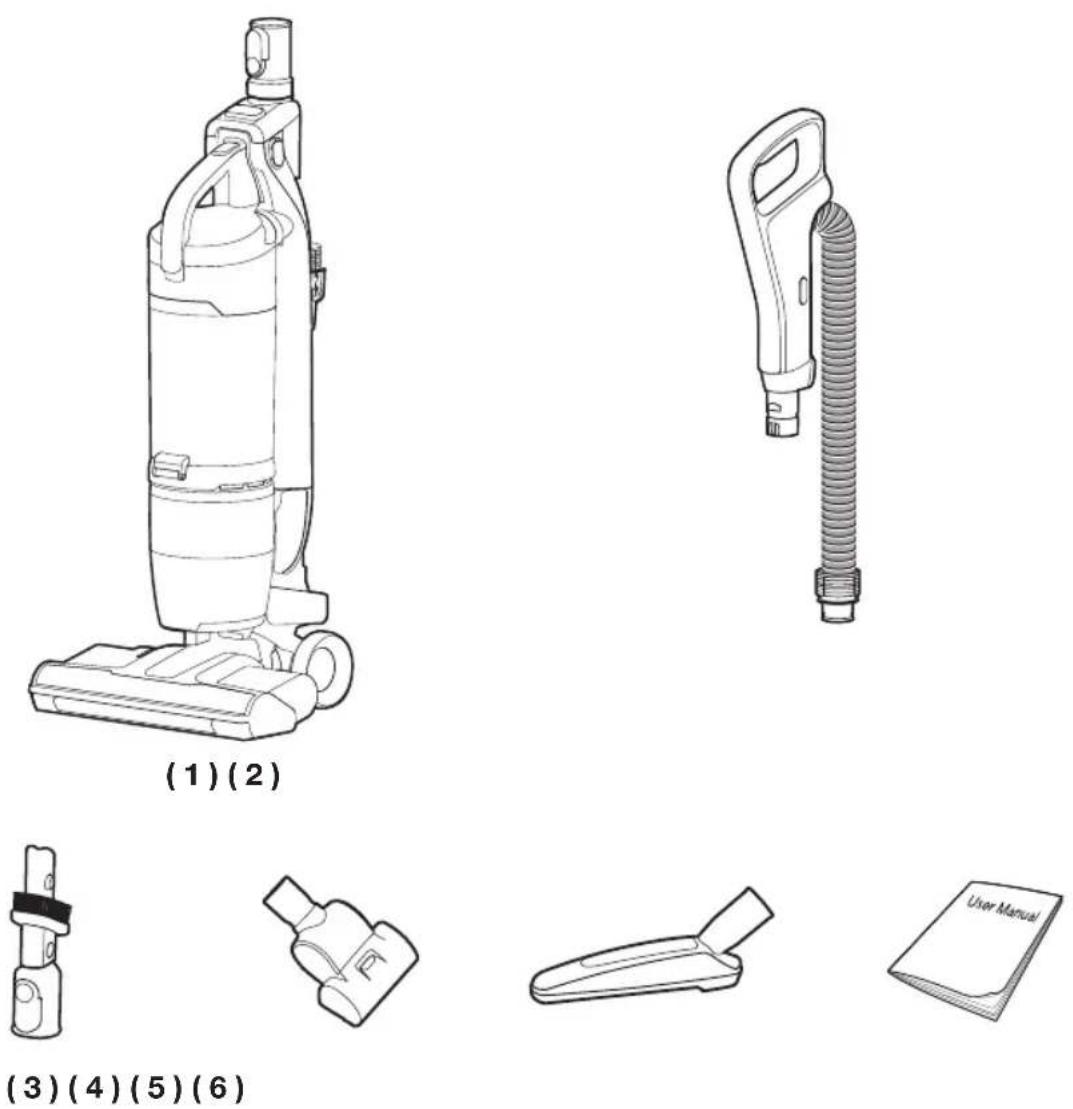
- Empty carton. Find the parts shown above before disposing of packing materials.
- Vacuum cleaner body & Pipe
- Handle
- 2 In 1 Accessory
- Mini turbo brush (Option)
- Furniture tool (Option)
- Users Manual
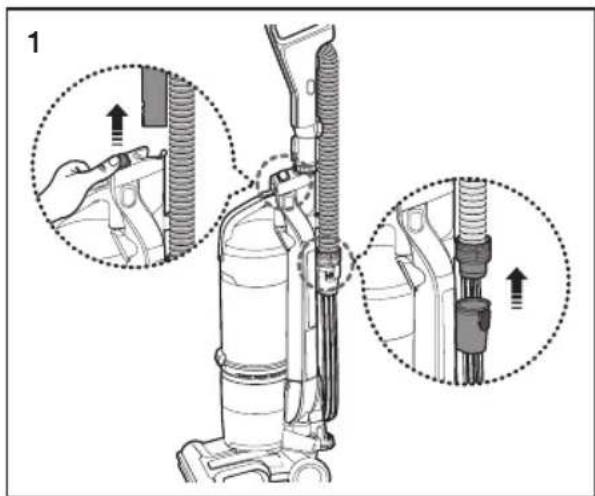
Before using the vacuum cleaner
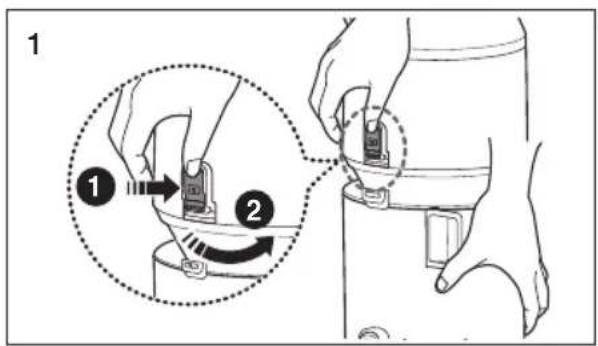
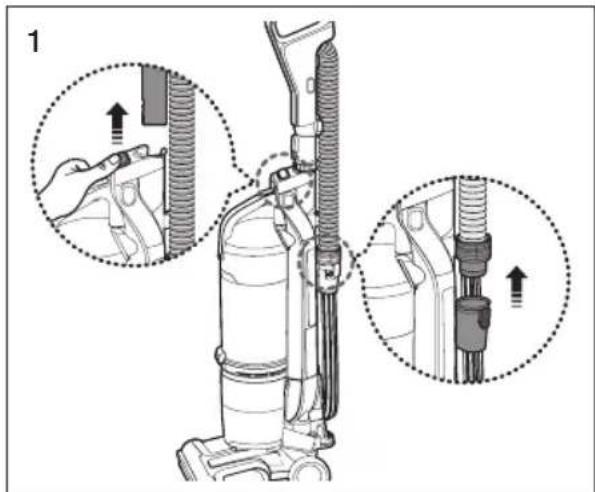
ASSEMBLE THE VACUUM CLEANER
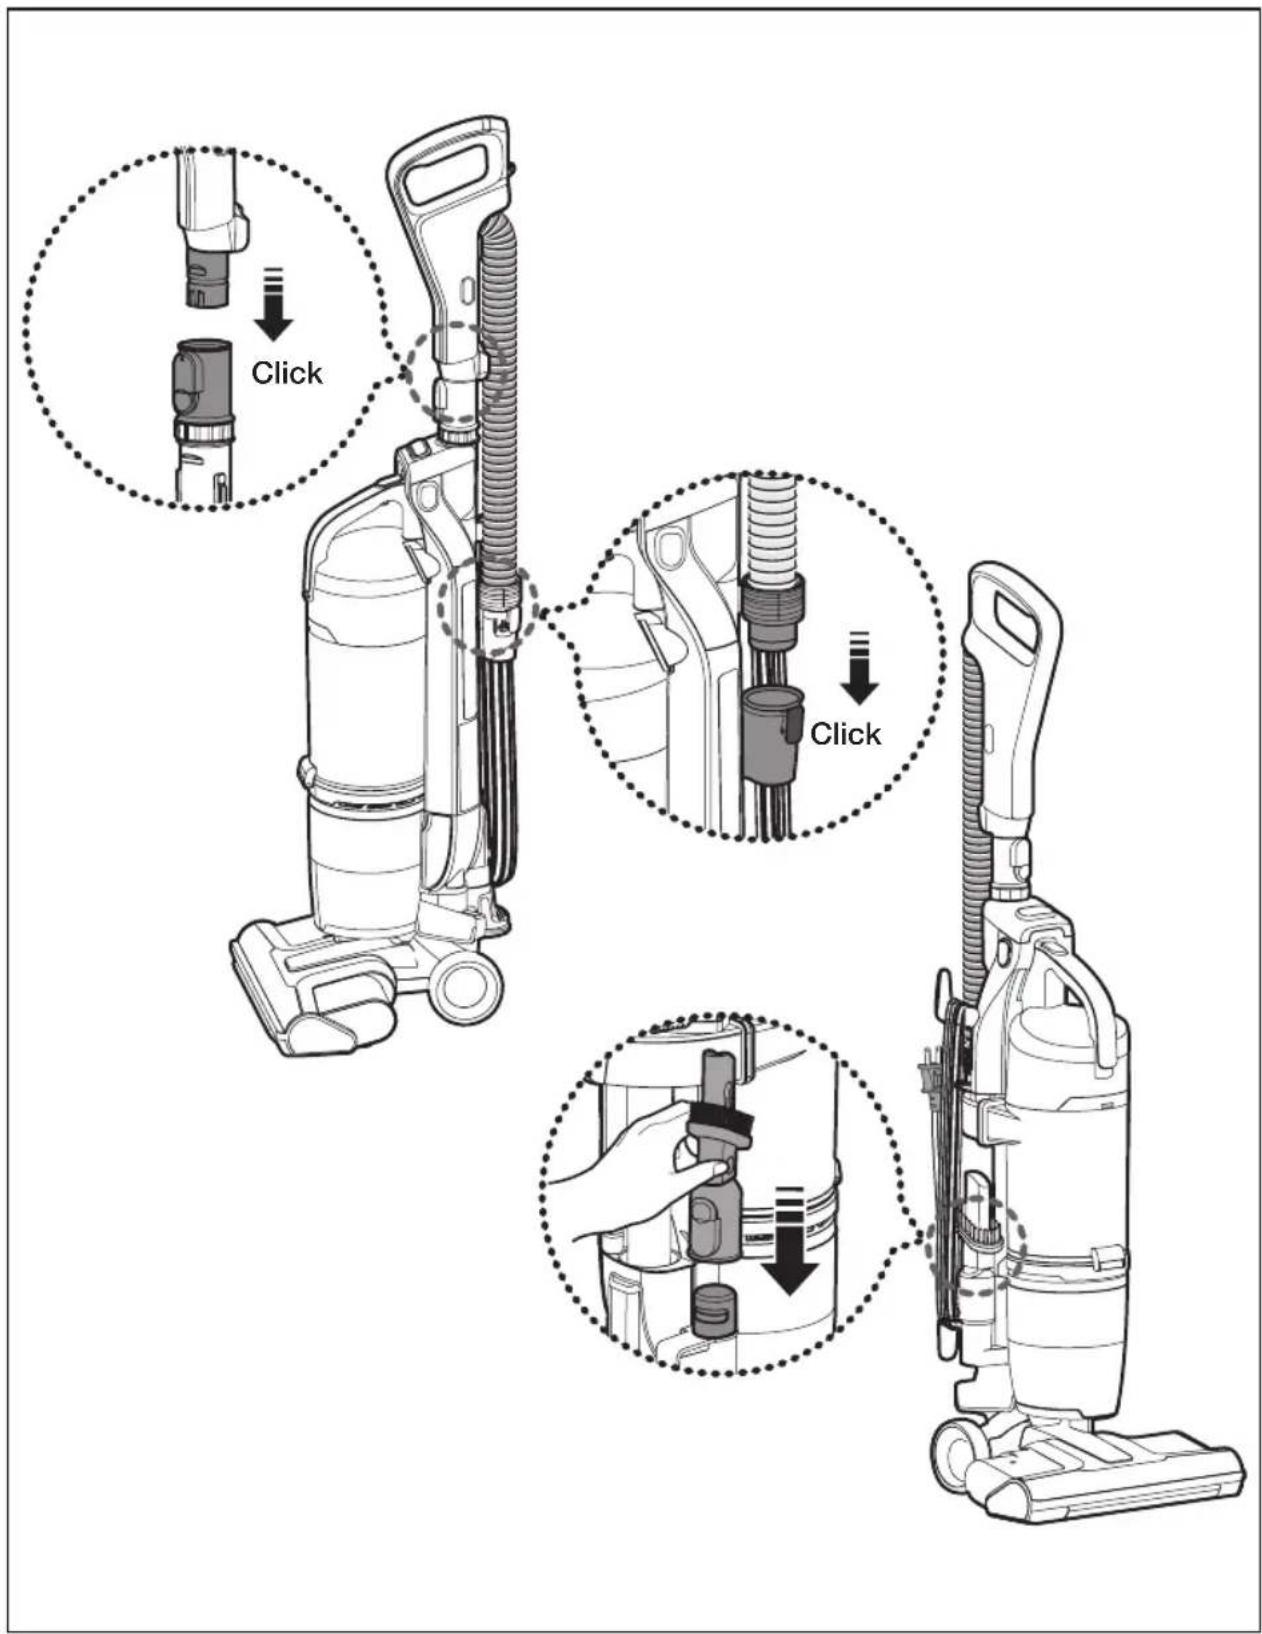
Operating the vacuum
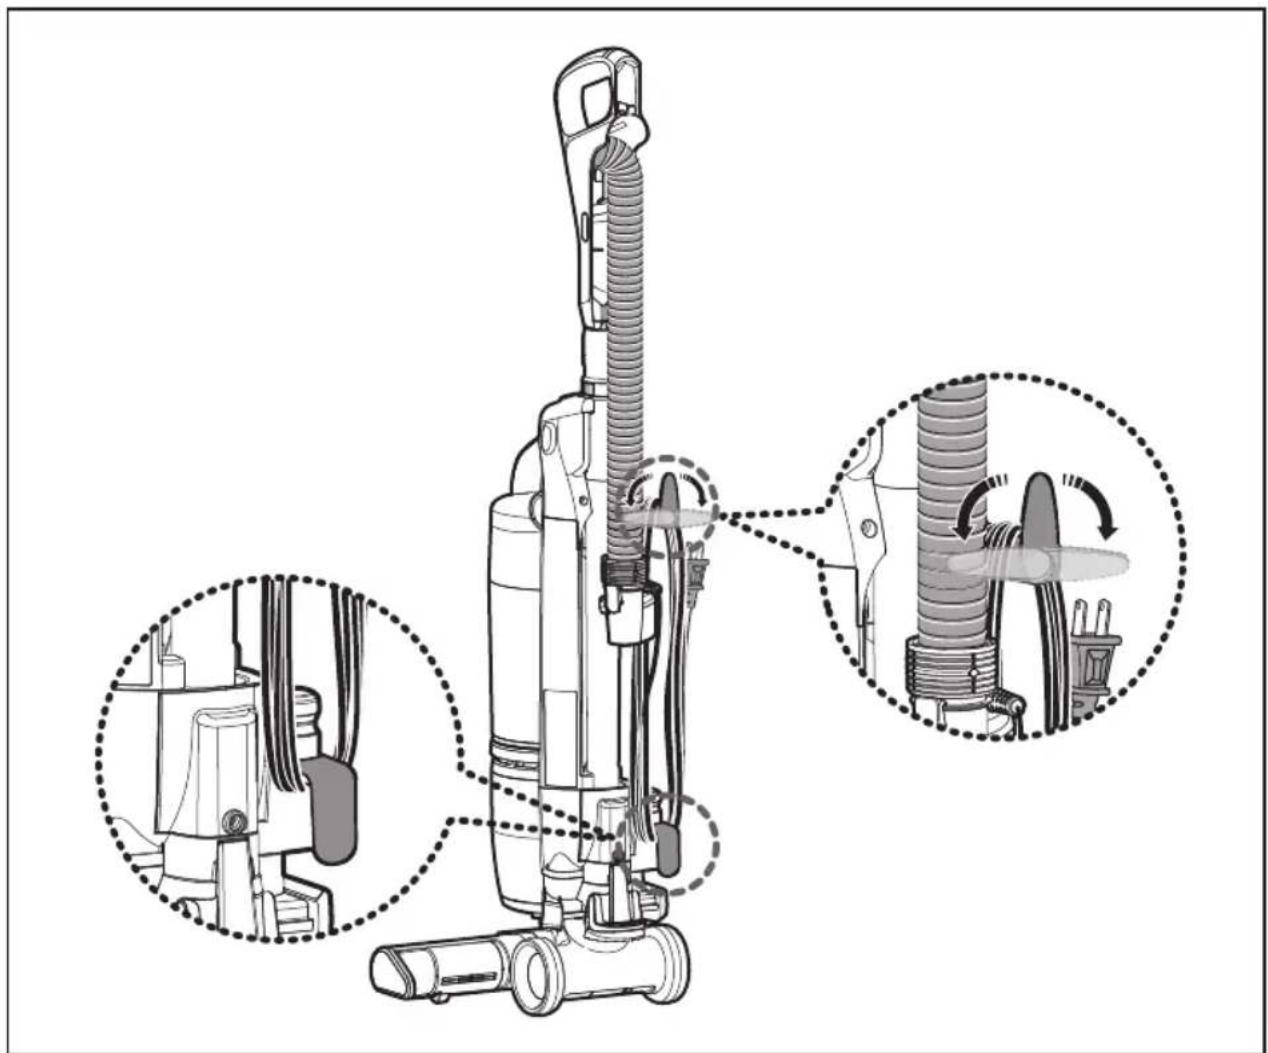
StoWinG tHe PoWer CorD
natural_image
Technical diagram of a vacuum cleaner with internal components and assembly steps (no text or labels)
When removing the plug from an electrical outlet, grasp the plug, not the cord.
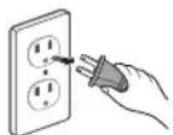
CAUTION
Please return the body to the brush for the storage
Upright mode
natural_image
Illustration of a vacuum cleaner's base with an arrow indicating motion (no text or symbols)
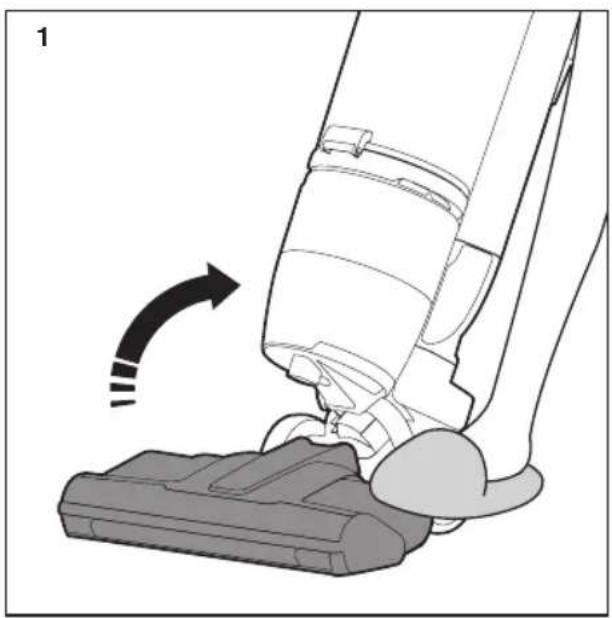
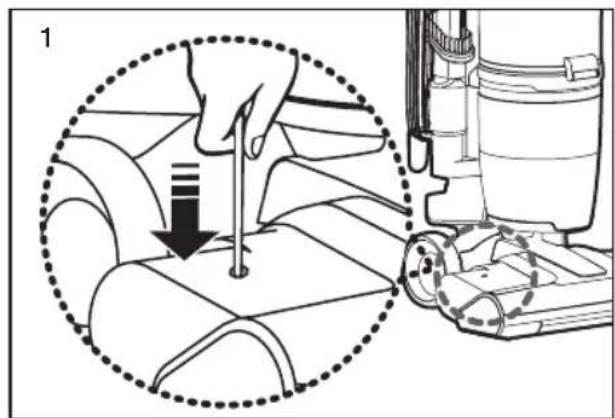
- Place your foot gently on the Motorized brush and tilt the handle back to start cleaning.
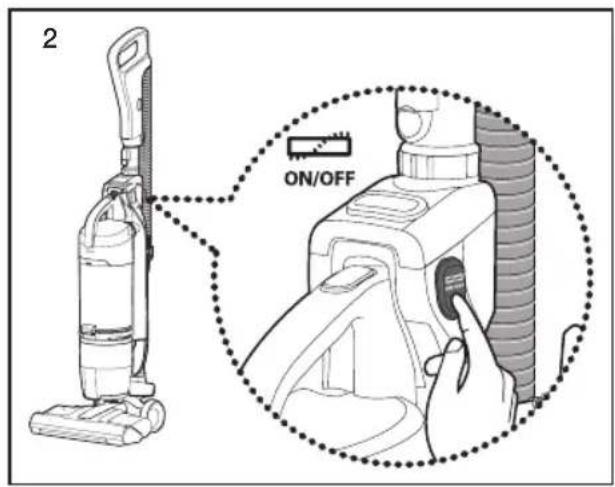
- Push the power On/Off switch.

natural_image
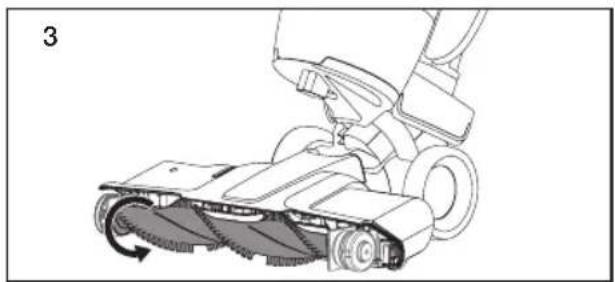
Technical line drawing of a robotic vacuum cleaner with motion arrow indicating rotation (no text or symbols)- Push the power On/Off switch, and then push the Motorized brush On/Off switch.

Do not invert the power brush while it is running.

Motorized brush only works when the body is tilted back.
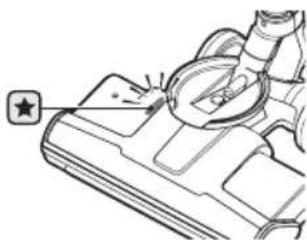
reSettinG tHe oVerLoaD ProteCtor
- The overload protector shuts off the brush motor if the Motorized brush becomes obstructed. To reset the overload protector, use a pen tip to press the reset switch.

Before starting the vacuum cleaner after resetting the overload protector, please check and clean the motorized brush.
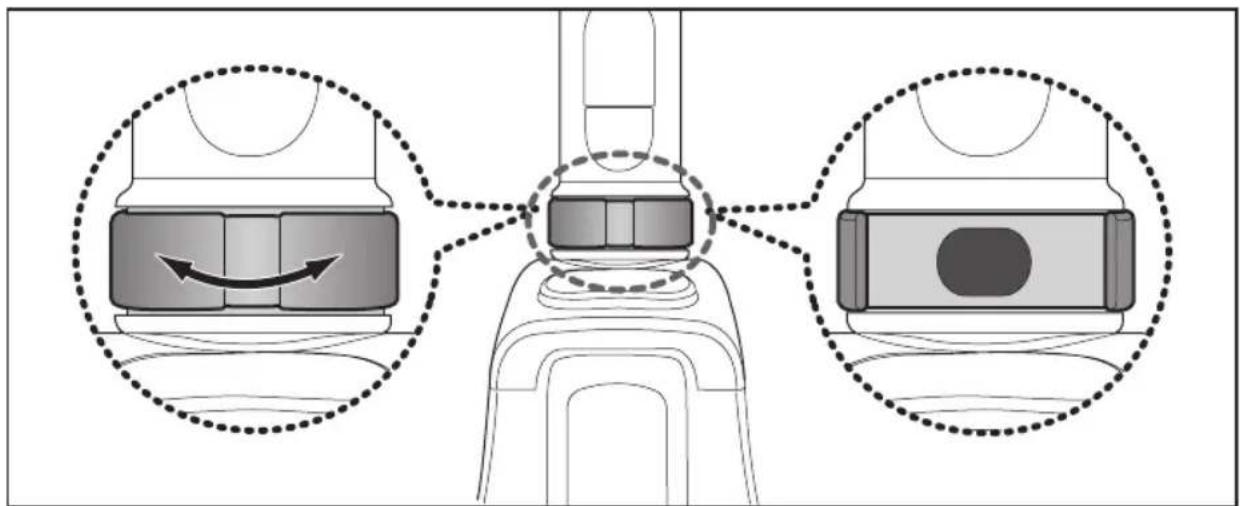
- Due to the suction power of this vacuum, it may become necessary at time to adjust the suction power on the handle. If the vacuum seems difficult to push or pull on high pile carpets and area rugs, adjust the suction power by rotating air tap 180° to open valve. Rotate the air tap to close the valve when you need high suction and for vacuuming floors.
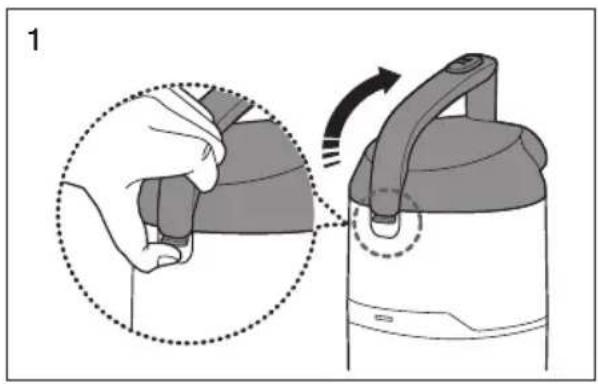
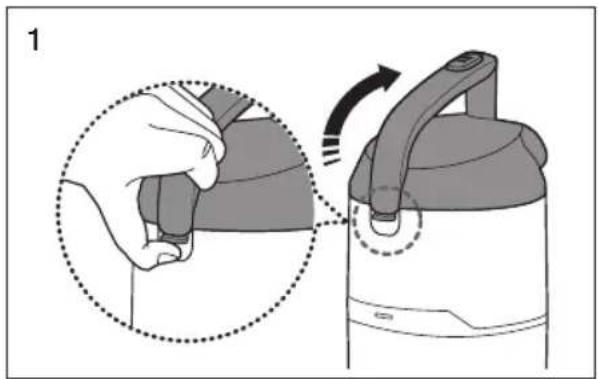
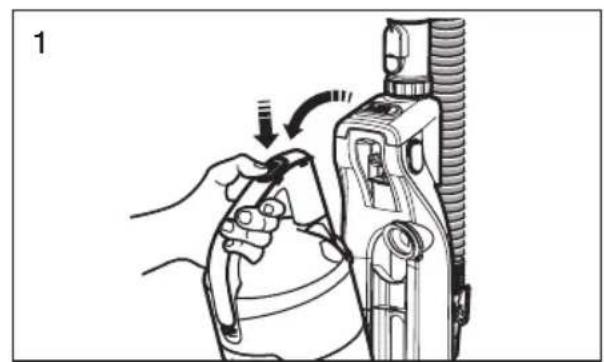
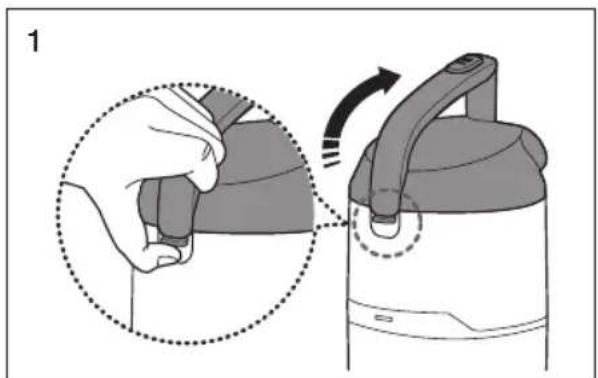
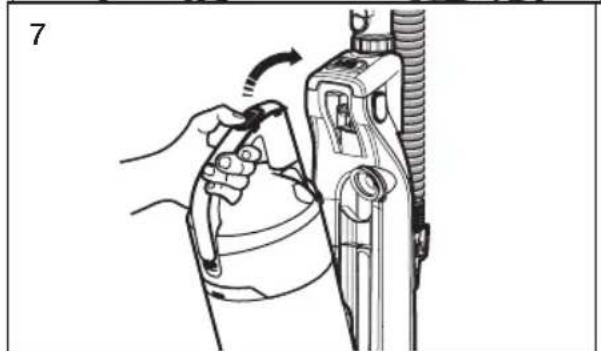
USING THE VACUUM'S HANDLE (THE DUST BIN HANDLE)

natural_image
Illustration of a person using an oxygen pump device with a magnified inset showing the handle and ring (no text or symbols)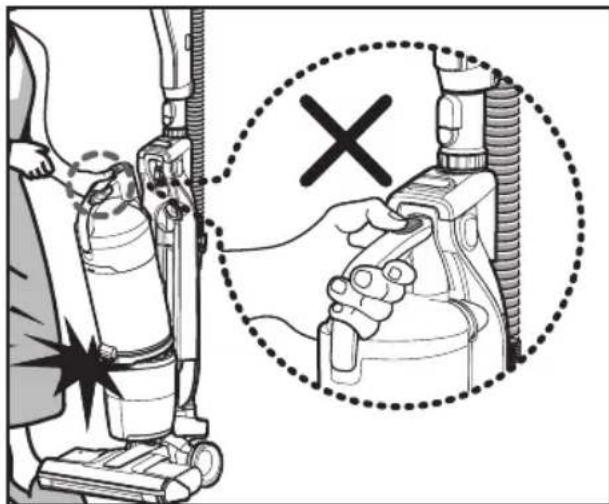

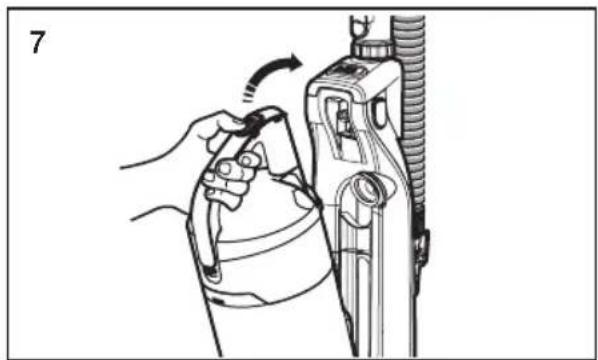
When you carry the vacuum cleaner by the handle, do not push the dust bin release button.
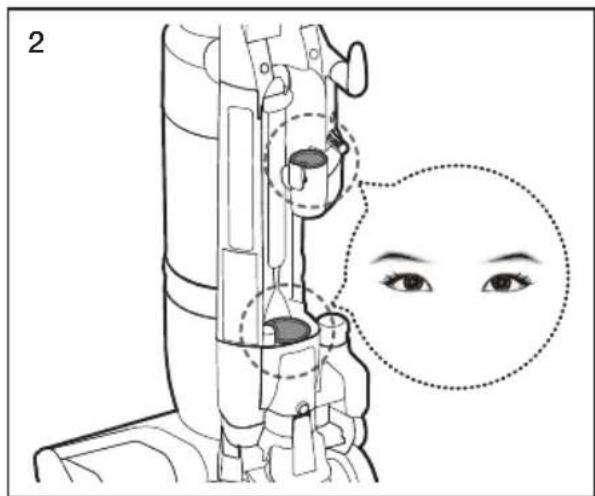
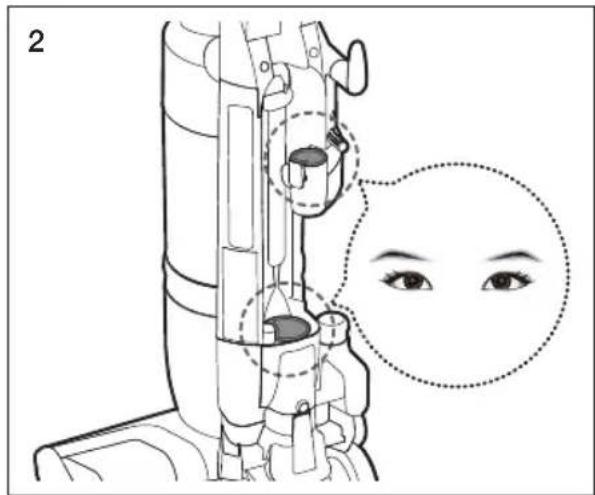
OPERATING THE DUST SENSOR (OPTION)
- Indicates the amount of dust being picked up and passing by the sensor which assist the user to clean more efficiently.
- The dust sensor is activated automatically when the cleaner runs and is turned off when the cleaner is stopped.

Green : Amount of dust passing sensor is small.
Red : Amount of dust passing sensor is large.
natural_image
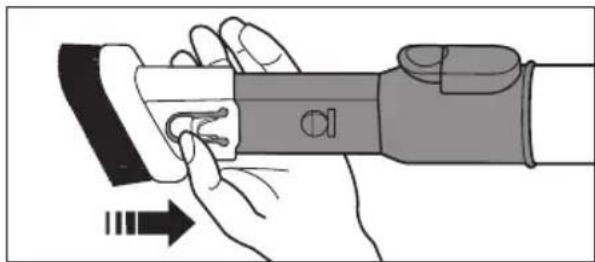
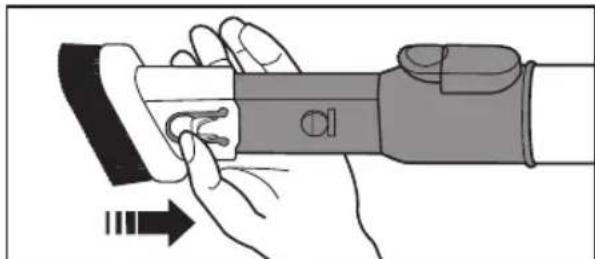
Technical line drawing of a mechanical component with a star symbol and a circular feature (no text or labels)Crevice tool
natural_image
Illustration of a hand holding a wristband with a device, showing motion direction (no text or symbols)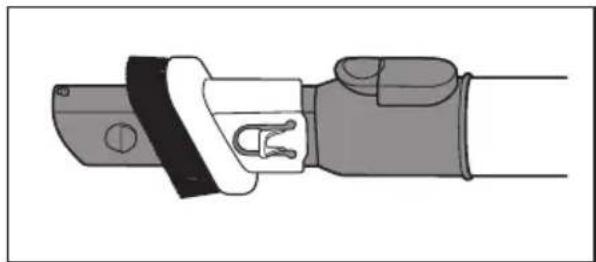
natural_image
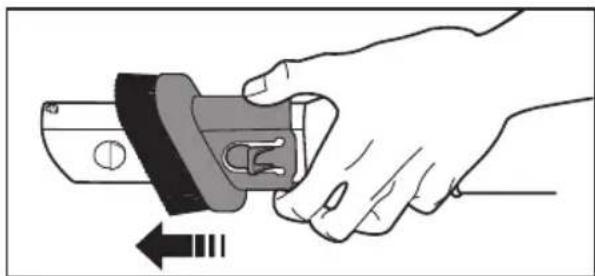
Technical illustration of a mechanical clamp or connector (no text or symbols)Dusting Brush
natural_image
Illustration of a hand holding a mechanical switch with an arrow indicating left motion (no text or symbols)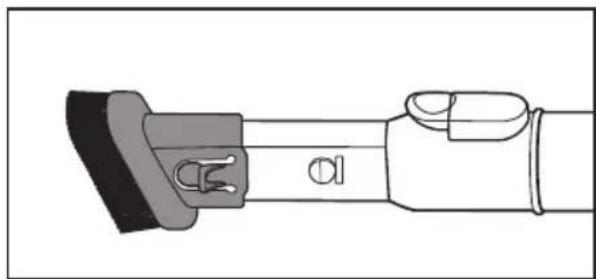
natural_image
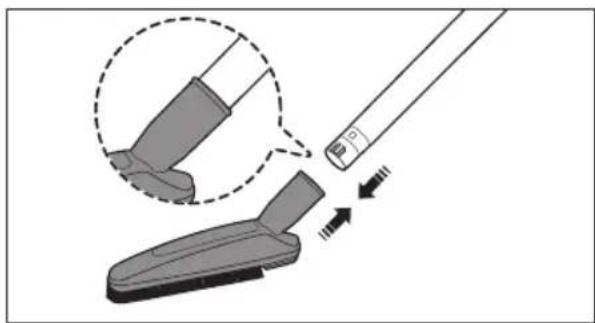
Technical line drawing of a mechanical component with no visible text or symbolsFurniture tool (OPTIONAL)
natural_image
Illustration of a cleaning tool interacting with a cleaning device, showing step-by-step assembly (no text or symbols)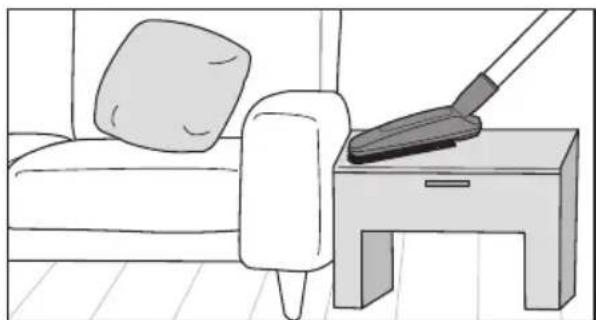
natural_image
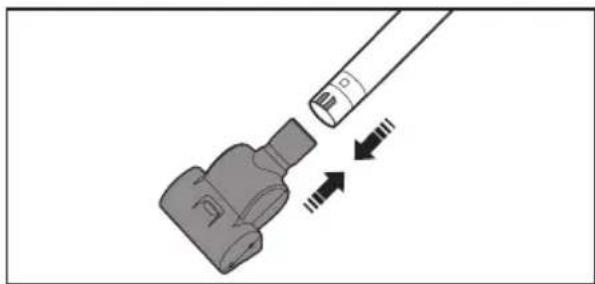
Illustration of a person cleaning a sofa with a broom on a side table (no text or symbols)Mini turbo brush (OPTIONAL)
natural_image
Diagram of a connector with a cable and two directional arrows indicating movement (no text or symbols)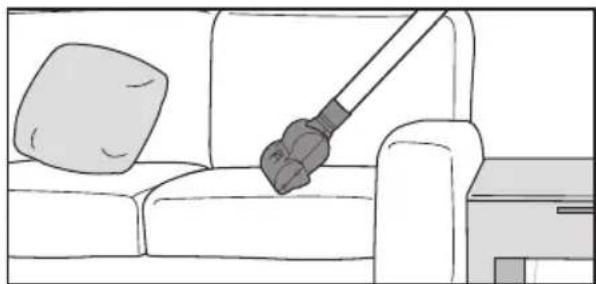
natural_image
Line drawing of a sofa with a lamp and a pillow, no text or symbols presentMaintenance
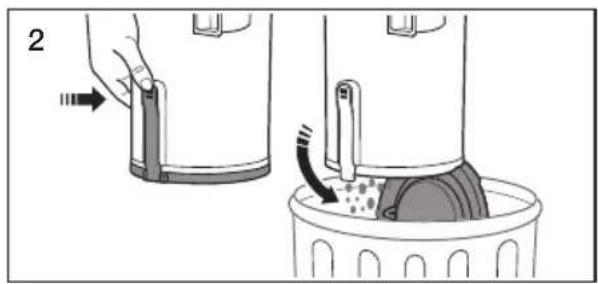
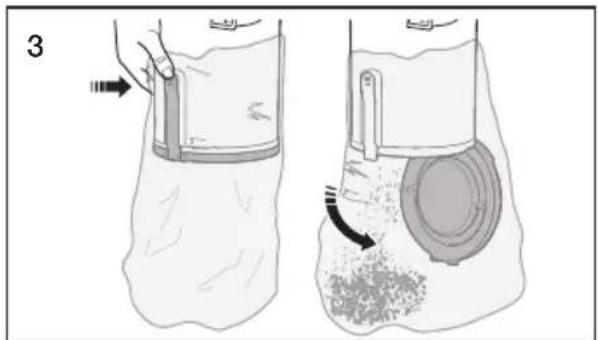
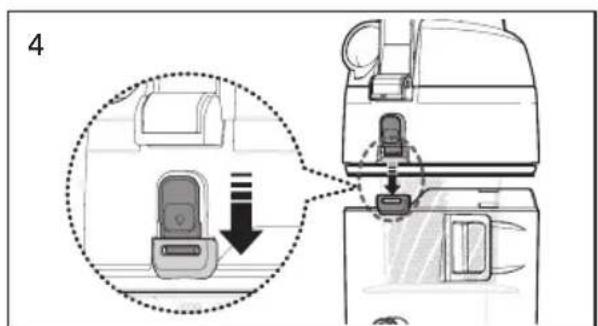
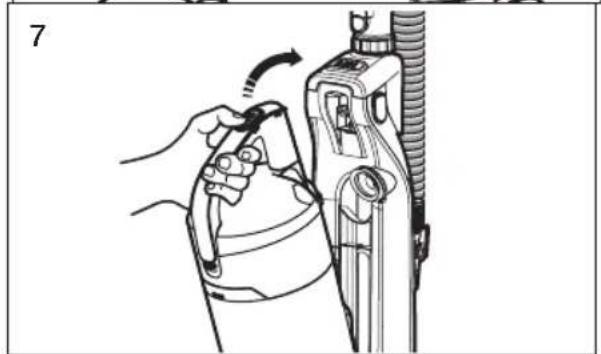
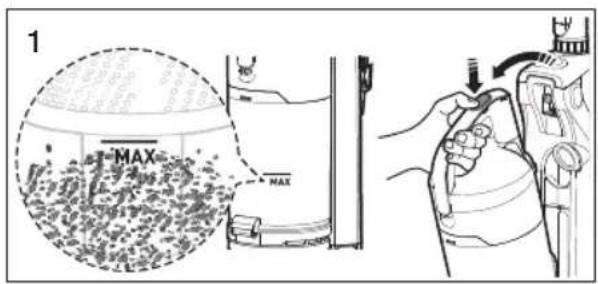
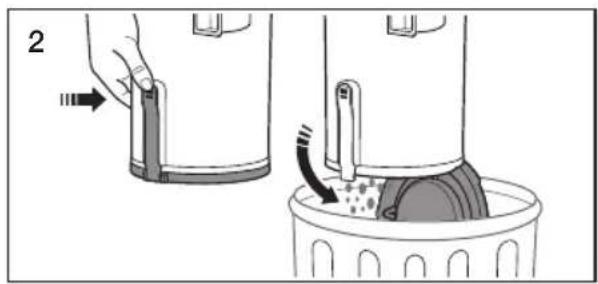
emPtyinG tHe DUSt Bin


natural_image
Illustration of two-step medical procedure showing a hand holding a device and a circular component inserted into a granular body (no text or symbols)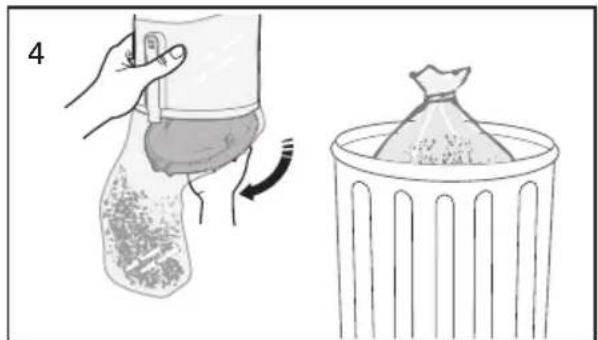
natural_image
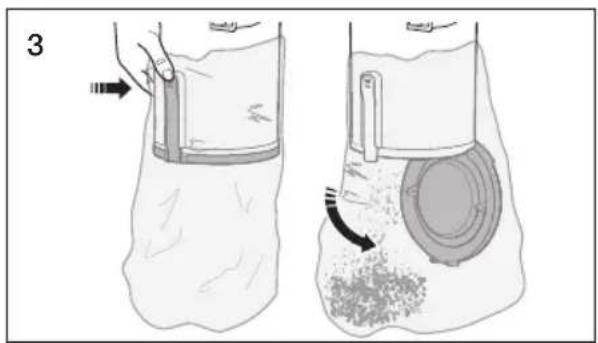
Illustration showing a hand holding a bag with a curved arrow, next to a trash bin (no text or symbols)Alternately, for asthma or allergy sufferers: Follow steps 3 and 4.
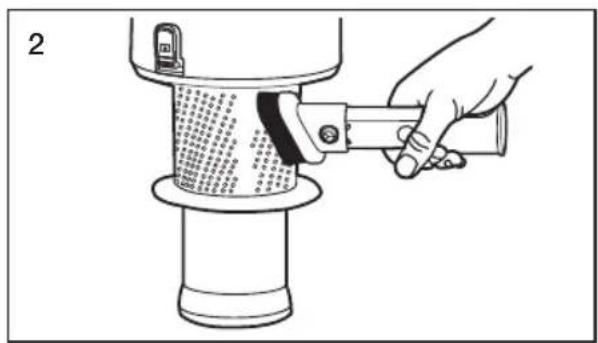
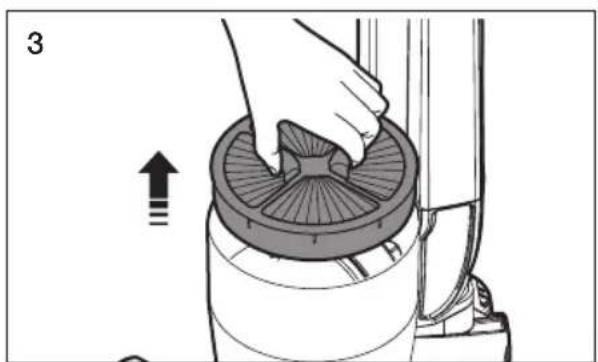
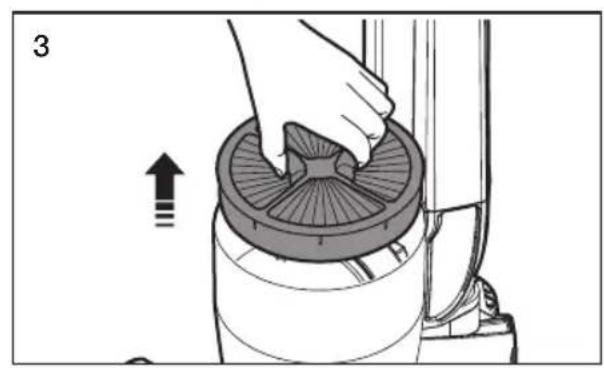
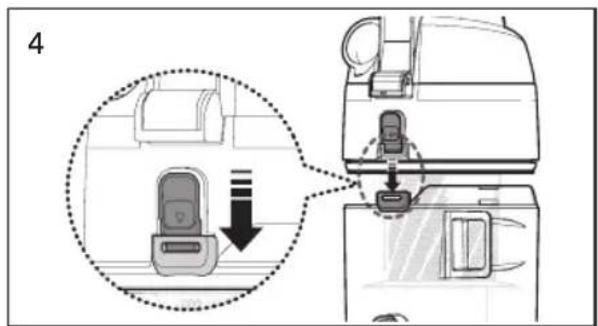
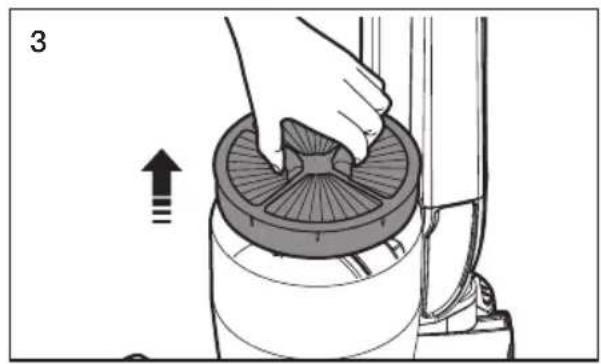
CLeaninG tHe GriLLe

natural_image
Illustration of a hand using a tool to press or adjust a textured cylindrical object (no text or symbols visible)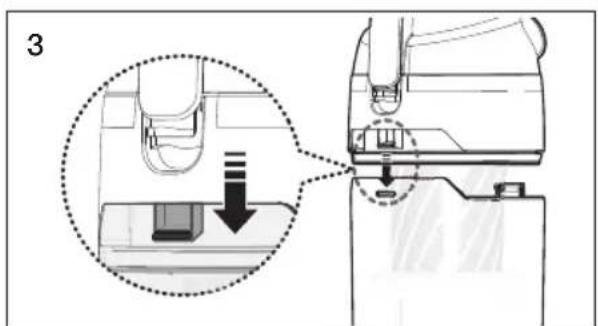
natural_image
Illustration of a hand holding a device with a close-up view of the device being turned, showing no text or symbols.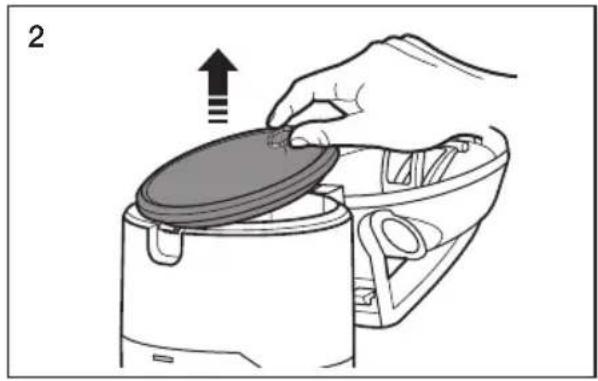
natural_image
Illustration of a hand placing a lid onto a device, with an arrow indicating upward motion (no text or symbols)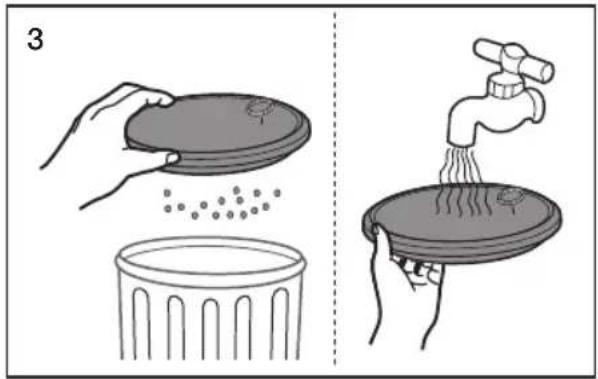
natural_image
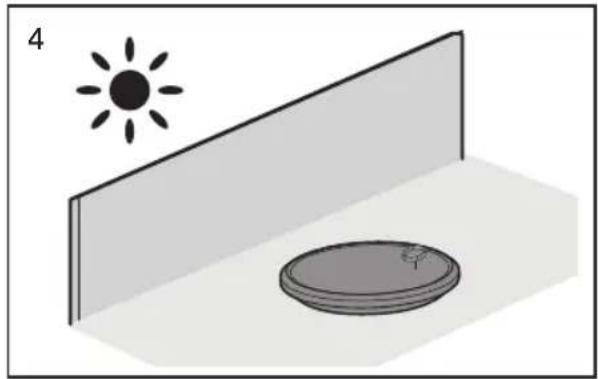
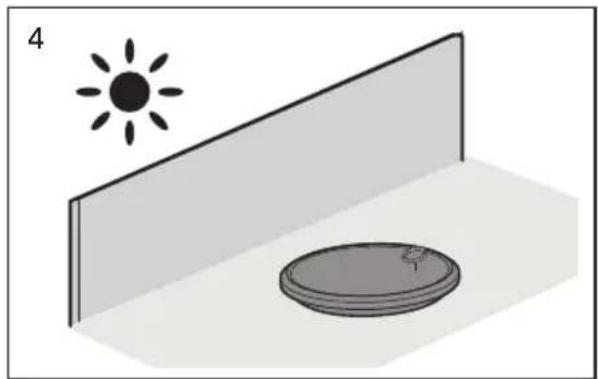
Simple 3D diagram showing a sun above a wall and a circular object on a base, with no text or symbols present.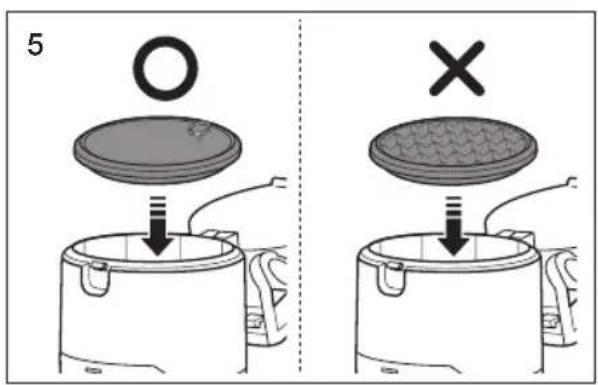

Check the premotor filter regularly and wash every 1\~2 months.
Make sure the premotor filter is completely dry before putting it back into the vacuum cleaner. Allow it to dry for at least 12 hours or more.
Do not use a wet filter
Replace the dust filter if it becomes damaged or deformed.
The dust bin cover will not close if the premotor filter is not installed.
natural_image
Black and white prohibition symbol of a microwave oven crossed out by a diagonal line (no text or numbers present)
natural_image
Prohibition sign showing a fire extinguisher crossed out by a diagonal line (no text or symbols)
natural_image
Prohibition sign showing a faucet crossed out by a diagonal line, indicating no prohibition or disinfection (no text present)
natural_image
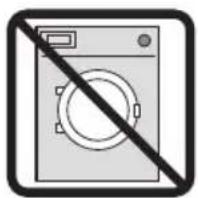
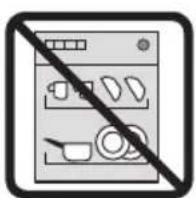
Exterior view of a washing machine with a diagonal line indicating prohibition (no text or symbols)
natural_image
Black and white icon of a kitchen counter with crossed-out kitchen utensils (no text or symbols)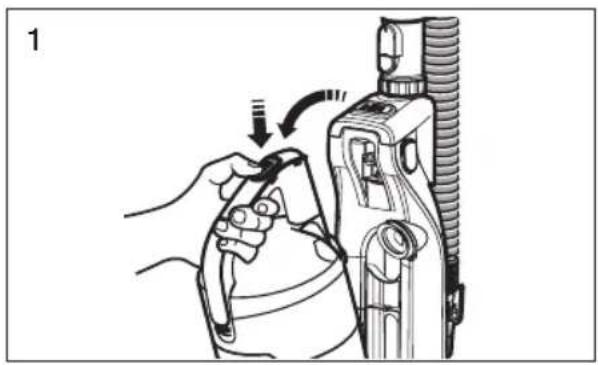
natural_image
Illustration of a hand using a tool to adjust or install a mechanical component, no text or symbols present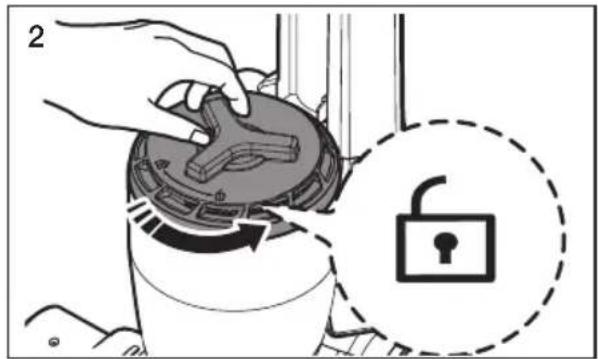
natural_image
Illustration of a hand pressing down on a mechanical component with an arrow indicating upward motion (no text or symbols)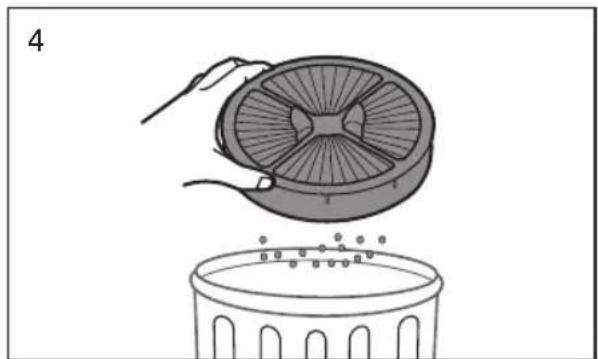
natural_image
Illustration of a hand placing a fan into a trash bin with scattered dots (no text or symbols)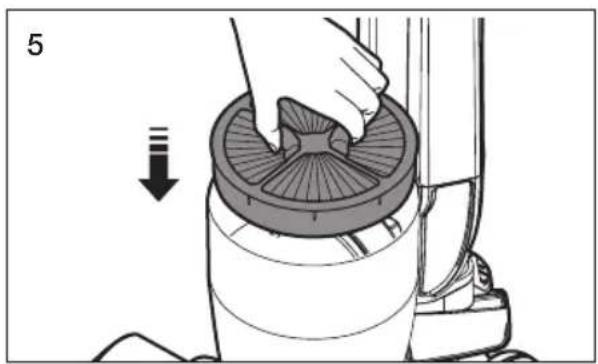
natural_image
Illustration of a hand using a circular filter to clean a component, with a downward arrow indicating the process (no text or symbols present)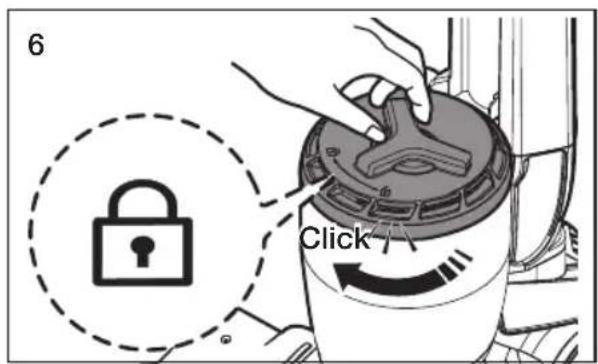
natural_image
Illustration of a hand using a tool to adjust or install a mechanical component, no text or symbols present
Clean the exhaust filter when suction is noticeably and continuously reduced or the vacuum cleaner overheats abnormally.
Note : The exhaust filter is not washable.
Replace the exhaust filter if cleaning does not resolve the problem.
The dust bin will not re-attach to the vacuum if the exhaust filter cover is not installed correctly.
Checking the rotating floor brush and drive belt
natural_image
Technical line drawing of a mechanical device with no visible text or symbols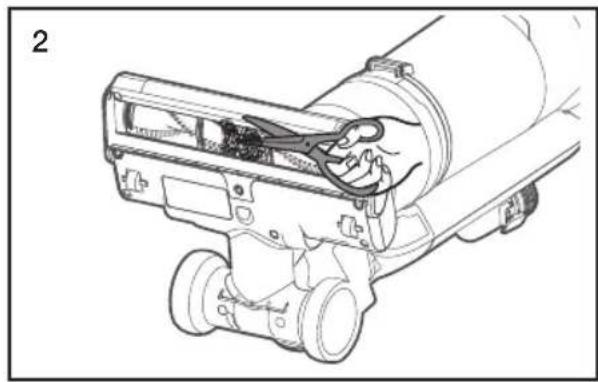
natural_image
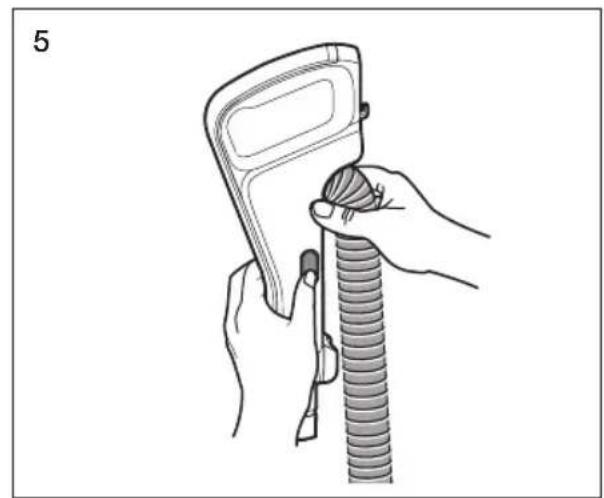
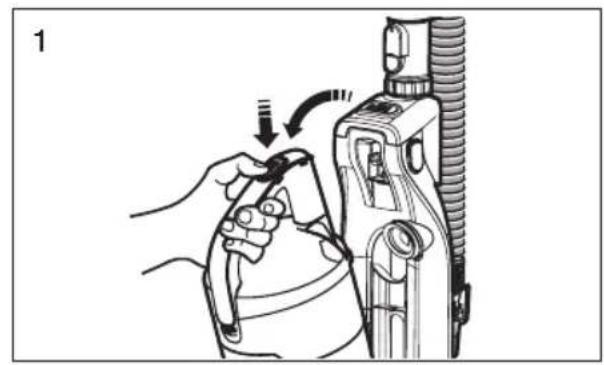
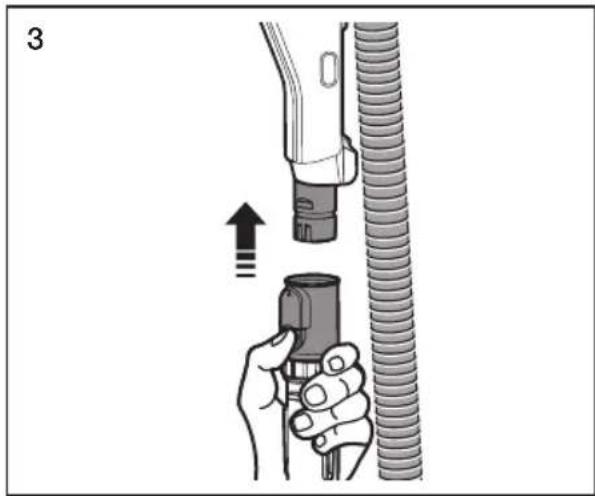
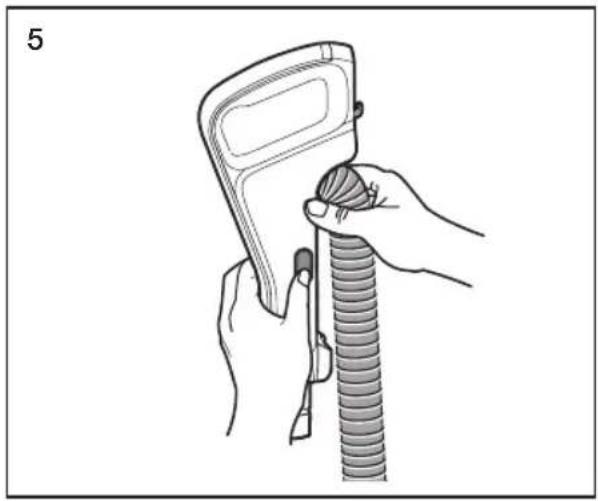
Technical line drawing of a mechanical device with hands operating a tool (no text or symbols visible)CHECKING FOR CLOGS

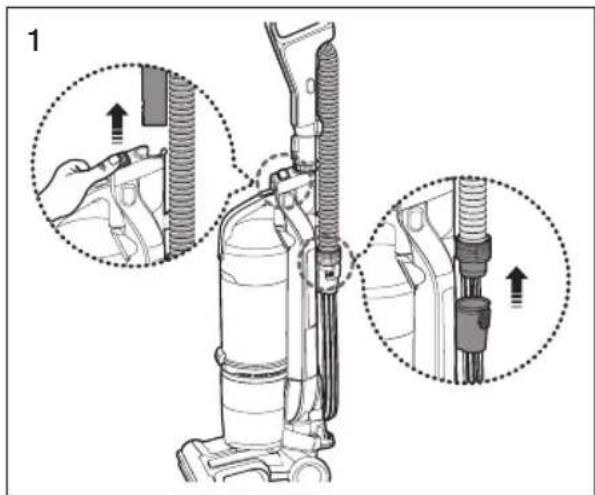


natural_image
Illustration of a hand holding a hose with a coiled tube, showing mechanical assembly (no text or symbols)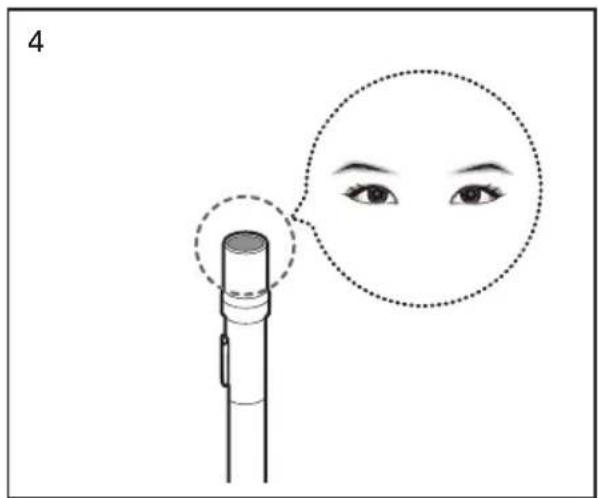
natural_image
Illustration of hands using a handheld device to lift a coiled tube (no text or symbols present)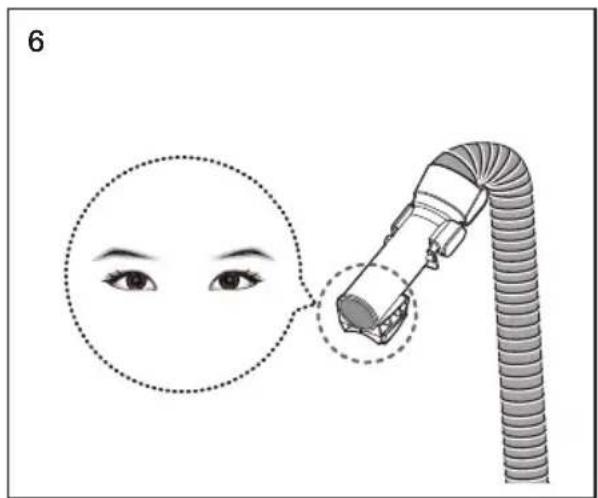
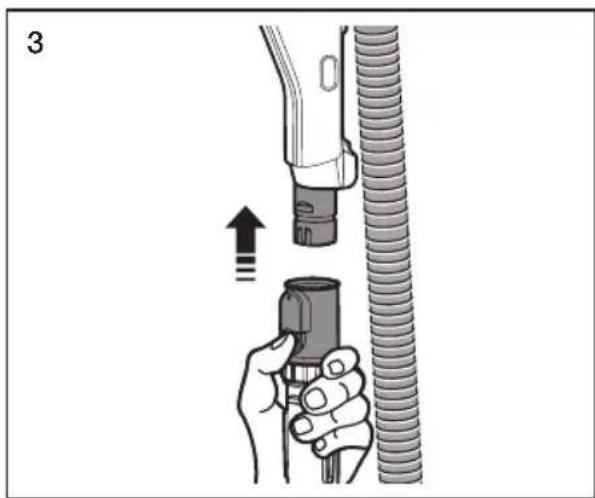
CAUTION
Before checking for clogs, turn off the Motorized brush and unplug the vacuum.
mini tUrBo BrUSH (oPtionaL)
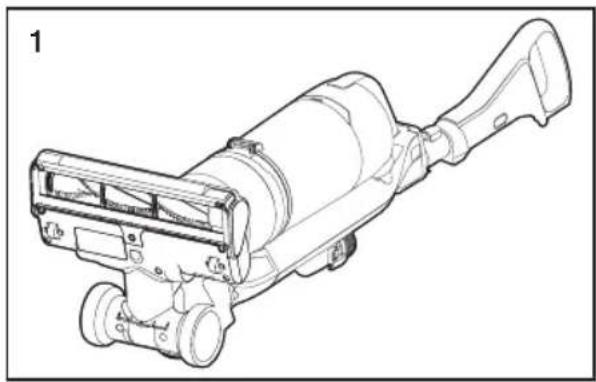
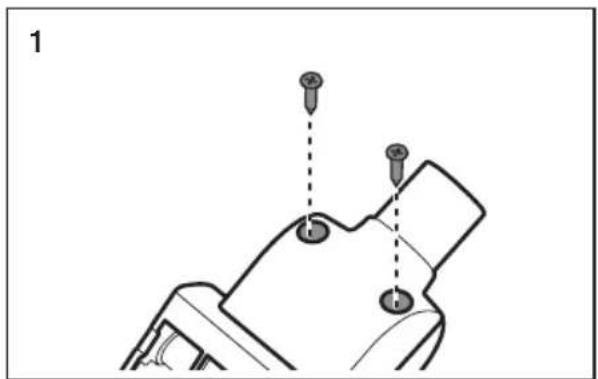
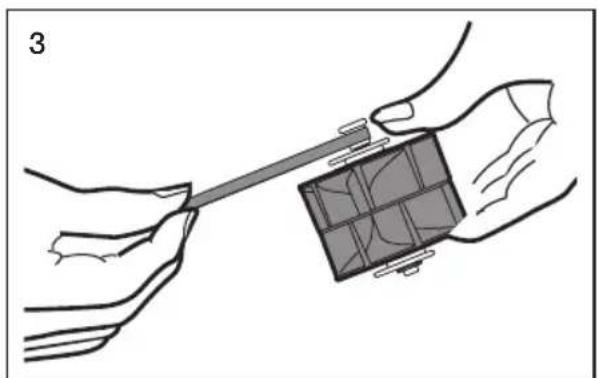
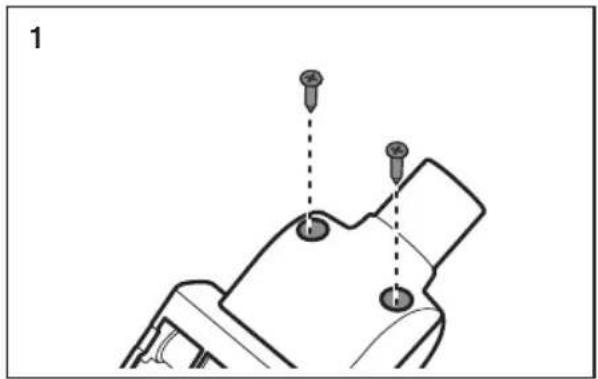
inSPeCtinG tHe BrUSH roLL & BeLt
natural_image
Technical diagram of a mechanical component with two screw holes and dashed alignment lines (no text or symbols)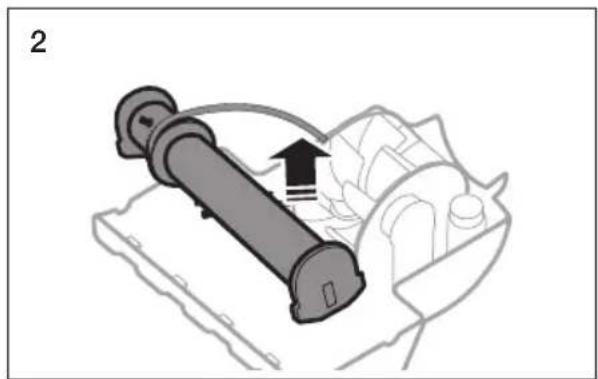
natural_image
Diagram of a mechanical device with a cylindrical component and directional arrow, no visible text or symbols- If a clog is present or debris is visible, inspect the brush roll.
natural_image
Illustration of hands holding a tool interacting with a grid-patterned object (no text or symbols)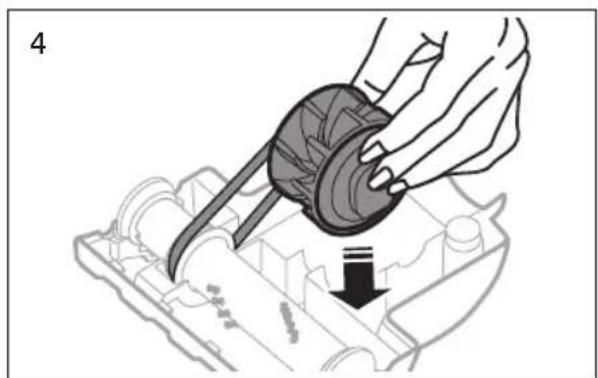
natural_image
Illustration of a hand using a mechanical component to press or install a component, with a downward arrow indicating motion (no text or symbols present)- If the belt is broken or cracked, replace it with a new belt following the instructions above.
Troubleshooting
Check this list of problems and possible solutions before bringing your vacuum to a service center.
| PROBLEM SOLUTION | |
| Vacuum won't run. | Check the electrical plug. Make sure it is fully plugged in.Press the Power on/off button.Reset overload protector.p12 |
| Suction Motor does not start.Thermal protector activated. | Allow the vacuum to cool. |
| Motorized brush does not start. | Check the power ON/OFF button and the brush ON/Off button.Cut hair or string off the brush.p18Reset the overload protector.p12 |
| Motorized brush repeatedly stops running after resetting the overload protector. | Use the air tap feature.p13 |
| Vacuum won't pick up or low suction. | Empty the dust bin.p15Clean the filter and confirm that the filter assembly is positioned properly.p16~17Check the hose connection or flow path.p18 |
| Dust escaping from the vacuum. | Empty the dust bin.p15Clean the premotor filters.p16Clean or replace the exhaust filter.p17Confirm that the filter assembly is positioned properly. |
| Cleaner tools won't pick-up. | Check inlets, pipe, and dust bin for obstructions.Remove obstruction.Empty the dust bin.p15Remove and clean the filters.p16~17Confirm that the dust bin is locked properly. |

SAMSUNG
If you have any questions or comments relating to Samsung products, please contact the SAMSUNG customer care center.
| COUNTRY CUSTOMER CARE CENTER WEB SITE | ||
| CANADA 1-800-SAMSUNG(726-7864) | www.samsung.com/ca/support (English)www.samsung.com/ca_fr/support (French) | |
| U.S.A 1-800-SAMSUNG(726-7864) www.samsung.com/us/support | ||
Aspiradora
Manual del usuario

PRECAUCIÓN
natural_image
Illustration of a vacuum cleaner's base with an arrow indicating rotation (no text or symbols)
natural_image
Mechanical robotic arm with a rotating conveyor belt and mechanical components (no text or symbols visible)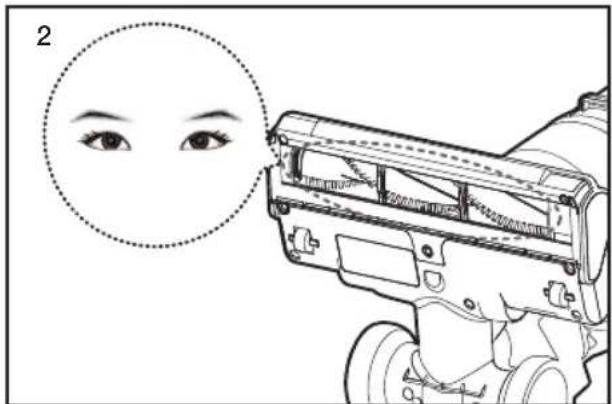
natural_image
Illustration of a person using a vacuum cleaner to adjust equipment, showing hand positioning and circular detail (no text or symbols)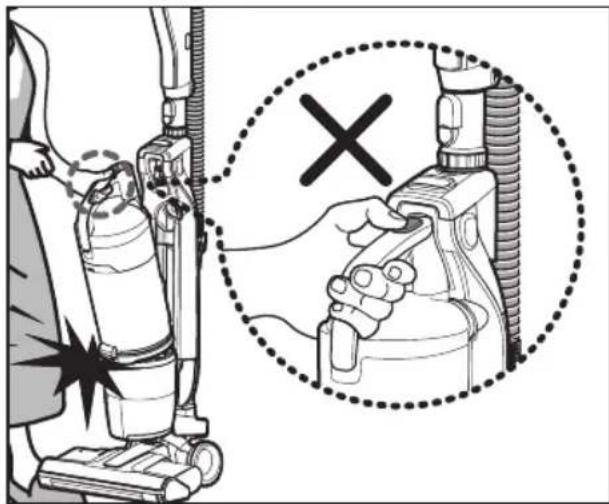

natural_image
Line drawing of a mechanical component with a star symbol pointing to it (no text or symbols present)natural_image
Illustration of a hand holding a wristband with a device labeled 'α' and an arrow indicating motion (no text or symbols beyond the label)Cepillo de Polvo

natural_image
Illustration of a mechanical tool with a handle and clasp (no text or symbols)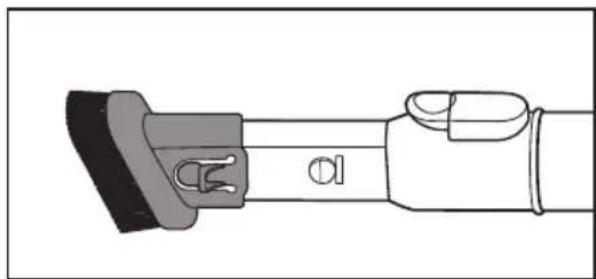
natural_image
Technical line drawing of a mechanical component with no visible text or symbols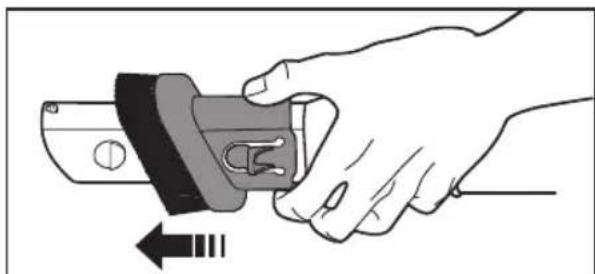
natural_image
Illustration of a hand holding a mechanical component with an arrow indicating rotation (no text or symbols)natural_image
Diagram showing a tool interacting with a cleaning or cleaning device, with arrows indicating motion (no text or symbols present)Cepillo mini turbo (OPCIONAL)

natural_image
Illustration of a mannequin cleaning a side table with a pillow on the back (no text or symbols)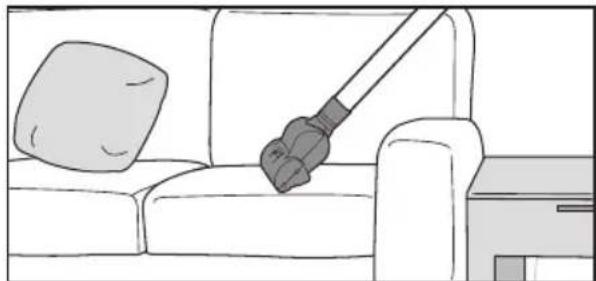
natural_image
Line drawing of a sofa with a hand holding a vacuum cleaner above it, no text or symbols present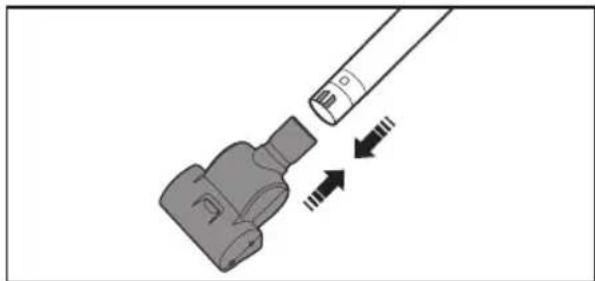
natural_image
Diagram of a mechanical component with arrows indicating motion or force direction (no text or symbols)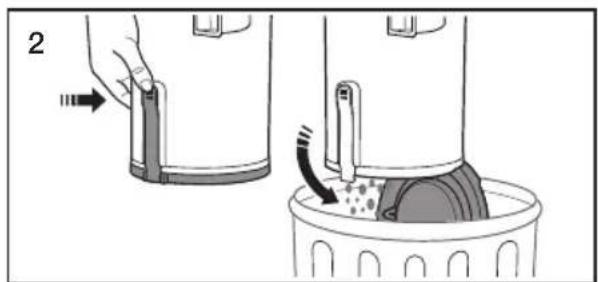
natural_image
Illustration of two-step medical procedure showing hand placement and fluid transfer (no text or symbols)
natural_image
Illustration showing a hand holding a bag with a curved arrow, next to a trash bin (no text or symbols)natural_image
Illustration of a hand using a tool to press or adjust a textured cylindrical object (no text or symbols visible)
natural_image
Illustration of a hand holding a device with a dotted circle highlighting the component, and a right-hand rule showing the device being twisted (no text or symbols present)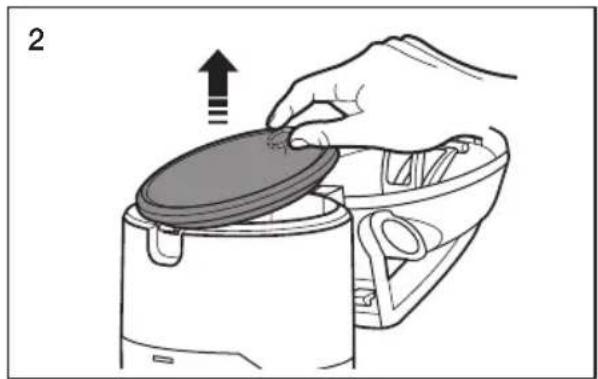
natural_image
Illustration of a hand placing a lid onto a kitchen appliance with an upward arrow (no text or symbols)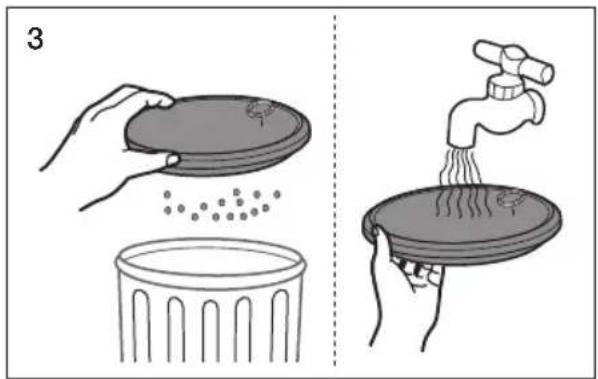
natural_image
Simple diagram showing a sun above a wall and a circular object on a base, with no text or symbols present.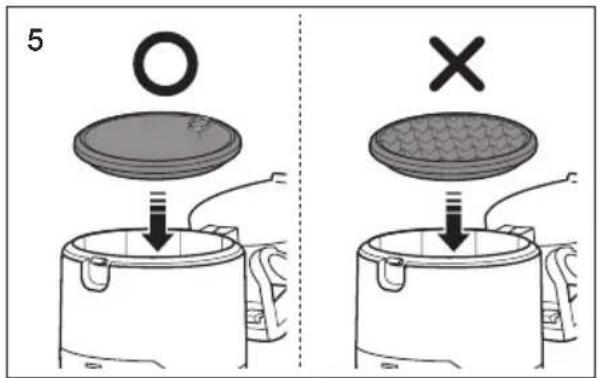

natural_image
Simple icon of a microwave oven with a diagonal line crossing through it, no text or symbols present.
natural_image
Prohibition sign showing a fire extinguisher crossed out by a diagonal line (no text or symbols)
natural_image
Prohibition sign of a faucet crossed over a surface, no text or symbols present
natural_image
Exterior view of a washing machine with a diagonal line indicating prohibition (no text or symbols)
natural_image
Illustration of a hand using a tool to adjust or install a mechanical device (no text or symbols visible)
natural_image
Illustration of a hand using a circular device to press or install a component, with an arrow indicating motion (no text or symbols present)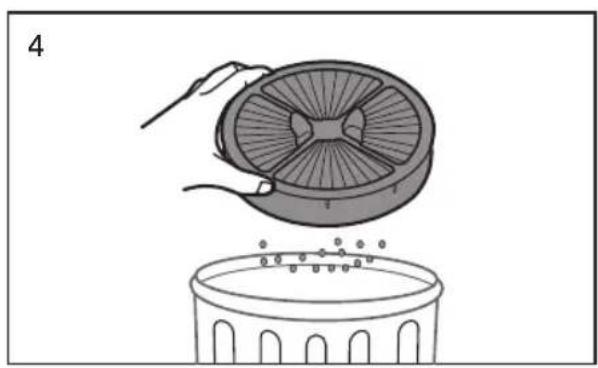
natural_image
Illustration of a hand placing a fan into a trash bin (no text or symbols)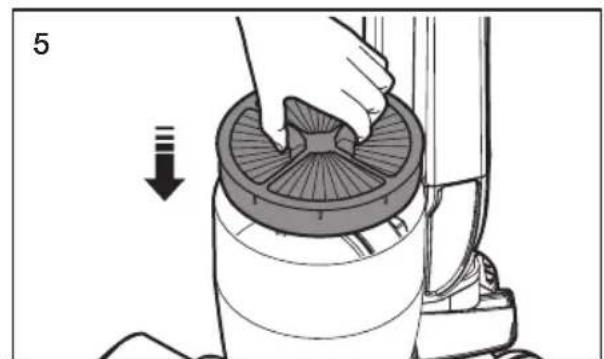
natural_image
Illustration of a hand using a vacuum cleaner to clean the interior (no text or symbols visible)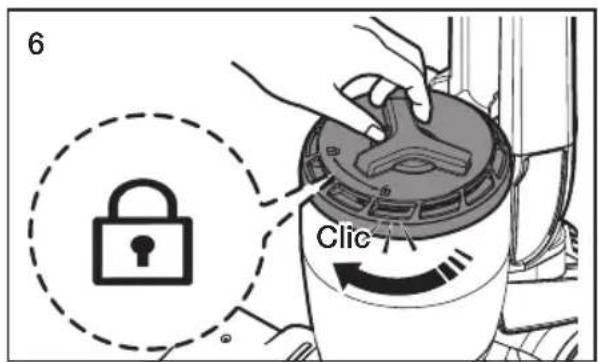
natural_image
Illustration of a hand holding a tool interacting with a mechanical device (no text or symbols visible)
natural_image
Technical line drawing of a mechanical device with no visible text or symbols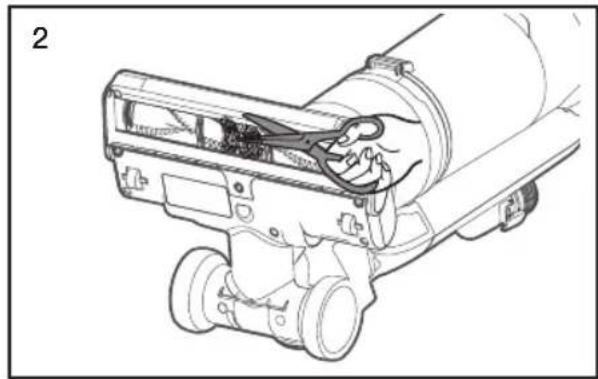
natural_image
Technical line drawing of a mechanical device with clamps and gears (no text or symbols)REVISANDO OBSTRUCCIONES

natural_image
Illustration of a hand holding a hose with a coiled tube, showing a mechanical assembly process (no text or symbols)

natural_image
Illustration of a hand holding a handheld device next to a coiled tube, no text or symbols present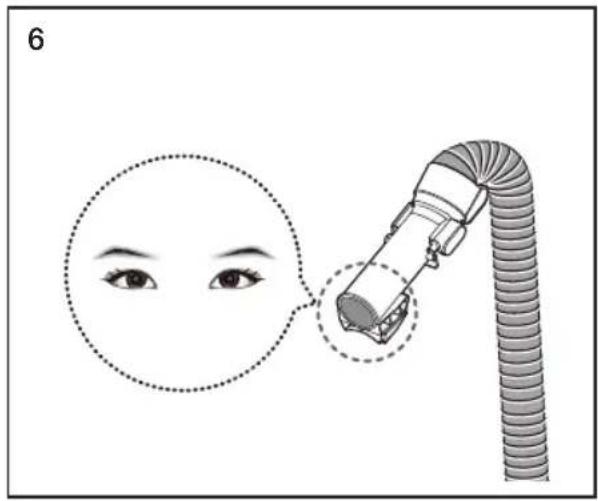

natural_image
Diagram of a mechanical component with two screw holes and dashed alignment lines (no text or symbols)
natural_image
Diagram of a mechanical device with a cylindrical component and directional arrow, no visible text or symbolsnatural_image
Illustration of hands holding a tool interacting with a grid-patterned object (no text or symbols)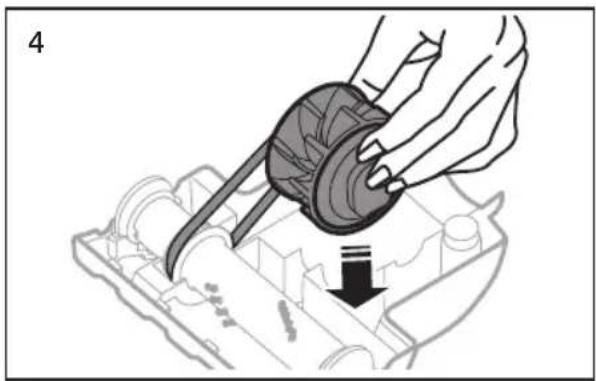
natural_image
Illustration of a hand using a mechanical component to adjust or install a mechanical part (no text or symbols visible)
ATTENTION
natural_image
Illustration of a vacuum cleaner's base with an arrow indicating rotation (no text or symbols present)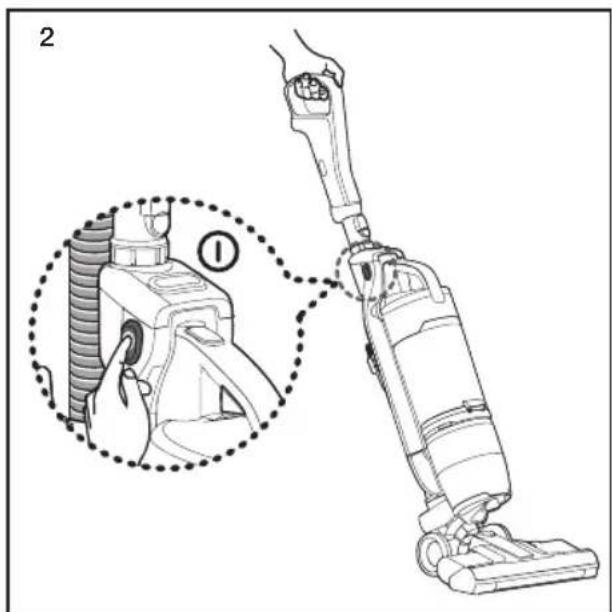
natural_image
Mechanical device with a rotating roller and mechanical components (no visible text or symbols)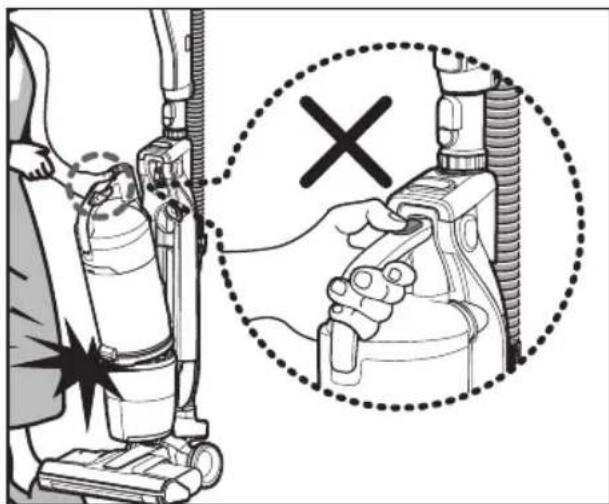

natural_image
Technical line drawing of a mechanical component with a star symbol pointing to a circular feature (no text or labels)Suceur plat
natural_image
Illustration of a hand holding a wristband with a device labeled 'α' and an arrow indicating motion (no text or symbols beyond the label)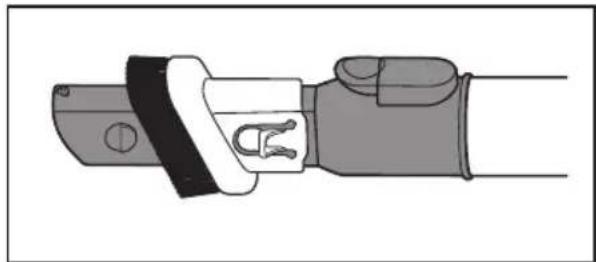
natural_image
Illustration of a mechanical tool with a handle and grip (no text or symbols)Brosse à épousseter

natural_image
Illustration of a hand holding a mechanical component with an arrow indicating rotation (no text or symbols)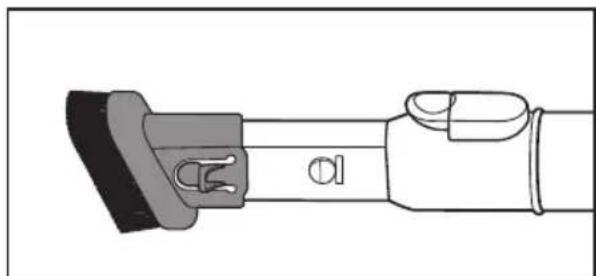
natural_image
Technical line drawing of a mechanical component with no visible text or symbolsnatural_image
Diagram showing a tool interacting with a cleaning or cleaning device, with arrows indicating motion (no text or symbols present)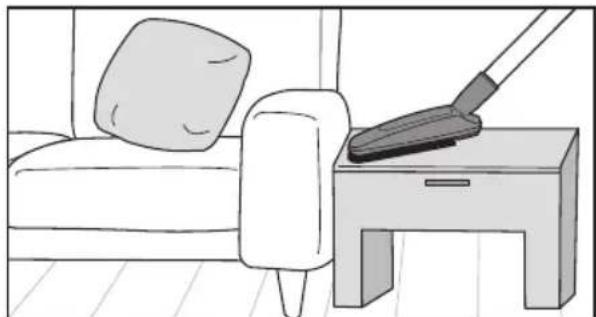
natural_image
Illustration of a mannequin cleaning a side table with a pillow on the back (no text or symbols)natural_image
Diagram of a mechanical component with arrows indicating motion or force direction (no text or symbols)
natural_image
Line drawing of a sofa with a hand holding a bulb, no text or symbols presentVIDER LE VIDE-POUSSIÈRE

natural_image
Diagram showing two steps of a cleaning or dust removal procedure: one being inserted into a container with dust residue, the other being removed (no text or symbols present)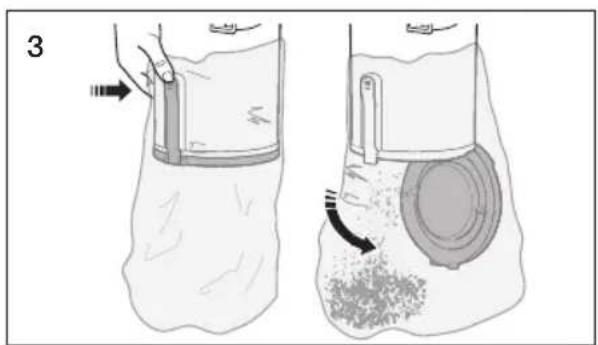
natural_image
Illustration of two-step medical procedure showing foot positioning and insertion of a circular component (no text or symbols)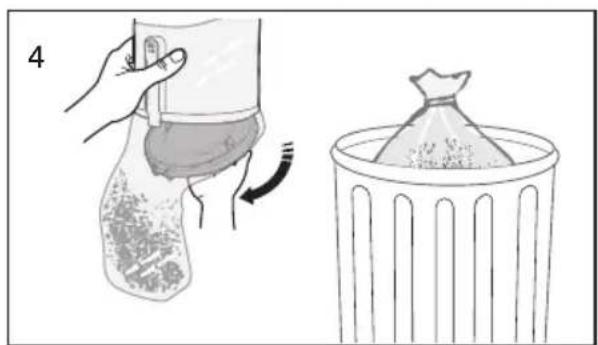
natural_image
Illustration showing a hand holding a bag with a curved arrow indicating rotation, next to a trash bin filled with granular material (no text or symbols)natural_image
Illustration of a hand using a tool to press or adjust a textured cylindrical object, no text or symbols present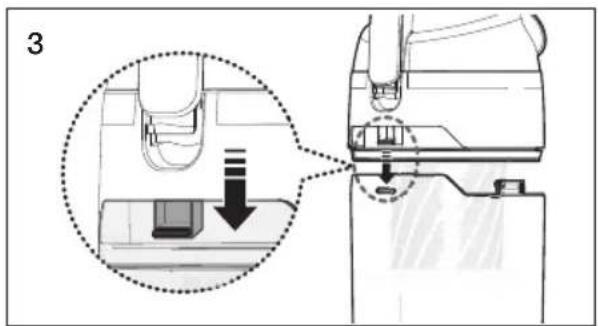
natural_image
Illustration of a hand holding a device with a close-up view of the lid and handle, showing motion (no text or symbols)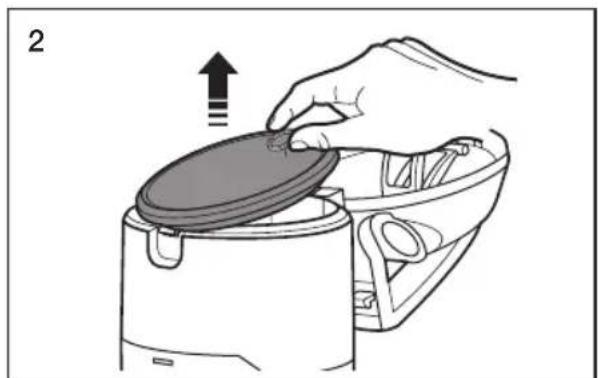
natural_image
Illustration of a hand placing a lid onto a kitchen appliance with an upward arrow (no text or symbols)
natural_image
Illustration showing two steps of cleaning a trash bin: one with a lid and particles, the other with a faucet pouring liquid into a container (no text or symbols)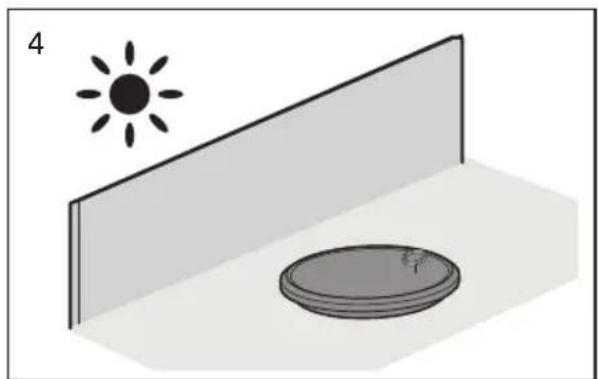
natural_image
Simple 3D diagram showing a sun above a wall and a circular object with a scale, no text or symbols present.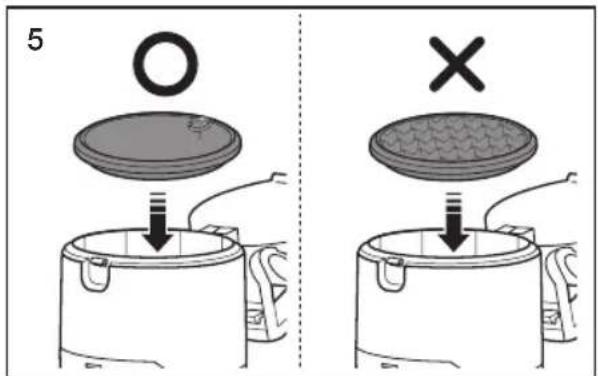

natural_image
Simple line drawing of a microwave oven without any text or symbols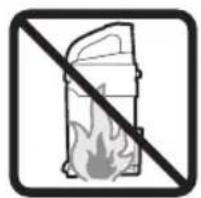
natural_image
Prohibition sign showing a fire extinguisher crossed out by a diagonal line (no text or symbols)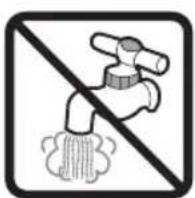
natural_image
Illustration of a hand using a tool to adjust or install a mechanical component, no text or symbols present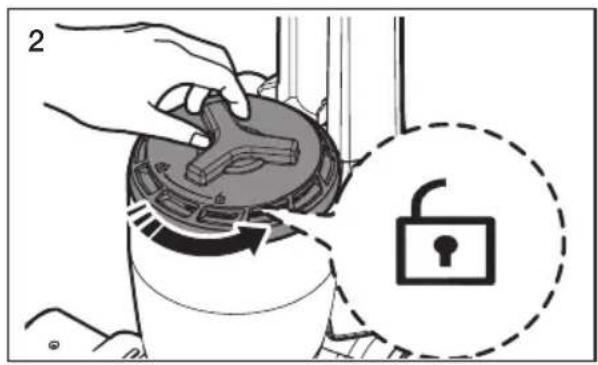
natural_image
Illustration of a hand placing a component into a circular device with a handle, showing an upward arrow (no text or symbols present)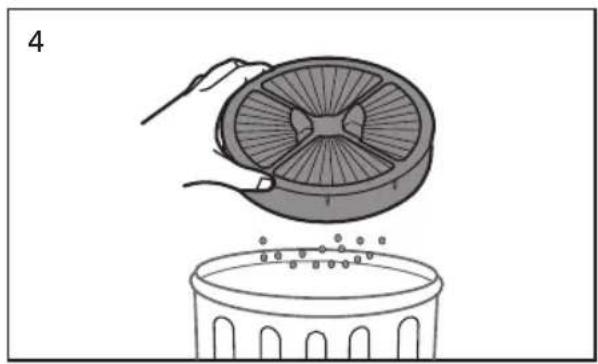
natural_image
Illustration of a hand placing a fan into a bowl with small dots on the surface (no text or symbols)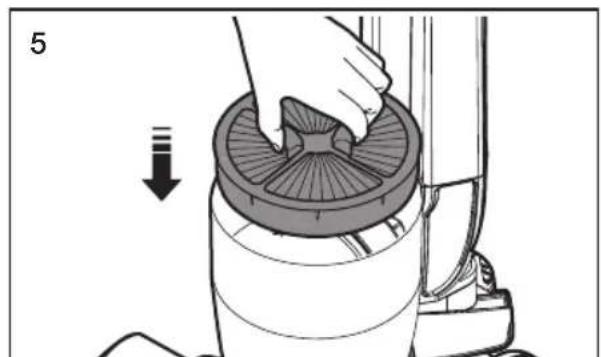
natural_image
Illustration of a hand placing a circular component into a cylindrical device, with an arrow indicating downward motion (no text or symbols present)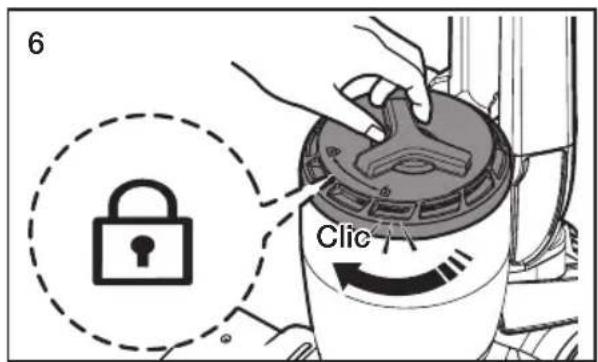
natural_image
Illustration of a hand holding a tool interacting with a mechanical device (no text or symbols visible)
natural_image
Technical line drawing of a mechanical device with no visible text or symbols
natural_image
Technical line drawing of a mechanical device with clamps and internal components (no text or symbols)VÉRIFICATION DES OBSTRUCTIONS

natural_image
Illustration of a hand holding a hose with a coiled tube, showing mechanical assembly (no text or symbols)
natural_image
Illustration of a hand holding a handheld device next to a coiled tube, no text or symbols present

MINI-BROSSE MÉCANIQUE (EN OPTION)
INSPECTION DU ROULEAU ET DE LA COURROIE DE LA BROSSE
natural_image
Diagram of a mechanical component with two screws and dashed alignment lines (no text or symbols)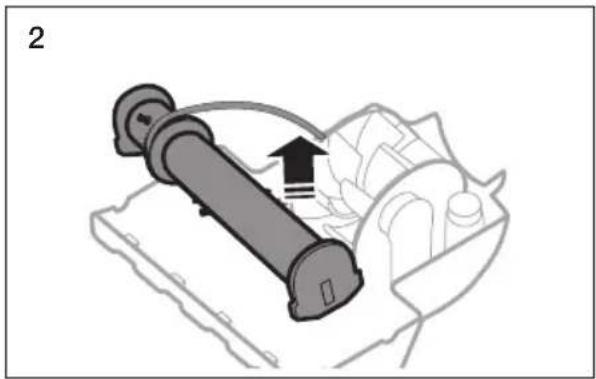
natural_image
Diagram of a mechanical device with a cylindrical component and directional arrow, no visible text or symbolsnatural_image
Illustration of hands holding a tool interacting with a grid-patterned object (no text or symbols)
natural_image
Illustration of a hand using a mechanical component to press or install a mechanical part, with a downward arrow indicating motion (no text or symbols present)mémo
mémo
SAMSUNG
- Vacuum Cleaner user manual
- YOUR VACUUM CLEANER
- BEFORE USING THE VACUUM CLEANER
- MAINTENANCE
- TROUBLESHOOTING
- SAFETY INFORMATION
- CAUTION/WARNING SYMBOLS USED
- OTHER SYMBOLS USED
- State of California Proposition 65 Warning (US only)
- imPortant Safety inStrUCtionS
- SAVE THESE INSTRUCTIONS
- PoLariZeD PLUG inStrUCtionS
- PRODUCT VIEW
- ASSEMBLE THE VACUUM CLEANER
- Operating the vacuum
- StoWinG tHe PoWer CorD
- Upright mode
- reSettinG tHe oVerLoaD ProteCtor
- USING THE VACUUM'S HANDLE (THE DUST BIN HANDLE)
- OPERATING THE DUST SENSOR (OPTION)
- Crevice tool
- Dusting Brush
- Furniture tool (OPTIONAL)
- Mini turbo brush (OPTIONAL)
- CHECKING FOR CLOGS
- SAMSUNG
- Aspiradora
- Manual del usuario
- REVISANDO OBSTRUCCIONES
- Suceur plat
- Brosse à épousseter
- VIDER LE VIDE-POUSSIÈRE
- MINI-BROSSE MÉCANIQUE (EN OPTION)
- INSPECTION DU ROULEAU ET DE LA COURROIE DE LA BROSSE
Brand : SAMSUNG
Model : SU10H3020P
Category : Vacuum Cleaner