
KU36PRO1X14 - Range hood BERTAZZONI - Free user manual and instructions
Find the device manual for free KU36PRO1X14 BERTAZZONI in PDF.
| Product type | Wall-mounted range hood |
| Brand | Bertazzoni |
| Model | KU36PRO1X14 |
| Dimensions (W x D x H) | Approximately 90 cm x 50 cm x 60 cm (estimated) |
| Weight | Approximately 15 kg (estimated) |
| Electrical supply | 120 V / 60 Hz, 15 A circuit with grounding |
| Motor power | Not specified (estimated 280 W) |
| Lighting | Integrated LED lamp |
| Number of speeds | 4 motor speed levels |
| Control type | Mechanical buttons: light, motor, speed +/-, timer |
| Timer | Automatic shut-off after 15 minutes |
| Exhaust duct diameter | 150 mm (6 in) |
| Filter type | Washable aluminum grease filter (dishwasher safe) |
| Filter cleaning frequency | Every 10 to 15 days under normal use |
| Minimum distance from cooktop | 650 mm (25 19/32 in) |
| Mounting | Wall-mounted with brackets included |
| Installation type | Exterior exhaust version only |
| Hood material | Stainless steel |
| Warranty | 2-year limited, 30-day cosmetic |
| Safety standards | Compliant with local electrical standards, grounding required |
Frequently Asked Questions - KU36PRO1X14 BERTAZZONI
User questions about KU36PRO1X14 BERTAZZONI
0 question about this device. Answer the ones you know or ask your own.
Ask a new question about this device
Download the instructions for your Range hood in PDF format for free! Find your manual KU36PRO1X14 - BERTAZZONI and take your electronic device back in hand. On this page are published all the documents necessary for the use of your device. KU36PRO1X14 by BERTAZZONI.
USER MANUAL KU36PRO1X14 BERTAZZONI
natural_image
3D technical illustration of a kitchen ventilation duct with mounting holes and ventilation grilles (no text or symbols)
KU24PRO1X/14
KL1A.HM5X..UA
KU30PRO1X/14
K71A.HM5X..UA
KU36PRO1X/14
K31A.HM5X..UA
KU48PRO1X/14
K41A.HM5X..UA
KU36PRO2X/14
K32AMHU5X..UA
KU48PRO2X/14
K42AMHU5X..UA

Fig.1
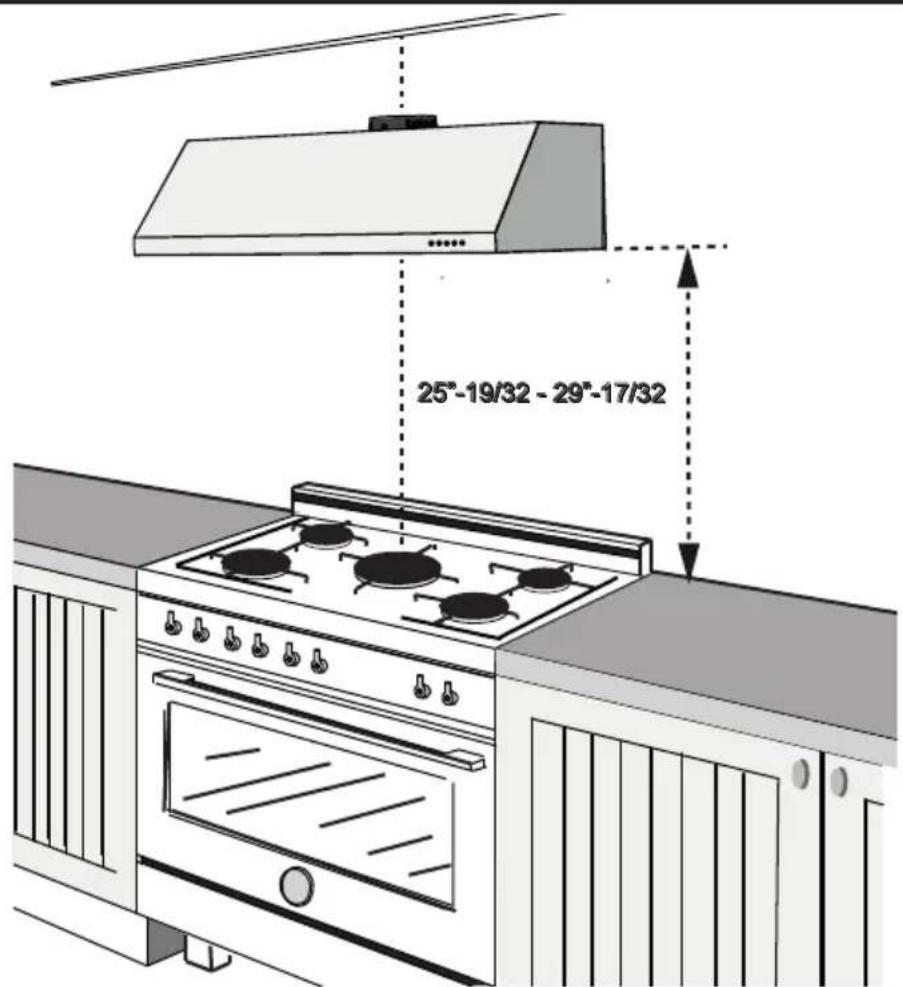
Fig.2
| MODELS | ABCDEFGH | |||||||
| KU24PRO1X/14 | 24" | 11"13/32 | 6"1/4 | 1"25/32 | 8"29/32 | 3"7/64 | 2"23/64 | 12"63/64 |
| KU30PRO1X/14 | 30" | 11"13/32 | 9"1/4 | 1"25/32 | 8"29/32 | 6"7/64 | 2"23/64 | 12"63/64 |
| KU36PRO1X/14 | 36" | 11"13/32 | 12"15/64 | 1"25/32 | 8"29/32 | 9"1/16 | 2"23/64 | 12"63/64 |
| KU48PRO1X/14 | 48" | 35"7/16 | 6"3/16 | 1"25/32 | 8"29/32 | 8"15/16 | 2"23/64 | 25"3/16 |
| KU36PRO2X/14 | 36" | 22"3/64 | 6"29/32 | 1"25/64 | 8"29/32 | 4"15/16 | 2"23/64 | 21"1/4 |
| KU48PRO2X/14 | 48" | 22"3/64 | 12"7/8 | 1"25/64 | 8"29/32 | 8"15/16 | 2"23/64 | 25"3/16 |

Fig.3
natural_image
Illustration of a microwave oven with a blue arrow indicating airflow or cooling process (no text or symbols)Fig.4


flowchart
graph TD
    A["1"] --> D["○"]
    B["32"] --> E["一"]
    C["□"] --> F["○"]
    G["■"] --> H["+"]
    I["4"] --> J["○"]
Fig.7
Please kindly register on our web site www.bertazzoni.com to validate your new product warranty and help us to assist you better in case of any inconvenience.
TWO YEAR LIMITED WARRANTY
ThewarrantiesprovidedbyBertazzoniSpainthisstatementapplyexclusivelytoBertazzoniappliancesand accessories sold as new products to the original owner by a Bertazzoni authorized distributor, retailer, dealer or service center and installed in the United States and Canada. The warranties provided in this statement are not transferable and have validity from the date of installation.
COVERAGE INFORMATION
Bertazzoni SpA will repair or replace any component part which fails or proves defective due to materials and/or workmanship within 2 years from the date of installation and under conditions of normal residential use.
Repair or replacement will be free of charge, including labor at standard rates and shipping expenses. Repair service must be performed by a Bertazzoni Authorized Service Center during normal working hours.
COSMETIC WARRANTY
Bertazzoni will cover parts showing cosmetic defects in material and workmanship for a period of thirty (30) days from date of installation of the unit. This coverage will include scratches, stains, surface imperfections on stainless steel, paint and porcelain, with the exclusion of slight differences in color due to materials and painting/enamelling technologies.
Exclusions are labor costs, B stock items, out - of - box appliances and display units.
HOW TO OBTAIN SERVICE
To obtain service please contact Bertazzoni Customer Service at the numbers below and make sure to have model number, serial number, and date of purchase ready. This information will be requested by our team and is crucial to speeding up resolution.
UNITED STATES https://us.bertazzoni.com/more/support
Phone: 866-905-0010
CANADA https://ca.bertazzoni.com/more/support
Save proof of original purchase or of original installation to establish warranty period. Copy of the product serial tag is affixed to the back cover of the instruction manual.
WHAT IS NOT COVERED
- The product used in any commercial/business application
- Repair service provided by other than a Bertazzoni authorized service agent.
-
Damage or repair service to correct service provided by an unauthorized agency or the use of unauthorized parts.
-
Installation not in accordance with local electrical codes or plumbing codes.
-
Defects or damage due to improper storage of the product.
-
Defects or damage or missing parts on products sold out of the original factory packaging or from displays.
-
Service calls or repairs to correct the installation of the product and/or related accessories.
-
Service calls to connect, convert or otherwise repair the electrical wiring / gas line / water line to properly use the product.
-
Service calls to provide instructions on the use of a Bertazzoni product.
-
Repair service due to product usage in manner other than what is normal and customary for home use.
-
Replacement of wear and tear parts
-
Replacement of glasses and light bulbs if they are claimed to have failed later than 30 days after installation and in no case later than 4 months after date of purchase
-
Defectsanddamagesarisingfromaccident,alteration,misuse,abuse,improperinstallation.
-
Defects and damages arising from transportation of the product to the home of the owner.
-
Defects and damage arising from external forces beyond the control of Bertazzoni SpA such as fire, flood, earthquakes and other acts of God.
In case the product will be installed in a remote area, where certified trained technicians are not reasonably available, the customer will be responsible for the transportation costs for the delivery of the product to the nearest authorized service center or for the displacement costs of a certified trained technician.
Bertazzoni does not assume any responsibility for incidental or consequential damages.
Some states do not allow the exclusion or limitation of incidental or consequential damages, so the above limitation or exclusion may not apply to you. This warranty gives you specific legal rights and you may also have other rights which may vary from state to state or province to province.
IMPORTANT SAFETY INSTRUCTIONS
Carefully read the following important information regarding installation safety and maintenance. READ AND SAVE THESE INSTRUCTIONS for future reference.
REQUIREMENTS:
120V, 60 Hz. 15A Circuit grounding.
- Do not connect the exhaust hood to the chimneys, flues and airducting the room.
- The evacuated air must not be let into a warm air duct.
- This appliance must be connected to a system equipped with earth or ground plate.
- When performing maintenance operations, disconnect the appliance from the field connection.
- Do not do any flambè cooking underneath the hood - When frying, never leave the pan alone because the cooking oil could flare up.
- Clean all the surfaces frequently to avoid danger of fire. To do so use a cloth and or brush soaked in denatured ethyl alcohol. It also important to remove and clean or substitute frequently the filter installed in the hood.
- It advisable to utilise cooking surfaces of the same width as the hood.
- Do not operate with a damaged cord or plug. Discard fan or return to an authorized service facility for examination and/or repair.
- Do not run cord under carpeting. Do not cover with throw rugs, runners or similar coverings. Arrange cord away from traffic area and where it will not be tripped over.
- Do not route cord under furniture or appliances.
- Do not operate any fan with a damaged cord or plug. Discard fan or return to an authorized service facility for examination and/or repair. Do not run cord under carpeting.
- Wiring shall be protected from sharp edges (including male screw threads), burrs, fins, moving parts, and other agencies that might abrade the insulation on conductors.
The device has a switch for disconnection from the main electricity network, which is placed inside the hood immediately after the filter and is of red colour.
By placing the knob in the Off position, the motor is not activated while the lamp can operate normally.
INTRODUCTION
These instructions are designed to tell you of the various technical details of your cooker hood and to make you familiar with its use. Since these instructions cover more than one type of hood within the same series, it may be that reference is made to components that do not form part of the hood that you are installing. The hood should be used in the exhaust version to discharge all the kitchen vapours and odours out-door of the building. Fittings can vary from country to country. We reserve the right to modify the product without any notice always with the aim of improvements and in compliance with the relevant norms.
SUGGESTIONS FOR USING THE HOOD IN EXHAUST POSITION
When an exhaust hood and a heat source requiring ambient air (e.g. gas, oil, coal stoves, etc.) are used at the same time, attention is required because the air necessary for combustion is exhausted from the room through the hood and this creates depression. There is no such danger when the maximum depression in the room is 0,04 mbar. In this condition no exhaust gas from the heat source is piped. To assure this condition, make opening in the room which cannot be closed (doors, windows, etc. are insufficient) and through which the air necessary for combustion can freely flow.
Note : All the exhaust ductwork in the apartment or house should be studied. In case of doubts, get advice or authorization from the person or agency responsible for the building.
Note : The efficiency of the exhaust hood decreases as the length of the ducts and number of increase. When using the exhaust version, follow these rules : Do not connect the exhaust hood to chimneys, flues, and air ducts serving the room. Before venting into exhaust flues and ducts no longer in use, ask for approval of person or agency responsible for the building. The evacuated air must not be let into a warm airduct. For the evacuation of the exhausted air please note official instructions.
INSTALLATION
Warning :
The discharge air is to be directed to building exterior.
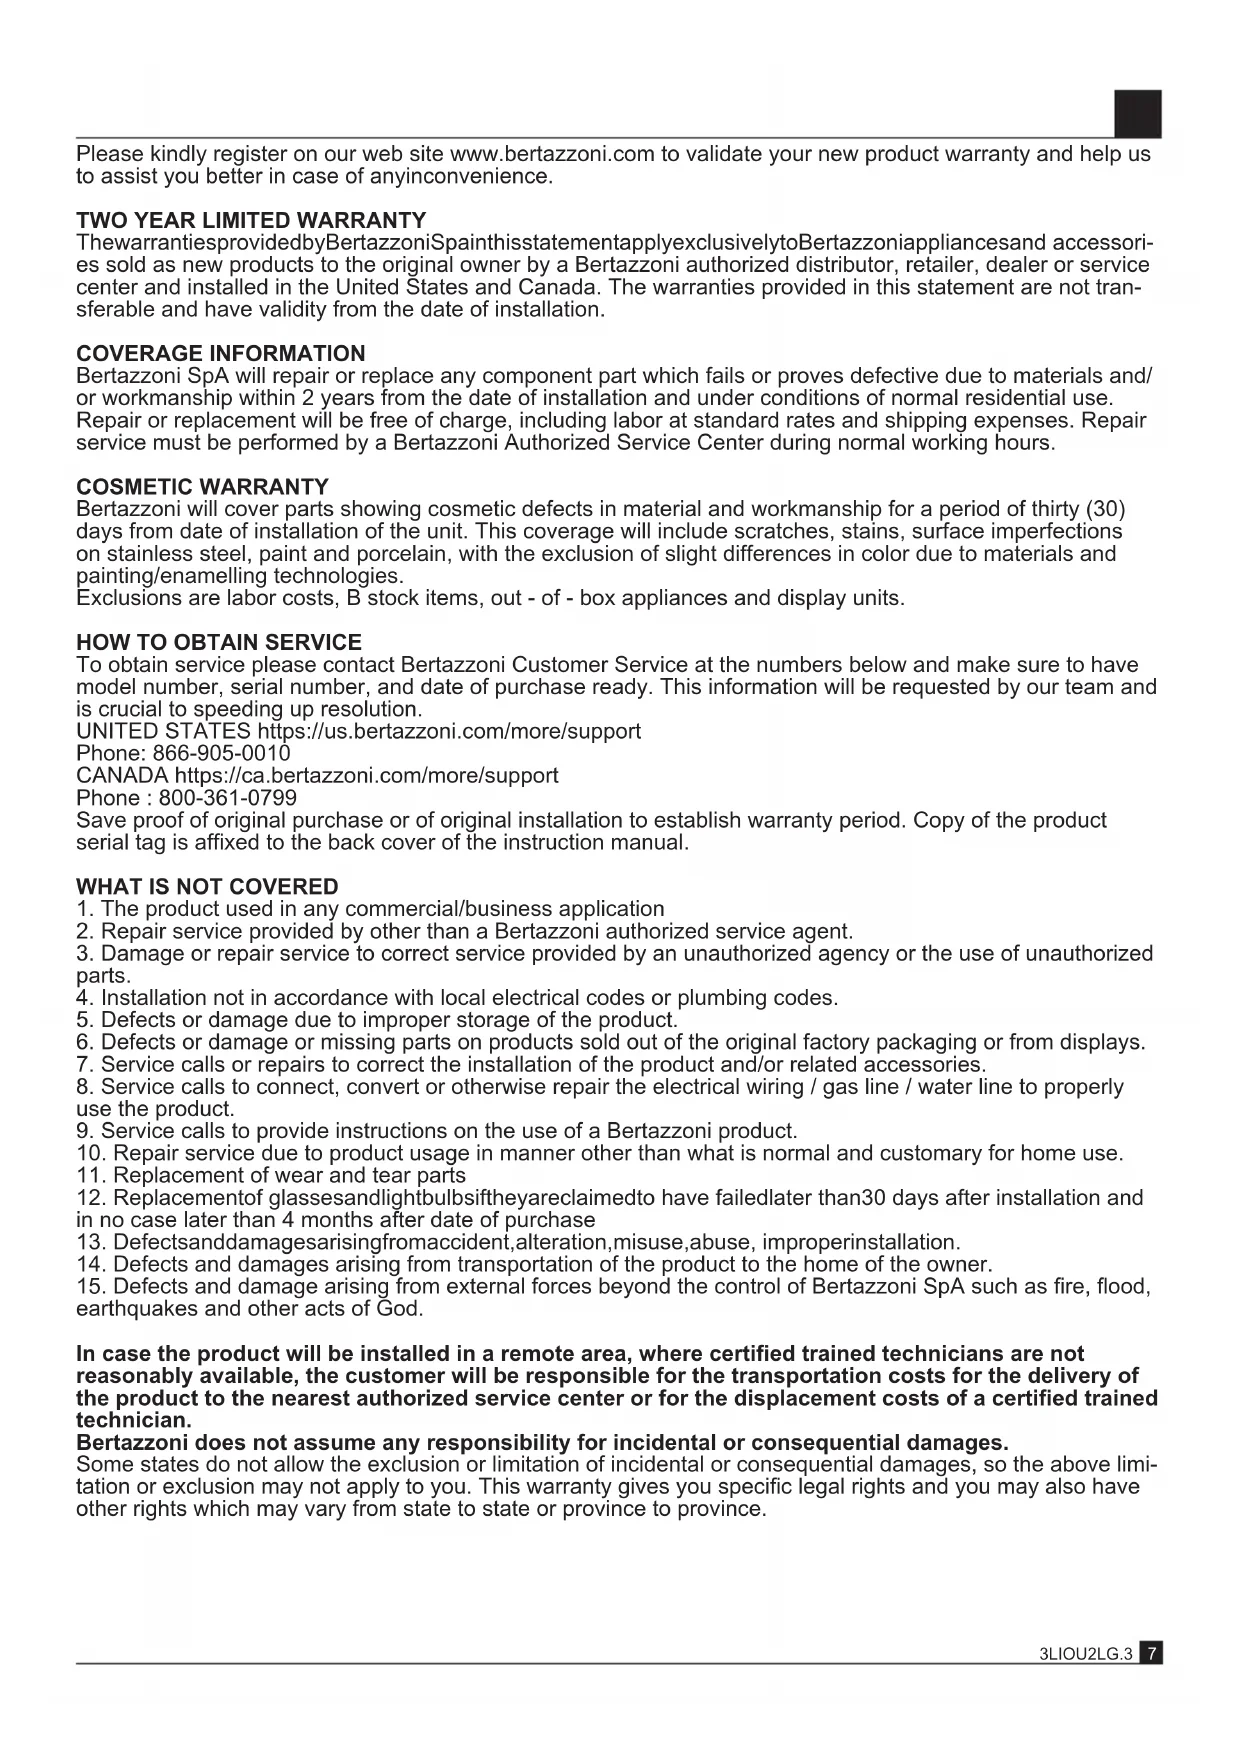
The hood must be mounted over the centre of cooking area. The minimum distances between the cooking area and the underside of the hood are 650 mm (25"19/32).
Warning : If the room contains a flued fuel burning appliance which is not of the balance flue type make sure these is an adequate air inlet to the room at all times so that fumes are not drawn the flue.
Note : The distances, however, are subject to the safety rules in effect in the various countries. Before drilling the wall make sure that no pipes or cables will be damaged. If there is no outer waste pipe for the exhaust version, an air outlet with a diameter of ∅ 160 mm (6"19/64) must be made through the wall.
WALL FIXING OF THE COOKER HOOD - INSTALLATION BY MEANS OF THE BRACKET SUPPLIED
1) Check the size of the model you have purchased (see picture 1).
2) When installing your product comply with the distance from the cooking surface (see picture 2).
3) Make a hole, for air circulation, inside of your furniture (see picture 3).
5) Partially tighten the four screws holding the hood to the furniture, make two holes in the wall and insert the two dowels (see picture 5).
6) Remove the three metallic filters (see picture 6).
7) Place the hood in the four screws on the furniture (see picture 7).
8) Push the hood to the wall (see picture 8 step 1 and 2), lock the hood and tighten the four screws (see picture 8 step 3)
9) Insert and tighten the two locking screws to the wall (see picture 9).
10) Drill a hole for the passage of the air intake duct, insert the tube locking it with the clamp (see picture 10).
CONNECTION EXHAUST
Link a 150 mm diameter air outlet chimney to the spigot. This pipe is an accessory of the hood.
Warning : To reduce the risk of fire use only metal ductwork.
Attention: The appliance is provided with a supply cord, the appliance must be positioned so that the plug is accessible.
Attention : If there are three wires in the electrical supply cable they must be connected as follows :
Grey/Yellow = ground - White = neutral - Black = line
Important : The hood manufacturer will not be
responsible for any damage or loss caused by failure to observe these instructions.
Important : A damage power supply cord must be replaced by the service.
WARNING GROUNDING INSTRUCTIONS
This appliance must be grounded. In the event of an electrical short circuit, grounding reduces the risk of electric shock by providing an escape wire for the electric current. This appliance is equipped with a cord having a grounding wire with a grounding plug. The plug must be plugged into an outlet that is properly installed and grounded.
WARNING: Improper grounding can result in a risk of electric shock. Consult a qualified electrician if the grounding instructions are not completely understood, or if doubt exists as to whether the appliance is properly grounded. Do not use an extension cord. If the power supply cord is too short, have a qualified electrician install an outlet near the appliance."
USING THE COOKER HOOD
The cooker hood should be switched on either before or the same as cooking of frying commences. The filters are more effective if the fan is not switched off immediately after cooking or frying is completed, but only after a period of some 20-30 minutes. Before using the cooker hood please ensure that all plastic films like on metal grease filter and stainless steel ducting are removed.
USER INSTRUCTION
flowchart
graph TD
    A["1"] --> B["↓"]
    C["3"] --> D["↓"]
    E["□"] --> F["↓"]
    G["■"] --> H["↓"]
    I["4"] --> J["↓"]
    K["+"] --> L["○"]
    M["-"] --> N["←"]
    O["♂"] --> P["♂"]
    Q["+"] --> R["+"]
    S["←"] --> T["←"]
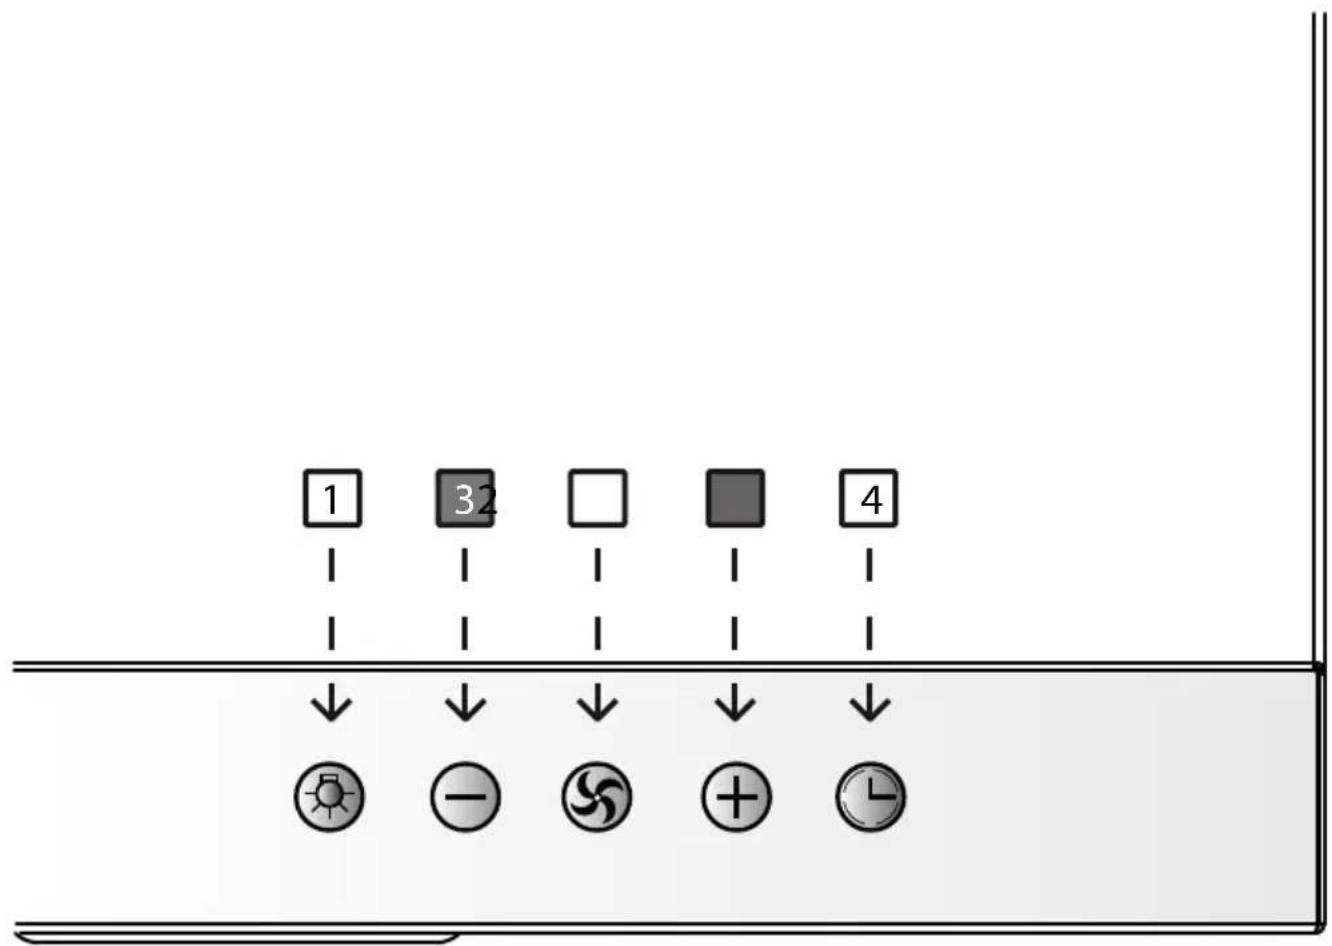
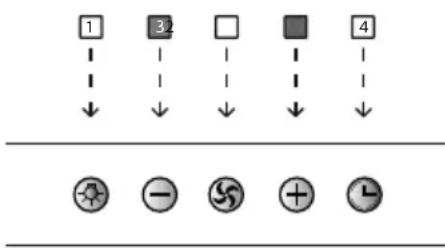
The cooker hood is equipped of the following functions Fig. 7: The simbol shows the ignition key for the oven light (on/off) (fig.7/1)
The simbol show the ignition key switch on/off of the motor aspirant (fig.7/2)
The simbols shows the keys of the speeds of the motor. They increase and they decrease the speed of the motor (there are 4 levels of possible speeds) (fig. 7/3)
The simbol shows the key timer: the timer will run if the timer is pushed and will switch off the cooker hood after 15 minutes (fig. 7/4)
LAMP REPLACEMENT
The hood has a LED lamp, take care to not touch with hands when you replace it. Use a dry and not greasy protection (for example a cloth) in order to avoid a direct contact with skin that could make the lamp break. Never use lamps with wattage higher than the one shown on the label inside the hood.
SAFETY RULES
Do not operate any fan with a damaged cord or plug. Discard fan or return to an authorized service facility for examination and/or repair."
Do not do any dry flambè cooking underneath the hood. When frying, never leave the pan alone because the cooking oil could flare up. Clean all the surface frequently to avoid danger of fire. This can be done with a cloth or/and with a brush drenched with denatured alcohol or with any other similar substances, except for the button. It also important to remove and clean or substitute frequently the filter installed in the hood.
MAINTENENCE
NOTE : Prior to any maintenance, switch off and disconnect from the electrical supply.
1) Under normal cooking conditions the grease should be cleaned every 10-15 days in hot water, to which a suitable detergent has been added. For reasons of efficiency and safety regular cleaning is advised. The grease filter may be subject to a small amount of shrinkage initially.
2) The outer casing of the cooker hood should be cleaned with a damp cloth.
GREASE FILTER
This absorbs vapour-suspended grease particles and protects the kitchen and furniture from grease residues. The filter should be washed every 10 to 15 days (in normal operating conditions). Dip the filter into a degreaser solution or put it in the dishwasher Make sure not to damage the filter, which is made of several layers of this alloy, by hitting or crushing it. The aluminium filter may change colour, that will have no influence of the efficiency of the filter.
REPLACING OR CLEANING THE FILTERS
Proceed with the cleaning and repeat the operation counter clockwise. To remove the alluminium grease filter grab the opening tongue at all filters, pull it in your direction and move the filter downwards. To reinstall it operates reversed.
READ AND SAVE THESE INSTRUCTIONS
1) WARNING - TO REDUCE THE RISK OF A RANGE TOP FIRE :
a. Never leave surface units unattended at high settings. Boilovers cause smoking and greasy spill overs that may ignite. Heat oils slowly on low or medium settings.
b. Always turn hood ON when cooking at high heat or when flambeing food (le crepes suzette, cherries jubilee, peppercorn beef flambè).
c. Clean ventilating fans frequently. Grease should not be allowed to accumulate on fan or filter.
d. Use proper pan size. Always use cookware appropriate for the size of the surface element.
2) WARNING : to reduce the risk of fire or electric shock, do not use this fan with any solid state speed control device
3) WARNING TO REDUCE RISK OF FIRE, ELECTRIC SHOCK, OR INJURY TO PERSON, OBSERVE THE FOLLOWING :
a. Use this unit only in the manner intended by the manufacturer. If you have questions, contact the manufacturer.
b. Before servicing or cleaning unit, switch power off at service panel and lock the service disconnecting means to prevent power from being switched on accidentally. When the service disconnecting means cannot be locked, securely fasten a prominent warning device, such as a tag, to the service panel.
4) CAUTION: For general Ventilating use only. Do not use to exhaust hazardous or explosive material and vapors.
5) WARNING TO REDUCE THE RISK OF INJURY TO PERSONS IN THE EVENT OF A RANGE TOP FIRE, OBSERVE THE FOLLOWING:
a. Smother flames with a close-fitting lid, cookie sheet, or metal tray, then turn off the burner. BE CAREFUL TO PREVENT BURNS. If the flames do not go out immediately. EVACUATE AND CALL THE FIRE DEPARTMENT.
b. NEVER PICKUP A FLAMING PAN You may be burned.
c. DO NOT USE WATER, including wet dishcloths or towels - a violent steam explosion will result.
d. Use an extinguisher only if :
1. You know you have a Class ABC extinguisher, and you already know how to operate.
2. The fire is small and contained in the area where it started.
3. The fire department is being called.
4. You can fight the fire with your back to an exit. (based on "Kitchen Fire safety Tips" published by NFP A.
6) WARNING TO REDUCE THE RISK OF INJURY TO PERSONS IN THE EVENT OF A RANGE TOP FIRE, OBSERVE THE FOLLOWING:
a. Installation work and electrical wiring must be done by qualified person(s) in accordance with all applicable codes and standards, including fire rated construction.
b. Sufficient air is needed for proper combustion and exhausting of gases through the flue (chimney) of fuel burning equipment to prevent back drafting. Follow the heating equipment manufacturer's guideline and safety standards such as those published by the National Fire Protection Association (NFPA), and the American Society for heating, refrigeration and air conditioning engineers (ASHRAE) and the local code authorities.
c. When cutting or drilling into wall or ceiling, do not damage electrical wiring and other hidden utilities.
d. Ducted fans must always be vented to the outdoors.
e. If this unit to be installed over a tube or shower, it must be marked as appropriate for the application and be connected to a GFCI (Ground Fault Circuit Interrupter) protected branch circuit.
f. Never place a switch where it can be reached from a tub or shower.
UNITED STATES https://us.bertazzoni.com/more/support
Phone: 866-905-0010
CANADA https://ca.bertazzoni.com/more/support
WARNING: Cancer and Reproductive Harm – www.P65Warnings.ca.gov.


- TWO YEAR LIMITED WARRANTY
- COVERAGE INFORMATION
- COSMETIC WARRANTY
- HOW TO OBTAIN SERVICE
- WHAT IS NOT COVERED
- IMPORTANT SAFETY INSTRUCTIONS
- REQUIREMENTS:
- INTRODUCTION
- SUGGESTIONS FOR USING THE HOOD IN EXHAUST POSITION
- INSTALLATION
- Warning :
- WALL FIXING OF THE COOKER HOOD - INSTALLATION BY MEANS OF THE BRACKET SUPPLIED
- CONNECTION EXHAUST
- WARNING GROUNDING INSTRUCTIONS
- USING THE COOKER HOOD
- LAMP REPLACEMENT
- SAFETY RULES
- MAINTENENCE
- GREASE FILTER
- REPLACING OR CLEANING THE FILTERS
- READ AND SAVE THESE INSTRUCTIONS
Brand : BERTAZZONI
Model : KU36PRO1X14
Category : Range hood