
8.5" x 9.5" Panini Grill - Electric grill BELLA - Free user manual and instructions
Find the device manual for free 8.5" x 9.5" Panini Grill BELLA in PDF.
| Product Type | Electric Grill Panini Press |
| Brand | BELLA |
| Model | 8.5" x 9.5" Panini Grill |
| Cooking Plate Dimensions | 8.5 x 9.5 inches (approx. 21.6 x 24.1 cm) |
| Appliance Dimensions (estimated) | Approx. 30 x 25 x 15 cm |
| Weight (estimated) | Approx. 3 kg |
| Power Supply | 120 V AC, 60 Hz |
| Power (estimated) | 1200 W |
| Plate Material | Non-stick |
| Control Type | Rotary Thermostat (MIN to MAX) |
| Indicator Lights | Power (red) and Ready (green) |
| Main Functions | Contact grill (open position) and panini press (closed position) |
| Floating Hinge | Yes, adjusts to food thickness |
| Capacity | Multiple sandwiches of same thickness |
| Safety | Polarized plug, plate lock for storage, hot surfaces |
| Care | Non-stick plates, do not immerse, use plastic/wooden utensils |
| Cleaning | Soft sponge, removable drip tray (hand wash) |
| Included Accessories | Removable drip tray |
| Warranty | 2 years (limited) |
| Repairability | Do not repair yourself, contact qualified technician |
| Color (estimated) | Black / Stainless Steel |
| Plug Type | Polarized (3 prongs) |
| Usage | Household use only |
| Safety Instructions | Read manual, supervise near children, do not use outdoors |
Frequently Asked Questions - 8.5" x 9.5" Panini Grill BELLA
User questions about 8.5" x 9.5" Panini Grill BELLA
0 question about this device. Answer the ones you know or ask your own.
Ask a new question about this device
Download the instructions for your Electric grill in PDF format for free! Find your manual 8.5" x 9.5" Panini Grill - BELLA and take your electronic device back in hand. On this page are published all the documents necessary for the use of your device. 8.5" x 9.5" Panini Grill by BELLA.
USER MANUAL 8.5" x 9.5" Panini Grill BELLA
www.bellahousewares.com
BELLA
THANK YOU
For your purchase

Register & sign up for special announcements and trendy recipes!

Tell us what you think!
Rate, review or ask us a question.

bellahousewares.com
get inspired


BellaLifestyle
BellaLife
Table of Contents
Important Safeguards 2
Additional Important Safeguards 3
Notes on the Plug 3
Notes on the Cord. 3
Plasticizer warning 3
Electric power 3
Getting To Know Your Panini Grill 4
Before First Use 5
Operating Instructions 5
To Use as a Contact Grill (Open Position) 5
To Use as a Press Grill (Closed Position) 6
Panini Preparation: Sandwich Assembly 6
Panini Hints for Best Results 7
User Maintenance Instructions. 7
Care and Cleaning 7
Storage 8
Recipes. 9-10
Warranty 11
Table des matieres
When using electrical appliances, basic safety precautions should always be followed, including the following:
1. READ ALL INSTRUCTIONS.
- The cord to this appliance should be plugged into a 120 V AC electrical outlet only.
CAUTION: Close supervision is necessary when any appliance is used by more than one or near children.
CAUTION: Do not use appliance for other than intended use. - To protect against risk of electric shock, do not immerse the cord, plug or cooking unit in water or any other liquid.
- Do not touch hot surfaces. Use handles.
- Extreme caution must be exercised when any appliance is used near children.
- Unplug from wall outlet when not in use and before cleaning. Allow to cool before cleaning or storing this appliance.
- Never yank the cord to disconnect the Panini Grill from the outlet. Instead, grasp the plug and pull to disconnect.
- Do not operate any appliance if the cord is damaged. Do not use this appliance if the unit malfunctions, if it is dropped or has been damaged in any manner. In order to avoid the risk of an electric shock, never try to repair the Panini Grill yourself. Bring it to a qualified technician for examination, repair or electrical or mechanical adjustment. An incorrect reassembly could present a risk of electric shock when the Panini Grill is used.
- The use of accessories or attachments not recommended by the manufacturer may cause fire, electrical shock or injury.
- Do not use outdoors. Do not use for commercial purposes.
- Do not use this appliance for purposes other than the one for which it was designed.
- Do not let the electrical cord hang over the edge of the table or countertop, or touch hot surfaces.
- Do not place on or near a hot gas or electric burner or heated oven.
- Use on a heat-resistant, flat level surface only.
- Use extreme caution when moving any appliance containing hot food, water, oil or other liquids.
- To disconnect, turn any control to "off", then remove plug from wall outlet.
- CAUTION HOT SURFACES: This appliance generates heat during use. Proper precautions must be taken to prevent the risk of burns, fire or other damage to persons or property.
- When using this appliance, provide adequate ventilation above and on all sides for air circulation. Do not allow this appliance to touch curtains, wall coverings, clothing, dish towels or other flammable materials during use.
- Use with wall receptacle only.
FOR HOUSEHOLD USE ONLY SAVE THESE INSTRUCTIONS
ADDITIONAL IMPORTANT SAFEGUARDS
CAUTION: This appliance is hot during operation and retains heat for some time after turning OFF. Always use oven mitts when handling hot materials and allow metal parts to cool before cleaning. Do not place anything on top of the appliance while it is operating or while it is hot.
- All users of this appliance must read and understand this Instruction Manual before operating or cleaning this appliance.
- Do not leave this appliance unattended during use.
Notes on the Plug
This appliance has a grounded 3-prong plug. Connect to a properly grounded outlet only. Do not attempt to modify the plug in any way.
Notes on the Cord
A. A short power-supply cord (or detachable power-supply cord) is to be provided to reduce the risk resulting from becoming entangled in or tripping over a longer cord.
B. Longer detachable power-supply cords or extension cords are available and may be used if care is exercised in their use.
C. If a long detachable power-supply cord or extension cord is used :
- The marked electrical rating of the cord or extension cord should be at least as great as the electrical rating of the appliance;
- If the appliance is of the grounded type, the extension cord should be a grounding-type3-wire cord; and
- The longer cord should be arranged so that it does not drape over the countertop or table top where it can be pulled on by children or tripped over unintentionally.
Plasticizer Warning
CAUTION: To prevent Plasticizers from migrating from the finish of the counter top or table top or other furniture, place NON-PLASTIC coasters or place mats between the appliance and the finish of the counter top or table top. Failure to do so may cause the finish to darken; permanent blemishes may occur or stains can appear.
Electric Power
If the electrical circuit is overloaded with other appliances, your appliance may not operate properly. It should be operated on a separate electrical circuit from other appliances.
Getting To Know Your Panini Grill
Product may vary slightly from illustration
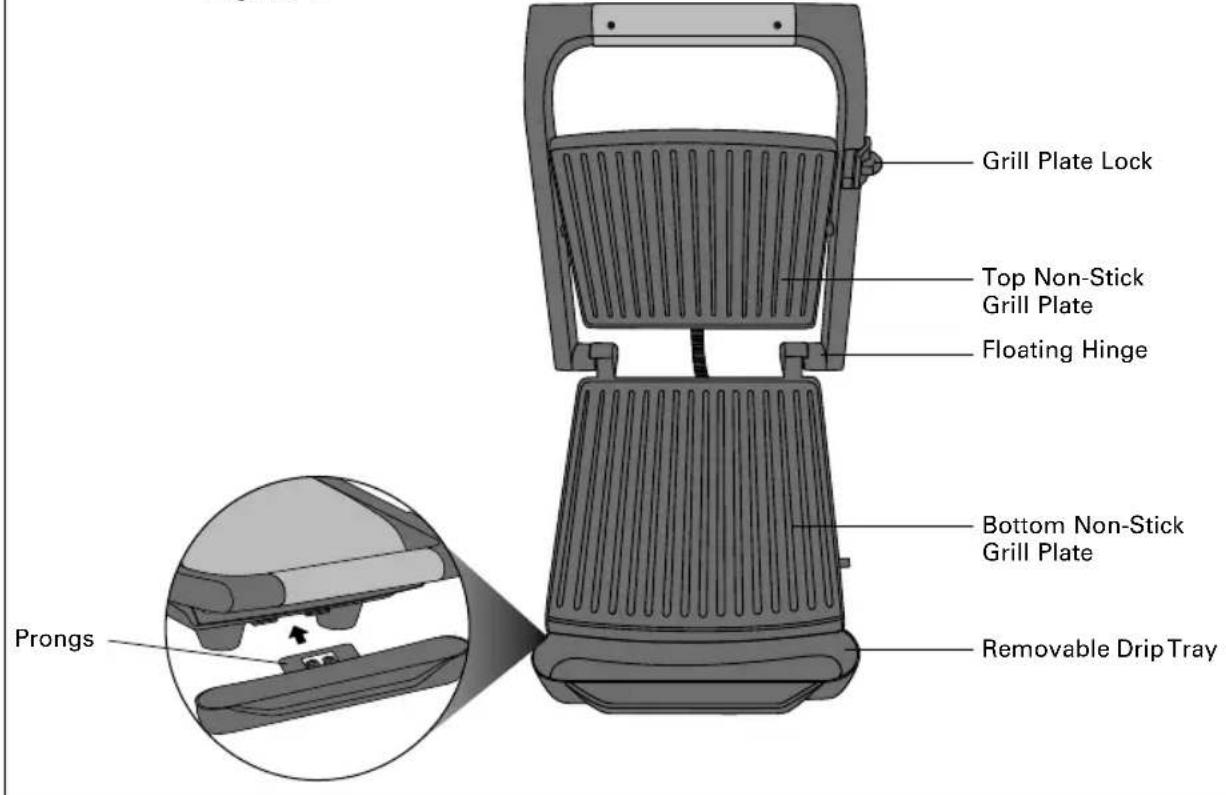
Figure 1
Figure 2
Before First Use
- Carefully unpack the Panini Grill and remove all packaging and materials.
- Set the appliance on a dry, clean and flat surface.
- Slide the 2 prongs of the removable drip tray into the bottom front of the unit. (See Figure 1) Push firmly to ensure the drip tray is securely attached.
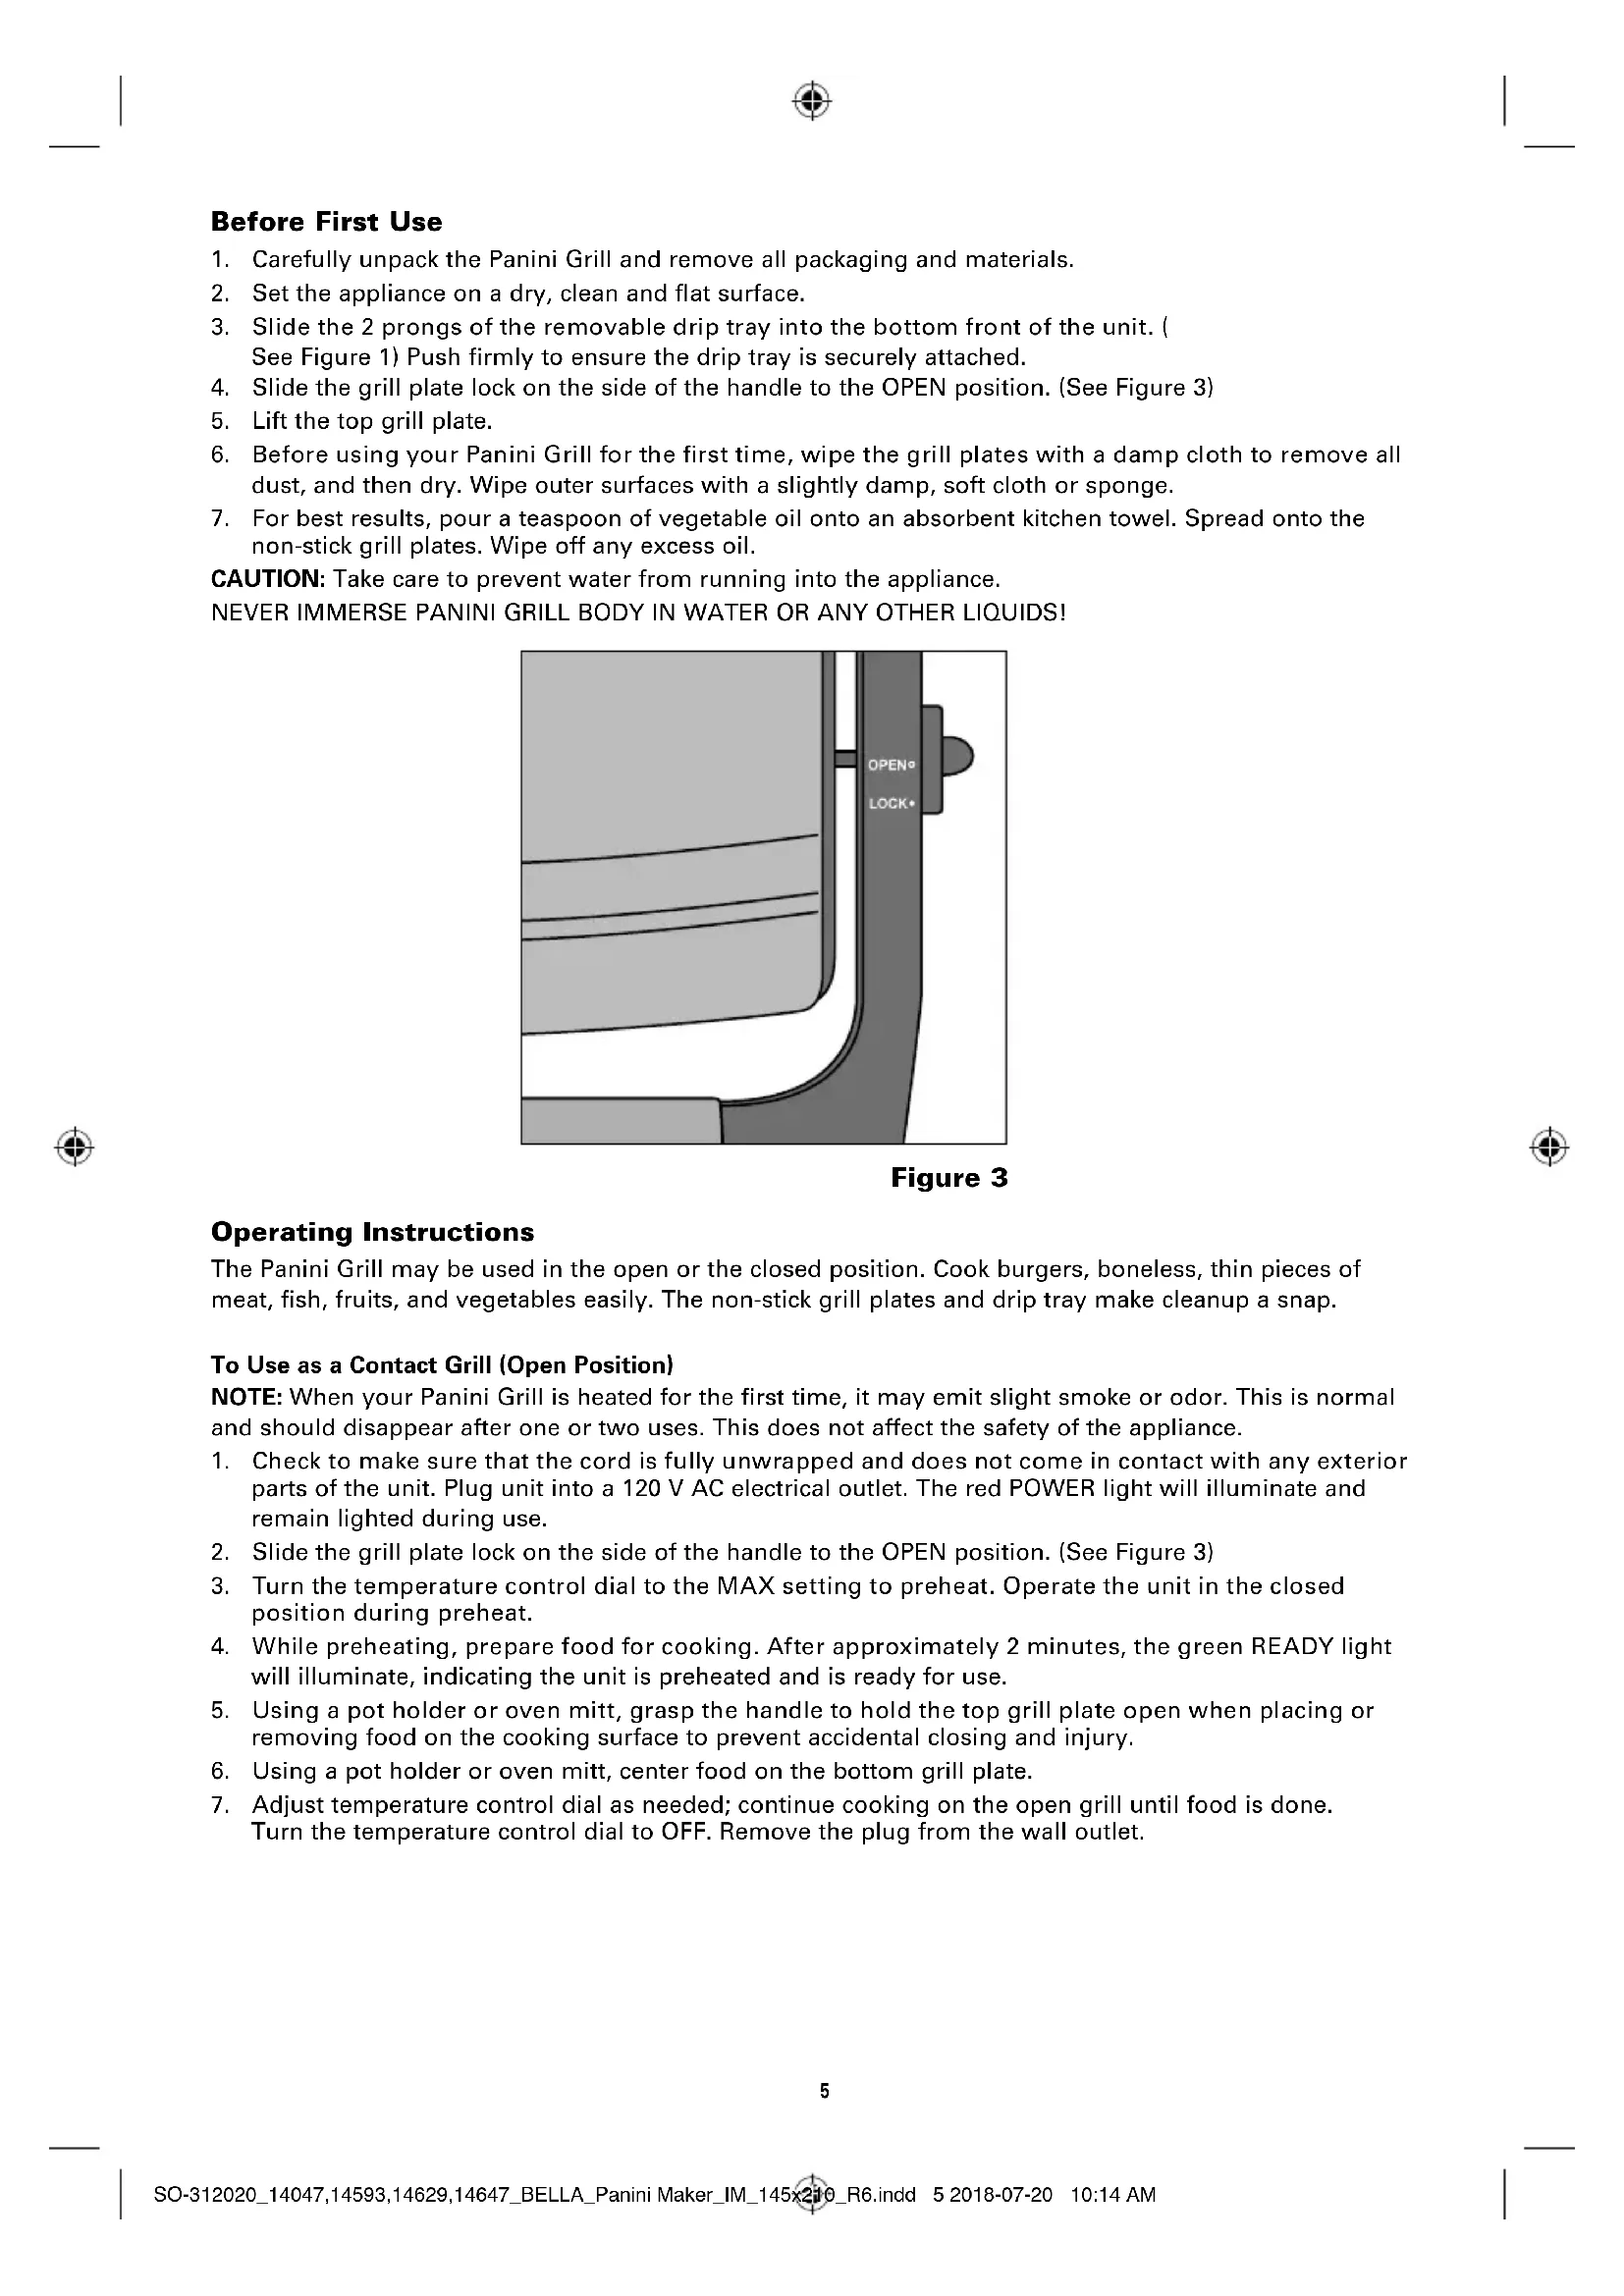
- Slide the grill plate lock on the side of the handle to the OPEN position. (See Figure 3)
- Lift the top grill plate.
- Before using your Panini Grill for the first time, wipe the grill plates with a damp cloth to remove all dust, and then dry. Wipe outer surfaces with a slightly damp, soft cloth or sponge.
- For best results, pour a teaspoon of vegetable oil onto an absorbent kitchen towel. Spread onto the non-stick grill plates. Wipe off any excess oil.
CAUTION: Take care to prevent water from running into the appliance.
NEVER IMMERSE PANINI GRILL BODY IN WATER OR ANY OTHER LIQUIDS!
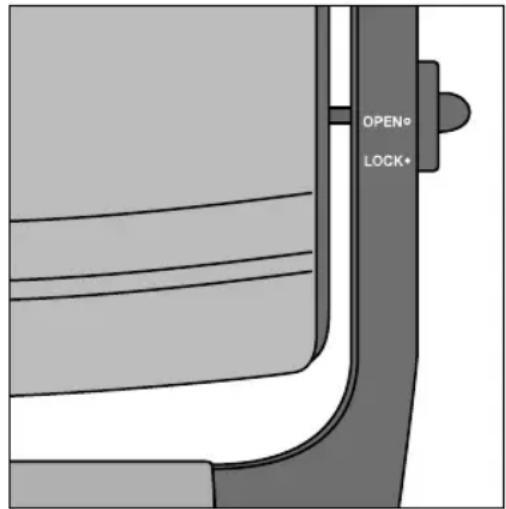
Figure 3
Operating Instructions
The Panini Grill may be used in the open or the closed position. Cook burgers, boneless, thin pieces of meat, fish, fruits, and vegetables easily. The non-stick grill plates and drip tray make cleanup a snap.
To Use as a Contact Grill (Open Position)
NOTE: When your Panini Grill is heated for the first time, it may emit slight smoke or odor. This is normal and should disappear after one or two uses. This does not affect the safety of the appliance.
- Check to make sure that the cord is fully unwrapped and does not come in contact with any exterior parts of the unit. Plug unit into a 120 V AC electrical outlet. The red POWER light will illuminate and remain lighted during use.
- Slide the grill plate lock on the side of the handle to the OPEN position. (See Figure 3)
- Turn the temperature control dial to the MAX setting to preheat. Operate the unit in the closed position during preheat.
- While preheating, prepare food for cooking. After approximately 2 minutes, the green READY light will illuminate, indicating the unit is preheated and is ready for use.
- Using a pot holder or oven mitt, grasp the handle to hold the top grill plate open when placing or removing food on the cooking surface to prevent accidental closing and injury.
- Using a pot holder or oven mitt, center food on the bottom grill plate.
- Adjust temperature control dial as needed; continue cooking on the open grill until food is done. Turn the temperature control dial to OFF. Remove the plug from the wall outlet.
To Use as a Press Grill (Closed Position)
NOTE: When cooking more than one piece of food, prepare so that the thickness of food items is consistent. This will allow food to cook quickly, evenly and produces rich grill marks both top and bottom.
- Follow steps 1 through 6 of the Operating Instructions section entitled: "To Use as a Contact Grill (Open Position)" described previously.
- Using a pot holder or oven mitt, pull down the arm and gently lower the top grill plate. The floating hinge will automatically adjust to the thickness of the food.
- To ensure perfectly grilled food, look to make sure that the top grill plate lies evenly on the top of the food. Make sure food is centered on the grill plate. If desired, press the handle down several times while cooking.
- Adjust temperature control dial as needed. During grilling, the green READY indicator light will cycle on and off during cooking. This indicates that the thermostat is maintaining the proper cooking temperature.
NOTE: The raised ridges and tilted bottom plate allow grease, fat and other drippings to run off away from your food and into the drip tray.
- Using an oven mitt or pot holder, grasp the handle and carefully lift the top grill plate. Always use a plastic or wooden spatula to remove cooked food. Test food for doneness. Grill until the food is cooked to your liking.
WARNING: Never use a sharp or metal object as it may damage the non-stick surface of the grill plates.
CAUTION: Do not leave appliance unattended during use!
- Turn the temperature control dial to OFF. Remove the plug from the wall outlet.
Panini Preparation: Sandwich Assembly
To prepare delicious pressed sandwiches, follow these simple steps. It is customary to prepare panini from a hearty loaf of bread. However, panini made from store-bought sliced breads or rolls can be delicious and simple to prepare. Experiment with a variety of breads, tortillas, flatbreads, evenitas. For health-conscious cooks, the non-stick coating of the grill plates assures crisp and delicious toasting without the use of oil or butter. The raised ridges and tilted bottom plate allow grease, fat and other drippings to run off away from your food and into the drip tray.
- Assemble panini. Brush or wipe both sides of the outside of the sandwich with olive oil, butter or margarine (optional). When the green READY light illuminates, the Panini Grill is ready to use.
- Follow steps 1 through 5 of the Operating Instructions section entitled: "To Use as a Contact Grill (Open Position)" described previously.
- Center panini, oiled side down, on the bottom grill plate.
- Using a pot holder or oven mitt, pull down the arm and gently lower the top grill plate. The floating hinge will automatically adjust to the thickness of the sandwiches.
- To ensure perfectly grilled panini, all sandwiches placed on the Panini Grill at the same time must be the same thickness. Look to make sure that the top grill plate lies evenly on the top of the bread. Make sure sandwiches are centered on the grill plate. If desired, press the handle down several times while cooking.
- Adjust temperature control dial as needed. During grilling, the green READY indicator light will cycle on and off during cooking. This indicates that the thermostat is maintaining the proper cooking temperature.
NOTE: The raised ridges and tilted bottom plate allow cheese, fat, and other drippings to run off away from your panini and into the drip tray.
- Using an oven mitt or pot holder, grasp the handle and carefully lift the top grill plate. Continue grilling until the bread is toasted and food is cooked to your liking.
- To remove your grilled panini sandwiches, always use a plastic or wooden spatula.
WARNING: Never use a sharp or metal object as it may damage the non-stick surface of the grill plates.
CAUTION: Do not leave appliance unattended during use!
- Turn the temperature control dial to OFF. Remove the plug from the wall outlet.
- Allow panini to cool to a safe handling temperature before slicing.
Panini Hints for Best Results
- Turn the temperature control dial to MAX to preheat the Panini Grill before each use.
- Have all ingredients at hand before preparing panini.
- A wide variety of breads may be used, such as whole wheat, rye, fruit breads, tortillas, flatbreads, even pitas.
- With the Panini Grill's non-stick grill plates, it is not necessary to butter or oil the outside of the bread. However, spreading a small amount of butter or olive oil is recommended to encourage even browning of the bread.
NOTE: The Panini Grill is coated with a non-stick surface. Do not use non-stick sprays as they can cause build-up on the grill plates. Use olive oil instead.
WARNING: Do not use non-fat spreads. They may burn and damage the non-stick grill plates. - When using soft or liquid fillings, use thicker-sliced breads. Try removing the insides of soft rolls to create a cup in which filling can be added.
- Most fresh fruits release juice when heated. If the recipe calls for canned fruit, drain and pat fruit dry with a clean paper towel.
- Avoid using processed cheeses, as they tend to "run" under high temperatures.
- A teaspoon of sugar sprinkled on the buttered side makes grilled panini crispier and adds flavor when using sweet fillings.
Whole grain and sweet breads will grill quicker than white breads and should be grilled at lower temperatures. - After you have removed finished panini, close the top grill plate to retain heat while assembling more sandwiches.
- Use the Panini Grill to keep food warm. Place grilled sandwiches onto the grill, lower the top grill plate. Turn the temperature control dial to MIN or to a lower setting before serving.
- To avoid food contamination, wearing oven mitts, use a soft, absorbent paper towel to wipe the grill plates clean after each use.
User Maintenance Instructions
This appliance requires little maintenance. It contains no user serviceable parts.
Do not try to repair it yourself. Contact a qualified appliance repair technician if the product requires servicing.
Care And Cleaning
CAUTION: Unplug from electrical outlet and allow to cool thoroughly before cleaning.
- Never immerse appliance in water or other liquids. Never place Panini Grill or drip tray in dishwasher.
- The grill plates should be wiped clean, and if necessary, conditioned before heating.
- To condition plates: pour a teaspoon of vegetable oil onto the non-stick grill plates. Spread with an absorbent kitchen towel and wipe off any excess oil. Recondition after cleaning or as needed.
- To protect the premium quality non-stick grill plates: use only plastic, nylon or wooden utensils.
- Inside cleaning: remove stubborn stains with a plastic mesh puff or pad, then wipe off with a paper towel or soft cloth. For best results, use only products with directions stating that it is safe for cleaning non-stick cooking surfaces. Do not use steel wool or coarse scouring pads. Allow the run off to drip into the drip tray.
- Pull drip tray out and away from the front of the Panini Grill. Empty the drip tray and clean with warm soapy water. Wipe dry.
- The exterior finish should be cleaned with a non-abrasive cleaner and a soft, damp cloth. Dry thoroughly.
- Make sure to hold the top grill plate open while cleaning to prevent accidental closing or injury.
Storage
- Make sure unit is unplugged and fully cooled.
- Attach clean drip tray to the unit.
- Lower top grill plate. Slide the grill plate lock located on the side of the handle to the LOCK position. (See Figure 3) Store the Panini Grill in the locked position for neat and compact storage.
- Store the cord on the bottom of the Grill by wrapping it around the back 2 legs and the central hub. Do not put any stress on cord where it enters unit, as this could cause the cord to fray and break.
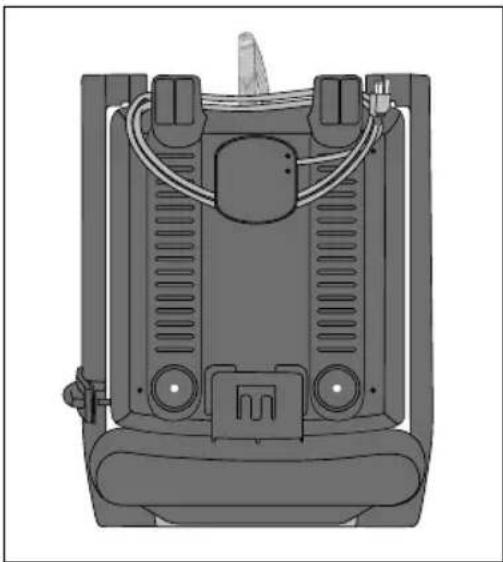
Figure 4

Recipes
Stuffed Pancetta and Brie Panini Roll
Italian sandwich roll
-
Brie cheese, cubed into 1/2-inch pieces
-
Pancetta, 6 to 8 slices per sandwich (adjust to taste)
Sun-dried tomato strips
-
Fresh baby spinach (optional)
-
Turn the temperature control dial to MAX. Preheat Grill.
- When the green READY light illuminates, turn the temperature control down to MED.
- Place the pancetta on the open Panini Grill. Cook 4 to 5 minutes until crispy. NOTE: Most of the grease will run off into the drip tray. Do not wipe the grill plates after use.
- While the pancetta cooks, cut brie cheese into 1/2-inch pieces. Slice the roll with a thinner top and larger bottom end; pull out the soft center from the bottom.
HINT: Place unused bread in a plastic freezer bag and save for future bread crumbs, stuffings or soup thickener.
Place pancetta on paper towels and set aside.
- To build the stuffed panini, place pancetta into the roll first. Top with Brie, sun-dried tomato and then spinach, then pancetta. Add more or less filling depending on the size of the roll. Stuff the roll 3/4 full. DO NOT OVERFILL.
- Cover with the top of the roll.
- Wearing an oven mitt, place assembled sandwich on the Panini Grill. Lower top grill plate onto the roll, making sure it lies evenly on the panini.
- Use the handle to press down lightly several times during grilling.
- Cook until golden brown, approximately 3 to 4 minutes.
- Raise the top cooking plate to check cooking progress; continue to grill if desired.
Variation: Try this panini with mozzarella cheese and fresh basil.

Grilled Apple Panini
Makes 2 panini
- 4 slices cinnamon raisin bread
2-4 teaspoons sugar
1 apple (Golden Delicious, cored and sliced 1/2'' thick)
1/4 teaspoon cinnamon
Butter
- Turn the temperature control dial to MAX. Preheat Grill.
- When the green READY light illuminates, place the apple slices on the Panini Grill. Close the Grill and cook on MAX for 4 minutes.
- While the apples are cooking, build the panini. Spad all 4 pieces of bread with butter. Place sugar onto a bowl and add cinnamon.
- Using an oven mitt, raise the top cooking plate to check cooking progress; continue to grill apple slices until brown grill marks appear on the apples.
NOTE: Most of the water from the apples will run off into the drip tray. Do not wipe the grill plates after use.
- Turn the temperature control dial to OFF. Remove grilled apples and set aside.
- Turn the temperature control dial to MAX. When the green READY light illuminates, sprinkle 1 teaspoon sugar onto 2 pieces of buttered bread and place onto the Grill, butter/sugar side down. Place cooked apple slices onto the bread. Sprinkle with cinnamon. Top with the remaining bread, making sure that the buttered sides are facing up. Sprinkle 1 teaspoon sugar onto the top of each of the pieces of raisin bread.
- Lower top grill plate onto the bread, making sure it lies evenly on the panini.
- Cook until golden brown, approximately 3 to 4 minutes.
- Using an oven mitt, raise the top cooking plate to check cooking progress; remove when the bread is brown and crisp.
Variation: Make this with bananas, or grilled pitted fruits such as peaches, plums or apricots.
Cheese may be added for a layer of rich goodness.
Recipes
Black Bread and Grilled Chicken Panini with Olive Tapenade
Makes 2 panini
- 4 slices hearty black bread
- 2 boneless, skinless chicken breasts, pounded thin
- 1/2 sweet onion, finely sliced
- 2 - 4 slices Monterey Jack cheese (or any
cheese of your choice)
1/2 tomato, thinly sliced
- 1 ripe avocado, thinly sliced
- Olive oil
- Olive tapenade (recipe follows)
- Condition grill plates with olive oil before use.
- Turn the temperature control dial to MAX. Preheat Grill.
- When the green READY light illuminates, turn the temperature control down to MED.
- Place chicken breasts and onions on the lower grill plate. Close and cook for 3 to 4 minutes or until chicken turns from pink to opaque white. Check at 3 minutes. If not fully cooked, lower top grill plate and continue grilling. Do not overcook. NOTE: Cooking times will vary due to the thickness of the chicken. Cut through the center of the thickest piece of meat to check for doneness.
- While the chicken cooks, prepare panini. Spread all 4 pieces of bread with olive tapenade.
- When grilling is done, turn the temperature control to OFF.
- Remove chicken and onions from Grill.
- Allow Grill to cool and, wearing an oven mitt, wipe the grill plates.
- Turn the temperature control dial to MAX and allow Grill to reheat. When the green READY light illuminates, turn the temperature control dial down to MED.
- Brush the outsides of the bread with olive oil and place 2 pieces of bread onto the Grill, tapenade side up. Stack grilled onions, avocado, tomato slices, chicken and cheese onto the bread. Top with the remaining bread, making sure that the oiled side is facing up.
- Lower top grill plate onto the bread, making sure it lies evenly on the panini sandwiches. Cook until golden brown, approximately 3 to 4 minutes.
Olive Tapenade
- 2 cups pitted oil-cured black olives
- 3 tablespoons drained capers
-
3 tablespoons extra-virgin olive oil
-
2 tablespoons lemon juice
- 2 teaspoons fresh thyme or 1 teaspoon dried
Pulse in food processor until mixture is coarse and uniform.
BELLA
Limited TWO-YEAR Warranty
SENSIO Inc. hereby warrants that for a period of TWO YEARS from the date of purchase, this product will be free from mechanical defects in material and workmanship, and for 90 days in respect to non-mechanical parts. At its sole discretion, SENSIO Inc. will either repair or replace the product found to be defective, or issue a refund on the product during the warranty period.
The warranty is only valid for the original retail purchaser from the date of initial retail purchase and is not transferable. Keep the original sales receipt, as proof of purchase is required to obtain warranty validation. Retail stores selling this product do not have the right to alter, modify, or in any way revise the terms and conditions of the warranty.
EXCLUSIONS:
The warranty does not cover normal wear of parts or damage resulting from any of the following: negligent use of the product, use of improper voltage or current, improper routine maintenance, use contrary to the operating instructions, disassembly, repair, or alteration by anyone other than qualified SENSIO Inc. personnel. Also, the warranty does not cover Acts of God such as fire, floods, hurricanes, or tornadoes.
SENSIO Inc. shall not be liable for any incidental or consequential damages caused by the breach of any express or implied warranty. Apart from the extent prohibited by applicable law, any implied warranty of merchantability or fitness for a particular purpose is limited in time to the duration of the warranty. Some states, provinces or jurisdictions do not allow the exclusion or limitation of incidental or consequential damages, or limitations on how long an implied warranty lasts, and therefore, the above exclusions or limitations may not apply to you. The warranty covers specific legal rights which may vary by state, province and/or jurisdiction.
HOW TO OBTAIN WARRANTY SERVICE:
You must contact Customer Service at our toll-free number: 1-866-832-4843. A Customer Service Representative will attempt to resolve warranty issues over the phone. If the Customer Service Representative is unable to resolve the problem, you will be provided with a case number and asked to return the product to SENSIO Inc. Attach a tag to the product that includes: your name, address, daytime contact telephone number, case number, and description of the problem. Also, include a copy of the original sales receipt. Carefully package the tagged product with the sales receipt, and send it (with shipping and insurance prepaid) to SENSIO Inc.'s address. SENSIO Inc. shall bear no responsibility or liability for the returned product while in transit to SENSIO Inc.'s Customer Service Center.
CONSIGNES DE SECURITE IMPORTANTES
For customer service questions or comments
BELLA is a registered trademark of Sensio Inc., Montréal, Canada H3B 3X9.
All rights reserved.