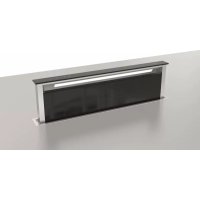
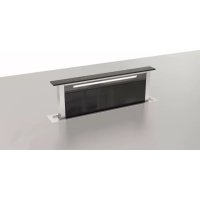
FPRHD 482 TC X - Basket Fulgor Milano - Free user manual and instructions
Find the device manual for free FPRHD 482 TC X Fulgor Milano in PDF.

User questions about FPRHD 482 TC X Fulgor Milano
0 question about this device. Answer the ones you know or ask your own.
Ask a new question about this device
Download the instructions for your Basket in PDF format for free! Find your manual FPRHD 482 TC X - Fulgor Milano and take your electronic device back in hand. On this page are published all the documents necessary for the use of your device. FPRHD 482 TC X by Fulgor Milano.
USER MANUAL FPRHD 482 TC X Fulgor Milano
this appliance can be used by children aged from 8 years and above and persons with reduced physical, sensory or mental capabilities or lack of experience and knowledge if they have been given supervision or instruction concerning use of the appliance in a safe way and understand the hazards involved.
Children shall not play with the appliance.
Cleaning and user maintenance shall not be made by children without supervision.
If the supply cord is damaged, it must be replaced by the manufacturer, its service agent or similarly qualified persons in order to avoid a hazard.
There is a fire risk if cleaning is not carried out in accordance with the instructions;
Do not flâbé under the range hood.
The air must not be discharged into a flue that is used for exhausting fumes from appliances burning gas or other fuels (not applicable to appliances that only discharge the air back into the room);
This appliance and its accessible parts are likely to become very hot if used in combination with cooking devices.
In case of installation with gas hobs the cooker surface and the inferior part of the cooker hood must be at a minimum di! stance of 65 cm.
To evacuate the air outlet, please comply with the pertaining rules given by competent authorities.
When performing the electrical connections on the appliance, please make sure that the power supply is provided with earth connection and that voltage values correspond to those indicated on the label placed inside the appliance itself.
If the supply cord is damaged, it must be replaced by the manufacturer, its service agent or similarly qualified persons in order to avoid a hazard.
Before carrying out any cleaning or maintaining operations, the appliance needs to be removed from the electric grid.
If the appliance is not provided with a non-separable flexible cable and plug, or with another device ensuring disconnections from the grid, with an opening distance between the contacts of at least 3mm , then such disconnecting devices must be supplied within the fixed installation.
If the fixed appliance is equipped with power cord and plug, the appliance shall be installed in a place where the plug is easily reachable.
Before carrying out the installation of the appliance, please check that all components are not damaged. In such a case, make contact with your retailer and do not proceed with the installation.
Should the product show any anomaly, disconnect the appliance from the power supply.
When the range hood and appliances supplied with energy other than electricity are simultaneously in operation, the negative pressure in the room must not exceed 4 Pa (4 x 10⁻⁵ bar).
USES
INSTALLATION
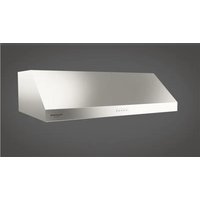
The appliance has been designed to work both in filtering and sucking mode.
- In the filtering version (fig. 1), the air and fumes conveyed by the appliance are purified by both a grease filter and an activated charcoal filter, and then re-circulated into the room through the side-grids of the chimney.
When the appliance works in this mode, we recommend the use of an air deflector (Fig. 1A) to be placed on the upper part of the pipe, allowing the air to be re-circulated into the room.
- In the sucking version (fig. 2), fumes are directly conveyed outside the building, through the top or rear air out-let. The use of a charcoal filter and air deflector is not necessary in this case.
*Before installing the appliance, make sure that none of the parts is damaged in any way. In case of damaged parts, contact your retailer and do not proceed with installation.
Read all of the following instructions carefully before installing the appliance:
-
Use an air outlet pipe of the shortest possible length.
-
Limit the number of pipe elbows.
-
Use a material approved by standards and regulations.
-
Avoid any sudden changes in the pipe section (recommended constant diameter: 200mm or equal surface area).
-
The manufacturer shall not respond for air capacity or noise problems due to non-compliance with above mentioned instructions, and no warranty shall be given.
The appliance air outlet is directed upwards: if you prefer to have the air outelt directed towards the rear side of the appliance, you will need to replace the air outlet upper fittings with the rear one supplied with the appliance (Fig. 3).
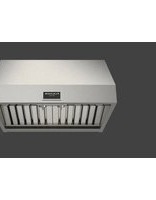
Remove the grease filter before installation, in order to prevent the appliance from being damaged.
To remove the metal grease filter, push the specific filter handle towards the hood rear side, rotating the filter downwards (Fig.4)
Drill the holes to fix the wall bracket, using the related template (drawings 5, 6); Appliances shall be installed at 650~mm from the hob surface.
Fasten the brackets to the wall using the dowels and screws supplied with the appliance.
Hang the suction body (drawing 7) to the wall brackets previously fixed.
Fit the four fixing screws into the holes found on the appliance top side. (fig. 8). Tighten the front screw to secure the appliance to the wall, then check that the hood is perfectly flush; if not, act on the rear screws and tighten either the right screw to lift the appliance right side, or the left one to raise the hood left side.
Fasten the hood by inserting the two screws into the rear side of the appliance (Fig. 9).
After determining the height of decorative pipes, fix the pipe support brackets either on the ceiling or the wall at a centre distance of 813.5mm (for the FPRHD 362 model) and 1118mm (for the FPRHD 482 model) Fig. 10, then place the two-decorative chimneys on the hood, lift the upper chimney and fix it to the brackets previously positioned with the two screws provided (Figure 11).
WORKING
(Fig.12)
A: Light ON/OFF button
B: Speed indicators
C: Speed indicators
D: Speed increase
E:10 Minute Timer
TIMING
As a result of the new EU65 "Energy label" and EU66 "Ecodesign" regulations issued by the European Commission, which came into force as from January 1st, 2015, our products have been adapted to comply with these new requirements. All of the models complying with the energy label requirements, are equipped with new electronics including a timer device for suction speeds control, when the air capacity exceeds 650m^3/h .
Internal motor models, with maximum air capacity higher than 650m^3/h , are equipped with a timer device that automatically switches the suction speed from 4th to 3rd speed, after 5 minutes operation.
Motors, whose air capacity exceeds 650m^3/h at both 4th and 3rd speed, will have the following by default timer control functions: The suction speed is automatically switched from 4th to 2nd speed, after 6 minutes operation.
If the appliance is working at 3rd speed, it is automatically switched to 2nd speed, after 7 minutes operation. Operation speeds can also be changed during operation.
The energy consumption of the appliance in stand - by mode is lower than 0.5W.
MAINTENANCE
An accurate maintenance guarantees good functioning and long-lasting performance.
Particular care is due to the grease filter.
The metal grease filter is removed by pushing the specific filter handle towards the hood rear side, rotating the filter downwards (Fig.4)
After 30 hour working, the grease filter saturation will be signaled by the simultaneous lighting of speed indicators; select the timer function with the hood off to reset it.
The grease filter needs cleaning by regular handwashing or in dishwashers, every two months at least, or depending on its use.
- If the appliance is used in the filtering version, the activated charcoal filter needs to be replaced periodically.
The charcoal filter is removed by removing the grease filter first, following the instructions above, then by pulling its special plastic tongue until it is released from its seat.
The charcoal filter is inserted by following the reverse procedure. (Fig. 13)
Tepid water and neutral detergents are recommended to clean the appliance, while abrasive products should be avoided.
The power cord shall be replaced by authorized personnel only.
Substitution of the LED bar:
Using an appropriate tool, remove the LED bar from its seat (refer to fig. 14), disconnect it electronically using the appropriate connector then substitute it with a LED bar with same characteristics.
Are directly conveyed outside the building, through the top or rear air out-let. The use of a charcoal filter and air deflector is not necessary in this case.
INSTALLATION
Laitters:
Laitters are used to prepare the products. They are used in the preparation of food and beverages, as well as in the production of pharmaceuticals.
The symbol on the product or on its packaging indicates that this product may not be treated as household waste. Instead it shall be handed over to the applicable collection point for the recycling of electrical and electronic equipment. By ensuring this product is disposed of correctly, you will help prevent potential negative consequences for the environment and human health, which could otherwise be caused by inappropriate waste handling of this product. For more detailed information about recycling of this product, please contact your local city office, your household waste disposal service or the shop where you purchased the product. This appliance is marked according to the European directive 2012/19/EC on waste electrical and electronic equipment (WEEE).