
SCANJET N6010 DOCUMENT SHEET-FEED SCANNER - To scan HP - Free user manual and instructions
Find the device manual for free SCANJET N6010 DOCUMENT SHEET-FEED SCANNER HP in PDF.

User questions about SCANJET N6010 DOCUMENT SHEET-FEED SCANNER HP
0 question about this device. Answer the ones you know or ask your own.
Ask a new question about this device
Download the instructions for your To scan in PDF format for free! Find your manual SCANJET N6010 DOCUMENT SHEET-FEED SCANNER - HP and take your electronic device back in hand. On this page are published all the documents necessary for the use of your device. SCANJET N6010 DOCUMENT SHEET-FEED SCANNER by HP.
USER MANUAL SCANJET N6010 DOCUMENT SHEET-FEED SCANNER HP
natural_image
Exterior view of a gray printer with open lid and paper tray (no visible text or symbols)Setup and Support Guide
Australia (out-of-warranty) 1902 910 910
中国 021-3881-4518
800-810-3888
服务编码:3003
香港特別行政區 2802 4098
India 91-80-28526900
1-600-425-7737
Indonesia +62 (21) 350 3408
日本 0570-000511
Setup and Support Guide
English
Copyright and license
© 2006 Copyright Hewlett-Packard Development Company, L.P.
Reproduction, adaptation or translation without prior written permission is prohibited, except as allowed under the copyright laws.
The information contained herein is subject to change without notice.
The only warranties for HP products and services are set forth in the express warranty statements accompanying such products and services. Nothing herein should be construed as constituting an additional warranty. HP shall not be liable for technical or editorial errors or omissions contained herein.
Trademark credits
ENERGY STAR is a U.S. registered service mark of the United States Environmental Protection Agency.
Microsoft and Windows are registered trademarks of Microsoft Corporation.
Contents
1 How to get started....4
Step 1. Check the box contents....4
Step 2. Install the software....5
Step 3. Connect the power supply....5
Step 4. Connect the USB cable....7
Step 5. Prepare the scanner for use....8
Step 6. Test the installation....10
Scanning software CD....11
Power Save mode or Instant Lamp On mode....11
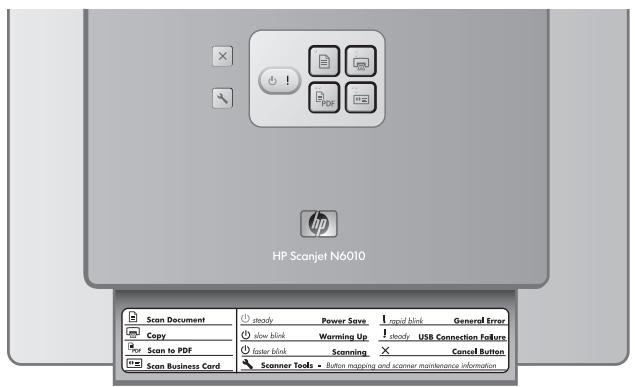
2 How to use the scanner buttons....13
Scanner buttons....13
3 Where to get additional information....15
HP Scanjet N6010 User Guide....15
Scanner Tools Utility help....15
Additional software help....16
4 Care and maintenance....17
5 Troubleshooting....18
Scanner does not work after installation....18
6 Product support....21
Accessibility....21
HP Web site....21
Getting assistance....21
7 HP limited warranty....23
HP limited warranty statement....23
8 Regulatory information and product specifications....25
Scanner specifications....25
Environmental specifications....25
Regulatory information....25
Recycling and Restricted Material Information....26
1 How to get started
Follow these steps to set up the scanner:
Step 1. Check the box contents
Unpack the scanner hardware. Be sure to remove any shipping tape.
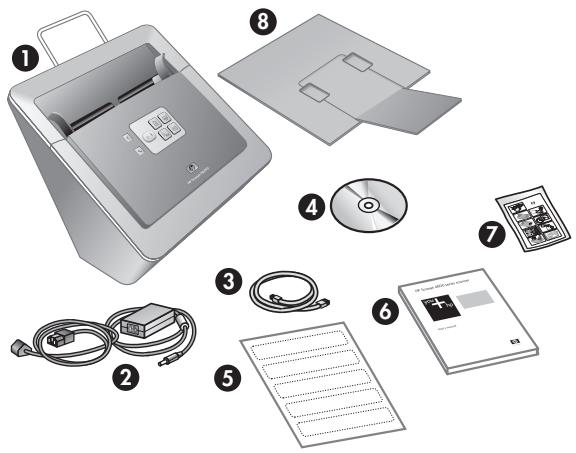
| 1 | HP Scanjet N6010 scanner |
| 2 | Power supply |
| 3 | USB cable |
| 4 | Scanning software CD (For more information, see Scanning software CD on page 11.) |
| 5 | Front-panel labels |
| 6 | Setup and Support Guide (this book) |
| 7 | Paper-path cleaning cloth (for later maintenance use) |
| 8 | Output tray |
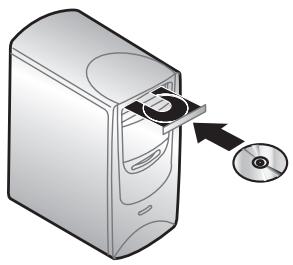
Step 2. Install the software
A number of scanning software programs are included with the scanner. For information about these programs, see Scanning software CD on page 11.

Caution Install the scanning software before connecting the USB cable to the computer.
natural_image
Illustration of a computer tower with an open CD and a disc inserted, showing no text or symbols.- Insert the scanning software CD that came with the scanner into the computer CD drive.
- Wait for the installation dialog box to display. If the installation dialog box does not display after a few moments, do the following:
a. Click Start and then click Run.
The Run dialog box is displayed.
b. In the Open box, type d:\setup.exe (where d: is the letter of your computer's CD drive).
c. Click OK.
- In the installation dialog box, select which software programs you want to install. To use all of the features of the scanner, it is recommended that you install all of the programs on the CD.
- Follow the onscreen instructions to complete the installation.
During the installation process you are asked whether you want to enable Power Save mode or Instant Lamp On mode. For information about these options, see Power Save mode or Instant Lamp On mode on page 11.
The install program will also check to see whether you have Adobe Acrobat Reader installed for viewing PDF files. If it is not installed, you are given instructions for installing it.
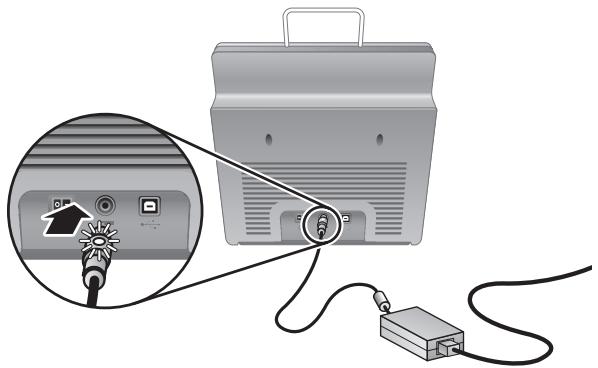
Step 3. Connect the power supply
The power supply has an attached cable that plugs into the back of the scanner. The connector on the end of this cable has a green LED that is on when the power supply is functioning correctly.

natural_image
Pure diagram of a cable with a pin and arrow, no text or symbols presentChapter 1
The power supply also has an AC cable that is connected to the power supply on one end and plugged into a power outlet or surge protector on the other end.
- Plug the AC cable into the back of the power supply.

natural_image
Simple line drawing of a rectangular device connected to a cable, with no text or symbols present.- Plug the other end of the AC cable into a power outlet or a surge protector.
-
Check that the green LED on the power supply cable connector is on.
-
If the green LED is not on, ensure that power is available to the power outlet or surge protector that the AC cable is plugged into.
-
If power is available to the power outlet or surge protector but the green LED is still not on, the power supply might be defective. Contact HP Support for assistance.
-
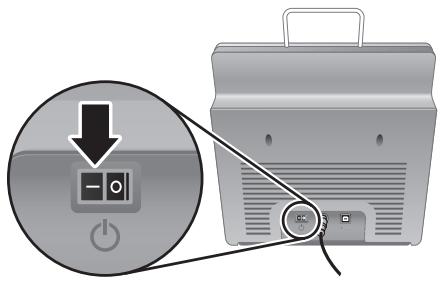
If the green LED is on, plug the power supply into the back of the scanner.
natural_image
Diagram showing a device connected to a cable via a connector, with an inset close-up of its cable (no text or symbols visible)- Turn the scanner on. Facing the back of the scanner, press the Power switch on the back of the scanner to the left.
Step 4. Connect the USB cable

Caution Be sure to install the software before connecting the scanner to your computer with the USB cable. See Step 2. Install the software on page 5.
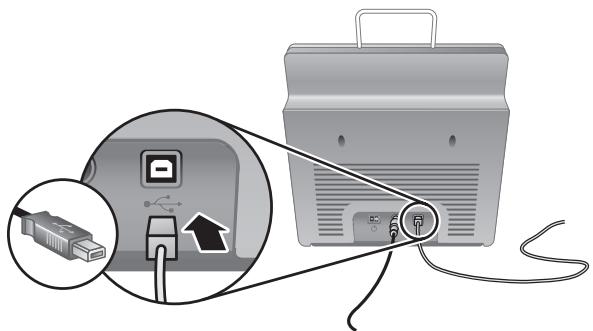
Use the USB cable that came with the scanner to connect the scanner to the computer.
- Connect the square end of the cable to the scanner.
natural_image
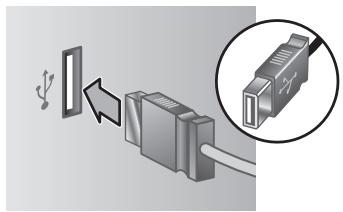
Diagram showing a device connected to a portable device via cable, with an inset image of a USB port and cable connector (no text or symbols present)- Connect the rectangular end of the cable to the computer.

Note If there is a USB port on both the front and the back of the computer, use the USB port that is in the back.
natural_image
Diagram showing a USB cable connector being inserted into a socket, with an inset close-up of the socket (no text or symbols present)Step 5. Prepare the scanner for use
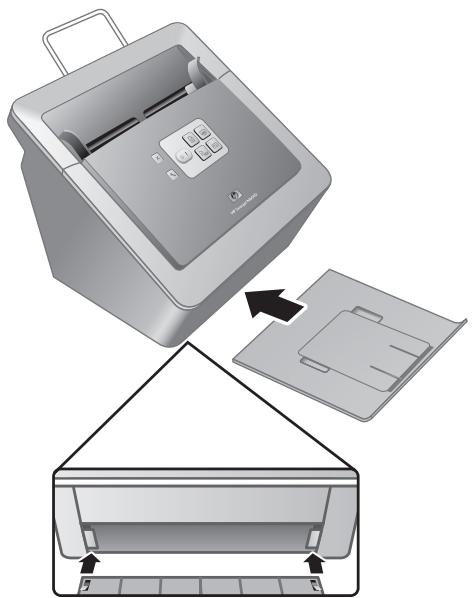
- Install the output tray. To install it, slide the tray, extension side up, into the guide slots on the bottom of the scanner.
natural_image
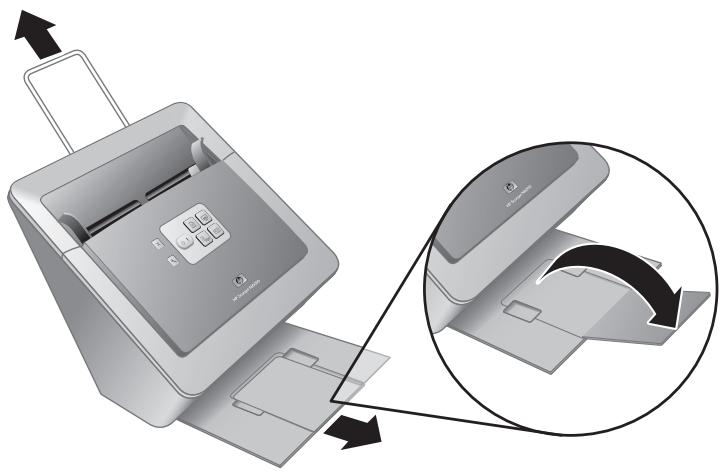
Illustration of a printer with internal components and a triangular base, showing no text or symbols.- Extend the output tray extension.
natural_image
Diagram of a printer with internal components and an inset showing the open lid view (no text or symbols)- For longer originals, extend the document feeder extension at the top of the scanner.
- Locate the front-panel label that came in the product box. Remove the backing and place the label on the pull-out tray that is below the HP logo on the front panel. This label provides information about the front-panel buttons and LED indicator lights.
Step 6. Test the installation

Caution Before placing an item in the document feeder, make sure that the item does not contain wet glue, correction fluid, or other substances that can be transferred to the interior of the scanner.
Make sure there are no curls, wrinkles, staples, paper clips, or any other attached material. Sheets should not be stuck together.
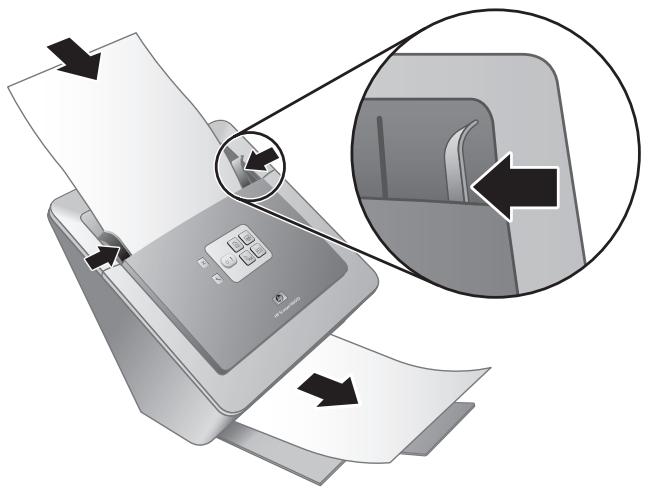
- Place a single page in the document feeder. The page should be face down, with the top of the page pointing down (☐).
natural_image
Illustration of a printer with paper feed and a close-up view of the printer's internal structure (no text or symbols)- Adjust the paper guides. The paper guides must be touching both sides of the page to work properly. Ensure that the page is straight and that the guides are against the edges of the page.

Note To adjust the paper guides, press on the lower part of the guide.
- Press the Scan to PDF ( E_PDF ) button.
The page will feed through the scanner. A scan of the page should appear on your computer screen in the PDF viewer. This confirms that the installation was successful.

Note You must have Adobe Acrobat Reader or another PDF-viewing program installed in order to successfully complete this process. If you do not have a PDF viewer, run this test using the Scan Document button.
If a scan of the page does not appear on your computer screen, see Troubleshooting on page 18.
Scanning software CD
This section describes the scanning software programs that come with the scanner. All of the programs are supported by Microsoft Windows 2000 and XP operating systems, including x-64.
There are two non-HP software programs included. These software programs are not available for all scanner models or all countries/regions.
| Programs | Software use |
| HP Scanning Software | The HP scanning software includes the Scanner Tools Utility, the HP Document Copy Utility, the HP PDF writer, and the TWAIN scanner drivers.Use the Scanner Tools Utility to configure settings for the Scan to PDF button, to map the scanner buttons to different applications, to disable the scanner buttons, or to view scanner maintenance information. It can be launched from the Scanner Tools front-panel button or from the Start menu.Use the Document Copy Utility to configure copies sent by the scanner to your default printer. It can be launched from the Copy front-panel button or from the Start menu.The HP PDF writer takes the scanned image and creates a PDF file. It has no user interface, but the PDF settings can be configured using the Scanner Tools Utility.The TWAIN drivers are necessary for using the scanner with standard business applications and customized software. They meet the minimum requirement for the scanner to work properly. |
| NewSoft Presto!PageManager | Use to create scanned images or documents and save them in a wide variety of formats. Provides access to managing documents (archive, reuse), OCR, e-mail and fax. |
| NewSoft Presto! BizCard | Use to scan business cards and organize your contacts into an easy to use database. |
Power Save mode or Instant Lamp On mode
During the installation process you are asked whether you want to enable Power Save mode or Instant Lamp On mode for the scanner. In Power Save mode, the scanner lamp times out and turns off automatically after a period of inactivity (about 15 minutes).
In Instant Lamp On mode, although the scanner lamp times out and turns off automatically after a period of inactivity (about 15 minutes), it remains warm and ready to scan.
Chapter 1
To switch from Power Save mode to Instant Lamp On mode, select the Instant Lamp On option on the Maintenance tab of the Scanner Tools Utility. To switch back to Power Save mode, clear the Instant Lamp On option.
2 How to use the scanner buttons
Scanner buttons
Use the buttons on the front panel of the scanner to start a scan, cancel a scan, or configure some scanner settings.
flowchart
graph TD
    A["①"] --> B["②"]
    B --> C["③"]
    C --> D["④"]
    D --> E["⑤"]
    E --> F["×"]
    G["⑥"] --> H["工具栏"]
    I["⑦"] --> J["PDF"]
    K["⑧"] --> L["文件图标"]
    M["⑨"] --> N["文件图标"]
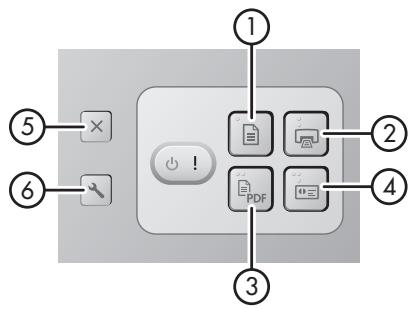
| Icon | Button name | Description | |
| 1 |  | Scan Document (upper-left button) | Start a scan. By default, this button will scan to the NewSoft Presto! PageManager application. |
| 2 |  | Copy (upper-right button) | Start a copy and send it to your default printer. The HP Document Copy utility opens and enables you to select options for the copy. |
| 3 |  | Scan to PDF (lower-left button) | Scan an item and save it as a PDF file for sharing or storing. By default, the PDF is automatically opened in your default PDF viewer. |
| 4 |  | Scan Business Card (lower-right button) | Scan a business card. By default, this button will scan to the NewSoft Presto! BizCard application. |
| 5 |  | Cancel (far-left top button) | Cancel a scan or copy in progress. |
| 6 |  | Scanner Tools (far-left bottom button) | Open the Scanner Tools Utility, which you can use to map the scanner buttons to different applications, configure PDF |
Chapter 2
(continued)
| options, or view scanner maintenance information. |
For more information about the scanner buttons than is provided in this chapter, see the scanner user guide. For information about the scanner user guide, see Where to get additional information on page 15.
3 Where to get additional information
The scanner comes with several sources of information about using the scanner and the scanning software.
HP Scanjet N6010 User Guide
The scanner user guide is the primary source of information regarding this product and includes the information you need to know for using, maintaining, and troubleshooting the scanner. The user guide is available as a PDF file, so that you can print all or parts of it, and as a screen-readable Help file.
To open the user guide PDF:
→ Click Start, point to Programs or All Programs, point to HP, point to Scanjet, point to N6010, and then click User Guide.
For a PDF version of the user guide in another language:
- Insert the scanning software CD that came with the scanner into the computer CD drive.
Wait for the installation dialog box to display. - Click View or print guides.
A list of languages is displayed. - Click the language that you want.
A list of guides is displayed. - Click User Guide.
For an online Help version of the user guide that can be used with screen reader software:
-
Insert the scanning software CD that came with the scanner into the computer CD drive.
Wait for the installation dialog box to display. -
Click View or print guides.
A list of languages is displayed.
- Click the language that you want.
A list of guides is displayed.
- Click Onscreen User Guide.
Scanner Tools Utility help

To open the utility, do one of the following:
- Double-click the Scanner Tools Utility icon on the desktop.
- Press the Scanner Tools (✗) button on the front panel of the scanner.
- Click Start, point to Programs or All Programs, point to HP, point to Scanjet, point to N6010, and then click Scanner Tools Utility.
Click Help on the Scanner Tools Utility dialog box to open the Help file.
Chapter 3
Additional software help
Each of the software programs included on the scanning software CD includes software Help. To open the software Help, open the program, select the Help menu, and then select Help or Using Help.
4 Care and maintenance
Occasional cleaning of the scanner helps ensure higher-quality scans. The amount of care necessary depends upon several factors, including the amount of use and the environment. You should perform routine cleaning as necessary.
For instructions about maintaining the scanner, see the scanner user guide. For information about the scanner user guide, see Where to get additional information on page 15.

Caution Before placing an item in the document feeder, make sure that the item does not contain wet glue, correction fluid, or other substances that can be transferred to the interior of the scanner.
Make sure there are no curls, wrinkles, staples, paper clips, or any other attached material. Sheets should not be stuck together.
5 Troubleshooting
Scanner does not work after installation
If the scanner does not work after installation, you might see one of the following messages displayed on the computer:
• The scanner could not be initialized.
• The scanner could not be found.
• An internal error has occurred.
- The computer cannot communicate with the scanner.
Try the following to fix the problem:
Step 1. Check the cables
Verify that the cable connections are in working order.
Power supply
The power supply has an attached cable that plugs into the back of the scanner. The connector on the end of this cable has a green LED that is on when the power supply is functioning correctly.

natural_image
Pure diagram of a cable with a pin and arrow, no text or symbols presentThe power supply also has an AC cable that is connected to the power supply on one end and plugged into a power outlet or surge protector on the other end.
The power cable is connected between the scanner and a power outlet.
- Check that the power rocker switch is in the on position.
- Check that the green LED on the power supply cable connector is on.
- If the green LED is not on, ensure that power is available to the power outlet or surge protector that the AC cable is plugged into.
- If power is available to the power outlet or surge protector but the green LED is still not on, the power supply might be defective. Contact HP Support for assistance.
USB cable
If the scanner has lost its USB connection, the Error LED is lit with a steady amber light. Try the following:
Check the physical connection to the scanner:
- Use the cable that was included with the scanner. Another USB cable might not be compatible with the scanner.
- Ensure that the USB cable is securely connected between the scanner and the computer or USB hub. The trident icon on the USB cable faces up when the cable is properly connected to the scanner.
To troubleshoot the USB connection:
- Do one of the following tasks, depending on how the scanner is connected to the computer:
- If the USB cable is connected to a USB hub or a docking station for a laptop, disconnect the USB cable from the USB hub or the docking station, and then connect the USB cable directly to the computer.
- If the USB cable is directly connected to the computer, plug it into another USB port on the computer.
- If the USB cable is connected to a USB port on the front of the computer, plug it into a USB port on the back of the computer.
-
Remove all other USB devices from the computer except for the keyboard and the mouse.
-
Turn the scanner off and then on.
-
Restart the computer.
-
After the computer has restarted, try using the scanner.
If the scanner works and you changed the way it was connected to the computer in step 1, the communication problem might involve the USB hub or docking station. Leave the scanner directly connected to the computer.
If the scanner does not work, uninstall and then reinstall the HP scanning software.
Step 2. Uninstall and then reinstall the scanning software
If checking the scanner cable connections did not solve the problem, the problem might have occurred because of an incomplete installation. Try uninstalling and then reinstalling the scanning software.
- Disconnect the USB cable from the computer.
- Do one of the following tasks to open the Control Panel:
- Windows XP: Click Start, and then click Control Panel.
-
Windows 2000: Click Start, point to Settings, and then click Control Panel.
-
Double-click the Add/Remove Programs icon.
A list of currently installed programs is displayed.
-
Select HP Scanjet N6010 Divers and Tools, and then click Remove or Change/Remove.
-
Follow the onscreen instructions. If prompted to remove or repair the software, click Remove. If prompted to restart the computer, click No.
-
After the scanning software is removed, unplug the scanner from the electrical outlet.
-
Restart the computer.
-
Insert the scanning software CD into the computer CD drive.
-
Follow the onscreen instructions to install the scanning software.
Chapter 5
- After the scanning software has installed, connect the scanner to an electrical outlet, turn on the scanner, and then use the USB cable to connect the scanner to the computer.
- Follow the onscreen instructions.
Scanner buttons are not working correctly
After each step, start a scan to see if the buttons are working. If the problem persists, proceed with the next step.
- A cable might be loose. Ensure that the USB cable and the power supply are securely connected.
- Turn off the scanner, wait 30 seconds, and then turn the scanner back on.
- Restart your computer.
- If the problem persists, the buttons might be disabled. Try the following procedure:
a. Open Control Panel, select Scanners and Cameras, and then select your scanner model from the list.
b. Do one of the following:
-
Windows 2000: Ensure that the Disable Device Events option is not selected.
• Windows XP: Ensure the Take No Action option is not selected. -
The buttons might be disabled in the Scanner Tools Utility. Try the following procedure:
a. Open the Scanner Tools Utility. For instructions, see Scanner Tools Utility help on page 15 or the device user guide.
b. Select the Buttons tab.
c. Verify that the Disable scanner buttons check box is NOT selected.
- Ensure that there is a software program associated with the scanner button by doing the following:
a. Open the Scanner Tools Utility. For instructions, see Scanner Tools Utility help on page 15 or the device user guide.
b. Select the Buttons tab.
c. Verify that each button is associated with the correct program. For more information, click Help in the Scanner Tools Utility.
Other sources for help
For more troubleshooting help with the scanner hardware or software, see Where to get additional information on page 15.
6 Product support
This section describes the options for product support.
Accessibility
To prevent buttons from being accidentally pushed, use the Scanner Tools Utility to disable the front-panel buttons. You can use the same utility to re-enable the buttons.
For more information about the Scanner Tools Utility, see the scanner user guide. For information about the scanner user guide, see Where to get additional information on page 15.
Customers with disabilities can get help by
visiting www.hp.com/hpinfo/community/accessibility/prodserv/ (US only).
HP Web site
Visit www.hp.com for a variety of information:
• Find solutions to technical issues.
- Learn tips for using your product more effectively and creatively.
- Update your HP drivers and software.
- Register your product.
- Subscribe to newsletters, driver and software updates, and support alerts.
• Purchase HP supplies and accessories.
Getting assistance
In order to get the best from your HP product, please consult the following standard HP support offerings:
- Please consult the product documentation that came with the product.
– Review the troubleshooting section or electronic Help of this manual/CD.
– Review the electronic Help section within the software. - Visit the HP online support at www.hp.com/support or contact your point of purchase.
HP online support is available to all HP customers. It is the fastest source for up-to-date product information and expert assistance, including the following features:
– Fast e-mail access to qualified online support specialists
– Software and driver updates for your product - Valuable product and troubleshooting information for technical issues
-
Proactive product updates, support alerts, and HP newsletters (available when you register your product)
-
HP support by phone
– Support options and fees vary by product, country/region and language.
- Fees and policies are subject to change without notice. Please check the web site www.hp.com/support for the latest information.
Chapter 6
- Post-warranty period
After the limited warranty period, help is available online at www.hp.com/support.
- Extending or upgrading your warranty
If you would like to extend or upgrade the product's warranty, please contact your point of purchase or check the HP Care Pack offers at www.hp.com/support.
- If you already purchased an HP Care Pack Service, please check the agreed support conditions on the contract.
7 HP limited warranty
The following information outlines the warranty information for this product.
HP limited warranty statement
| Product | Duration of limited warranty |
| HP Scanjet N6010 Sheetfeed Document Scanner | 1 year |
A. Extent of limited warranty
- Hewlett-Packard (HP) warrants to the end-user customer (Customer) that each HP product specified above (Product) shall be free from defects in material and workmanship for the period specified above. The warranty period begins on the date of purchase by Customer.
- For each software product, HP's limited warranty applies only to a failure to execute programming instructions. HP does not warrant that the operation of any Product will be uninterrupted or error free.
- HP's limited warranty covers only those defects that arise as a result of normal use of a Product, and does not cover any other problems, including those that arise as a result of:
a. Improper use, maintenance, storage, handling, or modification;
b. Software, media, parts, accessories, supplies, or power adapters or sources not provided or supported by HP; or,
c. Operation or other conditions outside a Product's specifications.
-
If HP receives, during the applicable warranty period, notice of a defect in a Product, HP shall at its option either replace or repair the defective Product.
-
If HP cannot replace or repair a defective Product that is covered by HP's limited warranty, HP may, within a reasonable time after being notified of the defect, provide either another product similar in performance or a refund of the purchase price prorated based on usage and other appropriate factors.
-
HP shall have no obligation to replace, repair, or refund until Customer returns the defective Product to HP and provides a valid proof of purchase.
- Any replacement product may be either new or like-new, provided it has functionality at least equal to that of the Product being replaced.
- A Product may contain remanufactured parts, components, or materials equivalent to new in performance.
- HP's limited warranty is valid in any country or locality where HP has a support presence for the Product and has marketed the Product. The level of warranty service may vary according to local standards. Upgraded warranty services, such as next day exchange, on-site service, and accident protection, may be purchased from HP.
B. Limitations of Warranty
TO THE EXTENT ALLOWED BY LOCAL LAW, NEITHER HP NOR ITS THIRD PARTY SUPPLIERS MAKE ANY OTHER WARRANTY OR CONDITION OF ANY KIND, WHETHER EXPRESS OR IMPLIED, WITH RESPECT TO A PRODUCT, AND SPECIFICALLY DISCLAIM THE IMPLIED WARRANTIES OR CONDITIONS OF MERCHANTABILITY, SATISFACTORY QUALITY, AND FITNESS FOR A PARTICULAR PURPOSE.
C. Limitations of Liability
- To the extent allowed by local law, the remedies provided in this Limited Warranty Statement (LWS) are Customer's sole and exclusive remedies.
- TO THE EXTENT ALLOWED BY LOCAL LAW, EXCEPT FOR THE OBLIGATIONS SPECIFICALLY SET FORTH IN THIS LWS, IN NO EVENT SHALL HP OR ITS THIRD PARTY SUPPLIERS BE LIABLE FOR DIRECT, INDIRECT, SPECIAL, INCIDENTAL, OR CONSEQUENTIAL DAMAGES, WHETHER BASED ON CONTRACT, TORT, OR ANY OTHER LEGAL THEORY AND WHETHER ADVISED OF THE POSSIBILITY OF SUCH DAMAGES.
D. Local Law
- This LWS gives Customer specific legal rights. Customer may also have other rights that vary from state to state in the United States, from province to province in Canada, and from country to country elsewhere in the world.
- To the extent this LWS is inconsistent with local law, this LWS shall be deemed modified to be consistent with local law. Under local law, certain disclaimers and limitations of this LWS may not apply to Customer. For example, the federal government of the United States, some states in the United States, and some governments outside the United States (including provinces in Canada), may:
a. Grant Customer additional warranty rights;
b. Preclude the disclaimers and limitations in this LWS from limiting the statutory rights of a consumer (e.g., the United Kingdom);
c. Otherwise restrict the ability of a manufacturer to enforce such disclaimers or limitations;
d. Specify the duration of implied warranties that the manufacturer cannot disclaim; or,
e. Disallow limitations on the duration of implied warranties
-
Customer may have additional statutory rights based on its purchase agreement. Those rights are not in any way affected by this LWS.
-
For consumer transactions in the United States, any implied warranties imposed by law are limited in duration to the express warranty period.
-
FOR CONSUMER TRANSACTIONS IN AUSTRALIA AND NEW ZEALAND, THE TERMS IN THIS LWS, EXCEPT TO THE EXTENT LAWFULLY PERMITTED, DO NOT EXCLUDE, RESTRICT, OR MODIFY, AND ARE IN ADDITION TO, THE MANDATORY STATUTORY RIGHTS APPLICABLE TO THE SALE OF A PRODUCT TO SUCH CUSTOMERS.
You may have additional statutory rights against the seller based on your purchase agreement. Those rights are not in any way affected by this HP Limited Warranty.
You will find on the inside front cover of this book the names and address of the HP entity responsible for the performance of the HP Limited Warranty in your country.
8 Regulatory information and product specifications
This section contains regulatory information and product specifications for the HP Scanjet N6010 scanner and accessories.
Scanner specifications
| Name | Description |
| Scanner type | Duplex sheet-feed scanner |
| Size | Width: 320 mm (12.6 in), Depth: 270 mm (10.63 in), Height: 312 mm (12.28 in) |
| Weight | 5.4 kg (11.8 lbs) |
| Scanning element | Charge-coupled device (CCD) |
| Interface | USB 2.0 high-speed |
| Optical resolution | 600 x 600 dpi hardware |
| AC power | 100-240V~, 50/60Hz, 1.5A |
| Power consumption | Operation: 32WSleep mode: 5.25W |
 | Your HP scanner is ENERGY STAR® compliant. As an ENERGY STAR® partner, Hewlett-Packard Company has determined that this product meets the ENERGY STAR® guidelines for energy efficiency. |
Environmental specifications
| Name | Description |
| Temperature | Operating the scanner: 10° to 35°C (50° to 95°F) |
| Storage: -40° to 60°C (-40° to 140°F) | |
| Relative humidity | Operating the scanner: 15 percent to 80 percent noncondensing 10° to 35°C (50° to 95°F) |
| Storage: up to 90 percent at 0° to 60°C or (32° to 140°F) |
Regulatory information
Regulatory Model Identification Number: For regulatory identification purposes your product is assigned a Regulatory Model Number. The Regulatory Model Number for your
Chapter 8
product is FCLSD-0601. This regulatory number should not be confused with the marketing name (HP Scanjet N6010) or product number (L1983A). Additional regulatory information about your scanner can be found on the regulatory_supplement.htm file on the scanning software CD.

Note The regulatory label (with the part numbers and serial numbers) is on the bottom of the scanner. However, when you insert the output paper tray on the bottom of the scanner, you will cover up the regulatory label.
Recycling and Restricted Material Information
The following recycling and restricted material policies apply to this product.
Disposal of Waste Equipment by Users in Private Households in the European Union

natural_image
Symbol of a trash bin with crossed lines indicating no waste or restriction, and a solid black rectangle below (no text or symbols)This symbol on the product or on its packaging indicates that this product must not be disposed of with your other household waste. Instead, it is your responsibility to dispose of your waste equipment by handing it over to a designated collection point for the recycling of waste electrical and electronic equipment. The separate collection and recycling of your waste equipment at the time of disposal will help to conserve natural resources and ensure that it is recycled in a manner that protects human health and the environment. For more information about where you can drop off your waste equipment for recycling, please contact your local city office, your household waste disposal service, or the shop where you purchased the product.
Environmental Product Stewardship Program
Hewlett-Packard is committed to providing quality products in an environmentally sound manner. Design for recycling has been incorporated into this product. The number of materials has been kept to a minimum while ensuring proper functionality and reliability. Dissimilar materials have been designed to separate easily. Fasteners and other connections are easy to locate, access, and remove using common tools. High priority parts have been designed to access quickly for efficient disassembly and repair. For more information, visit HP's Commitment to the Environment Web site at: www.hp.com/globalcitizenship/environment/
Plastics
Plastic parts over 25 grams are marked according to international standards that enhance the ability to identify plastics for recycling purposes at the end of product life.
Recycling program
HP offers an increasing number of product return and recycling programs in many countries/regions, and partners with some of the largest electronics recycling centers throughout the world. HP conserves resources by reselling some of its most popular products. For more information regarding recycling of HP products, please visit: www.hp.com/hpinfo/globalcitizenship/environment/recycle/
Special handling of materials
This HP product contains materials that might require special handling at end-of-life. Mercury in the fluorescent lamp(s) of this product is exempt from the European Union's Directive 2002/95/EC, Restrictions of Hazardous Substances.
Chapter 8
© 2006 Copyright Hewlett-Packard Development Company, L.P.
natural_image
Illustration of a computer tower with an open CD inside, showing disc transfer from one to the other (no text or symbols present)natural_image
Pure diagram of a cable with a pin and arrow, no text or symbols presentnatural_image
Simple line drawing of a rectangular device connected to a cable, with no text or symbols present.natural_image
Illustration of a portable TV setup with cable and connector, showing an inset close-up of the screen (no text or symbols)natural_image
Diagram showing a device connected to a portable TV with cable, highlighting an internal connection (no text or symbols present)natural_image
Diagram showing a USB cable connector with an icon of a fuse (no text or symbols present)natural_image
Illustration of a printer with internal components and a triangular base, showing no text or symbols.natural_image
Illustration of a printer with a close-up view showing the internal mechanism (no text or symbols)natural_image
Illustration of a printer with paper feed and a close-up view of the printer's internal structure (no text or symbols)natural_image
Pure diagram of a cable with a pin and arrow, no text or symbols presentl'adresse www.hp.com/hpinfo/community/accessibility/prodserv/.
Site Web HP
natural_image
Symbol of a trash bin with crossed lines indicating no waste or restriction, and a solid black rectangle below (no text or symbols)site :www.hp.com/hpinfo/globalcitizenship/environment/recycle/
(c) 2006 Copyright Hewlett-Packard Development Company, L.P.
Scanning software CD....11
natural_image
Illustration of a computer tower with an open CD and a disc inserted, showing no text or symbols.natural_image
Illustration of a cable connector with an arrow pointing to a circular component (no text or symbols)natural_image
Illustration of a rectangular device connected to two cables, one with a cable and the other with a cable (no text or symbols)natural_image
Illustration of a TV set connected to an audio device via cable, showing a close-up of the screen and cable (no text or symbols present)natural_image
Diagram showing a device with an attached cable and a close-up of its internal components (no text or symbols present)natural_image
Diagram showing a USB cable connector being inserted into a socket, with an inset close-up of the socket (no text or symbols present)natural_image
Illustration of a printer with internal components and a triangular base, showing no text or symbols.natural_image
Illustration of a printer with a close-up view showing the internal mechanism (no text or symbols)natural_image
Illustration of a printer with paper feed and a close-up view of the printer's internal structure (no text or symbols)Scanning software CD
natural_image
Pure diagram of a cable with a pin and arrow, no text or symbols presentnatural_image
Symbol of a trash bin crossed with a diagonal line, no text or numbers presentconsulte: www.hp.com/hpinfo/globalcitizenship/environment/recycle/
© 2006 Copyright Hewlett-Packard Development Company, L.P.
HP Scanning Software CD....11
natural_image
Illustration of a computer tower with an open CD and a disc inserted, showing no text or symbols.natural_image
Pure diagram of a cable with a pin and arrow, no text or symbols presentnatural_image
Simple line drawing of a rectangular device connected to a cable, with no text or symbols present.natural_image
Illustration of a TV set with cable and connector, showing a close-up of the cable's cable to a monitor (no text or symbols present)natural_image
Diagram showing a device connected to a portable TV with cable, highlighting an internal connection (no text or symbols present)natural_image
Diagram showing a USB cable connector being inserted into a socket, with an inset close-up of the socket (no text or symbols present)natural_image
Illustration of a printer with internal components and a triangular base, showing no text or symbols.natural_image
Illustration of a printer with a close-up view showing the internal mechanism (no text or symbols)natural_image
Illustration of a printer with paper feed and a close-up view of the printer's internal structure (no text or symbols)HP Scanning Software CD
natural_image
Pure diagram of a cable with a pin and arrow, no text or symbols presentnatural_image
Symbol of a trash bin with crossed lines indicating no waste or restriction, and a solid black rectangle below (no text or labels)site: www.hp.com/hpinfo/globalcitizenship/environment/recycle/
Printed in USA or Mexico
© 2006 Hewlett-Packard Development Company, L.P.