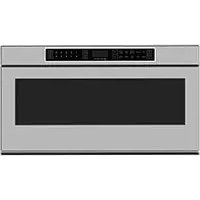
KMWR30 - Microwave Oven Hestan - Free user manual and instructions
Find the device manual for free KMWR30 Hestan in PDF.


| Product Type | Drawer Microwave Oven |
| Brand | Hestan |
| Model | KMWR30 |
| Unit Width | 54.9 cm (21-5/8 in) |
| Depth without Door | 55.6 cm (21-7/8 in) |
| Body Height | 37.1 cm (14-19/32 in) |
| Door Width | 76.4 cm (30-1/16 in) |
| Appliance Face Height | 40.3 cm (15-7/8 in) |
| Approximate Weight | 45 kg (100 lb) |
| Electrical Supply | 120 V, 60 Hz, 15 A single phase |
| Plug Type | 3-prong grounding plug |
| Capacity | Not specified (sliding drawer) |
| Automatic Drawer Opening | 38.1 cm (15 in) |
| Main Functions | Microwave, clock, quick start, stop/clear, timed cooking |
| Safety | Anti-tip block, grounding, child safety lock (subject to confirmation) |
| Installation | Standard or built-in with supplied air deflector |
| Minimum Clearances (Standard) | See manual: opening width 72.2 cm, depth 59.7 cm, height 39.5 cm |
| Minimum Clearances (Built-in) | Width 72.2-72.4 cm, height 42.9 cm, min depth 59.7 cm |
| Maintenance and Cleaning | Clean according to user manual; do not remove waveguide cover |
| Spare Parts and Repairability | Contact Hestan customer service for parts and repairs |
| General Information | Manual available for free download; 28 pages |
Frequently Asked Questions - KMWR30 Hestan
User questions about KMWR30 Hestan
0 question about this device. Answer the ones you know or ask your own.
Ask a new question about this device
Download the instructions for your Microwave Oven in PDF format for free! Find your manual KMWR30 - Hestan and take your electronic device back in hand. On this page are published all the documents necessary for the use of your device. KMWR30 by Hestan.
USER MANUAL KMWR30 Hestan
IF THE INFORMATION IN THIS MANUAL IS NOT FOLLOWED EXACTLY, A FIRE OR EXPLOSION MAY RESULT CAUSING PROPERTY DAMAGE, PERSONAL INJURY, OR DEATH.
Do not store or use gasoline or other flammable vapors and liquids in the vicinity of this or any other appliance.
Installation and service must be performed by a qualified installer or service agency.
DO NOT REPAIR, REPLACE OR REMOVE ANY PART OF THE APPLIANCE UNLESS SPECIFICALLY RECOMMENDED IN THE MANUAL. IMPROPER INSTALLATION, SERVICE OR MAINTENANCE CAN CAUSE INJURY OR PROPERTY DAMAGE. REFER TO THIS MANUAL FOR GUIDANCE. ALL OTHER SERVICING SHOULD BE DONE BY A HESTAN AUTHORIZED SERVICE TECHNICIAN.
READ THESE INSTRUCTIONS CAREFULLY AND COMPLETELY BEFORE INSTALLING OR USING YOUR APPLIANCE TO REDUCE THE RISK OF FIRE, BURN HAZARD, OR OTHER INJURY. KEEP THIS MANUAL FOR FUTURE REFERENCE.
SAFETYDEFINITIONS
THIS INDICATES THAT DEATH OR SERIOUS INJURY MAY OCCUR AS A RESULT OF NOT OBSERVING THIS WARNING

THIS INDICATES THAT MINOR OR MODERATE INJURY MAY OCCUR AS A RESULT OF NOT OBSERVING THIS WARNING.

THIS INDICATES THAT DAMAGE TO THE APPLIANCE OR PROPERTY MAY OCCUR AS A RESULT OF NOT OBSERVING THIS WARNING.
INSTALLER: LEAVE THIS MANUAL WITH THE OWNER OF THE APPLIANCE.
HOMEOWNER: RETAIN THIS MANUAL FOR FUTURE REFERENCE.
INSTALLATION AND SERVICE MUST BE PERFORMED BY A QUALIFIED INSTALLER.
1 SAFETY PRECAUTIONS-BEFORE YOU BEGIN
2 MODEL NUMBERS
2 RATING LABEL
2 REGULATORY / CODE REQUIREMENTS
2 IMPORTANT NOTES
3 CLEARANCES AND DIMENSIONS
10 INSTALLATION STEPS
SAFETY PRECAUTIONS - BEFORE YOU BEGIN
When properly cared for, your Hestan Printer Microwave will provide safe, reliable service for many years. When using this microwave, basic safety practices must be followed as described in the following pages.
IMPORTANT: Save these instructions for the local Utility Inspector's use.
INSTALLER: Please leave these Installation Instructions with the owner.
OWNER: Please read these Instructions and save them for future reference.
WARNING
ELECTRICAL SHOCK HAZARDELECTRICAL SHOCK HAZARD
Disconnect power before installing or servicing appliance. Failure to do so can result in electrical shock or death. It is the responsibility of the user to have the appliance connected by a licensed electrician in accordance with all applicable codes and standards, including fire-related construction. See "ELECTRICAL CONNECTION" for details.
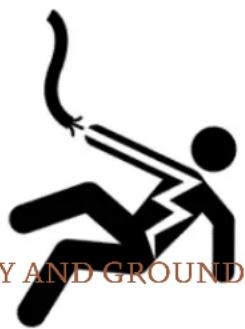
ELECTRICAL SUPPLY AND GROUNDING ELECTRICAL SUPPLY AND GROUNDING
- This appliance must be grounded. Grounding reduces the risk of electric shock in the event of a short circuit. See "INSTALLATION STEPS" on page 10 for instructions.
- This appliance must be connected to 120 VAC Single Phase, 60Hz , with a current rating as shown in the model number listing on page 2.
- OWNER: Have the installer show you where the electric circuit breaker is located so you know how to shut off the power to this appliance.
GENERAL SAFETY PRECAUTIONSGENERAL SAFETY PRECAUTIONS
When properly cared for, your new Printer Microwave has been designed to be a safe, reliable appliance. Read all instructions carefully before using it. When using kitchen appliances, basic safety precautions must be followed.
WARNING
TO REDUCE THE RISK OF FIRE, ELECTRIC SHOCK, OR INJURY TO PERSONS, OBSERVE THE FOLLOWING:
a) Use this microwave only as intended by the manufacturer. If you have any questions, contact the manufacturer.
b) Before servicing or cleaning unit, unplug the microwave or switch power off at service panel and lock the service disconnecting means to prevent power from being switched on accidentally. If the appliance cannot be unplugged and the service disconnecting means cannot be locked, securely fasten a prominent warning device, such as a tag, to the service panel.
MODEL NUMBERS
| MODEL NO. D | DESCRIPTION CIRCUIT BREAKER | |
| KMWR30 | 30"Drawer Microwave 15 Amps |
All units 115 VAC 60 Hz
RATING LABEL
The rating plate includes model and serial number. Open the Printer Microwave fully. The label is beyond the back wall of the drawer facing up from the bottom surface.
If service is necessary, contact Hestan Customer Care with the model and serial number information shown on the label.
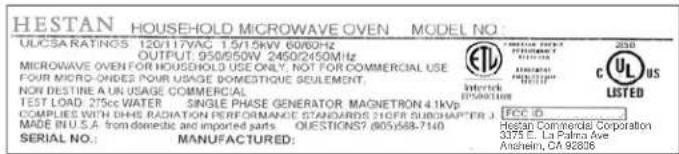
TYPICALRATINGLABEL
REGULATORY / CODE REQUIREMENTS
Installation of this cooking appliance must be made in accordance with local codes. In the absence of local codes, this unit should be installed in accordance with the National Electrical Code and local codes.
This appliance must be electrically grounded in accordance with local codes or in the absence of local codes with the National Electrical Code ANSI/NFPA 70, or Canadian Electrical code CSA C22.1.
IMPORTANT NOTES
- Remove all packing materials from inside the Printer Microwave. DO NOT REMOVE THE WAVEGUIDE COVER, which is located on the top of the Printer Microwave.
- Remove the feature sticker, if there is one. Check the drawer for any damage, such as misaligned or bent drawer, damaged drawer seals and sealing surfaces, broken or loose Drawer Microwave guides and dents inside the cavity or on the front side of the drawer. If there is any damage, do not operate the Drawer Microwave and contact your dealer or a HESTAN AUTHORIZED SERVICER.
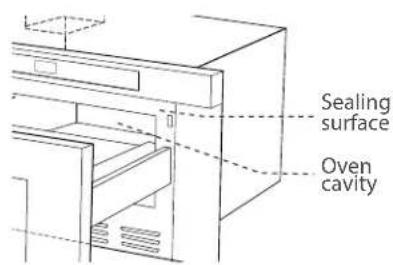
Sealing
surface
IMPORTANT NOTES TO THE INSTALLER/IMPORTANT NOTES TO THE INSTALLER
- Read all of the Installation Manual before installing the Printer Microwave.
- Remove all packing material before connecting the electrical supply.
Observe all governing codes and ordinances. BE SURE TO LEAVE THESE INSTRUCTIONS WITH THE CONSUMER.
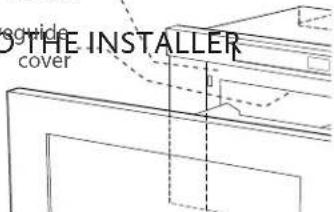
IMPORTANT NOTES TO THE CONSUMERIMPORTANT NOTES TO THE CONSUMER
Keep this manual with your Use and Care Manual for future reference.
- As when using any microwave oven generating heat, there are certain safety precautions you should follow. These are listed in the Use and Care Manual. Read all and follow carefully.
- Be sure your Printer Microwave is installed and grounded properly, in accordance with local codes by a qualified installer or service technician.
IMPORTANT SAFETY INSTRUCTIONSIMPORTANT SAFETY INSTRUCTIONS

If the information in this manual is not followed exactly, a fire or electrical shock may result that could cause property damage, personal injury or death.

To reduce the risk of tipping, the Printer Microwave must be secured by a properly installed Anti-Tip block.

Do not install drawer in any combustible cabinetry unless it meets the stated clearances and dimensions on the following pages. See Figure 1, 2 and 3.
- Make sure the wall coverings and the cabinets around the Printer Microwave can withstand the heat generated by the appliance.
Never leave children alone or unattended in the area where a Printer Microwave is in use. Never leave the drawer open when the microwave is unattended.

Stepping, leaning or sitting on the drawer may result in serious injuries and can also cause damage to theDrawer Microwave.
- Do not use the Printer Microwave as a storage space. This creates a potentially hazardous situation.
- Check that the time of day is in the display. If not, touch Stop/Clear to prevent unintended use.
ABOUT DIMENSIONSBABOUT DIMENSIONS
Figure 1 shows dimensions of the unit. Figures 2 - 3 provide minimum clearance for standard (non-flush) installation. Figures 4 - 9 show clearances and additional information for flush mount installation. Suggested electrical outlet location is shown in figures 2 - 6.
- Contact surface must be solid and level. Pay special attention to the floor on which the Printer Microwave will sit. The floor of the opening should be constructed of plywood strong enough to support the weight of the unit - about 100 pounds [45kg] .
- Check location where the Printer Microwave will be installed for proper electrical supply.
- Your Printer Microwave can be installed into a cabinet by itself or below any electric or gas wall oven. Be sure that the clearance of the floor between the wall oven and the Printer Microwave is a minimum of 2 inches [5.1 cm].
- Always check electrical codes for requirements.

The Drawer Microwave must be placed close enough to the electrical outlet so that the cord is not under tension.
See Figures 1 - 6 for required clearances and dimensions when planning the drawer's location.
DRAWER MICROWAVE DIMENSIONSDRAWER MICROWAVE DIMENSIONS
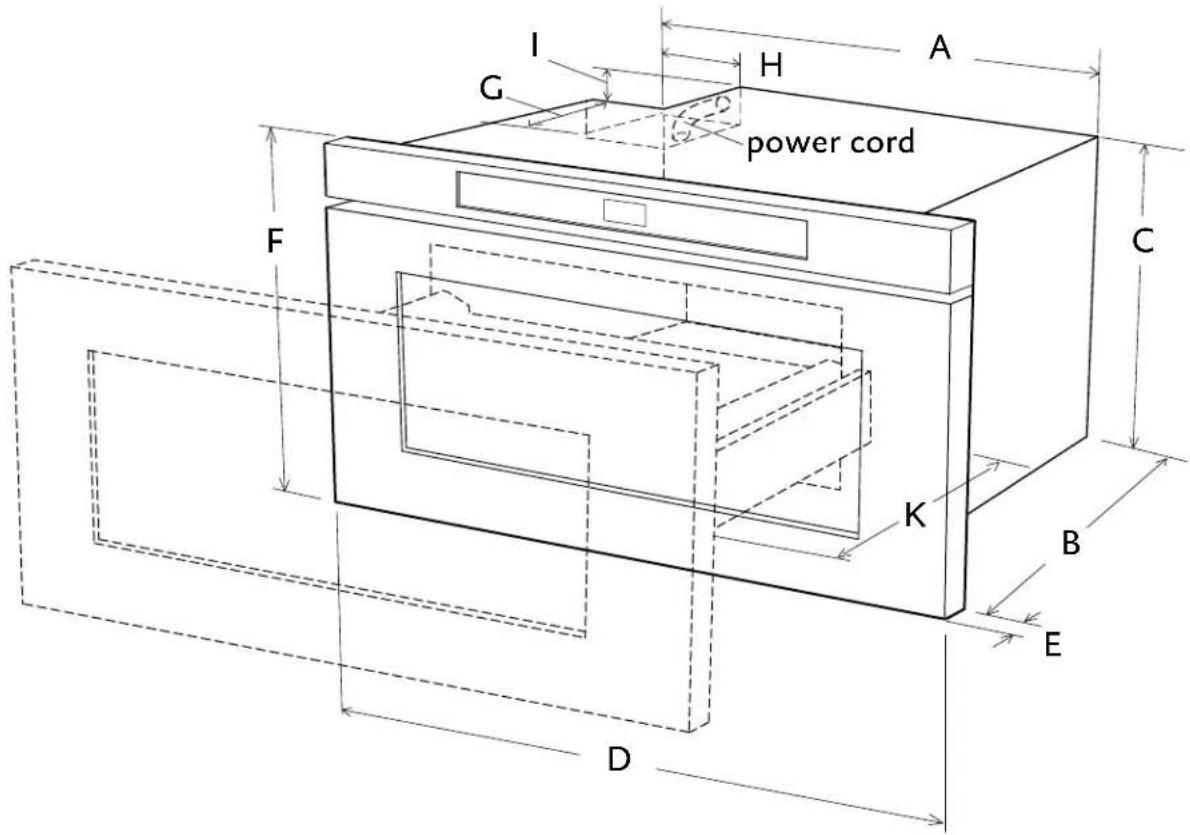
Figure 1. Microwave dimensions
| KEY DESCRIPTION DIMENSION | |
| A Unit width 21-5/8 in. [54.9 cm] | |
| B Depth without door 21-7/8 in. [55.6 cm] | |
| C Height of body 14-19/32 in. [37.1 cm] | |
| D Width of door face 30-1/16 in. [76.4 cm] | |
| E Door thickness 1-5/16 in. [3.3 cm] | |
| F Height of appliance face 15-7/8 in. | [40.3 cm] |
| G Cord recess depth 4 in. [10.2 cm] | |
| H Cord recess width 4 11/16 in. [11.9 cm] | |
| I Cord recess height | 1-3/4 in. [4.5 cm] |
| K Auto drawer opening 15 in. [38.1 cm] |
GABINET DIMENSIONS, STANDARD INSTALLATION CABINET DIMENSIONS, STANDARD I
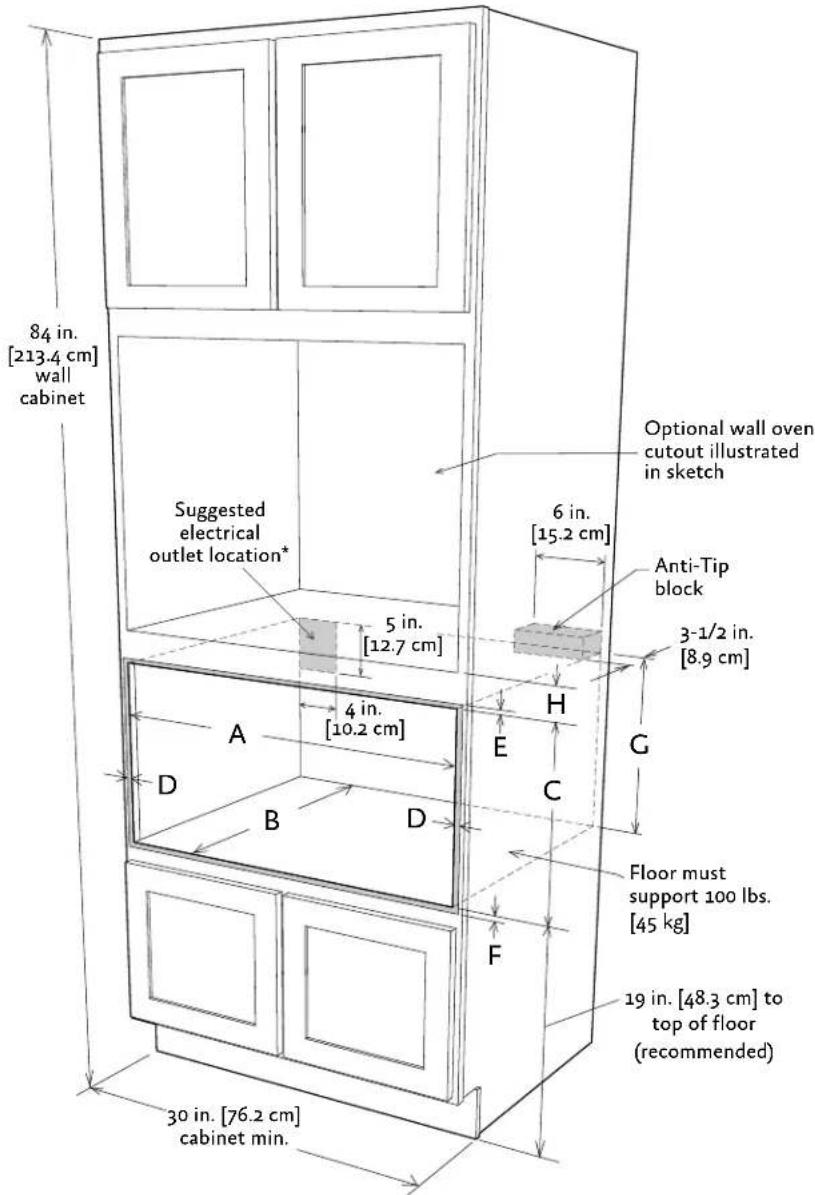
Figure 2. Standard mounting under oven
| KEY DESCRIPTION DIMENSION | |
| A Cutout width 28-7/16 in. [72.2 cm] | |
| B Cutout depth 23-1/2 in. [59.7 cm] | |
| C Height of opening 15-9/16 in. [39.5 cm] | |
| D Sides overlap 23/32 in. [1.8 cm] | |
| E Top edge overlap 3/16 in. [0.48 cm] | |
| F Bottom edge overlap 1/8 in. [0.32 cm] | |
| G Bottom of opening to bottom of anti-tip block 14-13/16 in. [37.6 cm] | |
| H Minimum distance between both openings 2 n. [5.1 cm] | |
EN
EN
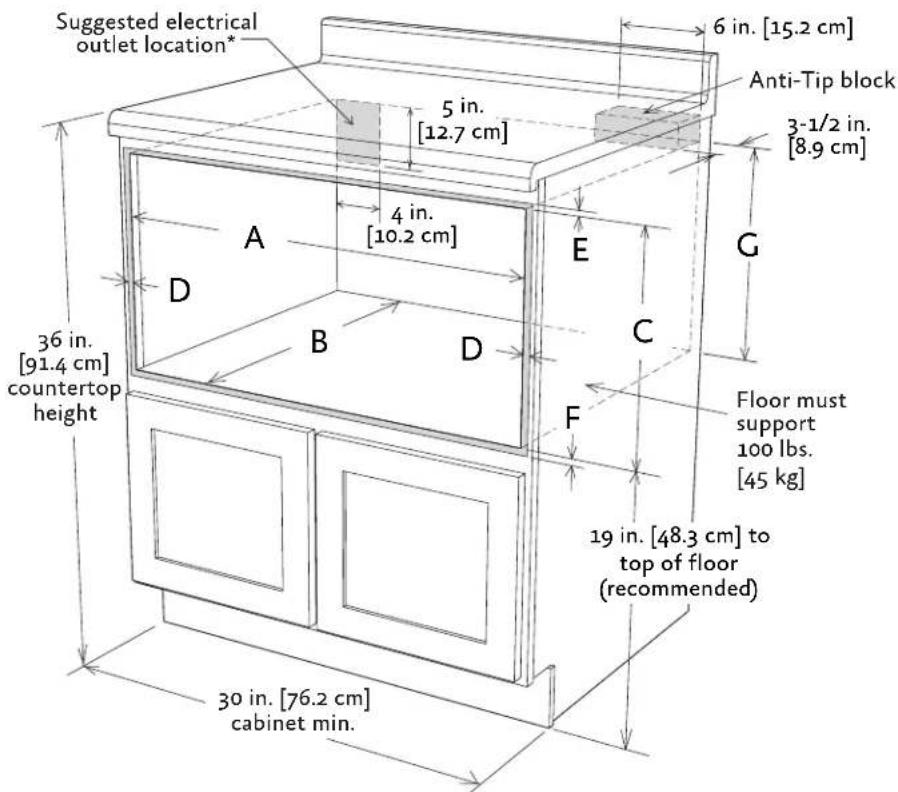
Figure 3. Standard mounting under counter
FLUSH MOUNT INSTALLATIONFLUSH MOUNT INSTALLATION
If installing flush to the cabinet, the included air deflector must be installed to provide adequate air movement for the appliance. Observe the following cabinet dimensions.
FLUSH MOUNT AIR DEFLECTOR PARTSFLUSH MOUNT AIR DEFLECTOR PARTS
Parts included:
| DescriptionQty. | |
| 1 | Flush Mount Air Deflector |
| 2 | Mounting Screws |
GABINET DIMENSIONS, FLUSH INSTALLATION CABINET DIMENSIONS, FLUSH INSTALLA
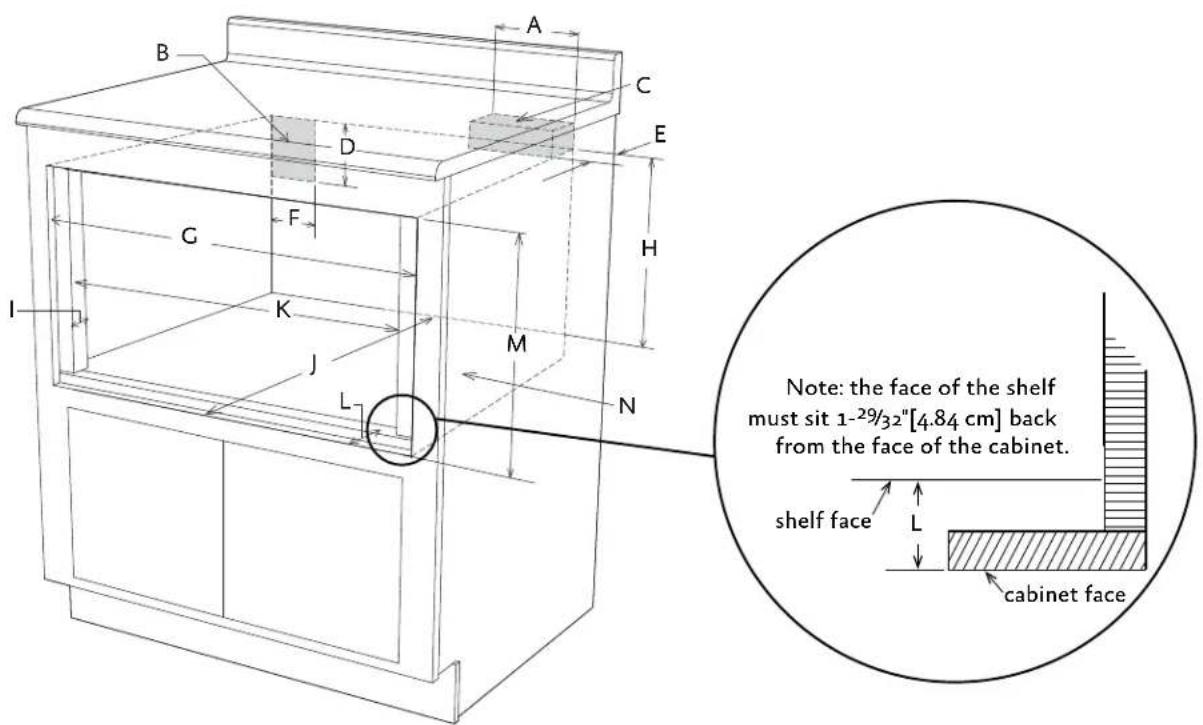
Figure 4. Mounting flush under counter
| Key Dimension |
| A 6" [15.2 cm] |
| B Suggested electrical outlet location |
| C Anti-Tip block |
| D 5" [12.7 cm] |
| E 3-1/2" [8.9 cm] |
| F 4" [10.2 cm] |
| G 30-5/16" [77 cm] minimum 30-5/8" [77.8 cm] maximum |
| H 14-13/16" [37,62 cm] to bottom of Anti-Tip block |
| I 1-1/16" [2.7 cm] |
| J 23-1/2" [59.7 cm] minimum depth |
| K 28-7/16" [72.2 cm] |
| L 1-29/32" [4.84 cm] |
| M 16-7/8" [42.9 cm] opening |
| N Floor must support 100 lb [45.4 kg] |
EN
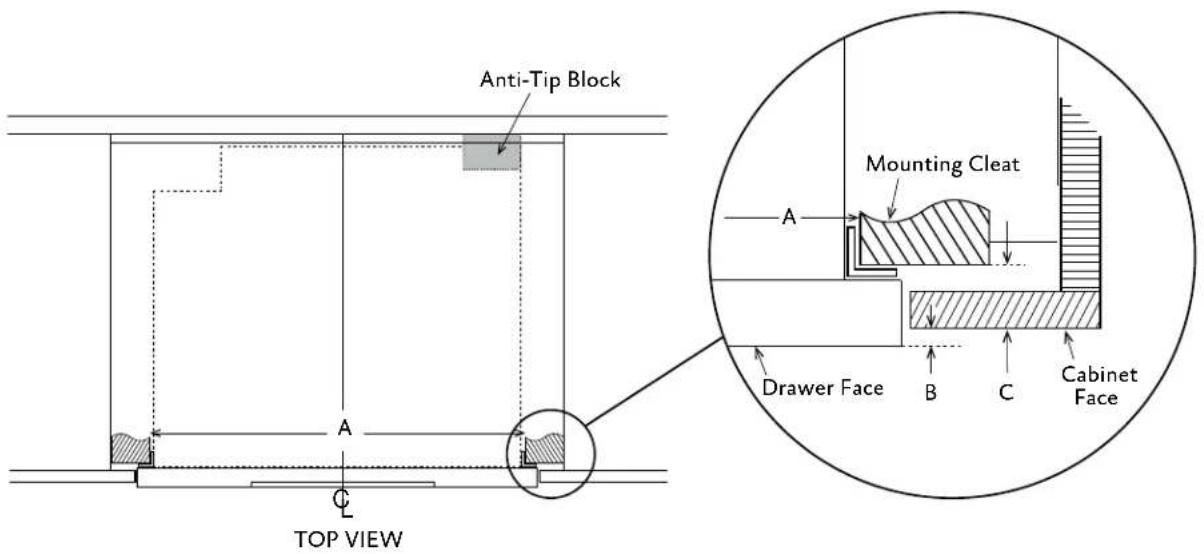
Figure 5. Flush mount, top view
Note: The mounting surface of the finished cleat must sit 1-15/64" [3.14 cm] back from the face of the cabinet (pushing the face of the drawer out 1/4" [0.64 cm].)
| Key Dimension |
| A 28-7/16 - 28-1/2" [72.2 - 72.4 cm] mounting cleat opening width |
| B 1/4" [0.64 cm] |
| C 1-15/64" [3.14 cm] |
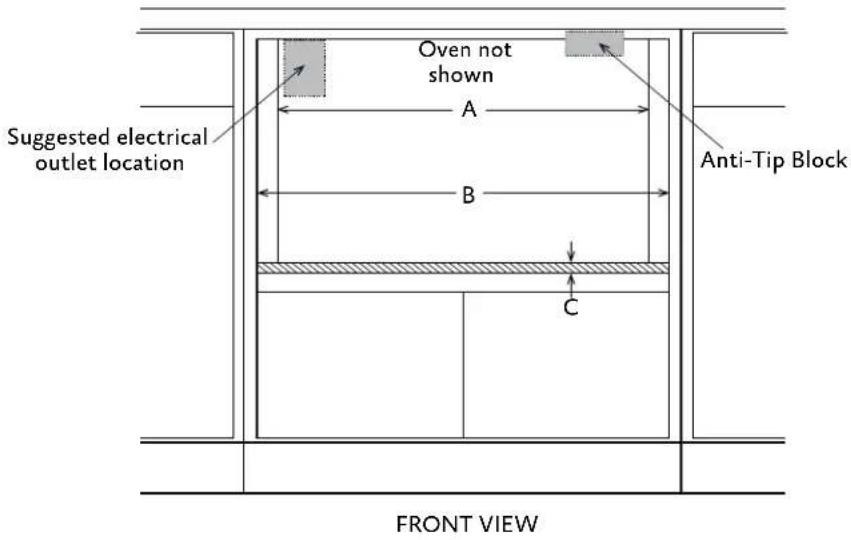
Figure 6. Flush mount, front view
| Key Dimension |
| A 28-7/16 to 28-1/2" [72.2 - 72.4 cm] mounting cleat opening width |
| B 30 -5/16" [77 cm] minimum, 30-5/8" [77.8 cm] maximum flush opening width |
| C 3/4" [1.9 cm] shelf |
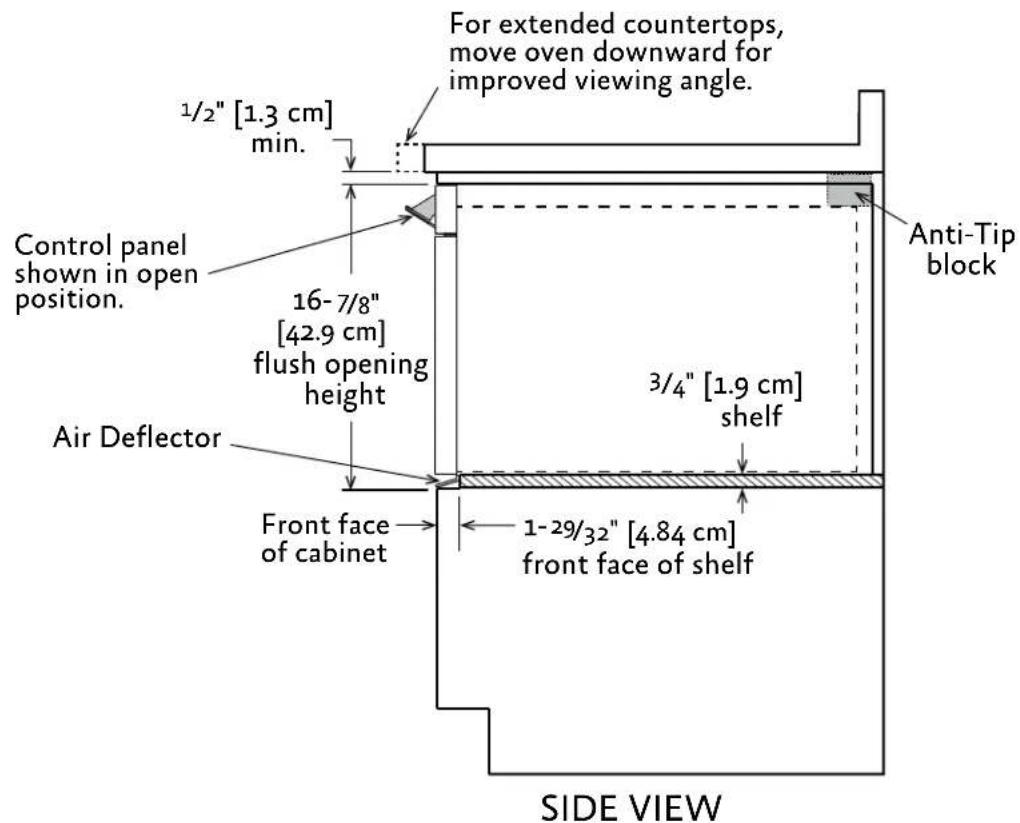
Figure 7. Flush mount, side view
MOUNTING AIR DEFECTORMOUNTING AIR DEFLECTOR
Shelf detail showing the deflector vent during installation.
1) Position air deflector and mark holes.
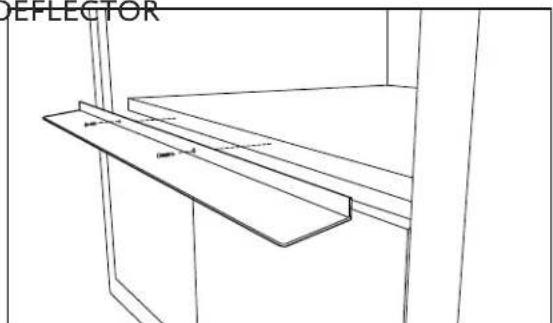
Figure 8
2) Pre-drill using a 1/16" [0.16 cm] bit before mounting.
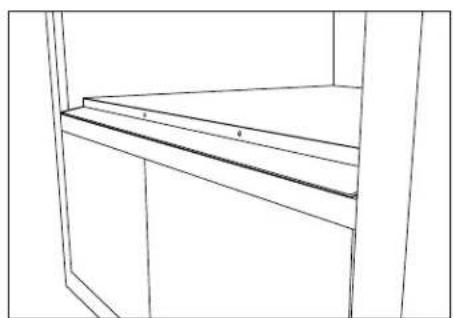
Figure 9
©2020 Hestan Commercial Corporation
ANTI-TIP BLOCKANTI-TIP BLOCK
To reduce the risk of tipping of the drawer, the Anti-Tip block must be properly installed. It must be located 14-13/16 in. [37.6cm] above the floor on which theDrawer Microwave will sit. The 6 in. [15.2cm] Anti-Tip block must be provided by the installer. See the figures for necessary dimensions. The Anti-Tip block prevents serious injury that might result from spilled hot liquids.
If the Painter Microwave is ever moved to a different location, the Anti-Tip block must also be moved and installed. When installed to the wall, make sure that the screws completely penetrate the dry wall and are secured in wood or metal so that the block is totally stable. When fastening, be sure that the screws do not penetrate electrical wiring or plumbing.
ELECTRICAL CONNECTION
The appliance requires a 120 volt, 60Hz , AC only, 15 amp or more protected electrical supply. It is recommended that a separate circuit serving only this appliance be provided.
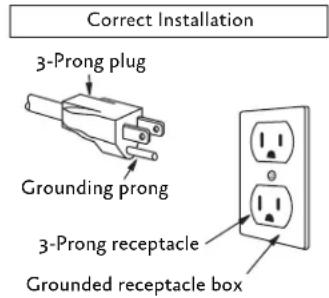
The appliance is equipped with a 3-prong grounding plug. It must be plugged into a wall receptacle that is properly installed and grounded. Should you only have a 2-prong outlet, have a qualified electrician install a correct wall receptacle. Do not cut or remove the grounding prong from this plug.
Note: If you have any questions about the grounding or electrical instructions, consult a qualified electrician or service person.
GROUNDING INSTRUCTIONSGROUNDING INSTRUCTIONS
This appliance must be grounded. The Drawer Microwave is equipped with a cord having a grounding wire with a grounding plug. It must be plugged into a wall receptacle that is properly installed and grounded in accordance with the National Electrical Code and local codes and ordinances. In the event of an electrical short circuit, grounding reduces risk of electric shock by providing an escape wire for the electric current.
WARNING
Improper use of the grounding plug can result in a risk of electric shock. DO NOT USE AN EXTENSION CORD. IF THE POWER SUPPLY CORD IS TOO SHORT, HAVE A QUALIFIED ELECTRICIAN OR SERVICEMAN INSTALL AN OUTLET NEAR THE APPLIANCE.
FLUSH MOUNTINGFLUSH MOUNTING
For flush mount installation, mount and secure the deflector vent. See instructions on previous pages.
PLACING DRAWERPLACING DRAWER
- Place the drawer adjacent to the wall or cabinet opening. Plug the power supply cord into the electrical outlet.
- Carefully guide the drawer into the prepared opening. Avoid pinching the cord between the oven and the wall.
- Slide the drawer all the way until the mounting flange is flush with the face of the cabinet. See Figure 10.
- Open the drawer. Using the 4 holes on the drawer as a template, pre-drill the cabinet using a 1/16'' [1.60 mm] bit.
- Secure the drawer with the 4 screws supplied.
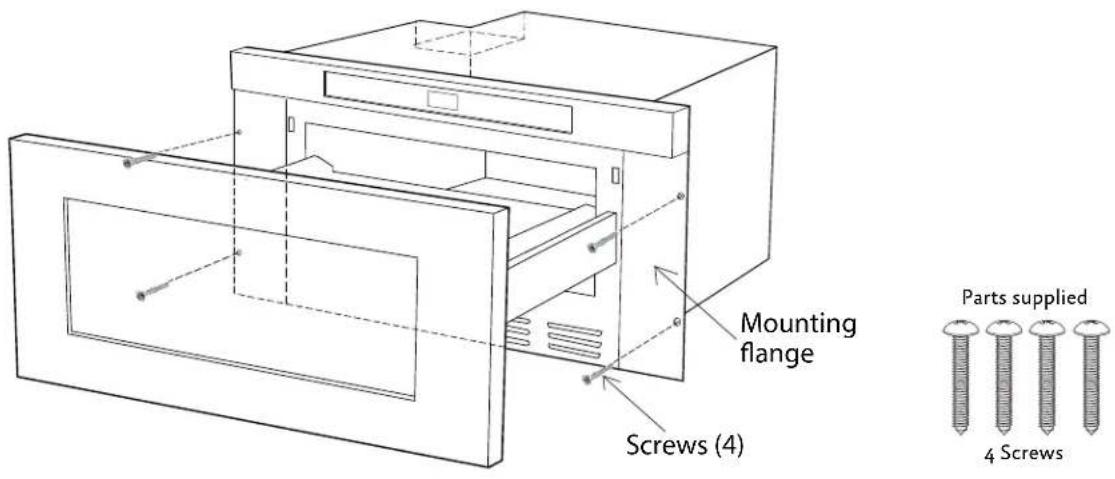
Figure 10. Screws and mounting flange
- Turn power ON to the Printer Microwave.
- Set the clock according to the instructions in the Use and Care Manual.
- Place a microwave-safe container with a cup of water in the unit and close the drawer.
- Touch START/ADD MINUTE.
- The microwave's fan should run and its light should come on.
- When it shuts off, the water should be warm or hot.
Refer to the Use and Care Manual for full operating procedures.
CLEANING AND MAINTENANCE CLEANING AND MAINTENANCE
Refer to the Use and Care Manual for cleaning instructions.
BEFORE YOU CALL FOR SERVICEBEFORE YOU CALL FOR SERVICE
Read the BEFORE YOU CALL and operating instruction sections in your Use and Care Manual. It may save you time and expense. The list includes common occurrences that are not the result of defective workmanship or materials in this microwave product.
Refer to the warranty in your Use and Care Manual for Hestan's service number and address. Please call or write if you have inquiries about your microwave product and/or need to order parts.
AVENTISSEMENT
LE NON-RESPECT À LA LETTRE DE CES INSTRUCTIONS PEUT CAUSER UN INCENDIE OU UNE EXPLOSION, QUI POURRAIT ENTRAINER DES DOMMAGES MATÉRIELS, DES BLESSURES OU LA MORT.
Hestan Commercial Corporation
3375 E. La Palma Ave.
Anaheim, CA 92806
(888) 905-7463
©2020 Hestan Commercial Corporation P/N 027836 REV C
TINSKB27MRRo
- SAFETYDEFINITIONS
- SAFETY PRECAUTIONS - BEFORE YOU BEGIN
- WARNING
- ELECTRICAL SHOCK HAZARDELECTRICAL SHOCK HAZARD
- ELECTRICAL SUPPLY AND GROUNDING ELECTRICAL SUPPLY AND GROUNDING
- GENERAL SAFETY PRECAUTIONSGENERAL SAFETY PRECAUTIONS
- TO REDUCE THE RISK OF FIRE, ELECTRIC SHOCK, OR INJURY TO PERSONS, OBSERVE THE FOLLOWING:
- MODEL NUMBERS
- RATING LABEL
- REGULATORY / CODE REQUIREMENTS
- IMPORTANT NOTES
- IMPORTANT NOTES TO THE CONSUMERIMPORTANT NOTES TO THE CONSUMER
- IMPORTANT SAFETY INSTRUCTIONSIMPORTANT SAFETY INSTRUCTIONS
- ABOUT DIMENSIONSBABOUT DIMENSIONS
- FLUSH MOUNT INSTALLATIONFLUSH MOUNT INSTALLATION
- MOUNTING AIR DEFECTORMOUNTING AIR DEFLECTOR
- ANTI-TIP BLOCKANTI-TIP BLOCK
- ELECTRICAL CONNECTION
- GROUNDING INSTRUCTIONSGROUNDING INSTRUCTIONS
- FLUSH MOUNTINGFLUSH MOUNTING
- PLACING DRAWERPLACING DRAWER
- CLEANING AND MAINTENANCE CLEANING AND MAINTENANCE
- BEFORE YOU CALL FOR SERVICEBEFORE YOU CALL FOR SERVICE
- AVENTISSEMENT
Brand : Hestan
Model : KMWR30
Category : Microwave Oven