HDD6RSP - Basket BOSCH - Free user manual and instructions
Find the device manual for free HDD6RSP BOSCH in PDF.
User questions about HDD6RSP BOSCH
0 question about this device. Answer the ones you know or ask your own.
Ask a new question about this device
Download the instructions for your Basket in PDF format for free! Find your manual HDD6RSP - BOSCH and take your electronic device back in hand. On this page are published all the documents necessary for the use of your device. HDD6RSP by BOSCH.
USER MANUAL HDD6RSP BOSCH
Signal Words for Safety and Best Use

WARNING
This indicates that death or serious injuries may occur as a result of non-observance of this warning.

CAUTION
This indicates that minor or moderate injuries may occur as a result of non-observation of this warning.
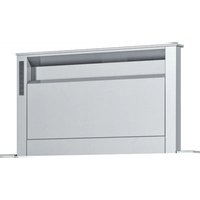
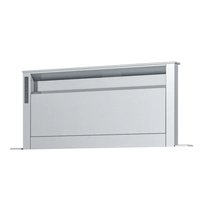
FOR USE WITH THESE DOWNDRAFT MODELS
Models HDD80050UC, HDD86050UC, HDD80051UC, HDD86051UC
NOTICE: This indicates that damage to the appliance or property may occur as a result of non-compliance with this advisory.
Note: This alerts you to important information and/or tips.
Pay special attention to the important safety instructions in the "Safety" section.
IMPORTANT SAFETY INSTRUCTIONS
READ AND SAVE THESE INSTRUCTIONS
General notes
WARNING
Use this unit only in the manner intended by the manufacturer. If you have questions, contact the manufacturer.
WARNING
- When cutting or drilling into wall or ceiling, do not damage electrical wiring and other hidden utilities.
Ducted fans must always be vented to the outdoors.
INSTALLER: LEAVE THESE INSTRUCTIONS WITH THE APPLICANCE AFTER INSTALLATION IS COMPLETE.
When properly cared for, your new appliance has been designed to be safe and reliable. Read all instructions carefully before use. These precautions will reduce the risk of burns, electric shock, fire, and injury to persons. When using kitchen appliances, basic safety precautions must be followed, including those in the following pages.
Proper Installation and Maintenance
WARNING
Remove all tape and packaging before using the appliance. Destroy the packaging after unpacking the appliance. Never allow children to play with packaging material.
This appliance is intended for normal family household use only. It is not approved for outdoor use. See the Statement of Limited Product Warranty in the Use and Care Guide. If you have any questions, contact the manufacturer.
Do not store or use corrosive chemicals, vapors, flammables or nonfood products in or near this appliance. It is specific cally designed for use when heating or cooking food. The use of corrosive chemicals in heating or cleaning will damage the appliance and could result in injury.
Do not operate this appliance if it is not working properly, or if it has been damaged. Contact an authorized servicer.
Do not repair or replace any part of the appliance unless specifi cally recommended in this manual. Refer all servicing to a factory authorized service center.
CAUTION
Grease left on flters can melt and move into the vent.
WARNING
Hidden surfaces may have sharp edges. Use caution when reaching behind or under appliance.
IMPORTANT SAFETY INSTRUCTIONS
READ AND SAVE THESE INSTRUCTIONS
Fire Safety
WARNING
Use this appliance only for its intended use as described in this manual.
Always have a working smoke detector near the kitchen. In the event that personal clothing or hair catches fire, drop and roll immediately to extinguish fl ames.
Have an appropriate fire extinguisher available, nearby, highly visible and easily accessible near the appliance.
Smother flames from food fires other than grease fires with baking soda. Never use water on cooking fi res.
WARNING
TO REDUCE THE RISK OF INJURY TO PERSONS IN THE EVENT OF A RANGE TOP GREASE FIRE, OBSERVE THE FOLLOWING:a
a. SMOTHER FLAMES with a close-fi tting lid, cookie sheet, or metal tray, then turn off the burner. BE CAREFUL TO PREVENT BURNS. If the fl ames do not go out immediately, EVACUATE AND CALL THE FIRE DEPARTMENT.
b. NEVER PICK UP A FLAMING PAN - You may be burned.
c. DO NOT USE WATER, including wet dishcloths or towels - a violent steam explosion will result.
d. Use an extinguisher ONLY if:
-
You know you have a Class ABC extinguisher, and you already know how to operate it.
-
The fire is small and contained in the area where it started.
- The fire department is being called.
- You can fight the fire with your back to an exit.
^a Based on "Kitchen Fire Safety Tips" published by NFPPA.
Whenever possible, do not operate the ventilation system during a cooktop fire. However, do not reach through fire to turn it off.
WARNING
RISK OF FIRE
Hot oil and fat catch fire fast. Never leave hot oil and fat unsupervised. Never extinguish a fire with water. Switch off the cooking position. Suffocate flames carefully with a lid, a fire blanket or similar.
WARNING
RISK OF FIRE
Grease deposits in the grease fi lter can ignite.
Clean the grease fiiter at least every two months or as frequently as necessary.
Never operate the appliance without the grease fi filter.
WARNING
RISK OF FIRE
Grease deposits in the grease filter can catch fire. Never work with a naked flame near the appliance (e.g. flambéing). Install the unit near a heat-producing appliance for solid fuels (e.g. wood or coal) only if there is a closed, non-detachable cover. There must be no flying sparks.
WARNING
RISK OF FIRE
Use only metal ductwork.
WARNING
RISK OF BURNS
The accessible parts get hot during operation. Never touch hot parts. Keep children away.
CAUTION
It is recommended to wear gloves and long sleeves to protect hands and forearms from abrasion and potential scratches during the installation process.

IMPORTANT SAFETY INSTRUCTIONS
READ AND SAVE THESE INSTRUCTIONS
Child Safety
When children become old enough to use the appliance, it is the responsibility of the parents or legal guardians to ensure that they are instructed in safe practices by qualified persons.
Do not allow anyone to climb, stand, lean, sit, or hang on any part of an appliance. This can damage the appliance or cause injury.
WARNING
Be sure the entire appliance (including the grease fi iters and light bulbs, if applicable) has cooled and grease has solidifi ed before attempting to clean any part of the appliance.
Do not use steam cleaners to clean the appliance.
State of California Proposition 65 Warnings
WARNING
This product may contain a chemical know to the State of California, which can cause cancer or reproductive harm. Therefore, the packaging of your product may bear the following label as required by California:
STATE OF CALIFORNIA PROPOSITION 65 WARNING:

RNING
Cancer and Reproductive Harm - www.P65Warnings.ca.gov
Protecting The Environment
Unpack the appliance and dispose of the packaging in line with environmental requirements.
NOTICE
Risk of damage due to corrosion. Always turn appliance on when cooking to avoid condensation buildup. Condensation can lead to corrosion damage.
Risk of damage due to moisture entering into the electronic circuitry. Never clean operator controls with a wet cloth.
Surface damage due to incorrect cleaning. Clean stainless steel surfaces in the grain direction only. Do not use any stainless steel cleaners for operator controls. Never use strong or abrasive cleaning agents, since they can cause surface damage.
Risk of damage from condensation back flow. Install exhaust vent at a slight downward slope away from the appliance (1° slope).
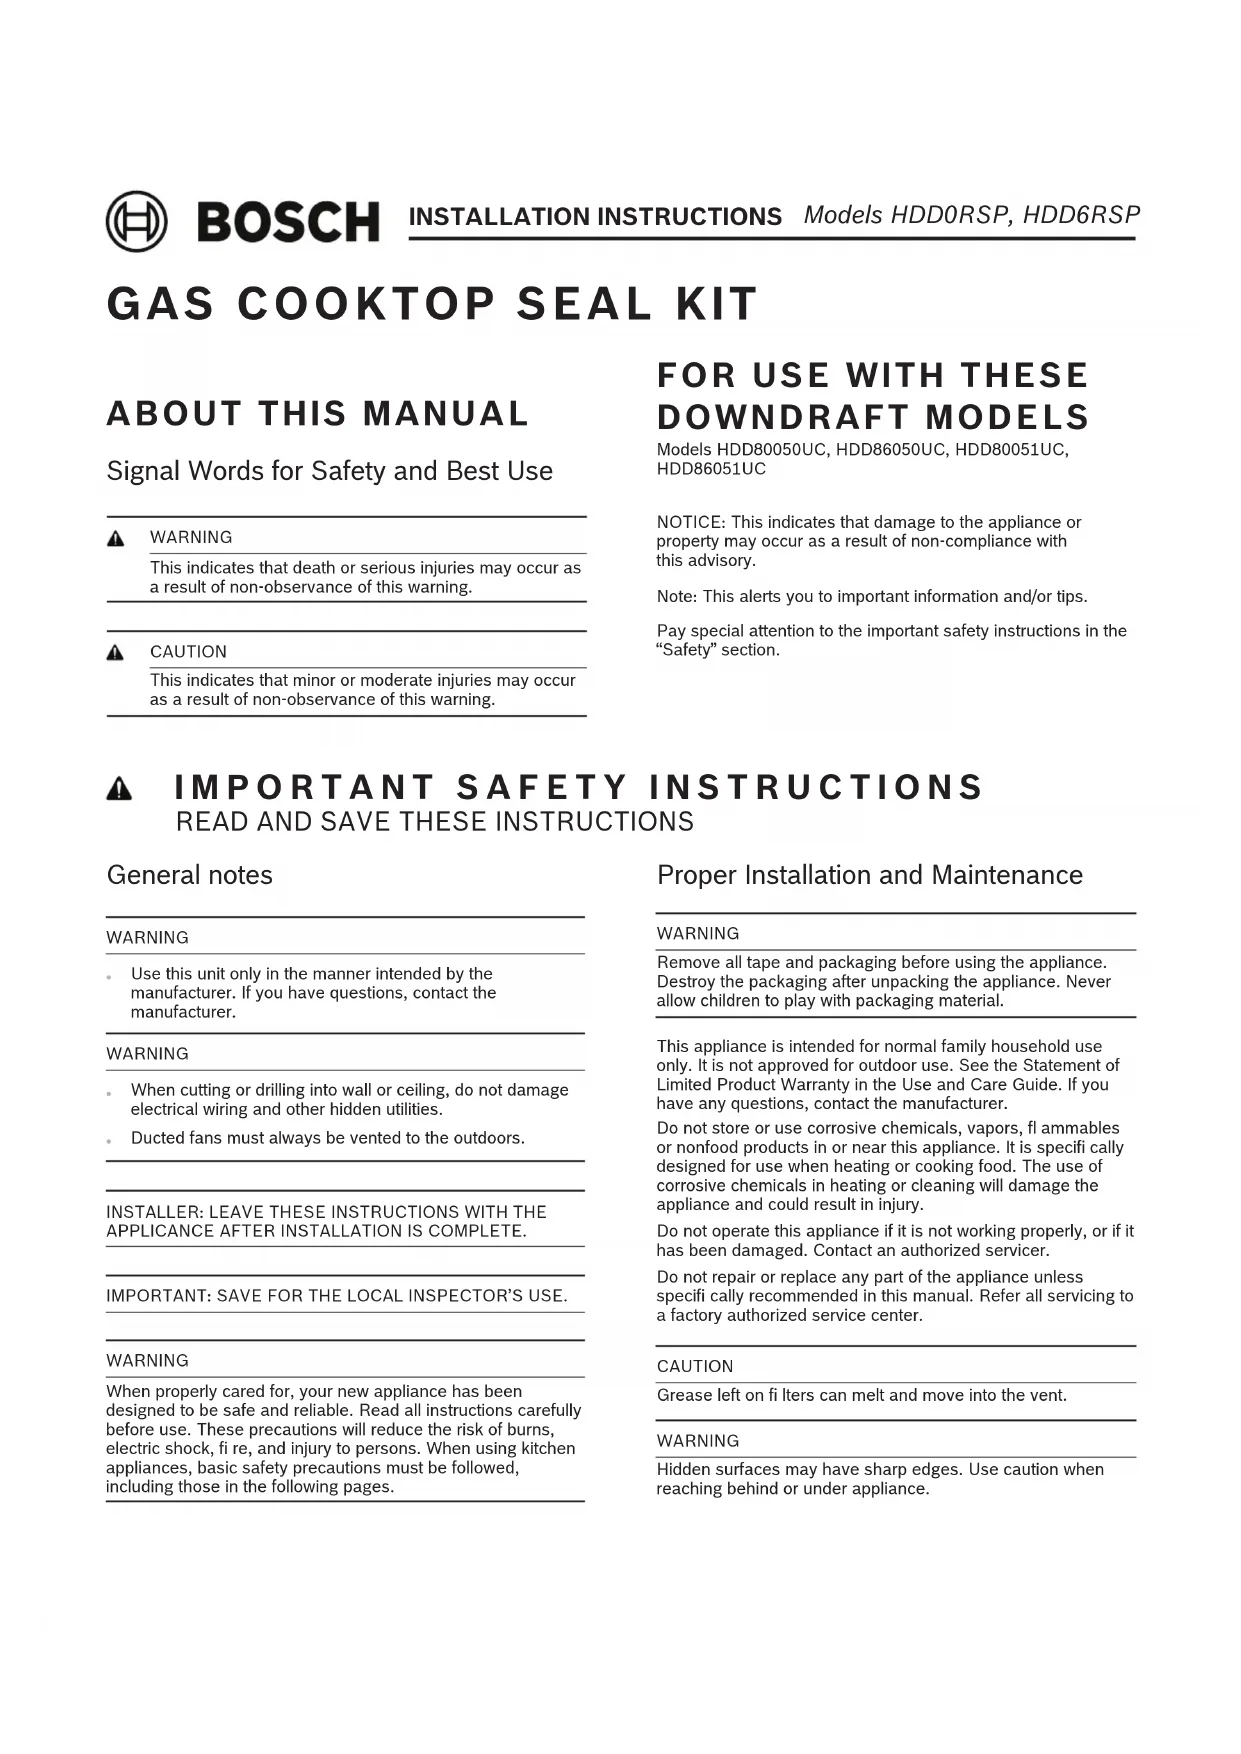
PARTS INCLUDED
2-Metal Grilles
1 - Trim Bracket
1 - Trim Seal
1 - Parts Bag (containing):
4-No. 8× 7 / 8" screws
INSTALLATION INSTRUCTIONS
Cut one 1814'' x 212'' (464 mm x 64 mm) OPENING (A) in the cabinet toe kick.
-- or -- Cut one 1814 x 2½" (464 mm x 64 mm) OPENING (B) in the cabinet side or back.
Mount one of the two metal grilles over this opening, using two screws provided.
② If you chose to cut an opening in the toe kick - you must cut another 18 14 x 2 12 (464 mm x 64 mm) OPENING (C) in the cabinet floor.
Mount the second metal grille over this opening.
* IMPORTANT NOTE
When using toe kick opening (A) with opening (C) in cabinet floor: Air must be able to flow freely between these two openings - and not restricted by cabinet structure or any other obstruction.
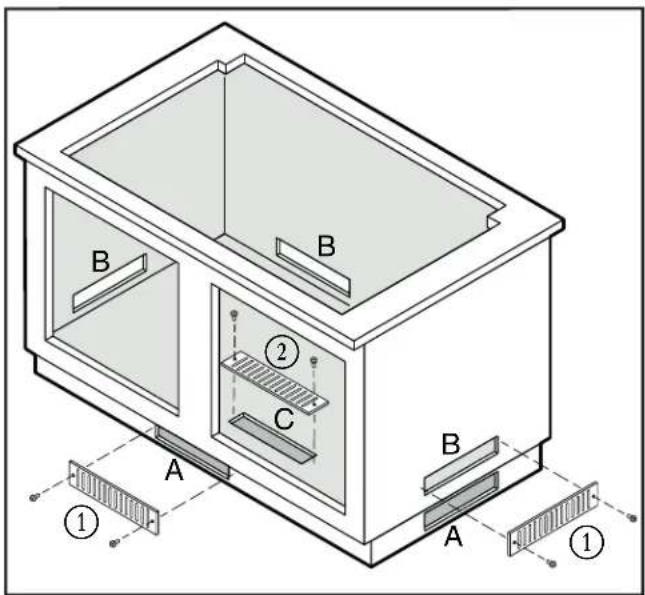
③ Clean housing surface (B) with Isopropyl Alcohol or Rubbing Alcohol. Remove TAPE STRIPS to reveal adhesive side of tape from the back side of TRIM BRACKET (A).
④ Center trim bracket left-to-right at TOP OF DOWNDRAFT HOUSING (B). Stick trim bracket to downdraft housing so that FLANGES (C) and (D) are flush with each other.
Cut TRIM SEAL (E) to length: No shorter than downdraft countertop cutout opening and no longer than cooktop width.
_i Remove tape backing from TRIM SEAL (E). Center trim seal left-to-right and stick trim seal across both FLANGES (C) and (D).
BOSCH® SUPPORT
Before Calling Service
See the Use and Care Manual for troubleshooting information. Refer to the "Statement of Limited Product Warranty".
To reach a service representative, see the contact information at the front of the manual. Please be prepared with the information printed on your product data label when calling.
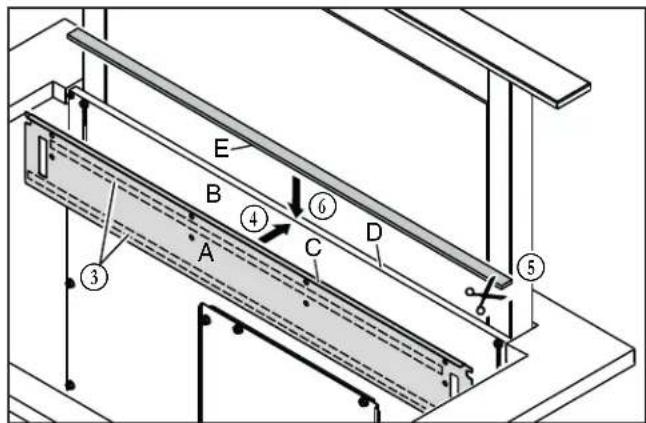
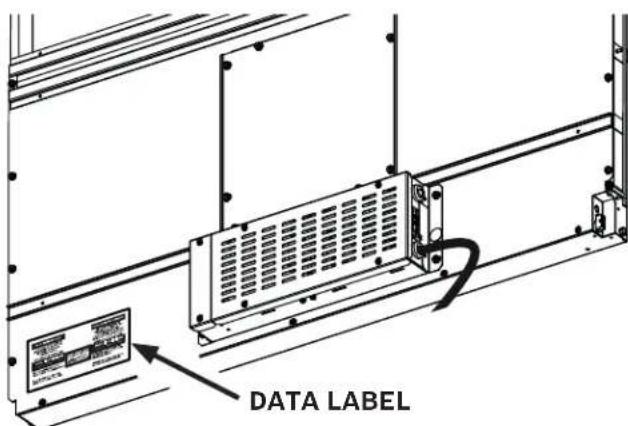
Data Label
The data label shows the model and serial number. Refer to the data label on the appliance when requesting service.
The data label can be found on the front / lower / left of the downdraft housing.
To avoid having to search for each piece of information when calling, you can enter the four items needed in the spaces below.
| Model No. | |
| Serial No. | |
| Date of Purchase | |
| Customer Service No. |
Keep your invoice or escrow papers for warranty validation if service is needed.
Service
We realize that you have made a considerable investment in your kitchen. We are dedicated to supporting you and your appliance so that you have many years of creative cooking.
Please don't hesitate to contact our Customer Support Department if you have any questions of in the unlikely event that you Bosch® appliance needs service. Our service team is ready to assist you.
USA
800-944-2904 www.bosch-home.com/us/support
Canada
800-944-2904 www.bosch-home.ca/en/support
Parts and Accessories
Parts, fi Iters, descalers, stainless steel cleaners and more can be purchased in the Bosch® eShop or by phone.
USA
www.bosch-home.com/us/store
Canada
Marcone 800-482-6022 or Reliable Parts 800-941-9217
JEU DE JOINT D'ETANCHÉITE POUR SURFACE DE CUISON AU GAZ
À PROPOS DE CE MANUEL
www.bosch-home.com/us/support
Canada
www.bosch-home.com/us/store
Canada
Marcone 800 482-6022 ou Reliable Parts 800 941-9217

BOSCH
JUEGO PARA SELLAR ESTUFAS DE GAS
ACERCA DE ESTE MANUAL
Canada 800-944-2904 www.bosch-home.ca/en/support
Piezas y accesorios
1901 Main Street, Suite 600 - Irvine, CA 92614 - 800-944-2904
www.bosch-home.com · © 2019 BSH Home Appliances