CI642CE14U - Cooker CANDY - Free user manual and instructions
Find the device manual for free CI642CE14U CANDY in PDF.
Download the instructions for your Cooker in PDF format for free! Find your manual CI642CE14U - CANDY and take your electronic device back in hand. On this page are published all the documents necessary for the use of your device. CI642CE14U by CANDY.
USER MANUAL CI642CE14U CANDY
4. Heating zone selection controls
5EN-7How to use Start cooking
LQGLFDWLQJWKDWWKHLQGXFWLRQKREKDVHQWHUHGWKHVWDWHRI VWDQGE\PRGH
Select a heat setting by touching the “-” or “+” control.
- If you don’t choose a heat setting within 1 minute, the Induction hob will automatically switch off. You will need to start again at step 1. • You can modify the heat setting at any time during cooking. If the display flashes alternately with the heat setting This means that:• you have not placed a pan on the correct cooking zone or,
- the pan you’re using is not suitable for induction cooking or,
- the pan is too small or not properly centered on the cooking zone. No heating takes place unless there is a suitable pan on the cooking zone. The display will automatically turn off after 1 minute if no suitable pan is placed on it. EN-8Finish cooking Using the Boost function Touching the heating zone selection control that you wish to switch off Turn the cooking zone off by scrolling down to “0” or touching “-” and “+” control together. Make sure the display shows “0”. Turn the whole cooktop off by touching the ON/OFF control. Beware of hot surfaces H will show which cooking zone is hot to touch. It will disappear when the surface has cooled down to a safe temperature. It can also be used as an energy saving function if you want to heat further pans, use the hotplate that is still hot.
7RORFNWKH FRQ WURO V
7RXFKLQJ³´DQG³´FRQWUROWRJHWKHU7KHFRRNLQJ]RQH
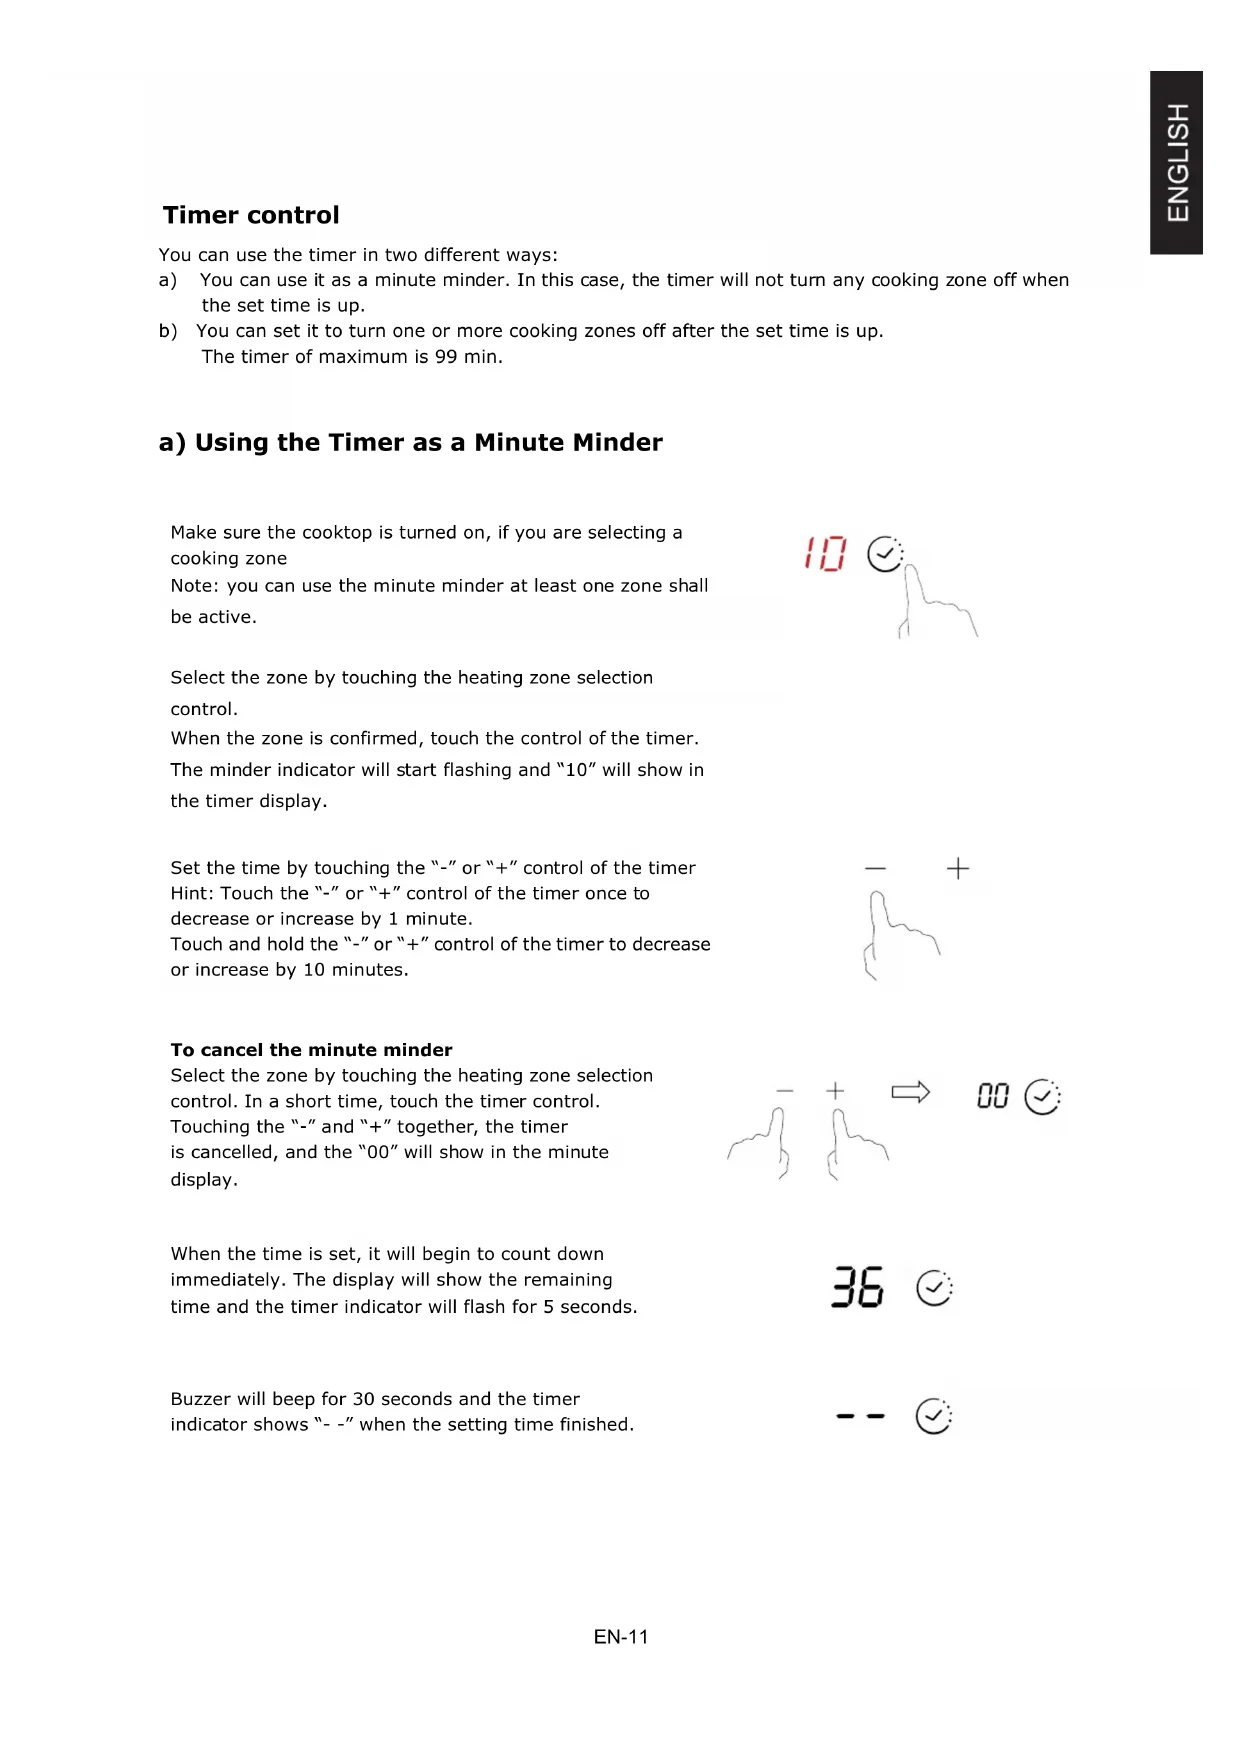
7KHWLPHURIPD[LPXPLVPLQ a) Using the Timer as a Minute Minder Make sure the cooktop is turned on, if you are selecting a cooking zone Note: you can use the minute minder at least one zone shall be active. Select the zone by touching the heating zone selection control. When the zone is confirmed, touch the control of the timer. The minder indicator will start flashing and “10” will show in the timer display. Set the time by touching the “-” or “+” control of the timer Hint: Touch the “-” or “+” control of the timer once to decrease or increase by 1 minute. Touch and hold the “-” or “+” control of the timer to decrease or increase by 10 minutes. To cancel the minute minder Select the zone by touching the heating zone selection control. In a short time, touch the timer control. Touching the “-” and “+” together, the timer is cancelled, and the “00” will show in the minute display. When the time is set, it will begin to count down immediately. The display will show the remaining time and the timer indicator will flash for 5 seconds. Buzzer will beep for 30 seconds and the timer indicator shows “- -” when the setting time finished. EN-11E 6HWWLQ JWKHWLPHUWR WX UQ RQHFRRNLQ J]R QHRII 6HWRQH]RQH
:KHQFRRNLQJWLPHUH[SLUHVWKHFRUUHVSRQGLQJFRRNLQJ]RQH
Touching the heating zone selection control that you want to set the timer for. (e.g. zone 3#) In short time, before the display stops flashing, touch the timer control. The minder indicator will start flashing and “10” will show in the timer display. Set the time by touching the ”–“ or “+” control of the timer Hint: Touch the “-” or “+” control of the timer once will decrease or increase by 1 minute. Touch and hold the “-” or “+” control of the timer will decrease or increase by 10 minutes. To cancel the timer Select the zone by touching the heating zone selection control. In a short time, touch the timer control. Touching the “-” and “+” together, the timer is cancelled, and the “00” will show in the minute display. When the time is set, it will begin to count down immediately. The display will show the remaining time and the timer indicator flash for 5 seconds. NOTE: The red dot next to power level indicator will illuminate indicating that zone is selected. EN-12Power Management Function it is possible to set a maximum power absorption level for the induction hob, choosing up to different power ranges. induction hobs are able to limit themselves automatically in order to work at lower power, to avoid the risk of overloading. It is not necessary to put any pots on the heating zones. We suggest to start setting within 5 seconds after connecting the power. You need to enter the power setting mode within 60 seconds to enter Power Management Function. To enter Power Management Function
1. Please be noted that do not turn on the
hob. At this stage, press “Boost” and “Lock” at the same time. The “S” symbol will be displayed on zone #1.
2. Press “Lock” key. The symbol “S” will be displayed on zone #1 and
symbol “E” will be displayed on zone #2.
3. Press “Boost” and “Lock” keys at the same
time again. The symbol “S” will be displayed on zone #1, “E” will be displayed on zone #2, and “t” will be displayed on zone #3. At the same time, the current maximum power mode (7.2) will be displayed on the timer indicator. To switch to another level short press the “Boost” key Confirmation Power Management Function There are 6 power levels, from “7.2” to “2.5”. The timer indicator will show one of them. “7.2” : the maximum power is 7.2kW. “6.5” : the maximum power is 6.5kW. “5.5” : the maximum power is 5.5kW. “4.5” : the maximum power is 4.5kW. “3.5” : the maximum power is 3.5kW. “2.5” : the maximum power is 2.5kW. EN-13After the desired power setting mode is selected, please press “Lock” key When the timer indicator stops flickering, the power mode is set successfully. Exit Power Management Function After the setting, make sure to dis- connect the power and connect it again. Then the hob will be turned off. EN-14You may have a number of different cooking vessels
1. This induction hob can identify a variety of cooking vessels, which you can test by
one of the following methods: Place the vessel on the cooking zone. If the corresponding cooking zone displays a power level, then the vessel is suitable. If “U” flashes, then the vessel is not suitable for use with the induction hob.
2. Hold a magnet to the vessel. If the magnet is attracted to the vessel is suitable for
use with the induction hob. NB: The base of the vessel must contain magnetic material. It must have flat bottom with a diameter according to the table 1 below.
3. Use only ferromagnetic cookwares made from enameled steel, cast iron or stainless
steel but compatible with induction
4. Use pans whose diameter of the ferromagnetic area (base of the pan) is in the range
of dimensions in the table below. (Table 1) - If you use smaller pots, performance could be affected - If you use pot with a diameter smaller than the one indicated in the table 1, pots may not be detected According to the dimension of the zone you can use pots of different diameters as picture below:
Iron oil frying Stainless steel Iron pan Iron kettle
Enamel stainless steel kettle Enamel cooking utesil Iron plate EN-155. If the ferromagnetic part covers only partially the base of the pan, only the ferromagnetic area will heat up, the rest of the base may not heat up a sufficient temperature for cooking.
6. If the ferromagnetic area is not homogeneous, but presents others material such as
aluminum this may affect the heating up and the pan detection. If the base of the pan is similar to the pictures below the pan could be not detected.
The base diameter of induction cookware Cooking zone
EN-16EN-17EN-18EN-19EN-20Position Symbol Value Unit zones 4 areas Induction cooking zones X Induction cooking cooking areas radiant cooking zones solid plates Rear left Ø 21,0 cm Rear central Ø cm Rear right Ø 18,0 cm Central left Ø cm Central central Ø cm Central right Ø cm Front left Ø 16,0 cm Front central Ø cm Front right Ø 18,0 cm Rear left
electric cooking 182,0 Wh/kg Rear central
electric cooking Wh/kg Rear right
electric cooking Wh/kg Central central
electric cooking Wh/kg Central right
electric cooking Wh/kg Front left
electric cooking Wh/kg Front right
electric hob 188,1 Wh/kg Suggestions for Energy Saving:
- To obtain the best efficiency of your hob, please place the pan in the centre of the cooking zone.
- Using a lid will reduce cooking times and save energy by retaining the heat.
- Minimise the amount of liquid or fat to reduce cooking times.
- Start cooking on a high setting and reduce the setting when the food has heated through.
- Use pans whose diameter is as large as the graphic of the zone selected. These information are to be considered as part of the appliance user manual. Standard applied : EN 60350-2 Household electric cooking appliances - Part 2: Hobs - Methods for measuring performance For circular cooking zones or areas: diameter of useful surface area per electric heated cooking zone, rounded to the nearest 5mm For non-circular cooking zones or areas: length and width of useful surface area per electric heated cooking zone or area, rounded to the nearest 5mm Energy consumption for cooking zone or area calculated per kg Energy consumption for the hob calculated per kg Heating technology (induction cooking zones and cooking areas, radiant cooking zones, solid plates) Type of hob: Number of cooking zones and/or areas Model identification Product Information for Domestic Electric Hobs Compliant to Commission Regulation (EU) No 66/2014 EN-21 CI642C/E14U3URPHPRULDVXOODVLFXUH]]DHPDQXWHQ]LRQH
OPPURE IT-10 ,7$/,$12
&LUFXLWRDSHUWRRJXDVWRGHOVHQVRUHGHOOD WHPSHUDWXUDGHOODSLDVWUDLQFHUDPLFD &RQWUROODUHLOFROOHJDPHQWRRVRVWLWXLUHLO VHQVRUHGHOODWHPSHUDWXUDGHOODSLDVWUDLQ FHUDPLFD
&RUWRFLUFXLWRRJXDVWRGHOVHQVRUHGHOOD WHPSHUDWXUDGHOODSLDVWUDLQFHUDPLFD
*XDVWRGHOVHQVRUHGHOODWHPSHUDWXUDGHOOD SLDVWUDLQFHUDPLFD
electric cooking 182,0 Wh/kg Centrale posteriore
1DSiMHFtGHVNDMH SRãNR]HQi 9\PČĖWHQDSiMHFtGHVNX
:KNJ =DGQtFHQWUiOQt (&HOHFWULFFRRNLQJ :KNJ =DGQtSUDYi (&HOHFWULFFRRNLQJ
:KNJ &HQWUiOQtOHYi (&HOHFWULFFRRNLQJ :KNJ &HQWUiOQt FHQWUiOQt (&HOHFWULFFRRNLQJ :KNJ &HQWUiOQtSUDYi (&HOHFWULFFRRNLQJ :KNJ 3ĜHGQtOHYi (&HOHFWULFFRRNLQJ
:KNJ³³ 3ĜHGQtFHQWUiOQt (&HOHFWULFFRRNLQJ :KNJ 3ĜHGQtSUDYi (&HOHFWULFFRRNLQJ
9\PHĖWHHOHNWULFN~GRVNX
3RþHW]yQDDOHERSO{FKQDYDUHQLH QDYDUHQLH ]yQ\
:KNJ Vzadu v strede (OHNWULFNpYDUHQLH
:KNJ 9]DGXYSUDYR (OHNWULFNpYDUHQLH
:KNJ 9VWUHGHYĐDYR (OHNWULFNpYDUHQLH
:KNJ 9VWUHGHY strede (OHNWULFNpYDUHQLH
:KNJ 9VWUHGHYSUDYR (OHNWULFNpYDUHQLH
:KNJ 9SUHGXYĐDYR (OHNWULFNpYDUHQLH
:KNJ³³ 9SUHGXYVWUHGH (OHNWULFNpYDUHQLH
:KNJ 9SUHGXYSUDYR (OHNWULFNpYDUHQLH
0LQLPDOL]iFLRXPQRåVWYDWHNXWLQ\DOHERWXNX]QtåLWHþDV\YDUHQLD
GDRGSUWLQH]D]UDNQLVR]DNULWH
SL-15 ýHIHURPDJQHWQLGHOOHGHOQRSRNULYDGQRORQFDVHERVHJUHOVDPRIHURPDJQHWQLdel,
WHPSHUDWXUQLVHQ]RUNHUDPLþQHSORãþH
2NYDUDWHPSHUDWXUQHJDVHQ]RUMD NHUDPLþQHSORãþH– NUDWNLVWLN
2NYDUDWHPSHUDWXUQHJDVHQ]RUMD NHUDPLþQHSORãþH
2NYDUDWHPSHUDWXUQHJDVHQ]RUMD,*%7– RGSUWWRNRNURJ =DPHQMDMWHQDSDMDOQRSORãþR
3RQRYQRY]SRVWDYLWHSRYH]DYRPHG
LQGXNFLMVNDNXKDOQDPHVWD
:KNJ =DGQMHVUHGQMH 3(HOHNWULþQR NXKDQMH
:KNJ =DGQMHGHVQR 3(HOHNWULþQR NXKDQMH
:KNJ 6SUHGQMHGHVQR 3(HOHNWULþQR NXKDQMH
1. sWDYLWHPDORYRGHXSRVXGXNRMXåHOLWHGDSURYHULWH
0RåHWHLPDWLYLãHUD]OLþLWLKSRVXGD]DNXYDQMH
SR-17E6 9LVRNDWHPSHUDWXUD,*%7-D
0RWRUYHQWLODWRUD]YXþL þXGQR 0RWRUYHQWLODWRUDMH RãWHüHQ =DPHQLWHYHQWLODWRU