
Advantix C850 - Camera KODAK - Free user manual and instructions
Find the device manual for free Advantix C850 KODAK in PDF.
| Product type | APS zoom film camera |
| Brand | Kodak |
| Model | Advantix C850 |
| Film format | APS (KODAK ADVANTIX Film) - 25 exposures |
| Lens | Motorized zoom 27-80 mm, aspherical lens |
| Focus | Multi-zone passive autofocus, from 0.6 m to infinity |
| Flash | Retractable built-in; modes: auto with/without red-eye reduction, fill-in, off |
| Flash range (200 ISO) | Wide-angle: 0.6 m to 6.4 m; Telephoto: 0.6 m to 4.3 m |
| Photo formats | Classic (C), Group/HDTV (H), Panoramic (P) |
| Special modes | Infinity, spot focus, portrait, night scene, continuous shooting |
| Self-timer | Electronic, approx. 10 seconds |
| Data imprinting | Date, time and title (30 preprogrammed titles) on the back of photos |
| Print quantity selection | From 0 to 9 per photo |
| Mid-roll film change | Yes, with automatic rewind and reload |
| Viewfinder | Real-image with format frame, parallax correction and diopter adjustment |
| Power source | 1 KODAK K123LA lithium battery (3 V) |
| Dimensions (W x H x D) | 122 x 66 x 45 mm |
| Weight | 228 g (without battery or film) |
| Included accessories | Wrist strap with command button activator |
| Cleaning and maintenance | Body: soft dry cloth; Lens: gentle blow then soft lint-free cloth |
| Safety | Keep batteries out of reach of children; do not disassemble the camera |
Frequently Asked Questions - Advantix C850 KODAK
User questions about Advantix C850 KODAK
0 question about this device. Answer the ones you know or ask your own.
Ask a new question about this device
Download the instructions for your Camera in PDF format for free! Find your manual Advantix C850 - KODAK and take your electronic device back in hand. On this page are published all the documents necessary for the use of your device. Advantix C850 by KODAK.
USER MANUAL Advantix C850 KODAK
EASTMAN KODAK COMPANY Rochester, NY 14650
© Eastman Kodak Company, 2000
PL No: 919 7344
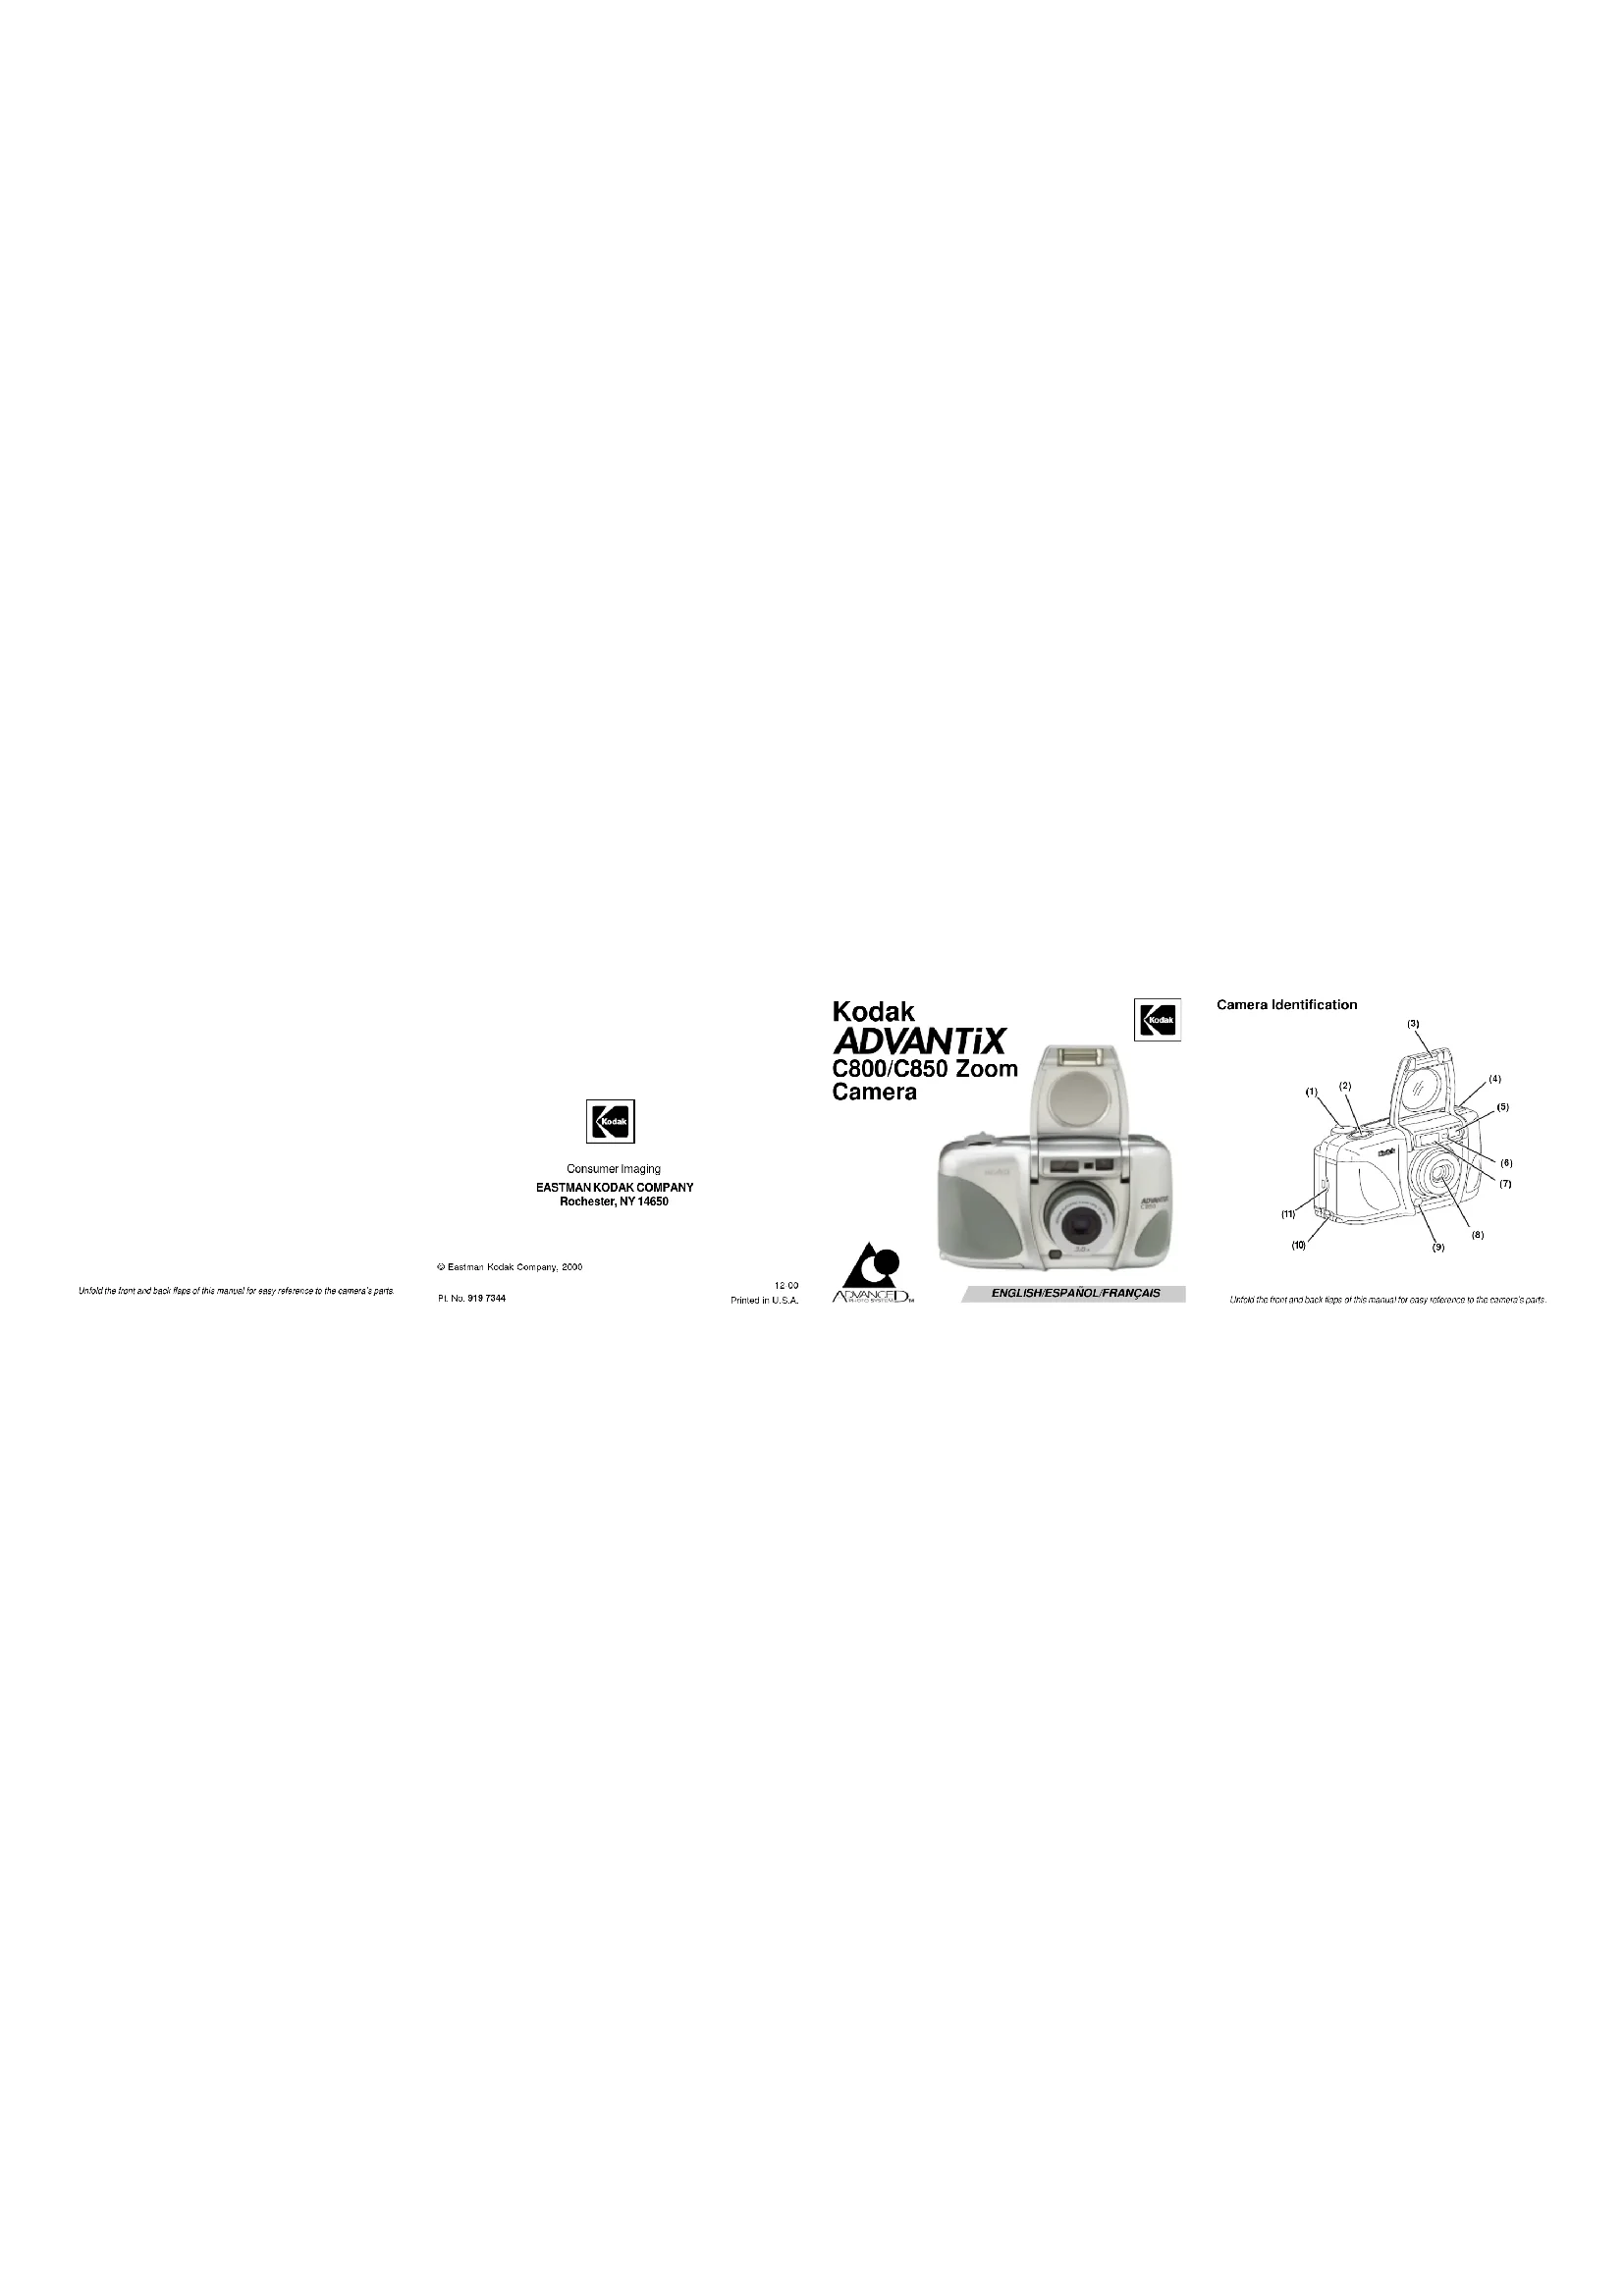
Kodak
ADVANTiX
C800/C850 Zoom
Camera

natural_image
Exterior view of a silver digital camera with a flat-screen display (no visible text or symbols)ENGLISH/ESPAÑOL/FRANÇAIS
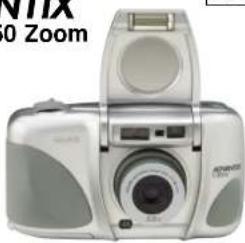
Camera Identification
Unfold the front and back flaps of this manual for easy reference to the camera's parts.

12 00 Printed in U.S.A.
Camera Identification
This device complies with part 15 of the FCC Rules. Operation is subject to the following two conditions: (1) this device may not cause harmful interference, and (2) this device must accept any interference received, including interference that may cause undesired operation.
NOTE: Your model camera has been tested and found to comply with the limits for a Clear B digit device pursuant to Part 15 of the FCC Ruze. These limits provide reasonable protection against interference in residential use. The camera generates, issues and can therefore radio frequency energy and, if not used in accordance with the instructions, may cause interference to radio communications. There is no guarantee that interference will not occur. If this camera does cause interference to radio or television reception, which can be determined by turning the camera still and on, you may reduce the interference by the following:
— Replant or relocate the receiving amore.
— Increase the separation between the camera and the receiver.
— Consult the dealer or an experienced radio/television technician for help.
Changes or modifications not approved by the party responsible for compliance
This Class B digital apparatus meets all requirements of the Canadian Interference-Causing Equipment Regulations
LCD Panel
Go to our Web site at http://www.kodak.com (for US) or http://www.kodak.ca (for Canada) or call:
Kodak (US only) from 9:00 a.m. to 7:00 p.m. (Eastern time) Monday through Friday at 1-800-242-2424.
Kodak (Canada only) from 8:00 a.m. to 5:00 p.m. (Eastern time) Monday through Friday at 1-800-465-6325, ext. 36100; for the Toronto area, call 416-766-8233, ext. 36100.
When you call, please have your camera available.
For warranty purposes, please keep your sales receipt as proof of the date of purchase.
ADVANCED PHOTO SYSTEM FEATURES AVAILABLE WITH THIS CAMERA
Print Quantity Selection
- You can select before you take the picture the number of prints (0-9) that you want from the photofinisher. This service is dependent on the photofinishers capability.
Three Print Formats
- You can take three different size pictures: Classic (C), Group/HDTV (H), and Panoramic (P) pictures from the same film cassette. The viewfinder changes to show the selected picture size.
Date, Time, and Title Imprinting
- The date, time, and cassette ID number are printed on the back of your prints, which makes it easy to organize pictures and order reprints. You can choose from one of 30 pre-programmed titles (5 languages available) to print on the back of the prints.

Automatic Energy Saving Features
Flip Flash Plus
- This smart-flash system automatically adjusts to provide the right light in any situation.
- Flip flash moves the flash away from the lens to reduce redeye.
- Automatically turns on for dimly lit scenes.
- Long flash range delivers brighter light for more colorful distance pictures.
- Automatically provides fill-in light for more sparkle and clarity in harshly lit outdoor portraits.
- Provides softer light for more natural images for close-ups.
- Provides extra red-eye reduction with the red-eye-reduction mode.
Mid-Roll Change (MRC)
- You can remove your film in mid-roll and later reload it and continue taking pictures. MRC lets you:
– share a family camera in which the members use their own roll of film, - switch between color and black-and-white film,
– switch film speeds in mid-roll to match scene requirements, and - organize by dedicating individual film rolls to specific subjects.
Picture Quality Information Exchange (PQix)
- This camera records vital scene data on the film's magnetic information strip and communicates that information to the photo lab to optimize lighting and color for better-looking prints.
Easy, Drop-in Loading
- Easy, drop-in loading is fast and virtually error-free, eliminating blank rolls and double exposures. The camera uses KODAK ADVANTIX Film. The film cassette, unlike the traditional 35 mm cartridge, becomes the carrier and storage container for the processed film.
Film Status Indicator (FSI)
- A highlighted indicator advances from one symbol to another to identify the status of the film inside the cassette.
CONTENTS
CAMERA IDENTIFICATION...... 5
GETTING STARTED 6
Setting the language.... 6
Date and time imprinting 7
Date formats 7
Setting the date and time ...... 7
ATTACHING THE STRAP 8
Control-button actuator 8
LOADING THE BATTERY 9
Low-battery indicator 9
Battery tips 10
Power shut-off 10
DIOPTER ADJUSTMENT 11
LOADING THE FILM 11
TAKING PICTURES 13
Typical print sizes (formats) 14
Tips for better pictures 15
USING THE ZOOM LENS 15
TAKING FLASH PICTURES 16
Flash-lamp signals 16
Flash-to-subject distance 17
SELECTING OTHER
FLASH MODES 18
Red-eye reduction 18
Auto flash without red-eye reduction .... 19
Fill flash.... 19
Flash off 20
Infinity-focus mode.... 21
Spot-focus mode.... 21
Portrait mode 22
Nightview mode 22
Continuous-drive mode 23
USING THE SELF-TIMER 23
TITLE IMPRINTING.... 24
Print-title imprinting 24
Deleting print title 25
Roll-title imprinting 25
Deleting roll title 26
Viewing selected titles 26
Title-select list 27
PRINT-QUANTITY SELECT...... 28
Canceling print-quantity select ..... 28
UNLOADING THE FILM 29
Automatic rewind.... 29
Mid-roll change (MRC) 29
CARING FOR YOUR CAMERA ..... 30
TROUBLESHOOTING 31
SPECIFICATIONS 32
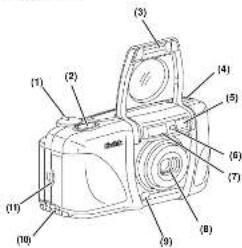
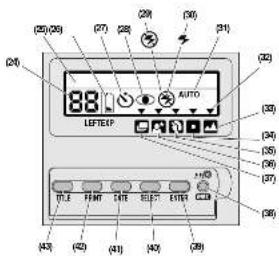
CAMERA IDENTIFICATION (Unfold the front and back cover flaps of manual for camera diagrams.)
1 ZOOM-DIAL LEVER
2 SHUTTER BUTTON
3 LENS COVER/FLASH
4 PRINT-FORMAT BUTTON
5 VIEWFINDER
6 LIGHT SENSOR
7 AUTO-FOCUS SENSORS
8 LENS
9 RED-EYE REDUCTION/ SELF-TIMER LAMP
10 STRAP POST
11 BATTERY DOOR
12 DIOPTER DIAL
13 FLASH/CAMERA-READY LAMP
14 VIEWFINDER EYEPIECE
15 LCD PANEL
16 FLASH-MODE BUTTON
17 MODE BUTTON
18 CONTROL-PANEL COVER
19 SELF-TIMER BUTTON
20 FILM DOOR
21 FILM CHAMBER
22 TRIPOD SOCKET
23 FILM-DOOR LATCH
24 FRAME COUNTER
25 TEXT-MESSAGING PANEL
26 BATTERY SYMBOL
27 SELF-TIMER INDICATOR
28 RED-EYE-REDUCTION INDICATOR
29 FLASH-OFF INDICATOR
30 FILL-FLASH INDICATOR
31 AUTO-FLASH INDICATOR
32 OPTION-MODE ARROW
33 INFINITY-FOCUS ICON
34 SPOT-FOCUS ICON
35 PORTRAIT ICON
36 NIGHTVIEW ICON
37 CONTINUOUS-DRIVE ICON
38 MID-ROLL-CHANGE (MRC) BUTTON
39 ENTER BUTTON
40 SELECT BUTTON
41 DATE BUTTON
42 PRINT-QUANTITY BUTTON
43 TITLE BUTTON
GETTING STARTED
After you load the battery (see LOADING THE BATTERY on page 9), it is important that you set the language (5 options available) and the date and time on the camera before you take pictures.
Setting the language
English is initially set into the memory of this camera, but you can change the language to German, French, Spanish, or Japanese.
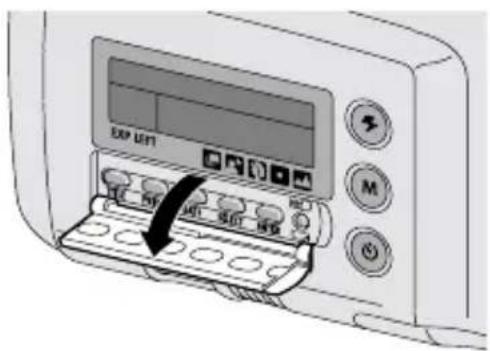
- Open the CONTROL-PANEL COVER (18) located below the LCD PANEL (15).
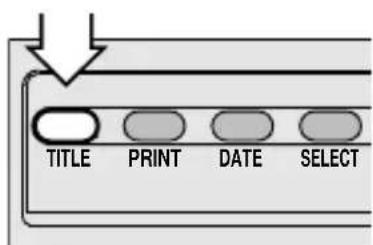
- Press and hold the TITLE BUTTON (43)
with the control-button actuator on the camera strap for approximately 4 seconds until "ENGLISH" appears on the LCD panel.
- When you release the button, the language "blinks."
- If the language does not appear and/or blink, turn the camera off and back on to refresh it; then repeat the steps.
- Move the ZOOM-DIAL LEVER (1) to the right or left or repeatedly press the SELECT BUTTON (40) to select a language.
natural_image
Diagram of a computer interface with buttons and a belt, showing no readable text or symbols
natural_image
Illustration of a washing machine with handle and side panel (no text or symbols)- Press the ENTER BUTTON (39) to complete your selection.
- The LCD panel displays "LANGUAGE IS" followed by the selected language.
Date and time imprinting
Traditional cameras print date and/or time information directly onto the film. Your ADVANTIX Camera uses the film's magnetic data strip to record date and time information which your photo lab prints on the back of your photographs. The camera has a quartz clock and automatic calendar through the year 2099.
Date formats
The date format is automatically set for you according to the designated language (see the following table). If you want to change the date format, see Setting the date and time.
Date Format
English month, day, year
German day, month, year
French day, month, year
Spanish day, month, year
Japanese year, month, day
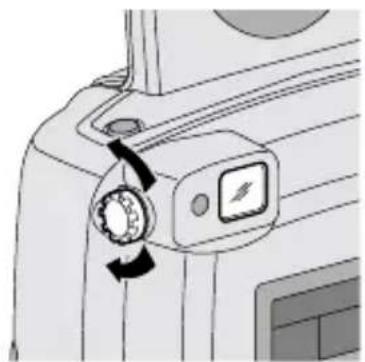
Setting the date and time
You can record the date in a choice of three formats: (year/month/day, month/day/year, or day/month/year) and time (hour/minute).
- Open the CONTROL-PANEL COVER (18) located below the LCD PANEL (15).
- Repeatedly press the DATE BUTTON (41) with the control-button actuator on the camera strap to select date format or time.

- Press the SELECT BUTTON (40) to activate the "blinking digits" of the selected date or time format.
- Move the ZOOM-DIAL LEVER (1) to the right or left to increase or decrease the number or press the select button to increase the number.
- Press the ENTER BUTTON (39) to store the information and to actuate the next "blinking digits" (follow steps 4 through 5 to complete your selection or press the enter button again to end the session).
- After you set the date or time, the LCD panel displays "DATE IS" or "TIME IS" followed by the selected date or time.
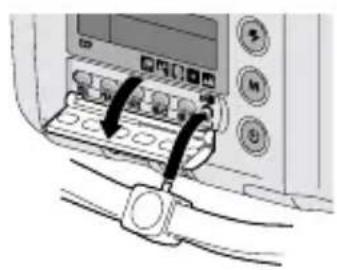
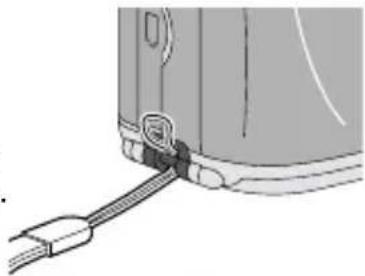
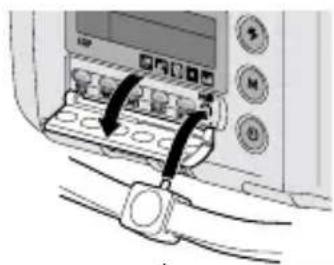
ATTACHING THE STRAP
- Insert the shorter looped end of the strap behind the STRAP POST (10).
- Thread the longer end of the strap through the shorter loop.
- Pull the strap tight.
natural_image
Diagram of a device's cable and connector assembly (no text or symbols)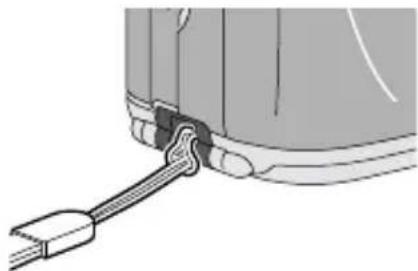
natural_image
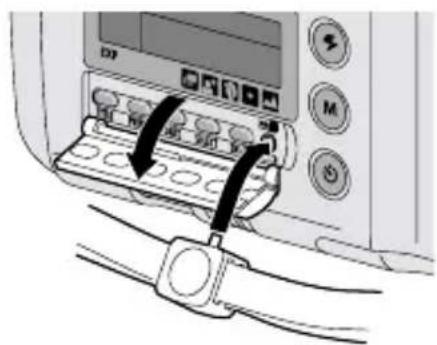
Diagram of a mechanical component with a cable and connector (no text or symbols)Control-button actuator
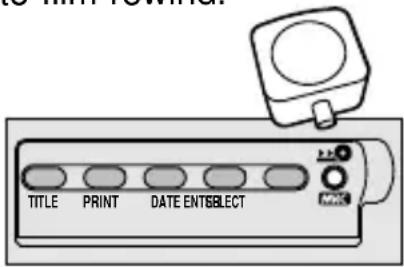
Use the knob on the clasp of the camera strap to actuate the small control buttons on the camera.
natural_image
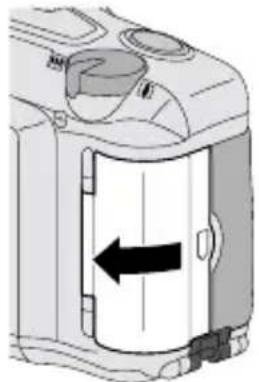
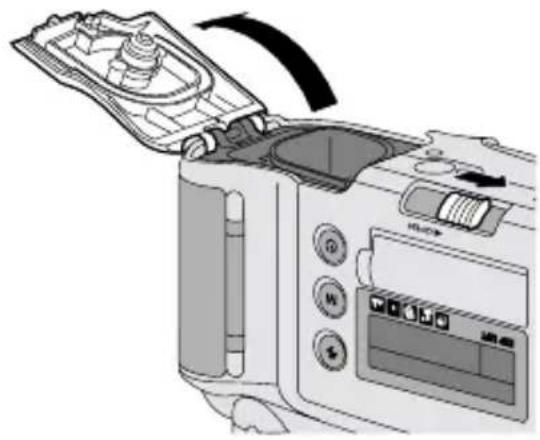
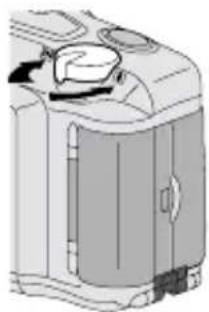
Diagram of a device with cable connectors and a control panel, showing no text or symbolsLOADING THE BATTERY
This camera uses one 3-volt lithium KODAK K123LA (or equivalent) Battery that supplies power for all camera operations.
-
Open the BATTERY DOOR (11) by using your finger tip.
-
Before you remove the old battery, close the LENS COVER/FLASH (3).
• To remove the battery, pull on the strap. -
Place the battery over the battery-pull strap and insert the battery into the battery chamber.
-
Snap the battery door closed.
• After you load a new battery into the camera, reset the date and time as prompted on the LC
natural_image
Diagram of a device interior showing a door with an arrow indicating left motion (no text or symbols present)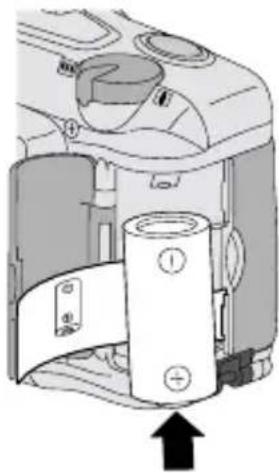
natural_image
Diagram of a mechanical device with labeled components and an upward arrow indicating motion (no text or symbols present)Low-battery indicator
It's time to replace the battery when —
- the BATTERY SYMBOL (26) "blinks" and the "BATTERY LOW" message appears on the LCD panel or
- none of the indicators, except for steady battery symbol, appear on the LCD panel and the shutter button cannot be released.

Battery tips
- Dispose of batteries according to local and national regulations.
- Keep a spare battery with you at all times.
- Read and follow all warnings and instructions supplied by the battery manufacturer.
- Keep batteries away from children.
- Do not try to take apart, recharge or short circuit the battery, or subject it to high temperature or fire.
- Store batteries in their original packaging prior to use.
- Do not use rechargeable batteries.
- Remove the battery from the camera when the camera is not going to be used for an extended length of time.
- In the unlikely event that battery fluid leaks onto your skin, contact Kodak Health, Safety and Environment Information at 1-716-722-5151 in the U.S. Customers outside the U.S. can contact their local health care provider.
- In the unlikely event that battery fluid leaks inside the camera, U.S. customers can contact the Kodak Information Center (KIC) at 1-800-242-2424. Customers outside the U.S. can contact their local Kodak Customer Service representative.

Automatic Energy Saving Features
Power shut-off
To save battery power, the camera will automatically go into a sleep mode if it is not operated for more than 2 12 minutes. You can press almost any of the control buttons to awaken the camera. When the camera is not used for an extended time, close the lens cover/flash to completely turn off the camera.
DIOPTER ADJUSTMENT
Use the diopter adjustment to customize the viewfinder for your eyesight.
- Point the camera at a well lit plain
wall or clear blue sky.
- While looking
through the VIEWFINDER EYEPIECE (14), turn the DIOPTER DIAL (12) until the spot-focus circle appears sl
natural_image
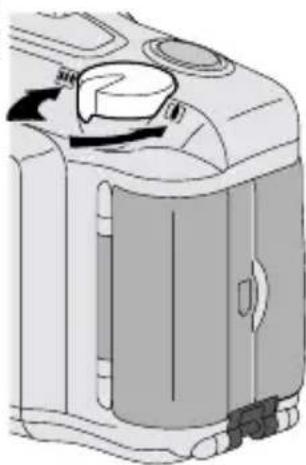
Diagram of a device's front panel with a rotary knob and indicator lights (no text or symbols)LOADING THE FILM
You can load film into the camera with the lens cover/flash opened or closed.
- Turn the camera upside down and slide the FILM-DOOR LATCH (23) to automatically open the FILM DOOR (20).
- The film door opens only when the film chamber is empty or the film in the camera is completely rewound into the film cassette. See UNLOADING THE FILM on page 29.
natural_image
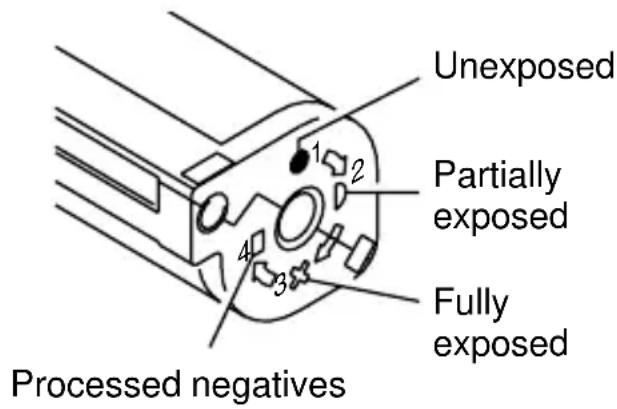
Diagram of a microwave oven with control panel and air vent (no text or symbols)- Insert the film cassette completely into the FILM CHAMBER (21). Make sure the Film Status Indicator (FSI) on the film cassette is at • (#1 position) for a new cassette or at ▶ (#2 position) for a partially exposed cassette.
- Do not force the film cassette into the film chamber.
- Close the film door to start the auto-film advance. The FRAME COUNTER (24) on the LCD PANEL (15) shows the number of pictures remaining on the film cassette.

natural_image
Mechanical device interior showing a cylindrical component being inserted into a housing, with no visible text or symbols.

Look for this logo to be certain that the film you buy is made for this camera.
Look for this logo to select a certified photo lab for developing your film and to assure that you get all the features of the Advanced Photo System.
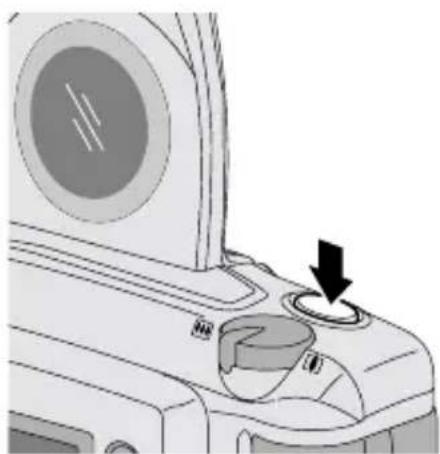
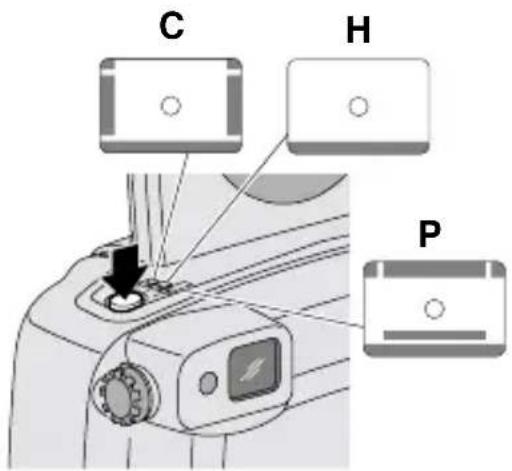
TAKING PICTURES
You can take Classic (C), Group/HDTV (H) ^* , and Panoramic (P) pictures on the same film cassette. See the table on page 14 for Typical print sizes (formats). Your photo-processing cost may be based on the format size(s) that you use to expose the film.
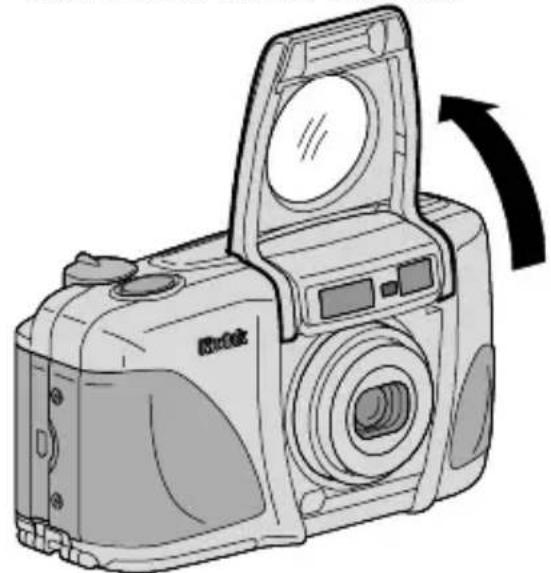
- Completely lift up the LENS COVER/FLASH (3) to uncover the LENS (8) and to turn on the camera.
natural_image
Line drawing of a digital camera with an open lid and arrow indicating rotation (no text or symbols)* High Definition Television (HDTV) prints are the same aspect ratio as the TV for CD interface capabilities.
- Repeatedly press the PRINT-FORMAT BUTTON (4) to select C, H, or P format. The viewfinder changes to show the selected field of view.
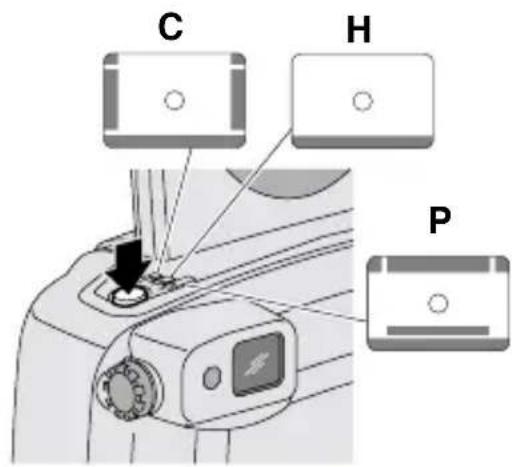
- Formats C and P cancel and default to H format when you turn the camera off.
-
Frame your subject within the VIEWFINDER EYEPIECE (14). For a sharp picture, stand at least 2 ft (0.6 m) from your subject.
-
Partially press down the SHUTTER BUTTON (2) until the FLASH/CAMERA-READY LAMP (13) turns green and "READY" appears on the LCD PANEL (15). Fully press down the shutter button to take the picture.
natural_image
Diagram of a computer monitor with a dial and control knob, showing no text or symbols- Follow the instructions on the LCD panel when the flash/camera-ready lamp is red. See Flash-lamp signals on page 16.
Typical print sizes (formats)
C H P
Classic Group (HDTV) Panoramic
3.5 x 5" or 4 x 6" 3.5 x 6" or 4 x 7" 3.5 x 8.5" to 4 x 11.5" (88.9 x 127 mm or (88.9 x 152 mm or (88.9 x 216 mm to 102 x 152 mm) 102 x 178 mm) 102 x 292.7 mm)
NOTE: Your photo lab will generally provide 4 x 6, 4 x 7, and 4 x 11.5 in. (102 x 152, 102 x 178, and 102 x 292.7 mm) sizes. Some local printers may offer 3.5 x 5, 3.5 x 6, and 3.5 x 8.5 in. (88.9 x 127, 88.9 x 152, and 88.9 x 216 mm) sizes.
Tips for better pictures
- Move close enough to your subject so it fills the viewfinder but not closer than 2 ft (0.6 m).
- Take pictures at the subject's level. Kneel down to take pictures of children and pets.
- Hold your camera vertically to capture tall, narrow subjects, such as a waterfall, skyscraper, or a single person.
- Add interest to your picture by framing it with a tree branch, a window, or even the rails of a fence.
- Keep the sun behind you. This provides the best subject illumination.
- Stand at an angle to shiny surfaces like windows or mirrors to avoid flash reflection and bright spots in your pictures.
- Turn on all room lights and have your subject look at the red-eye-reduction light to reduce red eyes in flash pictures.
USING THE ZOOM LENS
This camera has a motorized-zoom lens that lets you select the ideal lens-focal length for taking pictures. When you turn the camera on, it is initially set to the wide-angle position.
- Completely lift up the LENS COVER/FLASH (3) to uncover the LENS (8) and to turn on the camera.
- Slide the ZOOM-DIAL LEVER (1) to the right for telephoto to zoom closer to
the subject or to the left for wide-angle to zoom away from the subject.
- Look through the VIEWFINDER EYEPIECE (14).
natural_image
Diagram of a mechanical device with internal components and directional arrows (no text or symbols)- Press the SHUTTER BUTTON (2) halfway down.
- When the subject is close to the camera, the masking in the viewfinder automatically adjusts for close-ups.
- Fully depress the shutter button to take the picture.
- The lens barrel automatically returns to the wide-angle position after approximately 2 12 minutes.
TAKING FLASH PICTURES
In dim light, such as indoors or outdoors in heavy shade, or on dark overcast days, you need flash. Your camera has an automatic flash that fires when you need it. The special Flip-Flash Plus system of this camera shortens the flash duration in close-up pictures. This enhances your flash pictures and helps to conserve battery life.
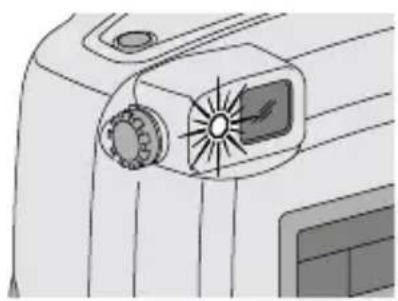
When you partially press down the shutter button and the flash-ready lamp glows green, the flash is fully charged and ready for taking pictures.
Flash-lamp signals
| Lamp Indicator Situation | |
| Glows green Flash fully charged | |
| “Blinks” red * Flash not fully charged | |
| Glows red Subject closer than 2 ft (0.6 m) |
* A warning message appears on the LCD panel.
- Completely lift up the LENS COVER/FLASH (3) to uncover the LENS (8) and to turn on the camera.
- Keep the subject within the recommended distance range for the speed of film in your camera. Do not take pictures beyond the maximum distance or your pictures will be dark.
- Partially press down the SHUTTER BUTTON (2) until the FLASH/CAMERA-READY LAMP (13) turns green and "READY" appears on the LCD PANEL (15). Fully press down the shutter button to take the picture.
natural_image
Diagram of a vehicle air intake system with fan and vent (no text or labels)- The LCD panel displays "FLASH NOT READY" when the flash is not fully charged.
Flash-to-subject distance
| ISOFilm Wide TeleSpeed (27 mm) (80 mm) |
| 50 2 to 10 ft 2 to 7 ft(0.6 to 3.1 m) (0.6 to 2.1 m) |
| 100 2 to 15 ft 2 to 10 ft(0.6 to 4.6 m) (0.6 to 3.0 m) |
| 200 2 to 21 ft 2 to 14 ft(0.6 to 6.4 m) (0.6 to 4.3 m) |
| 400 2 to 30 ft 2 to 20 ft(0.6 to 7.9 m) (0.6 to 6.7 m) |
| 800 2 to 42 ft 2 to 28 ft(0.6 to 12.8 m) (0.6 to 8.5 m) |
| 1600 2 to 60 ft 2 to 40 ft(0.6 to 18.2 m) (0.6 to 12.2 m) |
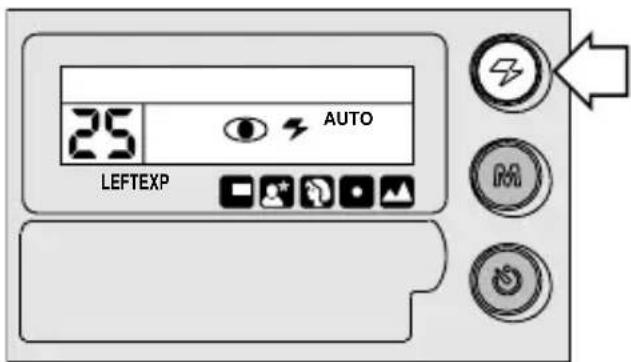
SELECTING OTHER FLASH MODES
Besides the auto flash with red-eye-reduction mode, which is the initial default setting of the camera, you can select auto flash without red-eye reduction, fill flash, or flash off. Repeatedly press the FLASH-MODE BUTTON (16) to view the choices on the LCD panel and to make your selection.
Red-eye reduction

Some people's eyes (and some pets') can reflect flash with a red glow. The extended flash and the red-eye-reduction light on the camera help to minimize red eyes in flash pictures. See Tips for better pictures on page 15 for information on how you can reduce red eyes in flash pictures.
- Repeatedly press the FLASH-MODE BUTTON (16) until "REDUCE RED EYE" and the RED-EYE-REDUCTION INDICATOR (28) appear on the LCD PANEL (15).
- Frame your subject within the VIEWFINDER EYEPIECE (14).
- Press the SHUTTER BUTTON (2) to take the picture.
- The camera defaults to the auto flash with red-eye-reduction mode.
- If you want to change the default setting to auto flash without red-eye reduction, repeat these steps but select "AUTO FLASH" instead of "REDUCE RED EYE" in step 1.
Auto flash without red-eye reduction

AUTO
Use this feature for taking pictures without people.
You can change the camera default setting to auto flash without red-eye reduction by following these steps:
- Repeatedly press the FLASH-MODE BUTTON (16) until "AUTO FLASH" and the AUTO-FLASH INDICATOR (31) appear on the LCD PANEL (15).
- Frame your subject within the VIEWFINDER EYEPIECE (14).
-
Press the SHUTTER BUTTON (2) to take the picture.
-
The camera now defaults to the auto flash without red-eye-reduction mode.
- If you want to change the default setting back to auto flash with red-eye reduction, repeat these steps but select “REDUCE RED EYE” instead of “AUTO FLASH” in step 1.
Fill flash

When bright light indoors or outdoors comes from behind the subject, dark shadows (especially on faces) may occur. Use fill flash to lighten these shadows and to add sparkle to your subject's eyes.
- Repeatedly press the FLASH-MODE BUTTON (16) until "FILL FLASH" and the FILL-FLASH INDICATOR (30) appear on the LCD PANEL (15).
- Frame your subject within the VIEWFINDER EYEPIECE (14).
- Press the SHUTTER BUTTON (2) to take the picture.
- The selection cancels when you turn off the camera, select a different flash mode or the infinity-focus mode, or when the camera powers down.
Flash off

When you do not want to use the flash, especially indoors where flash is prohibited, or capture the ambiance of existing light, use the flash-off feature. Use a tripod and high-speed film because the shutter speed in these situations will most likely be slow.
- Repeatedlypress the FLASH-MODE BUTTON (16) until "FLASH OFF" and the FLASH-OFF INDICATOR (29) appear on the LCD PANEL (15).
- Frame your subject within the VIEWFINDER EYEPIECE (14).
- Press the SHUTTER BUTTON (2) to take the picture.
- The selection cancels when you turn off the camera, select a different flash mode or the night-view or continuous-drive mode, or when the camera powers down.
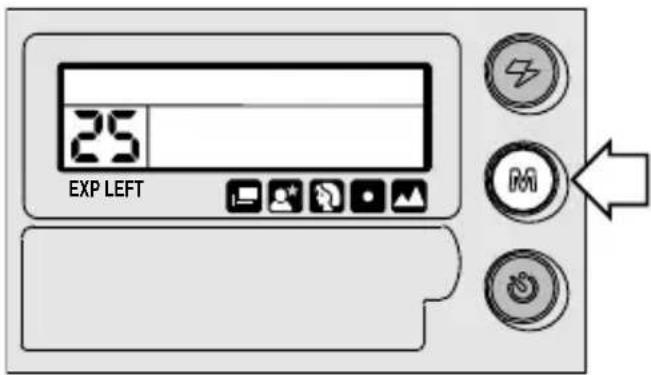
SELECTING THE SPECIAL OPTION MODES
Repeatedly press the MODE BUTTON (17) to view the special option modes on the LCD panel and to make your selection. The special option modes let you tailor the camera's fully automatic operation to suit the subject. The various modes provide optimal camera settings for infinity focus, spot focus, portrait, nightview, and continuous drive.
Infinity-focus mode

In this mode, you can capture sharp, distant scenery when you take pictures outdoors.
-
Press repeatedly the MODE BUTTON (17) until "INFINITY" and the FLASH-OFF INDICATOR (29) appear on the LCD PANEL (15).
-
The OPTION-MODE ARROW (32) on the LCD panel points to the INFINITY-FOCUS ICON (33).
• In this mode the camera is automatically set for flash off, the only available flash option. -
Frame your subject within the VIEWFINDER EYEPIECE (14).
-
Press the SHUTTER BUTTON (2) to take the picture.
- The selection cancels when you turn off the camera, press the mode or flash-mode button, or when the camera powers down.
Spot-focus mode

By using spot focus, you can obtain extremely precise focus control of what you consider the most important parts of your subject.
- Press repeatedly the MODE BUTTON (17) until "SPOT FOCUS" appears on the LCD PANEL (15).
- The OPTION-MODE ARROW (32) on the LCD panel points to the SPOT-FOCUS ICON (34).
-
All flash options are available in this mode.
-
Look through the VIEWFINDER EYEPIECE (14).
-
Place the spot-focus circle on the main portion of the subject that you want focused.
-
Press the SHUTTER BUTTON (2) to take the picture.
- The selection cancels when you turn off the camera, select a different option mode, or when the camera powers down.
Portrait mode

In this mode, the lens automatically zooms to provide suitable framing for portraits.
-
Repeatedly press the MODE BUTTON (17) until "PORTRAIT MODE" appears on the LCD PANEL (15).
-
The OPTION-MODE ARROW (32) on the LCD panel points to the PORTRAIT ICON (35).
-
All flash options are available in this mode.
-
Look through the VIEWFINDER EYEPIECE (14) placing the spot-focus circle on your subject.
- Press the SHUTTER BUTTON (2) halfway down.
- The lens zooms to provide suitable framing for a portrait exposure.
-
Wait for the lens to zoom, then press the shutter button completely down to take the picture.
-
If you manually zoom the lens after selecting the portrait mode, the portrait-mode selection cancels.
- The selection cancels after you take the picture.
Nightview mode

In this mode, the camera balances the flash and existing light exposure so that you can take beautiful pictures of people at sunset or at night. Use a tripod or place the camera on another firm support, and use high-speed KODAK ADVANTIX Film because the shutter speed at night will most likely be slow.
-
Press repeatedly the MODE BUTTON (17) until "NIGHT MODE" appears on the LCD PANEL (15).
-
The OPTION-MODE ARROW (32) on the LCD panel points to the NIGHTVIEW ICON (36).
-
All flash options, except for flash off, are available in this mode.
-
Frame your subject within the VIEWFINDER EYEPIECE (14).
- Press the SHUTTER BUTTON (2) to take the picture.
- The selection cancels when you turn off the camera, select a different option mode, or when the camera powers down.
Continuous-drive mode

In this mode, the camera continuously takes pictures and advances the film as long as the shutter button is held down.
-
Repeatedly press the MODE BUTTON (17) until "CONTINUOUS" appears on the LCD PANEL (15).
-
The OPTION-MODE ARROW (32) on the LCD panel points to the CONTINUOUS-DRIVE ICON (37).
-
All flash options are available in this mode.
-
Frame your subject within the VIEWFINDER EYEPIECE (14).
- Press the SHUTTER BUTTON (2) completely down and hold.
- The shutter continues to release and advance the film as long as the shutter button is held down. When you take flash pictures, the shutter releases after the flash has charged.
- The selection cancels when you turn off the camera, select a different option mode, or when the camera powers down.
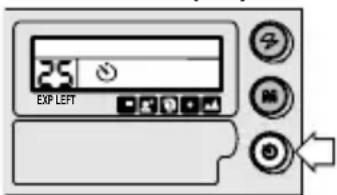
USING THE SELF-TIMER

Use the self-timer feature to include yourself in pictures. The electronic self-timer delays the release of the shutter button for approximately 10 seconds.
- Attach a tripod to the camera TRIPOD SOCKET (22) or place it on another firm support.
- Frame your subject within the VIEWFINDER EYEPIECE (14).
- Press the SELF-TIMER BUTTON (19).
- "SELFTIMER READY" appears on the LCD PANEL (15).
-
Press the SHUTTER BUTTON (2) to take the picture.
-
The SELF-TIMER LAMP (9) on the front of the camera blinks during the self-timer countdown.
- The self-timer automatically turns off after the shutter releases.
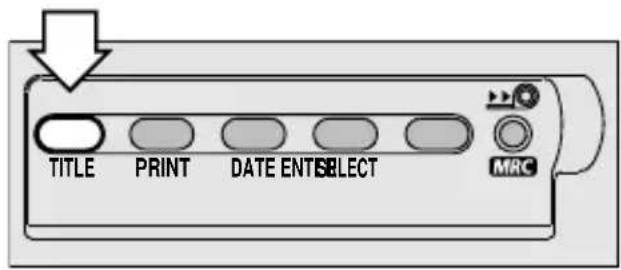
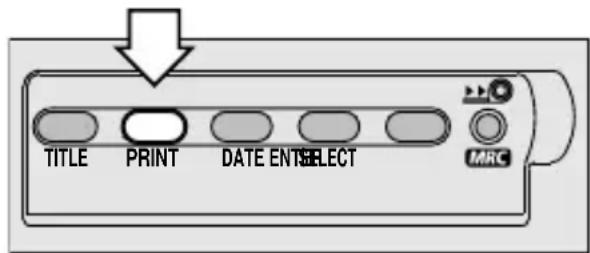
TITLE IMPRINTING
You can choose a print title from one of 30 pre-programmed titles (see Title-select list) and/or a roll title for the entire roll of film. The title(s) are recorded on the film's magnetic data strip and printed on the back of the prints at certified Advanced Photo System labs. Look for this logo to select certified photofinishing services.

Print-title imprinting
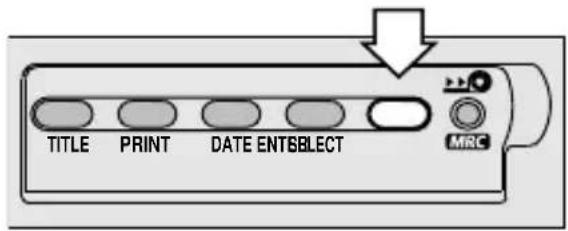
- Open the CONTROL-PANEL COVER (18) located below the LCD PANEL (15).
- Repeatedly press the TITLE BUTTON (43) with the control-button actuator on the camera strap until the LCD PANEL (15) displays "SET PRINT TITLE."
- Move the ZOOM-DIAL LEVER (1) back and forth to scroll and select a print title or repeatedly press the SELECT BUTTON (40).
-
Press the ENTER BUTTON (39) to store the print title.
-
After you set the title, the LCD panel displays "PRINT TITLE IS" followed by the selected title.
• The print title you select before you take a picture automatically cancels after 24 hours.
Deleting print title
- Repeatedly press the TITLE BUTTON (43) with the control-button actuator on the camera strap until the LCD PANEL (15) displays "SET PRINT TITLE."
- Press immediately the SELECT BUTTON (40) until "NONE" appears on the LCD panel.
- Press the ENTER BUTTON (39) until "PRINT TITLE IS NONE" appears on the LCD panel.
- This cancels the last print-title selection. See Print-title imprinting if you want to select a different title.
- You cannot cancel or change earlier print-title selections.
Roll-title imprinting
- Open the CONTROL-PANEL COVER (18) located below the LCD PANEL (15).
- Repeatedly press the TITLE BUTTON (43) with the control-button actuator on the camera strap until the LCD PANEL (15) displays "SET ROLL TITLE."
- Move the ZOOM-DIAL LEVER (1) back and forth to scroll and select a roll title or repeatedly press the SELECT BUTTON (40).
- Press the ENTER BUTTON (39) to store the roll title.
- After you set the title, the LCD panel displays "ROLL TITLE IS" followed by the selected title.
Deleting roll title
- Repeatedly press the TITLE BUTTON (43) with the control-button actuator on the camera strap until the LCD PANEL (15) displays "SET ROLL TITLE."
- Immediately press the SELECT BUTTON (40) until "NONE" appears on the LCD panel.
- Press the ENTER BUTTON (39) until "ROLL TITLE IS NONE" appears on the LCD panel.
- This cancels the roll-title selection. See Roll-title imprinting if you want to select a different title.
- You cannot change or delete the roll title on an MRC (partially exposed) cassette when it is reloaded into the camera.
Viewing selected titles
Use this feature to check which roll or print title is currently in use.
- Repeatedly press the TITLE BUTTON (43) with the control-button actuator on the camera strap until the LCD PANEL (15) displays "SET ROLL TITLE" or "SET PRINT TITLE."
- Press the ENTER BUTTON (39) until "PRINT TITLE IS ....." or "ROLL TITLE IS ....." and the current selected title appears on the LCD panel.
| Title-select list | |
| NONE | HOLIDAY |
| ANNIVERSARY | HONEYMOON |
| BAPTISM | I LOVE YOU |
| BIRTHDAY | INDEPENDENCE DAY |
| CANADA DAY | MOTHER'S DAY |
| CHRISTMAS | PARTY |
| CONGRATULATIONS | REUNION |
| EASTER | SCHOOL EVENT |
| FAMILY | SEASONS GREETING |
| FATHER'S DAY | THANK YOU |
| FESTIVAL | THANKSGIVING |
| FRIENDS | TRIP |
| GRADUATION | VACATION |
| HALLOWEEN | VALENTINE'S DAY |
| HANUKKAH | WEDDING |
| HAPPY NEW YEAR | |
PRINT-QUANTITY SELECT
This feature lets you choose before you take the picture the number of prints from 0 to 9 you will receive from the photofinishing lab. This service is dependent on the photofinishers capability.
- Open the CONTROL-PANEL COVER (18) located below the LCD PANEL (15).
- Press the PRINT-QUANTITY BUTTON (42) once with the control-button actuator on camera strap.
- The LCD panel displays "PRINT QUANTITY" and "P1."
- Press repeatedly the print-quantity button to select the number of prints you want.
- You can view the numbers "P1," "P2," etc., in the FRAME COUNTER (24) area on the LCD panel.
- Press the ENTER BUTTON (39) to complete your selection.
• After you take the picture, the print quantity defaults to 1.
Canceling print-quantity select
You can cancel the selected print quantity after you take the picture and before you take the next picture.
- Press and hold the PRINT-QUANTITY BUTTON (42).
- Release the button when the motor stops running.
- The film will rewind one frame to rewrite the data.
- See PRINT-QUANTITY SELECT, steps 2 through 4, to select a different quantity or bypass steps 2 through 4 if the default is to resume at P1.
UNLOADING THE FILM
Automatic rewind
The camera automatically rewinds the film into the cassette after the last picture is taken.
- Wait for the camera motor to stop to ensure that the film is completely rewound into the film cassette.
- The LCD PANEL (15) displays "FILM REWINDING" and the FRAME COUNTER (24) counts down to "0."
- When the film is fully rewound, the LCD panel indicates "REMOVE FILM."
- Turn the camera upside down and slide the FILM-DOOR LATCH (23) to open the FILM DOOR (20).
- Remove the film cassette from the camera and reload with new KODAK ADVANTIX Film.
- The Film Status Indicator (FSI) on the film cassette is at × and the LCD panel displays "E."
Mid-roll change (MRC)

You can remove your film in mid-roll and later reload it and continue picture-taking. The Film Status Indicator (FSI) on a partially exposed film cassette is set to ▶ (#2 position). When you reload the film cassette into the camera, "SEARCHING" appears on the LCD panel. The camera automatically advances the film to the first unexposed frame and "FRESH FILM" appears on the LCD panel. Film can be rewound and reloaded until the last picture is taken. The camera automatically rewinds the film and sets the FSI to ✗ (#3 position) when the last picture is taken.
- Open the CONTROL-PANEL COVER (18) located below the LCD PANEL (15).
- Gently press the MID-ROLL-CHANGE BUTTON (38) with the control-button actuator on the camera strap to start the auto-film rewind.
3. See Automatic rewind, steps 1 through 3 on page 29.
- You can either reinsert the partially exposed film cassette into the camera to take more pictures or take it to your photo lab for processing.
CARING FOR YOUR CAMERA
- Protect the camera from dust, moisture, sudden impact, and excessive heat.
CAUTION: Do not use solvents or harsh or abrasive cleaners on the camera body.
- If the lens appears dirty, breathe on it to form a mist and wipe the surface gently with a soft, lintless cloth or lens-cleaning tissue. Never wipe a dry lens.
CAUTION: Use solvents or solutions designed for cleaning camera lenses. Do not use chemically treated tissues intended for cleaning eye glasses.
- Remove the battery when you store the camera for an extended time.
CAUTION: To prevent possible damage and electrical shock, do not attempt to disassemble or repair the camera or flash unit by yourself.
TROUBLESHOOTING
| What happened Probable cause Solution | ||
| Camera will There are no more not operate pictures remaining | Remove the film and replace with new film | |
| Battery weak, dead, missing, Replace or reload or improperly loaded the battery | ||
| Film does not Battery weak, dead, missing, Replace or reload advance or rewind or improperly loaded the battery | ||
| LCD panel is blank Battery weak, dead, missing, Replace or reload or improperly loaded the battery | ||
| Camera in sleep mode Press almost any of the control buttons to awaken the camera | ||
| LCD panel displays: “BATTERY LOW” “REPLACE BATTERY” “FLASH NOT READY” | Battery weak Replace the battery | |
| Battery weak, dead, missing, Replace or reload or improperly loaded the battery | ||
| Flash not fully charged Wait until the “FLASH NOT READY”message disappears or until the flash-ready lamp glows green | ||
| Flash/camera ready Flash not lamp “blinks” red | Wait for lamp to fully charged | glow green |
| Flash/camera ready lamp glows red | Subject closer than 2.0 ft (0.6 m) | See Flash-to-subject distance on page 17 |
SPECIFICATIONS
Film Type: KODAK ADVANTIX
Film for color or black-and-white pictures
Lens: 27 - 80 mm
motorized zoom lens, glass aspheric
Focus System: Passive, multi-spot autofocus
Viewfinder: Real image, format masking, parallax correction, diopter adjustment
LCD: Text display with camera-status information and warnings
Film-Speed: DXIX (ISO) 50 – 1600 for color and black-and-white films
Flash Unit: Built-in, KODAK SENSALITE™ Flash
Flash Range (ISO 200):
Wide: 2 - 21 ft (0.6 - 6.4 m)
Tele: 2 - 14 ft (0.6 - 4.3m)
Apertures: f/5.6 - f/8.5
Shutter: 1/2 - 1/300 second
Power Source: Main power: one 3 V lithium KODAK K123LA (or equivalent) Battery
Dimensions: 4.8 in. x 2.6 in. x 1.8 in. (122 mm x 66 mm x 45 mm)
Weight: 8 oz (228 g) without film or battery
Kodak, Sensalite, “e” mark, Advantix, and the Advanced Photo System symbol and logotype are trademarks.
natural_image
Illustration of a kitchen appliance with a side panel and handle (no text or symbols)natural_image
Diagram of a device's cable and connector assembly (no text or symbols)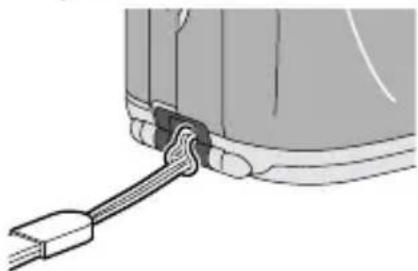
natural_image
Diagram of a mechanical component with a cable inserted into a housing (no text or symbols visible)natural_image
Close-up of a device's cable connector with two black arrows indicating connection points (no text or symbols visible)COMO CARGAR LA BATERÍA
natural_image
Diagram of a device interior showing a door with an arrow indicating leftward movement (no text or symbols present)natural_image
Diagram of a mechanical device with battery and housing components, no visible text or symbolsnatural_image
Diagram of a device's rotary knob and display panel (no text or symbols)COMO CARGAR LA PELÍCULA
natural_image
Diagram of a digital camera with open lid and control panel (no text or symbols)natural_image
Mechanical device component with a cylindrical housing and directional arrow indicating motion (no text or symbols)natural_image
Line drawing of a digital camera with an open lid and scroll, showing no text or symbolsnatural_image
Diagram of a computer monitor with a dial and control knob, showing no text or symbolsnatural_image
Technical line drawing of a mechanical device with no visible text or symbolsnatural_image
Diagram of a vehicle's air intake system with fan and exhaust components (no text or labels)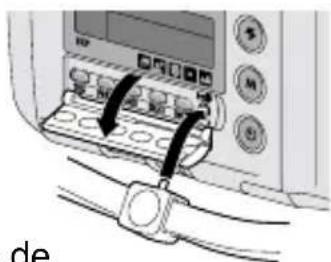
natural_image
Illustration of a portable electronic device with a door and control panel (no text or symbols visible)natural_image
Diagram showing two mechanical components with connectors and connecting wires, no text or symbols presentnatural_image
Diagram of a device's cable connector with ports and connectors (no text or symbols visible)INSTALLATION DE LA PILE
natural_image
Diagram of a device interior showing a door with an arrow indicating leftward movement (no text or symbols present)natural_image
Diagram of a camera interior showing the lens, battery, and adjustment knobs (no text or labels)natural_image
Diagram of a device's door handle and rotary knob (no text or symbols)CHARGEMENT DU FILM
natural_image
Diagram of a microwave oven with control panel and air vent, showing internal components and airflow direction (no text or symbols)natural_image
Mechanical device with a cylindrical component inserted into a housing, showing internal components and a downward arrow indicating motion (no text or symbols present)natural_image
Line drawing of a digital camera with an open lid and scroll, showing no text or symbols on the device itself.natural_image
Diagram of a computer monitor with a circular screen and a black arrow pointing to the button (no text or symbols present)Formats de photo
CH P
natural_image
Illustration of a portable device with buttons and ventilation slots (no text or symbols)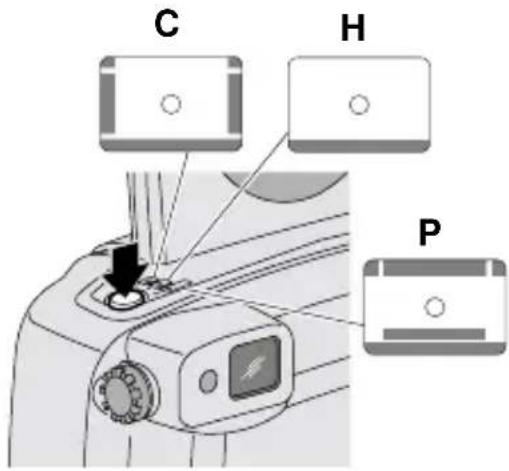
natural_image
Diagram of a car air conditioner unit with fan and sunburst (no text or symbols)- ADVANCED PHOTO SYSTEM FEATURES AVAILABLE WITH THIS CAMERA
- Print Quantity Selection
- Three Print Formats
- Date, Time, and Title Imprinting
- Flip Flash Plus
- Mid-Roll Change (MRC)
- Picture Quality Information Exchange (PQix)
- Easy, Drop-in Loading
- Film Status Indicator (FSI)
- CONTENTS
- CAMERA IDENTIFICATION (Unfold the front and back cover flaps of manual for camera diagrams.)
- GETTING STARTED
- Setting the language
- Date and time imprinting
- Date formats
- Date Format
- Setting the date and time
- ATTACHING THE STRAP
- Control-button actuator
- LOADING THE BATTERY
- Low-battery indicator
- Battery tips
- Automatic Energy Saving Features
- Power shut-off
- DIOPTER ADJUSTMENT
- LOADING THE FILM
- TAKING PICTURES
- Typical print sizes (formats)
- Classic Group (HDTV) Panoramic
- Tips for better pictures
- USING THE ZOOM LENS
- TAKING FLASH PICTURES
- SELECTING OTHER FLASH MODES
- Red-eye reduction
- Auto flash without red-eye reduction
- Fill flash
- Flash off
- SELECTING THE SPECIAL OPTION MODES
- Infinity-focus mode
- Spot-focus mode
- Portrait mode
- Nightview mode
- Continuous-drive mode
- USING THE SELF-TIMER
- TITLE IMPRINTING
- Print-title imprinting
- Deleting print title
- Roll-title imprinting
- Deleting roll title
- Viewing selected titles
- PRINT-QUANTITY SELECT
- Canceling print-quantity select
- UNLOADING THE FILM
- Automatic rewind
- See Automatic rewind, steps 1 through 3 on page 29.
- CARING FOR YOUR CAMERA
- SPECIFICATIONS
- COMO CARGAR LA BATERÍA
- COMO CARGAR LA PELÍCULA
- INSTALLATION DE LA PILE
- CHARGEMENT DU FILM
- Formats de photo
Brand : KODAK
Model : Advantix C850
Category : Camera