USER MANUAL Quattro Sport POLARIS
Works with Polaris Booster Pump
To avoid risk of potentially serious injury:
- Do not handle the Polaris cleaner while it is operating, except when checking the wheel RPM.
• Always remove the Polaris cleaner before swimmers enter the pool.
CAUTION
USE OF A POLARIS QUATTRO IN A VINYL LINER POOL
Certain vinyl liner patterns are particularly susceptible to rapid surface wear or pattern removal caused by objects coming into contact with the vinyl surface, including pool brushes, pool toys, floats, fountains, chlorine dispensers, and automatic pool cleaners. Some vinyl liner patterns can be seriously scratched or abraded simply by rubbing the surface with a pool brush. Ink from the pattern can also rub off during the installation process or when it comes into contact with objects in the pool. Zodiac Pool Systems LLC and its affiliates and subsidiaries are not responsible for, and the Limited Warranty does not cover, pattern removal, abrasion or markings on vinyl liners.
- Before installing the Polaris cleaner, make sure the pool filter is clean.
- New plumbing lines should be flushed out before installing the cleaner.
- The cleaner should not be used to remove plaster dust in new pools.
- Except when checking the wheel RPM, do not handle the cleaner while it is operating.
• Always remove the cleaner before swimmers enter the pool.
- Disconnect the cleaner from the pool wall when cleaning or backwashing the pool filter.
• Always remove the cleaner from the pool before chemical shock treatments.
- After cleaning or backwashing, let the filtration system run for at least five minutes before re-connecting the cleaner.
For customer service or support:
Zodiac Pool Systems LLC
2620 Commerce Way, Vista, CA 92081
1.800.822.7933 | polarispool.com
Zodiac Pool Systems Canada, Inc.
2-3365 Mainway, Burlington, ON L7M 1A6
1.800.822.7933 | ZodiacPoolSystems.ca
Zodiac Pool Care Europe
Boulevard de la Romanerie -BP 90023
49180 St. Barthelemy d'Anjou cedex FRANCE
zodiac.com
Zodiac Group Australia PTY, Ltd.
219 Woodpark Rd. Smithfield
NSW, 2164
1300 763 021 | Zodiac.com.au

Included in the Box
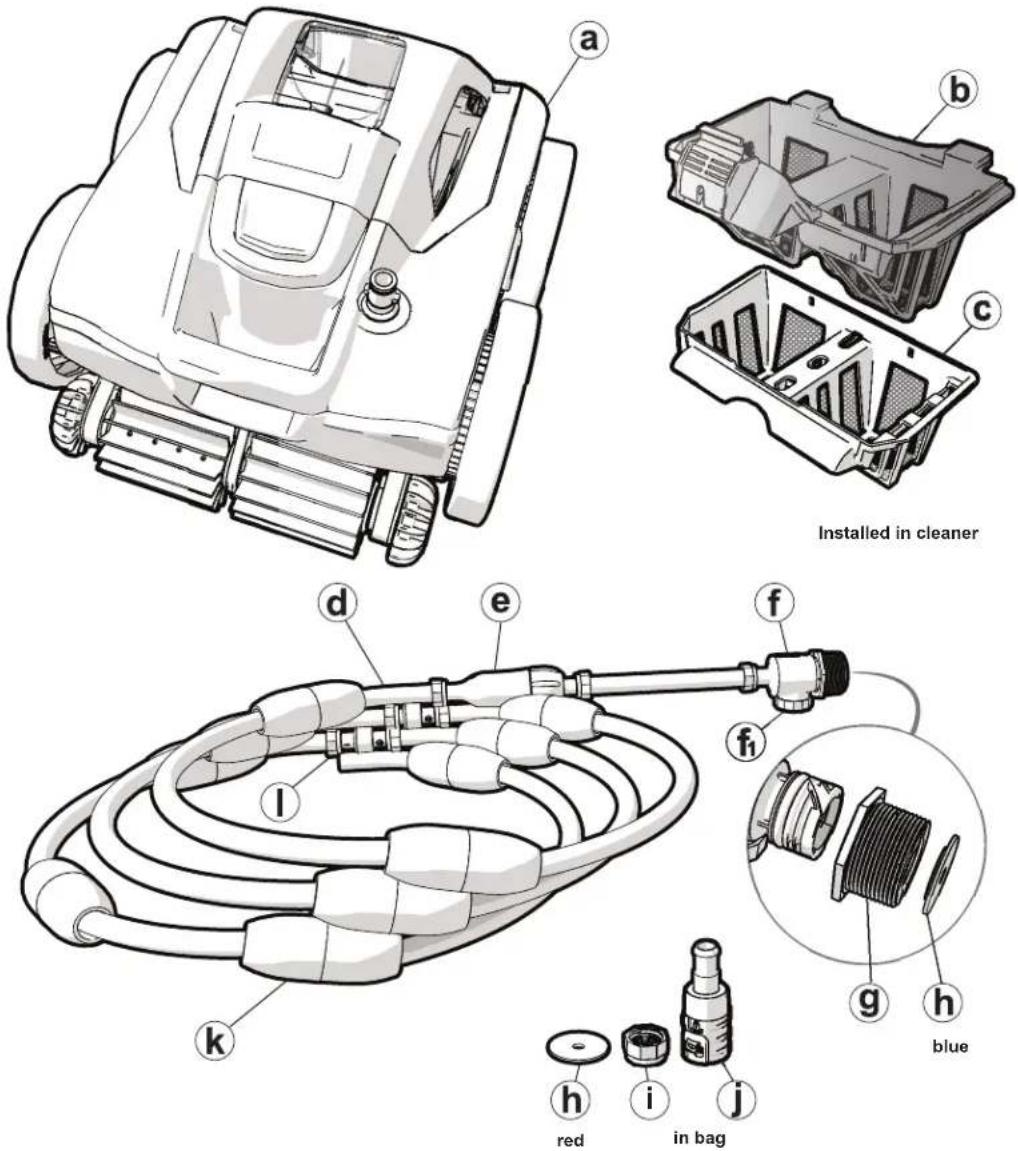
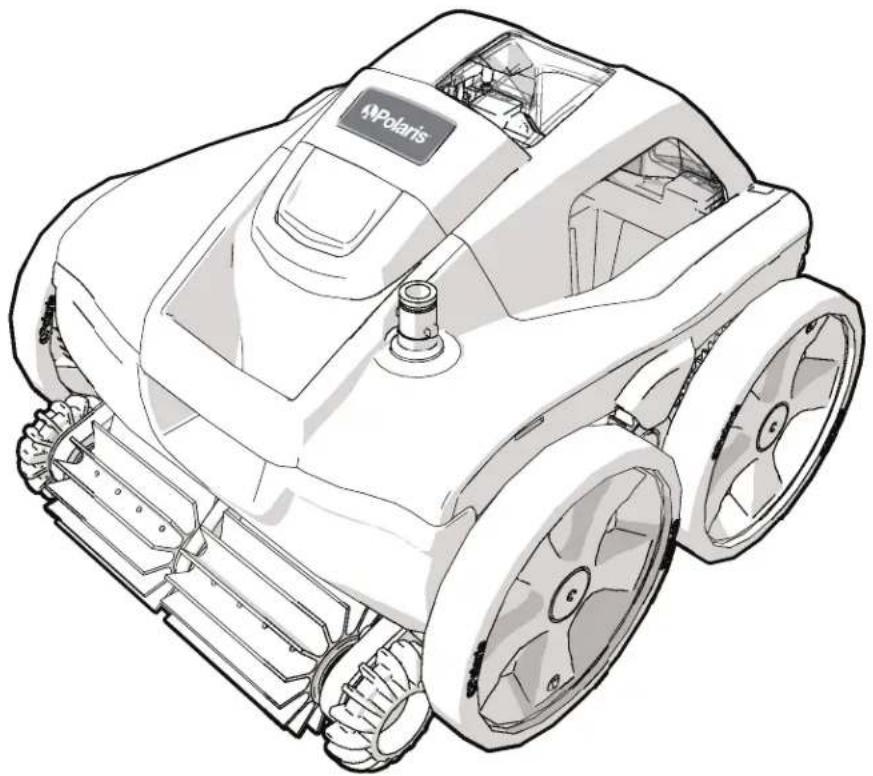
a - Cleaner Body
b - Filter Canister - All-Purpose Debris
c - Filter Canister - Fine Debris
d - Hose Assembly
e - In-Line Filter Assembly
f - Quick Disconnect
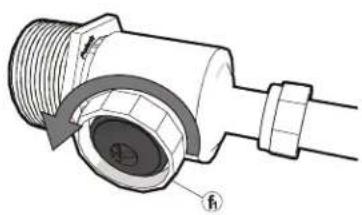
f1 - Pressure Relief Valve
g - Universal Wall Fitting (UWF®)
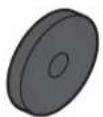
h - Retrictor Disks (Blue and Red)
i - Hose Nuts
j - Feed Hose Connector
k - Hose Floats
I - Hose Swivels
1 Prepare the Pool
- Turn on the filtration pump, allow to prime.
- Turn on the booster pump and flush plumbing lines for five minutes.
- Turn off both pumps.
2 Install the Universal Wall Fitting
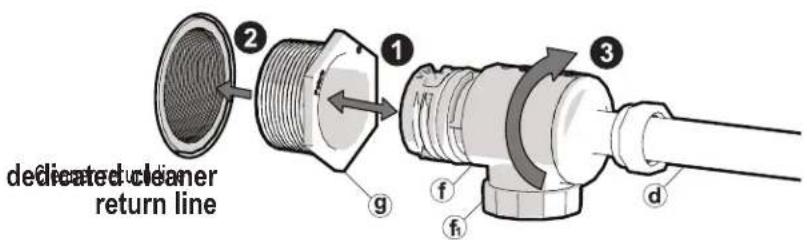
The UWF installs on pools with a dedicated cleaner return line and a threaded 1-1/2" female pipe fitting.
- Remove the Universal Wall Fitting (UWF) (g) from the Quick Disconnect (f).
- Thread the UWF (g) with Blue Restrictor Disk (h) in place, into the dedicated cleaner return line.
- Attach the Quick Disconnect (f) and hose to the UWF (g). Turn clockwise then pull away to secure.
3
Adjust Hose Length
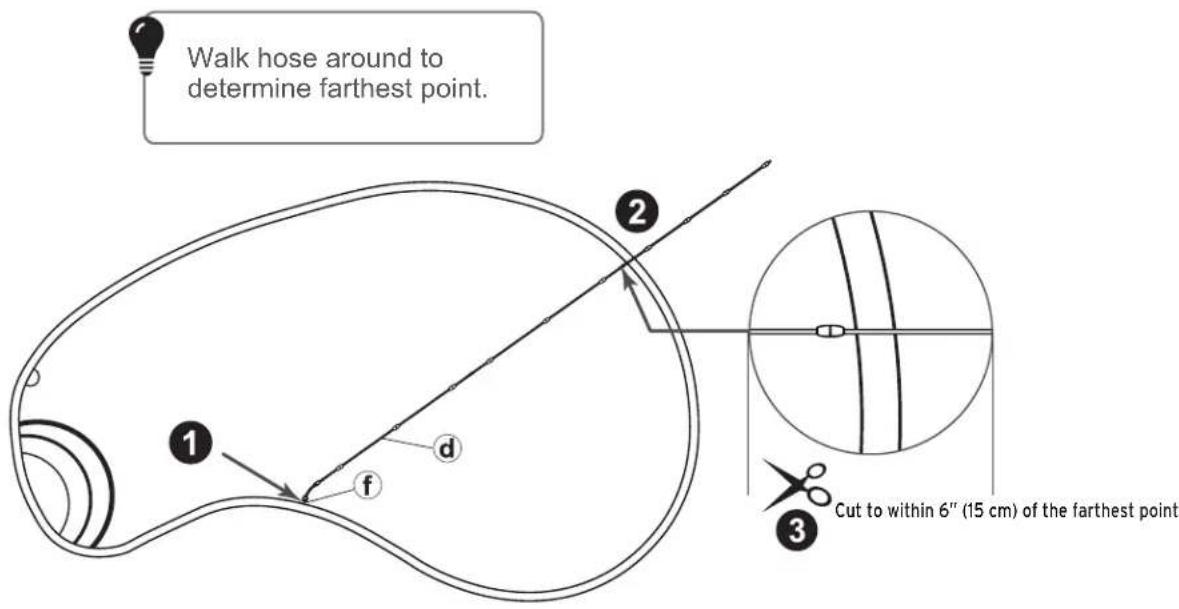
- With the hose assembly (d) connected at the cleaner return line, extend the end of the hose to the farthest point of the pool. Do not include steps or seating areas.
- The end of the hose should be within 6" (15 cm), longer or shorter, of farthest point.
- If hose is too short, add a feed hose section with floats, a swivel and two hose nuts, available through your local Polaris dealer. Adjust to proper length.
- Cut the hose so that it is within 6" (15 cm) of the farthest point.
4
Connect Hose Fitting and Adjust Floats
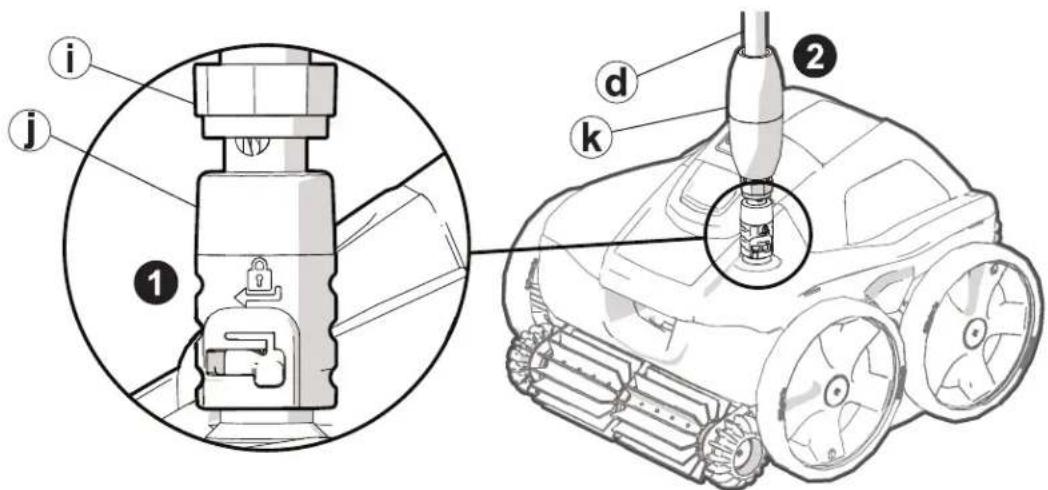
- Place the hose nut (i) onto the end of the feed hose connector (j).
- Push the hose assembly (d) onto the feed hose connector (j). Water can be used to lubricate the hose.
- Tightly secure the hose nut (i) onto the hose assembly (d).

- Position the first hose float (k) up against the feed hose connector (j) and then space hose floats 1-3 ft (30-90 cm) apart.

5
Assemble the Cleaner
WARNING
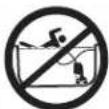
To avoid risk of potentially serious injury, do not swim or use the pool when the cleaner is submerged or operating.
- Attach the feed hose connector (j) to the cleaner.
- Confirm the first hose float (k) is up against the feed hose connector (j).
- Submerge the cleaner, allow it to sink to the bottom of the pool.
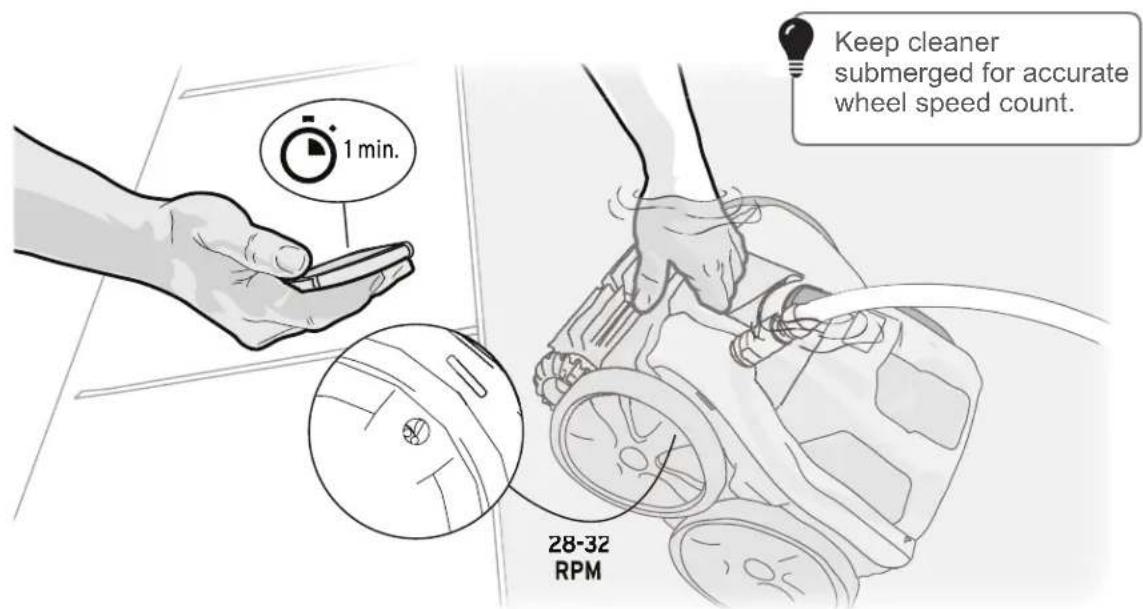
Before operating the cleaner, check for proper wheel revolutions per minute (RPM). For maximum efficiency, the cleaner should operate between 28 and 32 RPM.
IMPORTANT: Keep the cleaner submerged for accurate wheel speed count.
- Turn on the filtration pump and allow it to prime.
- Turn on the booster pump, the cleaner will begin to move.
-
With both pumps on, pull the cleaner to the waterline and keep submerged.
CAUTION: Always lift the cleaner using the handle and take care to avoid possible hair entanglement when leaning over.
NOTE: The Polaris® logo latch is not a handle.
-
Using the Polaris logo on the left-front wheel as a reference, count wheel revolutions (RPM) for 1 minute. If wheels change direction during timing, start over.
-
Target wheel speed is 28 to 32 RPM. If wheel speed is not in target range, refer to Section 7 Adjust Wheel Speed.
7
Adjust the Wheel Speed
< 28 RPM
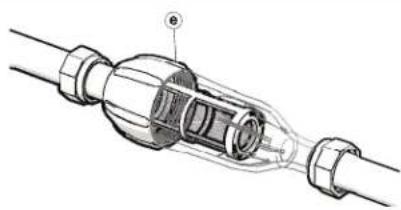
Flow direction
arrow ( )
toward
the cleaner
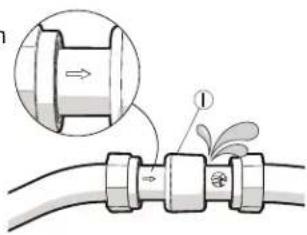
- Check the filter screen in the in-line filter assembly (e) for debris that restricts water flow.
- Clean the skimmer, filter, and pump basket, clearing debris that restricts water flow.
- Check the hoses and connections for leaks that cause loss of water pressure.
- Check hose swivels (I) for for excessive leaking or spraying. Verify flow direction arrow (=)is toward the cleaner.
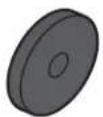
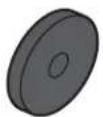
- Remove the blue restrictor disk (h) from the UWF (g).
> 32 RPM
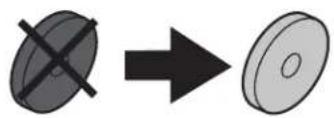
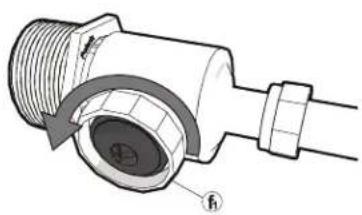
- Replace the blue restrictor disk with the red restrictor disk (h).
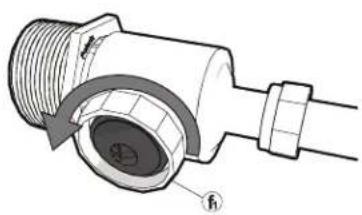
- Loosen the pressure relief valve (f 1 ) until proper RPM is reached.
NOTE: The Pressure Relief Valve should only be adjusted when a restrictor disk is installed.
8
Fine Tuning
When operating correctly, the Polaris ® cleaner vacuums, sweeps and scrubs all surfaces randomly throughout the pool. The climbing ability depends on the pool's shape and water pressure or flow. The cleaner climbs best in pools without sharp angles or curves in the transition from the pool floor to the pool wall. Fine tune your cleaner for optimal operation, as necessary.
Thrust Jet Position
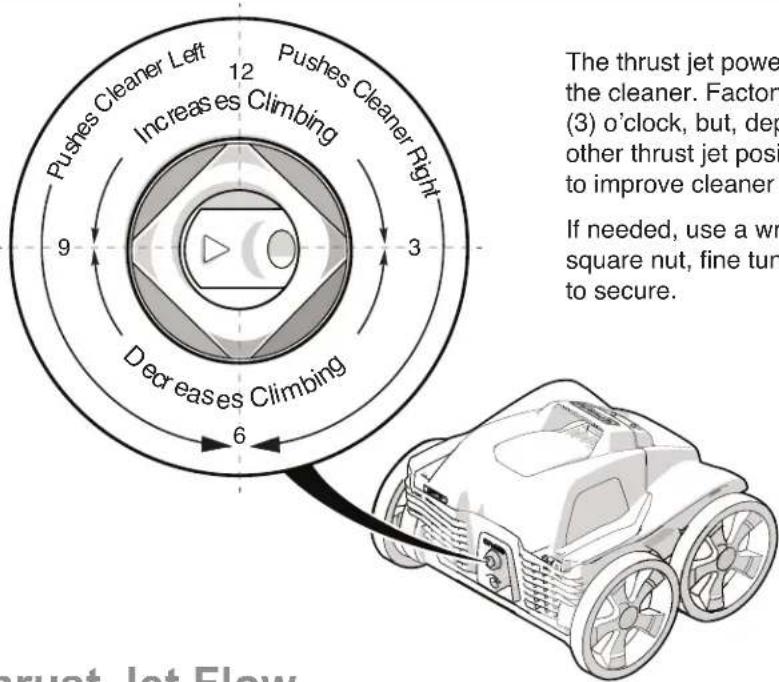
The thrust jet powers the direction of the cleaner. Factory position is three (3) o'clock, but, depending on the pool, other thrust jet positions can be helpful to improve cleaner coverage.
If needed, use a wrench to loosen the square nut, fine tune and then tighten to secure.
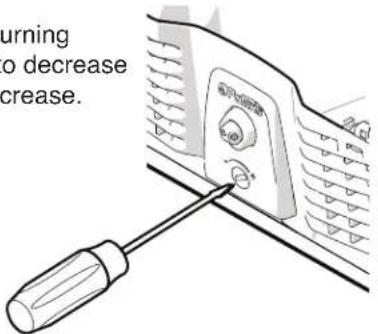
Thrust Jet Flow
Adjust the flow by turning counter-clockwise to decrease and clockwise to increase.
Cleaning Schedule
The cleaner's quick and efficient pool coverage may allow for a reduced cleaning schedule and runtime. The Polaris Quattro cleans most pools in one to two hours or less.
9
Maintenance
Perform routine maintenance to prolong the life of your cleaner.
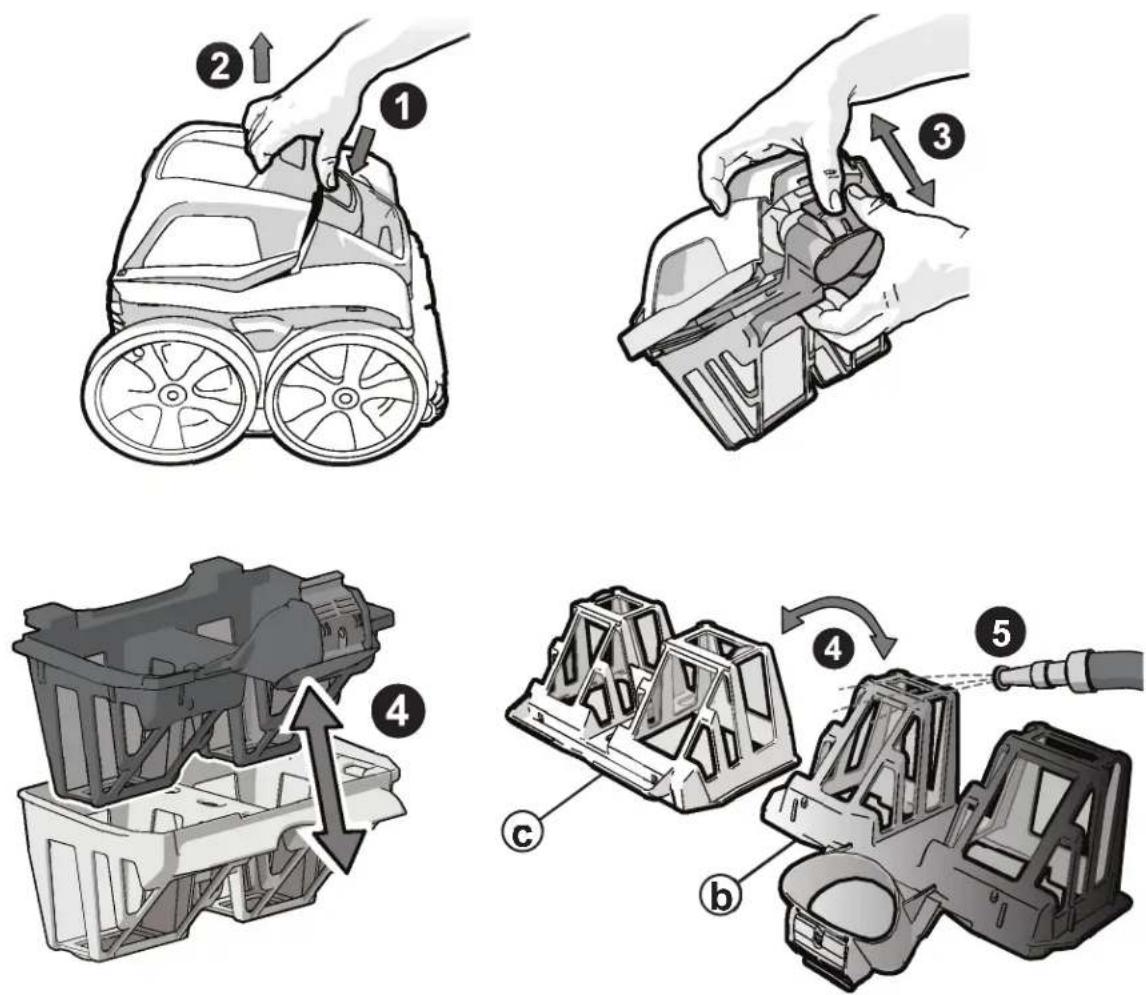
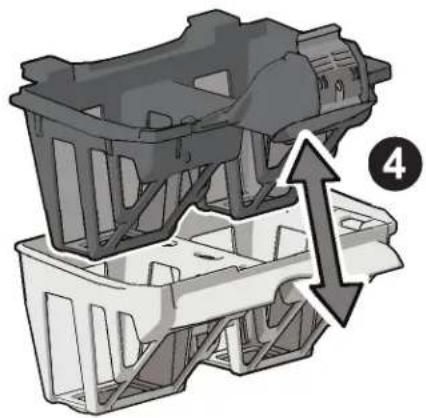
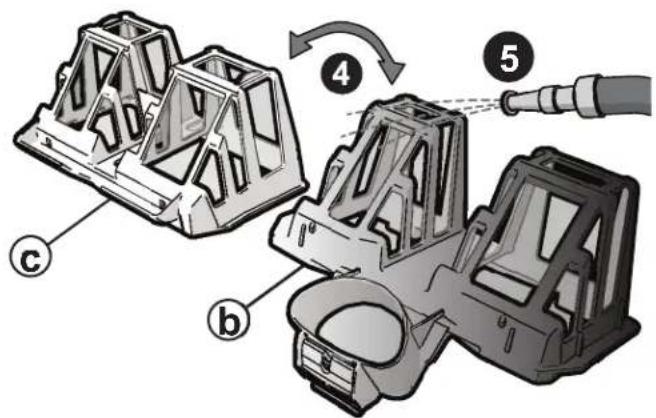
Clean the Filter Canister
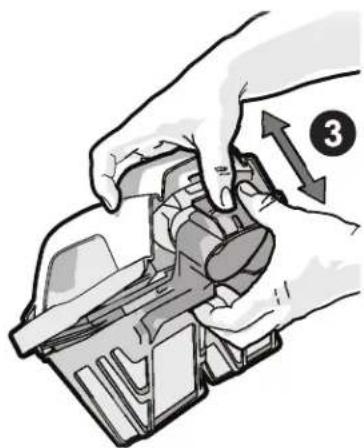
- Press the lid release latch.
- Lift the handle to remove the filter canister.
- Press the filter cover release to remove the filter canisters.
- Separate the fine debris canister (c) from the all-purpose canister (b).
- Empty debris and rinse the filter canisters with fresh water.
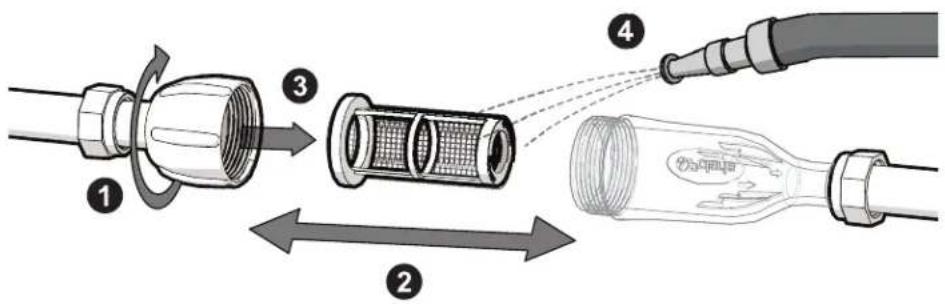
Clean the In-Line Filter Screen
- Turn off the booster pump.
- Loosen the in-line filter cap.
- Separate the in-line filter body from the filter cap.
- Remove the filter screen.
- Rinse with fresh water.
Storage/Winterizing
NOTE: Never store the cleaner in direct sunlight.
To store the cleaner for the winter:
- Remove cleaner from the pool and drain all water to avoid freezing water damage (freeze damage is not covered under the warranty).
- Remove the UWF from the pool wall using the Quick Disconnect. Use a pulling pressure as you unscrew.
If necessary, use the UWF Removal Tool (part #10-102-00) available from any Polaris® dealer.
Troubleshooting
| Problem Solution |
| Hose assemblybecomes tangled. | 1. Remeasure the hose to verify that it is adjusted to the proper length for the pool shape.2. With the cleaner operating, check that the hose swivels and the hose connections turn freely.3. Ensure the hose is floating and the hose floats are positioned properly. Position the first float (k) up against the feed hose connector (j) and then space hose floats 1-3 ft (30-90 cm) apart.4. Check the wheel RPM. Target wheel speed is 28-32 RPM. If wheel speed is not in target range, refer to Section 7 Adjust Wheel Speed.5. Straighten the hose assembly by laying it out flat in the sun. |
| Cleaner hangs up on steps or other obstacles for longer than 3 minutes. | 1. Check the wheel RPM. Target wheel speed is 28-32 RPM. If wheel speed is not in target range, refer to Section 7 Adjust Wheel Speed.2. Check for debris in the filter canister and clean, if necessary.3. Ensure the hose is floating and the hose floats are positioned properly. Position the first float (k) up against the feed hose connector (j) and then space hose floats 1-3 ft (30-90 cm) apart.4. Adjust the thrust jet. Refer to Section 8 Fine Tuning.5. Remove unnecessary pool hardware or install a Ladder Guard Kit (part # G21) from a Polaris® dealer.6. Install a Back-Up Valve accessory (part # G62, black or part # G52, white) from a Polaris dealer. Additional hose nuts and swivel may be required. Position the back-up valve and its adjacent hose float 6-8 ft (1.8 - 2.4m) away from the cleaner. |
| Thrust jet sprays too much water out of pool. | Check the thrust jet position and adjust thrust jet flow, if necessary. Refer to Section 8 Fine Tuning. |
| Cleaner does not clean the entire pool. | 1. Ensure the hose length is adjusted to the proper length for the pool shape. Refer to Section 3 Adjust Hose Length.2. Adjust the thrust jet to improve coverage. Refer to Section 8 Fine Tuning. |
| Cleaner is sluggish, running with less power than normal or not moving. | 1. Check the wheel RPM. Target wheel speed is 28-32 RPM. If wheel speed is not in target range, refer to Section 7 Adjust Wheel Speed.2. Check for debris in the filter canister and clean, if necessary.3. Check the filter screen and the in-line filter and clean, if necessary.4. Clean the skimmer basket, pump basket, and pool filter.5. Check all of the hoses, connections, and swivels for leaks that could cause loss of water pressure. |
| Cleaner does not climb walls. | 1. Check the wheel RPM. Target wheel speed is 28-32 RPM. If wheel speed is not in target range, refer to Section 7 Adjust Wheel Speed.2. Ensure the hose is floating and the hose floats are positioned properly. Position the first float (k) up against the feed hose connector (j) and then space hose floats 1-3 ft (30-90 cm) apart.3. Check for debris in the filter canister and clean, if necessary.4. Adjust the thrust jet. Refer to Section 8 Fine Tuning.5. For smooth surface pools (tile, fiberglass, etc.), replace both rear tires with PosiTrax® tires for more traction (available from a Polaris® dealer). |
| Smooth Surface Pools (tile, fiberglass, etc.) |
| Problem Solution |
| Not enough traction on smooth surface pools (tile, fiberglass, etc.). | Replace both rear tires with PosiTrax tires for more traction (available from a Polaris dealer). |

Zodiac Pool Systems LLC
2620 Commerce Way, Vista, CA 92081
1.800.822.7933 | polarispool.com
Zodiac Pool Care Europe
Boulevard de la Romanerie -BP 90023
49180 St. Barthelemy d'Anjou cedex FRANCE
zodiac.com
Zodiac Pool Systems Canada, Inc.
2-3365 Mainway, Burlington, ON L7M 1A6
1.800.822.7933 | ZodiacPoolSystems.ca
Zodiac Group Australia PTY, Ltd.
219 Woodpark Rd. Smithfield
NSW, 2164
1300 763 021 | Zodiac.com.au

Polaris® and the 3-wheeled cleaner design are registered trademarks of Zodiac Pool Systems LLC
All other trademarks referenced herein are the property of their respective owners.
Zodiac Pool Systems LLC
2620 Commerce Way, Vista, CA 92081
1.800.822.7933 | polarispool.com
Zodiac Pool Systems Canada, Inc.
2-3365 Mainway, Burlington, ON L7M 1A6
1.800.822.7933 | ZodiacPoolSystems.ca
Zodiac Pool Care Europe
Boulevard de la Romanerie -BP 90023
49180 St. Barthelemy d'Anjou cedex FRANCE
zodiac.com
Zodiac Group Australia PTY, Ltd.
219 Woodpark Rd. Smithfield
NSW, 2164
1300 763 021 | Zodiac.com.au

2 Installer le raccord mural universel
6
Stockage/hivernage
Zodiac Pool Systems LLC
2620 Commerce Way, Vista, CA 92081
1.800.822.7933 | polarispool.com
Zodiac Pool Care Europe
Boulevard de la Romanerie -BP 90023
49180 St. Barthelemy d'Anjou cedex FRANCE
zodiac.com.
Zodiac Pool Systems Canada, Inc.
2-3365 Mainway, Burlington, ON L7M 1A6
1.800.822.7933 | ZodiacPoolSystems.ca
Zodiac Group Australia PTY, Ltd.
219 Woodpark Rd. Smithfield
NSW, 2164
1300 763 021 | Zodiac.com.au

Polaris®
QUATTRO™
Zodiac Pool Systems LLC
2620 Commerce Way, Vista, CA 92081
1.800.822.7933 | polarispool.com
Zodiac Pool Systems Canada, Inc.
2-3365 Mainway, Burlington, ON L7M 1A6
1.800.822.7933 | ZodiacPoolSystems.ca
Zodiac Pool Care Europe
Boulevard de la Romanerie -BP 90023
49180 St. Barthelemy d'Anjou cedex FRANCIA
zodiac.com
Zodiac Group Australia PTY, Ltd.
219 Woodpark Rd. Smithfield
NSW, 2164
1300 763 021 | Zodiac.com.au

6
Zodiac Pool Systems LLC
2620 Commerce Way, Vista, CA 92081
1.800.822.7933 | polarispool.com
Zodiac Pool Care Europe
Boulevard de la Romanerie -BP 90023
49180 St. Barthelemy d'Anjou cedex FRANCIA
zodiac.com
Zodiac Pool Systems Canada, Inc.
2-3365 Mainway, Burlington, ON L7M 1A6
1.800.822.7933 | ZodiacPoolSystems.ca
Zodiac Group Australia PTY, Ltd.
219 Woodpark Rd. Smithfield
NSW, 2164
1300 763 021 | Zodiac.com.au