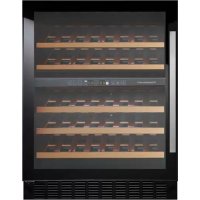
FWKU1800.0S - Wine cellar Küppersbusch - Free user manual and instructions
Find the device manual for free FWKU1800.0S Küppersbusch in PDF.


| Product type | Wine cellar |
| Brand | Küppersbusch |
| Model | FWKU1800.0S |
| Refrigerant | R600a (isobutane, flammable) |
| Voltage | 220-240 V / 50 Hz |
| Climate class | N (temperate, 16-32°C) |
| Temperature range | 5 to 20 °C |
| Compartments | 2 independent zones (upper and lower) |
| Interior lighting | LED (temporary or permanent mode) |
| UV filter | Yes (treated glass door) |
| Defrost | Automatic |
| Alarms | Temperature alarm and door alarm |
| Sabbath mode | Yes (deactivates display, light and audible alarms) |
| Eco demo mode | Yes (turns off compressor and fans for presentation) |
| Installation type | Freestanding or built-in |
| Cleaning and maintenance | Warm water and mild detergent; no abrasives or solvents |
| Spare parts availability | 10 years from market launch |
| After-sales service | Contact the dealer or Küppersbusch Hausgeräte GmbH |
| Installation | Wait 24 hours before first power-on |
Frequently Asked Questions - FWKU1800.0S Küppersbusch
User questions about FWKU1800.0S Küppersbusch
0 question about this device. Answer the ones you know or ask your own.
Ask a new question about this device
Download the instructions for your Wine cellar in PDF format for free! Find your manual FWKU1800.0S - Küppersbusch and take your electronic device back in hand. On this page are published all the documents necessary for the use of your device. FWKU1800.0S by Küppersbusch.
USER MANUAL FWKU1800.0S Küppersbusch
Please read the users and installation instructions carefully before installation of the appliance and before starting to use it.
| Küppersbusch | |
| Reference | FWKU1800.0S |
| Service ref | FWKU1800.0S/1 |
| S/N | |
| Factory ref | JG46 |
| Climate class | N |
| Net volume | 135L |
| Annual consumption | 157 kWh/an |
| Daily energy consumption at 16°C | 0,119 kWh/24h |
| Daily energy consumption at 32°C | 0,562 kWh/24h |
| Refrigerant | R600A/35g |
| Foaming agent | Cyclopentane |
| Voltage | 220-240V AC |
| Frequency | 50 Hz |
| Amperage | 1.2 A |
| Power input | 80W |
| Lamp power | Max 1 W |
| Class of protection against electric shock | I |
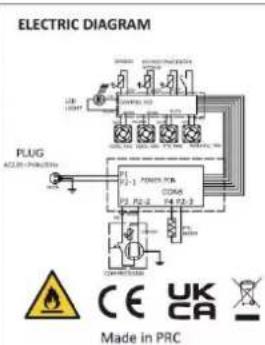
| ELECTRIC DIAGRAM | |
| PLUG KICKSCHAVERTE 2 CABLE 1. 1. 1000 V CABLE 2. 1000 V CABLE 3. 1000 V CABLE 4. 1000 V CABLE 5. 1000 V CABLE 6. 1000 V CABLE 7. 1000 V CABLE 8. 1000 V CABLE 9. 1000 V CABLE 10. 1000 V CABLE 11. 1000 V CABLE 12. 1000 V CABLE 13. 1000 V CABLE 14. 1000 V CABLE 15. 1000 V CABLE 16. 1000 V CABLE 17. 1000 V CABLE 18. 1000 V CABLE 19. 1000 V CABLE 20. 1000 V CABLE 21. 1000 V CABLE 22. 1000 V CABLE 23. 1000 V CABLE 24. 1000 V CABLE 25. 1000 V CABLE 26. 1000 V CABLE 27. 1000 V CABLE 28. 1000 V CABLE 29. 1000 V CABLE 30. 1000 V CABLE 31. 1000 V CABLE 32. 1000 V CABLE 33. 1000 V CABLE 34. 1000 V CABLE 35. 1000 V CABLE 36. 1000 V CABLE 37. 1000 V CABLE 38. 1000 V CABLE 39. 1000 V CABLE 40. 1000 V CABLE 41. 1000 V CABLE 42. 1000 V CABLE 43. 1000 V CABLE 44. 1000 V CABLE 45. 1000 V CABLE 46. 1000 V CABLE 47. 1000 V CABLE 48. 1000 V CABLE 49. 1000 V CABLE 50. 1000 V CABLE 51. 1000 V CABLE 52. 1000 V CABLE 53. 1000 V CABLE 54. 1000 V CABLE 55. 1000 V CABLE 56. 1000 V CABLE 57. 1000 V CABLE 58. 1000 V CABLE 59. 1000 V CABLE 60. 1000 V CABLE 61. 1000 V CABLE 62. 1000 V CABLE 63. 1000 V CABLE 64. 1000 V CABLE 65. 1000 V CABLE 66. 1000 V CABLE 67. 1000 V CABLE 68. 1000 V CABLE 69. 1000 V CABLE 70. 1000 V CABLE 71. 1000 V CABLE 72. 1000 V CABLE 73. 1000 V CABLE 74. 1000 V CABLE 75. 1000 V CABLE 76. 1000 V CABLE 77. 1000 V CABLE 78. 1000 V CABLE 79. 1000 V CABLE 80. 1000 V CABLE 81. 1000 V CABLE 82. 1000 V CABLE 83. 1000 V CABLE 84. 1000 V CABLE 85. 1000 V CABLE 86. 1000 V CABLE 87. 1000 V CABLE 88. 1000 V CABLE 89. 1000 V CABLE 90. 1000 V CABLE 91. 1000 V CABLE 92. 1000 V CABLE 93. 1000 V CABLE 94. 1000 V CABLE 95. 1000 V CABLE 96. 1000 V CABLE 97. 1000 V CABLE 98. 1000 V CABLE 99. 1000 V CABLE 100. 1000 V CABLE 101. 1000 V CABLE 102. 1000 V CABLE 103. 1000 V CABLE 104. 1000 V CABLE 105. 1000 V CABLE 106. 1000 V CABLE 107. 1000 V CABLE 108. 1000 V CABLE 109. 1000 V CABLE 110. 1000 V CABLE 111. 1000 V CABLE 112. 1000 V CABLE 113. 1000 V CABLE 114. 1000 V CABLE 115. 1000 V CABLE 116. 1000 V CABLE 117. 1000 V CABLE 118. 1000 V CABLE 119. 1000 V CABLE 120. 1000 V CABLE 121. 1000 V CABLE 122. 1000 V CABLE 123. 1000 V CABLE 124. 1000 V CABLE 125. 1000 V CABLE 126. 1000 V CABLE 127. 1000 V CABLE 128. 1000 V CABLE 129. 1000 V CABLE 130. 1000 V CABLE 131. 1000 V CABLE 132. 1000 V CABLE 133. 1000 V CABLE 134. 1000 V CABLE 135. 1000 V CABLE 136. 1000 V CABLE 137. 1000 V CABLE 138. 1000 V CABLE 139. 1000 V CABLE 140. 1000 V CABLE 141. 1000 V CABLE 142. 1000 V CABLE 143. 1000 V CABLE 144. 1000 V CABLE 145. 1000 V CABLE 146. 1000 V CABLE 147. 1000 V CABLE 148. 1000 V CABLE 149. 1000 V CABLE 150. 1000 V CABLE 151. 1000 V CABLE 152. 1000 V CABLE 153. 1000 V CABLE 154. 1000 V CABLE 155. 1000 V CABLE 156. 1000 V CABLE 157. 1000 V CABLE 158. 1000 V CABLE 159. 1000 V CABLE 160. 1000 V CABLE 161. 1000 V CABLE 162. 1000 V CABLE 163. 1000 V CABLE 164. 1000 V CABLE 165. 1000 V CABLE 166. 1000 V CABLE 167. 1000 V CABLE 168. 1000 V CABLE 169. 1000 V CABLE 170. 1000 V CABLE 171. 1000 V CABLE 172. 1000 V CABLE 173. 1000 V CABLE 174. 1000 V CABLE 175. 1000 V CABLE 176. 1000 V CABLE 177. 1000 V CABLE 178. 1000 V CABLE 179. 1000 V CABLE 180. 1000 V CABLE 181. 1000 V CABLE 182. 1000 V CABLE 183. 1000 V CABLE 184. 1000 V CABLE 185. 1000 V CABLE 186. 1000 V CABLE 187. 1000 V CABLE 188. 1000 V CABLE 189. 1000 V CABLE 190. 1000 V CABLE 191. 1000 V CABLE 192. 1000 V CABLE 193. 1000 V CABLE 194. 1000 V CABLE 195. 1000 V CABLE 196. 1000 V CABLE 197. 1000 V CABLE 198. 1000 V CABLE 199. 1000 V CABLE 200. 1000 V CABLE 201. 1000 V CABLE 202. 1000 V CABLE 203. 1000 V CABLE 204. 1000 V CABLE 205. 1000 V CABLE 206. 1000 V CABLE 207. 1000 V CABLE 208. 1000 V CABLE 209. 1000 V CABLE 210. 1000 V CABLE 211. 1000 V CABLE 212. 1000 V CABLE 213. 1000 V CABLE 214. 1000 V CABLE 215. 1000 V CABLE 216. 1000 V CABLE 217. 1000 V CABLE 218. 1000 V CABLE 219. 1000 V CABLE 220. 1000 V CABLE 221. 1000 V CABLE 222. 1000 V CABLE 223. 1000 V CABLE 224. 1000 V CABLE 225. 1000 V CABLE 226. 1000 V CABLE 227. 1000 V CABLE 228. 1000 V CABLE 229. 1000 V CABLE 230. 1000 V CABLE 231. 1000 V CABLE 232. 1000 V CABLE 233. 1000 V CABLE 234. 1000 V CABLE 235. 1000 V CABLE 236. 1000 V CABLE 237. 1000 V CABLE 238. 1000 V CABLE 239. 1000 V CABLE 240. 1000 V CABLE 241. 1000 V CABLE 242. 1000 V CABLE 243. 1000 V CABLE 244. 1000 V CABLE 245. 1000 V CABLE 246. 1000 V CABLE 247. 1000 V CABLE 248. 1000 V CABLE 249. 1000 V CABLE 250. 1000 V CABLE 251. 1000 V CABLE 252. 1000 V CABLE 253. 1000 V CABLE 254. 1000 V CABLE 255. 1000 V CABLE 256. 1000 V CABLE 257. 1000 V CABLE 258. 1000 V CABLE 259. 1000 V CABLE 260. 1000 V CABLE 261. 1000 V CABLE 262. 1000 V CABLE 263. 1000 V CABLE 264. 1000 V CABLE 265. 1000 V CABLE 266. 1000 V CABLE 267. 1000 V CABLE 268. 1000 V CABLE 269. 1000 V CABLE 270. 1000 V CABLE 271. 1000 V CABLE 272. 1000 V CABLE 273. 1000 V CABLE 274. 1000 V CABLE 275. 1000 V CABLE 276. 1000 V CABLE 277. 1000 V CABLE 278. 1000 V CABLE 279. 1000 V CABLE 280. 1000 V CABLE 281. 1000 V CABLE 282. 1000 V CABLE 283. 1000 V CABLE 284. 1000 V CABLE 285. 1000 V CABLE 286. 1000 V CABLE 287. 1000 V CABLE 288. 1000 V CABLE 289. 1000 V CABLE 290. 1000 V CABLE 291. 1000 V CABLE 292. 1000 V CABLE 293. 1000 V CABLE 294. 1000 V CABLE 295. 1000 V CABLE 296. 1000 V CABLE 297. 1000 V CABLE 298. 1000 V CABLE 299. 1000 V CABLE 300. 1000 V CABLE 301. 1000 V CABLE 302. 1000 V CABLE 303. 1000 V CABLE 304. 1000 V CABLE 305. 1000 V CABLE 306. 1000 V CABLE 307. 1000 V CABLE 308. 1000 V CABLE 309. 1000 V CABLE 310. 1000 V CABLE 311. 1000 V CABLE 312. 1000 V CABLE 313. 1000 V CABLE 314. 1000 V CABLE 315. 1000 V CABLE 316. 1000 V CABLE 317. 1000 V CABLE 318. 1000 V CABLE 319. 1000 V CABLE 320. 1000 V CABLE 321. 1000 V CABLE 322. 1000 V CABLE 323. 1000 V CABLE 324. 1000 V CABLE 325. 1000 V CABLE 326. 1000 V CABLE 327. 1000 V CABLE 328. 1000 V CABLE 329. 1000 V CABLE 330. 1000 V CABLE 331. 1000 V CABLE 332. 1000 V CABLE 333. 1000 V CABLE 334. 1000 V CABLE 335. 1000 V CABLE 336. 1000 V CABLE 337. 1000 V CABLE 338. 1000 V CABLE 339. 1000 V CABLE 340. 1000 V CABLE 341. 1000 V CABLE 342. 1000 V CABLE 343. 1000 V CABLE 344. 1000 V CABLE 345. 1000 V CABLE 346. 1000 V CABLE 347. 1000 V CABLE 348. 1000 V CABLE 349. 1000 V CABLE 350. 1000 V CABLE 351. 1000 V CABLE 352. 1000 V CABLE 353. 1000 V CABLE 354. 1000 V CABLE 355. 1000 V CABLE 356. 1000 V CABLE 357. 1000 V CABLE 358. 1000 V CABLE 359. 1000 V CABLE 360. 1000 V CABLE 361. 1000 V CABLE 362. 1000 V CABLE 363. 1000 V CABLE 364. 1000 V CABLE 365. 1000 V CABLE 366. 1000 V CABLE 367. 1000 V CABLE 368. 1000 V CABLE 369. 1000 V CABLE 370. 1000 V CABLE 371. 1000 V CABLE 372. 1000 V CABLE 373. 1000 V CABLE 374. 1000 V CABLE 375. 1000 V CABLE 376. 1000 V CABLE 377. 1000 V CABLE 378. 1000 V CABLE 379. 1000 V CABLE 380. 1000 V CABLE 381. 1000 V CABLE 382. 1000 V CABLE 383. 1000 V CABLE 384. 1000 V CABLE 385. 1000 V CABLE 386. 1000 V CABLE 387. 1000 V CABLE 388. 1000 V CABLE 389. 1000 V CABLE 390. 1000 V CABLE 391. 1000 V CABLE 392. 1000 V CABLE 393. 1000 V CABLE 394. 1000 V CABLE 395. 1000 V CABLE 396. 1000 V CABLE 397. 1000 V CABLE 398. 1000 V CABLE 399. 1000 V CABLE 400. 1000 V CABLE 401. 1000 V CABLE 402. 1000 V CABLE 403. 1000 V CABLE 404. 1000 V CABLE 405. 1000 V CABLE 406. 1000 V CABLE 407. 1000 V CABLE 408. 1000 V CABLE 409. 1000 V CABLE 410. 1000 V CABLE 411. 1000 V CABLE 412. 1000 V CABLE 413. 1000 V CABLE 414. 1000 V CABLE 415. 1000 V CABLE 416. 1000 V CABLE 417. 1000 V CABLE 418. 1000 V CABLE 419. 1000 V CABLE 420. 1000 V CABLE 421. 1000 V CABLE 422. 1000 V CABLE 423. 1000 V CABLE 424. 1000 V CABLE 425. 1000 V CABLE 426. 1000 V CABLE 427. 1000 V CABLE 428. 1000 V CABLE 429. 1000 V CABLE 430. 1000 V CABLE 431. 1000 V CABLE 432. 1000 V CABLE 433. 1000 V CABLE 434. 1000 V CABLE 435. 1000 V CABLE 436. 1000 V CABLE 437. 1000 V CABLE 438. 1000 V CABLE 439. 1000 V CABLE 440. 1000 V CABLE 441. 1000 V CABLE 442. 1000 V CABLE 443. 1000 V CABLE 444. 1000 V CABLE 445. 1000 V CABLE 446. 1000 V CABLE 447. 1000 V CABLE 448. 1000 V CABLE 449. 1000 V CABLE 450. 1000 V CABLE 451. 1000 V CABLE 452. 1000 V CABLE 453. 1000 V CABLE 454. 1000 V CABLE 455. 1000 V CABLE 456. 1000 V CABLE 457. 1000 V CABLE 458. 1000 V CABLE 459. 1000 V CABLE 460. 1000 V CABLE 461. 1000 V CABLE 462. 1000 V CABLE 463. 1000 V CABLE 464. 1000 V CABLE 465. 1000 V CABLE 466. 1000 V CABLE 467. 1000 V CABLE 468. 1000 V CABLE 469. 1000 V CABLE 470. 1000 V CABLE 471. 1000 V CABLE 472. 1000 V CABLE 473. 1000 V CABLE 474. 1000 V CABLE 475. 1000 V CABLE 476. 1000 V CABLE 477. 1000 V CABLE 478. 1000 V CABLE 479. 1000 V CABLE 480. 1000 V CABLE 481. 1000 V CABLE 482. 1000 V CABLE 483. 1000 V CABLE 484. 1000 V CABLE 485. 1000 V CABLE 486. 1000 V CABLE 487. 1000 V CABLE 488. 1000 V CABLE 489. 1000 V CABLE 490. 1000 V CABLE 491. 1000 V CABLE 492. 1000 V CABLE 493. 1000 V CABLE 494. 1000 V CABLE 495. 1000 V CABLE 496. 1000 V CABLE 497. 1000 V CABLE 498. 1000 V CABLE 499. 1000 V CABLE 500. 1000 V CABLE 501. 1000 V CABLE 502. 1000 V CABLE 503. 1000 V CABLE 504. 1000 V CABLE 505. 1000 V CABLE 506. 1000 V CABLE 507. 1000 V CABLE 508. 1000 V CABLE 509. 1000 V CABLE 510. 1000 V CABLE 511. 1000 V CABLE 512. 1000 V CABLE 513. 1000 V CABLE 514. 1000 V CABLE 515. 1000 V CABLE 516. 1000 V CABLE 517. 1000 V CABLE 518. 1000 V CABLE 519. 1000 V CABLE 520. 1000 V CABLE 521. 1000 V CABLE 522. 1000 V CABLE 523. 1000 V CABLE 524. 1000 V CABLE 525. 1000 V CABLE 526. 1000 V CABLE 527. 1000 V CABLE 528. 1000 V CABLE 529. 1000 V CABLE 530. 1000 V CABLE 531. 1000 V CABLE 532. 1000 V CABLE 533. 1000 V CABLE 534. 1000 V CABLE 535. 1000 V CABLE 536. 1000 V CABLE 537. 1000 V CABLE 538. 1000 V CABLE 539. 1000 V CABLE 540. 1000 V CABLE 541. 1000 V CABLE 542. 1000 V CABLE 543. 1000 V CABLE 544. 1000 V CABLE 545. 1000 V CABLE 546. 1000 V CABLE 547. 1000 V CABLE 548. 1000 V CABLE 549. 1000 V CABLE 550. 1000 V CABLE 551. 1000 V CABLE 552. 1000 V CABLE 553. 1000 V CABLE 554. 1000 V CABLE 555. 1000 V CABLE 556. 1000 V CABLE 557. 1000 V CABLE 558. 1000 V CABLE 559. 1000 V CABLE 560. 1000 V CABLE 561. 1000 V CABLE 562. 1000 V CABLE 563. 1000 V CABLE 564. 1000 V CABLE 565. 1000 V CABLE 566. 1000 V CABLE 567. 1000 V CABLE 568. 1000 V CABLE 569. 1000 V CABLE 570. 1000 V CABLE 571. 1000 V CABLE 572. 1000 V CABLE 573. 1000 V CABLE 574. 1000 V CABLE 575. 1000 V CABLE 576. 1000 V CABLE 577. 1000 V CABLE 578. 1000 V CABLE 579. 1000 V CABLE 580. 1000 V CABLE 581. 1000 V CABLE 582. 1000 V CABLE 583. 1000 V CABLE 584. 1000 V CABLE 585. 1000 V CABLE 586. 1000 V CABLE 587. 1000 V CABLE 588. 1000 V CABLE 589. 1000 V CABLE 590. 1000 V CABLE 591. 1000 V CABLE 592. 1000 V CABLE 593. 1000 V CABLE 594. 1000 V CABLE 595. 1000 V CABLE 596. 1000 V CABLE 597. 1000 V CABLE 598. 1000 V CABLE 599. 1000 V CABLE 600. 1000 V CABLE 601. 1000 V CABLE 602. 1000 V CABLE 603. 1000 V CABLE 604. 1000 V CABLE 605. 1000 V CABLE 606. 1000 V CABLE 607. 1000 V CABLE 608. 1000 V CABLE 609. 1000 V CABLE 61O. 1000 V CABLE 61I. 1000 V CABLE 62I. 1000 V CABLE 62II. 1000 V CABLE 62III. 1000 V CABLE 62IV. 1000 V CABLE 62V. 1000 V CABLE 63I. 158 M-25 M-26 M-27 M-28 M-29 M-32 M-33 M-34 M-35 M-36 M-37 M-38 M-39 M-42 M-43 M-44 M-45 M-46 M-47 M-48 M-49 M-52 M-53 M-54 M-55 M-56 M-57 M-58 M-59 M-62 M-63 M-64 M-65 M-66 M-67 M-68 M-69 M-72 M-73 M-74 M-75 M-76 M-77 M-78 M-79 M-82 M-83 M-84 M-85 M-86 M-87 M-88 M-89 M-92 M-93 M-94 M-95 M-96 M-97 M-98 M-99 M-99A M-99B M-99 C M-99D M-99E M-99F M-99G M-99H M-99I M-99J M-99K M-99L M-99M M-99N M-99O M-99P M-99Q M-99R M-99S M-99T M-99U M-99V M-99W M-99X M-99Y M-99Z M-99A M-99B M-99C M-99D M-99E M-99F M-99G M-99H M-99I M-99J M-99K M-99L M-99M M-99N M-99O M-99P M-99Q M-99R M-99S M-99T M-99U M-99V M-99V W-22 A-22 B-22 C-22 D-22 E-22 F-22 G-22 H-22 I-22 J-22 K-22 L-22 M-22 N-22 O-22 P-22 Q-22 R-22 S-22 T-22 U-22 W-22 Y-22 Z-22 W-22 X-22 Y-22 Z-22 W-22 Y-22 Z-22 W-22 Y-22 Z-22 W-22 Y-22 Z-22 W-22 Y-22 Z-22 W-22 Y-22 Z-22 W-22 Y-22 Z-22 W-22 Y-22 Z-22 W-22 Y-22 Z-22 W-22 Z-22 W-22 Y-22 Z-22 W-22 Y-22 Z-22 W-22 Y-22 Z-22 W-22 Y-22 Z-22 W-22 Y-22 Z-22 W-22 Y-22 Z-22 W-22 Y-22 Z-22 W-22 Y-22Z Y-22 Z-22 Y-22 Z-22 Y-22 Z-22 Y-22 Z-22 Y-22 Z-22 Y-22 Z-22 Y-22 Z-22 Y-22 Z-22 Y-22 Z-22 Y-22 Z-22 Y-22 Z-22 Y-22 Z-22 Y-22 Z-22 Y-28 A-28 B-28 C-28 D-28 E-28 F-28 G-28 H-28 I-28 J-28 K-28 L-28 M-28 N-28 O-28 P-28 Q-28 R-28 S-28 T-28 U-28 V-28 W-28 Y-28 Z-28 W-28 Y-28 Z-28 W-28 Y-28 Z-28 W-28 Y-28 Z-28 W-28 Y-28 Z-28 W-28 Y-28 Z-28 W-28 Y-28 Z-28 W-28 Y-28 Z-28 W-28 Y-28 Z-28 Y-28 Z-28 Y-28 Z-28 Y-28 Z-28 Y-28 Z-28 Y-28 Z-28 Y-28 Z-28 Y-28 Z-28 Y-28 Z-28 Y-28 Z-28 Y-28 Z-28 Y-28 Z-28 Y-28 Z-28 Z-28 Y-28 Z-28 Y-28 Z-28 Y-28 Z-28 Y-28 Z-28 Y-28 Z-28 Y-28 Z-28 Y-28 Z-28 Y-28 Z-28 Y-28 Z-28 Y-28 Z-28 Y-28 Z-28 Y-28 Y-28 Z-28 Y-28 Z-28 Y-28 Z-28 Y-28 Z-28 Y-28 Z-28 Y-28 Z-28 Y-28 Z-28 Y-28 Z-28 Y-28 Z-28 Y-28 Z-28 Y-28 Z-28 Y-28 Z-28Y-28 Z-28 Y-28 Z-28 Y-28 Z-28 Y-28 Z-28 Y-28 Z-28 Y-28 Z-28 Y-28 Z-28 Y-28 Z-28 Y-28 Z-28 Y-28 Z-28 Y-28 Z-28 Y-28 Z-28 Y-28Z-28 Y-28 Z-28 Y-28 Z-28 Y-28 Z-28 Y-28 Z-28 Y-28 Z-28 Y-28 Z-28 Y-28 Z-28 Y-28 Z-28 Y-28 Z-28 Y-28 Z-28 Y-28 Z-28 Y-28 Z-28.Y-28 Z-28 Y-28 Z-28 Y-28 Z-28 Y-28 Z-28 Y-28 Z-28 Y-28 Z-28 Y-28 Z-28 Y-28 Z-28 Y-28 Z-28 Y-28 Z-28 Y-28 Z-28 Y-28 Z-28 Y-28.Z-28 Y-28 Z-28 Y-28 Z-28 Y-28 Z-28 Y-28 Z-28 Y-28 Z-28 Y-28 Z-28 Y-28 Z-28 Y-28 Z-28 Y-28 Z-28 Y-28 Z-28 Y-28 Z-28 Y-28 Z-28 | |
directement accesses.
| Küppersbusch | |
| Reference | FWKU1800.05 |
| Service ref | FWKU1800.05/1 |
| S/N | |
| Factory ref | JG46 |
| Climate class | N |
| Net volume | 135L |
| Annual consumption | 157 kWh/an |
| Daily energy consumption at 16°C | 0,119 kWh/24h |
| Daily energy consumption at 32°C | 0,562 kWh/24h |
| Refrigerant | R600A/35g |
| Foaming agent | Cyclopentane |
| Voltage | 220-240V AC |
| Frequency | 50 Hz |
| Amperage | 1.2 A |
| Power input | 80W |
| Lamp power | Max 1 W |
| Class of protection against electric schock | T |
11. PROBLEM ET CAUSE POSSIBLE
Before use, please read and follow the safety rules and operating instructions in this manual.
Firstly, we would like to thank you for purchasing an KUPPERSBUSCH product and hope that this appliance fully lives up to your expectations.
This appliance enables you to bring your bottles at room temperature or bring them to service temperature (depending on the bottles) thanks to its wide adjustment range.
1. GENERAL SAFETY INSTRUCTIONS
Before you use your appliance for the first time, please read this user manual carefully. Store it carefully so that you can refer to it in the future, if necessary. To reduce the risk of fire, electrical shock, or injury when using your appliance, follow these basic precautions.
Generally speaking, your appliance must be maintained by a qualified professional.
For your safety and correct usage, before installing and first using the appliance, read this user manual carefully, including its hints and warnings. To avoid unnecessary mistakes and accidents or to avoid damage to the appliance, it is important to make sure that all people using the appliance are thoroughly familiar with its operation and safety features. Save these instructions and be sure that they remain with the appliance if it is moved or sold, so that anyone using it throughout its life will be properly informed on its usage and safety notices. This will ensure optimum operation of the appliance.
For the safety of life and property and to avoid any risk of injury, keep the precautions of these user's instructions as the manufacturer is not responsible for damages caused by omission.
This appliance is intended exclusively for domestic use and is intended for the storage of special drink products at a storage temperature higher than that of a storage compartment for fresh products. Under no circumstances is it intended to keep food products fresh.
Make sure that your electrical installation's voltage corresponds to that on the appliance's nameplate; the appliance must be connected to an
approved, earthed system. Incorrect repairs or connections can cause safety hazards. Have your electrical installation checked by a professional, if you are in any doubt.
This unit must be correctly connected to an earthed socket for your protection. Do not cut off or remove the earth wire on the mains cable supplied.
For safety reasons, do not use an electrical extension cable.
If your appliance is damaged (e.g. a major impact) or suffers harm (power surge due to lightning, flood, fire), it may be dangerous to use. Disconnect the mains plug and have the appliance checked by an approved professional repairer.
To prevent any danger, do not replace a damaged mains cable yourself. Contact your retailer, an approved service center or professional repairer.
This appliance must be positioned such that the mains socket is accessible. Do not move the appliance once it is full: you might distort its body beyond repair. The electrical parts must not be directly accessible.
Keep children away from the appliance
√ Do not use this appliance outdoors
In the event that liquid is accidentally spilled (broken bottle, etc.) on electrical components (motor, etc.), disconnect the mains plug immediately.
To prevent any risk of fire, electrocution or injury, do not immerse the mains cable, plug or the appliance itself in water or any other liquid. Do not handle the appliance with wet hands.
Keep the appliance away from any source of heat and out of direct sunlight.
Do not allow the mains cable to hang from a table or be in contact with sharp edges or hot surfaces.
Do not pull on the mains cable - take hold of the plug to disconnect the appliance.
Ensure that the area where your appliance is positioned can support its weight when loaded (a 75 cl bottle weighs approximately 1.3kg ). Your cellar must be placed on a flat surface. If you have to position it on a rug or carpet, place a support underneath.
To prevent damaging the door gasket, make sure the door is fully open when pulling shelves out of the rail compartment.
Safety of children and other vulnerable persons
-
This appliance can be used by children aged from 8 years and above, and by persons with reduced physical, sensory or mental capabilities or lack of experience and knowledge if they have been given supervision or instruction concerning use of the appliance in a safe way and understand the hazards involved.
-
User cleaning and servicing operations should not be carried out by children, unless they are more than 8 years old and are supervised.
-
Keep all packaging away from children as there is risk of suffocation.
-
Risk of child entrapment. Child entrapment and suffocation are not problems of the past. Junked or abandoned appliances are still dangerous, even if they will "just sit in the garage a few days".
-
If you are discarding the appliance, pull the plug out of the socket, cut the connection cable (as close to the appliance as you can) and remove the door to prevent children playing from suffering an electric shock or from closing themselves inside it.
-
If this appliance, featuring a magnetic door seals, is to replace an older appliance having a spring lock (latch) on the door or lid, be sure to make the
spring lock unusable before you discard the old appliance. This will prevent it from becoming a death trap for a child.
- Keep the appliance and its power cable out of reach of children less than 8 years old.
- Before you throw away your old wine cooler: take off the door. Leave the shelves in place so that children may not easily climb inside.
- Children should be supervised to ensure they do not play with the appliance.
- Note: Children aged from 3 to 8 years are allowed to load and unload the appliance.
General safety
WARNING — This appliance is intended to be used in household and similar applications such as:
✓ Staff kitchen areas in shops, offices and other working environments,
✓ Farm houses and by clients in hotels, motels and other residential type environments,
Bed and breakfast type environments,
Catering and similar non-retail applications.
WARNING — To avoid a hazard due to instability of the appliance, it must be fixed in accordance with the instructions.
WARNING — Do not store explosive substances such as aerosol cans with a flammable propellant in this appliance, as they could leak or release fluids.
WARNING — If the supply cord is damaged, it must be replaced by the manufacturer, its service agent or similarly qualified persons in order to avoid a hazard.
WARNING — Keep ventilation openings, in the appliance enclosure or in the built-in structure, clear of obstruction and ensure that air can circulate, especially if the appliance is dedicated for a built-under or built-in installation.
WARNING — Do not use mechanical devices or other means to accelerate the defrosting process, other than those recommended by the manufacturer.
WARNING — Do not damage the refrigerant circuit.
WARNING — Do not use electrical appliances inside the storage compartments of the appliance, unless they are of the type recommended by the manufacturer.
WARNING — The refrigerant and insulation blowing gas are flammable. When disposing of the appliance, do so only at an authorized waste disposal center. Do not expose to flame.
WARNING — The refrigerant of these appliances is R600a, flammable and explosive articles should not be put in or near the cabinet, to avoid the fire or explode caused.
Refrigerating fluid
The refrigerating circuit in the appliance uses refrigerating isobutene (R600a), which is a highly inflammable natural gas and is therefore dangerous for the environment. When transporting or installing the appliance, ensure that no element of the refrigerating circuit is damaged. The refrigerating fluid (R600a) is inflammable.
Caution: risk of fire
If the refrigerant circuit should be damaged:
Avoid opening flames and sources of ignition.
Thoroughly ventilate the room in which the appliance is situated.
It is dangerous to alter the specifications or modify this product in any way. Any damage to the cord may cause a short circuit, fire, and/or electric shock.
Electrical safety
- We decline any liability in respect of incidents caused by poor electrical installation.
- The power cord must not be lengthened. Do not use an extension cable, or adapter, or multi-way socket.
- Make sure that the power plug is not crushed or damaged. A crushed or damaged power plug may overheat and cause a fire.
- Make sure that you can access the main plug of the appliance.
- Do not pull the main cable.
- Ensure that the appliance is always electrically earthed.
- If the power plug socket is loose, do not insert the power plug. There is a risk of electric shock or fire.
- You must not operate the appliance without the interior lighting lamp cover.
- The cellar is only applied with power supply of single phase alternating current of 220 240V / 50Hz .
- Do not attempt to replace a damaged power cable, contact your after-sales service.
- The power socket must be easily accessible but out of reach of children. In case of doubt, contact your installation technician.
Daily use
- This appliance is intended to be used exclusively for the storage of wine.
- Do not store flammable gas or liquids in the appliance. There is a risk of an explosion.
- Do not operate any electrical appliances in the appliance (electric ice cream makers, mixers etc.).
- When unplugging always pull the plug from the mains socket and do not pull on the cable.
- Do not place hot items near the plastic components of this appliance.
- The appliance manufactures storage recommendations should be strictly
adhered to. Refer to relevant instructions for storage.
- Keep burning candles lamps and other items with naked flames away from the appliance so that do not set the appliance on fire.
- The appliance is intended for keeping beverages in normal household as explained in this instruction booklet.
- The appliance is heavy. Care should be taken when moving it. If your appliance is equipped with castors, remember that these are only designed to facilitate minor movements. Do not move the appliance over long distances.
- Never use the base, drawers, doors etc. to stand on or as supports.
- To avoid items falling and causing injury or damage to the appliance, do not overload the door racks or put food into the appliance.
Caution: cleaning and servicing
- Before carrying out servicing, switch off the power supply and disconnect the appliance.
- When cleaning the appliance, do not use metal objects, steam systems, volatile fluids, organic solvents or abrasive substances.
- Never clean appliance parts with flammable fluids. The fumes can create a fire hazard or explosion.
- Do not use sharp or pointed objects to remove ice. Use a plastic scraper.
Important information concerning installation
- It is intended to be used exclusively for the storage of wine.
- This refrigerating appliance is not suitable for the freezing foodstuffs.
- The wine cooler is recommended to be designed at 12^ C .
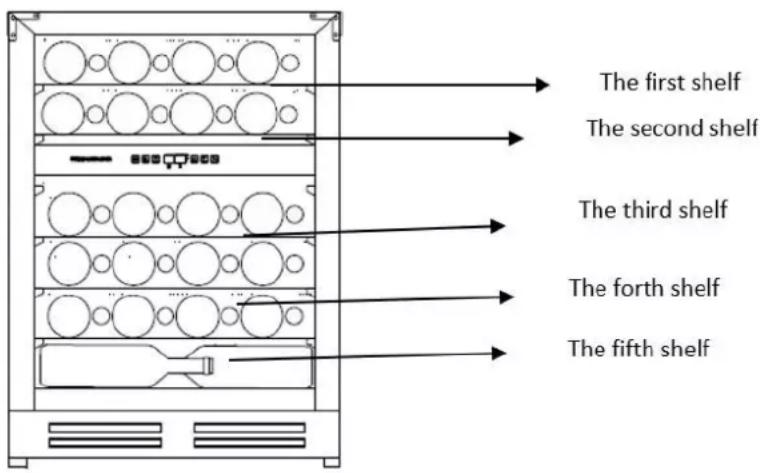
- The shelves placed in factory mode is the most efficient use of energy for the refrigerating appliances.
- Avoid locating the unit in moist areas.
- Keep the appliance away from direct sunlight and sources of heat (stove,
heater, radiator, etc.). Direct sunlight may affect the acrylic coating and heat sources may increase electrical consumption. Extreme cold or hot ambient temperatures may also cause the appliances not to perform properly.
- Plug the wine cooler into an exclusive, properly installed-grounded wall outlet. Do not under any circumstances cut or remove the third (ground) prong from the power cord. Any questions concerning power and/or grounding should be directed toward a certified electrician or an authorized products service center.
- To ensure proper electrical connection, follow the recommendations given in the present manual.
- Unpack the appliance and visually check that it is not damaged. Do not connect a damaged appliance. Inform your retailer or point of sale of any damage. In such a case, keep the packaging.
- It is recommended that the appliance be allowed to settle for at least 24 hours before connecting the electrical power supply, so that the compressor fluid feed is correct.
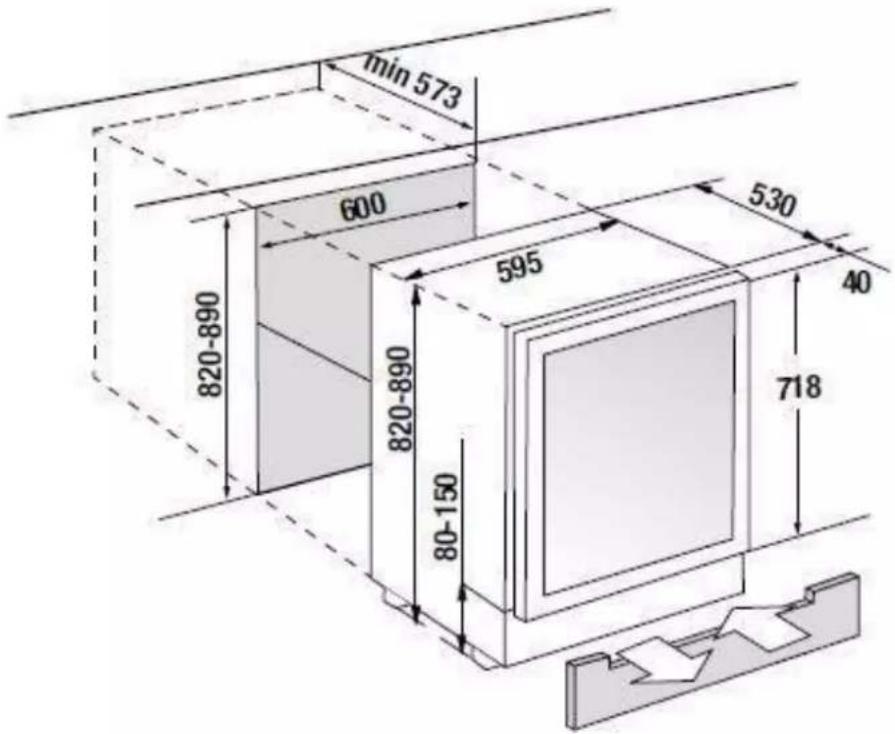
- Proper air circulation is necessary to avoid overheating. To ensure sufficient ventilation, observe the installation recommendations provided.
- In order to avoid fire risk, wherever possible, ensure that the appliance is not in contact with walls or with any hot element (compressor, condenser). Observe the installation recommendations.
- The appliance should not be placed close to radiators or cooking hot plates or gas rings.
- Check that electrical sockets remain accessible when the appliance is installed.
- When positioning the appliance, ensure the supply cord is not trapped or damaged.
Power saving
To limit the electricity consumption of your appliance:
Install it in an appropriate place (see "Installation instructions").
Leave the doors open as little time as possible.
To ensure that the appliance operates properly, clean the condenser regularly (see "Maintenance").
Regularly inspect the door seals and ensure that they are still closing properly. If this is not the case, contact your after-sales service.
✓ The following combination of shelves is recommended for energy to be used as efficiently as possible by the refrigeration unit. There are four shelves and one display shelf in total.
- The appliance's thermostat is electronic and allows you to set the temperature between 5 and 20 degrees.
For wine storage, it is recommended that you set your appliance to 12 degrees.
This temperature can be adapted according to the type of wine stored.
Setting the temperature above 12 degrees will reduce the energy consumption of the appliance.
Setting the temperature below 12 degrees will increase the energy consumption of the appliance. Some models allow you to set different temperature levels in the same cellar. The appliance ensures that the temperature is maintained as long as it is in operation and used under normal conditions.
The temperature inside the appliance can be influenced by many factors: room temperature, exposure to the sun, number of door openings and the
number of bottles stored... Slight changes in temperature are perfectly normal.
Trouble shooting
- Any electrical work should be carried out by a qualified and skilled technician.
- The appliance should be repaired by an accredited repair centre, using only manufacturer's original spare parts.
The appliance is designed for home use only. The manufacturer declines any liability whatsoever in the case of other use.
R600a
Safety instructions
- Caution — Do not obstruct the ventilation grills on the appliance. Keep ventilation openings in the appliance enclosure or in the structure for building-in clear of obstruction.
- Caution — Do not store explosive substances, such as aerosol cans containing an inflammable propellant, in the appliance.
- Caution — Do not damage the refrigerating circuit in the appliance.
- Caution — The refrigerating units use isobutane (R600a), and should not be placed close to ignition sources (for example, electrical contacts that are exposed or open contacts that could be closed by the refrigerating fluid in the event of a leak). The refrigerating fluid type is specified on the power cabinet identification plate.
- Caution — Do not use electrical equipment in the compartments of the appliance, unless they are of the type recommended by the manufacturer.
This appliance meets the requirements of all applicable European directives and their amendments.

UK CA
C E
EPREL
To find out more about your product, consult the online EPREL database. As defined in Commission Delegated Regulation (EU) 2019/2016, all information relating to this refrigeration appliance is available on the EPREL Base (European Product Database for energy labeling). This database enables you to consult the information and technical documentation of your refrigeration appliance. You can access the EPREL Database by scanning the QR code on the energy label of your appliance or by going directly to: www.ec.europa.eu and searching the reference of your refrigeration appliance.
2. TECHNICAL DATA
Below is an example of the nameplate:
| Küppersbusch | |
| Reference | FWKU1800.08 |
| Service ref | FWKU1800.09/1 |
| S/N | |
| Factory ref | JG46 |
| Climate class | N |
| Net volume | 135L |
| Annual consumption | 157 kWh/an |
| Daily energy consumption at 16℃ | 0,119 kWh/24h |
| Daily energy consumption at 32℃ | 0,562 kWh/24h |
| Refrigerant | R600A/35g |
| Foaming agent | Cyclopentane |
| Voltage | 220-240V AC |
| Frequency | 50 Hz |
| Amperage | 1.2 A |
| Power input | 80W |
| Lamp power | Max 1 W |
| Class of protection against electric school | X |
The nameplate attached to the inside or rear of the appliance (depending on the model) includes the entire information specific to your appliance.
We recommend that you make a note of its serial number in this booklet prior to installation, so that you can refer to it later (technical work, request for assistance, etc.).
Once the appliance is installed and loaded, access to it is not so easy.
CAUTION: no assistance can be provided without this information.
3. INSTALLATION INSTRUCTIONS
Before using this appliance
- Remove the exterior and interior packing.
- Before connecting the appliance to the power source, let it stand upright for approximately 24 hours. This will reduce the possibility of a malfunction in the cooling system from handling during transportation.
- Clean the interior surface with lukewarm water using a soft cloth.
- When disposing your appliance, please choose an authorized disposal site.
- Use two or more suitably qualified people to move and install the appliance. Failure to do so can result in back or other injury.
- Place your wine cooler on a position that is strong enough to support it when it is fully loaded. To level your wine cooler, adjust the front leveling leg at the bottom of the wine cooler.
- Adequate ventilation is required, do not block the front air outlet.
- Not designed for placement in adage or basement.
The appliance is for indoor use only. - This wine cellar is designed for free-standing or built-under installation.
- Connect the cellar to a single socket and be careful to support it, so that your wine cellar is perfectly level (use of a spirit level is recommended). This will prevent any movement due to instability, causing noise and vibration, and will ensure that the door seals perfectly.
- This appliance is intended to be used exclusively for the storage of wine.
- This appliance is using flammability refrigerant. So never damage the cooling pipe work during the transportation.
Attention
- Store wine in sealed bottles.
- Do not overload the cabinet.
- Do not open the door unless necessary.
- Do not cover shelves with aluminum foil or any other shelf material which may prevent air circulation.
- Should the wine cooler be left empty for long periods it is suggested that the appliance is unplugged, and after careful cleaning, leave the door ajar to allow air to circulate inside the cabinet in order to avoid possible condensation, mold or odors forming.
CAUTION: please keep the appliance away from substance, which can cause ignition.
Ambient room temperature limits
This appliance is designed to operate in ambient temperatures specified by its temperature class marked on the rating plate.
| CLASS | SYMBOL | AMBIENT TEMPERATURES RANGE (°C) |
| Extended temperate | SN | From +10 to +32 |
| Temperate | N | From +16 to +32 |
| Subtropical | ST | From +16 to +38 |
| Tropical | T | From +16 to +43 |
This refrigerating appliance is intended to be used at ambient temperatures ranging from 16^ to 32^
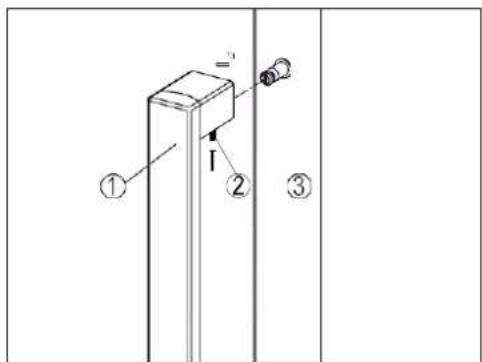
Mounting the handle
IMPORTANT: do not overtighten the screws
Locate the handle (1) over the pins (3) of the door and tighten the handle by screwing the allen key grab screws (2).
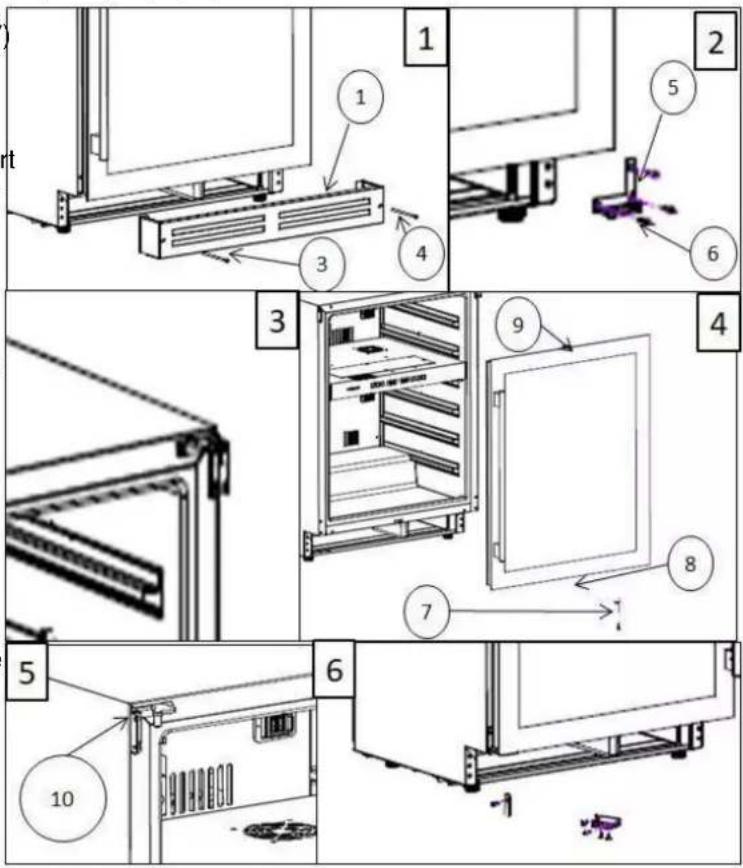
- Remove the ventilation grille (1) by unscrewing the screws (3) & (4). (Fig. 1)
- Remove the bottom hinge (5) by unscrewing the four lock screws (6). Be careful to hold the glass door firmly after removing the screws. (Fig. 2)
- Gently pull down to remove the glass door from the right top hinge and place it on a padded surface to avoid the risk of damage. Then remove the right top hinge. (Fig.3)
- Unscrew and transfer the hinge pin (7) and/or the door stopper of the bottom hinge to the opposite side. (Fig. 4)
- Remove the cap from position 9. Insert the light switch supplied, and tighten the screw to fix the light switch.
Remove the light switch from location 8 and place the cap to cover the hole.
6. Pop out the cover caps on the left side of the cabinet and use them to cover the screw holes on the right hand side.
7. Screw the alternative left top hinge (10), included in the fittings, on the left hand side of the cabinet. (Fig. 5)
8. Rotate the door at 180^ and relocate the door to the designated position. Then screw the bottom hinge assembly on the left designated position (Fig.6) and tighten it after the door is leveled.
9. Reassembly the ventilation grille.
4. OPERATING INSTRUCTIONS
It is recommended that you installed your appliance in a place where the ambient temperature is between 16 - 32^ . If the ambient temperature is above or below recommended temperatures, the performance of the unit may be affected and it may not be possible to obtain temperature between 5 - 20^ / 5 - 20^ .
Temperature setting

| A | ON/OFF switch, turn on by pressing once, turn off by pressing and holding 5 seconds. |
| B | Decrease temperature of 1 degree Celsius or Fahrenheit. |
| C | Raise temperature of 1 degree Celsius or Fahrenheit. |
| D | Display shows upper zone temperature at its setting. 5 seconds later it will automatically turn to actual temperature inside the wine cellar till reaching setting one. |
| E | Temperature display in Celsius. |
| F | Temperature display in Fahrenheit. |
| G | Display shows lower zone temperature at its setting. 5 seconds later it will automatically turn to actual temperature inside the wine cellar till reaching setting one. |
| H | Setting temperature checking switch. Touch key H once, display switch to setting temperature with one zone flashing and the other one no flashing. touch it again to switch the flashing. Only flashing zone could be adjusted by raise or decrease key. 5 seconds later without operation display automatically turn to inner cabinet actual temperature till it reaches the setting one. |
| I | Alarm cancel switch, press once to cancel the alarm. Press and hold 5 seconds to change Celsius or Fahrenheit. |
| J | Light ON/OFF switch, turn on and turn off the light. |
Temperature selection
The wine cooler has two temperature zones. The temperature setting of upper zone is adjustable with the range 5 - 20^ , which is ideal for storing sparkling and white wines. The temperature setting of lower zone is adjustable with the range 5 - 20^ , which is ideal for storing white and red wines.
NOTE: both two zones temperature could be set at 12^ , and it is workable at the same time. But for optimal performance, once one zone is set at 12^ , we suggest another setting for the other zone with 3^ difference at minimum (example: 5^ upper and 8^ lower). Maximum temperature difference between both compartments is 10^ . Always set cooler temperature in the upper compartment and warmer temperature in the lower compartment (example: 5^ upper and 15^ lower).
- To select the temperature zone, press (H) once, upper zone will flash, (H) key pressing again to switch it to lower zone. Setting temperature could only be set under display flash status.
- You can touch key "+" (C) and key "-" (B) to set the internal temperature for the selected zone. The
degrees indicators will appear in the display window marked for upper zone and for lower zone.
- When the unit is plugged in for the first time, the LED readouts will show the original temperature set previously. Touch the "+" (C) and "-" (B) mark once of each compartment to set the desired temperature.
- The temperature will increase by 1^ or 1^ if you touch the "+" (C) mark once, or the temperature will decrease by 1^ or 1^ if you touch the "-" (B) mark once.
Temperature display
To view the set temperature in either zone at any time, touch key H, display will switch to setting temperature with one zone flashing and the other one no flashing.
5 seconds later without operation. Then the display turn to current inner temperature again.
NOTE: when first used or after operating the wine cellar after a long period of inactivity, the inner temperature will not immediately be the temperature setting on the display. Indeed, it is necessary to wait a few hours for a temperature adjustment of the wine cellar in order to have a homogeneous temperature. To avoid excessive condensation when the ambient temperature is above 28^ , do not lower the temperature to below 7^ .
IMPORTANT: after unplugging, turning off the power or after a power failure, it is imperative to wait 5 minutes before turning it on again.
Temperature alarm
The alarm will sound and the temperature display will flash when:
The temperature in one of the zones rises or falls outside the temperature range (5 - 20^)
- You switch the appliance on, if the temperature inside the appliance is very different (+/- 4^) from the temperature set after 7 hours working
- Too many items have been put into the unit at one time, and the temperature inside the appliance is very different (+/- 4^) from the temperature set after 7 hours working
The door has not been closed tightly
When the surrounding temperature is 25^ and the wine cooler has no bottle loaded, it will take around 12 minutes to increase the wine cooler's temperature from 5^ to 12^ . Under the same circumstance, it will take around 25 minutes to decrease the wine cooler's temperature from 12^ to 5^ . The less the temperature span is, the less time it will take. The setting temperature of upper zone should be lower than the setting temperature of lower zone
Door alarm
If the door has been left open for more than 60s, the alarm will sound. Once the set temperature has been reached in the appliance, the alarm stops and the relevant temperature display stops flashing. However, if the noise disturbs you, you can switch the alarm off before this if you wish by pressing the key I once. The alarm will stop. The relevant temperature display continues to flash until the set temperature has been reached. The display then lights up constantly and the alarm system is fully active again.
Interior light
The interior light makes it easy to view your wines labels and enhances the display of your collection.
Touching the dark (J) toggles between two modes of operation for the internal lights:
Functional mode (default): the light will turn on only when the door is open, this is the most economic mode
- Showcase mode: the lights will be on whether or not the door is open. To turn this permanent light mode and get back the default mode, please push again the light button.
Modes
SABBATH MODE
Sabbath mode is available for the observance of certain religious holidays. This mode turns off the displays, interior light and audible alarms and prevents them from turning on again. Normal cooling operations will still take place. To initiate sabbath mode, press the power (A) and light (J) keys at the same time for at least 5 seconds. The indicator light will flash four times and confirm the sabbath mode is ON. Sabbath mode can be stopped by repeating the above process. The sabbath mode will automatically exit after 96 hours.
ECO DEMO MODE
Eco demo mode can be activated by presenting the appliance at exhibitions, shows or in salesrooms. In eco demo mode, compressor and all fan motors are switched OFF. By pressing and holding the "+" and "-" (C and B) and light (J) keys at the same time for at least 5 seconds, the indicator light will flash five times to confirm the input and the unit will operate in eco demo mode. Eco demo mode can be abandoned by repeating the above process, be noted that compressor and fan will activate 5 minutes later (for compressor protection reason).
5. EQUIPMENT
The climate control system
According to advice from specialists, the ideal temperature for storing wine is around 12^ , within a bracket of 10 to 14^ . Do not confuse this with service temperature, which varies between 5 and 20^ , depending on the specific nature of the wine.
It is especially important to avoid sudden changes in temperature. Designed by specialists for oenophiles, this appliance, unlike a simple refrigerator, takes into account the sensitivity of grand cru wines to sudden variations in temperature by ensuring the close control of a constant average temperature.
The anti-vibration system
The refrigeration compressor is equipped with special dampers (silent-blocks) and the inner space is insulated from the body by a thick layer of polyurethane foam. These characteristics prevent the transmission of vibration to your wines.
The anti-UV system
Light accelerates the ageing of wine. In our solid door cellars, your wines are naturally protected, on condition, of course, that the door is not opened too often. This glass-door model has been specially treated and filters out harmful ultraviolet rays, thus ensuring your wines are perfectly shielded.
Defrosting
Your appliance is equipped with an automatic defrost cycle. When a cooling cycle finishes, the appliance's refrigerated surfaces are defrosted automatically. The defrost water is channeled into a condensates evaporation tray which is located in the back of the appliance near the compressor. The heat produced by the compressor then evaporates the condensates collected in the tray.
Shelves
- To prevent damage to the door seal, ensure that the door is fully open before pulling out the shelves to add or remove bottles.
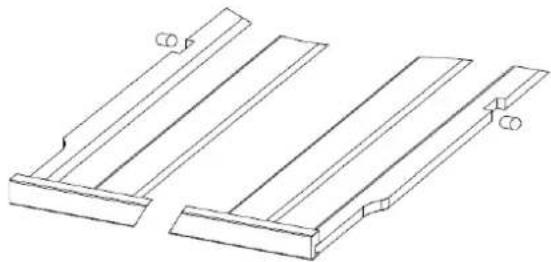
- For easier access to the contents of the shelves, slide the shelf out approximately one third of the way. The shelves are,
however, fitted with a stop to prevent the bottles falling out.
To remove or reposition the shelves, move the shelf to the position where the notch of wooden shelf is exactly underthe plastic post and lift the wooden shelf. Please ensure these are replaced when the shelf is put back.
6. LOADING
The maximum recommended loading quantities for bottles are given as guidelines and are indicative only; they provide a quick estimate of the size of the appliance (similar to the capacity of a refrigerator expressed in liters).
They correspond to tests conducted with a standard bottle: the standard "75 cl light Bordeaux" bottle -standards apply the geographical origin of each bottle shape (Bordeaux, Burgundy, Provence, etc.) and a type (traditional, heavy, light, flute, etc.), each with its own diameter and height.
In reality and in extreme cases, you could store more bottles by stacking the same type of bottle without using shelves, but a varied cellar comprises a wide variety of bottles and the practical aspect of everyday cellar management limits its capacity. You will therefore probably load the appliance a little less than the recommended maximum.
Types of bottle:
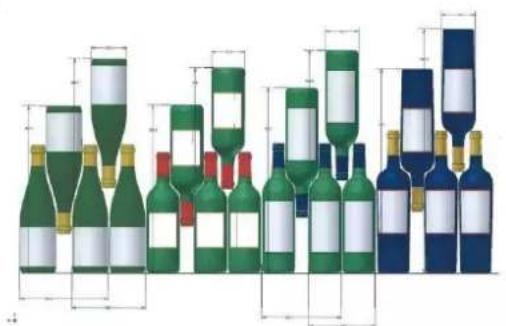
We see here 4 kinds of 75 cl wine bottles: Burgundy and Bordeaux wine bottles of different dimensions. There are many others of all shapes and sizes. You will note the storage differences depending on bottle heights, diameters and alternating position method.
For example, if a wine cellar is loaded only with Burgundy wine bottles, there will be approximately 30% fewer bottles than the initial quantity calculated for Bordeaux bottles.
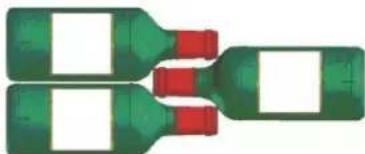
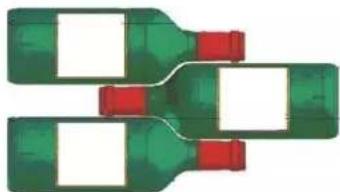
Criss-crossing types
Top-to-bottom neck-to-neck:
Note the difference in depth!
Top-to-bottom neck between bottle bodies:
Increased loading.
- Verify that you can shut the door without touching a bottle before closing.
- When loading several bottles at once, it will take more time for the unit to reach the desired temperature.
Examples of serving temperatures
Opinions vary, and the ambient temperature too, but many people agree on the following:
Prestigious Bordeaux wines - Reds 16-17°C
Prestigious Burgundy wines - Reds 15-16°C
Prestigious dry white vintages 14-16°C
Light, young, fruity reds 11-12°C
Provence rosés, primeur wines 10-12°C
Dry whites and vin de pays reds 10-12°C
Vin de pays whites 8-10°C
Champagnes 7-8°C
Sweet wines 6^
7. CARE AND MAINTENANCE
Before cleaning your appliance (something that should be done regularly), disconnect it by removing the plug or by pulling the fuse on the circuit.
Before using your appliance for the first time and regularly after that, we recommend that you clean the inside and outside (front, side and top) with warm mixed with a gentle cleaning product. Rinse with clean water and allow drying before reconnecting. Do not use solvents or abrasives.
When the appliance is switched on for the first time, there may be a residual odor. In that case, runt the appliance empty for a few hours at the coldest possible temperature. The cold will kill any odors.
In case of a power cut
Most power cuts are resolved within a short time. A power cut of 1 or 2 hours will not affect the temperature in your cabinet. To protect your wines during a power cut, avoid opening the door as much as possible. During very long power cuts, take the necessary measures to protect your wine.
If the appliance is disconnected or if there is a power cut, you must wait three to five minutes before re- starting. If you try to re-start before this time, the compressor will only re-start after 3 to 5 minutes (if the temperature requires).
- When switching on for the first time or following a prolonged shutdown, it is possible that when re-starting, the temperatures selected and those displayed are not the same. This is normal. It will take a few hours before they stabilize.
Vacation time
-
Short vacations: leave the wine cooler operating during vacations of less than three weeks.
-
Long vacations: if the appliance will not be used for several months, remove all items and turn off the appliance. Clean and dry the interior thoroughly. To prevent odor and mold growth, leave the door open slightly: blocking it open if necessary.
Moving your wine cooler
- Remove all items.
- Securely tape down all loose items (shelves) inside your appliance.
- Turn the adjustable leg up to the base to avoid damage.
- Tape the door shut.
- Be sure the appliance stays secure in the upright position during transportation. Also protect outside of appliance with a blanket, or similar item.
8. IN THE EVENT OF A BREAKDOWN
Despite the care we take during production, a breakdown can never be totally ruled out. Before contacting your retailer's after-sales department, please check that:
- The appliance is properly plugged in
There is not a power cut in progress - The breakdown is not one of those described in the table at the end of this manual
IMPORTANT: if the power cable supplied is damaged, it must be replaced by the manufacturer, a service centre approved by the brand or the retailer. In all events, it must be replaced by qualified personnel in order to avoid any risk of injury.
IF THESE CHECKS REVEAL NOTHING, THEN CONTACT YOUR RETAILER'S AFTER-SALES DEPARTMENT.
CAUTION!
Unplug the appliance before carrying out any maintenance or repair work.
9. SPARE PART AND SAV
Aesthetic and functional spare parts are available to professional repairers and final consumers for a minimum period of 10 years from the date of placing the last unit in the model on the market.
The list of spare parts and the procedure for ordering them (professional access / final consumer access) are available on the following website: www.kueppersbusch-home.com or by post to the following address:
You can solve many common wine cooler problems easily, saving you the cost of a possible service call. Try the suggestions below to see if you can solve the problem before calling the servicer.
| PROBLEM | POSSIBLE CAUSE |
| Wine cooler does not operate | Not plugged inThe circuit breaker tripped or a blown fuseCheck the temperature control settingExternal environment may require a higher settingThe door is opened too oftenThe door is not closed completelyThe door gasket does not seal properly |
| Wine cooler is not cold enough | The room temperature is hotter than normalA large amount of contents has been added to the wine cooler.The door is open too oftenThe door is not closed completelyThe temperature control is not set correctlyThe door gasket does not seal properly |
| Turns on and off frequently | Not plugged inThe circuit breaker tripped or a blown fuseThe bulb has burned out, contact your after-sales serviceThe light switch is “OFF” |
| The light does not work | |
| Vibrations | Check to assure that the wine cooler is levelThe rattling noise may come from the flow of the refrigerant, which is normalAs each cycle ends, you may hear gurgling sounds caused by the flow of refrigerant in your wine coolerContraction and expansion of the inside walls may cause popping and crackling noisesThe wine cooler is not level |
| The wine cooler seems to make too much noise | |
| The door will not close properly | The wine cooler is not levelThe door was reversed and not properly installedThe gasket is dirtyThe shelves are out of positionPoor display qualityTemperature value does not appearContact your after-sales service |
| Failure LED display | Contact your after-sales service |
| Fans do not work anymore | Contact your after-sales service |
| « E1 » or « E2 » error code | Temperature probe is failingContact your after-sales service |
Replacing light
This appliance consists of light-emitting diodes (LEDs). This type of diode cannot be changed by the consumer. The lifetime of these LEDs is normally sufficient for no change to be made. If however, and despite all the care taken during the manufacture of your wine cellar, the LEDs were defective, please contact your after-sales service for any intervention.
11. ENVIRONMENT
This appliance is marked according to the European directive 2019/290/UE on Waste Electrical and Electronic Equipment (WEEE). By ensuring this product is disposed of correctly, you will help prevent potential negative consequences for the environment and human health, which could otherwise be caused by inappropriate waste handling of this product.
The symbol on the product, or on the documents accompanying the product, the Crossed Out Wheelie Bin, indicates that this appliance may not be treated as household waste. Instead it shall be handed over to the applicable collection point for the recycling of electrical and electronic equipment, or, if you are buying an equivalent product, to the retailer of the new product.
The user is responsible for taking the appliance to the appropriate collection center at the end of its useful life. Selective and appropriate collection for the recycling of no longer used appliances and their disposal and destruction in an environmentally friendly manner, helps to prevent potential negative effects on the environment and health, and encourages the recycling of materials used to make the product.
For more detailed information about treatment, recovery and recycling of this product, please contact your local authority, your household waste disposal service or the retailer where you purchased the product.
12. WARNING
As we continuously improve our products for the benefit of our customers, we reserve the right to modify technical characteristics without notice.
Warranties for KUPPERSBUSCH brand products are offered exclusively by selected retailers. No part of these instructions may be considered as a supplementary guarantee.
KUPPERSBUSCH cannot be held liable for errors or technical or editorial omissions in this document.
Non-binding document.
| Küppersbusch | |
| Reference | FWKU1800.08 |
| Service ref | FWKU1800.09/1 |
| S/N | |
| Factory ref | JG46 |
| Climate class | N |
| Net volume | 135L |
| Annual consumption | 157 kWh/an |
| Daily energy consumption at 16℃ | 0,119 kWh/24h |
| Daily energy consumption at 32℃ | 0,562 kWh/24h |
| Refrigerant | R600A/35g |
| Foaming agent | Cyclopentane |
| Voltage | 220-240V AC |
| Frequency | 50 Hz |
| Amperage | 1.2 A |
| Power input | 80W |
| Lamp power | Max 1 W |
| Class of protection against electric schock | I |
4. UW APPARAAT BEDIEN
| Küppersbusch | |
| Reference | FWKU1800.05 |
| Service ref | FWKU1800.05/1 |
| S/N | |
| Factory ref | JG46 |
| Climate class | N |
| Net volume | 135L |
| Annual consumption | 157 kWh/an |
| Daily energy consumption at 16℃ | 0,119 kWh/24h |
| Daily energy consumption at 32℃ | 0,562 kWh/24h |
| Refrigerant | RE00A/35g |
| Foaming agent | Cyclopentane |
| Voltage | 220-240V AC |
| Frequency | 50 Hz |
| Amperage | 1.2 A |
| Power input | 80W |
| Lamp power | Max 1 W |
| Class of protection against electric schock | X |
| Küppersbusch | |
| Reference | FWKU1800.05 |
| Service ref | FWKU1800.05/1 |
| S/N | |
| Factory ref | JG46 |
| Climate class | N |
| Net volume | 135L |
| Annual consumption | 157 kWh/an |
| Daily energy consumption at 16℃ | 0,119 kWh/24h |
| Daily energy consumption at 32℃ | 0,562 kWh/24h |
| Refrigerant | R600A/35g |
| Foaming agent | Cyclopentane |
| Voltage | 220-240V AC |
| Frequency | 50 Hz |
| Amperage | 1.2 A |
| Power input | 80W |
| Lamp power | Max 1 W |
| Class of protection against electric schock | X |
- PROBLEM ET CAUSE POSSIBLE
- GENERAL SAFETY INSTRUCTIONS
- Safety of children and other vulnerable persons
- General safety
- Refrigerating fluid
- Caution: risk of fire
- Electrical safety
- Daily use
- Caution: cleaning and servicing
- Important information concerning installation
- Power saving
- Trouble shooting
- Safety instructions
- EPREL
- TECHNICAL DATA
- INSTALLATION INSTRUCTIONS
- Before using this appliance
- Attention
- Ambient room temperature limits
- Mounting the handle
- OPERATING INSTRUCTIONS
- Temperature setting
- Temperature selection
- Temperature display
- Temperature alarm
- Door alarm
- Interior light
- Modes
- SABBATH MODE
- ECO DEMO MODE
- EQUIPMENT
- The climate control system
- The anti-vibration system
- The anti-UV system
- Defrosting
- Shelves
- LOADING
- Types of bottle:
- Criss-crossing types
- Examples of serving temperatures
- CARE AND MAINTENANCE
- In case of a power cut
- Vacation time
- Moving your wine cooler
- IN THE EVENT OF A BREAKDOWN
- CAUTION!
- Unplug the appliance before carrying out any maintenance or repair work.
- SPARE PART AND SAV
- Replacing light
- ENVIRONMENT
- WARNING
- UW APPARAAT BEDIEN
Brand : Küppersbusch
Model : FWKU1800.0S
Category : Wine cellar