HQPL11010 - String lights HQ Power - Free user manual and instructions
Find the device manual for free HQPL11010 HQ Power in PDF.
User questions about HQPL11010 HQ Power
0 question about this device. Answer the ones you know or ask your own.
Ask a new question about this device
Download the instructions for your String lights in PDF format for free! Find your manual HQPL11010 - HQ Power and take your electronic device back in hand. On this page are published all the documents necessary for the use of your device. HQPL11010 by HQ Power.
USER MANUAL HQPL11010 HQ Power
natural_image
Coiled black and white plastic braid with spherical connectors (no text or symbols visible)USER MANUAL 2
GEBRUIKERSHANDLEIDING 6
MODE D'EMPLOI 10
MANUAL DEL USUARIO 14
To all residents of the European Union
Important environmental information about this product
This symbol on the device or the package indicates that disposal of the device after its lifecycle could harm the environment. Do not dispose of the unit (or batteries) as unsorted municipal waste; it should be taken to a specialized company for recycling. This device should be returned to your distributor or to a local recycling service. Respect the local environmental rules.
If in doubt, contact your local waste disposal authorities.
Thank you for choosing HQPower! Please read the manual thoroughly before bringing this device into service. If the device was damaged in transit, do not install or use it and contact your dealer.
2. Safety Instructions
 | This appliance is not intended for use by persons (including children) with reduced physical, sensory or mental capabilities, or lack of experience and knowledge, unless they have been given supervision or instruction concerning use of the appliance by a person responsible for their safety.Children shall be supervised to ensure that they do not play with the appliance. |
 | Warning:The external flexible cable or cord of this luminaire cannot be replaced; if the cord is damaged, the luminaire shall be destroyed.Do not connect the chain to the power supply while it is still in the packing.Do not connect this lighting chain electrically to another chain.Make sure that the available voltage does not exceed the voltage stated in the specifications in this manual. |
 | Always disconnect the mains power when the device is not in use or when servicing or maintenance activities are performed. Handle the power cord by the plug only. |
 | Ensure that all lamp holders are fitted with a lamp.Do not remove or insert lamps while the chain is connected to the power supply.Replacement lamps must be of the exact same type as stated in the specifications in this manual.Warning:This lighting chain must not be used without all gaskets correctly in place. |
- Do not crimp the chain and protect it against damage.
- Keep away from dust and extreme temperatures.
- This splash-proof chain is suitable for indoor and outdoor use. When using outdoors, make sure to connect the chain to a splash-proof power socket approved for outdoor use. If in any doubt, contact a qualified electrician.
- For outdoor use, do not install the chain or replace lamps during rain or other inclement weather conditions.
- The device is not waterproof. Do not submerge in water or any other liquid. Not suitable for installation under water.
- Not suitable for installation in cabinets, ceilings, or other enclosures.
3. General Guidelines
Refer to the Velleman® Service and Quality Warranty on the last pages of this manual.

Protect this device from shocks and abuse. Avoid brute force when operating the device.
- Familiarise yourself with the functions of the device before actually using it.
- All modifications of the device are forbidden for safety reasons. Damage caused by user modifications to the device is not covered by the warranty.
- Only use the device for its intended purpose. Using the device in an unauthorised way will void the warranty.
HQPL11010 - HQPL11011
- Damage caused by disregard of certain guidelines in this manual is not covered by the warranty and the dealer will not accept responsibility for any ensuing defects or problems.
- Keep this manual for future reference.
4. Features
• 11 m black cable with IP44 power plug
• with 20 pcs of E27 lamps:
- HQPL11010: 4 pcs each colour (red, yellow, green, blue, white)
- HQPL11011: 20 pcs warm white.
5. Installation

For outdoor use, do not install the chain or replace lamps during rain or other inclement weather conditions.
Inspecting the Chain Before Installation
- Take the chain out of the box and unroll it fully.
- Make sure that the power plug is disconnected from the power supply.
- Check the plug, cable, insulation, lamp holders, and lamps for damage:
○ Replace any damaged lamps. See Fitting or Replacing Lamps for detailed instructions.
- If you notice any other damage, do not use the chain and contact your dealer.
- Make sure that the lamp holders are dry and clean on the inside and outside.
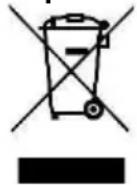
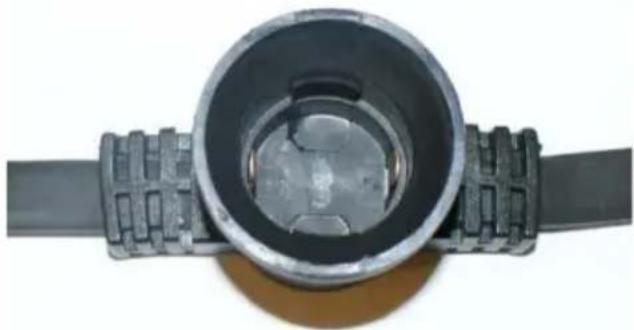
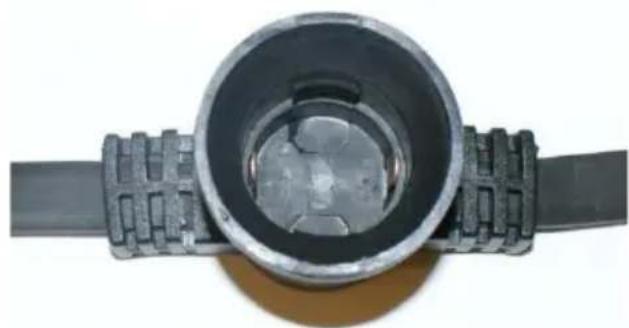
- Check if the electrical connectors in the lamp holders are in the correct position. One shall be flat at the bottom of the socket, the other shall point upwards, as shown in the image. If you find a socket with both connectors pointing upwards, bend one down to match the other sockets.
Caution: only do this when the power is disconnected.
| OK | Not OK |
 |  |
Fitting or Replacing Lamps
- Make sure that the power plug is disconnected from the power supply. Do not replace lamps during rain or other inclement weather conditions.
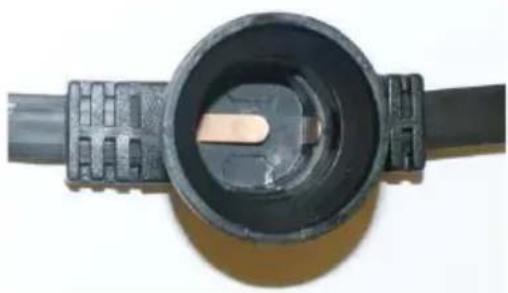
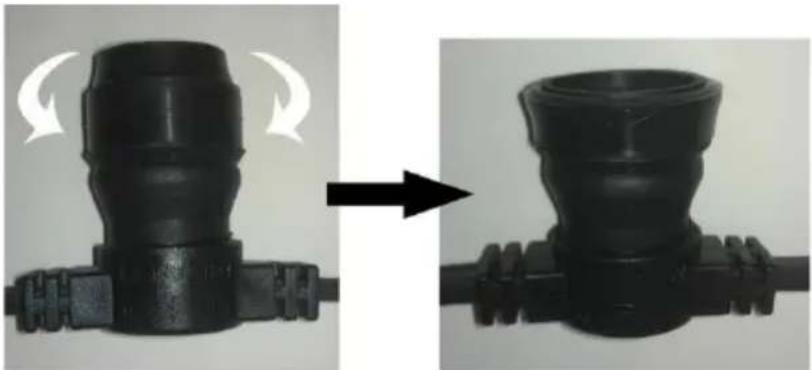
- To replace a lamp, carefully unscrew the faulty lamp.
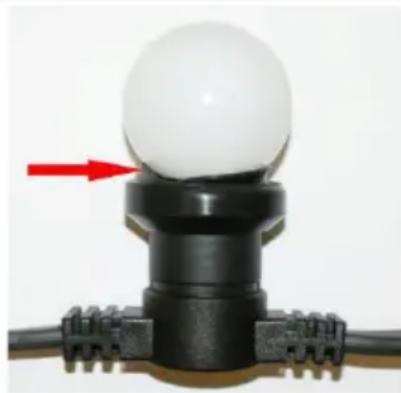
- Fold down the rubber gasket over the lamp holder. This makes it easy to fit the lamp.
natural_image
Two black plastic pipe fittings with white curved arrows indicating motion, shown from left to right (no text or symbols)- With the gasket folded down, screw the lamp into the lamp holder.
HQPL11010 - HQPL11011
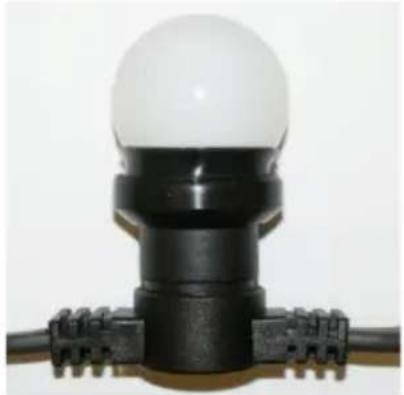
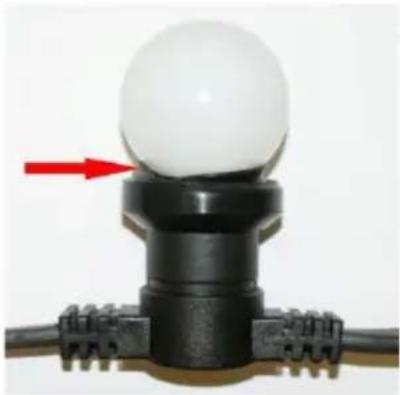
- Fold the gasket back up around the base of the lamp. Make sure that the gasket fits evenly. The gasket must not be crinkled.
| OK | Not OK |
 |  |
- Repeat for each lamp holder.
Testing
When each lamp holder has a lamp fitted and the gaskets are correctly placed, test the chain before installing it.
- Plug the chain into a suitable power socket.
- Check if all lamps are working.
○ If yes, you can proceed with the installation.
- If no, disconnect the chain from power and replace any faulty lamps.
Caution: if the problem persists, do not use the chain and contact your dealer.
Installation

There must be a lamp fitted in each lamp holder, and each lamp must be sealed correctly with its gasket. It is not safe to use the chain with missing or incorrectly placed lamps or gaskets.
To install the chain after testing, proceed as follows:
- Choose a suitable mounting spot. Make sure that the chain cannot get damaged, for example by sharp edges, swinging windows, doors, etc. Also make sure that the chain cannot cause hazardous situations if it accidentally comes loose. For example, avoid crossing passageways. Not suitable for installation in cabinets, ceilings, or other enclosures. Not suitable for installation under water.
- To mount the chain, start at the side of the power plug. Position the power plug near a mains outlet, but do not plug it in yet. Make sure to leave enough power cable to easily plug into the mains outlet without stress on the cable.
- Start mounting the chain in the desired location.

Caution: make sure not to damage the insulation during installation. Do not use sharp tools to install the chain. Do not fix the chain to buildings or other supports using nails, staples, or other sharp, conducting materials.
- It is recommended to fix the chain to a support at least every metre.
6. Use
- Plug the chain into a suitable mains outlet to switch it on.
- Unplug it from the mains to switch off.
7. Maintenance
- Once a month, inspect the plug, cable, insulation, and lamp holders for degradation due to weather, UV light, or other damage. If you notice any deterioration, stop using the chain and dispose of it.
-
If a lamp is not working, unplug the chain immediately and replace the lamp. See Fitting or Replacing Lamps for detailed instructions. Use only replacement lamps of the exact same type as stated in the specifications in this manual.
-
Technical Specifications
| HQPL11010 | HQPL11011 | |
| power supply | 230 VAC 50 Hz | |
| lamp specifications | SMD 3528 - 7 LEDs - 0.6 W | |
| socket | E27 | |
| total number of lamps | 20 | |
| colours | 4 red, 4 yellow, 4 green, 4 blue, 4 white | warm white |
| replacement lamps (6 pcs) | order code HQPL11020: 1 red, 1 yellow, 1 green, 1 blue, 1 white, 1 warm white | order code HQPL11022: 6 pcs warm white |
Use this device with original accessories only. Velleman nv cannot be held responsible in the event of damage or injury resulting from (incorrect) use of this device. For more info concerning this product and the latest version of this manual, please visit our website www.velleman.com. The information in this manual is subject to change without prior notice.
© COPYRIGHT NOTICE
The copyright to this manual is owned by Velleman nv. All worldwide rights reserved. No part of this manual may be copied, reproduced, translated or reduced to any electronic medium or otherwise without the prior written consent of the copyright holder.
GEBRUIKERSHANDLEIDING
1. Inleiding
natural_image
Close-up of a mechanical component with a central hole and surrounding wires (no visible text or symbols)Niet OK
natural_image
Close-up of a mechanical bearing component with concentric rings and textured base (no visible text or symbols)natural_image
Two black plastic pipe fittings with white curved arrows indicating motion, shown from left to right (no text or symbols)text_image
OK Pas OKnatural_image
Two black plastic pipe fittings with white curved arrows indicating direction, shown from left to right (no text or symbols)natural_image
Two black plastic pipe fittings with white curved arrows indicating motion, shown from left to right (no text or symbols)natural_image
Close-up of a black plastic connector with a central pin and cable (no text or symbols visible)FALSCH

natural_image
Close-up of a mechanical component with a central circular opening and flanged end (no visible text or symbols)natural_image
Two black plastic pipe fittings with directional arrows indicating transformation (no text or symbols)natural_image
Close-up of a white spherical object mounted on a black and brown connector (no text or symbols visible)FALSCH
natural_image
Close-up of a white spherical object mounted on a black and red mechanical component (no text or symbols visible)natural_image
Two black plastic pipe fittings with white curved arrows indicating motion, shown from left to right (no text or symbols)© INFORMACJA O PRAWACH WŁASNOŚCI
natural_image
Two black plastic pipe fittings with white curved arrows indicating motion, shown from left to right (no text or symbols)Velleman® Service and Quality Warranty
Since its foundation in 1972, Velleman® acquired extensive experience in the electronics world and currently distributes its products in over 85 countries.
All our products fulfil strict quality requirements and legal stipulations in the EU. In order to ensure the quality, our products regularly go through an extra quality check, both by an internal quality department and by specialized external organisations. If, all precautionary measures notwithstanding, problems should occur, please make appeal to our warranty (see guarantee conditions).
General Warranty Conditions Concerning Consumer Products (for EU):
- All consumer products are subject to a 24-month warranty on production flaws and defective material as from the original date of purchase.
- Velleman® can decide to replace an article with an equivalent article, or to refund the retail value totally or partially when the complaint is valid and a free repair or replacement of the article is impossible, or if the expenses are out of proportion.
You will be delivered a replacing article or a refund at the value of 100% of the purchase price in case of a flaw occurred in the first year after the date of purchase and delivery, or a replacing article at 50% of the purchase price or a refund at the value of 50% of the retail value in case of a flaw occurred in the second year after the date of purchase and delivery.
• Not covered by warranty:
- all direct or indirect damage caused after delivery to the article (e.g. by oxidation, shocks, falls, dust, dirt, humidity...), and by the article, as well as its contents (e.g. data loss), compensation for loss of profits;
- consumable goods, parts or accessories that are subject to an aging process during normal use, such as batteries (rechargeable, non-rechargeable, built-in or replaceable), lamps, rubber parts, drive belts... (unlimited list);
- flaws resulting from fire, water damage, lightning, accident, natural disaster, etc....;
- flaws caused deliberately, negligently or resulting from improper handling, negligent maintenance, abusive use or use contrary to the manufacturer's instructions;
- damage caused by a commercial, professional or collective use of the article (the warranty validity will be reduced to six (6) months when the article is used professionally);
- damage resulting from an inappropriate packing and shipping of the article:
- all damage caused by modification, repair or alteration performed by a third party without written permission by Velleman®.
- Articles to be repaired must be delivered to your Velleman® dealer, solidly packed (preferably in the original packaging), and be completed with the original receipt of purchase and a clear flaw description.
- Hint: In order to save on cost and time, please reread the manual and check if the flaw is caused by obvious causes prior to presenting the article for repair. Note that returning a non-defective article can also involve handling costs.
• Repairs occurring after warranty expiration are subject to shipping costs.
- The above conditions are without prejudice to all commercial warranties.
The above enumeration is subject to modification according to the article (see article's manual).