HQRL09010 - Lighting HQ Power - Free user manual and instructions
Find the device manual for free HQRL09010 HQ Power in PDF.

| Product type | Flexible multicolour LED strip |
| Brand | HQ Power |
| Model | HQRL09010 |
| Colour | Multicolour (RGB) |
| Length | 9 m |
| Power supply | 220-240 V~, 50/60 Hz |
| Power consumption | 1.7 W/m (i.e. 15.3 W total) |
| Protection rating (IP) | IP44 (splash-proof) |
| Strip diameter | 13 mm |
| Power cable length | 1.5 m |
| Number of LEDs per metre | 36 LEDs/m (i.e. 324 LEDs total) |
| LED spacing | 2.78 cm |
| Cuttable | Yes, every 3 m (cut marks ✗) |
| Minimum bending radius | 30 cm |
| Application | Indoor and outdoor (with adequate protection) |
| Main functions | Decorative lighting, cuttable and connectable with connectors (L, T, X, inline) |
| Included accessories | Power cable, power connector, protective cap, glue |
| Care and cleaning | Disconnect before cleaning. Use a soft, dry cloth. Do not immerse. |
| Safety | Do not use if damaged. Do not cover during use. Keep out of reach of children. |
| Spare parts and repairability | LEDs are not replaceable. Connectors and power cables available as accessories. Repair by qualified technician. |
| Warranty | 24 months (consumer), Velleman conditions |
Frequently Asked Questions - HQRL09010 HQ Power
User questions about HQRL09010 HQ Power
0 question about this device. Answer the ones you know or ask your own.
Ask a new question about this device
Download the instructions for your Lighting in PDF format for free! Find your manual HQRL09010 - HQ Power and take your electronic device back in hand. On this page are published all the documents necessary for the use of your device. HQRL09010 by HQ Power.
USER MANUAL HQRL09010 HQ Power
natural_image
Circular transparent glass wire with glowing spots, no text or symbols visibleUSER MANUAL 3
HANDLEIDING 10
MODE D'EMPLOI 17
MANUAL DEL USUARIO 24
natural_image
3D rendering of a U-shaped pipe or tube with a highlighted section and small circular markers (no text or symbols)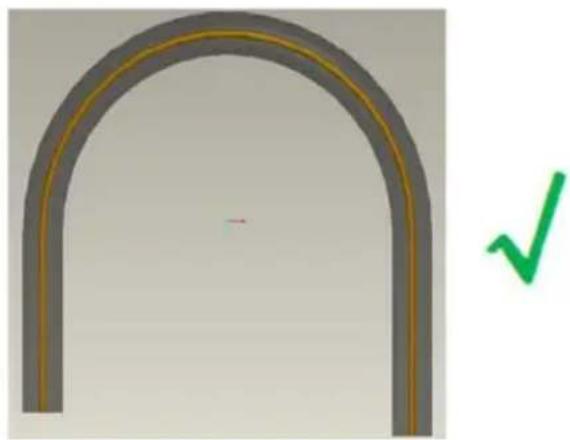
natural_image
Simple 3D diagram of an arched structure with a green checkmark indicating completion (no text or symbols)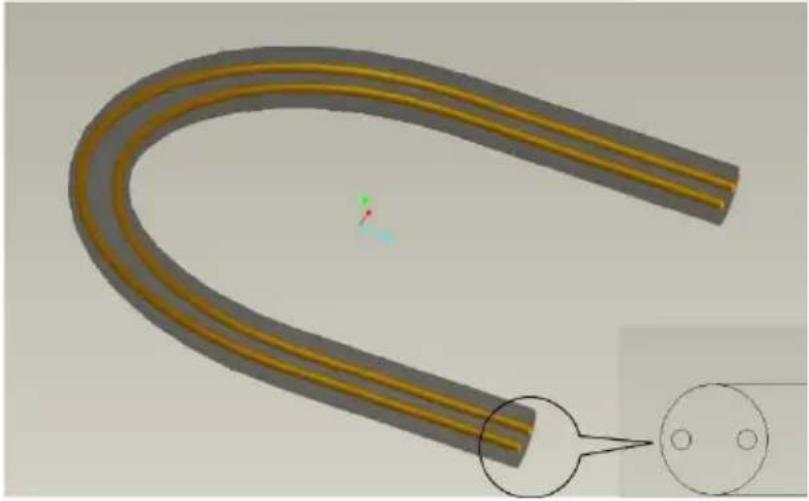
natural_image
3D rendering of a curved, segmented cable or wire with two circular holes, shown with an inset magnified view (no text or symbols)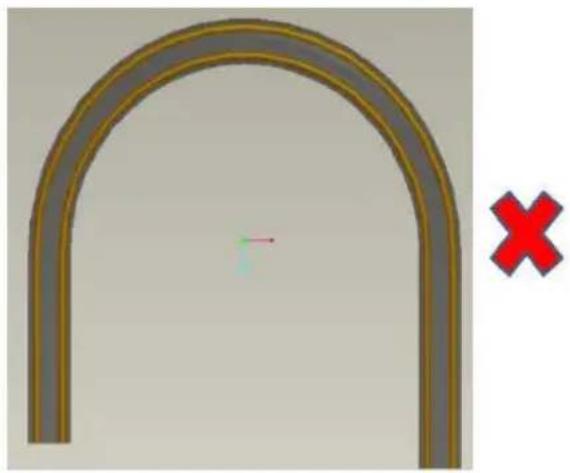
natural_image
Pure diagram of an arch structure with a red X mark, no text or symbols presentUSER MANUAL
1. Introduction
To all residents of the European Union
Important environmental information about this product
This symbol on the device or the package indicates that disposal of the device after its lifecycle could harm the environment. Do not dispose of the unit (or batteries) as unsorted municipal waste; it should be taken to a specialized company for recycling. This device should be returned to your distributor or to a local recycling service. Respect the local environmental rules.
If in doubt, contact your local waste disposal authorities.
Thank you for choosing HQPower™! Please read the manual thoroughly before bringing this device into service. If the device was damaged in transit, do not install or use it and contact your dealer.
2. Safety Instructions

Read and understand this manual and all safety signs before using this appliance.
This device is not suitable for ordinary lighting in household room illumination.
Class 2.
- This device can be used by children aged from 8 years and above, and persons with reduced physical, sensory or mental capabilities or lack of experience and knowledge if they have been given supervision or instruction concerning the use of the device in a safe way and understand the hazards involved. Children shall not play with the device. Cleaning and user maintenance shall not be made by children without supervision.
- Do not connect the rope light to the supply while it is in the packing or wound onto a reel.
- Do not use the rope light when covered or recessed into a surface.
- Always disconnect mains power when the device is not in use or when servicing or maintenance activities are performed. Handle the power cord by the plug only.
- If the external flexible cable or cord of this device is damaged, it shall be exclusively replaced by the manufacturer or his service agent or a similar qualified person in order to avoid a hazard.
- All cords and cables should be routed so that they will not be walked on or pinched by items placed upon or against them. Pay particular attention to the point where they exit the unit.
- Remove all flammable materials close to the device before switching on.
- Do not install the device on a flammable surface (linoleum, carpet, wood, paper, cardboard, plastic, etc.).
HQRLxxxxx
- Protect this device from heat sources such as radiators, heat registers, stoves, or other appliances (including amplifiers) that produce heat.
- Do not remove the cover under any conditions. There are no user-serviceable parts inside. Never operate this device when its cover is removed.
- Do not operate a visibly damaged device. Do not attempt to operate this device if the power cord has been frayed or broken.
- Always mount this device in a safe and stable manner. Mount this device in an area that will allow proper ventilation.
• This device should only be serviced by qualified service personnel. - Always make sure to connect the device to an alternating current matching the value stated on the device.
- Always install the device in a well-ventilated location.
- This device is not designed for permanent operation: regular operation breaks will prolong its live.
- To maintain the IP value, all accessories must be carefully glued in position. This should be done by a qualified technician.
- The rope lights must be uncoiled to avoid heat build-up. Heat build-up could result in unsafe situations: fire, meltdown, uninsulated internal wiring, etc.
- The LEDs and lamps cannot be replaced.
- Check the rope light for mechanical damage, wear or tear. Do not use a rope light with visible damage.
- If a section of the rope light does not light up or flickers, unplug the rope light immediately. Cut out the faulty section(s) of rope light and re-connect using connectors.
3. General Guidelines
- Refer to the Velleman ^® Service and Quality Warranty on the last pages of this manual.
- All modifications of the device are forbidden for safety reasons. Damage caused by user modifications to the device is not covered by the warranty.
- Only use the device for its intended purpose. Using the device in an unauthorised way will void the warranty.
- Damage caused by disregard of certain guidelines in this manual is not covered by the warranty and the dealer will not accept responsibility for any ensuing defects or problems.
- Nor Velleman Group nv nor its dealers can be held responsible for any damage (extraordinary, incidental or indirect) – of any nature (financial, physical...) arising from the possession, use or failure of this product.
- Keep this manual for future reference.
4. Overview
text_image
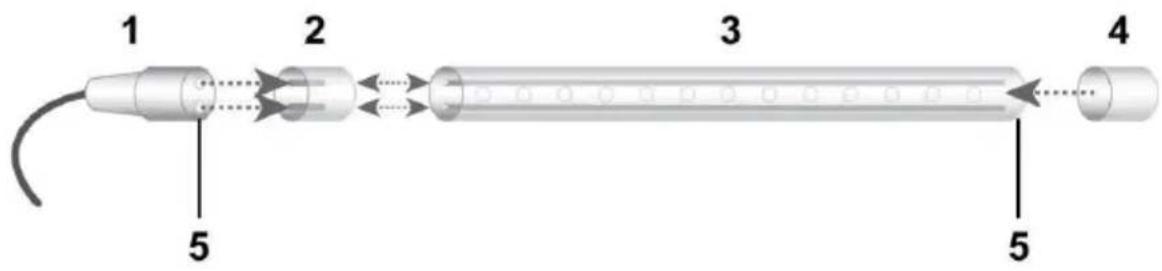
1 2 3 4 5 5| part | description | |
| 1 | power cord | |
| 2 | power connector | connects the power cord to the rope light |
| 3 | rope light | inner wires run the length of the rope light; can be cut at certain intervals (cut marks are indicated on sheath with ✗) |
| 4 | end cap | protects the exposed ends of the rope light |
| 5 | glue | apply glue only on the plastic parts, not on the conductive parts |
5. Initial Test
Always refer to the safety instructions above.
Before installing or using the rope light, test the rope light and keep it plugged in to warm up the plastic. This makes it more pliable when installing.
6. Assembling Rope Lights
This device shall be installed by qualified personnel only.
Switch off the mains power before you continue.
6.1 Connecting the Power Connector
-
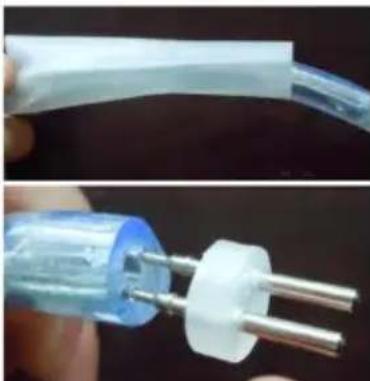
Slide the heatshrink over the rope light.
-
Firmly push the sharp prongs of the power connector into the rope light. Make sure the prongs are pushed in all the way and make contact with the tube light leads.
natural_image
Close-up of two types of electrical plug connectors, one with transparent insulation and the other with a blue plastic housing (no text or symbols visible)-
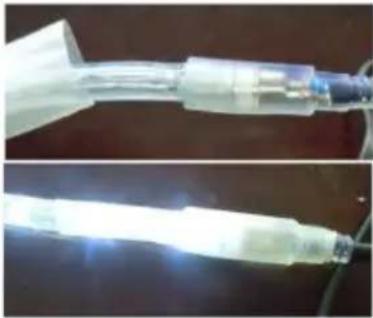
Push the power connector firmly into the connector sleeve.
-
Use a heat gun to shrink the heatshrink over the connector.
natural_image
Close-up of two transparent medical or laboratory devices with glowing blue liquid, no visible text or symbols6.2 Cutting Rope Lights
-
Make sure the mains power is switched off.
-
The rope light can be cut at specific intervals. These are indicated with following symbol: ✗.
Cut the wires only at the marks ✗.
- Use a sharp cutter and make a clean straight cut.
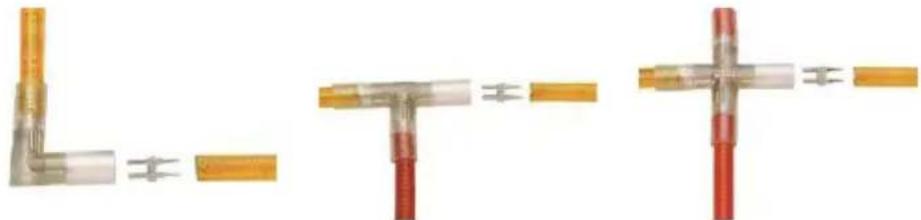
6.3 Assembling the Connectors
See section Technical Specifications below for product codes.
The maximum length of the rope light assembly is 45 m. Exceeding the maximum length may cause overheating and fire.
- Make sure the mains power is switched off.
- Use connectors (in-line, L, T, or X-shaped) to connect the rope light sections.
- Always check that the pins are correctly inserted into the fitting.
natural_image
Three-step diagram showing connected electrical connectors with orange and red components, no text or symbols present.-
Apply some glue and push the 2 parts together making sure that it fits well. Apply glue only on the plastic parts – not on the conductive parts.
-
Let the glue dry for about 15 minutes before using the unit.
6.4 Attaching End Caps
See section Technical Specifications below for product codes.
Attach the end caps as follows:
- Apply the special glue to the rope light.
Apply glue only on the plastic parts - not on the conductive parts. - Gently push the end cap on the rope light end.

- Important: Let the glue dry for about 15 minutes before using the unit.
6.5 Shaping the Rope Light
- Switch off the mains power before you continue.
- The maximum length of the rope light assembly is 45 m. Exceeding the maximum length may cause overheating and fire.
- The bending radius of the rope light is at least 30 cm, do not make sharp bends. Use connectors to make sharp angles.
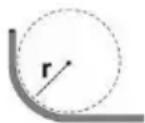
Bending radius r = min. 30 cm
- Bend the rope light according to the pictures on page 2.
7. Installing
- When you have shaped the rope light, test it again as described above.
- If the shaped rope light works correctly, you can proceed with mounting. Keep the light plugged in to warm up the plastic. This makes it more pliable when installing.
- Switch off the mains power before you actually install the rope light.
8. Use
Check the rope light before every use. Always refer to the safety instructions above.
9. Technical Specifications
9.1 LED Rope Lights
LED rope lights - common specifications
| power supply | 220-240 V~, 50/60 Hz |
| LEDs/m | 36 |
| LED space | 2.78 cm |
| IP index | IP44 |
| diameter | ∅ 13 mm |
| power cord length | 1.5 m |
LED rope lights - 45 m - common specifications
| cutting distance | 1 m |
LED rope lights - 45 m - individual specifications
| product code | colour | power consumption |
| HQRL45001 | cold white | 2.5 W/m |
| HQRL45002 | warm white | 2.5 W/m |
| HQRL45003 | red | 3.0 W/m |
| HQRL45004 | green | 2.5 W/m |
| HQRL45005 | blue | 2.5 W/m |
| HQRL45006 | yellow | 3.0 W/m |
| HQRL45007 | pink | 2.5 W/m |
LED rope lights - 9 m - common specifications
| cutting distance | 1 m (HQRL09010 = 3 m) |
LED rope lights - 9 m - individual specifications
| product code | colour | power consumption |
| HQRL09001 | cold white | 2.5 W/m |
| HQRL09002 | warm white | 2.5 W/m |
| HQRL09003 | red | 3.0 W/m |
| HQRL09004 | green | 2.5 W/m |
| HQRL09005 | blue | 2.5 W/m |
| HQRL09006 | yellow | 3.0 W/m |
| HQRL09007 | pink | 2.5 W/m |
| HQRL09010 | multicolour | 1.7 W/m |
LED rope lights - 20 m - common specifications
| cutting distance | 2 m |
LED rope lights - 20 m - individual specifications
| product code | colour | power consumption |
| HQRL09011 | multicolour | 1.7 W/m |
9.2 Standard Rope Lights
| product code | HQRL45012 |
| power supply | 220-240 V~, 50/60 Hz |
| IP index | IP44 |
| diameter | ∅ 13 mm |
| power cord length | 1.5 m |
| power consumption | 14.2 W/m |
| colour | warm white |
| cutting distance | 1 m |
| length | 45 m |
9.3 Cables
cables - individual specifications
| product code | overview |
| HQRL99001 | waterproof power cable for LED rope light |
| HQRL99002 | waterproof power cable for rope light |
cables - common specifications
| product code | overview |
| use | indoor and outdoor use |
| length | 150 cm |
| voltage | 220-240 V~ |
| maximum power | max. 3000 W = 180 m length |
9.4 Connectors
| product code | description | diameter |
| HQRL99003 | mounting clips for rope lights and LED rope lights | 13 mm |
| HQRL99004 | end cap for rope lights and LED rope lights | 13 mm |
| HQRL99005 | inline connector for rope lights and LED rope lights | 13 mm |
| HQRL99006 | T-connector for rope lights and LED rope lights | 13 mm |
| HQRL99007 | L-connector for rope lights and LED rope lights | 13 mm |
| HQRL99008 | X-connector for rope lights and LED rope lights | 13 mm |
Use this device with original accessories only. Velleman Group nv cannot be held responsible in the event of damage or injury resulting from (incorrect) use of this device. For more info concerning this product and the latest version of this manual, please visit our website www.velleman.eu. The information in this manual is subject to change without prior notice.
© COPYRIGHT NOTICE
The copyright to this manual is owned by Velleman Group nv. All worldwide rights reserved. No part of this manual may be copied, reproduced, translated or reduced to any electronic medium or otherwise without the prior written consent of the copyright holder.
HANDLEIDING
1. Inleiding
natural_image
Close-up of two types of electrical plug connectors, one with transparent insulation and the other with a blue plastic housing (no text or symbols visible)natural_image
Close-up of two transparent medical or laboratory devices with glowing blue liquid, no visible text or symbols6.2 De lichtslang knippen
natural_image
Three-step diagram showing a L-shaped connector being inserted into a terminal block, with no text or symbols present.natural_image
Close-up of two types of electrical plug connectors, one with transparent insulation and the other with a blue plastic plug (no text or symbols visible)natural_image
Close-up of two transparent medical or laboratory devices with glowing blue liquid, no visible text or symbolsnatural_image
Three-step diagram showing a L-shaped pipe connection with orange connectors and red terminal posts, connected by wires (no text or symbols)natural_image
Close-up of two electrical plug connectors with metal pins, one being held and the other holding a plastic wire (no text or symbols visible)natural_image
Close-up of two transparent medical or laboratory devices with glowing blue liquid, no visible text or symbols6.2 Cortar la manguera luminosa
natural_image
Three-step diagram showing a L-shaped connector being inserted into a terminal block, with no text or symbols present.natural_image
Close-up of two electrical plug connectors with metal pins, one being held and the other showing internal wiring (no text or symbols visible)natural_image
Close-up of two transparent medical or laboratory devices with glowing blue liquid, no visible text or symbolsnatural_image
Three-step diagram showing a L-shaped connector being inserted into two red and orange wires, with no text or symbols present.natural_image
Close-up of two electrical plug connectors with metal pins, one being held and the other inserted (no text or symbols visible)natural_image
Close-up of two transparent medical or laboratory devices with glowing blue liquid, no visible text or symbolsnatural_image
Three-step diagram showing a L-shaped pipe connection with orange connectors, connected by wires to red and transparent components (no text or symbols)natural_image
Close-up of two types of electrical plug connectors, one with transparent insulation and the other with a blue plastic plug (no text or symbols visible)natural_image
Close-up of two transparent medical or laboratory devices with glowing blue light, no visible text or symbolsnatural_image
Three-step diagram showing L-shaped connectors connected to a terminal block, with no text or symbols present.Velleman® Service and Quality Warranty
Since its foundation in 1972, Velleman® acquired extensive experience in the electronics world and currently distributes its products in over 85 countries.
All our products fulfil strict quality requirements and legal stipulations in the EU. In order to ensure the quality, our products regularly go through an extra quality check, both by an internal quality department and by specialized external organisations. If, all precautionary measures notwithstanding, problems should occur, please make appeal to our warranty (see guarantee conditions).
General Warranty Conditions Concerning Consumer Products (for EU):
- All consumer products are subject to a 24-month warranty on production flaws and defective material as from the original date of purchase.
- Velleman® can decide to replace an article with an equivalent article, or to refund the retail value totally or partially when the complaint is valid and a free repair or replacement of the article is impossible, or if the expenses are out of proportion.
You will be delivered a replacing article or a refund at the value of 100% of the purchase price in case of a flaw occurred in the first year after the date of purchase and delivery, or a replacing article at 50% of the purchase price or a refund at the value of 50% of the retail value in case of a flaw occurred in the second year after the date of purchase and delivery.
• Not covered by warranty:
- all direct or indirect damage caused after delivery to the article (e.g. by oxidation, shocks, falls, dust, dirt, humidity...), and by the article, as well as its contents (e.g. data loss), compensation for loss of profits;
- consumable goods, parts or accessories that are subject to an aging process during normal use, such as batteries (rechargeable, non-rechargeable, built-in or replaceable), lamps, rubber parts, drive belts... (unlimited list);
- flaws resulting from fire, water damage, lightning, accident, natural disaster, etc....;
- flaws caused deliberately, negligently or resulting from improper handling, negligent maintenance, abusive use or use contrary to the manufacturer's instructions;
- damage caused by a commercial, professional or collective use of the article (the warranty validity will be reduced to six (6) months when the article is used professionally);
- damage resulting from an inappropriate packing and shipping of the article;
- all damage caused by modification, repair or alteration performed by a third party without written permission by Velleman®.
- Articles to be repaired must be delivered to your Velleman® dealer, solidly packed (preferably in the original packaging), and be completed with the original receipt of purchase and a clear flaw description.
- Hint: In order to save on cost and time, please reread the manual and check if the flaw is caused by obvious causes prior to presenting the article for repair. Note that returning a non-defective article can also involve handling costs.
• Repairs occurring after warranty expiration are subject to shipping costs.
- The above conditions are without prejudice to all commercial warranties.
The above enumeration is subject to modification according to the article (see article's manual).