SmartRack SRW12UG - Server Tripp Lite - Free user manual and instructions
Find the device manual for free SmartRack SRW12UG Tripp Lite in PDF.
| Product Type | Non-swivel wall-mount rack for 19" equipment |
| Brand | Tripp Lite |
| Model | SmartRack SRW12UG |
| Height | 12U (approx. 53.3 cm) |
| Width | 48.3 cm (19") |
| Mounting Depth | Adjustable in 6 mm increments |
| Material | Heavy-duty steel |
| Maximum Load Capacity | See product specifications on Tripp Lite website |
| Front Door | Reversible and lockable with keys provided |
| Side Panels | Removable and lockable |
| Cable Management | Rectangular opening at top with removable cover |
| Wall Mounting | Mounting plate included, attach to studs or concrete (hardware not provided) |
| Mounting Rails | Square and threaded holes, depth adjustable |
| Included Accessories | Cage nuts, mounting screws (black and silver), collar washers, keys |
| Grounding | Front/rear grounding point, M6 screw included, 8 AWG cable recommended |
| Maintenance | Clean with a dry, lint-free cloth; do not use liquids or abrasives |
| Safety | Do not exceed maximum load, handle with two people, securely attach to wall before installing equipment |
| Warranty | 2-year limited |
| Intended Use | Indoor, controlled environment, away from moisture and extreme temperatures |
| Certifications | Compliant with applicable safety standards (see manual) |
Frequently Asked Questions - SmartRack SRW12UG Tripp Lite
User questions about SmartRack SRW12UG Tripp Lite
0 question about this device. Answer the ones you know or ask your own.
Ask a new question about this device
Download the instructions for your Server in PDF format for free! Find your manual SmartRack SRW12UG - Tripp Lite and take your electronic device back in hand. On this page are published all the documents necessary for the use of your device. SmartRack SRW12UG by Tripp Lite.
USER MANUAL SmartRack SRW12UG Tripp Lite
Non-Swinging Wall-Mounted SmartRack® Enclosures
Applies to Model Series: SRWxxU
(Agency Series Number: AG-00E9)
Table of Contents
- Important Safety Instructions 2
- Overview 2
- Feature Identification 3
- Enclosure Installation 4
4.1 Preparation 4
4.2 Unpacking 4
4.3 Ground Connection 4
- Enclosure Configuration 5
5.1 Door Locks 5
5.2 Cable Access & Management 5
5.3 Reversing the Enclosure 5
5.4 Mounting Rails 6
5.5 Adjusting Mounting Rail Depth 6
- Wall Mounting the Enclosure 6
- Equipment Installation 7
7.1 Installing or Removing Cage Nuts 7
7.2 Alternate Mounting: 8 Tapped Hole Mounting Rail
8.Storage and Service 9
9. Warranty and Product Registration 9
Espanol 10
Français 19
Pycckn 28
PROTECT YOUR INVESTMENT!
Register your product for quicker service and ultimate peace of mind.
You could also win an ISOBAR6ULTRA surge protector—a $50 value!
www.triplite.com/warranty


1111 W. 35th Street, Chicago, IL 60609 USA · www.triplite.com/support
Copyright © 2015 Tripp Lite. All trademarks are the sole property of their respective owners.
1. Important Safety Instructions
SAVE THESE INSTRUCTIONS
This manual contains instructions and warnings that must be followed during the installation and operation of the product described in this manual. Failure to comply may invalidate the warranty and cause property damage or personal injury.
- Keep the enclosure in a controlled indoor environment, away from moisture, temperature extremes, flammable liquids and gasses, conductive contaminants, dust and direct sunlight.
- Leave adequate space at the front and rear of the enclosure for proper ventilation. Do not block, cover or insert objects into the external ventilation openings of the enclosure.
- The enclosure is extremely heavy. Use caution when handling the enclosure. Do not attempt to unpack, move or install it unassisted. Use a mechanical device such as a forklift or pallet jack to move the enclosure in the shipping container.
- Do not place any object on the enclosure, especially containers of liquid, and do not attempt to stack the enclosures.
- Inspect the shipping container and the enclosure for shipping damage. Do not use the enclosure if it is damaged.
- Leave the enclosure in the shipping container until it has been moved as close to the final installation location as possible.
- Install the enclosure in a structurally sound area capable of handling the load, or on a level floor that is able to bear the weight of the enclosure, all equipment that will be installed in the enclosure and any other enclosures and/or equipment that will be installed nearby.
- For permanent wall mounting, be sure to securely fasten the enclosure to the building structure before operation.
- Use caution when cutting packing materials. The enclosure could be scratched, causing damage not covered by the warranty.
- Save all packing materials for later use. Repacking and shipping the enclosure without the original packing materials may cause product damage that will void the warranty.
- Do not reship the enclosure with additional equipment unless the enclosure was shipped with a special shock pallet ("SP1" models only). The combined weight of the enclosure and installed equipment must not exceed the load capacity of the pallet. Tripp Lite is not responsible for any damage that occurs during reshipment.
- Use of this equipment in life support applications where failure of this equipment can reasonably be expected to cause the failure of the life support equipment or to significantly affect its safety or effectiveness is not recommended. Do not use this equipment in the presence of a flammable anesthetic mixture with air, oxygen or nitrous oxide.
2. Overview
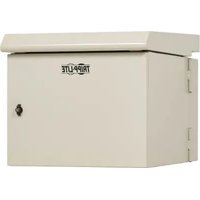
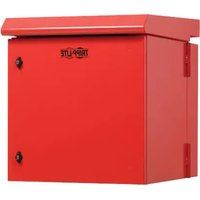
Non-swinging wall-mounted SmartRack enclosures accommodate all standard 19-inch rackmount equipment, regardless of vendor, and ship fully assembled for quick and easy deployment. They feature adaptable, heavy-duty cabinets in various heights.
Non-swinging wall-mounted SmartRack enclosures have variable mounting depths, ideal for servers. The cabinets include quick-release doors and side panels for convenient maintenance. Front access doors are reversible for installation flexibility. Front door and side panels are lockable. An optional rolling caster kit (SRCASTER) is available for easy maneuvering of enclosures.
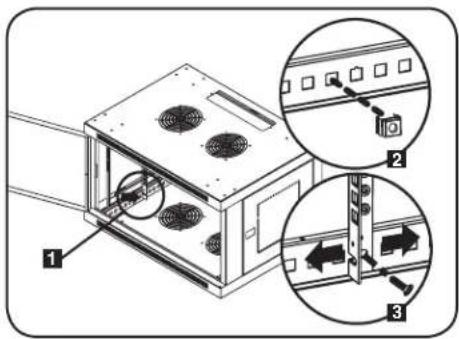
3. Feature Identification
Model SRW6U is shown. The other models have similar features, with the only differences being rack height and depth.
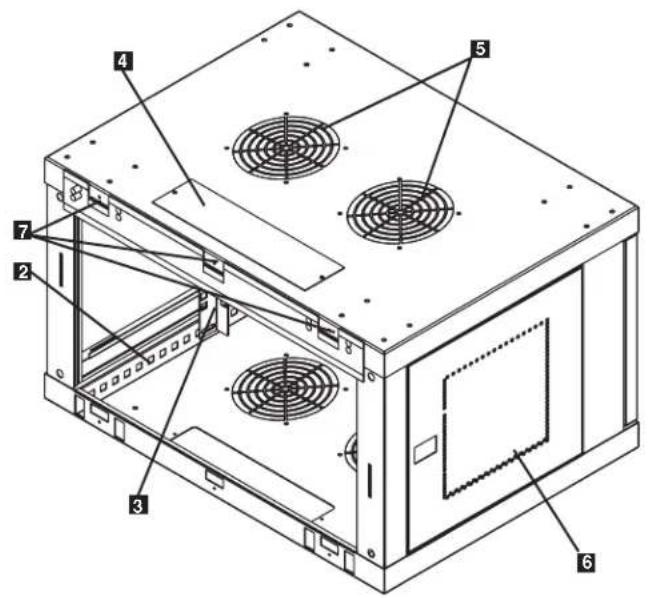
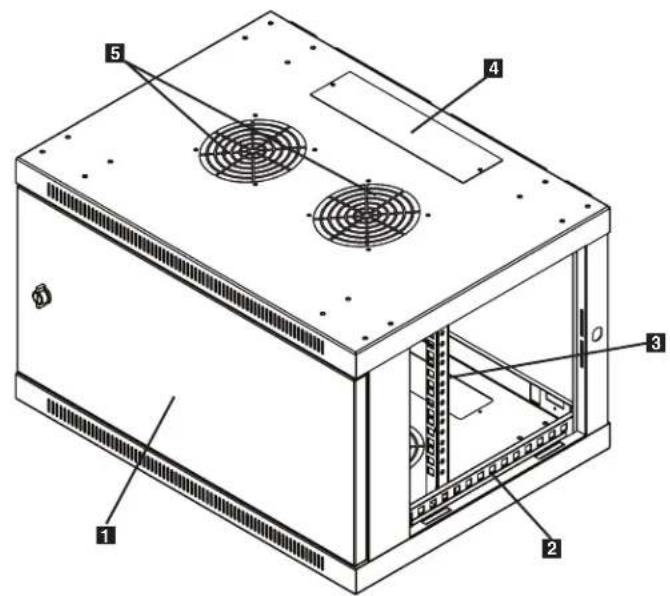
1 Front Door
2 Horizontal Rails
Vertical Mounting Rails
4 Removable Cable Access Hole Cover
5 Vents
6 Locking/Removable Side Panels
7 Mounting Notches (found on the enclosure's back panel)
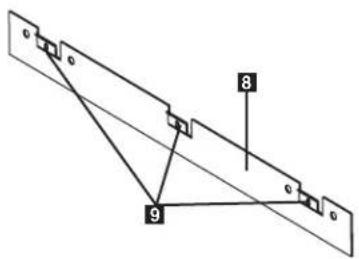
8 Mounting Plate (separate piece)
9 Mounting Plate Hooks
4. Enclosure Installation

Caution! Read All Instructions andWarnings Before Installation!

Warning: Rack enclosures can be extremely heavy. Do not attempt to unpack, move or install the enclosure without assistance. Use extreme caution when handling the enclosure and be sure to follow all handling and installation instructions. Do not attempt to install equipment without first stabilizing the enclosure.
4.1 Preparation
The enclosure must be installed in a structurally sound area that is able to bear the weight of the enclosure, all the equipment that will be installed in the enclosure and any other enclosures and/or equipment that will be installed nearby. Before unpacking the enclosure, you should transport the shipping container closer to the final installation location to minimize the distance you will need to move the unit after the protective packaging has been removed. If you plan to store the enclosure for an extended period before installation, follow the instructions in the Storage and Service section.
You need several tools:
You also need the following hardware:
- Level
- Appropriate hardware for wall mounting (not included)
- Phillips-head screwdriver
- Appropriate tools for wall mounting
4.2 Unpacking

Use at least two people to unpack the enclosure.

1 Move shipping pallet to a firm, level surface.
2 Open box and remove the four foam corner protectors. Save all packing materials for later use unless you are certain they will not be required. Packing materials are recyclable.
3 With one person on each side, carefully lift the enclosure out of the box and place on a firm, level surface.
Examine the enclosure for any damage or loose parts. Confirm all parts are present. If anything is missing or damaged, contact Tripp Lite for assistance. Do not attempt to use the enclosure if it has been damaged.

Never extend more than one component from the enclosure at a time.


Warning: Never attempt to lift or install without adequate help. Do not try lifting the enclosure alone.

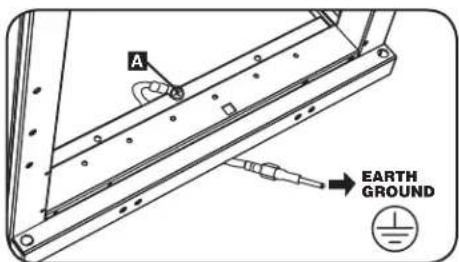
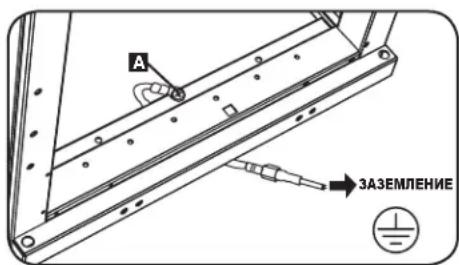
4.3 Ground Connection
All parts of the enclosure are grounded to the frame of the enclosure. Use the enclosure's front or rear threaded grounding point A and an M6 screw (included) to connect the frame of the enclosure directly to your facility's earth ground connection with an 8 AWG (3.264 mm) wire. Route the ground wire under the enclosure's frame to ensure unhindered door operation. Warning: Attach each enclosure to earth ground separately. Do not use the enclosure without an earth ground connection.
5. Enclosure Configuration
Before installation, be sure to plan the location and arrangement of components within the enclosure. Be sure all mounting rails are reversed or adjusted for depth, depending on your equipment configuration.
5.1 Door Locks
The front and back doors have locks that are accessible by the included keys.
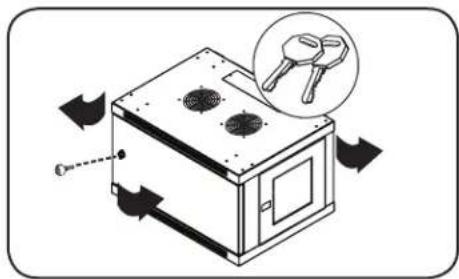
Each side panel locks using an L-shaped lever on the inside of the enclosure.
1 To unlock and remove the side panels, lift the shorter leg of the "L" up and pull it away from the side panel. Pull the tab on the side panel and remove it from the enclosure.
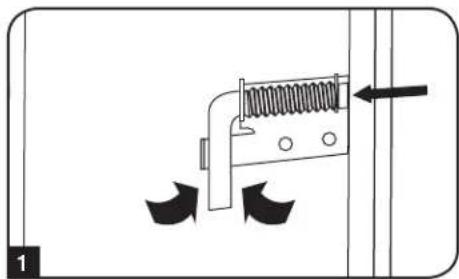
To re-lock the side panels, secure it in the proper position, lift the shorter leg of the "L" up and push it toward the side panel, back into the hole that it was in initially. Once it is in place, push the shorter leg of the "L" down to lock it. Note: To lock and unlock the side panels, you will need to have access to the interior of the enclosure.
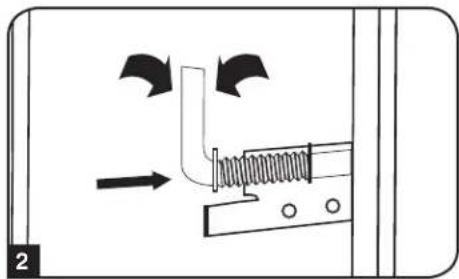
5.2 Cable Access and Management
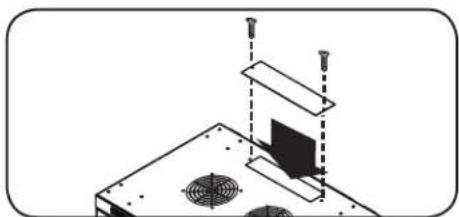
The top of the cabinet has a rectangular opening for cable access and management. This opening can be opened or closed by unscrewing or screwing in the removable cable access panel.
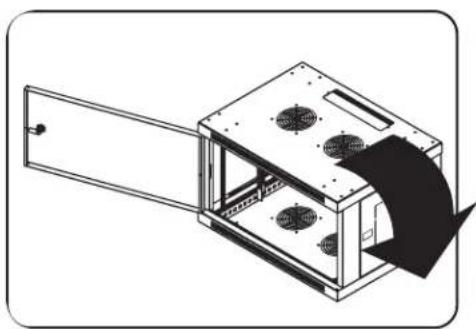
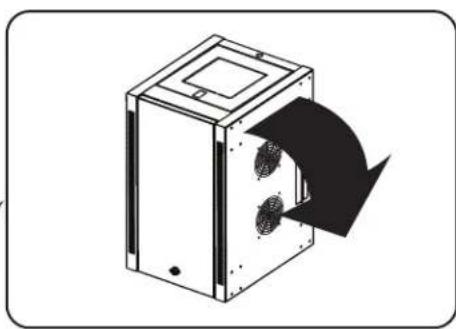
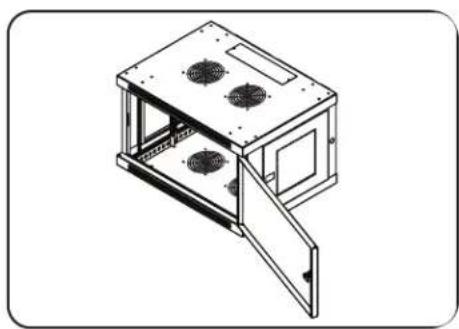
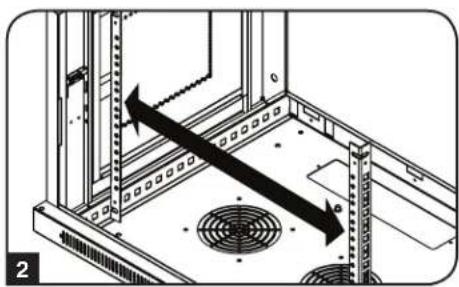
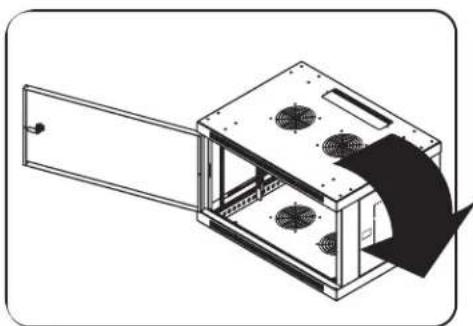
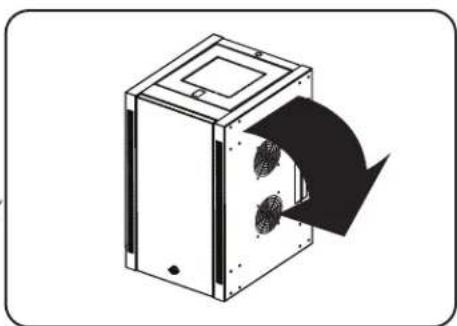
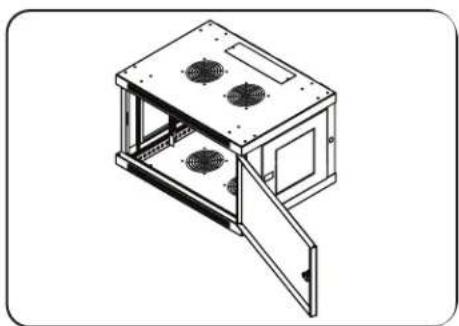
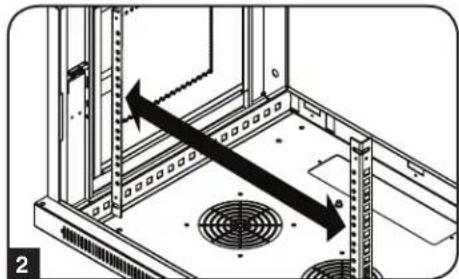
5.3 Reversing the Enclosure
In order to accommodate various rack configurations, the enclosure can be reversed. To do so, simply turn the enclosure over so that the doors open in the opposite direction.
5. Enclosure Configuration continued
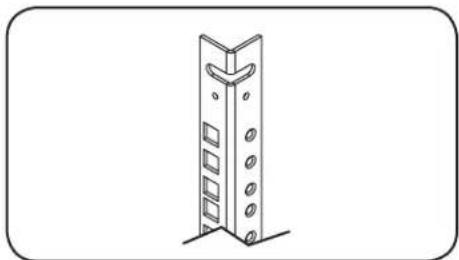
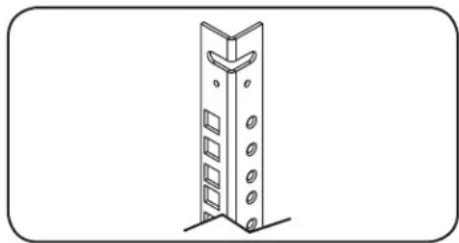
5.4 Mounting Rails
The enclosure comes with mounting rails that have both square and tapped holes for mounting rack equipment. To install equipment, use the included cage nuts and other hardware. (section 7.1 for installation of cage nuts.) Warning: Be sure to have the enclosure securely mounted to the wall, or in its final position on the floor, before mounting any equipment inside. Also be sure to have all the right adjustments on your rails before mounting equipment. (See below for Adjusting Mounting Rail Depth.)
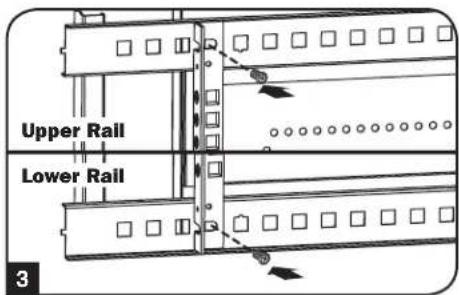
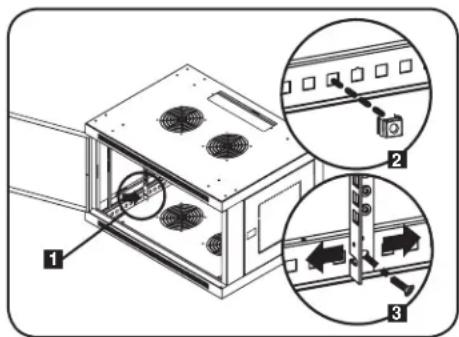
5.5 Adjusting Mounting Rail Depth
Warning: Do not attempt to adjust rails while equipment is installed in the enclosure. Do not attempt to use rails without screws installed. (2 per rail.)
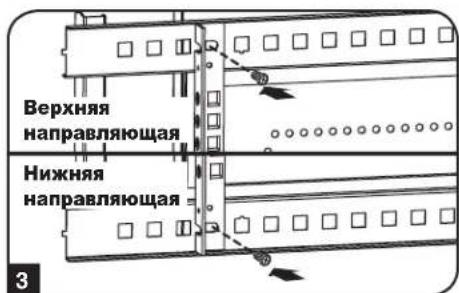
The 2 mounting rails are pre-installed to accommodate different mounting depths, depending on the model. Do not adjust the mounting rails unless your equipment requires a different mounting depth. The front and rear sets of rails can be adjusted independently in 1/4-inch (6mm) increments.
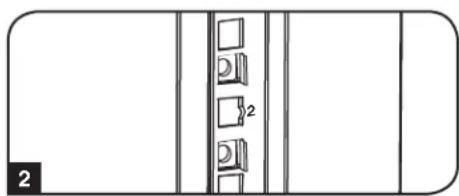
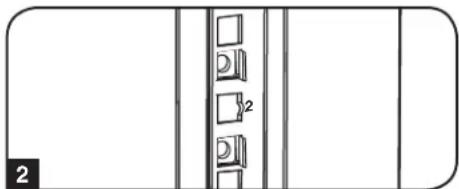
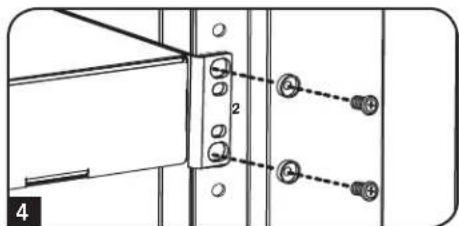
1 Each rail is connected to the enclosure with 2 screws and 2 cage nuts: 1 set in the upper corner and another in the lower corner. Using a Phillips-head screwdriver, remove the screws that fasten the rails to the enclosure.
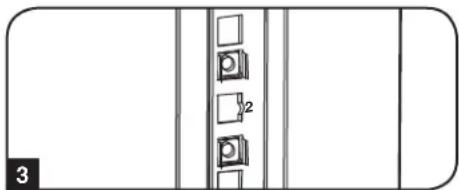
2 Move cage nuts to the desired depth and reinstall.
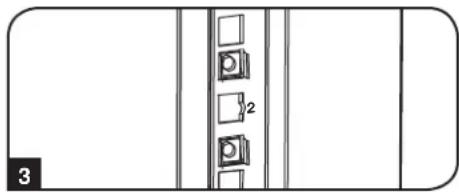
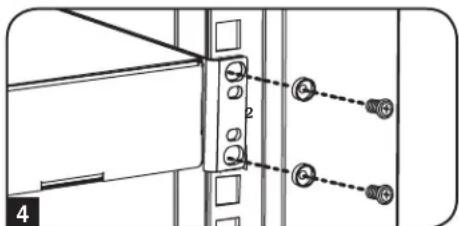
3 Slide the mounting rails to the desired depth and reattach them using the screws you removed in Step 1.
6. Wall Mounting the Enclosure
Warning: Do not attempt to mount the enclosure to the wall with equipment in the enclosure.
Note: Enclosure must be installed by a qualified technician. Before mounting, use a level and tape measure to position your mounting area precisely. Use appropriate fasteners (not included) to secure the enclosure to the wall. Use suitable mounting means when installing to cinder block, concrete, drywall or wood studs. Warning: The supporting surface must be able to safely support the combined load of the equipment and all attached hardware and components. For the actual weight, size and load capacity of the enclosure, view the product specifications and other support resources at www.triplite.com/support.
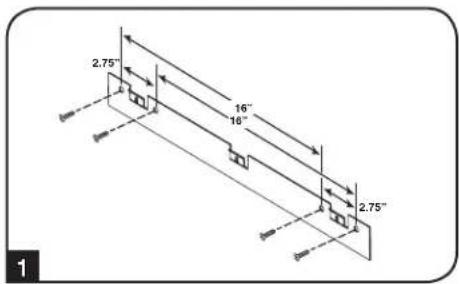
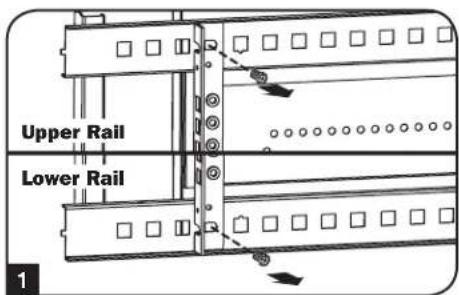
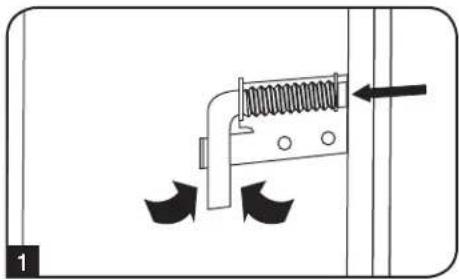
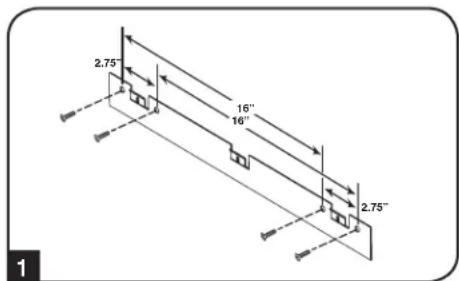
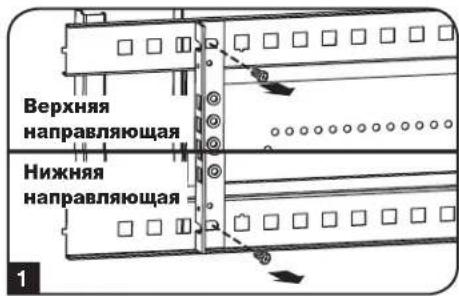
1 Using user-supplied hardware, attach the mounting plate to a wall or other suitable mounting surface. Each mounting hole can accommodate an M8 or 5/16" bolt and the holes are spaced 16" apart to accommodate standard stud placement as reflected in the diagram. Note: When mounting the mounting plate to the wall, be sure the three mounting hooks are facing outwards and away from the wall.
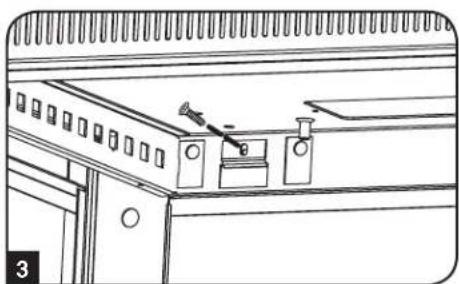
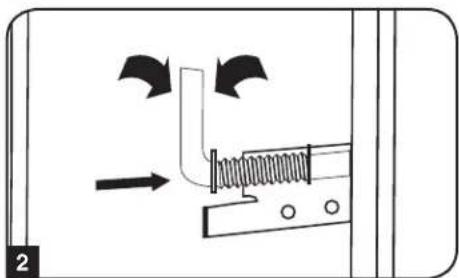
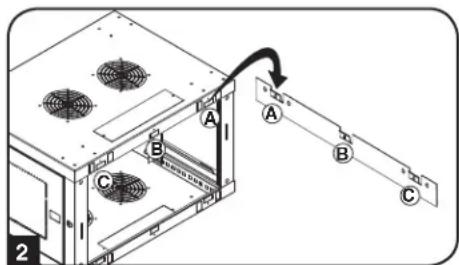
2 After the mounting plate has been securely attached to the mounting surface, hang the enclosure's three mounting notches onto the three mounting hooks on the plate attached to the wall. The notches will fit over the hooks and the enclosure should slide down onto the hooks until secure. Note: Mounting notches exist on both the upper and lower rails of the back panel. This allows for mounting in the standard or reversed positions.
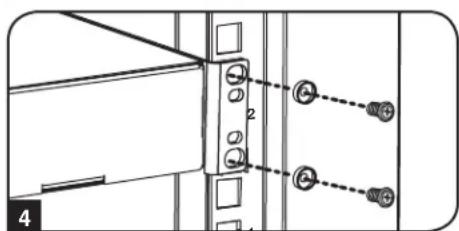
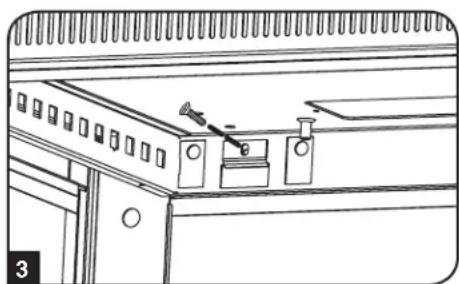
After the mounting plate has been secured and the enclosure hung properly, secure the enclosure to the mounting plate by installing the three supplied screws in the holes on the mounting hooks as shown.

7. Equipment Installation
Warning: Do not install equipment until you have stabilized the enclosure. Install heavier equipment first towards the bottom of the enclosure. Install equipment starting from the bottom of the enclosure and proceed toward the top of the enclosure - never the reverse. If using sliding equipment rails, be careful when extending the rails. Do not extend more than one set of sliding equipment rails at one time. Avoid extending sliding equipment rails near the top of the enclosure.
Note: The unit comes with two different kinds of screws for equipment installation, black and silver. Use the black mounting screws if you are securing your equipment to the square hole side of the mounting rail. Use the silver screws if you are securing your equipment to the tapped hole side of the mounting rail.
Note: The square holes in the middle of each rack unit are numbered and also include a small notch to aid identification. A single rack unit includes the space occupied by the numbered hole and the holes directly above and below.

7.1 Installing or Removing Cage Nuts
WARNING: The flanges of the cage nuts should engage the sides of the square opening in the rail, not the top and bottom. Follow the instructions in your equipment documentation to ensure proper installation of your equipment.
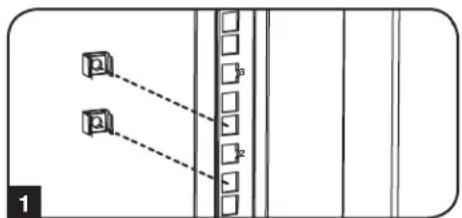
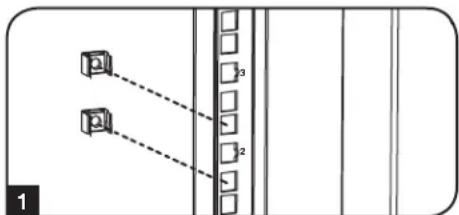
1 Locate the numbered square openings in the mounting rails where you plan to install your equipment. You will install cage nuts (included) into the square openings in order to provide an attachment point for the mounting screws (included). Note: Consult your equipment documentation to determine how many cage nuts will be required and where they will need to be installed.
2 From the inside of the mounting rail, insert one of the flanges of the cage nut through the square opening. Press it against the side of the square opening. Each flange should engage one side of the square opening, not the top or bottom.
3 Compress the cage nut at the sides slightly to allow the remaining flange to fit through the square opening. When the cage nut is properly installed, both flanges will protrude through the square opening and will be visible on the outer surface of the mounting rail. Repeat steps 1-3 until all required cage nuts are installed.
4 After installing the required cage nuts, use the included black mounting screws and cup washers to secure your equipment to the rack rail. Place the cup washers between the screws and the equipment mounting brackets.
Note: Your equipment may also include mounting hardware. Read the mounting instructions that came with your equipment before installing your equipment.
To Remove Cage Nuts, Reverse Steps 1-3
Note: You may wish to use a cage nut tool (user-supplied) to aid cage nut installation and removal.
7. Equipment Installation continued
7.2 Alternate Mounting: Tapped Hole Mounting Rail
Warning: Do not attempt to adjust rails while equipment is installed in the enclosure. Do not attempt to use rails without screws installed. (2 per rail.)
The 2 mounting rails are pre-installed for securing equipment using the square hole side of the mounting rail. To switch to the tapped hole side of the mounting rail, follow the steps below:
Each rail is connected to the enclosure with 2 screws: 1 in the upper corner and another in the lower corner. Using a Phillips-head screwdriver, remove the screws that fasten the rails to the enclosure.
2 Switch the rail locations. Ensure the tapped hole side of each rail is facing the front door.
3 Reattach the mounting rails.
Use the included silver mounting screws to secure your equipment to the rack rail. Place the cup washers between the screws and the equipment mounting brackets.
Note: Your equipment may also include mounting hardware. Read the mounting instructions that came with your equipment before installing.

8. Storage and Service
Storage
The enclosure should be stored in a controlled indoor environment, away from moisture, temperature extremes, flammable liquids and gasses, conductive contaminants, dust and direct sunlight. Store the enclosure in its original shipping container if possible.
Service
Your Tripp Lite product is covered by the warranty described in this manual. A variety of Extended Warranty and On-Site Service Programs are also available from Tripp Lite. For more information on service, visit www.triplite.com/support. Before returning your product for service, follow these steps:
- Review the installation and operation procedures in this manual to insure that the service problem does not originate from a misreading of the instructions.
- If the problem continues, do not contact or return the product to the dealer. Instead, visit www.triplite.com/support.
- If the problem requires service, visit www.triplite.com/support and click the "Request Return (RMA)" link. From here you can request a Returned Material Authorization (RMA) number, which is required for service. This simple on-line form will ask for your unit's model and serial numbers, along with other general purchaser information. The RMA number, along with shipping instructions will be emailed to you. Any damages (direct, indirect, special or consequential) to the product incurred during shipment to Tripp Lite or an authorized Tripp Lite service center are not covered under warranty. Products shipped to Tripp Lite or an authorized Tripp Lite service center must have transportation charges prepaid. Mark the RMA number on the outside of the package. If the product is within its warranty period, enclose a copy of your sales receipt. Return the product for service using an insured carrier to the address given to you when you request the RMA.
9. Warranty and Product Registration
5-Year Limited Warranty
Seller warrants this product, if used in accordance with all applicable instructions, to be free from original defects in material and workmanship for a period of 5 years from the date of initial purchase. If the product should prove defective in material or workmanship within that period, Seller will repair or replace the product, at its sole discretion.
THIS WARRANTY DOES NOT APPLY TO NORMAL WEAR OR TO DAMAGE RESULTING FROM ACCIDENT, MISUSE, ABUSE OR NEGLECT. SELLER MAKES NO EXPRESS WARRANTIES OTHER THAN THE WARRANTY EXPRESSLY SET FORTH HEREIN. EXCEPT TO THE EXTENT PROHIBITED BY APPLICABLE LAW, ALL IMPLIED WARRANTYES, INCLUDING ALL WARRANTYES OF MERCHANTABILITY OR FITNESS, ARE LIMITED IN DURATION TO THE WARRANTY PERIOD SET FORTH ABOVE; AND THIS WARRANTY EXPRESSLY EXCUSES ALL INCIDENTAL AND CONSEQUENTIAL DAMAGES. (Some states do not allow limitations on how long an implied warranty lasts, and some states do not allow the exclusion or limitation of incidental or consequential damages, so the above limitations or exclusions may not apply to you. This warranty gives you specific legal rights, and you may have other rights which vary from jurisdiction to jurisdiction).
WARNING: The individual user should take care to determine prior to use whether this device is suitable, adequate or safe for the use intended. Since individual applications are subject to great variation, the manufacturer makes no representation or warranty as to the suitability or fitness of these devices for any specific application.
Product Registration
Visit www.triplite.com/warranty today to register your new Tripp Lite product. You'll be automatically entered into a drawing for a chance to win a FREE Tripp Lite product!*
- No purchase necessary. Void where prohibited. Some restrictions apply. See website for details.
Tripp Lite has a policy of continuous improvement. Specifications are subject to change without notice.


1111 W. 35th Street, Chicago, IL 60609 USA • www.triplite.com/support
1111 W. 35th Street, Chicago, IL 60609 USA • www.triplite.com/support

1111 W. 35th Street, Chicago, IL 60609 USA • www.triplite.com/support
1111 W. 35th Street, Chicago, IL 60609 USA • www.triplite.com/support
PyKOBODCTBO NOJIb3OBaTeJIA
Bam notpebyotc HecKoJIbKO INHCTpyMeHTOB:
Kpome toro, Bam notpe6yETc cneDyoUaOchactka:
- YpoBeHb
KpeToo6pa3HaHa OTBePtKa
HhctpyMeHTbI,INcNoB3yEmble nHaCTeHHoro MOHTaxa
-Ппспocбнгдпнспго MOHTaKa(BKOMNKeT NOCTaBKN He BXOДТ)
4.2 PacnaKobka

IpaacnakOBbBaHnHaKaopaTpe6yETcHe MeHee DByx YenObek.

I IepemecntTne TpaHcnpTnpoBOOHbIK KOHTeHep Ha npOHyIO pOBHyIO NOBepxHOCTb.
OTKpoTKe Kopo6ky Hn3BNeKInTe YeTbIpe YrIOBbIX AmOpTn3aTopa H3 NeHONnacta.Bce ynaKOBOHybe MaTePnaJIb CneJeYet CoXPaHHTb DnnoCneDyUoero nOIOB3OBAHnE, cINn BBy He y6ExeHbBTOM, 4TO OHN BoJee He Notpe6yOTc. YnaKOBOHybe MaTePnaJIb NOIIeKAT BTOpHNO Pepe60Tke.
PacnoJIOKINBIMCb no ONDHMy cKeNoIcTOpBOHb, AkkypaTHo BbInbTe 13 Kopo6Kn I NmoeCTnTe eHa npOpyu npOBHy IOBpXHOCTb.
0cMoTpIe 1kaF ha npEMeH HAnuH KAKx-NbO nobpeKdEHH nHn He3akpenHeBHX Detanei. Y6eNTecb B HauHm BceX Detanei. B cnyae OTCyTCTBn IN NOBpeKdEHn KaKx-NbO Detanei o6paTntEc 3a nomouB b KomnHIO Tripp lte. He noIb3yTeCb kFaPOM B cnyae ero nobpeKdEHn.

Hn B Koem cnyae He n3BneKaIte n3 ukaΦa 6onee ODHoro KOMnoHETa ODHOBpeMeHHo.


BHMaHHe! Hn B KOem cnyae He nbTaIaTecb n3BNeKaTb WkaΦ m3 ynaKOBKn mnn yctanabJnBaTb ero 6e3 nonHOceHHo nOmoU. He nbTaIaTeCb noDHMaTb WkaΦ B ODNHOuyk.
4.3 3a3emJehne
Bce detanu shkaopa 3a3emnnoTcpe3 eropkapac. nnpamoro coeHneHnKapkaca ukaopa c mno hno 3a3emnne HnBaWero obekta c nOmoIb npoBa oAkan6pom 8 AWG (3,264 MM) cneJeT nCnlo3oBaTb nepeHIO nni 3adHIO TOky 3a3emnHn A n BnHT M6 (noCTabnnmB b KOMnKeTe). nna
obecneueHHN 6ecPnepnTCTBeHHoro OTKpbIBAHn I 3akpbIBAHn DBepuI npOBeDnte 3a3emnHOu npoBD nod kapkacom shkaopa. BHMaHHe! KaXdbu shkaF donKeH noCoEHHrbcK WnHe 3a3emnHn no
OTdBelhocTN. NOnb3oBAHHe He3a3emnHbIM shkaFOM He DonyckaeTcR.
5. KomnohoBka wkaqpa
Ipeed yctahOBKO kkaopa 6ra3aTeJIbHO cneJeT coCTaBnTB IhaH erO pa3MeUeHnN CXemy paCIOJIOKeHn KOMIOHETOB BVHTpH Hero. Heo6xOIMo y6eHITbcB TOM, UTO BCE MOHTAKHbIe HAnpaBIAHcIe NOBepHyTb HaDnEkaaMm Oba3om NIN OTpeYInPOBaHbI IO Iy6HHe B 3aBNCIMocTn OT KOMIOHOBKn BaWero 06OpOyOBOAHn.
5.1Дверныезамки
IpeenHn 3aHnra DBePbO OChAuEhbl 3aMKAMN, OTnnpaembIMN C NOMoUBO BXODAUX B KOMnTeKT KIOHcH.

KaJdaI360Kobix nahEn 3aHpaTc npn NOMOu I-6pa3HOro pbuaKc C BVHTpeHHe CTOpOBhI uka.
1 TnO TnnpaHn H ChTnB 60KOBbix NaHeNe CnEduyTe NoDnTb BBepx KopoTkoe PnEyo F-6pa3Horo pbMaXka N OCTpaHHTb erO 60KOBoi NaHeN. BbHyTB 60Koby NaHeNb n3 WkaFa, NotryBee 3a R3bl4OK.
2Дя NOBTOHOFФИKCAUH6OKOBONAHENHACBOEMMeCTeCNEyETYCTAHOBHTeB HNYKHOILOXKeHME,NOHHTB BBePb KOPOTKOE NPEOΓ-OBpa3HOROpbuaKKa HADABNTb HA Hero B CTOPHY6OKOBONaHEIN CUEbIO NOMEcTbE O6pAHO B TO OTBepCTne,Γe OHHXoUNcNepBOHaJbHO.10cNe TOrO KAKOPOTKOE NPEOΓ-OBpa3HOROpbuaKKa OKaXetcH a CBOem MeCTe,CNEyET3aФHKcIPoBaTb ERO HAKATnEM BHN.IPumeyHae.DJIa 3aIupaHua U omnpaHua 6OKOBbIX naHeenu He6xOduMo umemb docmyn bHympu KaFa.
5.2 OTBepCTne IJRA BBOJa Ka6eJeN IOTNMM3aunr Ka6eJIbHbIX CoeINHeHH
B BepxHn naHei nkaFpa HmeeTc npMoyroIbHoe OTBepCTne IIN BBOda KaBeJIe N IN ONTMaHbHO pa3MeHn. 3TO OTBepCTne MOKeT 6bITb OTKpbIto NIN CKpbIto NytEm BBHHuBaHn B Hero CbeMHo naHei KaBeJIbHO R BOda.
5.3 NpebopaunbaHne ukaFa
Ipeaun3aun paanHbix BapnAHTOB pa3meHnna Kaopa donyckaTcnepeBopauBaHne erO Kopnyca. Ira 3rO cneNyET npocTo nepeBepHyb Kopnyc
5. KomnohOBka wkaopa npoDOnJxHne
5.4 MoHTaXHbIe HappaBnIoune
山kaФ noCTabJIeTcS c MOHTaXbHIMn HAnpaBnIOUmIM, KOToPbIe IMeOT KAK KBaIpaTHbIe, TAK IN pe3b6ObIe OTBepCTN I dR moTAtxa CTOeHrO OobpyoBaHnA. IINy UCTaHOBKn OOBpyoBaHnCneDyET uCN0JIb3OaTb NOCTABnEMeBb B KOMJIeKTe 3aKaIaNbIe raIKN I pOHyO OCHAcTky (npraDOK yCTaHOBKn 3aKApIbIX raek CM. B pa3dene7). BHMmaHne! PpeD yCTaHOBKn KAKoro-Ni6o oobpyoBaHnB HbTp b KaKaF Heo6xOJMo 06eMntbcr B Tom, qTO OH NaExHo 3aKpenIe Ha cTeHe NII B Dpyrom KoHeYHom nOxoKeHN. KpOme TorO, nepe MoHTaXkOM oOBpyoBaHnHa Heo6xOJMo DoJIxxbIM m Obpa3om OTpeRyIpopoBaTb BCE HappaBIAIOUne. (CM. npDeCTabJIeHHbI Hnxke pa3dien "PerynpobKa rIy6nbI MoHTaXbIX HappaBIAIOUnx").
5.5 Perynnpobka rny6HHb MoNTaXHbIX HapabNIOx
BHHMaHHe: He nbItaTeCb perynnpoBaTb HappaBnaOuIe npy yctaHOBneHHOM B uKaΦ o6OpdyobAHm. He nbItaTeCb nCnoJb3ObaTb HappaBnaIOUme 6e3 yctaHOBKn BHTOB (no 2 Ha KaKdyu HappaBnaIOUyO).
2 MOHTaXHbIe HAnpaBnIooJe yCTaHabNBAIOcTa Ha 3aBOe-ntROBtTeHe n paCCHTaHbHa pa3MeueHne o6OpYOBaHnC p a3NIuHO MoTAtXHoI TnyBHO B 3aBNCIMOCTN O KOHKpeTHoM OMeH. He peYInpTyMe MOHTaXHbIe HApBaBnIooJe 3a NCKJIIOUeHmE Tex CNYaeB, KOrJa dIy YcTaHabNBAeMORo BAMn o6OpYOBaHnI Tpe6yeTc npra MOnTaXHnA rnyBHa. IpeDnHa n 3adHra rpynnbI HapBaBnIooHx MOryt peYInpOBAbTcB He3aBNCIMO Dpyr OT Dpyr c WArOM 6 MM.
1 KaKaJa HApBaBnIouaŋ npKpennHea K KopnyCy uKaΦa npn NOMOu 2 BnHbN 2 3akNaHbIX raeK: OHa npa TakaX DeTaneepacNoJaraTeC BepxHem yIy, a Dpyra-B HnxHem. C NOMOu bKpcToo6paHoi OTBePkn BBePbHne BnHTbl, KOtOpble KpeRr HApBaBnIoUe K KopnyCy uKaΦa.
2IpeMeCTNTe 3aKnaHbIe raIKn HaKeNaeMyIO rynBuHy N yCtAHOBITe BnHTbHa MeTO.
3 CbHbTe MOHTaXHbIe HAnpaBnIOUHe Ha JKeNaemyIO IHy6Hy N ChOBA 3akpeNITe IX C NOMOuBIO BnHTOB, BBiBepHyTbIX Ha lare 1.
6. Nopradk HacteHHoro MOHTaJa KaΦa
BHHMaHHe! He nbItaIteCb KpenHTb WkaΦ K cTeHe C hAxoJuaMcB HByTpN Hero o6OpydoBaHHeM.
PpumueaHue. Ycmaohka uka fdoJnKa npou3oobumc monbko KeanuuppuoabHHm mexHueckum cneuaucmom. Ipeo hauanom mohmaka cledyem moho Hamemumb Mecm 6dyuueo pacnoiokehura uka fca c nmoouy oyeha u pyneku. Dna KpenneHua uka fpa K cmene uocno lyume noxoduue dna 3mou eenu kpenexkhe deamaru (E komnekm nocmaeku He exoam). Ppu KpenneHu K 6emohy, ukanokemohy, auncokapmohy unu cmoukam depoeHHOzo kapkaca ucNoIb3yume coombemcmeHyoue MOmaxkhble npucnoocbenue. Bhumane! Onopnar noepxnoctb doonka c 3anacom ebidepkueamcb cymmaphyu haay3ky, co3daaemyo obopyoabaumu u csemu 6xoaduumu b Komnekm demanmu Ochamcu u dpuyuma k omnoehmamc. Cm. mexHueckue xapakmpucmuu 3denui u dpyue ecnpomozamnbie pecypbcic yemom paKmuuecko2o eeca, pa3mepa u donycmuoi Haay3ku uka fha cmpaHue www.triplite.com/support.
1 C nomoubIc o6ctBeHHo KpeJxHoi OCHAcTKn npKpeINTE MOHTaXHyIOJaCTnHy K cTeHe nnDpyro IOnxOJaIeI dIra MOHTaKa IOBepXHOCTN. KaKDoe MOHTaXHOe OTBepCTne pacChTuHa 60NT M8, a paccToHHe MeJy HmM COCTaBnEET 40,5 cm, qTO oecneuBaet BO3MOxHoCTb pa3MeueHnHa CTehax Co TAnapTHbIM KApKacOM, KaK NOKaHO Ha CXeME. IpumeeHue. Ppu KpenHeuMoHmaxHoII PaacMuHcBIX KcpeKa HapaeHbI Hapky om cmeHbl.
2 Pocne HndexHoro npKpeHnMoHTaXHO NIOBepxHOCTMOHTaXHaBeCbTe KOpNcU KaTAKIM O6pa3OM, YTO6bI TpM MOHTaXbIX KPOKA npKpeHnHO K CTEHe NpACTHB BOuIN B TPN MOHTaXbIX OTBepCTNA B KOpNc. PpN 3OM OTBepCTNA HacaxNBaOTCA HA KPOKN, a KOpNc DOJKeH CNO3TN Ha KPOKN Do yOnpa. Ipumeahue. MoHmaxHbJe OMBepcmua UMeiOMcKa Ka H eepxHe, maK u Ha HuxHe HapBaIIouux 3aoHe naHenu. 3mo oBeceyuBaem 803MOXHoCm b MOHmaxa e O6bIyHOM U nepeeepHymom noloxHeuX.
3 Nocne HaDexKHOPOnpKpePHeHMOHTaXHOI PnactHbI INpAbBnHOr HabeUmbHaN KOpTyCa 1kaΦa npKpeNTe KopYc K MOHTaXHOI PnactHne, BBePHyB TPN BXOJaux B KOMJIeKT BnHTA B OTBepCTNa MOHTaXHbIX KpHOBK, KaK NOKa3aHO Ha pncyHke.
7. yctaHObKa o6OpyDoBaHnIa
BHHMaHHe! He yctaHaBnBaIte o6OpyDobAHne do o6ecneueHn yctoynBOcTH uKaΦa. ChaNa cJeNyET yCTaHaBnBaTb 6Oone TjKeJeoe o6OpyDobAHne, pa3MeIaer erO B HxKHe qAcTH uKaΦa. YcTaHaBnBaIte o6OpyDobAHne HaunHar C Hn3a uKaΦa No HAnpaBJIeHNIO BBepx - Hn B Koem cnyae He hao6opot. PpN nCnoIb3OBaHm HAnpaBraIooX dIy yCTaHOBKn O6OpyDobAHn co6JIoAaTe octopoxhocTB npN IX BblBHXKeHN. He BblBraIte 6Oone ODHor rpynnbI HanpaBraIooX OHOBpeMeHNo.
CTapaTecb He BbIDBnraTb HnpaBnIoune dny yctaHOBKn O6OpydoBaHH, pacnoNoXeHHbIe B BepxHe YacTHu KaFa.
Ppumeyaue. TaHbMnOcmaenmec E KOMPnkeMe c BuHMaMu dey paunhBx munoe dmoHmka o6pyoaeHua. MoHmKbIe uHmbIeepHOzema cnedyem uonb3oaeMb e mom cnyae, ecu bkpene mce o6o6pyoaeHue K mo cmopone MOHmKHO Hapnaenoue, kcmopar Chabxena KeadpamHbIMU omepcmmu. MoHmKbIe buHmbIe cepepcmozo ueema cnedyem uonb3oaeMb e mom cnyae, ecu bkpene mce o6opyoaeHue K mo cmopone MoHmKHO Hapnaenoue, kcmopar Chabxena pe3b6oBuMu omeepcmmu.
Pumuehue.Keadpamhie omepcmue cepedune kaskdozo wka pnohmepoeahu u meom heonbwyho haceky dny yodcmea pacno3haaHua. B kaskdomehohm wka fy umeemc mecm, 2e paonanaemc hymepoeahnoe omeepcmue u omeepmua, haxoayuece hernocpecmehno had u noHUM.

7.1 YctaHOBka IIN CHrTne 3aKnadhbIX raeK
BHIMAHHE! OTRn6bI KpOMOK 3aKnadhblx rae kdoJXHbI 3auenPbcr 3a 6okobbe, a He BepxHm HnxHm Kpa KaBpaTHoro OTBepCTN B HanpaBnHOse. IIn oBeCneueHH npabHbOcTH yctahOBKn Baewero obopyoBaHH cneyte yka3aHHM, N3IOKeHHbIM B conpoBODntelHoDokymeHTauuK Hemy.
HaiHte HymepoBaHHbkeBapthbte OBePCTn BMOHTaXhHX HanpaBnHOxN, KOTOpbe Bbl PAnHypeTe nONb3OaTb DnY yTaHOBKn CBOero 06pOydoAHn. BCTabTe 3aknaHbIe raKu (n3 KOMNeKTA) B KBaPaTHbte OBePCTn C cEJIbIO o6ceueHn TOKn KPeNHeHn Dn MOHTaXhBX BNTOB (NoCTABnREMbIX B KomnKeTe). PumeyHue. Dn onpeDeneHn HeobxOduMo2o KOJueCmBa 3aKaNaDbHx 2aek U Meem ux YcmaHOBku O3HaKOBmecb C conpoBodumEnbHou DokyMeHmaueu K eauemy 66
2IpoeHbTe OINH N3OTRn6OB KpOMK 3aKnadHO raKN YpeE3 KBaDpaTHOE OTBepCTNE C BNYtpENHei CTOpOHb MoTAtXHoH HapBaBnHOue. BdABITE ee NO HanpaBNeHHO K6OKOBMy KpaIO KBaDpaTHORO OTBepCTN.OTr6bIKPOMK 3aKnadHBIX RaEK DOnJKNbI 3aCenIIaTbcra 3a6okobie,aHE BepxHm HkHN KpaRAKaDpaTHORO OTBepCTN.
3 CnErKa Hauabnte Ha 3aknadhyraky No6okam, YTO No3BOHNT dpyrOmy OTN6y KpOMKn npOHTupe3 KBaDpaTHoe OTBepCTne. Pn PpaBnblHOY yCTaHOBKe 3akLnHOH raKNo 6oa OTN6a ee KpOMK BbIaHOTc C o6paTHOH CTOpHOb KBaDpaTHORO OTBepCTNA BnHbHa BHeUHe NOBepXHOCTM MOHTaKHOH HapBaBnIOUe. NObTOpAte 1-3 Do Tex nop, noka He 6byt YcTaHOBHeBb BCE Heo6xOIMbIe 3aknAdhhe raKN.
1 Pocne yctahOBKn Heo6xOaMbix 3aKnadHbIX Raek npKpenTe CBOe oBopyoBaHne K CToeuHO HnpaBraHoue C NOMOUsIOCTaBIAReMbx B KOMNKeTE MOHTaXHbIX BNHTOB UepHOrO UBeTa N aWeo6bpa3HbIX Wai6. IomeCTte aWeo6bpa3HbIe Wai6bI MeJy BnHTAMn M OHTaxHbIMN KPOHtEiHAMn DnI KpeJIeHnA oBopyoBaHnR.
PumueaHue.Baue obopyoohue makke moKem noCmaenbce E KOMnKeMe C MOHmAgHbIMu npucno6neHmu. Ipepe ycmahokou c0e2o obopyoohua O3hakommbec c yka3aHuraMu nO MoHmaxy, noCmaenbEmbmu e KOMnKeMe c HUM.
IIN3BneHn 3aKnadhbx raeK nobTopte warn 1-3 B o6paTHOM npAke
PpumueaHue. Ppu keaHaHu ycmaHOky u 3aeneHue 3aknaDbix 2aek MoxHo npou3eOoDb c nomoubocuunbHO20 UhcmpyMeHma (E KOMnKeM nocMaKU He ExoDum).
7. YctaHOBka o6OpydoBaHn npoDoJIxKeHne
7.2 AInbTePhaTHBbI CNOCo6 MOHTaXa: MOHTaXHa HAnpaBJIouaJc pe3b6OBbIMN OTBepCTnA M
BnMaHHe: He nItaTaeCb perynnpoBaTb HappaBnaIOuOne npy uTaHOBJIeHHOM B wkaF o6OpydoBaHH. He nbIaTecb HCNoIb3OBaTb HappaBnaIOUcne 6e3 yCTaHOBKn BHTOB (no 2 Ha KaKdyo HappaBnaIOUyO).
Ha 3aBoe-3nroBntene 2 MoHTaxhble Happabnlouie yctahOBneHb npKpeIeHne o6OpOBAHnC nCIOB3oBAHnEM ToCTOPHO Happabnlouie, KOtOpA Ch6xHe HA BApTaHbIMN OTBepCTnM. IIN nepeXoDa Ha nCNOJb3oBAHn To CTOpOHb MOHTAXHO Happabnlouie, KOTopA CH6xHe pe3b6oBIMN OTBepCTnMn, Heo6xOIMO BInONHnTcNeYUOuie DeECTBN:
Kakda HappaBnloa npkpenHe Ka Kopnyu kkaopa npn NMOUy BByx BNTOB, OINH 3 KOtOpbIX pacnoaraetc B BepxHem yJy, a pyro- - B HxHem. C NOMOuBo Kpctoo6pa3HOI OTBeptTKBbBepHTe BNTbI, KOtOpble KpEaT HappaBnlouie K Kopnyu kkaopa.
2 NomeHnTe pacNoIoxKeHHe HAnpaBJIouxN. Y6eDITecb B TOM, yTO KaKJdA n3 HnPaPbIauOxNpacnoIaraeTcTaKIM O6pa30M, yTO ee CToPOHa C pe3b6oBbIMN OTBepCTnMa M 6paUeHa K nepeHne IDbepue.
TIOBTOPHO3aKpeHnTeMOHTaXKhHbHeHaNPaBJIHOUne.
4 PnKpeNITe O6OpYOBaHHe K CToeHbIM HAnpAblraIOUcM C NcNoIb3OBAHNEM BXOJaUNB KOMPTNEKT MOHTaXHbX BnHTOB Ce6epnCTOro Ubeta. IomeCTe YaWSeOpa3HbIe WaBb MExdy BnHTAMN MOHTaXHbIM KPOHtEHHaM DnI KpeJIeHnO6OpYOBaHnR.
PpumueaHue. B KOMnEkm nocmaeku baweO obopyoabaHua moay makke exodum MOHmxaHbI npucno6neHua. Npeed ycmaHOeKo obopyoabaHua 03HaKOMbmeC c yka3aHuaMu no MOHmaxy, nocmaenEmmu e KomnEkm c HUM.
8. XpaheHne n TexHnueckoe o6cIyXnBaHne
XpaHne
KaФdoJKeH XpaHnTcB C NOMeUeHmN C KOHTpOInpyEmbIM MKNpOKINMaTOM BdaIIN OT NCTOCHIKOB BlaIIN, 3KCTpeMaJIbHbIX TeMnepaTp, BOCIIaMeHryoXxCg KIqKocTe Hra3OB, 3NeKTpOnpoBOdHbIX 3arpa3HNteNe, PbIN IN PpAmORo coJIHeHOro CBeta. IIO Bo3MOxHOCTn XpaHNTe KaΦ B erO 3aBOcKnOpTHou ynaKOBke.
CepBnchoe o6cIyXnBaHne
Ha npdykun kOMnAHm Tripp Lite daetc orpaHueHHa rapaHTn yCIOBn KOTopo n3IOKeHb B HactoIeM pyKOBOCTBe. TaKoe dcTynhpa3JIMHbIe nporpammbl npdneBaemr rapaHTm n o6cyxuBAHn Ha o6bkeTe OT kOMnAHm Tripp Lite. nnoIyehn 6Oee noPobHOH mOpmaun O cepBnCHom 0cbnyxBAHm nocTeTbe Be6-caT kOMnAHm www.triplite.com/support. PpeD Bo3BPaToM npdykun dna obcnyxuBAHn, BInoINHe t Cne dyUcne DeiCTBnA:
- Ppocmptne HNCTpykun no yctahOBke n 3KcIpyatau, n3noxeHHbE B HactoJem pyKOBOdCTBe, YTO6bl y6eHTbcra, TTo npobnmbipnpcxOaTHe n3-3a He npabHbHO NOHIMAHIN IHCTpykun.
- Ecn npobnema coxpaHareTc, He obaaauTecb n He Bo3BpaauTe n3dene ToproBOMy nopeHky. BmecTo 3toro nocette Be6-caNT www.triplite.com/support.
- Ecni nIpeHn np6bnmI tr6byTcpeMHT, nocTe TBe 6b-caTI Ww.trpIite.com/support npeHnnte no cblke Product Returns (Bo3bpat npdykun). 3decMoXHO cEnaTb 3anPoc O Homepe pa3peHnna HA Bo3bpat (RMA), KOTOpB He06xOIMn IpnpeMOHa. B 3to npocTo INTEPAKTHBOHOF pOme HyKHO 6ydt 3aoNHNtB Homep moENu yCtpoCTBa n erO cepHnHbHomep, a taKe o5uyIO IHOpmaUIO o NOKynateHe. Homep RMA BMeCTe C INCTpyKUNMn NO OTnpABKE 6ydt BbcNAH No 3NeKTPHOH NOte. JIO6bIe NOBpeJXehnRA pOdykUnn (npMbE, KOcBEHbE, yMbIuNEHbE nIN NOoCHBle), NOLyueHHBe B pe3yNbTaTe TpaHCnopTIPOBKn B KomnAHIo Tripp Lite nB yIOLNHOMeHHB cepBCHb CEHTp, rapaHTne He NOKpbIAOTc. TpaHCnopTIPOBKa npOduKun B KomnAHIo Tripp Lite nB abTOPI3OBAHbCEPBCHb CEHTp DOJHXa B6tB ONNAeHa OTnpABHTenEM. Ha BHeuHE CTOPoHE YnakOBKn HNaEsCeHrne HOMep pa3peHnHA BO3bpAT. Ecn npOdyKT HaxOITcRa H rapaHTnB, BNOXtke KONIO YekA nIN DOKyMeHTa Ha npno6peTeHne. DoCTABK npOduKun dIra ObcnyKBaHnO cOyUeCTBnIe Yepe3 3acTpaxOBaHbIX PepeBO3uKNOB IO aDpccy, NOlyueHHOMy BMeCTe C pa3peHnEM Ha BO3BPAT.
9. rapaHTnHbIe 683aTeJbCTBa
OrpaHnueHHra rapaHTna 5 net
PpOaBcRapAHTpyETIIN DaHnro PPOyKTA OTCyTCTBne DepeKTOB B MaTePnAax N TexHONrnx B TeueHe 5 let OT daTbI nepBvHou IpoaJx npu yCIOBmNCNtB30BaHnra ERO B COOTBeTCTBnco BCEMN pnpMeHNbIMN INCTpykUmaMn. B cnyae BblBneHnRA DepeKTOB, CB3aHHbx CO CBOIcTBAMn MaTePnAra INKaueCTBOM IN3rTOBHeHn RAHHo IN3dEInna B TeueHnE yka3aHHo nepNoDa, PpOaBeu o63yeTc, n CBOeMy YCMOTpeHIO, npOBecTn 3a CBOI cHT eTo peMOHT INI 3aMeHy.
3TA TAPAHNTY HE PACNPOCTPAHRETCA HA HOPMAJbHbI N3HOC ININIOBPEXDEHENE IPODyKTABPE3yJIbTATEHECACTHO CUYAHA, HEPABUNBOHNOOBAHNA, HEBPEXKHOOBAHNA, HEBPEXKHOOBAHNA, HEBPEXKHOOBAHNA, HEBPEXKHOOBAHNA, HEBPEXKHOOBAHNA, HEBPEXKHOOBAHNA, HEBPEXKHOOBAHNA, HEBPEXKHOOBAHNA, HEBPEXKHOOBAHNA, HEBPEXKHOOBAHNa, HEBPEXKHOOBAHNA, HEBPEXKHOOBAHNA, HEBPEXKHOOBAHNA, HEBPEXKHOOBAHNA, HEBPEXKHOOBAHNA, HEBPEXKHOOBAHNA, HEBPEXKHOOBAHNA, HEBPEXKHOOBAHNA, HEBPEXKHOOBAHNA,HEBPEXKHOOBAHNA,HEBPEXKHOOBAHNA,HEBPEXKHOOBAHNA,HEBPEXKHOOBAHNA,HEBPEXKHOOBAHNA,HEBPEXKHOOBAHNA,HEBPEXKHOOBAHNA,HEBPEXKHOOBAHNA,HEBPEXKHOOBAHNA,HEBPEXKHOOBAHNA, HEBPEXKHOOBAHNA,HEBPEXKHOOBAHNA,HEBPEXKHOOBAHNA,HEBPEXKHOOBAHNA,HEBPEXKHOOBAHNA,HEBPEXKHOOBAHNA,HEBPEXKHOOBAHNA,HEBPEXKHOOBAHNA,HEBPEXKHOOBAHNa, HEBPEXKHOOBAHNA,HEBPEXKHOOBAHNA,HEBPEXKHOOBAHNA,HEBPEXKHOOBAHNA,HEBPEXKHOOBAHNA,HEBPEXKHOOBAHNA,HEBPEXKHOOBAHNA,HEBPEXKHOOBAHNA,HEBPEXKHOOBAHNA,HEBPEXKHOOBAHBaAMBcBbIMnBcBbIMnBcBbIMnBcBbIMnBcBbIMnBcBbIMnBcBbIMnBcBbIMnBcBbIMnBcBbIMnBcBbIMnBcBbIMnBcBbIMnBcBbIMnBcBbIMnBcBbIMnBcBbIMnBcBcBbIMnBcBbIMnBcBbIMnBcBbIMnBcBbIMnBcBbIMnBcBbIMnBcBbIMnBcBbIMnBcBbIMnBcBbIMnBcBbIMnBcBbIMnBcBbIMnBcBbIMnBcBbIMnBcBblm Bcbm Bcbm Bcbm Bcbm Bcbm Bcbm Bcbm Bcbm Bcbm Bcbm Bcbm Bcbm Bcbm Bcbm Bcbm Bcbm Bcbm Bcbm Bcbm Bcbm Bcbm Bcbm Bcbm Bcbm Bcbm Bcbm Bcbm Bcbm Bcbm Bcbm Bcbm Bcbm Bcbm Bcbim Bcbim Bcbim Bcbim Bcbim Bcbim Bcbim Bcbim Bcbim Bcbim Bcbim Bcbim Bcbim Bcbim Bcbim Bcbim Bcbim Bcbim Bcbim Bcbim Bcbim Bcbim Bcbim Bcbim Bcbim Bcbim Bcbim Bcbim Bcbim Bcbim Bcbim Bcbim Bcbim BCBM
BHIMAHHE: Npeed nncnbs0bAHem Hactoere 3dne Jnnn noJb30aTeB doJkeH cmoctore bHO onpeJeNTb cTeene h er npiroDhOCTn dI npednonaraemoro npimehenra, a taKKe CTeNeB 6e3onachocTn TaKOro npimehenra. TaK KAc Hactouee 3dneMe IMeET MHOKeCTBO INHmBnAylbHbIX npimehenn, npou3BOuTeB He daet rapaHTnHbIX o83ateBcTB B OTHouEHn pnproDhOCTn HactoUxN 3dneJIN TEx INN INhBX KOHKPeTbIX npimehenn.
KoMaHnri TrippLite noCToRHHo COBepueHcTByet CBOH npOdykUHO. B CBaN C 3TmM BO3MOXHO N3MeHeHne TexHnuecknx XapakTePncTK 6e3 npeDbapntelbHorO yBeOMHeHn.


1111 W. 35th Street, Chicago, IL 60609 USA • www.triplite.com/support