SmartRack SRW9UDPVRT - Server Tripp Lite - Free user manual and instructions
Find the device manual for free SmartRack SRW9UDPVRT Tripp Lite in PDF.

| Product Type | Non-swiveling wall-mount enclosure for 19-inch equipment |
| Brand | Tripp Lite |
| Model | SmartRack SRW9UDPVRT (also SRW9UDPGVRT with transparent acrylic window) |
| Rack Unit Capacity | 9U |
| Dimensions (H x W x D) | Height: 40 cm (9U), Width: 48.3 cm (19 inches standard), Depth: adjustable (variable) |
| Material | Heavy-duty steel with coating |
| Front Door | Reversible and lockable, with transparent acrylic window (model SRW9UDPGVRT) |
| Side Panels | Removable and lockable with ventilation ports |
| Mounting Rails | Depth-adjustable vertical rails, with square and threaded holes |
| Cable Management | Front and rear vertical cable managers, four inter-connect ports with brush grommets, cutouts for cable ties |
| Additional Supports | Vertical rack-mount supports (2U each side) |
| Grounding | Ground stud with M6 screw for ground connection (8 AWG wire recommended) |
| Wall Mounting | Mounting plate with hooks, M8 or 5/16 in. fasteners (not included) |
| Locks | Keys provided for front door and side panels |
| Ventilation | Fan ports on side panels and top cover |
| Installation | Requires at least two people, heavy equipment, use of pallet jack recommended |
| Environment | Controlled indoor, free from humidity, extreme temperatures, flammable liquids, dust |
| Maintenance | Clean with a dry cloth, do not use liquids. Store in original packaging if possible. |
| Warranty | 5-year limited (material and workmanship defects) |
| Replacement Parts | Screws, cage nuts, keys, mounting plates included. Parts available through Tripp Lite. |
Frequently Asked Questions - SmartRack SRW9UDPVRT Tripp Lite
User questions about SmartRack SRW9UDPVRT Tripp Lite
0 question about this device. Answer the ones you know or ask your own.
Ask a new question about this device
Download the instructions for your Server in PDF format for free! Find your manual SmartRack SRW9UDPVRT - Tripp Lite and take your electronic device back in hand. On this page are published all the documents necessary for the use of your device. SmartRack SRW9UDPVRT by Tripp Lite.
USER MANUAL SmartRack SRW9UDPVRT Tripp Lite
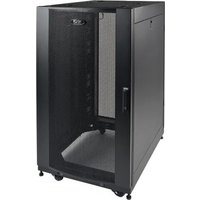
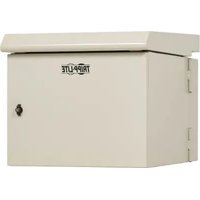
Non-Swinging Wall-Mounted SmartRack® Enclosure
Models: SRW9UDPVRT, SRW9UDPGVRT
(Series Number: AG-00E9)
Table of Contents
- Important Safety Instructions 2
- Overview 2
- Feature Identification 3
- Enclosure Installation 4
4.1 Preparation 4
4.2 Unpacking 4
4.3 Ground Connection 4
- Enclosure Configuration 5
5.1 Door Locks 5
5.2 Cable Access & Management 5
5.3 Reversing the Enclosure 5
5.4 Mounting Rails 6
5.5 Adjusting Mounting Rail Depth 6
- Wall Mounting the Enclosure 6
- Equipment Installation 7
7.1 Installing or Removing Cage Nuts 7
7.2 Alternate Mounting: 7 Tapped Hole Mounting Rail
7.3 Horizontal Rack-Mount Installation 8
7.4 Vertical Rack-Mount Installation 8
7.5 Cable Routing 8
8.Storage and Service 9
9. Warranty and Product Registration 9
Espanol 10
Français 19
Pycckn 28
PROTECT YOUR INVESTMENT!
Register your product for quicker service and ultimate peace of mind.
You could also win an ISOBAR6ULTRA surge protector—a $100 value!
www.triplite.com/warranty


1111 W. 35th Street, Chicago, IL 60609 USA • www.triplite.com/support
Copyright © 2018 Tripp Lite. All trademarks are the sole property of their respective owners.
1. Important Safety Instructions
SAVE THESE INSTRUCTIONS
This manual contains instructions and warnings that must be followed during the installation and operation of the product described in this manual.
Failure to comply may invalidate the warranty and cause property damage or personal injury.
- Keep the enclosure in a controlled indoor environment, away from moisture, temperature extremes, flammable liquids and gasses, conductive contaminants, dust and direct sunlight.
- Leave adequate space at the front and rear of the enclosure for proper ventilation. Do not block, cover or insert objects into the external ventilation openings of the enclosure.
- The enclosure is extremely heavy. Use caution when handling the enclosure. Do not attempt to unpack, move or install it unassisted. Use a mechanical device such as a forklift or pallet jack to move the enclosure in the shipping container.
- Do not place any object on the enclosure, especially containers of liquid, and do not attempt to stack the enclosures.
- Inspect the shipping container and the enclosure for shipping damage. Do not use the enclosure if it is damaged.
- Leave the enclosure in the shipping container until it has been moved as close to the final installation location as possible.
- Install the enclosure in a structurally sound area capable of handling the load, or on a level floor that is able to bear the weight of the enclosure, all equipment that will be installed in the enclosure and any other enclosures and/or equipment that will be installed nearby.
- For permanent wall mounting, be sure to securely fasten the enclosure to the building structure before operation.
- Use caution when cutting packing materials. The enclosure could be scratched, causing damage not covered by the warranty.
- Save all packing materials for later use. Repacking and shipping the enclosure without the original packing materials may cause product damage that will void the warranty.
- Do not reship the enclosure with additional equipment unless the enclosure was shipped with a special shock pallet ("SP1" models only). The combined weight of the enclosure and installed equipment must not exceed the load capacity of the pallet. Tripp Lite is not responsible for any damage that occurs during reshipment.
- Use of this equipment in life support applications where failure of this equipment can reasonably be expected to cause the failure of the life support equipment or to significantly affect its safety or effectiveness is not recommended.
2. Overview
Non-swinging wall-mounted SmartRack enclosures accommodate all standard 19-inch rack-mount equipment, regardless of vendor, and ship fully assembled for quick and easy deployment. They feature adaptable, heavy-duty cabinets in various heights.
Non-swinging wall-mounted SmartRack enclosures have variable mounting depths. The cabinets include quick-release doors and side panels for convenient maintenance. Front access doors are reversible for installation flexibility. Front door and side panels are lockable. Vertical rack-mount brackets are located on the left and right sides of the cabinet can accommodate an additional 2U of equipment. Front and rear vertical cable managers and four cable pass-through ports located on the top and bottom of the cabinets allow for easy, organized cable routing.
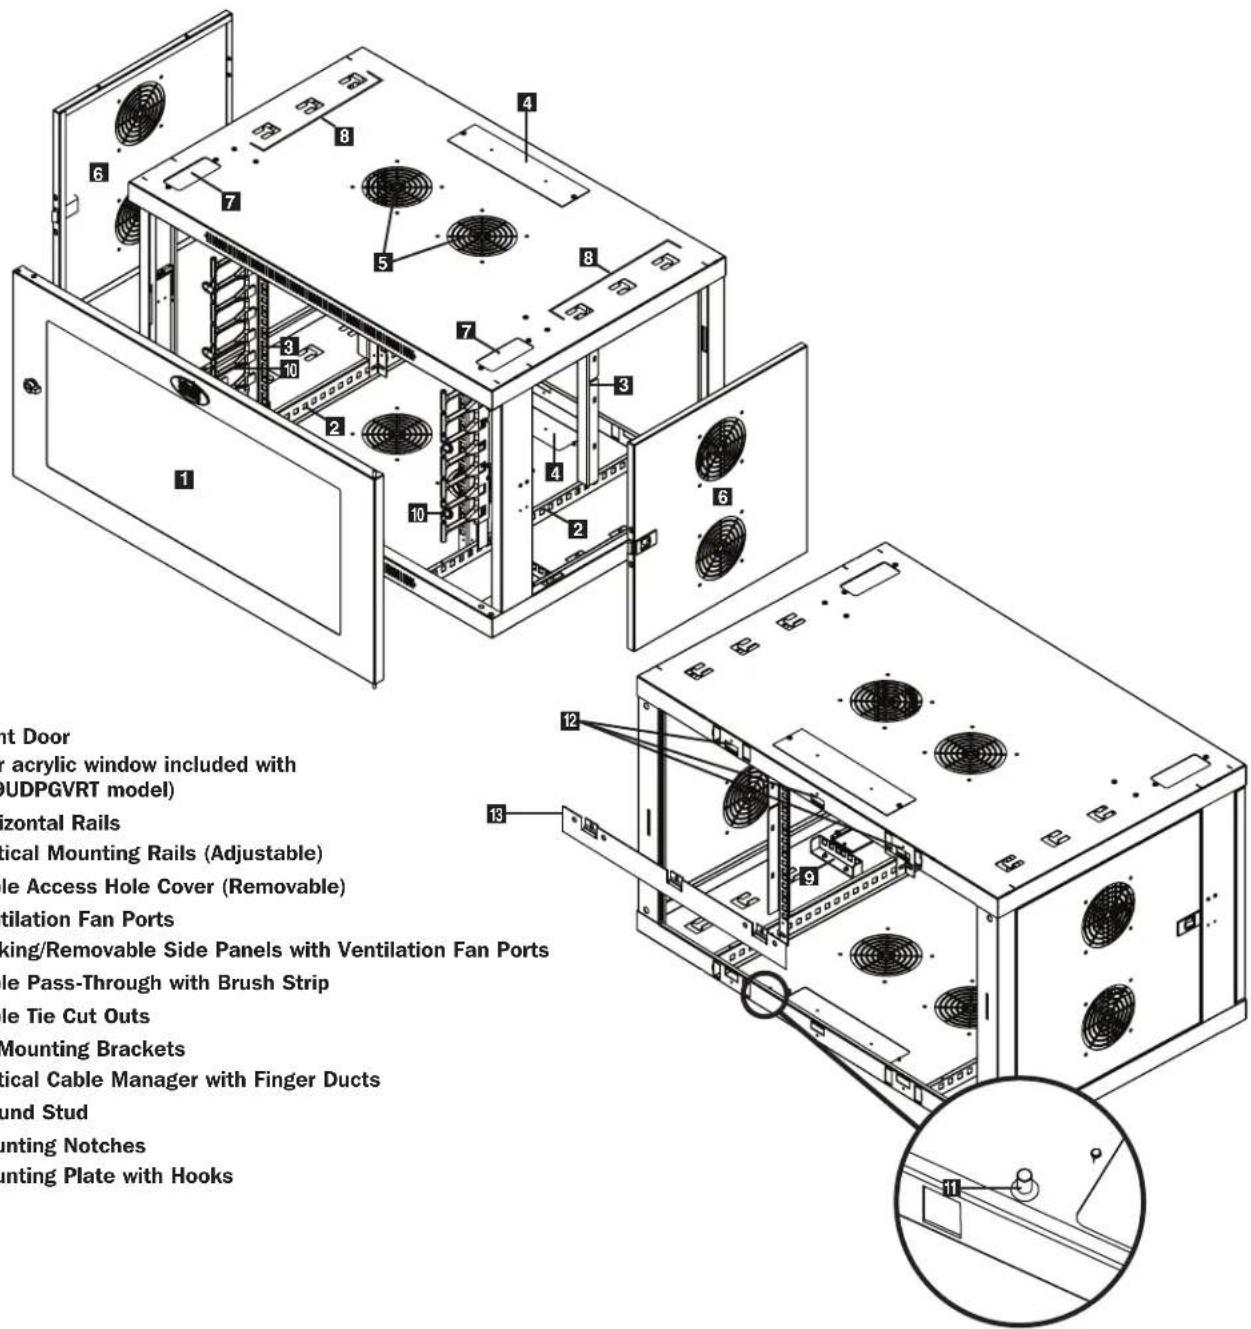
3. Feature Identification
4. Enclosure Installation

Caution! Read All Instructions andWarnings Before Installation!

Warning: Rack enclosures can be extremely heavy. Do not attempt to unpack, move or install the enclosure without assistance. Use extreme caution when handling the enclosure and be sure to follow all handling and installation instructions. Do not attempt to install equipment without first stabilizing the enclosure.
4.1 Preparation
The enclosure must be installed in a structurally sound area that is able to bear the weight of the enclosure, all the equipment that will be installed in the enclosure and any other enclosures and/or equipment that will be installed nearby. Before unpacking the enclosure, you should transport the shipping container closer to the final installation location to minimize the distance you will need to move the unit after the protective packaging has been removed. If you plan to store the enclosure for an extended period before installation, follow the instructions in the Storage and Service section.
You need several tools:
You also need the following hardware:
- Level
- Appropriate hardware for wall mounting (not included)
- Phillips-head screwdriver
- Appropriate tools for wall mounting
4.2 Unpacking

Use at least two people to unpack the enclosure.
1 Move shipping pallet to a firm, level surface.
2 Open box and remove the four foam corner protectors. Save all packing materials for later use unless you are certain they will not be required. Packing materials are recyclable.
3 With one person on each side, carefully lift the enclosure out of the box and place on a firm, level surface.
Examine the enclosure for any damage or loose parts. Confirm all parts are present. If anything is missing or damaged, contact Tripp Lite for assistance. Do not attempt to use the enclosure if it has been damaged.

Never extend more than one component from the enclosure at a time.


Warning: Never attempt to lift or install without adequate help. Do not try lifting the enclosure alone.
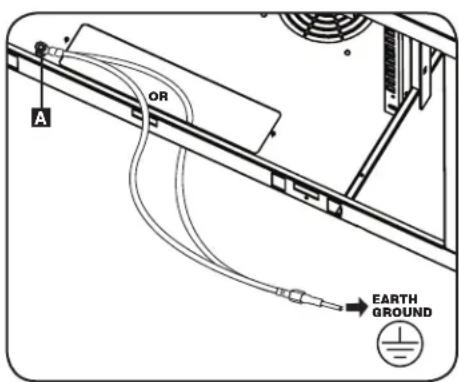
4.3 Ground Connection
All parts of the enclosure are grounded to the frame of the enclosure. Near the rear of the enclosure cabinet, use the grounding stud A and an M6 screw (included) and 8 AWG (3.264mm) wire to connect the enclosure frame directly to your facility's earth ground connection. Route the ground wire either by removing the bottom rear cable access hole cover or running the wire through the rear of the enclosure cabinet. Warning: Attach each enclosure to earth ground separately. Do not use the enclosure without an earth ground connection.
5. Enclosure Configuration
Before installation, be sure to plan the location and arrangement of components within the enclosure. Be sure all mounting rails are reversed or adjusted for depth, depending on your equipment configuration.
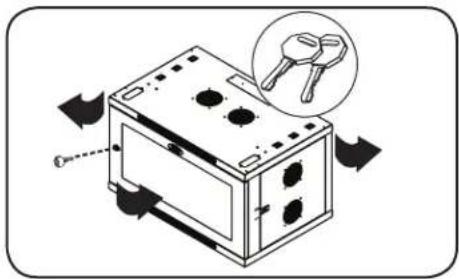
5.1 Door Locks
The front and back doors have locks that are accessible by the included keys.
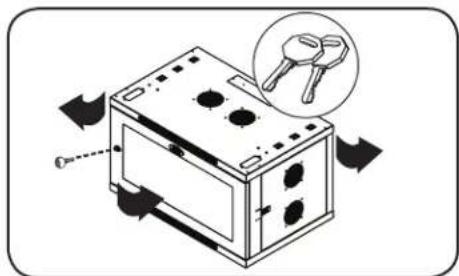
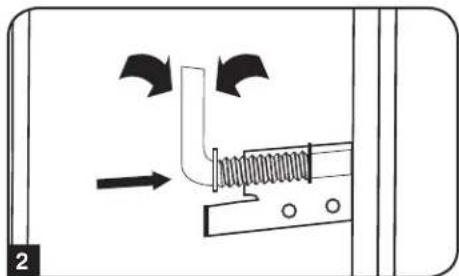
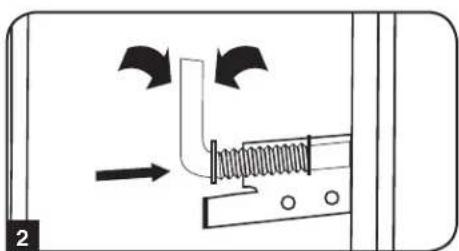
Each side panel locks using an L-shaped lever on the inside of the enclosure.
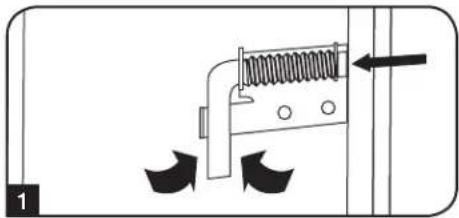
1 To unlock and remove the side panels, lift the shorter leg of the "L" up and pull it away from the side panel. Pull the tab on the side panel and remove it from the enclosure.
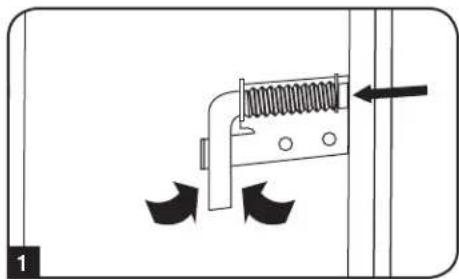
To re-lock the side panels, secure it in the proper position, lift the shorter leg of the "L" up and push it toward the side panel, back into the hole that it was in initially. Once it is in place, push the shorter leg of the "L" down to lock it.
Note: To lock and unlock the side panels, you will need to have access to the interior of the enclosure.
5.2 Cable Access and Management
Several cable access and management options are available, depending on your installation.
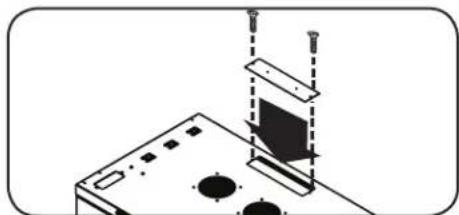
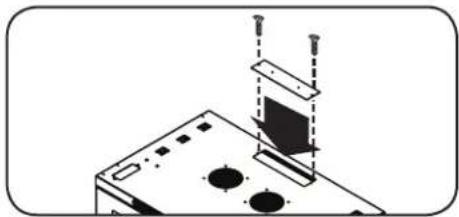
Cable Access Hole with Cover
The top of the cabinet has a rectangular opening for cable access and management. This opening can be opened or closed by unscrewing or screwing in the removable cable access panel.
Cable Pass-Throughs with Brush Strips
Four cable pass-through ports located on the top and bottom of the cabinets allow for easy, organized cable routing. See section 7.5 Cable Routing for more information.
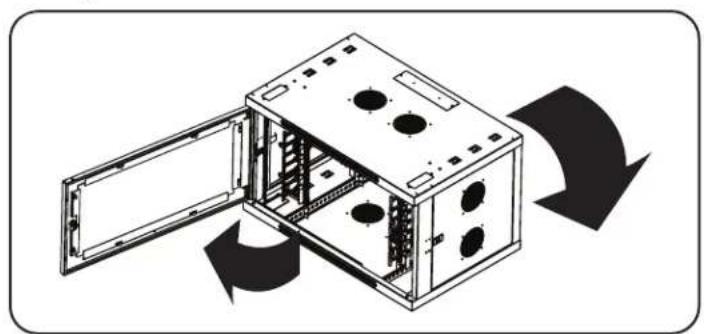
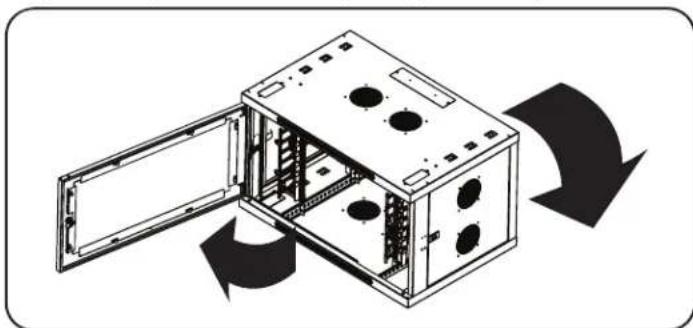
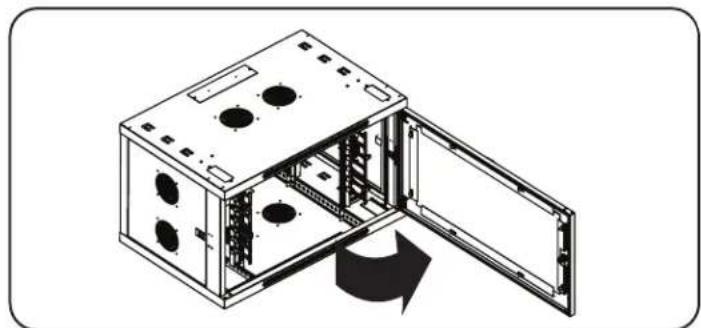
5.3 Reversing the Enclosure
In order to accommodate various rack configurations, the enclosure can be reversed. To do so, simply turn the enclosure over so that the doors open in the opposite direction.

5. Enclosure Configuration continued
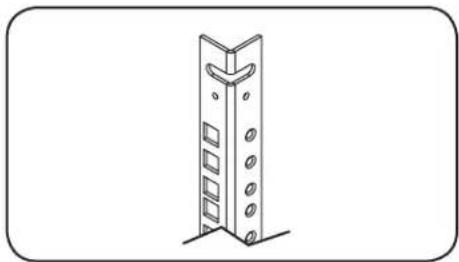
5.4 Mounting Rails
The enclosure comes with mounting rails that have both square and tapped holes for mounting rack equipment. To install equipment, use the included cage nuts and other hardware (See section 7.1 for installation of cage nuts.) Warning: Be sure to have the enclosure securely mounted to the wall, or in its final position on the floor, before mounting any equipment inside. Also be sure to have all the right adjustments on your rails before mounting equipment. (See below for Adjusting Mounting Rail Depth.)
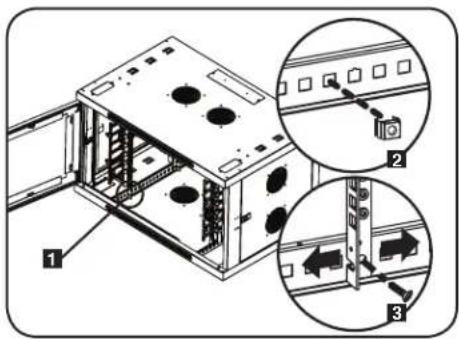
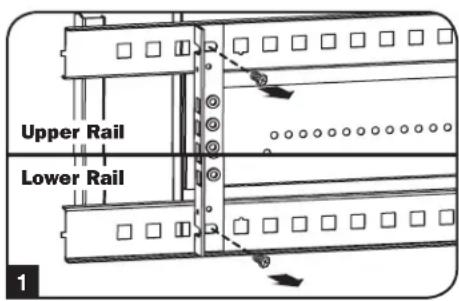
5.5 Adjusting Mounting Rail Depth
Warning: Do not attempt to adjust rails while equipment is installed in the enclosure. Do not attempt to use rails without screws installed. (2 per rail.)
The 2 mounting rails are pre-installed to accommodate different mounting depths, depending on the model. Do not adjust the mounting rails unless your equipment requires a different mounting depth. The front and rear sets of rails can be adjusted independently in 3/4-inch (19 mm) increments.
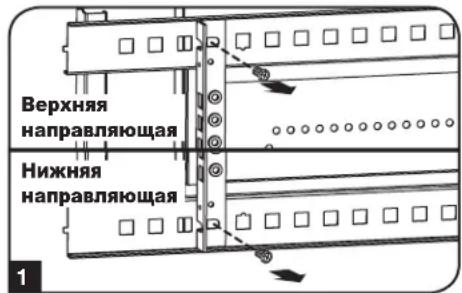
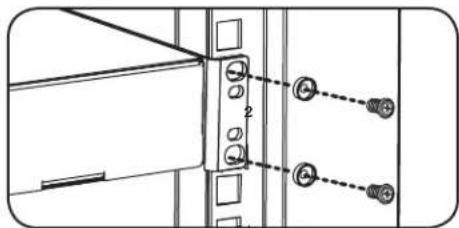
Each rail is connected to the enclosure with 2 screws and 2 cage nuts: 1 set in the upper corner and another in the lower corner. Using a Phillips-head screwdriver, remove the screws that fasten the rails to the enclosure.
2 Move cage nuts to the desired depth and reinstall.
Slide the mounting rails to the desired depth and reattach them using the screws you removed in Step 1.
6. Wall Mounting the Enclosure
Warning: Do not attempt to mount the enclosure to the wall with equipment in the enclosure.
Note: Enclosure must be installed by a qualified technician. Before mounting, use a level and tape measure to position your mounting area precisely. Use appropriate fasteners (not included) to secure the enclosure to the wall. Use suitable mounting means when installing to cinder block, concrete, drywall or wood studs. Warning: The supporting surface must be able to safely support the combined load of the equipment and all attached hardware and components. For the actual weight, size and load capacity of the enclosure, view the product specifications and other support resources at www.triplite.com/support.
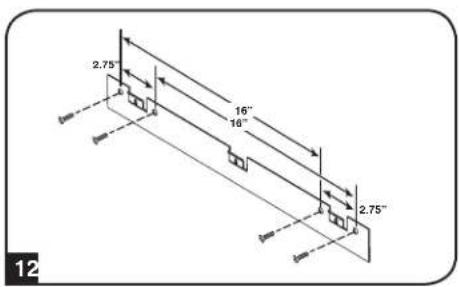
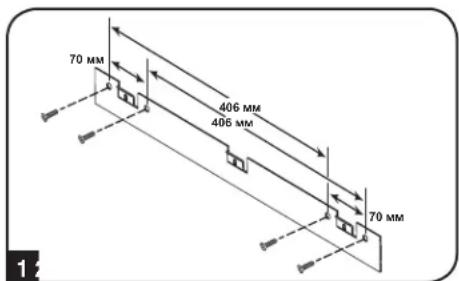
Using user-supplied hardware, attach the mounting plate to a wall or other suitable mounting surface. Each mounting hole can accommodate an M8 or 5 / 16^ bolt and the holes are spaced 16^ apart to accommodate standard stud placement as reflected in the diagram.
Note: When mounting the mounting plate to the wall, be sure the three mounting hooks are facing outwards and away from the wall.
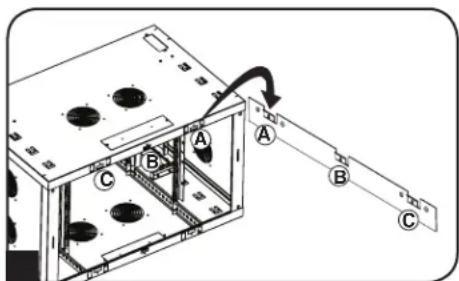
After the mounting plate has been securely attached to the mounting surface, hang the enclosure's three mounting notches onto the three mounting hooks on the plate attached to the wall. The notches will fit over the hooks and the enclosure should slide down onto the hooks until secure.
Note: Mounting notches exist on both the upper and lower rails of the back panel. This allows for mounting in the standard or reversed positions.
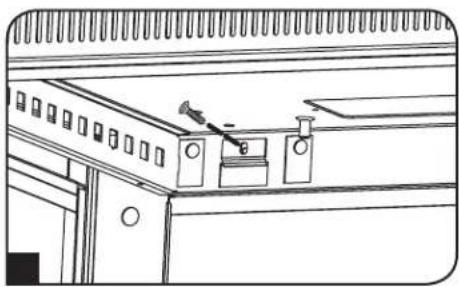
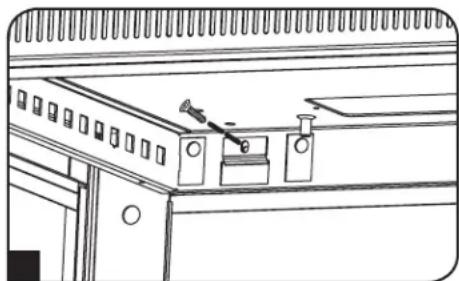
After the mounting plate has been secured and the enclosure hung properly, secure the enclosure to the mounting plate by installing the three supplied screws in the holes on the mounting hooks as shown.

7. Equipment Installation
Warning: Do not install equipment until you have stabilized the enclosure. Install heavier equipment first towards the bottom of the enclosure. Install equipment starting from the bottom of the enclosure and proceed toward the top of the enclosure - never the reverse. If using sliding equipment rails, be careful when extending the rails. Do not extend more than one set of sliding equipment rails at one time. Avoid extending sliding equipment rails near the top of the enclosure.
Note: The unit comes with two different kinds of screws for equipment installation, black and silver. Use the black mounting screws if you are securing your equipment to the square hole side of the mounting rail. Use the silver screws if you are securing your equipment to the tapped hole side of the mounting rail.
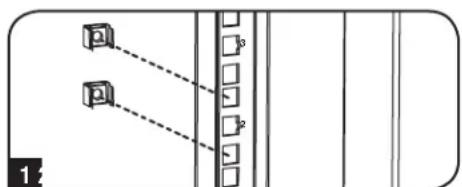
Note: The square holes in the middle of each rack unit are numbered and also include a small notch to aid identification. A single rack unit includes the space occupied by the numbered hole and the holes directly above and below.

7.1 Installing or Removing Cage Nuts
WARNING: The flanges of the cage nuts should engage the sides of the square opening in the rail, not the top and bottom. Follow the instructions in your equipment documentation to ensure proper installation of your equipment.
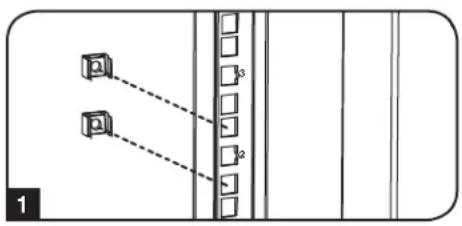
1 Locate the numbered square openings in the mounting rails where you plan to install your equipment. You will install cage nuts (included) into the square openings in order to provide an attachment point for the mounting screws (included).
Note: Consult your equipment documentation to determine how many cage nuts will be required and where they will need to be installed.
2 From the inside of the mounting rail, insert one of the flanges of the cage nut through the square opening. Press it against the side of the square opening. Each flange should engage one side of the square opening, not the top or bottom.
3 Compress the cage nut at the sides slightly to allow the remaining flange to fit through the square opening. When the cage nut is properly installed, both flanges will protrude through the square opening and will be visible on the outer surface of the mounting rail. Repeat steps 1-3 until all required cage nuts are installed.
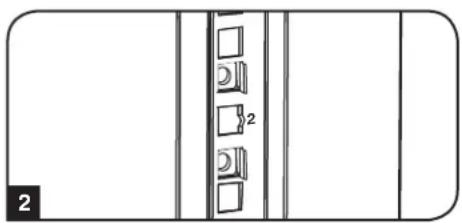
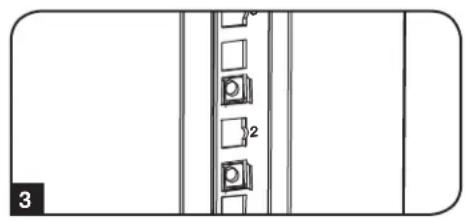
To Remove Cage Nuts, Reverse Steps 1-3
Note: You may wish to use a cage nut tool (user-supplied) to aid cage nut installation and removal.
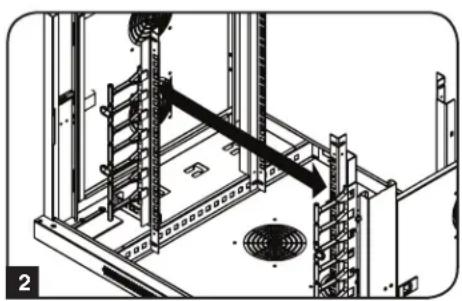
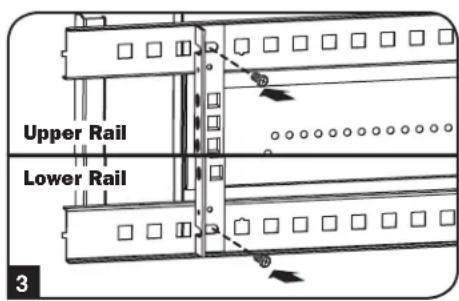
7.2 Alternate Mounting: Tapped Hole Mounting Rail
Warning: Do not attempt to adjust rails while equipment is installed in the enclosure. Do not attempt to use rails without screws installed. (2 per rail.)
The 2 mounting rails are pre-installed for securing equipment using the square hole side of the mounting rail. To switch to the tapped hole side of the mounting rail, follow the steps below:
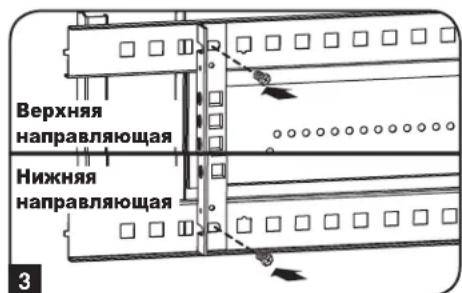
Each rail is connected to the enclosure with 2 screws: 1 in the upper corner and another in the lower corner. Using a Phillips-head screwdriver, remove the screws that fasten the rails to the enclosure.
Switch the rail locations. Ensure the tapped hole side of each rail is facing the front door.
Reattach the mounting rails.
7. Equipment Installation continued
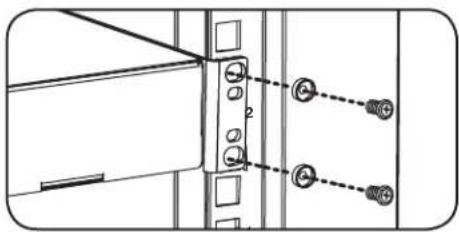
7.3 Horizontal Rack-Mount Installation
Once you have determined the equipment depth and installation method, use the included silver mounting screws and cup washers to secure your equipment to the rack rail. Place the cup washers between the screws and the equipment mounting brackets.
Note: Your equipment may also include mounting hardware. Read the mounting instructions that came with your equipment before installing your equipment.
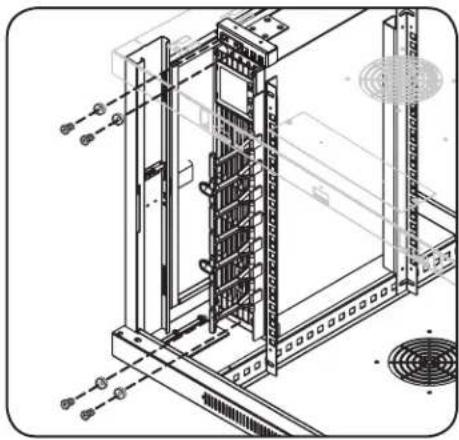
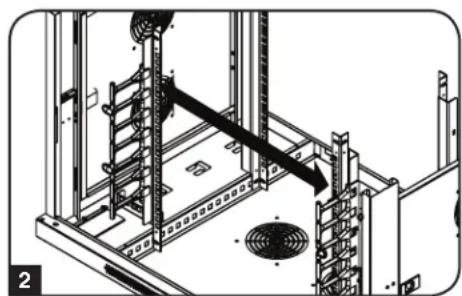
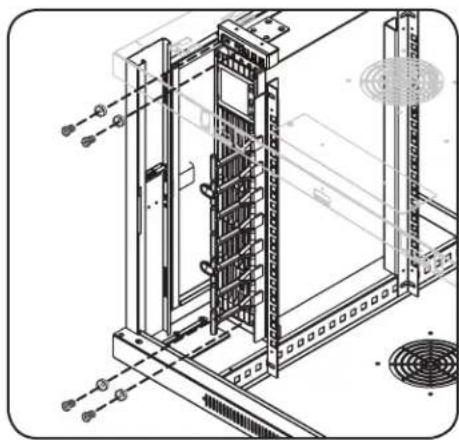
7.4 Vertical Rack-Mount Installation
A set of vertical rack mount brackets are located on the left and right sides of the cabinet. Each bracket set can accommodate 2U of equipment. To install equipment into the vertical rack-mount brackets, follow the installing cage nuts instructions in section 7.1. Then use the included black mounting screws and cup washers to secure your equipment to the mounting brackets.
Note: Your equipment may also include mounting hardware. Read the mounting instructions that came with your equipment before installing your equipment.
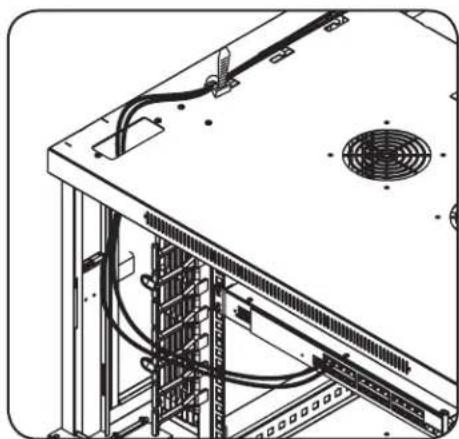
7.5 Cable Routing
Two front vertical cable managers and two cable pass-through ports conveniently located on the top and bottom of the cabinets allow for easy, organized cable routing. Cable tie cut outs can be used to secure cable bundles to the cabinet.

8. Storage and Service
Storage
The enclosure should be stored in a controlled indoor environment, away from moisture, temperature extremes, flammable liquids and gasses, conductive contaminants, dust and direct sunlight. Store the enclosure in its original shipping container if possible.
Service
Your Tripp Lite product is covered by the warranty described in this manual. A variety of Extended Warranty and On-Site Service Programs are also available from Tripp Lite. For more information on service, visit www.triplite.com/support. Before returning your product for service, follow these steps:
- Review the installation and operation procedures in this manual to insure that the service problem does not originate from a misreading of the instructions.
- If the problem continues, do not contact or return the product to the dealer. Instead, visit www.triplite.com/support.
- If the problem requires service, visit www.triplite.com/support and click the "Request Return (RMA)" link. From here you can request a Returned Material Authorization (RMA) number, which is required for service. This simple on-line form will ask for your unit's model and serial numbers, along with other general purchaser information. The RMA number, along with shipping instructions will be emailed to you. Any damages (direct, indirect, special or consequential) to the product incurred during shipment to Tripp Lite or an authorized Tripp Lite service center are not covered under warranty. Products shipped to Tripp Lite or an authorized Tripp Lite service center must have transportation charges prepaid. Mark the RMA number on the outside of the package. If the product is within its warranty period, enclose a copy of your sales receipt. Return the product for service using an insured carrier to the address given to you when you request the RMA.
9. Warranty and Product Registration
5-Year Limited Warranty
Sell warrants this product, if used in accordance with all applicable instructions, to be free from original defects in material and workmanship for a period of 5 years from the date of initial purchase. If the product should prove defective in material or workmanship within that period, Seller will repair or replace the product, at its sole discretion.
THIS WARRANTY DOES NOT APPLY TO NORMAL WEAR OR TO DAMAGE RESULTING FROM ACCIDENT, MISUSE, ABUSE OR NEGLECT. SELLER MAKES NO EXPRESS WARRANTY OTHER THAN THE WARRANTY EXPRESSLY SET FORTH HEREIN. EXCEPT TO THE EXTENT PROHIBITED BY APPLICABLE LAW, ALL IMPLIED WARRANTY, INCLUDING ALL WARRANTY OF MERCHANTABILITY OR FITNESS, ARE LIMITED IN DURATION TO THE WARRANTY PERIOD SET FORTH ABOVE; AND THIS WARRANTY EXPRESSLY EXCUSES ALL INCIDENTAL AND CONSEQUENTIAL DAMAGES. (Some states do not allow limitations on how long an implied warranty lasts, and some states do not allow the exclusion or limitation of incidental or consequential damages, so the above limitations or exclusions may not apply to you. This warranty gives you specific legal rights, and you may have other rights which vary from jurisdiction to jurisdiction).
WARNING: The individual user should take care to determine prior to use whether this device is suitable, adequate or safe for the use intended. Since individual applications are subject to great variation, the manufacturer makes no representation or warranty as to the suitability or fitness of these devices for any specific application.
Product Registration
Visit www.triplite.com/warranty today to register your new Tripp Lite product. You'll be automatically entered into a drawing for a chance to win a FREE Tripp Lite product!
- No purchase necessary. Void where prohibited. Some restrictions apply. See website for details.
Tripp Lite has a policy of continuous improvement. Specifications are subject to change without notice.


1111 W. 35th Street, Chicago, IL 60609 USA · www.triplite.com/support
1111 W. 35th Street, Chicago, IL 60609 USA • www.triplite.com/support
1111 W. 35th Street, Chicago, IL 60609 USA • www.triplite.com/support
1111 W. 35th Street, Chicago, IL 60609 USA • www.triplite.com/support
1111 W. 35th Street, Chicago, IL 60609 USA • www.triplite.com/support
PykoBODCTBO NOJIb3OBaTeJIA
1111 W. 35th Street, Chicago, IL 60609 USA • www.triplite.com/support
Copyright © 2018 Tripp Lite. BCE ToproBbme MapKn ABHOTc HCKIOHHTeBHON CO6CTBEHNHO BX COOTBETCTBYIOUX BtAednbueB.
1. Baxkhble yka3aHnno texhNke 6e3oNaChoctn

COXPAHNTE HACTOUIUE YKA3AHNIA
B HacToaIeM pyKoBOcCTBe coOpEkaHn I npDynpEckDeHn, KOToPbIE HeoXoIMo Co6KnDaTb B nPocece yCtahOBKn I kCkPiYatauOn OIncaHoro B Hem 3dJIIN. HecobKnOeHne 3nx yka3AHn I npDynpEckDeHn MoKet npBecTn KaHHynpObaHn rapaHTm I npNHNbMbtepeNaIbHbI yuepe N IN Bpe 3doobbo JIOde.
- ⅢkaΦdoJIKeH haxOHTbcra B NOMeUeHmN C KOHTPOINpyEmbM MKNKPOIIMaTOM BdaIIN OT ICTOUYHKOB BnA,3KCTpeMaJIbHbIX TEMNEpaTp, BOCIIaMeHHOUXcRAJIOKCTeRnra0B,3JEKTPoPNOBOHBix 3arp3HNTeNe, nblnnnpamoro cONHeHOrO CBeta.
- Ipeid shkafoM nno3aHrE Heo6xOIMO o6cneuMb DOCTaTOH CBO6OHO rpoCTpaHCTBa Inraero HAnJexaIero npoBeTpBbAHn. He 3aropaxNBaiTe n He NaKpbBaTBe BHeUHMe BeHTINLAIOHbIe OTBepCTNg ShkaP, a TaKKe HE BCtABnTe B Hnx KaKe-Jn6o PpeMToB1.
- WkaeBnIeTcKpaHne TaeKeJIbOecbHbIM. Pnp nepeMeeHnn WkaFaCo6bnJaTe ocToPOXHOCTb. He nbTaIeTcB paCnakOBbBaTb, nepeMeaTaHnYctanabNtBaTb WkaB OdInHOChy. DnpeMeEeHn WkaFa BHyTpIn TpaCnOpTnpoBOHOro KOHeHepa NcOnb3yTe MExAHueckoe yctpoCTBO TnPaBnIOOHr NOpy3UkA ININ BINOCHN rINDpABNUEcKo TeLexKKn.
- He KnaIte Ha IkaKΦ KaKne-Ni6o npEmdetb, OcOeHHO EMKocTn C KInIOKocTMy, a TaKke He yCTaHaBnBaIte IkaKΦbI Dpyr Ha dpyra.
- Ocmotne TpaHcnopTnpoBOnHbIKoHTeHep NskaΦHa npEaMeT HAnuHna NobpeXdHn, nOlyeHHbIX npn TpaHcnopTnpOBke. He noIb3yTeCb skaΦom B clyuae erO nobpeXdHn.
He n3BnkeKaIeUkAΦ n3 TpaHcnpTIpOBOOHOro KOHTeHepa dO er opeMeEeHnHa MaKcMmAbHo 6bn3Koe pacCToHne K MeCtY OKoHuaTebHO yTaHOBKn. - ⅢkaФdoJKeHbItyCTaHOBJIeB KOHCTpyKUIOHHIOPOuHOMMeTeCPOBHBIMOCHOBAHNEM,ClOcO6HbIMBbIepKINBaTBeCamaT0kaPb,BCero obopyoBOAHnRA,KOTOpOE6yETyCTaHOBNEHO BHTpHrERHO,NIOb6xDpyTHXkAfoBmNInOBOpYDOBAHnR,KOToPbIE6yDyTyCTaHOBJIeBBI6m3Hr Hero.
- PapehauanompaobtofoaKaFOMo83aTeNbHO npKpeNITe erO KecyueK konctpykun 3daHn.
CobnDnTcOToPoxHocTB npn pa3pe3AHm yNakOBHybIX MATEpnaOB. 3TO MOKET pINBecTN K HAnceHIO capanHH Ha NoBepXHOCTb uKaΦa, YTO npdctabnTet coBoy uyep6, He nokpbBaembl deIeCTbyUoei rapaHTnei.
Bce ynaKOBHbIe MaTePnAbIc neyet coXpaHHT bIra nocneIkyuIero IcnoNb3oBaHn. NobTopna ynaKOBa n TpaHcnoptnpOBA kkaFba 63 nCnIb3oBaHnOpunHaNbHbIX ynaKOBOHbIX MaTePnAIOB MOKeT npBecTH K NOpeKdEHHIO HdEHH, KOtOpoe NobNeET 3a c06o anHyHnPOBaHn DeiCTByUoJ eRapaHTn.
He DOnyckaeTcnoCnEduOua TpaHcnOpTnpOBKa 6kaFa CdoNolHnteBbHm O6opyDObAHm 3a NCKIouHeHm Cnyaee BepBOHaaybHO NoCTaKn 6kaFco CneuAubHm UdaP0a3uUeHHbIM NOHOOM (ToIbKO Ira MoJeNei SP1). CymMapHbM Bec 6kaFa N yctAHOBnHOro B Hm O6OpyDobAHn He DoJKeH npBeBbWt A rpy3oONDbemHocTB noDoHa. KomnaHn Tripp Lite He HeceT OTBeTcBEHOCr 3a KaKoi-NbO yuep6, pRnuHEHb B npoecce NocJeDuOe TpaHCnOpTnpOBKn.
He peKomeHdyetycNcNoJIb3OBAHnE daHHoro o6OpyIDOBAHnB CnCTeMax KIn3HeoBeCneYehn, ITe erO BbIXoI3 CTpoIpeJIOIOKHTBHO MOxET npNBecTN K nepe6oM B pa6ote 6OpOyIDOBAHn KIn3HeoBeCneYehn INI B 3aHuTEnbHO Mepe Chn3NTb Ero 6e3OnaHocTB INI eFPeKtINBHOCTb.
2. Kpatkoe onncaHne
ФИКСИРОВАHьIE HAcTeHHIe ɪkaфы cemeiCTBa SmarRack BmEaHOT B ce6Я CteTaNapTHoe 19-ДIOIMOBOE obopyOBAHne He3aBnCnmo O erо npOn3BOAnTeJI IN NOCTAIBIYOTc NOHOCtBu B c6ope dIЯ obecneHEnb6bICTpoTbI N IeKoCTN BBOda B 3KcIIpyatauIIO. B coCTAB 3ToI cepIN BXoJr aIANTInpyEmbIe ⅢkaΦbl pa3NlUHoi BlicOTbIC NObBIWeHHO INPOUHOCTbIO KOHCTpyKUHN.
ΦKcnpoBaHbIe HacteHbIe Wkafo cemEcbTa SmrRack mHeOT perynpemyro nHy MoTaxa. Kkafo kOMnneKToCT 6bICTPOCBHMIM DbepuAMN 60kOBbIMn paHeJIaMn dny yOobcTBa texHmeccko oBcnyKBaHnpeDnne DBePbMoYr HabeWbAtcRa HAIOby CTOPOHY, YTO OBeCNEuBAET yHBePcAIBHOCTb ycTahOBKn. PepdHaDBpca u6okobie naHEn 3aHpaOcra Ha 3AMOK. KpoHTeHbI da BepTKaJIbHO rO MOnTaXa B cToIKy, paoIarauoicce C neBoi npaboi CTOpOH Wkafo, oBcneuBaIOT BO3MOxHoCTb DOONHITeNBHO p3MaueHnO bOpdyOBaHnry BcOTOn Do 2U. PepdHi n 3aHnBepTKaJIbHbIe Ka6eNbHbIe orpAHn3aTopb I YeTbIpe CKBO3bIX OTBepCTnra DnRA Ka6eNe, paCNOJoxKeHHbIe B BepXHe N HIXHe YacTAX WkaFp, PO3BOJIaHOT 6e3 Tpyda npoknaDbBaT Ka6eN ONtImaNbHbIM CnOCo6om.
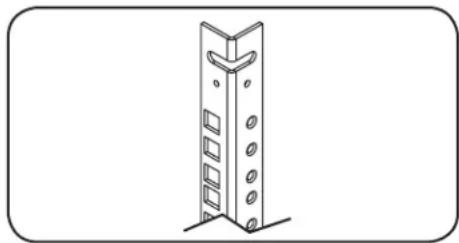
3.Cxema paacnoJoxKeHnaYHKUHOHaJIbHbIX 3JeMeHTOB
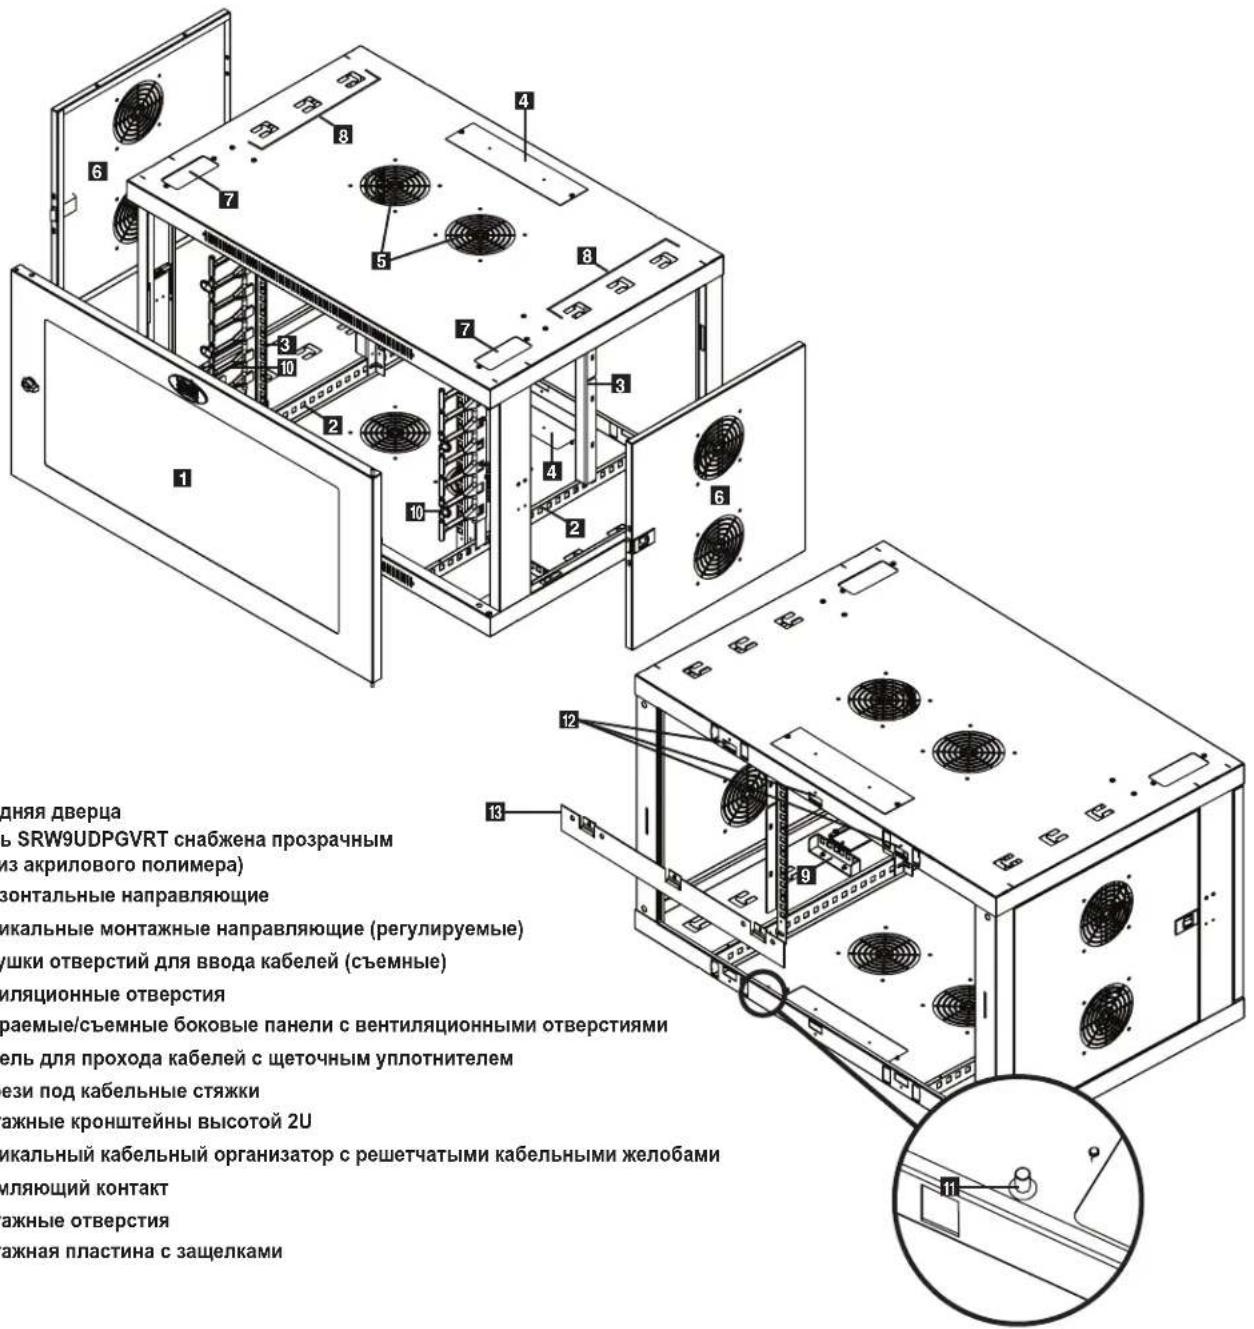
I IpeHnra DBepa (Moenb SRW9UDPGVRT ch6xHa npo3paHbIM OKHom n3 akpnoBoro nonmepa)
2 TOpn3oHTaIbHbIe HappaBJIIOUne
3BepTKaJIbHbIe MoTHaXHbIe HAnpaBnIOUne (peyIpyeMbIe)
3aRnyuKNIOTBepCTNIIBA BBOJaKa6enei (cbeMHbIe)
5 BeHTnIaHNoHHbIe OTBepCTN
3aHpaembIe/cbeMHbIe 6okOBbIe naHeN C BeHTnlaUIOHHbIMN OTBepCTHnM
7 7NaHEnb dnn npoxoKa6eNeC ueToHbIM yNnOHTHeNEM
3 Inpoe3n noK Ka6eNbHbIe CTaXKn
9 MoHTaXHbIe KPOHUTeHbI BbICOTo 2U
BepTKaJIbHbI Ka6eJIbHbI opraHHaTOp c peWTeYaTBIMn Ka6eJIbHbIMn JKeJIo6aMn
3a3eMJIHOUHKOHTaKT
MOHTAXHbIe OTBepCTn
MOHTAXHAR nactnHa C 3aueKamu
5. KomnohoBka wkaqpa
Ipeed yctahOBKO kkaopa 6ra3aTeJIbHO cneJeT coCTaBnTB IhaH erO pa3MeUeHnN CXemy paCIOJIOKeHnKOMIOHETOB BHTpyrHcR HEOxOIMo y6eHtbcB TOM, UTO BCE MOHTAXHbIe HAnpaBIAHouuie NOBepHyTb HaDnEkaaMm Oba3om NIN OTpeYnnpOBAHbI IO Iy6HnE B 3aBNCIMocTn OT KOMIOHOBKn BaWero o60pOBOAHn.
5.1Дверныезамки
IpeepnHn 3aDnHn DBePcbl OChuEhbl 3aMKAMN, OTnnpaembIMN C NOMOuBb BXoJuxB KOMnneKT KIOeH.
KaJdaI360Kobix nahEn 3aHpaTc npn NOMOu I-6pa3HOro pbuaKc C BVHTpeHHe CTOpOBhI uka.
1 ⅡIOTINPAPHNA H CHTNIA BOKOBbIX NaHEe NcEduyET NOHrTB BBepx KopoTkoe PnEyo T-6pa3Horo pbMaXka N OCTpAHITb erO OT 60KOBIO NaHEn. BbHyTB 60Koby IO HeNb n3 WkaFa, NotaHyB ee 3a R3bl4OK.
2IINIOBTOHPOHФKCAUH6OKOBnAHEHnHa CBOEMeCTCNEyETcYTAHOHTbEEHJXHOe IIOJOxHHe,NOHnTB BBePbKOtKoe PnEOO-6p3HOro PbUaKa HnADABNTb Ha Hero BCTOPOH 6OKOBn PAHEn CzEBnIO NmecTnB erO O6pTaHO B TO OTBepCTNe, Tne OH HAXOuNcR nepBOHaayhBo. Iocne TOrO KAK KOpOTKe PnEO-6p3HOro PbUaKa OKaKeTcRa CBOe MeCTe, CNEyET 3aΦHKnPoBaTb ERO HaxaTHM BH3.
PnmeaHne. 3a npnra H n OTnpnra 60kOBx naHe ne Heo6xoHmO mETb DoCTyn BHTpb KaFa.
5.2 OTBepCTne IJRA BBOJa Ka6eJeN IOTNMM3aunrKa6eJIbHbIX CoeHNHeHHI
B 3aBNCIMOCn OT Tnna yCTaHOBKn npeyCMOTpeHo HeCKoJIbKO BapNaHToB IpokJaKn I ONTmN3aCnn Ka6eJen.
OTBepTne DnB BBOda Ka6eIa 3aIykoK
B BepxHn IaHEnI uKaFa HmEeTc npMoyToIbHoe OTBepCTne DnB BBOa N OITNIM3aun Ka6eJe. 3TO OTBepCTne MOXET OTKpbIBaTbcra n 3akpbIBaTbcra nyTEM CHrTna YCTaHOBKn CbeMHo IaHEnI C BuHTOBbIM KpeJIHeHem.
PAnenIpnoxoKa6eNeC 9eTOHbIM yNnOHTHeM
YeIbpe cKBo3HbIX OTBepCTnA dna Ka6ene, paCnoJoxeHHBe B BepxHe n HxHe uacTEx uKa4a, no3BOJrOt 6e3 Tpyd npoklaibBaT bKa6en ONTMaJIbHbM cnocobm. Boone noDpO6Hy nHΦopMaunIO cm.B pa3dene 7.5 "Ppoklndka ka6ene".
5.3ПepebopaunBaHneшkaфa
Ipeaun3aun pa3nunhix BapnaHOB pa3meueHn Ikafda Donyckaetra nepebopaunBaHne eropnyca. Ira 3rO cneyert npocTo nepeBepHyb Kopnyc IkaFpa TAKM O6p3OM, YTObE rO DBepU OTKpbBANCb B pOTUBONIOJXHM HanpaBHeHH.
5. KomnohOBka wkaopa npoDOnJxHne
5.4 MoHTaXHbIe HappaBnIoune
山kaФ noCTabJIeTcS c MOHTaXbHIMn HAnpaBnIOUmIM, KOtOpIe IMeHOT KAK KBaIpaTHbIe, TAK IN pe3b6ObIe OTBepCTNIA JnMOtaXa CToeHOro OobpyObaHnA. JnYcTaHOBKn OOBpyOboHnCneDyET nCOnlNb3OaTb NOCTABJNeMbE B KOMJIeKTe 3aKaIaNbIe raIKN I npOHyO cHAcSTKy (npraDOK yCTaHOBKn 3aKApIbIX raeK CM. B pa3dene7). BHMnAHme! Npeed YCTaHOBKn KaKOro-Ni6o obopyOBOHaBH BHTpb WkaFa Heo6XoHMo 06eHNtCBs B TOM, qTO OH NaExHo 3aKpenIIe Ha CTHe MIn B Dpyrom KoHeHOM NoOKeHn. Kpome TorO, nepeD MoHTaXkOM ObopyObaHn HEO6XoHMo DoJnxHbIM o6pa3OM oTperyIpopoBaTb BCE HappaBnIOuHne. (CM. npDeCTabJIeHHbI HNXe pa3dien "PerynpobKa rIy6nbI MOHTaXbIX HAnpaBJIIOUxN").
5.5 Perynnpobka rny6HHb MoNTaXHbIX HapabNIOx
BHHMaHHe: He nbItaTeCb perynnpoBaTb HappabJIOUne npu yctahOBNeHHOM B uKaΦ o6OpydoBaHm. He nbItaTeCb nCnoJIb3ObaTb HappabJIOUne 6e3 yctahOBKn BHTOB (no 2 Ha KaKdyo HappabJIOUyo).
2MOHTaXbIe HnPaBnIooJe yCTaHabNtBaIOcTc Ha 3aBoDe-n3rOToBnTe e n paCCHTaHbHa pa3MeueHne o6OpYOBaHnCpa3NNUHO MO7axHoH MoTAXHO Hm7xHOB H 3aBNCIMoCTn OT KOHKpeTHoM moenn. He perynpIte MO7axHBe HnPaBnIooJe 3a NCKJIOUeHMemTex CnyaeB, KOrDa Iy TaHabNBAeMORo Bamn O6OpDobAHn Tpe6yetc Dpyra MO7axHAR ngbHa. PepdHra n 3adHra npBnAIOxu Moryt peYnPiPoBaTbc He3aBNCIMO dpyr ot dpyra c warom 19 MM.
KaxdahnpaBnIouaepnKpennHeKaKopnycUkaFa npn NOMOu 2 BHTOB 2 3aknaHbIXraek: OHa npa TakaX DeTanepePacNoJaraTeCBepxHem yIy, aDpyra-B HNkHem. C nOMoBuKpcTo06paHOnOTBepTKBbBepHnTe BHTbl, KOtOpble KpenrHnPaBnHOuMe KopnycUkaFa.
2 Nepemecnte 3aknabHbIe raKn Ha keaemyu Iy6Hy u yctahOBte BHTbHa MeCTO.
CDBINHbTe MOHTAXHbHe HAnpaBnIOUe Ha JKeNaemyIO Ipy6Hy N CHOBa 3akpeNITe IN C NOMOuBIO BnHTOB, BBiBepHyTbIX Ha lare 1.

6. Nopradk HacteHHoro MOHTaJa Ka
BHHMaHHe! He nbItaIteCb KpeNHTb WkaΦ K CTHe C HaxOJaUIMc BHyTpH Hero 06OpyDoBaHNem.
PnmeaHne. YcAHObKa 1KpaDnKHa npO3BOnTbCra TOnkBo KBaIINpObaHHbIM TexHueckm CneuaJIACm. PpeJ Haayamom MoHTaxa CJeYET ToHO HAeHTb MeCTo BdyUepao PaONIOKHe HkaFa c NOMoubIy OpyBaN pnyTeKn, dJa KpeIeHnna 1kAeK aKeTHbIy Te NOxOaIuie dIg AToIe IeN KpeENXhBe DetanII (B kOMnEKT NoCTaKN He BXoT). Prn KpeIeHnN K6eTOHy, mNcoKApTOHy, TMcOKaPTOHy MIn CTOnKAM DepeBHNOT OAPKACA INOnb3yTE COOTBcTByHIOme MOtAXHbIe npICNOc06BHeH. BHMaHne! OnOpHn NaOBepxHoctb DoNNHa c 3anaCom BlyKePknBaCymmapHy harp3Ky, Cozdaaemyo ObopydOBaHem n BCEMn BXoDAHMM B KomnNeT DetanAm NocHAcTN Mm. CM. TexHueckne XapakTePHcTNK MDeIe N Dpyrte BCnomoratEnbIbe pecypcbIc yyeTOM qAKTHeCKoro Beca, pa3Mepa n DonyctHMn Harpy3Kn Wa KaHa h CTpaHnue www.triplite.com/support.
C NOMOJIbIO CO6CTBeHHoK KpeNEXHOI OCHAcTKn PnPKpeINTE MOHTaKHyIO PnACTHNY K CTHe INI Dpyro NOxOJaE INI MONTaKa NOBepXHOCTN. KaXDoE MOHTaKHoe OTBepCTMe paCCHTaHO H BoNTM, a PaCtOReHMe MeJy HMM CoCTABnRE 40,5 CM, YTO ObecneHBAET BO3MOXHOCTb pa3MeUeHNHa C TcHAX CO CTAHdAPThbIM KapkacOM, KAK NOKa3aHO Ha CXEMe.
PnmeHn. PnKpIeHHM MoTaxHoNPiactHb KCTHe CNeNyET YBeuNTbC B TOM, YTO TPN MOtAXHbX KPOKa HappaBneHb HApKy OT CTHebl.
10ncIe HndekHoro npKppeHnMa MOnTaXHO nnactNbIK NOBepxHocTm MOHTaKaHaBeCbTe KOpYc ukaTakM o6pa3OM, 7ObI TPN MOtAkhbIX KpOKa npKpPeHnHO KCTHe nnactNbIB BOuIN B TpN MOtAkhbIX OTBpcTnB B Kopnyce. Ppi ATOM OTBpcTnH HacaxKBAAOTcHa KpOKu, a KpOyC DOJnKeH cON3Tu Ha KpOKu Do ynpa.
PnmuueHne. MoHTaKbIe OTBepCTNr IMeHOTCKa HBePcxHE, TAK NcHxHeHnAPaBJIuOxIN 3aJeHne PAENi. 3To O6eCneHVAeT B0MxOHOCTb MOHTaXbOBbUHOM INpeBepHYtOM NOJOKeHNIX.
10ncne HadeJxHoro npKpeIeHnMoTHaXHOI pNactHHb I npaBnIbHOr HabeUBaHnK Kopnyca ukaapa npKpeIe Tc KMOHTaXHOI nactHHe, BBepyB TpN BXOJaIX B KOMIIKeT BnHTa B OTBepCTMa MOtAXHbIX KPOKOB, KaK NOKa3aHO Ha PUCyHke.
7. yctaHObKa o6OpyDoBaHn
BHHMaHHe! He yctaHaBnBaIte o6OpyDobAHne do o6ecneueHn yctoHnBOcTH uKaΦa. ChaNa cJeMyet yctaHaBnBaTb 6Oone TjKeJeoe o6OpyDobAHne, pa3MeIaI erO B HxKHe YacTh uKaΦa. YcTaHaBnBaIte o6OpyDobAHne HaunHa C Hn3a uKaΦa No HAnpaBJIeHNIO BBepx - H N B Koem cnyae He HaOBopot. PpN nCnoIb3OBAHm HAnpaBnIOuX dIy cTaHOBKn O6OpyDobAHn co6JIoAaIte octopoxhocTB npN IX BblBHXKeHN. He BblBraIte 6Oone ODHn rpynnbI HanpaBnIOux OHOBpeMeHNo.
CTapaTecb He BbIDBnraTb HanpabIoune dIy yctaHOBKn O6OpdyoBaHn, paCIOJoxeHHbE B BepXHe YacTH uKaFa.
PnmeHne. DAnHHb moynb nocTabncre B KOMnNEKte C BNHTAMn DByx pa3mNHybTx TNOB dnn MOHTaKa OobpyoBaHn. MoHTaKHe BnHTb YepeHO CTeDyET NcTIOB3OaBt B To CM cIyae, ecn BkpeNTe CBOe oobpyoBaHne K ToT CTOpoe MOnTAKHO HapPaBnOe, KOtopa Cha6KeHa KaBpaTHBMn OTBePCTMn. MoHTaKHe BnHTb Cepe6pictoro CBeta cNeDyET NcONb3OaBt B To CM cIyae, ecn BkpeNTe CBOe oobpyoBaHne K ToT CTOpoe MOnTAKHO HapPaBnOe, KOtopa Cha6KeHa pe3b0bBmN OTBePCTMn.
PnmeHne. Kbaapthbe OTBepCTN B cepenHe KAKDOro 1kKaFa npOHymeBaHbI N IMeIO T HeONbUHO HAcEHy dny yOboCTBA pACNO3HaBAHm. B KaKdOM OTDenbHom kkaqpy IMeTcra MeTo, Ipe paONaRaTeC HmepoBaHHoe OTBepCTNe HOBpCEHn HxOJaUncn HENOpceDcTBHeH No n oHnHm.

7.1 YctaHOBKa NJI CHrTne 3aKnaIbIX raeK
BHIMAHHE! OTRH6bI KpOMOK 3aKnaadhbx Raek DoJnxHbI 3auenTbcra 3a 6okobbe, a He BepxHm HnXHM Kpa KBaDpaTHoro OTBepCTN B Hnnpabnloe. Ipn ObecneueHH npabunbHocTN yctahOBKn BaWero o6opydoBaHH cneayte yka3aHnM, MIOXeHHbIM B COpOBOIDTeNbHO DOKyMeHTaUN K Hemy.
1 HaHnIte HymepoBaHHbIe KBaIpaTHbIE OTBepCTN B MOtaxHbIX HAnpabNIOxN, KOToPbe Bbl INaHpyTe IcNoIb3ObaTbIy cTaHaOBKn CBoero O6OpyOBaHN. BCTaBbTe 3aKnAdHbIe raIK (u3 KOMNKeTA) B KBaIpaTHbIe OTBepCTN C UeJIbIO ObecneHEn TOck KpeJIeHN DnI MoTAtKbIX BNHTOB (NOCTABNIeMbx B KOMNKeTc).
PnmuueHne.ДЯ ONpeIeHHe HEO6xOIMORO KOJIuCCTBa 3akJaDhBx Faek N MecT Hx UcTaHOBKn O3aKoMbTeCb C coPBODHTeBHOJ DOkymeTAUHe K BAWeMy OobpyOBAHnIO.
2IpoeHbTe OINH N3OTRn6OB KpOMKn 3aKnadHoi rainKu YpeE3 KBaDpaTHoe OTBepCTne C BHyTpeHHe CTOpOHbl MOHTaXHoH HApBaBnHOuei. BdaNte ee no HapBaBHeHIO K6OKOBMy KpaO KBaDpaTHoO OTBepCTn. OTn6bl KpOMOK 3aKnadHix Raek DoJIHKbl 3auePiYbcra 3a 60KOBbIe, a He BepxHm I HxHkn Kpa KBaDpaTHoro OTBepCTn.
3 CnErKa HAdaBnTe Ha 3akLnHHy raiKy no 6okam, YTO No3BOJNT DpyrOmy OTn6y KpOMKn npOITuYepe3 KBaDpaTHoe OTBepCTne. Pn npAanbHOY UCTAHOBKe 3AKnADHOI raKIN O6a OTn6Ba ee KpOMOK BbDAKOTcC O6paTHoH CTOPOHb KBAdPaTHOrO OTBepCTN IN BUNHb HA BHeUHe NOBePxHOCTN MONTAXHOH HanpaBIAUeIe. NObTOPaReIe WAn 1-3 Do Tex nop, NOKa He 6dyT yCTaHOBJIeHb BCE Heo6XoIMMbIe 3akNaDhbIe raiKn.


IIN3BneHnna3aknaHbIXraek nobTopte warn 1-3 B o6paTHOM npaKe
PpmeHne. PnKeHaHHy cTaHOBky n3BHeHHe 3aKJaIaHbIX raeK MoXHO pOni3bOHTb C NOMoUbIO cEuaNbHOrIO HcTpyMeHTa (B KOMPiKeTIOCTaBKn HE BXOIT).
7.2 AnbTepeHaTHBbI CNOCO6 MOHTaXa: MoHTaxHaNpAbaIOUa C pe3b6oBBIM OTBepCTHMM
BnMaHHe: He nItaTebc peryIpnoBaTb HapabJIOUne npy yctaHOJIeHHOM B wkaof o6opyoBaHH. He nbIaTecb HCNoJIb3ObaTb HapabJIOUne 6e3 yctaHOBKn BHTOB (no 2 Ha KaKdyu HapabJIOUyio).
Ha 3aBoJe-3rTOBnTeIe 2 MoHTaxKHe HAnpaBnIOUne yCTaHOBnEhbl NOJ KpeNIIeHne OobpyOBOAHnC INcNoJIb3OBaHmE ToI CTOpOHb HAnpaBnIOUe, KOtOpA Ch6KeHa KBaPaTHbIMN OTBepCTnMn. IInI nepeXoDa Ha ICNOJb3OBaHne ToI CTOpOHb MOHTaXHO HAnpaBnIOUe, KOtOpA CHa6KeHa pe3b6ObIMN OTBepCTnMn, Heo6xOIMO BblONIHb CNeIyUOune DeIcTBnI:
Kakda Hapablaoua npikpenneHa Kkopnyc uka pni NOMOu DByx BINTOB,ODIN3 KOtOpbix pacnoIaraetCB BepxHem yrny,aDpyro-B HnXHeM.C NOMOuBo KpeToo6pa3HOI OTBepTKBbEpHNTe BNHTbl,KOTOpbe KpeTAT Hapablaouue Kkopnyc ukaopa.
2 NomeHnIte paonnoJxHe HappaBnHOx. YBeNTecb B TOM, YTo KaJdaN3 HappaBnHOx pacnonaraeTcTaKIM 0bpa3OM, YTo ee CToPOHa c Pe3bObBMn OTBepCTnMn ObaaHeKapeDHeiDbepue.
1 NobtopHO 3akpeiTe MOHTaXhBie HapabnHouue.
7. YctaHOBka o6OpydoBaHn npoDoJIxKeHne
7.3Topn3oHTaIbHbI MOHTaX B CToiKy
Iocne onpeeneHn IybuHbObpOBAHN n CnoCoBa yCTaHOBKn npKpEnTe oOpyoBaHne K HapabnaIOeU kkaC nOMoBIO NOCTABNReMbIX B KOMPNEKeT ME OHTaXhBX BNHTOB CEpe6pNCTO RBeTa n Yaaeoobpa3HbIX Wai6. PomeCTte Yaaeoobpa3HbIe Wai5b MExdy BNTAMn MOHTaxHBIM KPOHtEHHAMn DnA KpennenHn OobpyoBaHn.
PnmeHne. NcnoB3yEmoe BAMM o6pOyOBaHNe MOKET TAKKE KOMJIeKToBaTcMoHTaxHO OCHAcTKoI. Pepe yCTaHOBKO CBOero 60pOyOBaHNr O3HaKOMbTeCb C yKa3aHmIMN PO MHTaxy, NOCTaBnEbIMN B KOMJIeKTe C HMM.
7.4 BepTKaJIbHbI MoTaN B CToNkY
KpoHHTeHbI dIaBepTikKaIbHO rO MOtXa B CToKy paCnOJaAOTc C IeBoI n npaBOI cTOPOH uKaFa. KaKdbI KOMPJIeK T KPOHTeHOB ObecneuBaET Bo3MOxHocTb yCTaHOBKn ObopyoBaHnry BbICOTOn Do 2U. DnY yCTaHOBKn OobpyoBaHnry C NcNoJb3OBAHnEM KPOHTeHOB DnR BEpTikKaIbHO R MoTHaXa B CToKy cJeDyIte Yka3aHnM No yCTaHOBKe 3aknaHbIX raeB Pa3dene 7.1. 3aTeM npKpeNITe CBOE oOpoyoBaHnE K MOtXkHbIM KPOHTeHnAM C NOMouBIO NOCTabJIeMbIX B KOMPJIeKTE MOHTaXhBIX BnHTOB ueHrO UBeTa N auaeO6pa3HbIx Wai6.
PnmeHne. NcnoB3yEmoe BAMM O60pyoBaHHe MOKET TAKKe KOMTNEKTOBATcR MOHTAKHOO CCHAcTkoI. Ppeed yCTaHOBKO CBOero 60pyoBaHnO 03HAKOMbTeCb C yka3AHmNIO MOHTaky, NOCTABNREMbIMN B KOMNTEKeTc HMM.
7.5 Ppokna Ka6enei
Да nepeDHnx BepTKaNbHbX Ka6eNbHbX opraHMaTopa nДBa CkBO3HbX OTBepCTnI NaKa6eN, yO6Ho pacnoJoxHeB BepxHe N HIXHe YacTeX WkaFa, No3BOJIaOT 6e3 Tpya NpOKNaIbIbA Tb Ka6eN ONTMaNbHbIM cNoCoBm.ДЯ КрелпгЯ Ka6eNbHbX pyKOB K KopnyCy WkaFa MOrY NcNoIb30BaTbcr Ka6eNbHbIe cTqKn, npOdeBaEMbIe Ype3 cneuaNbHbIe npope3n.
8. XpaheHne n TexHnueckoe o6cIyXnBaHne
XpaHne
KaФdoJKeH XpaHnTcBcR B NOMeUeHmN C KOHTpOInpyEmbIM MKNpOKINMaTOM BdaIIN OT NCTOCHIKOB BlaIIN, 3KCTpeMaJIbHbIX TeMnepaTp, BOCIIaMeHraOuNXcR KIκKocTei Ra3OB, 3NeKTpOnpoBOdHbIX 3arpa3HNteNe, PbIIN IN PpAmORo coJIHeHOro CBeta. IIO Bo3MOXHOCTn XpaHnte KaΦ B erO 3aBoDcKo TpaHCnOpTHoi ynaKOBke.
CepBnchoe o6cIyXnBaHne
Ha npdykun kOMnAHm Tripp Lite daetc orpaHueHHa rapaHTn yCIOBn KOTopo n3IOKeHb B HactoIeM pyKOBOCTBe. TaKoe dcTynhpa3JIMHbIe nporpammbl npdneBaemr rapaHTm n o6cyxuBAHn Ha o6bkeTe OT kOMnAHm Tripp Lite. nnoIyehn 6Oee noDpoBHO m HfOpMaUN O cepBnCHOM o6cnyxBAHm nocTeTbe Be6-caT kOMnAHm www.triplite.com/support. PpeD Bo3BPaTOM npdykun dna obcnyxuBAHn, BInoINHte Cne dyUcne DeiCTBnA:
- Ppocmptne HNCTpykun no yctahOBKe n 3KcIpyatau, n3noxeHHbE B HactoJem pyKOBOdCTBe, YTO6bl y6eHTbcra, TTo npobnBIpOncxOaTHe n3-3a He npabHbHO NOHIMAHIN IHCTpykun.
- Ecn npobnema coxpaHareTc, He obaaauTecb H He Bo3BpaauTe n3dene ToproBOMy nopeHNky. BmecTo 3toro nocette Be6-caNT www.triplite.com/support.
- Ecni nIpeHn np6bnmI tr6byTcpeMHT, nocTe TBe 6b-caTI Ww.trpIite.com/support npeHnnte no cblke Product Returns (Bo3bpat npdykun). 3decMoXHO cEnaTb 3anPoc O Homepe pa3peHnna HA Bo3Bpat (RMA), KOTOpB He06xOIMn IpnpeMOHa. B 3to npocTo INTEPAKTHBOHOF pOme HyKHO 6ydt 3aoNHNtB Homep moENu yCtpoCTBa n erO cepHnHbHomep, a taKe o5uyIO IHOpmaUIO o NOKynateHe. Homep RMA BMeCTe C INCTpyKUNMn NO OTnpABKE 6ydt BbcNAH No 3NeKTPHOH NOte. JIO6bIe NOBpeJXehnRA pOdykUnn (npAMyE, KOcBEHbE, yMbIuNEHbE nIN NOoCHyE), NOLyueHHBe B pe3yNbTaTe TpaHCnopTIPOBKn B KomnAnHIO Tripp Lite nB yIOLNHOMeHHB cepBCHbY CEHTp, rapaHTne He NOKpbBAOTc. TpaHCnopTIPOBKa npOduKunB KMnAnHIO Tripp Lite nB ABTOIN3OBAHbCepBCHbY CEHTp DOJnxHa 6bITb ONNaeHa OTnpABNTenEM. Ha BHeuHe CTopoHe YnakobKn HNaEsCeTne Homep pa3peHnra HA Bo3Bpat. Ecn npOdyKT HaxOITcRa H rapaHTnB, BNOxHr KeONu YekA nIN DOKyMeHTa Ha npNo6peTeHne. DoCTABky npOduKunDnI obcnyKBaHnO cOyUeCTBnIe Yepe3 3acTpaxOBaHbIX PepeBO3YNKOB IO aDpccy, NOlyueHHOMy BMeCTe C pa3peHnem Ha BO3Bpat.
9. rapaHTnHbIe 683aTeJbCTBa
OrpaHnueHHra rapaHTna 5 net
PpOaBcRapAHTpyETIIN DaHnro PPOyKTA OTCyTCTBne DepeKTOB B MaTePnAax N TexHONrnx B TeueHe 5 let OT daTbI nepBvHou IpoaJx npu yCIOBmNCNtB30BaHnra ERO B COOTBeTCTBnco BCEMN pnpMeHNMbIMN IHCTpykUmaMn. B cnyae BblBneHnRA depeKTOB, CB3aHHbx CO CBOiCTBaMn MaTePnAra INKaueCTBOM IN3rTOBHeHn RAHHo IN3dEInna B TeueHnE yka3aHHo nepNoDa, PpOaBeu o63yeTc, n CBOeMy YCMOTpeHIO, npOBecTn 3a CBOI CHT eTo peMOHT INI 3aMeHy.
3TA TAPAHNTY HE PACNPOCTPAHRETCA HA HOPMAJbHbI N3HOC ININIOBPEXDEHENE IPODyKTABPE3yJIbTATEHECACTHO CUYAHA, HEPABUNBOHNOOBAHNA, HEBPEXKHOOBAHNA, HEBPEXKHOOBAHNA, HEBPEXKHOOBAHNA, HEBPEXKHOOBAHNA, HEBPEXKHOOBAHNA, HEBPEXKHOOBAHNA, HEBPEXKHOOBAHNA, HEBPEXKHOOBAHNA, HEBPEXKHOOBAHNA, HEBPEXKHOOBAHNa, HEBPEXKHOOBAHNA, HEBPEXKHOOBAHNA, HEBPEXKHOOBAHNA, HEBPEXKHOOBAHNA, HEBPEXKHOOBAHNA, HEBPEXKHOOBAHNA, HEBPEXKHOOBAHNA, HEBPEXKHOOBAHNA, HEBPEXKHOOBAHNA,HEBPEXKHOOBAHNA,HEBPEXKHOOBAHNA,HEBPEXKHOOBAHNA,HEBPEXKHOOBAHNA,HEBPEXKHOOBAHNA,HEBPEXKHOOBAHNA,HEBPEXKHOOBAHNA,HEBPEXKHOOBAHNA,HEBPEXKHOOBAHNA,HEBPEXKHOOBAHNA, HEBPEXKHOOBAHNA,HEBPEXKHOOBAHNA,HEBPEXKHOOBAHNA,HEBPEXKHOOBAHNA,HEBPEXKHOOBAHNA,HEBPEXKHOOBAHNA,HEBPEXKHOOBAHNA,HEBPEXKHOOBAHNA,HEBPEXKHOOBAHNa, HEBPEXKHOOBAHNA,HEBPEXKHOOBAHNA,HEBPEXKHOOBAHNA,HEBPEXKHOOBAHNA,HEBPEXKHOOBAHNA,HEBPEXKHOOBAHNA,HEBPEXKHOOBAHNA,HEBPEXKHOOBAHNA,HEBPEXKHOOBAHNA,HEBPEXKHOOBAHBaAMBcBbIMnBcBbIMnBcBbIMnBcBbIMnBcBbIMnBcBbIMnBcBbIMnBcBbIMnBcBbIMnBcBbIMnBcBbIMnBcBbIMnBcBbIMnBcBbIMnBcBbIMnBcBbIMnBcBbIMnBcBcBbIMnBcBbIMnBcBbIMnBcBbIMnBcBbIMnBcBbIMnBcBbIMnBcBbIMnBcBbIMnBcBbIMnBcBbIMnBcBbIMnBcBbIMnBcBbIMnBcBbIMnBcBbIMnBcBblm Bcbm Bcbm Bcbm Bcbm Bcbm Bcbm Bcbm Bcbm Bcbm Bcbm Bcbm Bcbm Bcbm Bcbm Bcbm Bcbm Bcbm Bcbm Bcbm Bcbm Bcbm Bcbm Bcbm Bcbm Bcbm Bcbm Bcbm Bcbm Bcbm Bcbm Bcbm Bcbm Bcbm Bcbim Bcbim Bcbim Bcbim Bcbim Bcbim Bcbim Bcbim Bcbim Bcbim Bcbim Bcbim Bcbim Bcbim Bcbim Bcbim Bcbim Bcbim Bcbim Bcbim Bcbim Bcbim Bcbim Bcbim Bcbim Bcbim Bcbim Bcbim Bcbim Bcbim Bcbim Bcbim Bcbim BCBM
BHIMAHHE: Npeed nncnbs0bAHem Hactoere 3dne Jnnn noJb30aTeB doJkeH cmoctore bHO onpeJeNTb cTeene h er npiroDhOCTn dI npednonaraemoro npimehenra, a taKKe CTeNeB 6e3onachocTn TaKOro npimehenra. TaK KAc Hactouee 3dneMe IMeET MHOKeCTBO INHmBnAylbHbIX npimehenn, npou3BOuTeB He daet rapaHTnHbIX o83ateBcTB B OTHoWeHHn piroDhOCTn HactoUxN 3dneJIN TEx INN INhBX KOHKPeTbIX npimehenn.
KoMaHnri TrippLite noCToRHHo COBepueHcTByet CBOH npOdykUHO. B CBaN C 3TmM BO3MOXHO N3MeHeHne TexHnuecknx XapakTePncTK 6e3 npeDbapntelbHorO yBeOMHeHn.


1111 W. 35th Street, Chicago, IL 60609 USA • www.triplite.com/support