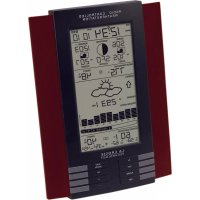
WS8025AL - Weather Station LA CROSSE TECHNOLOGY - Free user manual and instructions
Find the device manual for free WS8025AL LA CROSSE TECHNOLOGY in PDF.



| Product type | Indoor weather station with radio-controlled outdoor sensor |
| Brand | La Crosse Technology |
| Model | WS8025AL (WS-8025U) |
| Power supply - station | 3 AA alkaline batteries (LR6) 1.5 V |
| Power supply - outdoor sensor | 2 AA alkaline batteries (LR6) 1.5 V |
| Transmission frequency | 433.92 MHz |
| Transmission range | 25 m (80 ft) in open field |
| Time signal | WWVB 60 kHz (Ft. Collins, Colorado) |
| Indoor temperature range | 0 °C to 50 °C (32 °F to 122 °F) |
| Outdoor temperature range | -29.9 °C to 59.9 °C (-22 °F to 140 °F) |
| Humidity range (indoor and outdoor) | 20% to 95% |
| Atmospheric pressure range | 700 to 1099 hPa (absolute); relative adjustable 960 to 1040 hPa |
| Display | LCD with adjustable contrast (8 levels) |
| Main functions | Radio-controlled time, weather forecast (3 icons), moon phases, sunrise/sunset and moonrise/moonset, barometric trend, 30-hour pressure history, storm alarm, temperature alarms, comfort indicator, min/max memory, up to 3 outdoor sensors |
| Included outdoor sensor | TX4U (temperature and humidity) |
| Mounting | Station: tabletop or wall mount; sensor: wall mount with included bracket |
| Maintenance and cleaning | Soft damp cloth; avoid solvents and immersion |
| Safety | Do not open the housing; keep out of reach of children; do not use for medical purposes |
| Warranty | 1 year (excluding abuse, batteries, unauthorized repairs) |
| After-sales service | La Crosse Technology, 190 Main St, La Crescent, MN 55947, USA - support@lacrossetechnology.com |
Frequently Asked Questions - WS8025AL LA CROSSE TECHNOLOGY
User questions about WS8025AL LA CROSSE TECHNOLOGY
0 question about this device. Answer the ones you know or ask your own.
Ask a new question about this device
Download the instructions for your Weather Station in PDF format for free! Find your manual WS8025AL - LA CROSSE TECHNOLOGY and take your electronic device back in hand. On this page are published all the documents necessary for the use of your device. WS8025AL by LA CROSSE TECHNOLOGY.
USER MANUAL WS8025AL LA CROSSE TECHNOLOGY
Wireless Weather Center with
Sun/Moon Time
Instruction Manual
FCC ID: OMO-01TX (transmitter), OMO-01RX (receiver)
THIS DEVICE COMPLIES WITH PART 15 OF THE FCC RULES. OPERATION IS SUBJECT TO THE FOLLOWING TWO CONDITIONS:
- THIS DEVICE MAY NOT CAUSE HARMFUL INTERFERENCE, AND
- THIS DEVICE MUST ACCEPT INTERFERENCE RECEIVED, INCLUDING INTERFERENCE THAT MAY CAUSE UNDESIRED OPERATION.
LA CROSSE®
TECHNOLOGY
technology tools for home & office
Contents
Language Page
English 2
French 22
Spanish 42
TABLE OF CONTENTS
| Topic Page | |
| Inventory of Contents/ Additional Equipment 3 | |
| About WWVB 3 | |
| Quick Set Up Guide 3-4 | |
| Detailed Set Up Guide | |
| Battery Installation | 4 |
| Start Up Sequence | 5 |
| Explanation of LCD Information | 6 |
| Function Key Layout | 6 |
| Program Mode | 6-12 |
| Time, 12/24 Hour Mode and Date Setting | 7 |
| City Location Setting | 7-8 |
| U.S. City Codes | 8-10 |
| Canada City Codes | 11 |
| Mexico City Codes | 11 |
| Time Zone and Daylight Saving Time (DST) Setting | 11 |
| Weather Measuring Units | 11-12 |
| LCD Contrast | 12 |
| Features and Operation | |
| Sun Rise/Sat and Moon Rise/Sat Calculation | 12-13 |
| Moon Phase | 13 |
| Minimum/Maximum Temperature/Humidity | 14 |
| Multiple Remote Transmitters | 14-15 |
| Remote Temperature Alarm | 15 |
| Comfort Indicator | 15 |
| Weather Forecast Icon and Pressure Trend | 15 |
| Weather Tendency Arrows | 16 |
| Storm Warning Alarm | 16 |
| Two Hour Air Pressure Tendency Chart | 17 |
| Barometric Air Pressure Reading | 17 |
| Air Pressure History Bar Chart | 17 |
| Mounting | 17-18 |
| Maintenance and Care | 19 |
| Troubleshooting Guide | 19 |
| Specifications | 19-20 |
| Warranty Information | 20-21 |
INVENTORY OF CONTENTS
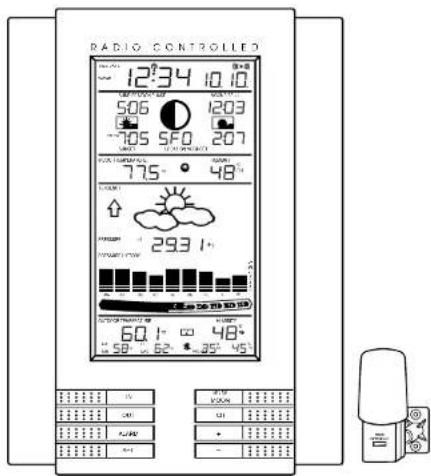
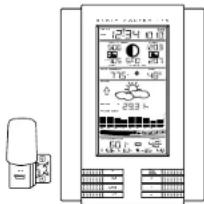
- WS-8025U-indoor weather station
- TX4U-remote thermo/hygro (temperature/humidity) sensor
- Instruction manual and warranty card
ADDITIONAL EQUIPMENT (not included)
-
Five fresh AA 1.5V alkaline batteries.
-
One wall-mounting screw (optional)
ABOUT WWVB (radio-controlled time)
The NIST (National Institute of Standards and Technology-Time and Frequency Division) radio station, WWVB, is located in Ft. Collins, Colorado and transmits the exact time signal continuously throughout the United States at 60 kHz. The signal can be received up to 2,000 miles away through the internal antenna in the indoor weather station. However, due to the nature of the Earth's lonosphere, reception is very limited during daylight hours. The indoor weather station will search for a signal every night when reception is best. The WWVB radio station derives its signal from the NIST Atomic clock in Boulder, Colorado. A team of atomic physicists continually measure every second of every day to an accuracy of ten billonths of a second a day. These physicists have created an international standard, measuring a second as 9,192,631,770 vibrations of a Cesium 133 atom in a vacuum. For more information about WWVB please see the NIST website at http://www.boulder.nist.gov/timefreq/stations/wwb.htm
QUICK SET-UP GUIDE
Hint : Use good quality Alkaline Batteries and avoid rechargeable batteries.
- Have the indoor weather station and remote thermo/hygro sensor 3 to 5 apart.
- Batteries should be out of both units for 10 minutes.
- Place the batteries into the remote thermo/hygro sensor first then into the indoor weather station.
(All remote thermo/hygro sensors must be started before the indoor weather station) - DO NOT PRESS ANY BUTTONS FOR 10 MINUTES.
In this time the indoor weather station and remote thermo/hygro sensor will start to talk to each other and the indoor weather station will show both the indoor temperature and humidity and the outdoor temperature and humidity. If the indoor weather station does not display all values after the 10 minutes please retry the set up as stated above. After all values are displayed for 10 minutes you can place your remote thermo/hygro sensor outdoors and set your time.
The remote thermo/hygro sensor should be placed in a dry, shaded area. The remote thermo/hygro sensor has a range of 80 feet. Any walls that the signal will have to pass through will reduce distance. An outdoor wall or window will have 20 to 30 feet of resistance and an interior wall will have 10 to 20 feet of resistance. Your distance plus resistance should not exceed 80 ft. in a straight line.
NOTE: Fog and mist will not harm your remote thermo-hygro sensor but direct rain must be avoided.
To complete the set up of your indoor weather station after the 10 minutes have passed please follow the steps in the Detailed Set Up Guide.
Note: The remote thermo/hygro sensor transmits a signal every 5 minutes; after the batteries have been installed, the indoor weather station will search for the signal for a duration of 5 minutes. If there is no temperature reading in the OUTDOOR LCD after 5 minutes, make sure the units are within range of each other, or repeat the battery installation procedure.
DETAILED SET-UP GUIDE
I. Battery Installation
Batteries will fit tightly. To avoid start-up problems, make sure that the batteries do not spring free. Also be sure to insert alkaline batteries into the remote thermo/hygro sensor first, then the indoor weather station. Initial set up should be done with the remote thermo/hygro sensor and indoor weather station in the same room. The units should be permanently mounted only after the signal reception has been verified.
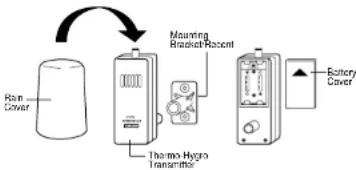
flowchart
graph TD
    A["Rain Cover"] --> B["Thermo Hydro Transmitter"]
    B --> C["Mounting Bracket Sensor"]
    C --> D["Battery Cover"]
A. Remote Temperature and Humidity Sensor, TX4U
- Pull the cylindrical rain cover off the transmitter.
- Remove the battery cover (located on the backside of the transmitter, above the mounting post and bracket). Press the arrow and slide the battery cover off.
- Observing the correct polarity install 2 Alkaline AA batteries.
- Replace battery cover, and place rain cover snugly onto the transmitter.
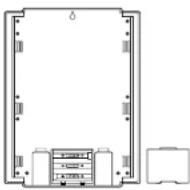
B. Weather Center
- Remove the battery cover (the cover has white writing on it).
- Observe the correct polarity, and install three Alkaline AA batteries.
- Do not press any buttons for at least ten minutes. If a button is pressed before the Weather Center has received information from the TX4U sensor, no data will be received from that sensor until reset.
- Replace the battery cover.
II. Start Up Sequence
A. Initial Start
- Immediately after the batteries have been installed, the indoor weather station will sound a "beep", and the LCD will completely light up for a brief moment.
- All information will then appear in normal mode, with "12:00" as the default time and "1.1" as the default date (2001 as the year).
- "DCA" is the default city (Washington, DC, USA), with the sunrise, sunset, moonrise and moonset times displayed for that city at that date.
-
The indoor temperature and humidity, and barometric air pressure (as 29.91 inHg relative RH) will also be displayed.
-
There is a "satellite" icon that appears near the bottom of the LCD, to the right of the "max" remote temperature-this icon informs the user that the indoor weather station is looking for signals from the remote thermo/hygro sensor. Within five minutes the remote temperature and humidity should be displayed-if not remove batteries from all units and repeat battery installation, the remote temperature sensor first, then the indoor weather station.
B. WWVB Reception
- Once the batteries are installed in the Weather Center, it will automatically search for the WWVB signal. If it receives a good signal (which is unlikely during daylight hours in most locations), the WWVB reception indicator (looks like a tower icon) will flash. The indoor weather station requires five full minutes of good reception to successfully capture the signal and set to the correct hour, minute, second, month, day and year. If the signal reception is not successful within ten minutes, the signal search will be cancelled and will automatically resume every two hours until the signal is successfully captured.
- The signal is sent from Ft. Collins, Colorado only and is similar to an AM radio signal. Atmospheric interferences such as storms, sunspots, and even sunlight will cause the signal to not travel as far.
- To maximize reception, place the indoor weather station in a window facing Colorado, at least six feet from any electrical source (computers, televisions, refrigerators, etc.). Do not move the indoor weather station while it is searching for the signal.
- The time and date can be manually set. Once the signal is captured, it will override any time and date set to the time zone selected.
- Once the time and date are set, the indoor weather station will conduct a search every night at midnight and correct to the accurate time and date (Daylight Saving Time is automatic). If the signal has been received in the past 24 hours, the reception indicator will be displayed.
III. Explanation of LCD Information
A. The below picture highlights the LCD features
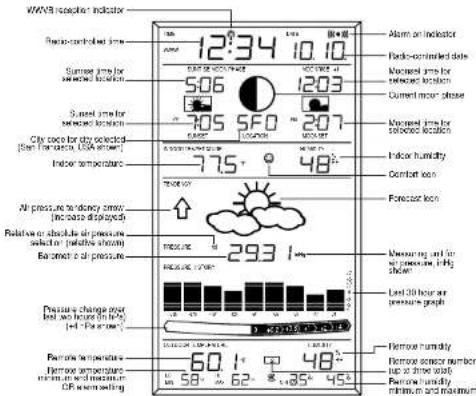
B. There are many different modes the indoor weather station can be set to. The LCD shown is the normal operating mode, and your actual data shown will be different based on your local settings and conditions.
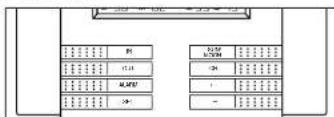
IV. Function Key Layout
A. The below picture shows the eight function keys used in programming and operation of your indoor weather station.
V. Program Mode
The program mode is laid out in a manner that allows you to program each function separately, or you can follow the instructions entirely to program the indoor weather center. Complete programming is usually done for the initial set-up, and will require you to skip step 1 and 2 of each programming section. The programming mode can be exited at any time by either pressing the "CH" button, or waiting for the 16-second time-out to take effect.
A. Overview of programming mode sequence
Note : If the country setting is other than USA step 8 is city, step 9 is time zone, etc.
| 1. Hour 2. Minute 3. 12/24 hour 4. Year | |||
| 5. Month 6. Date 7. Country 8. State | |||
| 9. City | 10. Time Zone | 11. DST on/off | 12. F/C |
| 13. inHg/hPa | 14. Relative pressure setting | 15. Forecast sensitivity | 16. Storm warning setting |
| 17. Storm alarm on/off | 18. LCD contrast | 19. LI on/off | |
B. Time, 12/24 Hour Mode and Date Setting
The WWVB signal will override any manual set time and date information. The time will be based on the time zone selected.
- Press and hold the " SET" button for 1 second.
- The hour is now flashing.
- Press and release the "+" or "-" button to select the current hour.
Note: In 12h mode "PM" will appear to the left of the time during PM hours. If the time is not within the PM hours nothing will be displayed. Be sure to set the time to the correct AM/PM time to ensure automatic reception.
- Press the "SET" button to advance to the minute
- The minute is now flashing.
- Press and release the "+"or "-" button to select the current minute.
- Press and release the * SET button to advance to the 12/24-hour setting.
- "12" is now flashing.
- Press and release the "+"or "-" button to select either 12 (am/pm) or 24 hour (military) time format.
- Press and release the "SET" button to advance to the year setting.
- The year is now flashing.
- Press and release the "+"or "-" button to select the current year.
- Press and release the "SET" button to advance to the month setting.
- The month is now flashing.
- Press and release the "+"or "-" button to select the current month.
- Press and release the "SET" button to advance to the date setting.
- The date is now flashing.
- Press and release the "+" or "-" button to select the current date.
- Press and release the "SET" button to advance to the location setting (skip steps 1 and 2 in section B if continuing).
C. City Location Setting
The list of the cities available is listed after this section.
- Press and hold the "SET" button for 1 second.
- Press and release the SET button 6 times.
- The country location will flash (USA default/factory setting).
- Press and release the "+" or "-" button to select the country (USA=United States, CAN=Canada, MEX=Mexico).
- Press and release the * SET* button to advance to the state setting (USA only) or the city location (Canada or Mexico).
Skip to step nine if Mexico or Canada is selected
-
The state is now flashing.
-
Press and release the "+"or "-" button to select the state.
-
Press and release the "SET" button to advance to the city setting.
-
The city is now flashing.
-
Press and release the "+" or "-" button to select the city closest to your location (abbreviated by airport code, if applicable).
-
Press and release the "SET" button to advance to the time zone setting (skip steps 1 and 2 in section D if continuing).
Section C lists the available city codes. Section D continues with the setup programming.
D. City Location Listing
The following list of city locations is entered in the database. Due the limited memory, 245 cities are listed. Every attempt has been made to provide a location close to all parts of North America. The choices were based first on state capitals, then nearby locations based on population and difference of latitude and longitude. There are cases where your city may be closer to a city in a nearby state rather than your state. We are unable to change the database, but are open to suggestions for future locations. If you feel there is a city that should be listed, please write to us (either mail or e-mail).
United States Cities, Listed by State
| Code | State/City | Code | State/City | Code | State/City |
| AK | Alaska | CA | California (cont.) | GA | Georgia |
| ANC | Anchorage | SAC | Sacramento | ABY | Albany |
| FAI | Fairbanks | SAN | San Diego | AGS | Augusta |
| JNU | Juneau | SBD | San Bernardino | ATL | Atlanta |
| OME | Nome | SFO | San Francisco | CSG | Columbus |
| AL | Alabama | CO | Colorado | MAC | Macon |
| BHM | Birmingham | DEN | Denver | SAV | Savanna |
| GAD | Gadsden | DRO | Durango | HI | Hawaii |
| MGM | Montgomery | FNL | Ft. Collins | HNL | Honolulu |
| MOB | Mobile | GJT | Grand Junction | ITO | Hilo |
| AR | Arkansas | ITR | Burlington | OGC | Kahului |
| FSM | Fort Smith | PUB | Pueblo | WAI | Waimea |
| LIT | Little Rock | CT | Connecticut | IA | Iowa |
| TXK | Texarkana | HFD | Hartford | ALO | Waterloo |
| AZ Arizona DC District of Columbia DSM Des Moines | |||||
| FLG | Flagstaff | DCA | Washington | DVN | Davenport |
| PHX | Phoenix | DE | Delaware | SUX | Sioux City |
| TUS | Tucson | ON5 | Dover | ID | Idaho |
| YUM | Yuma | FL | Florida | BOI | Boise |
| CA | California | EYW | Kay West | GIB | Gibbonsville |
| BFL | Bakersfield | JAX | Jacksonville PIH Pocatello | ||
| BLH | Blythe | MIA | Miami | SZT | Sand Point |
| EKA | Eureka | ORL | Orlando | IL | Illinois |
| FAT | Fresno | PNS | Pensacola | CMI | Champaign |
| FTB | Ft. Bragg | TLH | Tallahassee | ORD | Chicago |
| LAX | Los Angeles | TPA | Tampa | SPI | Springfield |
| IN Indiana MN Minnesota ND North Dakota, cont. | |||||
| EVV Evansville AEL Albert Lea GFK Grand Forks | |||||
| HUF Terre Haute BJI Bemidji NE Nebraska | |||||
| IND | Indianapolis | DLH | Duluth | GRI | Grand Island |
| SBN South Bend GPO Grand Portage LNK Lincoln | |||||
| KS | Kansas | INL | International Falls | OMA | Omaha |
| DDC | Dodge City | STP | St. Paul | SNY | Sidney |
| K32 | Wichita | MO | Missouri | VTN | Valentine |
| KCK | Kansas City | JEF | Jefferson City | NH | New Hampshire |
| OH1 | Wakeeney | MKC | Kansas City | CON | Concord |
| TOP | Topeka | MPH | Memphis | NJ | New Jersey |
| KY | Kentucky | POF | Poplar Bluff | EWR | Newark |
| FFT | Frankfort | SGF | Springfield | TTN | Trenton |
| LEX | Lexington | STL | St. Louis | NM | New Mexico |
| LOU | Louisville | MS | Mississippi | ABQ | Albuquerque |
| LA | Louisiana | GWO | Greenwood | MAG | Magdalene |
| BTR | Baton Rouge | HUV | Huntsville | ROW | Roswell |
| CWF | Lake Charles | JAN | Jackson | RTN | Raton |
| IER | Natchiloches | TUP | Tupelo | SAF | Santa Fe |
| NEW | New Orleans | MT | Montana | NV | Nevada |
| SHV | Shreveport | BIL | Billings | AIN | Austin |
| MA | Massachusetts | FTP | Ft. Pock | CXP | Carson City |
| BOS | Boston | GFT | Great Falls | ELY | Ely |
| MD | Maryland | HLN | Helena | LAS | Las Vegas |
| BWI | Baltimore | SDY | Sidney | LWL | Wells |
| ME | Maine | WTF | Whitefish | RNO | Reno |
| AUG | Augusta | NC | North Carolina | NY | New York |
| BGR | Bangor | AVL | Asheville | ALB | Albany |
| CAR | Caribou | CLT | Charlotte | BUF | Buffalo |
| PWM | Portland | FAY | Fayetteville | JFK | New York City |
| MI | Michigan | ILM | Wilmington | LKP | Lake Placid |
| AZO | Kalamazoo | INT | Winston-Salem | SYR | Syracuse |
| DET | Detroit | MCZ | Williamston | OH | Ohio |
| FNT | Flint | RDU | Raleigh | CLE | Cleveland |
| LAN | Lansing | ND | North Dakota | CMH | Columbus |
| PZQ | Rogers City | BIS | Bismarck | ISZ | Cincinnati |
| SAW | Marquette | BWB | Bowbells | TOL | Tolodo |
| TVC | Traverse City | FAR | Fargo | YNG | Youngstown |
| OK | Oklahoma | TX | Texas (cont.) | WV | West Virginia |
| 17K | Boise City | DFW | Dallas/Ft. Worth | CRW | Charleston |
| LAW | Lawton | ELP | El Paso | HLG | Wheeling |
| OKC | Oklahoma City | HOU | Houston | WY | Wyoming |
| TUL | Tulsa | LRD | Laredo | BYG | Buffalo |
| OR | Oregon | ODO | Odessa | CPR | Casper |
| BNO | Burns | SAT | San Antonio | CYS | Cheyenne |
| EUG | Eugene | UT | Utah | LAA | Little America |
| MFR | Medford | SAL | Saline | WYE | West Yellowstone |
| PDX | Portland | SGU | St. George | ||
| SLE | Salem | SLC | Salt Lake City | ||
| PA | Pennsylvania | TSN | Thompson | ||
| CXY | Harrisburg | VA | Virginia | ||
| PHL | Philadelphia | DON | Vienna | ||
| PIT | Pittsburgh | LYH | Lynchburg | ||
| SCR | Scranton | ORF | Norfolk | ||
| PR | Puerto Rico | RIC | Richmond | ||
| SJU | San Juan | ROA | Roanoke | ||
| RI | Rhode Island | VT | Vermont | ||
| PVD | Providence | BTV | Burlington | ||
| SC | South Carolina | MPR | Montpelior | ||
| CHS | Charleston | WA | Washington | ||
| CUB | Columbia | ABE | Aberdeen | ||
| GMU | Greenville | ALW | Walla Walla | ||
| SD | South Dakota | KTF | Kettle Falls | ||
| FSD | Sioux Falls | MVN | Mt. Vernon | ||
| PIR | Pierre | OLM | Olympia | ||
| RAP | Rapid City | SEA | Seattle | ||
| TN | Tennessee SFF | Spokane | |||
| BNA | Nashville | TON | Tonasket | ||
| CHA | Chattanooga | YKM | Yakima | ||
| DKX | Knoxville | WI | Wisconsin | ||
| MEM | Memphis | AUW | Wausau | ||
| TX | Texas | GRB | Green Bay | ||
| ABI | Abilene | LSE | La Crosse | ||
| AMA | Amarillo | MSN | Madison | ||
| AUS | Austin | MWC | Milwaukee | ||
| BRO | Brownsville SSQ | Spooner | |||
Canada City Listing
| Code City | Code City Code | City | |||
| EDM | Ecmonton YEL | Yellowknife CHT | Charlotte Town | ||
| ALB | Calgary OTT | Ottawa | MON Montreal | ||
| VAN | Vancouver | SUD | Sudbury | QUE | Quebec |
| WIN | Winnipeg | THU | Thunder Bay | REG | Regina |
| FRE | Fredericton | TOR | Toronto | WHI | Whitehorse |
| HAL | Halifax |
Mexico City Listings
| Code City Code City | Code City | ||||
| CHH | Chihuahua | MEX | Mexico City | HER | Hermosillo |
| DUR | Durango | GUA | Guadalupe | ||
E. Time Zone and Daylight Saving Time Settings
-
Press and hold the "SET" button for 1 second
-
Press and release the *SET* button 9 times.
- The time zone will now flash based on the city selected.
- Press and release the "+"or "-" button to adjust to the correct time zone.
- Press and release the "SET" button to advance to the Daylight Saving Time setting.
- "dst ON" will now flash.
- Press and release the *+* or "-" button to select DST 1 (recognizes Daylight Saying
Time change) or DST 0 (does not change with Daylight Saving Time).
Note : Some locations (Arizona and parts of Indiana) do not follow Daylight Saving Time.
- Press and release the *SET* button to advance to the weather measurement units
settings (skip steps 1 and 2 in section E if continuing)
F. Weather measurement units ('F/°C, InHg/hPa)
- Press and hold the "SET" button for 1 second
- Press and release the "SET" button 11 times.
- The selected temperature units will now flash (E default/factory setting).
- Press and release the "+"or "-" button to select "E (Fahrenheit) or "C (Celsius)
- Press and release the *SET* button to advance to the barometric air pressure units
6) Price and release the 121 option to advance to the barometric air pressure units setting - The sel
- The selected air pressure units will flow flash (inHg defabricatory setting).
- Dress and release the -*or " button to select inIa (inches of Mercury) or
- Press and release the + of - button to select inHg (inches of Mercury) of nPa
(hectopascal or millibars). - Press and release the "SET" button to advance to the barometric air pressure calibration
setting. - The air pressure reading will now flash (29.91 inHg, 1012.8 hPa as default).
- Press and release the "+"or "-" button to adjust to the correct relative air pressure
based on local reports - Press and release the *SET* button to advance to the forecast sensitivity setting.
Note: Barometric air pressure is usually reported as "relative air pressure". This reading is based on the combination of absolute air pressure and altitude. In general, an increase in altitude will result in a decrease in air pressure. Relative air pressure will make readings in nearby locations relative to each other to allow for proper forecasting. The absolute air pressure reading in the Weather Center cannot be calibrated, only the relative air pressure.
-
The selected forecast sensitivity setting will now flash (0.09 inHg default).
-
Press and release the "+or "-" button to select 0.06, 0.09, or 0.12 inHg (if hPa is selected, the choices will be 2, 3, or 4). A lower setting will result in a quicker change in the forecast icon. In other words, if the setting is 0.06 inHg, the forecast icon will change if the air pressure changes by at least 0.06 inHg within a six-hour period. This is useful, as certain areas will have a change of air pressure but no change in weather.
-
Press and release the "SET" button to advance to the storm warning setting
-
The selected storm warning level will now flash (0.15 inHg, 5 hPa default).
-
Press and release the "+"or "-" button to select the storm warning setting. This can be set to 0.09, 0.12, 0.15, 0.18, 0.21, 0.24, or 0.27 in Hg (from 3 to 9 hPa). This setting will determine how much of a drop in air pressure over six hours will sound the storm warning alarm.
-
Press and release the "SET" button to advance to the storm warning alarm on/off setting.
-
The storm warning on or off setting will now flash (AOFF default/factory setting).
-
Press and release the "+"or "-" button to select whether or not the storm warning alarm is activated.
-
Press and release the "SET" button to advance to the LCD setting (skip steps 1 and 2 in section F if continuing).
G. LCD Contrast
-
Press and hold the * SET" button for 1 second.
-
Press and release the " SET" button 17 times.
-
The LCD contrast setting will now flash (4 is the default/factory setting).
-
Press and release the "+"or "-" button to select the contrast level desired (from 1 to 8).
-
Press and release the "SET" button to advance to the LI setting.
-
The LI setting will now flash (ON is the default/factory setting)
-
Press and release the "-"or "-" button to select ON or OFF.
-
Press and release the "SET" button to exit the programming mode.
Note : The LI setting does not affect the function of the indoor weather station and is present only for future use.
FEATURES AND OPERATIONS
A. Sunrise/set and Moonrise/set Calculation
The indoor weather station will calculate the sunrise/set moonrise/set each day based on the location entered through the programming mode. To view another location and/or date without affecting the programmed city location and date, follow section A.2 in Features and Operations.
1. Daylight Hours and Minutes Calculation
Press and release the "SUN/MOON" button. In place of the sunrise/sunset time will be the number of daylight hours and minutes. Press the "SUN/MOON" button to view the sunrise/sunset time again.
2. View Different Location/Time for Sunrise/set and Moonrise/set
If no buttons are pressed in 30 seconds during this selection the indoor weather station will revert to the normal mode. Alternatively, you may press the "CH" key to revert to the normal mode.
a. Press and hold the * SUN/MOON* key for at least two seconds.
b. The selected country will now flash.
c. Press and release the "+" or "-" key to select the desired country.
d. Press and release the "SET" key to advance to the state selection (or city if Canada or Mexico is selected skip to step h.).
e. The state is now flashing.
f. Press and release the "+" or "-" key to select the state (see listing on pages 8 to 11).
g. Press and release the * SET* key to advance to the city selection.
h. The city is now flashing.
i. Press and release the "+" or "-" key to select the city.
j. Press and release the "SET" key to advance to the date setting.
If the sunrise/set moonrise/set times are desired for the current date, the "SUN/MOON" key may be pressed to calculate. Skip to step 1 for further explanation.
k. The year is now flashing (the current year).
I. Press and release the "+" or "-" key to select the year desired.
m. Press and release the "SET" key to advance to the month setting.
n. The month is now flashing (the current month).
o. Press and release the "+" or "-" key to select the month desired.
p. Press and release the * SET* key to advance to the date setting.
q. The date is now flashing (the current date).
r. Press and release the "+" or "-" key to select the date desired.
s. Press and release the "SUN/MOON" key to calculate the new city location at the date selected.
You may instead press the "SET" key to select a different location, starting at step b above.
t. Once the "SUN/MOON" key is pressed, the sunrise/set and moonrise/set times will flash as dashes while the indoor weather station calculates the times (the moon phase is calculated, also). Once the times are displayed, the indoor weather station will remain in this mode for 30 seconds or until the "CH" key is pressed. The year, month, or date will also be flashing. At this time it is possible to start at step b. to select another date or location.
u. Once this mode is exited either through timeout after 30 seconds or by pressing the "CH" button, the indoor weather station will revert to the normal mode with the location and date set through the programming mode. The indoor weather station will default to the last city selected when this mode is entered again.
B. Moon Phase
There are 12 moon phases shown on the indoor weather station; the black portion signifies the portion of the moon visible in the sky. Thus, when the moon icon is all black, it is a full moon. The indoor weather station is programmed with all moon phases from the year 2000 until 2099.
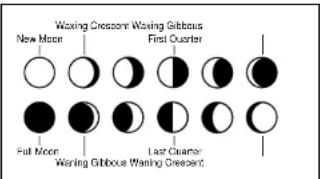
- The moon phase for any date may be found by selecting a different date through the sunrise/set moon rise/set programming section (section A in Features and Operations).
C. Minimum and Maximum Temperature and Humidity
1. Indoor Minimum and Maximum Temperature and Humidity
The indoor weather station automatically stores the minimum and maximum indoor temperature and humidity. The minimum and maximum values are updated automatically when a new minimum or maximum is recorded, or until manually reset.
a. From the normal display mode, press and release the "IN" key once to view the indoor minimum temperature and humidity ("MIN" will be displayed near the indoor temperature and humidity).
b. Press and release the "IN" key again to view the indoor maximum temperature and humidity.
c. Press and release the *IN* key again to return to the normal mode (timeout of viewing minimum/maximum values will occur if no keys are pressed for fifteen seconds).
Note : To reset the indoor minimum and maximum temperature and humidity, press and hold the "IN" key for at least two seconds.
2. Outdoor Minimum and Maximum Temperature and Humidity
The indoor weather station automatically stores the minimum and maximum outdoor temperature and humidity. The minimum and maximum values are updated automatically when a new minimum or maximum is recorded, or until manually reset.
a. The outdoor (remote) minimum and maximum temperature values are displayed below the outdoor temperature display.
b. These values are rounded down for minimum and rounded up for maximum.
Note: The temperature alarm mode shares the same display. When the alarm values are displayed, "ALARM" will be displayed above the remote temperature. To switch back and forth between views, press the "OUT" key.
c. To reset the outdoor minimum and maximum temperatures press and hold the ^* CH key for at least one second.
D. Multiple Remote Temperature Sensors
The WS-8025U is able to receive signals from 3 different remote sensors. These extra remote sensors can be purchased through the same dealer as this unit. A TX4U will monitor the temperature and humidity, a TX3U will monitor temperature and display the temperature on its LCD and the TX3UP will monitor the temperature via a probe for measuring soil or water temperatures.
Note: When setting up multiple units it is important to insert batteries first into all the remote sensors, and in numeric sequence. Second install batteries into the indoor weather station. Transmission problems will arise if this is not done correctly and if the total time for set-up exceeds 6 minutes
1. Set Up of Multiple Units
a. It is necessary to remove the batteries from all units currently in operation.
b. Remove the battery covers to all remote sensors.
c. Place all remote sensors in a numeric sequential order.
d. In sequential order, install batteries following the same battery installation procedures seen in Detailed Set-Up Guide section of this manual.
e. Install batteries into the indoor weather station
f. Follow the Detailed Set-Up Guide for programming and operating instructions.
2. Viewing and Operating with Multiple Remote Sensors
a. To view the temperature of a different remote sensor press and release the "CHANNEL" button. A shift from one "boxed" number to the next should be observed in the OUTDOOR LCD.
b. The minimum and maximum temperature of the additional remote sensor will be displayed below the current temperature of the remote sensor in the OUTDOOR LCD.
c. To reset the minimum and maximum temperature readings press and hold the "RESET" button for 5 seconds and the records for all the remote sensor will be reset.
Each remote sensor will have its own minimum and maximum values stored, as well as its own alarm settings for temperature. Resetting the outdoor minimum and maximum values will reset all remote sensors' recordings.
E. Remote Temperature Alarm
1. Activating the alarm
From the normal mode, press and release the *OUT* key to toggle between the temperature alarm and minimum/maximum values. *ALARM* will be displayed above the remote temperature display; this will also activate the temperature alarm.
2. Setting the temperature alarm
a. Press and hold the "OUT" key for two seconds.
b. The low temperature will be flashing (32°F default/factory setting).
c. Press and release the "+" or "-" key to adjust the temperature from -22°F to +157°F
(*--" if outside this range). Any value attained below this will sound the alarm
d. Press and release the "SET" key to advance to the high temperature alarm
e. The high temperature setting is now flashing (86°F default/factory setting).
f. Press and release the + or - key to adjust the temperature from -22°F to +157°F
(* - - if outside this range). Any value attained above this value will sound the alarm
g. Press and release the "SET" key to return to the normal display mode (or the display will timeout after fifteen seconds and return to the normal mode automatically).
3. Canceling the Temperature Alarm While Sounding
a. While the alarm is sounding, press any key to mute the alarm. The temperature will
flash as long as the value is above the set value.
b. The alarm will reactivate automatically once the value has fallen below the set value, or if a new value is entered.
F. Comfort Indicator for Indoor Temperature and Humidity
- The comfort level indicator appears in between the indoor tempearture and humidity.
- The indicator will display a "happy-face" when the temperature is between 68°F and 79°F (20°C and 25.9°C), and the humidity is between 45% and 64%.
- A "sad-face" will be displayed when the temperature and humidity are outside the mentioned ranges.
- If the humidity is below 45% the word "DRY" will appear to the right of the "sad-face" icon.
- If the humidity is above 54% the word "WET" will appear to the right of the "sad-face" icon.
G. Weather Forecast Icon and Pressure Trend Indicators
The weather forecasting feature is estimated to be 75% accurate, and is based solely upon the change of air pressure over time. The WS-8025U averages past air-pressure readings to provide an accurate forecast-creating a necessity to disregard all weather forecasting for 12-24 hours after the unit has been set-up, reset, or moved from one altitude to another (i.e. from one floor of a building to another floor). In areas where the weather is not affected by the change of air pressure, this feature will be less accurate.
1. Weather Icons
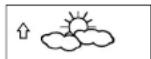
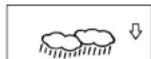
a. There are 3 possible weather icons that will be displayed at various times in the center of the indoor weather station.
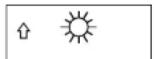
i Sunny - indicates that the weather is expected to improve (not that the weather will be sunny).
ii Sun with Clouds - indicates that the weather is expected to be fair (not that the weather will be sunny with clouds).
iii Clouds with Rain - indicates that the weather is expected to get worse (not that the weather will be rainy).
b. The weather icons change when the unit detects a change in air pressure. c. The icons change in order, from "sunny" to "sun with clouds" to "clouds with rain" or the reverse.
d. It will not change from "sunny" directly to "clouds with rain", although it is possible for the change to occur quickly.
e. If the symbols do not change, the weather has not changed (or the change has been slow and gradual).
f. The sensitivity of the change in forecast icon is set by the user in section F of the Detailed Set Up Guide.
H. Weather Tendency Arrows
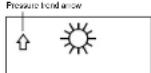
-
Along with the forecast icon there is a pressure tendency arrow.
-
There is one that points up (on the left side of the LCD) and one that points down (on the right side of the LCD).
-
These arrows reflect current changes in the air pressure.
-
An arrow pointing up indicates that the air pressure is increasing and the weather is expected to improve or remain good.
-
An arrow pointing down indicates that the air pressure is decreasing and the weather is expected to become worse or remain poor.
-
No arrow means the pressure is stable.
-
A storm can be expected if there is a drop of 4 hPa or more in less than 6 hours. The clouds with rain icon will be displayed and the tendency arrow that points down will be flashing-indicating the storm warning feature has been activated. The flashing will stop when the air pressure stabilizes or begins to rise.
I. Storm Warning Alarm
-
An alarm can be set to warn of a drop in air pressure.
-
Please follow the programming instructions in section F of the Detailed Set Up Guide to activate this alarm
-
When the air pressure drops by the level set, an alarm will sound (if the alarm is activated).
-
To cancel the alarm while sounding press any key.
J. Air Pressure Tendency for Past Two Hours
The bar below the air pressure history chart displays the air pressure change over the past two hours (values based on hPa change, 1 hPa equals 0.03 inHg).
K. Barometric Air Pressure Reading
- The actual barometric air pressure is displayed directly under the weather forecast icon
- The relative air pressure is calibrated by the user through the programming mode
- Please Follow the programming instructions in section F of the Detailed Set Up Guide to set this feature.
- To toggle between absolute and relative air pressure, press the "-" key.
L. Air Pressure History Bar Chart
- The bar graph shows in hPa (Hekto Pascal) the recorded air pressure over the past 30-hours.
- The horizontal axis shows the hours at increments of -30 hours, -24 hours, -18 hours, -12 hours, -6 hours, -3 hours, -1 hours, and 0 hours (current).
-
The vertical axis is set by hPa: the "0" on this axis represents the current hPa, and + or -1,3,5, or 7 shows (in hPa) how high or low the past air pressure was as compared to the current one.
-
The "0" on the vertical axis indicates the current air pressure value.
-
The "0h" on the horizontal axis indicates the current hour, thus the current air pressure also.
-
Each bar on the bar graph represents a value of 0.03 hPa, and each bar also has a corresponding value on the vertical axis.
-
Air pressure trends can be determined by simply glancing at the bar graph
a. If the bars are rising (higher on the right than the left) then the air pressure has a rising trend, and the weather should improve.
b. If the bars are dropping (lower on the right than the left) then the air pressure has a falling trend, and the weather should worsen. -
Multiply the two values to find past air pressure (note the + or - sign of values on the vertical axis); i.e. 0.03 hPa x 3 = 0.09 hPa, now add this value to the air pressure (in LCD 4) to evaluate what past air pressures have been.
-
The bar chart will constantly scroll to avoid burnout of the LCD.
Note : This feature cannot be turned off.
MOUNTING
Note: Before permanently mounting, ensure that the indoor weather station is able to receive signals from the transmitters and WWVB signal at the desired location. To achieve a true temperature reading, avoid mounting the remote thermo/hygro sensor (or any sensor) where direct sunlight can reach the remote sensor. We recommend that you mount the remote sensor on a North-facing wall or under an eve. The sending range of the remote thermo/hygro sensor is 80 ft (25m) however obstacles such as walls, concrete, and large metal objects can reduce the range. Place all units in their desired location, and wait approximately 15 minutes before permanently mounting to ensure that there is proper reception. If the indoor weather station loses the signal from the remote sensor, it will display the last temperature reading for 15 minutes. After 15 minutes of not receiving any signals, the remote temperature will display “...”.
A. Mounting the Remote Thermo/hygro Sensor
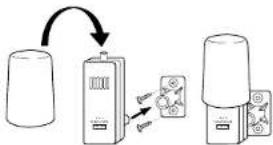
The remote thermo/hygro sensor can be mounted with the use of screws or by using the adhesive tape.
1. Mounting with screws
a. Remove the mounting bracket/receptor from the packaging.
b. Place the mounting bracket over the desired mounting surface.
c. Through the 2 screw holes of the bracket, mark the mounting surface with a pencil.
d. Where marked, start the screw holes using the provided screws.
e. Remove screws from the mounting surface.
f. Align the mounting bracket with the started screw holes.
g. Screw mounting bracket onto the mounting surface. The screws should be flush with the bracket.
h. Fit the mounting post (on the back of the transmitter) into the receptor of the mounting bracket.
flowchart
graph TD
    A["Device 1"] --> B["Switch"]
    B --> C["Device 2"]
2. Mounting with Adhesive Tape
a. With a nonabrasive solution, clean and dry the back of the mounting bracket and the mounting surface to ensure a secure hold. The mounting surface should be smooth and flat.
b. Remove the protective strip from one side of the tape.
c. Press firmly onto the designated area on the back of the mounting bracket.
d. Remove the protective strip from the other side of the tape, and situate the mounting bracket.
e. Firmly press the mounting bracket onto the mounting surface.
1. Fit the mounting post into the receptor of the mounting bracket.
B. Mounting the WS-8025U Weather Center
The indoor weather station can be mounted in two ways; free standing or hanging on a wall.
To have the indoor weather station free standing, simply unfold the stands on the back and set on a stable flat surface.
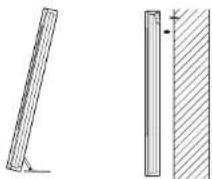
To wall mount the indoor weather station;
-
Ensure that the integrated stands are folded in.
-
Fix a screw (not included) into the desired wall, leaving approximately 3/16 of an inch (5mm) extended from the wall.
-
Place the indoor weather station onto the screw using the hanging hole on the backside.
Gently pull the indoor weather station down to lock the screw into place.
Maintenance and Care Instructions
A. Extreme temperatures, vibration, and shock should be avoided to prevent damage to the units.
B. Clean displays and units with a soft, damp cloth. Do not use solvents or scouring agents; they may mark the displays and casings.
C. Do not submerge in water.
D. Immediately remove all low powered batteries to avoid leakage and damage.
E. Opening the casings invalidates the warranty. Do not try to repair the unit. Contact La Crosse Technology for repairs.
TROUBLESHOOTING
Problem : The LCD is faint.
Solution : 1) Set the LCD contrast to a higher level.
2) Replace batteries.
Problem : No outdoor temperature:humidity is displayed.
Solution : 1) Remove all batteries, reinsert into the remote thermo/hygro sensor first, then into the indoor weather station.
2) Place remote thermo/hygro sensor closer to the indoor weather station.
3) Be sure all batteries are fresh.
4) No other interfering sources are being used (such as computer monitors, TV sets.
headphones, or speakers) in the vicinity. The signal travels in a straight line, an electrical
source near that "line" may cause interference.
Problem : Temperature, humidity, or air pressure is incorrect.
Solution : 1) Check/Replace batteries.
2) If multiple remote sensors are in use, check location with corresponding "boxed
numbers.
3) Move away from sources of heat/cold
4) Adjust relative air pressure to a value from a reliable source (TV radio, etc.).
5) The indoor weather station and remote sensors are calibrated at the factory. If there is
a consistent problem, please call La Crosse Technology.
Problem : '-' in humidity display.
Solution : 1) Humidity is below 20% or above 95%.
2) TX3U or TX3UP is used for remote temperature.
Problem : WWVB time and date will not set or update
Solution : 1) Wait until overnight for signal to be received
2) Move indoor weather station away from sources of electricity
3) Place indoor weather station in window facing Colorado
4) The first reception is most difficult, as the indoor weather station needs five continual
minutes of clear signal reception. After the initial time/date set, the indoor weather
station only requires one full minute of clear reception each night.
SPECIFICATIONS
Radio-controlled Time Signal WWVB, 60 kHz from Ft. Collins, CO
Indoor weather station recommended
temperature
32°F to 122°F (0°C to 50°C)
LCD contrast 8 levels (1-8)
Sunrise/set, Moonrise/set, and moon phase
dates available January 1, 2000 through December 31, 2099
Temperature measuring range
| Indoor | 14°F to 140°F with 0.2°F resolution(-9.9°C to 59.9°C with 0.1°C resolution)"OFL" displayed if outside this range) |
| Outdoor | -22°F to 140°F with 0.2°F resolution(-29.9°C to 59.9°C with 0.1°C resolution)"OFL" displayed if outside this range |
Relative humidity range
| Indoor/Outdoor 20% to 95% with 1% resolution, indoor weather station displays *--.* if outside this range |
Air pressure
| Absolute hPa/inHg 700 hPa to 1099 hPa | (20.67 inHg to 32.46 inHg) |
Relative hPa (adjustable) 960 hPa to 1040 hPa
Relative inHg (adjustable) 28.60 inHg to 30.45 inHg
Sensitivity setting hPa 1 hPa to 4 hPa
Air pressure history For the past 30 hours (0, -1, -2, -3, -6, -12, -18, -24 and -30 hours)
Data checking intervals
Indoor temperature Every 15 second
Indoor humidity Every 20 seconds
Outdoor temperature Every 5 minutes
Outdoor humidity Every 5 minutes
Transmitter reading update (within sensor)
Outdoor temperature Every 1 minute
Outdoor humidity Every 1 minute
Transmission frequency
Transmission range
Power supply
| Weather Center: | 3 x AA, IEC LR6, 1.5V batteries. |
| Thermo Hygro Transmitter: | 2 x AA, IEC LR6, 1.5V batteries. |
Dimensions (L x W x H)
Indoor weather station
Remote thermo/hygro sensor
7.75 x10.00 x 1.00 inches
(196×254×25mm)
1.56 x 0.78 x 4.29 inches
(40 x 20 x 110 mm)
WARRANTY INFORMATION
La Crosse Technology provides a 1-year warranty on this indoor weather station. Contact La Crosse Technology immediately upon discovery of any defects covered by this warranty.
Before sending the indoor weather station in for repairs, contact La Crosse Technology. The indoor weather station will be repaired or replaced with the same or similar model.
This warranty does not cover any defects resulting from improper use, unauthorized repairs, faulty batteries, or the indoor weather stations inability to receive a signal due to any source of interference.
LA CROSSE TECHNOLOGY WILL NOT ASSUME LIABILITY FOR INCIDENTAL, CONSEQUENTIAL, PUNITIVE, OR OTHER SIMILAR DAMAGES ASSOCIATED WITH THE OPERATION OR MALFUNCTION OF THIS INDOOR WEATHER STATION. THIS PRODUCT IS NOT TO BE USED FOR MEDICAL PURPOSES OR FOR PUBLIC INFORMATION. THIS PRODUCT IS NOT A TOY KEEP OUT OF CHILDRENS' REACH.
This warranty gives you specific legal rights. You may also have other rights specific to your State Some States do not allow the exclusion of consequential or incidental damages; therefore the above exclusion of limitation may not apply to you.
For warranty work, technical support, or information contact:
La Crosse Technology
190 Main St
La Crescent, MN 55947
Phone: 507.895.7095
Fax: 507.895.8000
e-mail:
support@lacrossetechnology.com (warranty work)
sales@lacrossetechnology.com (information on other products)
Website:
www.lacrossetechnology.com
TABLE DES MATIERES
EQUIPEMENT SUPPLEMENTAIRE (non fourni)
V. Mode de programmation
| IN | Indiana | MN | Minnesota | ND | North Dakota, cont. |
| EVV | Evansville | AEL | Albert Lea | GFK | Grand Forks |
| HUF | Terre Haute | BJI | Bemidji | NE | Nebraska |
| IND | Indianapolis | DLH | Duluth | GRI | Grand Island |
| SBN | South Bend | GPO | Grand Portage | LNK | Lincoln |
| KS | Kansas | INL | International Falls | OMA | Omaha |
| DDC | Dodge City | STP | St. Paul | SNY | Sidney |
| K32 | Wichita | MO | Missouri | VTN | Valentine |
| KCK | Kansas City | JEF | Jefferson City | NH | New Hampshire |
| OH1 | Wakeeney | MKC | Kansas City | CON | Concord |
| TOP | Topeka | MPH | Memphis | NJ | New Jersey |
| KY | Kentucky | POF | Poplar Bluff | EWR | Newark |
| FFT | Frankfort | SGF | Springfield | TTN | Trenton |
| LEX | Lexington | STL | St. Louis | NM | New Mexico |
| LOU | Louisville | MS | Mississippi | ABQ | Albuquerque |
| LA | Louisiana | GWO | Greenwood | MAG | Magdalene |
| BTR | Baton Rouge | HUV | Huntsville | ROW | Roswell |
| CWF | Lake Charles | JAN | Jackson | RTN | Raton |
| IER | Natchitoches | TUP | Tupelo | SAF | Santa Fe |
| NEW | New Orleans | MT | Montana | NV | Nevada |
| SHV | Shreveport | BIL | Billings | AIN | Austin |
| MA | Massachusetts | FTP | Ft. Pock | CXP | Carson City |
| BOS | Boston | GFT | Great Falls | ELY | Ely |
| MD | Maryland | HLN | Helena | LAS | Las Vegas |
| BWI | Baltimore | SDY | Sidney | LWL | Wells |
| ME | Maine | WTF | Whitefish | RNO | Reno |
| AUG | Augusta | NC | North Carolina | NY | New York |
| BGR | Bangor | AVL | Asheville | ALB | Albany |
| CAR | Caribou | CLT | Charlotte | BUF | Buffalo |
| PWM | Portland | FAY | Fayetteville | JFK | New York City |
| MI | Michigan | ILM | Wilmington | LKP | Lake Placid |
| AZO | Kalamazoo | INT | Winston Salem | SYR | Syracuse |
| DET | Detroit | MCZ | Williamston | OH | Ohio |
| FNT | Flint | RDU | Raleigh | CLE | Cleveland |
| LAN | Lansing | ND | North Dakota | CMH | Columbus |
| PZQ | Rogers City | BIS | Bismarck | ISZ | Cincinnati |
| SAW | Marquette | BWB | Bowbells | TOL | Toledo |
| TVC | Traverse City | FAR | Fargo | YNG | Youngstown |
| OK Oklahoma TX Texas (cont.) WV West Virginia17K Boise City DFW Dallas/Ft. Worth CRW CharlestonLAW Lawton ELP El Paso HLG Wheeling | |||||
| OKC Oklahoma City | HOU Houston | WY Wyoming | |||
| TUL Tulsa | LRD Laredo | BYG Buffalo | |||
| OR Oregon | ODO Odessa CPR Casper | ||||
| BNO Burns | SAT San Antonio CYS Cheyenne | ||||
| EUG Eugene | UT Utah | LAA Little America | |||
| MFR Medford | SAL Saline | WYE West Yellowstone | |||
| PDX Portland | SGU St. George | ||||
| SLE Salem | SLC Salt Lake City | ||||
| PA Pennsylvania | TSN Thompson | ||||
| CXY Harrisburg | VA Virginia | ||||
| PHL Philadelphia | DON Vienna | ||||
| PIT Pittsburgh LYH Lynchburg | |||||
| SCR Scranton | ORF Norfolk | ||||
| PR Puerto Rico | RIC Richmond | ||||
| SJU San Juan | ROA Roanoke | ||||
| RI Rhode Island VT Vermont | |||||
| PVD Providence | BTV Burlington | ||||
| SC South Carolina | MPR Montpelior | ||||
| CHS Charleston WA Washington | |||||
| CUB Columbia | ABE Aberdeen | ||||
| GMU Greenville ALW Walla Walla | |||||
| SD South Dakota | KTF Kettle Falls | ||||
| FSD Sioux Falls | MVN Mt. Vernon | ||||
| PIR Pierre | OLM Olympia | ||||
| RAP Rapid City | SEA Seattle | ||||
| TN Tennessee | SFF Spokane | ||||
| BNA Nashville | TON Tonasket | ||||
| CHA Chattanooga | YKM Yakima | ||||
| DKX Knoxville | WI Wisconsin | ||||
| MEM Memphis | AUW Wausau | ||||
| TX Texas | GRB Green Bay | ||||
| ABI Abilene | LSE La Crosse | ||||
| AMA Amarillo | MSN Madison | ||||
| AUS Austin | MWC Milwaukee | ||||
| BRO Brownsville | SSQ Spooner | ||||
| IN | Indiana | MN | Minnesota | ND | North Dakota, cont. |
| EVV | Evansville | AEL | Albert Lea | GFK | Grand Forks |
| HUF | Terre Haute | BJI | Bemidji | NE | Nebraska |
| IND | Indianapolis | DLH | Duluth | GRI | Grand Island |
| SBN | South Bend | GPO | Grand Portage | LNK | Lincoln |
| KS | Kansas | INL | International Falls | OMA | Omaha |
| DDC | Dodge City | STP St. Paul | SNY | Sidney | |
| K32 | Wichita | MO | Missouri | VTN | Valentine |
| KCK | Kansas City | JEF | Jefferson City | NH | New Hampshire |
| OH1 | Wakeeney | MKC | Kansas City | CON | Concord |
| TCP | Topeka | MPH | Memphis | NJ | New Jersey |
| KY | Kentucky | POF | Poplar Bluff | EWR | Newark |
| FFT | Frankfort | SGF | Springfield | TTN | Trenton |
| LEX | Lexington | STL | St. Louis | NM | New Mexico |
| LOU | Louisville | MS | Mississlppi | ABQ | Albuquerque |
| LA | Louisiana | GWO | Greenwood | MAG | Magdalene |
| BTR | Baton Rouge | HUV | Huntsville | ROW | Roswell |
| CWF | Lake Charles | JAN | Jackson | RTN | Raton |
| IER | Natchitoches | TUP | Tupelo | SAF | Santa Fe |
| NEW | New Orleans | MT | Montana | NV | Nevada |
| SHV | Shreveport | BIL | Billings | AIN | Austin |
| MA | Massachusetts | FTP | Ft. Puck | CXP | Carson City |
| BOS | Boston | GFT | Great Falls | ELY | Ely |
| MD | Maryland | HLN | Helena | LAS | Las Vegas |
| BWI | Baltimore | SDY | Sidney | LWL | Wells |
| ME | Maine | WTF | Whitefish | RNO | Reno |
| AUG | Augusta | NC | North Carolina | NY | New York |
| BGR | Bangor | AVL | Asheville | ALB | Albany |
| CAR | Caribou | CLT | Charlotte | BUF | Buffalo |
| PWM | Portland | FAY | Fayetteville | JFK | New York City |
| MI | Michigan | ILM | Wilmington | LKP | Lake Placid |
| AZO | Kalamazoo | INT | Winston Salem | SYR | Syracuse |
| DET | Detroit | MCZ | Williamston | OH | Ohio |
| FNT | Flint | RDU | Raleigh | CLE | Cleveland |
| LAN | Lansing | ND | North Dakota | CMH | Columbus |
| PZQ | Rogers City | BIS | Bismarck | ISZ | Cincinnati |
| SAW | Marquette | BWB | Bowbells | TOL | Tolodo |
| TVC | Traverse City | FAR | Fargo | YNG | Youngstown |
| OK Oklahoma TX Texas (cont.) WV West Virginia17K Boise City DFW Dallas/Ft. Worth CRW CharlestonLAW Lawton ELP El Paso HLG Wheeling | |||||
| OKC Oklahoma City | HOU Houston | WY Wyoming | |||
| TUL Tulsa | LRD Laredo | BYG Buffalo | |||
| OR Oregon | ODO Odessa CPR Casper | ||||
| BNO Burns | SAT San Antonio CYS Cheyenne | ||||
| EUG Eugene | UT Utah | LAA Little America | |||
| MFR Medford | SAL Saline | WYE West Yellowstone | |||
| PDX Portland | SGU St. George | ||||
| SLE Salem | SLC Salt Lake City | ||||
| PA Pennsylvania | TSN Thompson | ||||
| CXY Harrisburg | VA Virginia | ||||
| PHL Philadelphia | DON Vienna | ||||
| PIT Pittsburgh LYH Lynchburg | |||||
| SCR Scranton | ORF Norfolk | ||||
| PR Puerto Rico | RIC Richmond | ||||
| SJU San Juan | ROA Roanoke | ||||
| RI Rhode Island VT Vermont | |||||
| PVD Providence | BTV Burlington | ||||
| SC South Carolina | MPR Montpelior | ||||
| CHS Charleston WA Washington | |||||
| CUB Columbia | ABE Aberdeen | ||||
| GMU Greenville ALW Walla Walla | |||||
| SD South Dakota | KTF Kettle Falls | ||||
| FSD Sioux Falls | MVN Mt. Vernon | ||||
| PIR Pierre | OLM Olympia | ||||
| RAP Rapid City | SEA Seattle | ||||
| TN Tennessee | SFF Spokane | ||||
| BNA Nashville | TON Tonasket | ||||
| CHA Chattanooga | YKM Yakima | ||||
| DKX Knoxville | WI Wisconsin | ||||
| MEM Memphis | AUW Wausau | ||||
| TX Texas | GRB Green Bay | ||||
| ABI Abilene | LSE La Crosse | ||||
| AMA Amarillo | MSN Madison | ||||
| AUS Austin | MWC Milwaukee | ||||
| BRO Brownsville | SSQ Spooner | ||||
flowchart
graph TD
    A["Power Supply"] --> B["Device with Control Unit"]
    B --> C["Motor with Switch"]
    C --> D["Output"]
(20.67 inHg a 32.46 inHg).
HPa relativo (ajustable): 960 hPa a 1040 hPa.
InHg relativo (ajustable): 28.60 inHg a 30.45 inHg.
- INVENTORY OF CONTENTS
- ADDITIONAL EQUIPMENT (not included)
- ABOUT WWVB (radio-controlled time)
- QUICK SET-UP GUIDE
- DETAILED SET-UP GUIDE
- Battery Installation
- Remote Temperature and Humidity Sensor, TX4U
- Weather Center
- Start Up Sequence
- Initial Start
- WWVB Reception
- Explanation of LCD Information
- Function Key Layout
- Program Mode
- Overview of programming mode sequence
- Time, 12/24 Hour Mode and Date Setting
- City Location Setting
- City Location Listing
- Time Zone and Daylight Saving Time Settings
- Weather measurement units ('F/°C, InHg/hPa)
- LCD Contrast
- FEATURES AND OPERATIONS
- Sunrise/set and Moonrise/set Calculation
- Daylight Hours and Minutes Calculation
- View Different Location/Time for Sunrise/set and Moonrise/set
- Moon Phase
- Minimum and Maximum Temperature and Humidity
- Indoor Minimum and Maximum Temperature and Humidity
- Outdoor Minimum and Maximum Temperature and Humidity
- Multiple Remote Temperature Sensors
- Set Up of Multiple Units
- Viewing and Operating with Multiple Remote Sensors
- Remote Temperature Alarm
- Activating the alarm
- Setting the temperature alarm
- Canceling the Temperature Alarm While Sounding
- Comfort Indicator for Indoor Temperature and Humidity
- Weather Forecast Icon and Pressure Trend Indicators
- Weather Icons
- Weather Tendency Arrows
- Storm Warning Alarm
- Air Pressure Tendency for Past Two Hours
- Barometric Air Pressure Reading
- Air Pressure History Bar Chart
- MOUNTING
- Mounting the Remote Thermo/hygro Sensor
- Mounting with screws
- Mounting with Adhesive Tape
- Mounting the WS-8025U Weather Center
- Maintenance and Care Instructions
- TROUBLESHOOTING
- SPECIFICATIONS
- WARRANTY INFORMATION
- EQUIPEMENT SUPPLEMENTAIRE (non fourni)
- Mode de programmation
Brand : LA CROSSE TECHNOLOGY
Model : WS8025AL
Category : Weather Station