
MMC 240 - Hi-fi system MAC AUDIO - Free user manual and instructions
Find the device manual for free MMC 240 MAC AUDIO in PDF.

| Product type | Stereo hi-fi system with CD player, DAB+/FM tuner, Bluetooth |
| Brand | Mac Audio |
| Model | MMC 240 |
| Dimensions (main unit) | 179 x 140 x 253 mm |
| Dimensions (speaker) | 154 x 252 x 127 mm |
| Weight (main unit) | 1.82 kg |
| Weight (speaker) | 1.1 kg |
| Power supply | 100-240 V AC, 50/60 Hz |
| Maximum power consumption | 30 W |
| Standby power consumption | < 1 W |
| Output power | 2 x 30 W |
| Bluetooth connectivity | Bluetooth 2.1 with EDR |
| FM tuner | PLL RDS, 87.5-108 MHz, 30 presets |
| DAB+ tuner | 174.928-239.200 MHz, 30 presets |
| CD player | CD/CD-R/CD-RW/MP3 |
| USB port | MP3 playback, 5V/500 mA |
| Auxiliary audio input | 3.5 mm stereo jack |
| Equalizer | Flat, Jazz, Classic, Rock, Pop |
| Functions | Sleep timer, alarm, repeat, random |
| Display | 8 digits, 12/24h clock |
| Included accessories | Remote control, FM/DAB antenna |
| Maintenance | Clean with a dry cloth only |
| Safety | Surge protection, do not open |
| Repairability | Repair by a specialist, original parts |
Frequently Asked Questions - MMC 240 MAC AUDIO
User questions about MMC 240 MAC AUDIO
0 question about this device. Answer the ones you know or ask your own.
Ask a new question about this device
Download the instructions for your Hi-fi system in PDF format for free! Find your manual MMC 240 - MAC AUDIO and take your electronic device back in hand. On this page are published all the documents necessary for the use of your device. MMC 240 by MAC AUDIO.
USER MANUAL MMC 240 MAC AUDIO
The Bluetooth® word mark and logos are registered trademarks owned by Bluetooth SIG, Inc. and any use of such marks by Mac Audio is under license. Other trademarks and trade names are those of their respective owners.


At the end of the product's useful life, please dispose of it at appropriate collection points provided in your country.
(D) 4
GB 18
F 32
①
46.
E 60
Thank you for choosing the Mac Audio MMC 240.
Please read the following information carefully before starting to use the MMC 240.
IMPORTANT SAFETY PRECAUTIONS
- Please read the instruction manual carefully before use and keep it in a safe place.
- This device is only intended for use with 240 V/50 Hz AC voltage.
- Only operate the device at an ambient/room temperature between 10^ and 40^ .
- Make sure there is sufficient ventilation for the device. There must be a minimum gap of 10 cm between objects to the side, to the rear and above the device.
- The ventilation slots should not be covered by any items (e.g. curtains, newspaper, etc.) in order to ensure sufficient ventilation for the device. Please do not position any sources of heat, such as radiators, ovens, naked flames or other devices that generate heat in close proximity to the device.
- The device and the remote control should not be exposed to dripping or splash water or high levels of humidity.
- No naked flame sources, such as lighted candles, should be placed on the apparatus.
- No objects filled with liquids, such as vases, shall be places on the unit.
- In the event of contact with moisture or liquids remove the mains adapter immediately.
- Only clean the device using a dry cloth.
- Do not use any cleaning agents or chemical solvents when cleaning, as these could damage the surface of the device.
- Never open the device.
- The mains cable must always be suitable for operation and it should only ever be laid out in a manner that prevents it from being trodden on. It should not be pinched by objects either, as this can damage the cable. When using plugs and power strips it must be ensured that the cable is not kinked at the point where it emerges from the socket. Do not connect or remove the mains cable with damp hands.
- Do not connect or remove the mains cable with damp hands.
- The mains plug is used as the disconnecting device. Disconnecting devices shall remain readily operable.
- Danger of explosion if battery is incorrectly replaced. Replace only with the same or equivalent type.
- Batteries (battery pack or batteries installed) shall not be exposed to excessive heat, such as sunshine, fire and the like.
• Always refer to a qualified specialist for any maintenance or repair work. - If the device is not going to be used for a prolonged period, remove the mains plug.
- Please remove the mains plug in the event of thunderstorms.
DAMAGE THAT MUST BE RECTIFIED BY A SPECIALIST:
If any of the following damage occurs, disconnect the device from the mains immediately and contact a specialist to conduct the repair work:
- Damage to the mains cable or the mains plug. A damaged cable should not be repaired, but must be replaced.
- If moisture or water has entered the device or foreign objects have fallen into the device.
- If the device has fallen and the housing is damaged.
- If the device does not work properly, even though all of the information in the instruction manual has been observed.
Only those subsequent alterations approved by the manufacturer may be conducted.
Only original spare parts should be used for repair.
After conducting any repairs the safety of device should be checked to ensure it is functioning correctly and safely.
Repairs must always be conducted by qualified specialists, as you might otherwise be exposed to dangerous high voltage levels or other hazards.

This symbol warns the user that high voltage is used within the device which can result in electric shock.

This symbol makes the user aware that there are important notes in the enclosed instruction manual which must be observed.

WARNING:DO NOT OPEN! RISK OF ELECTRIC SHOCK!
To reduce the risk of fire or electric shock, do not expose this unit to rain or moisture.

This symbol informs the user that there is a class 1 laser operating inside the device which does not pose any hazardous threat outside the device.

DECLARATION OF CONFORMITY
Hereby, Magnat Audio-Produkte GmbH declares that the MMC 240 is in compliance with the essential requirements and other relevant provisions of directive 2014/53/EU. The Declaration of Conformity can be found at http://www.mac-audio.de in the download area of the device.
INSTRUCTIONS FOR DISPOSAL
In accordance with European Directive 2012/19/EU all electrical and electronic appliances must be disposed of separately via local collection points. Please observe the local regulations and do not dispose of your old appliances with normal household waste.
BATTERY DISPOSAL
Old batteries are hazardous waste and must be disposed of in accordance with current regulations.
REMOTE CONTROL
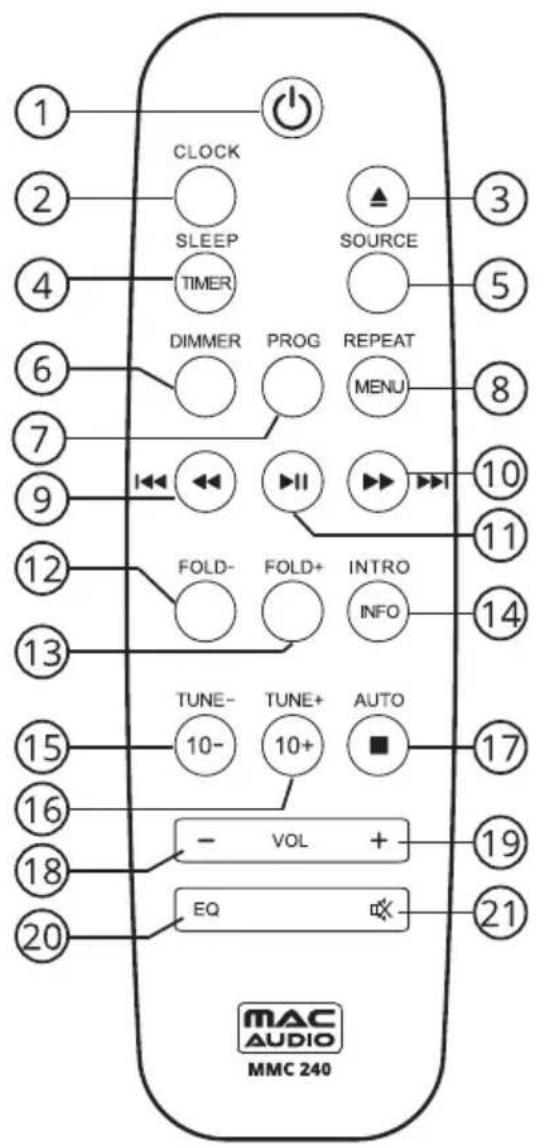
1 ON/STBY: Switches the device on when it is in the standby mode. Conversely the device can be switched from power operation to the standby mode.
2 CLOCK:
In standby mode, press and hold CLOCK to adjust the clock time.
- Use SKIP BACK or SKIP FORWARD to select the 24 or 12 hour clock mode.
- Press CLOCK to confirm your selection.
- Use SKIP BACK or SKIP FORWARD to adjust the hours.
- Press CLOCK to confirm your selection.
- Use SKIP BACK or SKIP FORWARD to adjust the minutes.
- Press CLOCK to confirm your selection.
Press SKIP BACK or SKIP FORWARD to select the time synchronization (SYNC ON or OFF). Press CLOCK to confirm your selection. If the setting SYNC ON is selected, the time is automatically updated during FM/RDS and DAB operation (Note: the automatic time update for FM / RDS operation is only possible with a sufficiently strong reception signal).
3 EJECT: Opens or closes the CD compartment.
4 SLEEP/TIMER: Set automatic shutdown time. Alarm timer.
Alarm setting
Before the alarm can be set, the clock must be set.
Alarm setting: In standby mode, press and hold the button TIMER for 2 seconds.
The source playback is now flashing in the display, now set the source playback with the buttons and confirm by pressing TIMER button.
The hour indication is flashing, set the hours with the buttons and and confirm with the TIMER button.
Now the minutes indication is flashing, set the minutes with the buttons and confirm with TIMER button.
The alarm volume is now flashing in the display, now set the alarm volume with the buttons and confirm by pressing TIMER button.
The alarm is now set and activated, in the display TIMER is indicated.
Switch off alarm: Press the button TIMER in standby mode, TIMER will disappear.
Automatie shutdown (sleep)
When the appliance is in active mode, you can switch off the appliance automatically after a preset time (between 90 and 10 minutes).
When the sleep timer is set, the SLEEP indicator is shown in the display. Press SLEEP button repeatedly to set the desirad shut down time in 10 minute sequence from 90 to 10 minutes.
Cancelling the sleep function: Press SLEEP button repeatedly until OFF appears on the display.
The settings are saved automatically after 5 seconds of inactivity.
5 SOURCE: Switch input source.
CD, USB, DAB, FM, AUDIO IN, BT.
6 DIMMER: Adjust the display brightness of the display screen.
7 PROG: To select a memory preset or to store a station.
FM operation:
A total of 30 FM stations can be stored in the memory.
- Select the desired station (FM). Open the memory using the PROGRAM button on the remote control (7).
- Choose the desired station number by SKIP BACK/SKIP FORWARD.
• The station number flashes in the display. - Press the PLAY/PAUSE button to store the station.
• The station number stops flashing. - Repeat this procedure to store other stations
CD operation:
Programming the playback sequence when not running playback from a CD:
- Press the PROG button.
- Press SKIP FORWARD or SKIP BACK to select the desired track.
- Press PROG to confirm your selection.
- Select the next track. Up to 20 tracks can be stored in the playlist.
- Press PLAY to start playback of the programmed list.
USB operation:
Programming the playback sequence when not running USB playback.
- Press the PROG button.
- Press SKIP FORWARD or SKIP BACK to select the desired track.
Tracks from other folders can be added to the playlist by pressing FOLDER+ or FOLDER-. - Press PROG to confirm your selection.
- Select the next track. Up to 99 tracks can be stored in the playlist.
- Press PLAY to start playback of the programmed list.
8 REPEAT/MENU:
FM operation:
Press PLAY/PAUSE and SKIP BACK/SKIP FORWARD to adjust the station search sensitivity (all stations / very strong stations).
DAB operation:
Description DAB see point DAB/DAB+ Tuner.
CD operation:
Activates the repeat function: Repeat 1 track/repeat all tracks/random playback of the tracks on the CD/Off.
USB operation:
Activates the repeat function: Repeat 1 track/repeat the album/repeat all tracks/random playback of the USB tracks/Off.
9/10 FAST REWIND/SKIP BACK / FAST FORWARD/SKIP FORWARD:
FM operation:
Brief press: Skips backwards/forward to the nearest station preset.
CD operation:
Brief press: Playback starts from the beginning of the current or previous/next track.
Press and hold: Fast rewinds/forwards the current track.
USB operation:
Brief press: Playback starts from the beginning of the current or previous/next track.
Press and hold: Fast rewinds/forwards the current track.
11 PLAY/PAUSE:
FM operation:
Switches between Mono and Stereo.
CD operation:
Starts or pauses the playback from a CD.
USB operation:
Starts or pauses the playback.
12 FOLDER - (USB operation): Selects Folder-.
13 FOLDER + (USB operation): Selects Folder+.
14 INTRO/INFO:
FM operation:
Switches between receiving frequency/Program Service (station name)/PTY (Program Type), Radio Text and CT (Clock Time), if supported by the station and/or the radio reception is sufficient
DAB:
Switch current station information
CD: ____
Intro function ON/OFF.
USB:
Intro function ON/OFF.
15 10-/TUNE -:
FM operation:
Brief press: Decreases the receiving frequency stepwise.
Press and hold: Activates the search function (backwards).
CD operation:
Decreases the played track by -10.
USB operation:
Decreases the played track by -10.
DAB:
DAB menu navigation and select per Play/Pause.
16 10 +/TUNE +:
FM operation:
Brief press: Increases the receiving frequency stepwise.
Press and hold: Activates the search function (forwards).
CD operation:
Increases the played track by +10.
USB operation:
Increases the played track by +10.
DAB:
DAB menu navigation and select per Play/Pause.
17 STOP/UNPAIR/AUTO:
FM operation:
Automatic station storing and search.
CD operation:
Press once: Stops the playback of the CD.
Press twice: Deletes the playlist.
USB operation:
Press once: Stops USB playback.
Press twice: Deletes the playlist.
Bluetooth operation:
Unpairs a paired phone.
18 VOLUME-: Decreases the volume.
19 VOLUME+: Increases the volume.
20 EQ:
Use EQ to choose between the equaliser presets (FLAT/JAZZ/CLASSIC/ROCK/POP).
21 MUTE: Switches the sound on and off.
FRONT PANEL
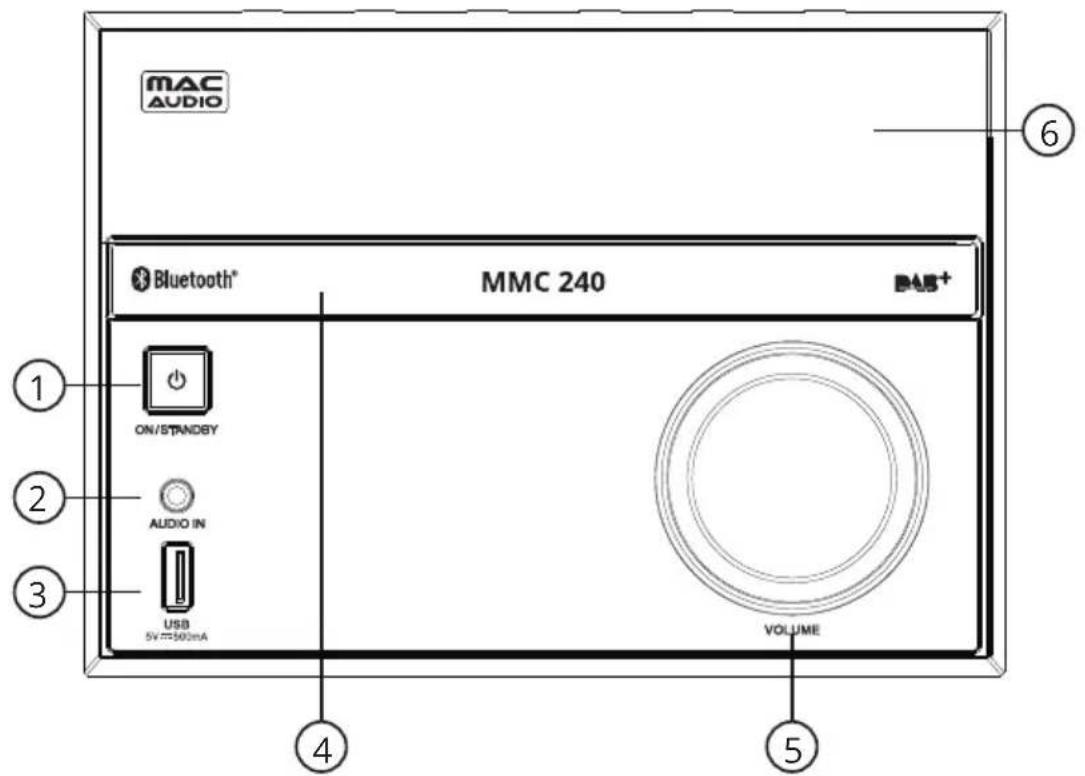
1 ON/STBY: Switches the device on when it is in the standby mode. Conversely the device can be switched from power operation to the standby mode.
2 AUDIO IN: 3.5 mm stereo input jack for an auxiliary audio device (e.g. MP3 player, etc.)
3USB-INPUT: For connecting USB storage media.
4 CD COMPARTMENT: Insert the CD into the compartment with the label facing upwards.
5VOLUME:Adjusts the volume. The volume is shown on the display. (VOL 00 - VOL 32/max).
6 DISPLAY SCREEN: Displays the settings you have made.
TOP PANEL
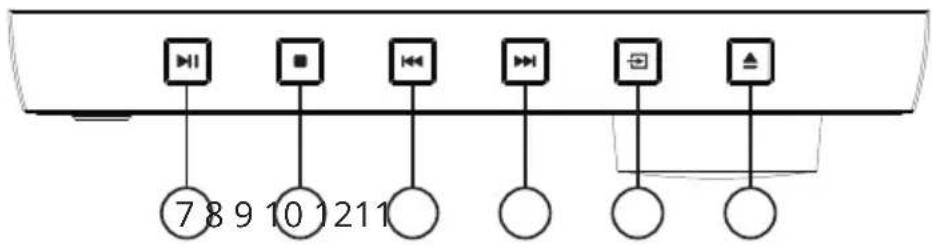
7 PLAY/PAUSE: Starts or pauses the playback from a CD/USB.
8 ■ STOP: Brief press: Stops a CD/USB that is playing.
9, 10 ◀◀, ▶SKIP
CD/USB operation:
- Jumps to previous/next track.
Radio operation: - Brief press: Decreases/increases the receiving frequency stepwise.
- Press and hold: Activates the search function (backwards/forwards).
11 SOURCE: Used for selecting the input source (UCD, USB, DAB, FM, AUDIO IN, BT). This is indicated on the display briefly.
12 ▲ EJECT: Opens or closes the CD compartment.
REAR PANEL
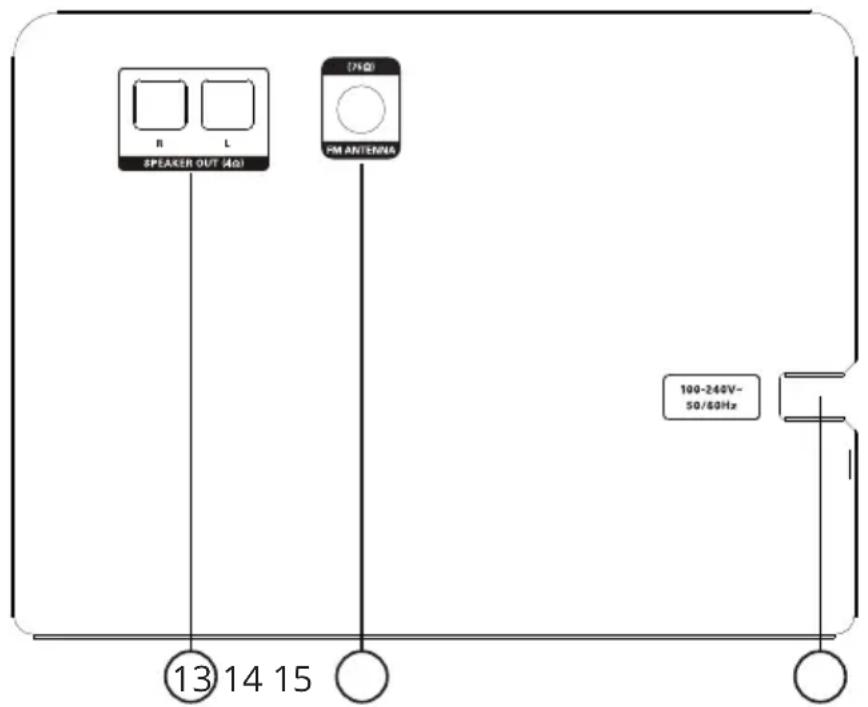
13 SPEAKER TERMINALS: Output for the connection of the supplied speakers.
14 FM ANTENNA CONNECTION: For connecting the supplied FM/DAB aerial antenna or a house antenna.
15 MAINS SUPPLY: For connection to domestic power sockets.
INSTALLATION
ANTENNA
For the best radio reception connect the supplied FM / DAB aerial antenna 75 ohm to the ANTENNA slot on the back side of the appliance and fully extend the cable.
AUXILIARY AUDIO EQUIPMENT
Auxiliary audio devices are to be connected to the appropriate sockets before starting to use the MMC 240.
REMOTE CONTROL
When using the remote control aim it at the display on the MMC 240.
FUNCTIONS OF THE MMC 240
DISPLAY BRIGHTNESS
In operation mode or in standby mode press the DIMMER button repeatedly to select the display brightness. Two brightness steps can be adjusted (0 and 1).
The unit is able to receive available DAB and DAB+ radio stations in your area.
BT: Activates the input source Bluetooth.
Search for new Bluetooth sources with your phone or tablet. You will find the MAC AUDIO MMC 240. Connect your device with the MAC AUDIO MMC 240. If you are asked for a password, use "0000".
DAB OVERVIEW
| Buttons / Commands Function | |
| TUNE- / TUNE+ Press to | select / display option item. |
| MENU Press to enter or | exit menu mode. |
| Press to confirm selection. | |
| FULL SCAN A full scan of | DAB / DAB+ radio stations in your area. Once the scan is completed, the radio returns to play the previously selected station or first station on the station list. |
| MANUAL Manual tune to a particular channel / frequency. | |
| DRC The DRC (Dynamic range compression) function reduces louder and loud sounds comparatively quieter. The difference between the loudest and quietest audio being broadcasted. Effectively, this makes quiet sounds comparatively. Note: DRC only works if it is enabled by the broadcaster for a front of the station name. | |
| PRUNE This function removes all invalid stations. Note: Invalid stations are indicated in the station list by a ? in front of the station name. | |
| SYSTEM | Factory ResetY or N option. Select Y to initiate reset to factory settings and confirm with button.Installation of an updateOption Y (yes) or N (no), if a software update is to be manually installed.SW VER: Software version. |
SELECTING AND SAVING STATIONS MANUALLY
- Hint: Before beginning to tune in stations manually, obtain the available DAB / DAB+ stations channel / frequency information for your area.
- Switch on the appliance.
- Press SOURCE button on the remote control or button on the appliance repeatedly to choose DAB mode. [FULL SCAN] is shown in the display.
- Press the TUNE- / TUNE+ buttons until [MANUAL] is shown in the display. Press to confirm.
- Now you will see 5A 174.928MHz in the display.
- Press the TUNE- / TUNE+ buttons to display a particular channel / frequency, the display will show the channels from SA to 13F and the associated frequencies.
- When the desired channel is displayed, press the button and the signal strength will be displayed. To add the channel, press the button again.
- Add additional channels in the same way and then press the MENU button to exit manual tuning mode.
- The radio will return to the first station and the new stations will be added.
- Use the TUNE-/TUNE+ buttons to move through the stations available and press the button to listen to the station.
Note: Up to 30 stations can be saved.
AUTO-SCAN AND STORE PRESET STATIONS
- Switch on the appliance.
- Press SOURCE button on the remote control or button on the appliance repeatedly to choose DAB mode.
- Press the MENU button. [FULL SCAN] is shown in the display.
- Press the button and the unit starts scanning DAB / DAB+ stations around your area. Scanning O is shown in the display.
- Once the scan is completed, the radio returns to play the previously-selected station or first station on the station list.
- Use the TUNE- / TUNE+ buttons to move through the stations available and press the button to listen to the station.
RESET DAB SETTINGS
- Switch on the appliance.
- Press SOURCE button (5) on the remote control or button on the appliance repeatedly to choose DAB mode.
- Press the MENU button. [FULL SCAN] is shown in the display.
- Presses the TUNE-/TUNE+ buttons repeatedly until [SYSTEM] is displayed then press the button to confirm, now [RESET] will be displayed.
RESET DAB SETTINGS
- Press the button [RESET N] will be displayed, use the TUNE- / TUNE+ buttons to toggle to [RESET Y] and then press the ▶button to start the reset process.
- Once the reset is completed, the unit will then automatically perform a full scan. All stored stations will be lost during reset.
FUNCTIONS OF THE CD PLAYER
Playing a CD
- Open the CD compartment by pressing the EJECT button.
- Insert the CD into the compartment (with the label facing upwards).
- Close the compartment by pressing the EJECT button.
- Press PLAY to listen to the first track on the CD.
- The display shows the track number and the elapsed time of the current track.
Pausing a CD
- Press the PAUSE button to pause the playback of the CD.
- Press the PLAY button to resume playback of the CD.
Selecting the track
- You can select the next or previous track during playback by pressing the SKIP buttons on the MMC 240 unit (9, 10) or on the remote control (9, 10).
Searching within a track
- Press the right/left SEARCH button on the remote control (9, 10) to search forwards/backwards within a track respectively.
Stopping playback from a CD
- Press the STOP button.
CD repeat mode
- Repeating a track: Start the CD. The REPEAT button repeats the current track. The following appears in the display: REP ONE.
- Repeating the entire CD: Start the CD. Press the REPEANT button twice. The following appears in the display: REP ALL.
- Shuffle function: Plays all tracks on the CD in a random order.
- Stopping the repeat function: Keep pressing the REPEAT button until REP OFF appears in the display.
FUNCTIONS OF THE TUNER
Radio operation
- Select TUNER as the audio source using the SOURCE (MMC 240, 11) or FM button (remote control, 5).
Station search
- Select TUNER as audio source (see above).
- Use the TUN+/TUN- buttons on the remote control (15, 16):
- Briefly pressing these buttons increases or decreases the tuning frequency by 50 kHz.
- Pressing and holding these buttons searches for the next or previous station.
FM/RDS MENU SETTINGS
| Buttons / Commands Function | |
| SCAN SET FM/RDS station | searchTo adjust the station search sensitivity (ALL: all receivable stations, STRONG: very strong local stations). Basic setting: ALL. |
| AUD/SET STEREO or MONO | Basic setting: STEREO. |
| SYSTEM | RESET: Reset to factory settings (Y (yes)/N (no))UPGRADE: Installation of an update. Option Y (yes) or N (no), if a software update is to be manually installed.SW VER: Software version. |
RDS (RADIO DATA SYSTEM) FUNCTIONS OF THE TUNER
RDS is a system which provides information about FM stations that is broadcast together with the station's signal. The MMC 240 can present this information (about the station, broadcast, etc.) in the display. The RDS functions can be set via the INFO button on the remote control (14).
- PS (Program Service Name): Displays the name of the programme.
- PTY (Program Type Identification): Displays the type of programme.
- RT (Radio Text): Displays all information for the programme.
- CT (Clock Time): Displays the clock time.
If one of these functions is not supported despite reception of an RDS signal, "NONE" will appear in the display.
SOUND SETTINGS
Setting the volume
The volume can be adjusted by using the VOLUME regulator on the front panel (5) or the VOLUME+/VOLUME- buttons on the remote control (18, 19). VOL and a value between 00 and MAX (32) then appears in the display.
EQ function
Various equaliser settings can be called up by pressing the EQ button on the remote control (20). The following settings can be selected: FLAT/JAZZ/CLASSIC/ROCK/POP. These can be selected by repeatedly pressing the EQ button.
TECHNICAL SPECIFICATIONS
Phone Connectivity
Wireless Bluetooth® 2.1 with EDR (Enhanced Data Rate)
Operating frequency: 2402-2480 MHz
Maximum power transmitted acc. EN62479: 1:3 dBm
CD Player
Playable formats: CD/CD-R/CD-RW/MP3
USB Player
playable formats: MP3 music
FM Tuner/ DAB+ Tuner
FM RDS PLL Tuner (87.5 - 108 MHz), 30 station presets
DAB+ Tuner (174.928 - 239.200 MHz), 30 station presets
FM aerial antenna (75 ohms)
Loudspeaker
87 mm fullrange bassreflex loudspeaker
Miscellaneous
Total power output 2 x 30 watts
Connections Front USB input: version 1.1 (5V/500mA), MP3 playback
Front AUDIO input (Line In): 3.5 mm jack
FM/DAB antenna input (75 ohms)
Mains voltage 100 - 240 V AC/50 - 60 Hz, built-in linear power mains adapter
Electricity consumption Max. 30 W
Standby: < 1 W
Display/Settings Display with 8 digits
12/24 hour clock format
5x equalizer: FLAT/JAZZ/CLASSIC/ROCK/POP
Sleep timer (90 - 0 minutes)
Alarm time adjustment (incl. source and volume)
Weight Main unit: 1.82 kg
Loudspeaker: 1.1 kg
Dimensions (wxhxd) Main unit: 179 x 140 x 253 mm
Loudspeaker: 154 x 252 x 127 mm
Accessories: Remote control incl. battery, FM/DAB aerial antenna
Subject to technical modifications.
Cher client,
ATTENTION! NE PAS OUVRIR, RISQUE D'ÉLECTROCUTION!
DÉCLARATION DE CONFORMITÉ
CD, USB, DAB, FM, AUDIO IN, BT.
Antenne FM (75 ohms)
Haut-parleur
CD, USB, DAB, FM, AUDIO IN, BT.
Switch current station information
CD: ____
Intro function ON/OFF.
USB:
Intro function ON/OFF.
15 DAB
CD, USB, DAB, FM, AUDIO IN, BT.
Switch current station information.
CD: ____
Intro function ON/OFF.
USB:
Intro function ON/OFF.
15 10-/TUNE -:
GB Congratulations! You have made a wise selection in becoming the owner of a MAC AUDIO product. We grant a 2-years warranty for this product.
The equipments are checked and tested continuously during the entire production process. In case you have problems with your MAC AUDIO equipment, kindly observe the following:
- The warranty period commences with the purchase of the component and is applicable only to the original owner.
- During the warranty period we will rectify any defects due to faulty material or workmanship by replacing or repairing the defective part at our discretion. Further claims, and in particular those for price reduction, cancellation of sale, compensation for damages or subsequential damages, are excluded.
- Unauthorized tampering with the equipment will invalidate this warranty.
- Consult your authorized dealer first, if warranty service is needed. Should it prove necessary to return the component to the factory, please insure that • the component is packed in original factory packing in good condition • your enclose your receipt as proof of purchase.
- Excluded from the warranty are: • Illuminates • Wear parts • Shipping damages, either readily apparent or concealed (claims for such damages must be lodged immediately with forwarding agent, the railway express office or post office). • Scratches in cases, metal components, front panels, etc. (You must notify your dealer directly of such defects within three days of purchase.) • Defects caused by incorrect installation or connection, by operation errors (see operating instructions), by overloading or by external force. • Equipments which have been repaired incorrectly or modified or where the case has been opened by persons other than us.
- Consequential damages to other equipments. • Reimbursement of cools, without our prior consent, when repairing damages by third parties • Batteries and battery packs.

natural_image
Blank white image with no visible content, text, or symbols
natural_image
Completely blank white image with no visible content, text, or symbols.
natural_image
Blank white image with no visible content, text, or symbols.
natural_image
Blank white image with no visible content, text, or symbols.
natural_image
Blank white image with no visible content, text, or symbols.
natural_image
Blank white image with no visible content, text, or symbols.
natural_image
Blank white image with no visible content, text, or symbols.
natural_image
Blank white image with no visible content, text, or symbols.
natural_image
Blank white image with no visible content, text, or symbols.
natural_image
Blank white image with no visible content, text, or symbols.
natural_image
Blank white image with no visible content, text, or symbols.
natural_image
Blank white image with no visible content, text, or symbols.
natural_image
Blank white image with no visible content, text, or symbols.
natural_image
Blank white image with no visible content, text, or symbols.
natural_image
Blank white image with no visible content, text, or symbols.
natural_image
Blank white image with no visible content, text, or symbols.
natural_image
Blank white image with no visible content, text, or symbols.
natural_image
Blank white image with no visible content, text, or symbols.
natural_image
Blank white image with no visible content, text, or symbols.
natural_image
Blank white image with no visible content, text, or symbols.
natural_image
Blank white image with no visible content, text, or symbols.
natural_image
Blank white image with no visible content, text, or symbols.
natural_image
Blank white image with no visible content, text, or symbols.
natural_image
Blank white image with no visible content, text, or symbols.
natural_image
Blank white image with no visible content, text, or symbols.
natural_image
Blank white image with no visible content, text, or symbols.
natural_image
Blank white image with no visible content, text, or symbols.
natural_image
Blank white image with no visible content, text, or symbols.
natural_image
Blank white image with no visible content, text, or symbols.
natural_image
Blank white image with no visible content, text, or symbols.
natural_image
Blank white image with no visible content, text, or symbols.
natural_image
Blank white image with no visible content, text, or symbols.
natural_image
Blank white image with no visible content, text, or symbols.
natural_image
Blank white image with no visible content, text, or symbols
natural_image
Blank white image with no visible content, text, or symbols.
natural_image
Blank white image with no visible content, text, or symbols.
natural_image
Blank white image with no visible content, text, or symbols.
natural_image
Blank white image with no visible content, text, or symbols
natural_image
Blank white image with no visible content, text, or symbols.
natural_image
Blank white image with no visible content, text, or symbols.
natural_image
Blank white image with no visible content, text, or symbols
natural_image
Blank white image with no visible content, text, or symbols.
natural_image
Blank white image with no visible content, text, or symbols
natural_image
Blank white image with no visible content, text, or symbols.
natural_image
Blank white image with no visible content, text, or symbols
natural_image
Blank white image with no visible content, text, or symbols.
natural_image
Blank white image with no visible content, text, or symbols.
natural_image
Blank white image with no visible content, text, or symbols
natural_image
Blank white image with no visible content, text, or symbols.
natural_image
Blank white image with no visible content, text, or symbols
natural_image
Blank white image with no visible content, text, or symbols.
natural_image
Blank white image with no visible content, text, or symbols.
natural_image
Pure horizontal black line on white background (no text or symbols)
natural_image
Completely blank white image with no visible content, text, or symbols.
natural_image
Blank white image with no visible content, text, or symbols
natural_image
Blank white image with no visible content, text, or symbols.

natural_image
Blank white image with no visible content, text, or symbols
MAC AUDIO
Lise-Meitner-Str. 9 • D-50259 Pulheim • Germany Tel. +49 (0) 2234/807 - 0 • Fax +49 (0) 2234/807 - 399 Internet: http://www.mac-audio.de