PC600D - Drill Porter-Cable - Free user manual and instructions
Find the device manual for free PC600D Porter-Cable in PDF.
| Brand | Porter-Cable |
| Model | PC600D |
| Product Type | Cordless Drill |
| Chuck Capacity | 9.5 mm (3/8 in) |
| No-load Speed | 0-2500 RPM |
| Metal Drilling Capacity | 13 mm (1/2 in) at low speed |
| Wood Drilling Capacity | 32 mm (1 1/4 in) with a flat bit |
| Chuck Type | Keyless |
| Switch | Variable speed trigger with continuous lock |
| Reversing lever | Yes, for forward/reverse |
| Belt clip | Yes |
| Power source | Battery pack (not specified in the manual) |
| Weight | Approximately 1.5 kg (estimate based on similar drills) |
| Dimensions (L x W x H) | Approximately 25 x 8 x 20 cm (estimate) |
| Body material | Reinforced plastic |
| Auxiliary handle | Not supplied (but recommended for safety) |
| Safety | Double insulation, switch lock, protection against accidental starts |
| Maintenance | Clean with a damp cloth and mild detergent; do not immerse |
| Spare parts | Available on the Porter-Cable website or through authorized repair centers |
| Repairability | Not user-repairable; take to an authorized center |
| Warranty | 3-year limited (2 years for batteries); free maintenance for 1 year; 90-day refund |
| Recommended accessories | Exclusively Porter-Cable |
| Standards | Complies with FCC Part 15 and Canada NMB-003 (Class B) |
Frequently Asked Questions - PC600D Porter-Cable
User questions about PC600D Porter-Cable
0 question about this device. Answer the ones you know or ask your own.
Ask a new question about this device
Download the instructions for your Drill in PDF format for free! Find your manual PC600D - Porter-Cable and take your electronic device back in hand. On this page are published all the documents necessary for the use of your device. PC600D by Porter-Cable.
USER MANUAL PC600D Porter-Cable
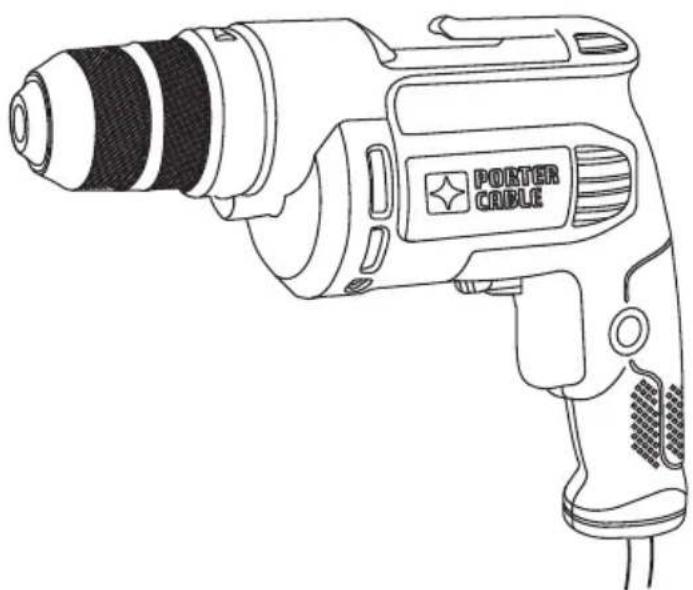
3/8 inch (10mm) Drill
Perceuse de 10 mm (3/8 po)
Taladro de 10 mm (3/8 pulgada)
natural_image
Line drawing of a portable power tool with a black-and-white design, no text or symbols present.www.portercable.com
Thank you for choosing PORTER-CABLE! To register your new product, go to: www.portercable.com/ServiceAndSupport/ProductRegistration.aspx
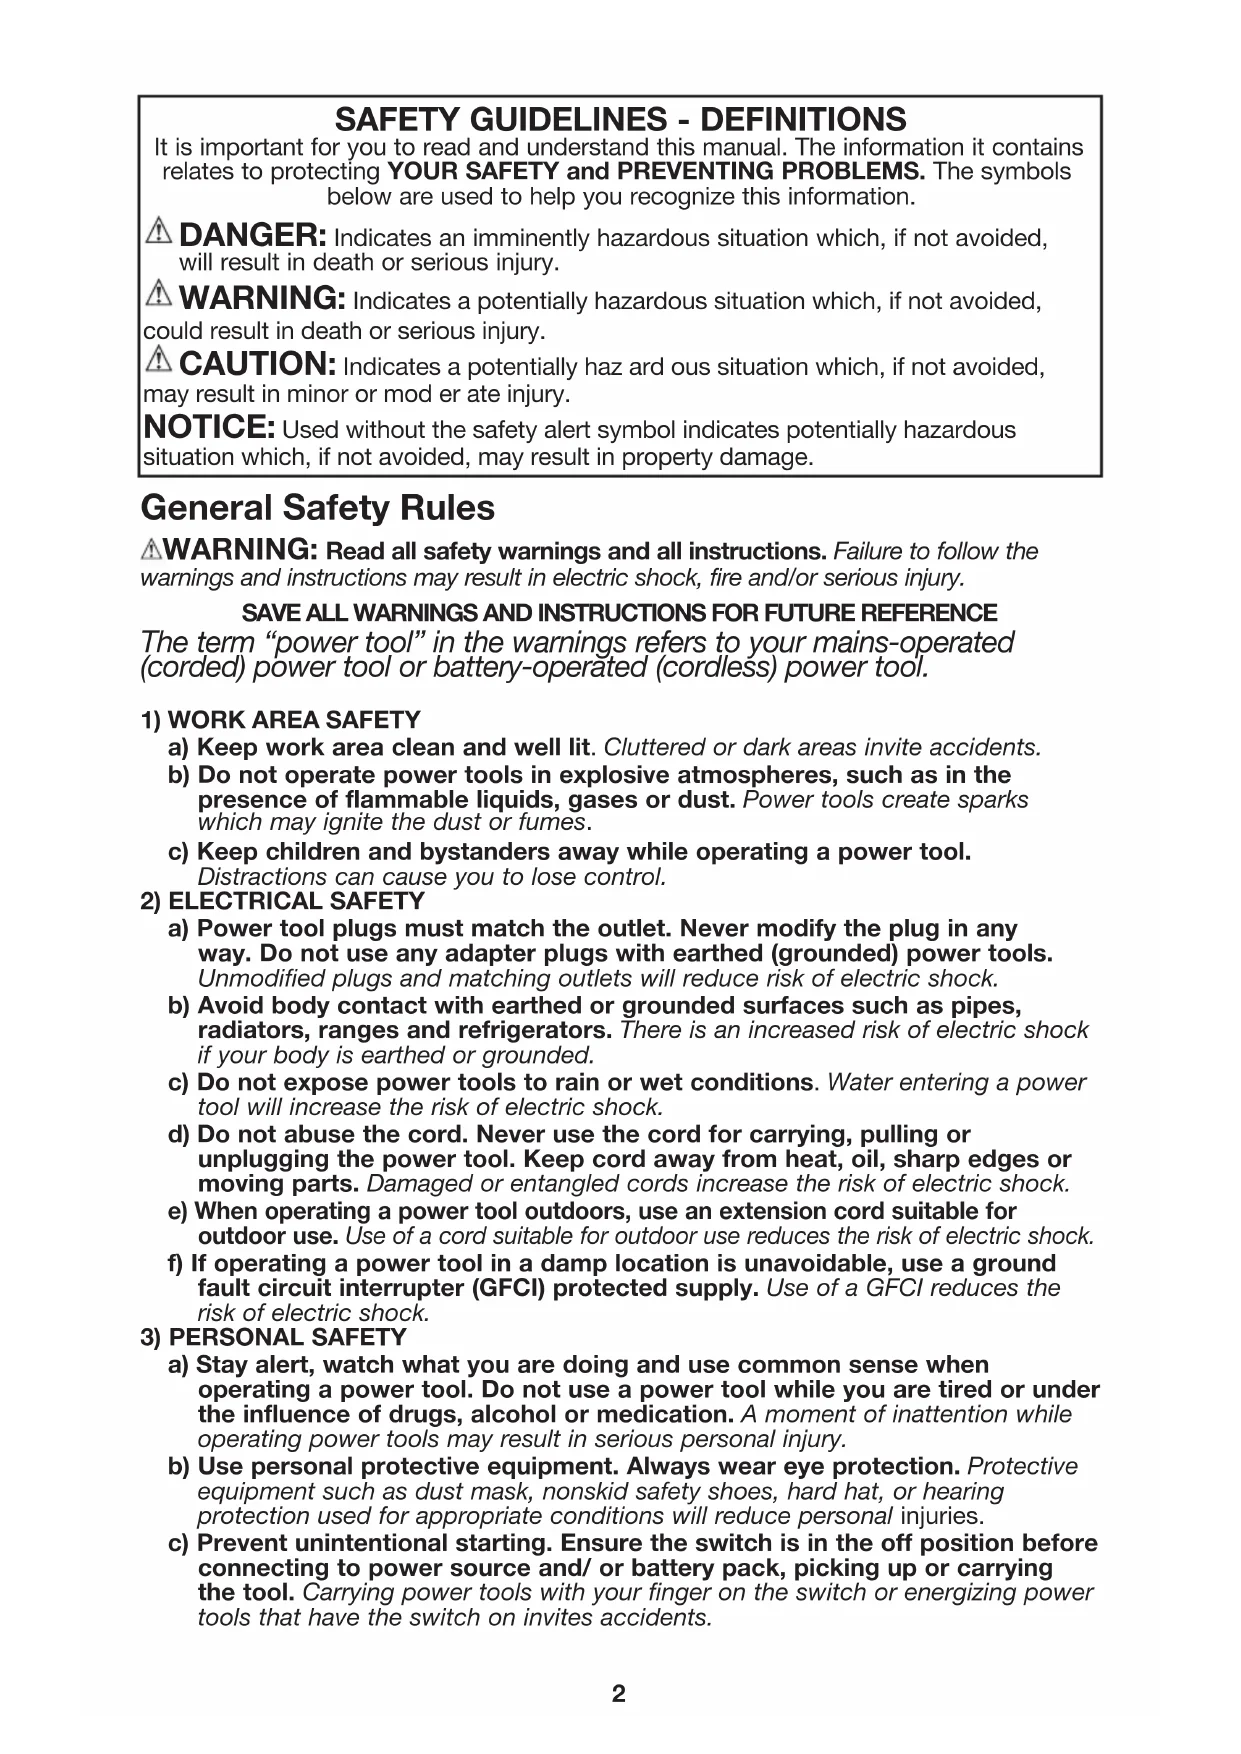
It is important for you to read and understand this manual. The information it contains relates to protecting YOUR SAFETY and PREVENTING PROBLEMS. The symbols below are used to help you recognize this information.
⚠️ DANGER: Indicates an imminently hazardous situation which, if not avoided, will result in death or serious injury.
⚠ WARNING: Indicates a potentially hazardous situation which, if not avoided, could result in death or serious injury.
⚠️ CAUTION: Indicates a potentially haz ard ous situation which, if not avoided, may result in minor or mod er ate injury.
NOTICE: Used without the safety alert symbol indicates potentially hazardous situation which, if not avoided, may result in property damage.
General Safety Rules
⚠ WARNING: Read all safety warnings and all instructions. Failure to follow the warnings and instructions may result in electric shock, fire and/or serious injury.
SAVE ALL WARNINGS AND INSTRUCTIONS FOR FUTURE REFERENCE
The term “power tool” in the warnings refers to your mains-operated (corded) power tool or battery-operated (cordless) power tool.
1) WORK AREA SAFETY
a) Keep work area clean and well lit. Cluttered or dark areas invite accidents.
b) Do not operate power tools in explosive atmospheres, such as in the presence of flammable liquids, gases or dust. Power tools create sparks which may ignite the dust or fumes.
c) Keep children and bystanders away while operating a power tool. Distractions can cause you to lose control.
2) ELECTRICAL SAFETY
a) Power tool plugs must match the outlet. Never modify the plug in any way. Do not use any adapter plugs with earthed (grounded) power tools. Unmodified plugs and matching outlets will reduce risk of electric shock.
b) Avoid body contact with earthed or grounded surfaces such as pipes, radiators, ranges and refrigerators. There is an increased risk of electric shock if your body is earthed or grounded.
c) Do not expose power tools to rain or wet conditions. Water entering a power tool will increase the risk of electric shock.
d) Do not abuse the cord. Never use the cord for carrying, pulling or unplugging the power tool. Keep cord away from heat, oil, sharp edges or moving parts. Damaged or entangled cords increase the risk of electric shock.
e) When operating a power tool outdoors, use an extension cord suitable for outdoor use. Use of a cord suitable for outdoor use reduces the risk of electric shock.
f) If operating a power tool in a damp location is unavoidable, use a ground fault circuit interrupter (GFCI) protected supply. Use of a GFCI reduces the risk of electric shock.
3) PERSONAL SAFETY
a) Stay alert, watch what you are doing and use common sense when operating a power tool. Do not use a power tool while you are tired or under the influence of drugs, alcohol or medication. A moment of inattention while operating power tools may result in serious personal injury.
b) Use personal protective equipment. Always wear eye protection. Protective equipment such as dust mask, nonskid safety shoes, hard hat, or hearing protection used for appropriate conditions will reduce personal injuries.
c) Prevent unintentional starting. Ensure the switch is in the off position before connecting to power source and/or battery pack, picking up or carrying the tool. Carrying power tools with your finger on the switch or energizing power tools that have the switch on invites accidents.
d) Remove any adjusting key or wrench before turning the power tool on. A wrench or a key left attached to a rotating part of the power tool may result in personal injury.
e) Do not overreach. Keep proper footing and balance at all times. This enables better control of the power tool in unexpected situations.
f) Dress properly. Do not wear loose clothing or jewelry. Keep your hair, clothing and gloves away from moving parts. Loose clothes, jewelry or long hair can be caught in moving parts.
g) If devices are provided for the connection of dust extraction and collection facilities, ensure these are connected and properly used. Use of dust collection can reduce dust-related hazards.
4) POWER TOOL USE AND CARE
a) Do not force the power tool. Use the correct power tool for your application. The correct power tool will do the job better and safer at the rate for which it was designed.
b) Do not use the power tool if the switch does not turn it on and off. Any power tool that cannot be controlled with the switch is dangerous and must be repaired.
c) Disconnect the plug from the power source and/or the battery pack from the power tool before making any adjustments, changing accessories, or storing power tools. Such preventive safety measures reduce the risk of starting the power tool accidentally.
d) Store idle power tools out of the reach of children and do not allow persons unfamiliar with the power tool or these instructions to operate the power tool. Power tools are dangerous in the hands of untrained users.
e) Maintain power tools. Check for misalignment or binding of moving parts, breakage of parts and any other condition that may affect the power tool's operation. If damaged, have the power tool repaired before use. Many accidents are caused by poorly maintained power tools.
f) Keep cutting tools sharp and clean. Properly maintained cutting tools with sharp cutting edges are less likely to bind and are easier to control.
g) Use the power tool, accessories and tool bits, etc. in accordance with these instructions, taking into account the working conditions and the work to be performed. Use of the power tool for operations different from those intended could result in a hazardous situation.
5) SERVICE
a) Have your power tool serviced by a qualified repair person using only identical replacement parts. This will ensure that the safety of the power tool is maintained.
Drill Safety Warnings
- Use auxiliary handle(s), if supplied with the tool. Loss of control can cause personal injury.
- Hold power tool by insulated gripping surfaces, when performing an operation where the cutting accessory may contact hidden wiring. Cutting accessory contacting a “live” wire may make exposed metal parts of the power tool “live” and could give the operator an electric shock.
- Use clamps or another practical way to secure and support the work piece to a stable platform. Holding the work by hand or against your body leaves it unstable and may lead to loss of control.
- When not in use, place tool on its side on a stable surface where it will not cause a tripping or falling hazard. Some tools with large battery packs will stand upright but may be easily knocked over.
- Keep your hair, clothing, and gloves away from air vents. Air vents often cover moving parts in which these items can be caught.
- Hold tool firmly with two hands, one hand on the handle, and the other gripping the bottom around the battery area or the auxiliary handle if provided. Loss of control can cause personal injury.
⚠ WARNING: ALWAYS use safety glasses. Everyday eyeglasses are NOT safety glasses. Also use face or dust mask if drilling operation is dusty. ALWAYS WEAR CERTIFIED SAFETY EQUIPMENT:
• ANSI Z87.1 eye protection (CAN/CPA Z94.3),
• ANSI S12.6 (S3.19) hearing protection,
• NOSH/OSHA respiratory protection.
⚠ WARNING: Some dust created by power sanding, sawing, grinding, drilling, and other construction activities contains chemicals known to the state of California to cause cancer, birth defects or other reproductive harm. Some examples of these chemicals are:
- lead from lead-based paints,
• crystalline silica from bricks and cement and other masonry products, and
• arsenic and chromium from chemically-treated lumber.
Your risk from these exposures varies, depending on how often you do this type of work. To reduce your exposure to these chemicals: work in a well ventilated area, and work with approved safety equipment, such as those dust masks that are specially designed to filter out microscopic particles.
- Avoid prolonged contact with dust from power sanding, sawing, grinding, drilling, and other construction activities. Wear protective clothing and wash exposed areas with soap and water. Allowing dust to get into your mouth, eyes, or lay on the skin may promote absorption of harmful chemicals.
⚠ WARNING: Use of this tool can generate and/or disperse dust, which may cause serious and permanent respiratory or other injury. Always use NOSH/OSHA approved respiratory protection appropriate for the dust exposure. Direct particles away from face and body.
Symbols
- The label on your tool may include the following symbols. The symbols and their definitions are as follows:
| V......volts | A......amperes |
| Hz......hertz | W......watts |
| min......minutes | ~ or AC......alternating current |
| --- or DC..direct current | no......no load speed |
| !!......Class I Construction(grounded) ......safety alert symbol | ### earthing terminal |
| ☐......Class II Construction(double insulated) | ../min or rpm...revolutions orreciprocation per minute |
| Read instruction manual before use | Use proper respiratory p |
| Use proper eye protection | Use proper hearing p |
- When using an extension cord, be sure to use one heavy enough to carry the current your product will draw. An undersized cord will cause a drop in line voltage resulting in loss of power and overheating. The following table shows the correct size to use depending on cord length and nameplate ampere rating. If in doubt, use the next heavier gage. The smaller the gage number, the heavier the cord.
| Minimum Gage for Cord Sets | |||||
| Volts | Total Length of Cord in Feet | ||||
| 120V | 0-25(0-7,6m) | 26-50(7,6-15,2m) | 51-100(15,2-30,4m) | 101-150(30,4-45,7m) | |
| 240V | 0-50(0-15,2m) | 51-100(15,2-30,4m) | 101-200(30,4-60,9m) | 201-300(60,9-91,4m) | |
| Ampere Rating | |||||
| More Than | Not more Than | American Wire Gage | |||
| 0 | 6 | 18 | 16 | 16 | 14 |
| 6 | 10 | 18 | 16 | 14 | 12 |
| 10 | 12 | 16 | 16 | 14 | 12 |
| 12 | 16 | 14 | 12 | Not Recommended | |
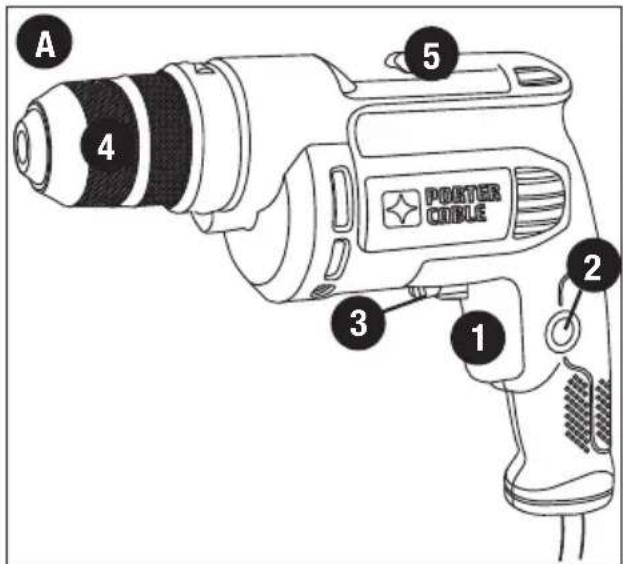
FUNCTIONAL DESCRIPTION Figure A
- Variable speed switch
- Lock-on button
- Reversing lever
- Keyless chuck
- Belt clip
text_image
A 4 5 POSTER CIBLE 3 2 1
natural_image
Illustration of a hand holding a circular object with a mesh pattern, no text or symbols present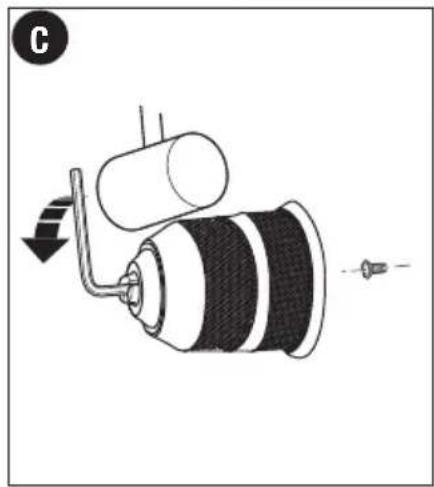
natural_image
Diagram of a mechanical device with a spool and lever, showing motion direction (no text or symbols)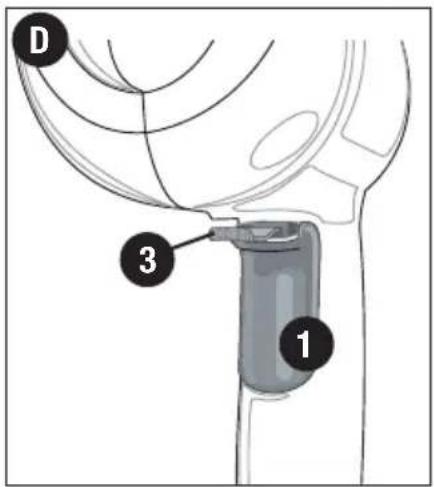
text_image
D 3 1ASSEMBLY
⚠ WARNING: To reduce the risk of injury, before assembly, make sure that the tool is switched off and unplugged.
INSERTING A DRILL BIT OR OTHER ACCESSORY (FIGURE B)
⚠ WARNING: Do not attempt to tighten drill bits (or any other accessory) by gripping the front part of the chuck and turning the tool on. Damage to the chuck and personal injury may occur when changing accessories.
⚠ WARNING: Always ensure the bit is secure before starting the tool. A loose bit may eject from tool causing possible personal injury.
Your tool features a keyless chuck (4) for greater convenience. To insert a drill bit or other accessory, follow the steps listed below.
- Grasp the rear half of the chuck with one hand and use your other hand to rotate the front half counterclockwise, as shown in figure B. Rotate far enough so that the chuck opens sufficiently to accept the desired accessory.
- Insert the bit or other accessory about 3/4 inch (19 mm) into the chuck and tighten securely by holding the rear half of the chuck and rotating the front portion in the clockwise direction.
- To release the accessory, repeat step 1 listed above.
REMOVING AND ATTACHING THE CHUCK (FIGURE C)
- Open the chuck as far as possible.
- Remove the chuck retaining screw, located in the chuck, by turning it clockwise using a screwdriver (lefthand thread).
- Tighten an Allen key of 1/4 inch or greater size (not supplied) into the chuck and strike it with a soft hammer in a counterclockwise direction as shown.
-
Remove the Allen key.
-
Remove the chuck by turning it counterclockwise.
- To attach the chuck, screw it onto the spindle and secure it with the chuck retaining screw.
OPERATING INSTRUCTIONS
⚠ WARNING: To reduce the risk of serious personal injury, read, understand and follow all safety warnings and instructions prior to using tool.
⚠ WARNING: It is important to support the work properly and to hold the drill firmly with both hands to prevent loss of control which could cause personal injury.
⚠ WARNING: Do not attempt to tighten drill bits (or any other accessory) by gripping the front part of the chuck and turning the tool on. Damage to the chuck and personal injury may occur when changing accessories.
⚠ WARNING: To reduce the risk of injury, always unplug drill from power supply before making any adjustments or changing accessories.
⚠ WARNING: To reduce the risk of injury, let the tool work at its own pace. Do not overload.
SWITCHES (FIGURE D)
- To switch the tool on, depress the variable speed switch (1). The tool speed depends on how far you press the switch.
- For continuous operation, press the lock-on button (2) and release the variable speed switch. This option is available only at full speed.
- To switch the tool off, release the variable speed switch. To switch the tool off when in continuous operation, depress the variable speed switch once more and release it.
⚠ WARNING: The drill should only be locked ON when it is held stationary in a drill press stand or other means; NOT BY HAND! Never unplug the tool with the locking feature engaged. To do so will cause the tool to start immediately the next time it is plugged in.
REVERSING LEVER
The reversing lever (3) is used for withdrawing bits from tight holes and removing screws. It is located above the trigger switch. To reverse the motor, release the trigger switch FIRST and then push the lever to the right. After any reversing operations, return lever to forward position. Never change the direction of rotation while the motor is running.
DRILLING
- Always unplug the drill when attaching or removing accessories. When attaching accessories in the drill chuck, it is important to securely tighten the chuck to prevent slippage. When using a keyless chuck, hand tighten firmly.
- Use sharp drill bits only.
- Support and secure work properly, as instructed in the Safety Instructions.
- Use appropriate and required safety equipment, as instructed in the safety instructions.
- Secure and maintain work area, as instructed in the safety instructions.
- Run the drill very slowly, using light pressure, until the hole is started enough to keep the drill bit from slipping out of it.
- Apply pressure in a straight line with the bit. Use enough pressure to keep the bit biting but not so much as to stall the motor or deflect the bit.
- Hold the drill firmly with both hands to control its twisting action.
- Drills equipped with a side handle must use the side handle.
- DO NOT CLICK THE TRIGGER OF A STALLED DRILL OFF AND ON IN AN ATTEMPT TO START IT. DAMAGE TO THE DRILL CAN RESULT.
- Minimize stalling on breakthrough by reducing pressure and slowly drilling through the last part of the hole.
- Keep the motor running while pulling the bit out of a drilled hole. This will help reduce jamming.
DRILLING IN WOOD
Holes in wood can be made with the same twist drill bits used for metal or with spade bits. These bits should be sharp and should be pulled out frequently when drilling to
clear chips from the flutes.
DRILLING IN METAL
Use a cutting lubricant when drilling metals. The exceptions are cast iron and brass which should be drilled dry. The cutting lubricants that work best are sulfurized cutting oil or lard oil.
DRILLING IN MASONRY
Use carbide tipped masonry bits. Refer to Drilling section. Keep even force on the drill but not so much that you crack the brittle material. A smooth, even flow of dust indicates the proper drilling rate.
TROUBLESHOOTING
Problem
Possible Cause
Possible Solution
- Unit will not start. - Cord not plugged in. - Plug tool into a working outlet.
- Circuit fuse is blown. • Replace circuit fuse. (If the
product repeatedly causes the circuit fuse to blow, discontinue use immediately and have it serviced at a PORTER-CABLE
center or authorized servicer.)
- Circuit breaker is tripped. • Reset circuit breaker. (If the product repeatedly causes the circuit breaker to trip, discontinue use immediately
and have it serviced at a PORTER-CABLE service center
or authorized servicer.)
- Cord or switch is damaged. • Have cord or switch replaced at a PORTER-CABLE Service Center or Authorized Servicer.
service
For assistance with your product, visit our website at www.portercable.com for a list of service centers, or call the PORTER-CABLE Customer Care Center at (888) 848-5175.
MAXIMUM RECOMMENDED CAPACITIES
| CHUCK CAPACITY | 3/8 in. (9.5 mm) |
| R.P.M. 0-2500 | |
| BITS, METAL DRILLING | 1/2 in. (13 mm) low speed |
| WOOD, FLAT BORING | 1-1/4 in. (32 mm) |
Maintenance
Use only mild soap and damp cloth to clean the tool. Never let any liquid get inside the tool; never immerse any part of the tool into a liquid.
Replacement Parts
Use only identical replacement parts. For a parts list or to order parts, visit our service website at www.portercable.com. You can also order parts from your nearest PORTER-CABLE Factory Service Center or PORTER-CABLE Authorized Warranty Service Center. Or, you can call our Customer Care Center at (888) 848-5175.
Service and Repairs
All quality tools will eventually require servicing and/or replacement of parts. For information about PORTER-CABLE, its factory service centers or authorized warranty service centers, visit our website at www.portercable.com or call our Customer Care Center at (888) 848-5175. All repairs made by our service centers are fully guaranteed against defective material and workmanship. We cannot guarantee repairs made or attempted by others.
You can also write to us for information at PORTER-CABLE, 4825 Highway 45 North, Jackson, Tennessee 38305, (888) 848-5175 - Attention: Product Service. Be sure to include all of the information shown on the nameplate of your tool (model number, type, serial number, etc.).
ACCESSORIES
⚠ WARNING: Since accessories, other than those offered by PORTER-CABLE, have not been tested with this product, use of such accessories with this tool could be hazardous. To reduce the risk of injury, only PORTER-CABLE recommended accessories should be used with this product.
A complete line of accessories is available from your PORTER-CABLE Factory Service Center or a PORTER-CABLE Authorized Warranty Service Center. Please visit our Web Site www.portercable.com for a catalog or for the name of your nearest supplier.
NOTE: This equipment has been tested and found to comply with the limits for a Class B digital device, pursuant to Part 15 of the FCC Rules. These limits are designed to provide reasonable protection against harmful interference in a residential installation. This equipment generates, uses and can radiate radio frequency energy and, if not installed and used in accordance with the instructions, may cause harmful interference to radio communications.
However, there is no guarantee that interference will not occur in a particular installation. If this equipment does cause harmful interference to radio or television reception, which can be determined by turning the equipment off and on, the user is encouraged to try to correct the interference by one or more of the following measures:
- Reorient or relocate the receiving antenna.
- Increase the separation between the equipment and receiver.
- Connect the equipment into an outlet on a circuit different from that to which the receiver is connected.
- Consult the dealer or an experienced radio/TV technician for help.
Changes or modifications to this unit not expressly approved by the party responsible for compliance could void the user's authority to operate the equipment. This Class B digital apparatus complies with Canadian ICES-003.
THREE YEAR LIMITED WARRANTY
PORTER-CABLE will repair or replace, without charge, any defects due to faulty materials or workmanship for three years from the date of purchase for tools (two years for batteries). This warranty does not cover part failure due to normal wear or tool abuse. For further detail of warranty coverage and warranty repair information, visit www.portercable.com or call (888) 848-5175. This warranty does not apply to accessories or damage caused where repairs have been made or attempted by others. This warranty gives you specific legal rights and you may have other rights which vary in certain states or provinces.
In addition to the warranty, PORTER-CABLE tools are covered by our:
1 YEAR FREE SERVICE: PORTER-CABLE will maintain the tool and replace worn parts caused by normal use, for free, any time during the first year after purchase. 90 DAY MONEY BACK GUARANTEE: If you are not completely satisfied with the performance of your PORTER-CABLE Power Tool for any reason, you can return it within 90 days from the date of purchase with a receipt for a full refund – no questions asked. LATIN AMERICA: This warranty does not apply to products sold in Latin America. For products sold in Latin America, see country specific
warranty information contained in the packaging, call the local company or see website for warranty information.
To register your tool for warranty service visit our website at www.portercable.com.
WARNING LABEL REPLACEMENT
If your warning labels become illegible or are missing, call (888) 848-5175 for a free replacement.
The following are PORTER-CABLE trademarks for one or more power tools and accessories: a gray and black color scheme; a “four point star” design; and three contrasting/outlined longitudinal stripes. The following are also trademarks for one or more PORTER-CABLE and Delta products: 2 BY 4®, 890™, Air America®, AIRBOSS™, Auto-Set®, B.O.S.S.®, Bammer®, Biesemeyer®, Builders Saw®, Charge Air®, Charge Air Pro®, CONTRACTOR SUPERDUTY®, Contractor’s Saw®, Delta®, DELTA®, Delta Industrial®, DELTA MACHINERY & DESIGN™, Delta Shopmaster and Design®, Delta X5®, Deltacraft®, DELTAGRAM®, Do It. Feel It.®, DUAL LASERLOC AND DESIGN®, EASY AIR®, EASY AIR TO GO™, ENDURADIAMOND®, Ex-Cell®, Front Bevel Lock®, Get Yours While the Sun Shines®, Grip to Fit®, GRIPVAC™, GTF®, HICKORY WOODWORKING®, Homecraft®, HP FRAMER HIGH PRESSURE®, IMPACT SERIES™, Innovation That Works®, Jet-Lock®, Job Boss®, Kickstand®, LASERLOC®, LONG-LASTING WORK LIFE®, MAX FORCETM, MAX LIFE®, Micro-Set®, Midi-Lathe®, Monsoon®, MONSTER-CARBIDETM, Network®, OLDHAM®, Omnijig®, PC EDGE®, Performance Crew™, Performance Gear®, Pocket Cutter®, Porta-Band®, Porta-Plane®, PORTER-CABLE®, PORTER-CABLE Professional Power Tools®, Powerback®, POZI-STOP™, Pressure Wave®, PRO 4000®, Proair®, Quicksand and Design®, Quickset II®, QUIET DRIVE TECHNOLOGY™, QUIET DRIVE TECHNOLOGY AND DESIGN™, Quik-Change®, QUIK-TILT®, RAPID-RELEASE™, RAZOR®, Redefining Performance®, Riptide®, Safe Guard II®, Sand Trap and Design®, Sanding Center®, Saw Boss®, Shop Boss®, Sidekick®, Site Boss®, Speed-Bloc®, Speedmatic®, Stair Ease®, Steel Driver Series®, SUPERDUTY®, T4 & DESIGN®, THE AMERICAN WOODSHOP®, THE PROFESSIONAL EDGE®, Thin-Line®, Tiger Saw®, TIGERCLAW®, TIGERCLAW AND DESIGN®, Torq-Buster®, TRU-MATCH®, T-Square®, Twinlaser®, Unifence®, Uniguard®, UNIRIP®, UNISAW®, UNITED STATES SAW®, Veri-Set®, Versa-Feeder®, VIPER®, VT™, VT RAZORT™, Water Driver®, WATER VROOM®, Waveform®, Whisper Series®, X5®, YOUR ACHIEVEMENT. OUR TOOLS.® Trademarks noted with ® are registered in the United States Patent and Trademark Office and may also be registered in other countries. Other trademarks may apply. Les marques de commerce suivies du symbole ® sont enregistrées auprès du United States Patent and Trademark Office et peuvent être enregistrées dans d’autres pays. D’autres marques de commerce peuvent également être applicables. Las marcas comerciales con el símbolo ® están registradas en la Oficina de patentes y marcas comerciales de Estados Unidos (United States Patent and Trademark Office), y también pueden estar registradas en otros países. Posiblemente se apliquen otras marcas comerciales registradas.
PORTER CABLE.
4825 Highway 45, North Jackson, TN 38305 / (888) 848-5175 / www.portercable.com
LIGNES DIRECTRICES EN MATIÈRE DE SÉCURITÉ - DÉFINITIONS
natural_image
Illustration of a hand adjusting a mechanical component with a circular inset showing internal structure (no text or symbols)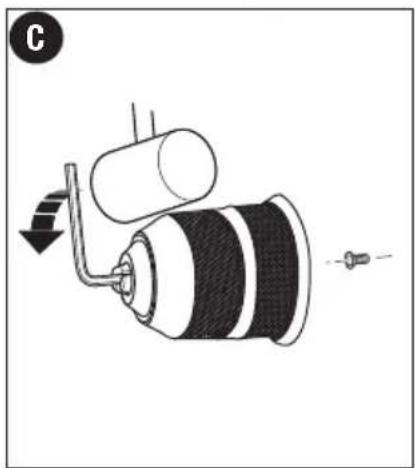
natural_image
Diagram of a mechanical device with a spool and lever, showing motion direction (no text or symbols)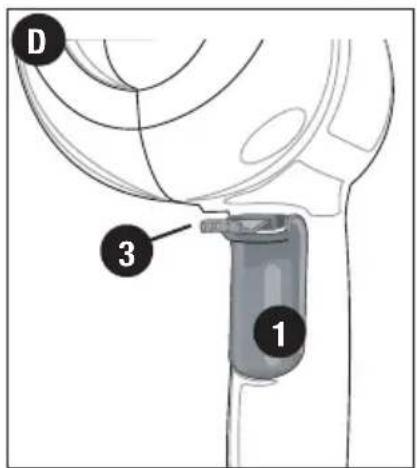
text_image
D 3 1AVERTISSEMENTS DE SÉCURITÉ ET DIRECTIVES : PERCEUSES
Les éléments ci-dessous sont des marques de commerce des outils et des accessoires de PORTER-CABLE : un agencement de couleurs grise et noire; un motif d' « étoile à quatre pointes » et trois bandes longitudinales contrastantes/à contours. Les marques suivantes sont également des marques de commerce se rapportant à un ou plusieurs produits PORTER-CABLE ou Delta : 2 BY 4®, 890™, Air America®, AIRBOSS™, Auto-Set®, B.O.S.S.®, Bammer®, Biesemeyer®, Builders Saw®, Charge Air®, Charge Air Pro®, CONTRACTOR SUPERDUTY®, Contractor's Saw®, Delta®, DELTA®, Delta Industrial®, DELTA MACHINERY & DESIGN™, Delta Shopmaster and Design®, Delta X5®, Deltacraft®, DELTAGRAM®, Do It. Feel It.®, DUAL LASERLOC AND DESIGN®, EASY AIR®, EASY AIR TO GO™, ENDURADIAMOND®, Ex-Cell®, Front Bevel Lock®, Get Yours While the Sun Shines®, Grip to Fit®, GRIPVAC™, GTF®, HICKORY WOODWORKING®, Homecraft®, HP FRAMER HIGH PRESSURE®, IMPACT SERIES™, Innovation That Works®, Jet-Lock®, Job Boss®, Kickstand®, LASERLOC®, LONG-LASTING WORK LIFE®, MAX FORCE™, MAX LIFE®, Micro-Set®, Midi-Lathe®, Monsoon®, MONSTER-CARBIDE™, Network®, OLDHAM®, Omnijig®, PC EDGE®, Performance Crew™, Performance Gear®, Pocket Cutter®, Porta-Band®, Porta-Plane®, PORTER-CABLE®, PORTER-CABLE Professional Power Tools®, Powerback®, POZI-STOP™, Pressure Wave®, PRO 4000®, Proair®, Quicksand and Design®, Quickset II®, QUIET DRIVE TECHNOLOGY™, QUIET DRIVE TECHNOLOGY AND DESIGN™, Quik-Change®, QUIK-TILT®, RAPID-RELEASE™, RAZOR®, Redefining Performance®, Riptide®, Safe Guard II®, Sand Trap and Design®, Sanding Center®, Saw Boss®, Shop Boss®, Sidekick®, Site Boss®, Speed-Bloc®, Speedmatic®, Stair Ease®, Steel Driver Series®, SUPERDUTY®, T4 & DESIGN®, THE AMERICAN WOODSHOP®, THE PROFESSIONAL EDGE®, Thin-Line®, Tiger Saw®, TIGERCLAW®, TIGERCLAW AND DESIGN®, Torq-Buster®, TRU-MATCH®, T-Square®, Twinlaser®, Unifence®, Uniguard®, UNIRIP®, UNISAW®, UNITED STATES SAW®, Veri-Set®, Versa-Feeder®, VIPER®, VT™, VT RAZORT™, Water Driver®, WATER VROOM®, Waveform®, Whisper Series®, X5®, YOUR ACHIEVEMENT. OUR TOOLS.®
natural_image
Illustration of a hand holding a circular object with a mesh pattern, no text or symbols present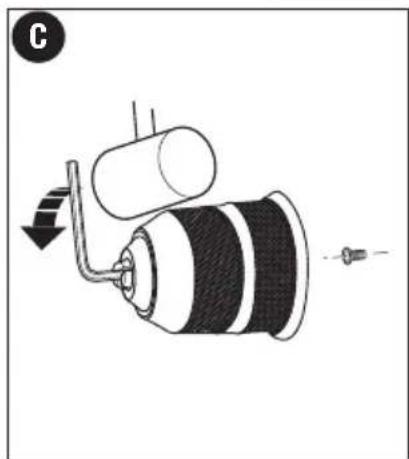
natural_image
Diagram of a mechanical device with a cylindrical component and a threaded rod, showing no text or symbols.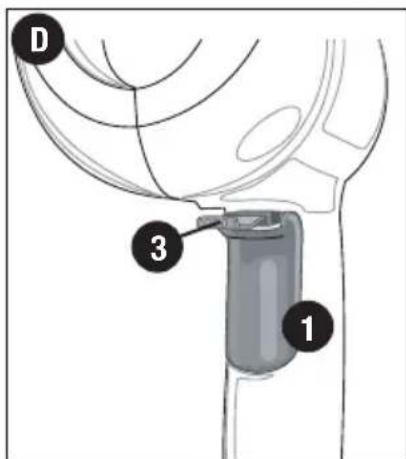
text_image
D 3 1Las siguientes son marcas comerciales PORTER-CABLE que distinguen a una o más herramientas y accesorios: un gráfico de color gris y negro; un diseño de “estrella de cuatro puntas” y tres franjas longitudinales contrastantes/delineadas. Las siguientes también son marcas comerciales para uno o más productos de PORTER-CABLE y Delta: 2 BY 4®, 890™, Air America®, AIRBOSS™, Auto-Set®, B.O.S.S.®, Bammer®, Biesemeyer®, Builders Saw®, Charge Air®, Charge Air Pro®, CONTRACTOR SUPERDUTY®, Contractor’s Saw®, Delta®, DELTA®, Delta Industrial®, DELTA MACHINERY & DESIGN™, Delta Shopmaster and Design®, Delta X5®, Deltacraft®, DELTAGRAM®, Do It. Feel It.®, DUAL LASERLOC AND DESIGN®, EASY AIR®, EASY AIR TO GO™, ENDURADIAMOND®, Ex-Cell®, Front Bevel Lock®, Get Yours While the Sun Shines®, Grip to Fit®, GRIPVAC™, GTF®, HICKORY WOODWORKING®, Homecraft®, HP FRAMER HIGH PRESSURE®, IMPACT SERIES™, Innovation That Works®, Jet-Lock®, Job Boss®, Kickstand®, LASERLOC®, LONG-LASTING WORK LIFE®, MAX FORCE™, MAX LIFE®, Micro-Set®, Midi-Lathe®, Monsoon®, MONSTER-CARBIDE™, Network®, OLDHAM®, Omnijig®, PC EDGE®, Performance Crew™, Performance Gear®, Pocket Cutter®, Porta-Band®, Porta-Plane®, Porter Cable®, PORTER-CABLE Professional Power Tools®, Powerback®, POZI-STOP™, Pressure Wave®, PRO 4000®, Proair®, Quicksand and Design®, Quickset II®, QUIET DRIVE TECHNOLOGY™, QUIET DRIVE TECHNOLOGY AND DESIGN™, Quik-Change®, QUIK-TILT®, RAPID-RELEASE™, RAZOR®, Redefining Performance®, Riptide®, Safe Guard II®, Sand Trap and Design®, Sanding Center®, Saw Boss®, Shop Boss®, Sidekick®, Site Boss®, Speed-Bloc®, Speedmatic®, Stair Ease®, Steel Driver Series®, SUPERDUTY®, T4 & DESIGN®, THE AMERICAN WOODSHOP®, THE PROFESSIONAL EDGE®, Thin-Line®, Tiger Saw®, TIGERCLAW®, TIGERCLAW AND DESIGN®, Torq-Buster®, TRU-MATCH®, T-Square®, Twinlaser®, Unifence®, Uniguard®, UNIRIP®, UNISAW®, UNITED STATES SAW®, Veri-Set®, Versa-Feeder®, VIPER®, VT™, VT RAZORT™, Water Driver®, WATER VROOM®, Waveform®, Whisper Series®, X5®, YOUR ACHIEVEMENT. OUR TOOLS.®
4825 Highway 45 North Jackson, Tennessee 38305
(888) 848-5175
www.portercable.com