ST8600 - Hedge trimmers BLACK & DECKER - Free user manual and instructions
Find the device manual for free ST8600 BLACK & DECKER in PDF.


| Product Type | Electric Edger / Trimmer |
| Brand | Black & Decker |
| Model | ST8600 |
| Power Source | Mains 120 V AC (power cord) |
| Cutting Diameter | Approximately 30 cm (estimated) |
| Cutting Line Diameter | 1.65 mm (0.065 in) round |
| Line Feeding System | Automatic (advance by need detection) |
| Operating Modes | Edger and trimmer (rotating head 180°) |
| Safety Guard | Integrated hand guard, cutting guide |
| Extension Cord Retainer | Yes, built into handle |
| Adjustable Auxiliary Handle | Yes, with adjustment button |
| Total Length | Approximately 1.5 m (estimated) |
| Weight | Approximately 3.2 kg (estimated) |
| Usage | Residential |
| Warranty | 2 years limited |
| Included Accessories | Pre-wound spool of line, hand guard, auxiliary handle |
| Maintenance | Clean with mild soap and damp cloth; store dry |
| Replacement Parts | AF-100 spool, bulk line 1.65 mm, hand guard, spool cover |
Frequently Asked Questions - ST8600 BLACK & DECKER
User questions about ST8600 BLACK & DECKER
0 question about this device. Answer the ones you know or ask your own.
Ask a new question about this device
Download the instructions for your Hedge trimmers in PDF format for free! Find your manual ST8600 - BLACK & DECKER and take your electronic device back in hand. On this page are published all the documents necessary for the use of your device. ST8600 by BLACK & DECKER.
USER MANUAL ST8600 BLACK & DECKER
Please read before returning this product for any reason.
If you have a question or experience a problem with your BLACK+DECKER purchase, go to:
http://www.blackanddecker.com/instantanswers
If you can't find the answer or do not have access to the Internet, call 1-800-544-6986 from 8 a.m. to 5 p.m. EST Mon. - Fri. to speak with an agent.
Please have the CATALOG NUMBER available when you call.
To register your new product, visit www.BlackandDecker.com/NewOwner
Definitions: Safety Alert Symbols and Words
This instruction manual uses the following safety alert symbols and words to alert you to hazardous situations and your risk of personal injury or property damage.
PANGER: Indicates an imminently hazardous situation which, if not avoided, will result in death or serious injury.
WARNING: Indicates a potentially hazardous situation which, if not avoided, could result in death or serious injury.
CAUTION: Indicates a potentially hazardous situation which, if not avoided, may result in minor or moderate injury.
(### without word) Indicates a safety related message.
NOTICE: Indicates a practice not related to personal injury which, if not avoided, may result in property damage.
Fig. A
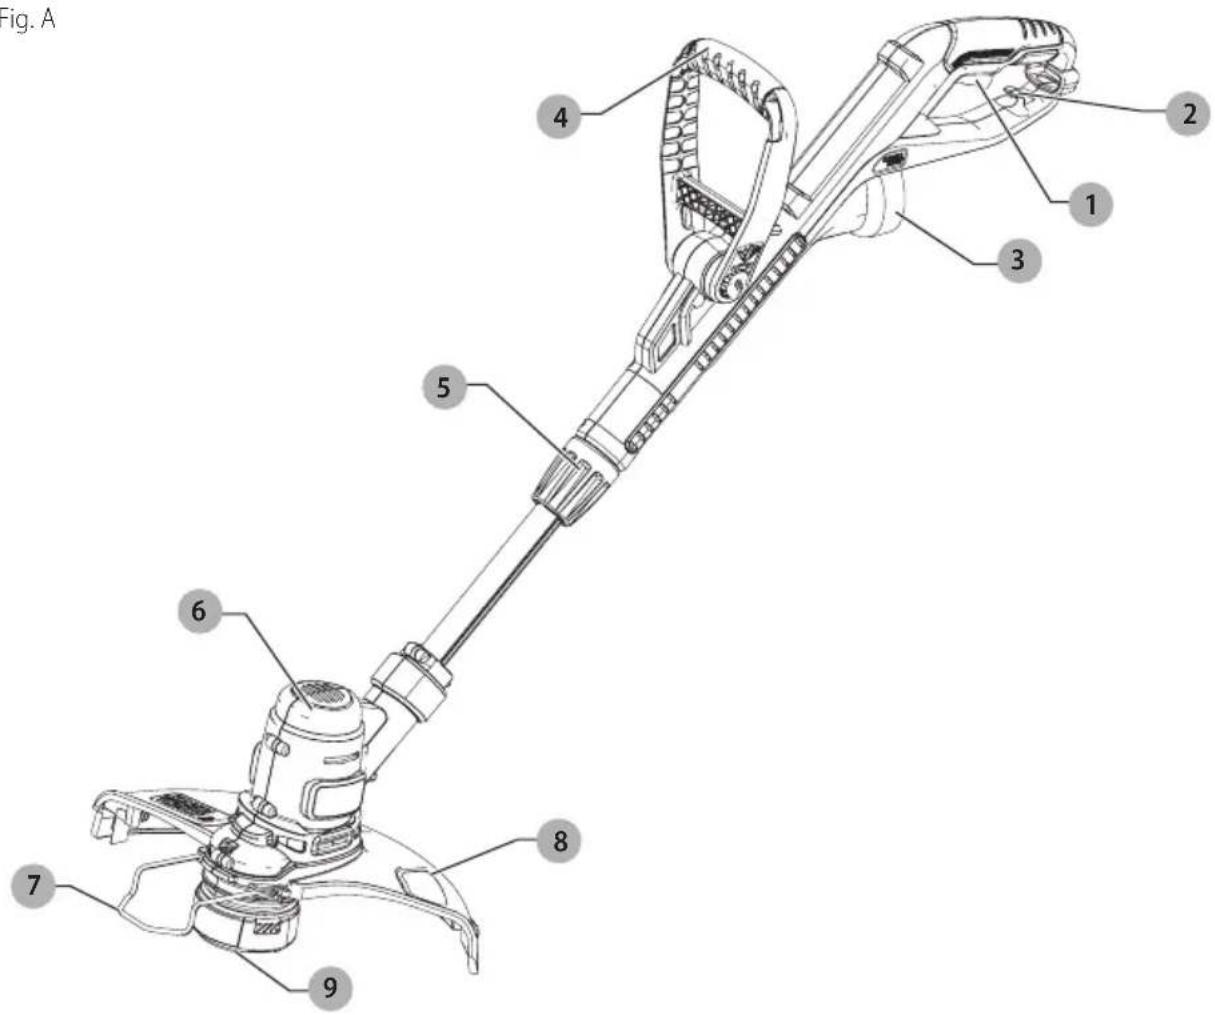
1 On/Off Trigger Switch
2 Cord Retainer
3 Power Cord Plug
4 Auxiliary Handle
5 Collar
6 Motor Housing
7 Edge Guide
8 Guard
9 Spool cap
WARNING! Read all safety
warnings and all instructions. Failure to follow the warnings and instructions may result in electric shock, fire and/or serious injury.

WARNING: To reduce the risk of injury, read the instruction manual.
EnGLISH
KEY INFORMATION YOU SHOULD KNOW
WARNING: Do not remove guard.
The guard must be attached when trimming. Operating this trimmer without the guard will violate the product warranty.
CAUTION:
AUTION: When replacing the line, use only 0.065 inch (1.65 mm) diameter round line. Other diameters or shapes may degrade performance or cause damage to the trimmer.
IF YOU HAVE ANY QUESTIONS OR COMMENTS ABOUT THIS OR ANY BLACK+DECKER appliance, CALL US TOLL FREE AT: 1-800-544-6986.
IMPORTANT SAFETY WARNINGS
WARNING:
When using electric
gardening appliances, basic safety precautions should always be followed to reduce risk of fire, electric shock, and personal injury, including the following.
READ ALL INSTRUCTIONS
- ALWAYS WEAR EYE PROTECTION – Wear safety spectacles or goggles at all times when this trimmer is plugged in. These items are available for purchase.
- GUARD – Do not use this appliance without guard attached.
- DRESS PROPERLY – Do not wear loose clothing or jewelry. They can be caught in moving parts. Gloves and substantial rubber soled footwear are recommended when working outdoors. Don't operate the appliance when barefoot or wearing open sandals. Wear heavy long pants to protect your legs. Wear protective hair covering to contain long hair.
- NYLON LINE – Keep face, hands and feet clear of rotating nylon line at all times.
- THE ROTATING LINE PERFORMS A CUTTING FUNCTION – Use care when trimming around screens and desirable plantings.
- KEEP ALL BYSTANDERS AWAY – at a safe distance from work area, especially children.
- IMPORTANT WARNING – When being used as an Edger, stones, pieces of metal and other objects can be thrown out at high speed by the line. The appliance and guard are designed to reduce the danger. However, the following special precautions should be taken: MAKE SURE that other persons and pets are at least 100 feet (30m) away.
• TO REDUCE THE RISK of rebound (ricochet) injury, work going away from any nearby solid object such as wall, steps, large stone, tree, etc. Use great care when working close to solid objects and where necessary, do trimming by hand. - AVOID ACCIDENTALLY STARTING – Don't carry with finger on trigger.
-
USE THE RIGHT APPLIANCE – Do not use this appliance for any job except that for which it is intended.
-
DON'T OVERREACH – Keep proper footing and balance at all times.
- DON'T FORCE APPLIANCE – It will do the job better and with less likelihood of a risk of injury at the rate for which it was designed
- DAMAGE TO UNIT – If you strike or become entangled with a foreign object, stop appliance immediately, unplug, check for damage and have any damage repaired before further operation is attempted. Do not operate with a broken hub or spool.
- DAMAGE TO CORD – Keep power cord away from rotating line. If you damage the cord, unplug it from the power supply before moving the tool or examining the damage. A damaged cord must be replaced before further use.
- SECURE EXTENSION CORD using the cord retainer shown in this manual.
- DISCONNECT TRIMMER – when not in use, when replacing line, or prior to cleaning.
- AVOID DANGEROUS ENVIRONMENTAL CONDITIONS – Do not use electric appliances in damp or wet locations. Follow all instructions in this Instruction Manual for proper operation of your appliance. Don't use the appliance in the rain.
- DO NOT OPERATE portable electric appliances in gaseous or explosive atmospheres. Motors in these appliances normally spark, and the sparks might ignite fumes.
- STORE IDLE APPLIANCES INDOORS – When not in use, appliances should be stored indoors in a dry, locked-up place out of reach of children.
- STAY ALERT – Do not operate this unit when you are tired, ill, or under the influence of alcohol, drugs, or medication.
- MAINTAIN APPLIANCES WITH CARE – Follow instructions in maintenance section. Keep handles dry, clean and free from oil and grease.
- GROUND FAULT CIRCUIT INTERRUPTER (GFCI) protection should be provided on the circuit(s) or outlet(s) to be used for the trimmer. Receptacles are available having built-in GFCI protection and may be used for this measure of safety.
- DON'T ABUSE CORD – Never carry trimmer by cord or yank it to disconnect from receptacle. Keep cord from heat, oil, and sharp edges.
- CHECK DAMAGED PARTS – Before further use of the appliance, a guard or other part that is damaged should be carefully checked to determine that it will operate properly and perform its intended function. Check for alignment of moving parts, binding of moving parts, breakage of parts, mounting, and any other condition that may affect its operation. A guard or other part that is damaged should be properly repaired or replaced by an authorized service center unless otherwise indicated elsewhere in this manual.
- DO NOT immerse appliance in water or squirt it with a hose. DO NOT allow any liquid to get inside it. If appliance does get wet, allow to dry for a minimum of 48 hours.
-
DO NOT store the appliance on or adjacent to fertilizers or chemicals.
• DO NOT clean with a pressure washer. -
KEEP GUARDS in place and in working order.
- KEEP HANDS AND FEET away from cutting area.
WARNING:
Do not use appliance if the switch trigger does not turn the appliance on or off. Any appliance that can not be controlled with the switch trigger is dangerous and must be repaired.
WARNING:
Some dust created by this product contains chemicals known to the State of California to cause cancer, birth defects or other reproductive harm. Some examples of these chemicals are:
- compounds in fertilizers
– compounds in insecticides, herbicides and pesticides - arsenic and chromium from chemically treated lumber
To reduce your exposure to these chemicals, wear approved safety equipment such as dust masks that are specially designed to filter out microscopic particles.
The label on your tool may include the following symbols. The symbols and their definitions are as follows:
V....volts
Hz......hertz
min......minutes
or DC.....direct current
Class I Construction (grounded)
.../min.....per minute
BPM.....beats per minute
☐......ClassII Construction (double insulated)
no ....no load speed n ....rated speed
earthing terminal
⚠️......safety alert symbol
△......visible radiation
E....wearrespiratory protection
weareye protection
○....wearhearing protection
readall documentation
SAFETY WARNINGS AND INSTRUCTIONS: POLARIZED PLUGS
CAUTION:
To reduce the risk of electric shock, this equipment has a polarized plug (one blade is wider than the other) and will require the use of a polarized extension cord. The trimmer plug will fit into a polarized extension cord only one way. If the plug does not fit fully into the extension cord, reverse the plug. If the plug still does not fit, obtain a correct polarized extension cord. A polarized extension cord will require the use of a polarized wall outlet. This plug will fit into the polarized wall outlet only one way. If the plug does not fit fully into the wall outlet, reverse the plug. If the plug still does not fit, contact a
qualified electrician to install the proper wall outlet. Do not change the equipment plug, extension cord receptacle, or extension cord plug in any way.
SAFETY WARNINGS AND INSTRUCTIONS: EXTENSION CORDS
WARNING:
To reduce the risk of electric shock, use only with an extension cord intended for outdoor use, such as an extension cord of cord type SW-A, SOW-A, STW-A, STOW-A, SJW-A, SJOW-A, SJTW-A. or SJTOW-A.
Make sure your extension cord is in good condition. When using an extension cord, be sure to use one heavy enough to carry the current your product will draw. An undersized cord will cause a drop in line voltage resulting in loss of power and overheating. The table shows the correct size to use depending on cord length and nameplate ampere rating. If in doubt, use the next heavier gauge. The smaller the gauge number, the heavier the cord. If the extension will be used outside, the cord must be suitable for outdoor work. The letters "WA" on the cord jacket indicate that the cord is suitable for outdoor use.
| Minimum Gauge for Cord Sets | |||||
| Volts | Total Length of Cord in Feet | ||||
| 120V | 0-25 | 26-50 | 51-100 | 101-150 | |
| (0-7,6m) | (7,6-15,2m) | (15,2-30,4m) | (30,4-45,7m) | ||
| Ampere Rating | |||||
| More | Not more | American Wire Gauge | |||
| Than | Than | ||||
| 6 | - | 10 | 18 | 16 | 14 |
SAVE THESE INSTRUCTIONS FOR FUTURE USE
COMPONENTS (FIG. A)
WARNING:
Never modify the power tool or any part of it. Damage or personal injury could result.
Refer to Figure A at the beginning of this manual for a complete list of components.
INTENDED USE
This string trimmer is designed for residential trimming applications. DO nOT use under wet conditions or in presence of flammable liquids or gases.
This string trimmer is a residential appliance. DO nOT let children come into contact with the tool. Supervision is required when inexperienced operators use this appliance.
ASSEMBLY AND ADJUSTMENTS
WARNING:
To reduce the risk of serious personal injury, turn unit off and disconnect it from power source before making any adjustments or removing/installing
attachments or accessories. An accidental start-up can cause injury.
EnGLISH
Assembly tools required
• Phillips Screwdriver (not supplied)
Installing the guard
WARNING: NEVER OPERATE appliance
WITHOUT GUARD FIRMLY IN PLACE. The guard must always be properly attached on the appliance to protect the user.
- Remove the screw from the guard.
- Turn the trimmer upside down so that you are looking down at the spool cap 9.
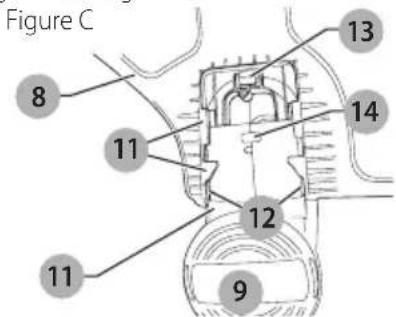
- Turn the guard 8 upside down and slide it fully onto the motor housing 6. Make sure the tabs 11 on the guard engage the ribs 12 on the trimmer head as shown.
- Continue to slide the guard on until you hear it "snap" into place. The locking tab 13 should snap into the housing slot 14 (figure C).
-
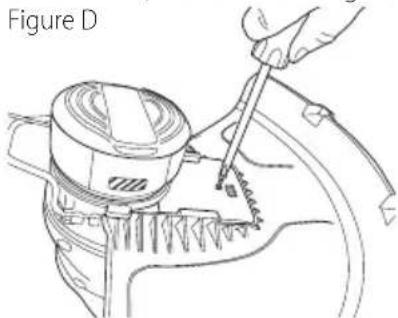
Using a phillips screwdriver, insert the guard screw and tighten securely as shown in figure D to complete the guard assembly.
-
Once the guard is installed, remove the covering from the line cut-off blade, located on the edge of the guard
natural_image
Line drawing of a mechanical device with a hand using a tool, labeled Figure D (no text or symbols on the diagram itself)Attaching the auxiliary handle
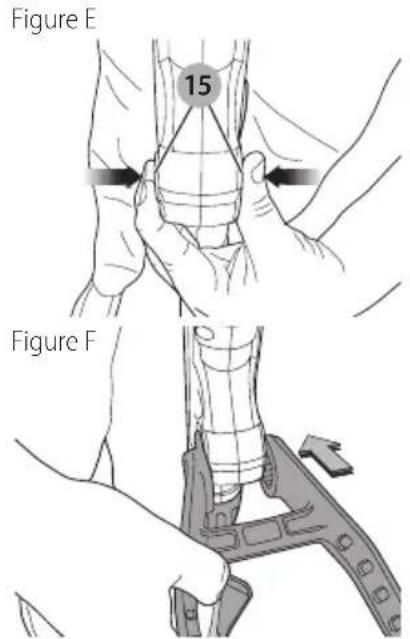
- To attach the handle 4, press in on the buttons 15 on both sides of the upper housing as shown in figure E.
- Position the handle as shown in figure F, matching up the grooved side of the handle with the grooved button. Partially push the handle on so that it will hold the buttons in when you release them with your hand.
- Push the handle completely onto the housing and position it slightly until it "snaps" into place.
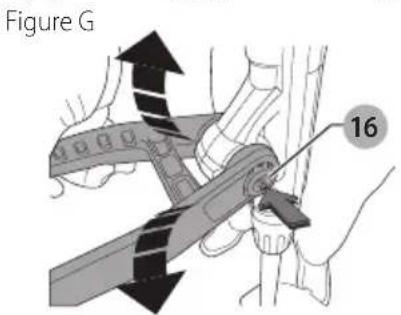
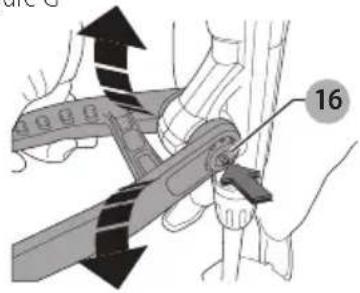
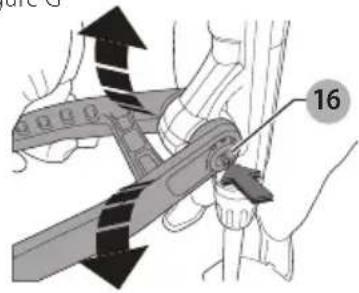
- To adjust the handle up or down, press in on the button 16 and raise or lower the handle (figure G).
- The handle should be adjusted so that your front arm is straight when the trimmer is in the working position.
Height adjustment
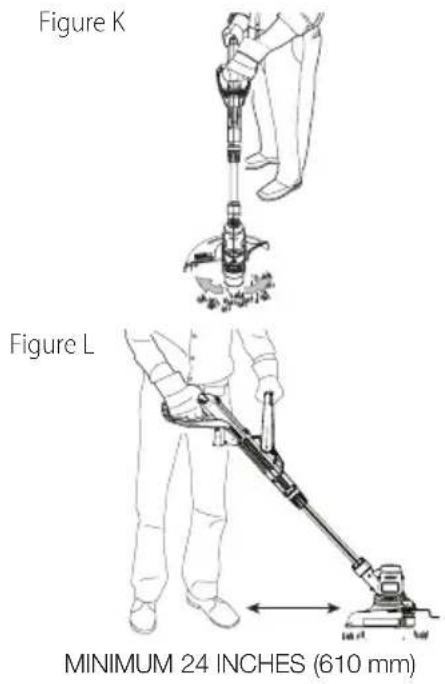
CAUTION: Adjust the length of the trimmer to obtain proper working positions as shown in figures K and L.
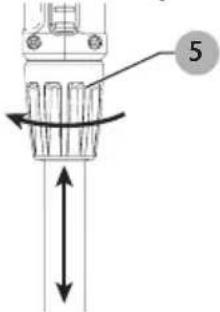
- The overall height of the trimmer can be adjusted by loosening the collar 5 and rotating it in the direction of the arrow shown in figure H.
- Move the upper housing straight up or down. When the desired height is achieved, tighten the collar by rotating it opposite of the direction shown in figure H.
Figure H
Attaching extension cord
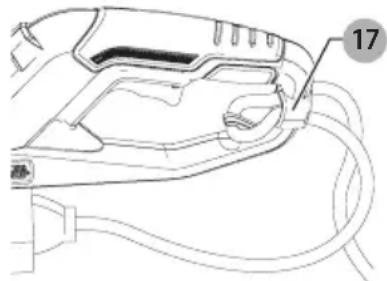
- An extension cord retainer 2 is built into the switch handle that prevents the cord from coming unplugged. To use this feature, simply double the extension cord about 8 inches (203mm) from the end, and insert it into the slot 17 in the end of the handle area as shown in figure H. Hook the loop formed by doubling the cord over the tab 2. Gently tug on the cord to insure that it is firmly retained in the trimmer's handle. Plug the
receptacle end of the extension cord into the power cord plug 3 in the trimmer.
Figure I
natural_image
Line drawing of a hairdryer with attached cable and connector (no text or symbols)Releasing the cutting line
For shipping purposes, the cutting line is taped to the spool housing.
- Remove the tape holding the cutting line to the spool housing.
- See "Replacing the Spool" for instructions for removing the spool
Setting trimming or edging mode
WARNING:
Disconnect the plug from the
power source before making any adjustments.
The trimmer can be used in trimming mode or edging mode to trim overhanging grass along lawn edges and flower beds.
WARNING:
When being used as an
Edger, stones, pieces of metal and other objects can be thrown out at high speed by the line. The trimmer and guard are designed to reduce the danger. However, MAKE SURE that other persons and pets are at least 100 feet (30m) away.
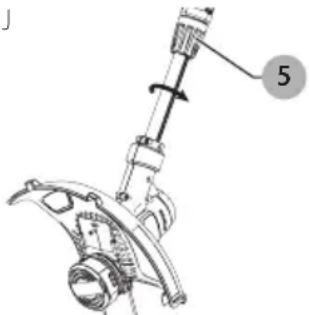
• To operate as a maintenance edger, turn the collar 5 as shown in figure H.
- Hold the metal shaft and rotate the lower housing 180^ as shown in figure J.
- Turn the collar back until tight.
NOTE: The metal shaft and housing will only rotate in one direction.
- To return to the trimming position, loosen the lock collar and rotate the lower housing back 180^ and retightening the collar.
Figure J
natural_image
Mechanical assembly diagram showing a lever and gear mechanism (no text or symbols)OPERATION
WARNING:
To reduce the risk of
serious personal injury, turn unit off and disconnect it from power source before making any adjustments or removing/installing attachments or accessories. An accidental start-up can cause injury.
WARNING:
Always use proper eye
protection that conforms to ANSI Z87.1 (CAN/CSA Z94.3) while operating this appliance.
AUTION:
Before you begin trimming, only
use the appropriate type of cutting line- 080 inch (1.65 mm) diameter, ROUND nylon line.
AUTION:
Inspect area to be trimmed and
remove any wire, cord, or string-like objects which could become entangled in the rotating line or spool. Be particularly careful to avoid any wire which might be bent outwardly into the path of the appliance, such as barbs at the base of a chain link fence.
Proper Hand Position
WARNING:
To reduce the risk of serious
personal injury, ALWAYS use proper hand position as shown.
WARNING:
To reduce the risk of serious
personal injury, ALWAYS hold securely in anticipation of a sudden reaction.
Proper hand position requires one hand on the main handle and one hand on the auxiliary handle 4.
Switching on and off
• To switch the trimmer on, squeeze the trigger switch
1.
- To switch the trimmer off, release the trigger switch.
Operating the trimmer
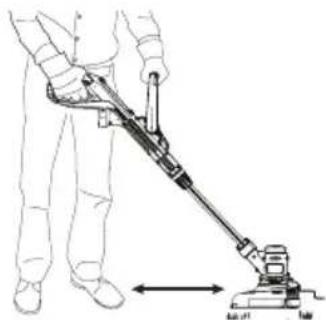
- With the unit on, angle unit and slowly swing the trimmer side to side as shown in figure K.
- Maintain a cutting angle of 5^ to 10^ . Do not exceed 10^ . Cut with the tip of the line. To keep distance from hard surfaces use edge guide 7. Pull the guide out until it snaps securely into place
- Maintain a minimum distance of 24 inches (609.6 mm) between the guard and your feet as shown in figure L.
EnGLISH
Edging
WARNING: When being used as an Edger, stones, pieces of metal and other objects can be thrown out at high speed by the line. The trimmer and guard are designed to reduce the danger. However, MAKE SURE that other persons and pets are at least 100 feet (30m) away. Optimum cutting results are achieved on edges deeper than 2 inches (50 mm).
- Do not use this trimmer to create trenches.
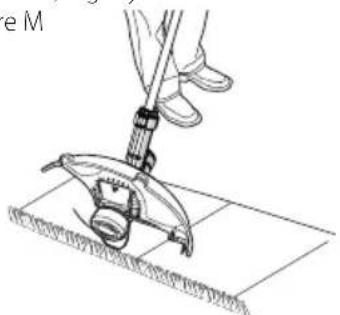
- Pull the edge guide 7 out of the motor housing 6 until it clicks into place. Ensure it is full engaged and can't be easily pushed back into the housing before edging.
• Using the edge guide, guide the trimmer as shown in figure M. - Position the edge guide on the edge of the sidewalk or abrasive surface so the cutting line is over the grass or dirt area to be edged.
NOTE: The Auto Feed System may not operate correctly if edge guide is not used.
NOTE: You will experience faster than normal cutting line wear if the edge guide is positioned too far from the edge with the cutting line positioned over the sidewalk or abrasive surface.
• To make a closer cut, slightly tilt the trimmer.
Figure M
natural_image
Line drawing of a hand using a tool to lift a mechanical component on a flat surface (no text or symbols)Helpful cutting tips
- Use the tip of the string to do the cutting; do not force string head into uncut grass. Use edge guide along such things as fences, houses and flower beds for best practices.
- Wire and picket fences cause extra string wear, even breakage. Stone and brick walls, curbs, and wood may wear string rapidly.
- Do not allow spool cap to drag on ground or other surfaces.
- In long growth cut from the top down and do not exceed 12 inches (304.8 mm) high.
- Keep trimmer tilted toward the area being cut; this is the best cutting area.
- The trimmer cuts when passing the unit from the right to left. This will avoid throwing debris at the operator.
- Avoid trees and shrubs. Tree bark, wood moldings, siding, and fence posts can easily be damaged by the string.
Cutting line / line feeding
Your trimmer uses .065 inch (1.65 mm) diameter, ROUND nylon line. During use, the tips of the nylon lines will become frayed and worn and the special self feeding spool will automatically feed and trim a fresh length of line. Cutting line will wear faster and require more feeding if the cutting or edging is done along sidewalks or other abrasive surfaces or heavier weeds are being cut. The advanced automatic line feeding mechanism senses when more cutting line is needed and feeds and trims the correct length of line whenever it's required. Do not bump trimmer on ground in attempt to feed line or for any other purposes.
Replacing the spool
AUTION:
Before you begin trimming, only use the appropriate type of cutting line. Ensure that cutting line is present in both sections of the spool.
- Unplug trimmer.
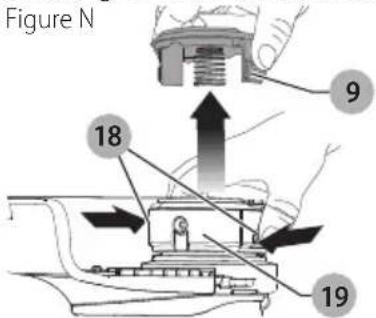
- Depress the tabs 18 and remove the spool cap 9 from the spool housing 19 in the trimmer head (figure N).
-
For best results, replace spool with BLACK+DECKER model no. AF-100.
-
Grasp empty spool with one hand and spool housing with other hand and pull spool out.
-
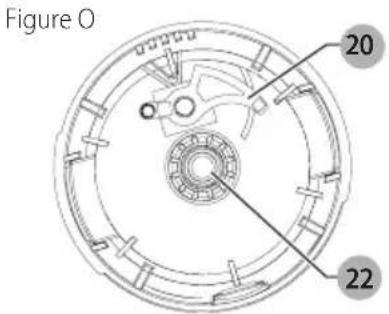
If lever 20 (figure O) in base of housing becomes dislodged, replace in correct position before inserting new spool into housing.
-
Remove any dirt and grass from the spool and housing.
-
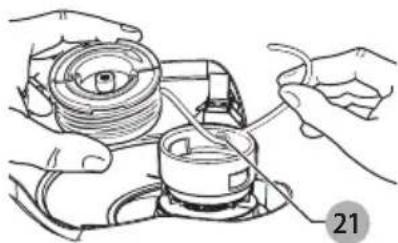
Unfasten the end of the cutting line and guide the line into the eyelet 21 figure P.
Figure P
natural_image
Illustration of hands using a tool to adjust or install a mechanical component (no text or symbols visible)-
Take the new spool and push it onto the boss 22 in the housing. Rotate the spool slightly until it is seated. The line should protrude approximately 5-3/8 inches (136mm) from the housing.
-
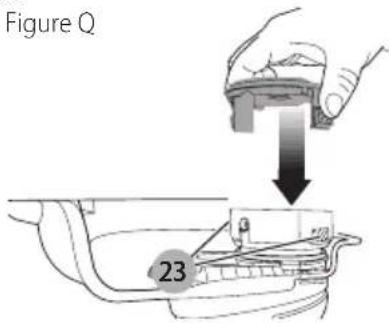
Align the tabs on the spool cap with the slots 23 in the housing (figure Q).
-
Push the cap onto the housing until it snaps securely into place.
To avoid appliance damage, if
the cutting line protrudes beyond the trimming blade, cut it off so that it just reaches the blade.
NOTE: Other replacement parts (guards, spool caps, etc.) are available through BLACK+DECKER service centers. To find your local service location call: 1-800-544-6986 or visit
www.blackanddecker.com.

The use of any accessory not recommended by BLACK+DECKER for use with this appliance could be hazardous.
Rewinding spool from bulk line (use only .065 in. round diameter line)
Do not use square, star or other shaped line or larger diameter. These may cause feeding issues or overload the motor.
Bulk line is also available for purchase from your local retailer.
NOTE: Hand wound spools from bulk line are likely to become tangled more frequently than BLACK+DECKER factory wound spools. For best results, factory wound spools are recommended.
To install bulk line, follow the steps below:
- Unplug trimmer.
- Remove the empty spool from the trimmer as described in "REPLACING THE SPOOL".
-
Remove any remaining cutting line from the spool.
-
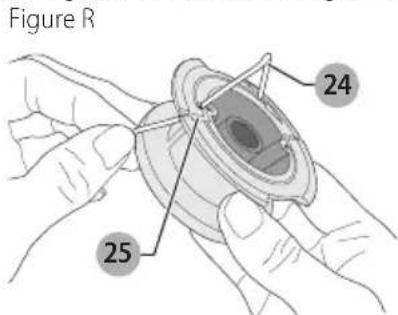
Make a fold at the end of the cutting line at about 3/4 inch (19mm) 24. Feed the cutting line into one of the line anchoring slots 25 as shown in figure R.
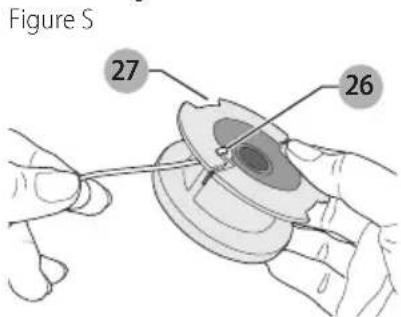
- Insert the 3/4 inch (19mm) end of the bulk line into the hole 26 in the spool adjacent to the slot as shown in figure S. Make sure the line is pulled tight against the spool as shown in figure S.
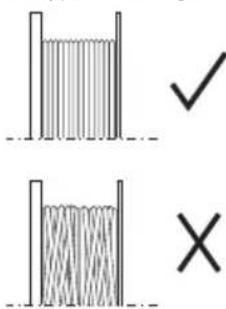
- Wind the cutting line onto the spool in the direction of the arrow on the spool. Make sure to wind the line on neatly and in layers. Do not crisscross (figure T).
- When the wound cutting line reaches the recesses 27, cut the line. (figure S).
- Fit the spool onto the trimmer as described in "REPLACING THE SPOOL".
Before you begin trimming, only use the appropriate type of cutting line.
Figure T
MAINTENANCE
WARNING:
To avoid serious injury,
unplug the appliance before performing any maintenance.
- Keep the air intake slots clean to avoid overheating.
- Your trimmer line can dry out over time. To keep your line in top condition, store spare pre-wound spools or bulk line in a plastic, sealable bag with a tablespoon of water.
- Plastic parts may be cleaned by using a mild soap and a damp rag.
- The line cutter on the edge of the guard can dull over time. It is recommended you periodically touch-up the sharpness of the blade with a file.
IMPOrTanT: To assure product SAFETY and RELIABILITY, repairs, maintenance and adjustment should be performed by authorized service centers or other qualified service organizations, always using identical replacement parts.
AUTOMATIC LINE FEED DOES NOT WORK
- Unplug the trimmer.
- Remove the spool cap.
- Make sure you are using 0.065 inch (1.65 mm) diameter ROUND line.
- Check to see if the lever is in place and pivots freely.
- Pull the cutting line until it protrudes approximately 5-3/8 inches (136mm) from the spool. If insufficient cutting line is left on the spool, install a new spool of cutting line.
- Ensure that the line is not crisscrossed on the spool as detailed in figure T. If it is, unwind the cutting line, then wind it back on the spool neatly so that the lines do not cross.
- Ensure the beginning of the cutting line is pulled tight against the spool as shown in figure S.
- Align the tabs on the spool cap with the cut outs in the housing.
- Push the spool cap onto the housing until it snaps securely into place.
- If the cutting line protrudes beyond the trimming blade, cut it off so that it just reaches the blade. If the automatic line feed still does not work or the spool is jammed, try the following suggestions:
- Carefully clean the spool and housing.
- Remove the spool and check if the lever in the spool housing can move freely.
- Remove the spool and unwind the cutting line, then wind it on neatly again. Replace the spool into the housing.
Two-Year Limited Warranty
Black & Decker (U.S.) Inc. warranties this product to be free from defects in material or workmanship for a period of two (2) years following the date of purchase, provided that the product is used in a home environment. This limited warranty does not cover failures due to abuse, accidental damage or when repairs have been made or attempted by anyone other than BLACK+DECKER and its Authorized Service Centers. A defective product meeting the warranty conditions set forth herein will be replaced or repaired at no charge in either of two ways: The first, which will result in exchanges only, is to return the product to the retailer from whom it was purchased (provided that the store is a participating retailer). Returns should be made within the time period of the retailer's policy for exchanges. Proof of purchase may be required. Please check with the retailer for its specific return policy regarding time limits for returns or exchanges. The second option is to take or send the product (prepaid) to a BLACK+DECKER owned or authorized Service Center for repair or replacement at BLACK+DECKER's option. Proof of purchase may be required. BLACK+DECKER owned and authorized service centers are listed online at www.blackanddecker.com. This warranty does not apply to accessories. This warranty gives you specific legal rights and you may have other rights which vary from state to state. Should you have any questions, contact the manager of your nearest BLACK+DECKER Service Center. This product is not intended for commercial use, and accordingly, such commercial use of this product will void this warranty. All other guarantees, express or implied, are hereby disclaimed.
FREE WARNING LABEL REPLACEMENT: If your warning labels become illegible or are missing, call 1-800-544-6986 for a free replacement.
LATIN AMERICA: This warranty does not apply to products sold in Latin America. For products sold in Latin America, check country specific warranty information contained in the packaging, call the local company or see the website for such information.
Accessories
WARNING:
Since accessories, other than
those offered by BLACK+DECKER have not been tested with this product, use of such accessories with this tool could be hazardous. To reduce the risk of injury, only BLACK+DECKER recommended accessories should be used with this product.
Recommended accessories for use with your tool are available at extra cost from your local dealer or authorized service center. If you need assistance in locating any accessory, please contact BLACK+DECKER, call 1-800-544-6986.
TROUBLESHOOTING
| PROBLEMTrimmer runs slowly. | SOLUTIONUnplug trimmer.Check that the spool housing can rotate freely. Carefully clean it if necessary.Check that the cutting line does not protrude more than approximately 4-13/16 inches (122mm) from the spool. If it does, cut it off so that it just reaches the line trimmingblade. |
| Trimmer will not start. | Plug trimmer into a working outlet.Replace circuit fuse. (If the product repeatedly causes the circuit fuse to blow, discontinue use immediately and have it serviced at a BLACK+DECKER service center or authorized servicer.)Have cord or switch replaced at a BLACK +DECKER Service Center or Authorized Servicer |
| Overfeeding | Make sure you are using 0.065 inch (1.65 mm) diameter ROUND line.Ensure you are cutting with the tip of the line (7 inches (177.8mm) from the spool).Use the edge guide if needed to ensure proper space is maintained.Ensure you are not exceeding a 10^ angle. |
| Line unravels when cap or spool is removed. | Make sure to park the lines in holding slots (figure S) before removing. |
Imported by Black & Decker (U.S.) Inc.,
701 E. Joppa Rd.
Towson, MD 21286

natural_image
Line drawing of a mechanical device with a hand using a screwdriver (no text or symbols)FIXATION DE LA POIGNÉE AUXILIAIRE
natural_image
Illustration of a hand using a tool to adjust or install a mechanical component, labeled 'Figure F' (no text or symbols on the diagram itself)Figure G
natural_image
Line drawing of a hair iron with attached cable and connector (no text or symbols)LIBÉRATION DU FIL DE COUPE
natural_image
Line drawing of a person using a handheld tool to lift a cylindrical device (no text or symbols visible)Figure L
natural_image
Line drawing of a person using a vacuum cleaner (no text or symbols present)(610 mm) 24 PO
COUPE EN BORDURE
natural_image
Line drawing of a person using a tool to lift a mechanical component on a tiled floor (no text or symbols)CONSEJOS ÚTILES PARA CORTAR
natural_image
Illustration of hands assembling a mechanical component with a tool (no text or symbols visible)ENTRETIEN
natural_image
Line drawing of a mechanical component with a hand using a tool, labeled Figure D (no text or symbols on the diagram itself)natural_image
Illustration of a hand using a tool to adjust or install a mechanical component, labeled 'Figure F' (no text or symbols on the diagram itself)Figure G
AJUSTE DE ALTURA
natural_image
Line drawing of a person using a tool to lift a piece of material on a tiled floor (no text or symbols)CONSEJOS ÚTILES PARA CORTAR
REEMPLAZO DE CARRETES
natural_image
Illustration of hands connecting a mechanical component with wires (no text or symbols)MANTENIMIENTO
Date of purchase · Fecha de compra Invoice No. · No. de factura
Col. Fracc. Universidad
Chihuahua, Chihuahua
Tel. 01 614 413 64 04
Fernando González Armenta
Bolivia No. 605
Col. Felipe Carrillo Puerto
Cd. Madero, Tamaulipas
Tel. 01 833 221 34 50
Black & Decker (U.S.) Inc.
701 East Joppa Road, Towson, MD 21286
Part No. 90642164
ST8600
OCT16

- Definitions: Safety Alert Symbols and Words
- WARNING! Read all safety
- EnGLISH
- KEY INFORMATION YOU SHOULD KNOW
- WARNING: Do not remove guard.
- CAUTION:
- IMPORTANT SAFETY WARNINGS
- WARNING:
- READ ALL INSTRUCTIONS
- SAFETY WARNINGS AND INSTRUCTIONS: POLARIZED PLUGS
- SAFETY WARNINGS AND INSTRUCTIONS: EXTENSION CORDS
- SAVE THESE INSTRUCTIONS FOR FUTURE USE
- COMPONENTS (FIG. A)
- INTENDED USE
- ASSEMBLY AND ADJUSTMENTS
- Assembly tools required
- Installing the guard
- WARNING: NEVER OPERATE appliance
- Attaching the auxiliary handle
- Height adjustment
- CAUTION: Adjust the length of the trimmer to obtain proper working positions as shown in figures K and L.
- Attaching extension cord
- Releasing the cutting line
- Setting trimming or edging mode
- OPERATION
- AUTION:
- Proper Hand Position
- Switching on and off
- Operating the trimmer
- Edging
- Helpful cutting tips
- Cutting line / line feeding
- Replacing the spool
- Rewinding spool from bulk line (use only .065 in. round diameter line)
- MAINTENANCE
- AUTOMATIC LINE FEED DOES NOT WORK
- Two-Year Limited Warranty
- Accessories
- FIXATION DE LA POIGNÉE AUXILIAIRE
- LIBÉRATION DU FIL DE COUPE
- COUPE EN BORDURE
- CONSEJOS ÚTILES PARA CORTAR
- ENTRETIEN
- AJUSTE DE ALTURA
- REEMPLAZO DE CARRETES
- MANTENIMIENTO
Brand : BLACK & DECKER
Model : ST8600
Category : Hedge trimmers