HMS 12 B2LDW - Subwoofer Hertz - Free user manual and instructions
Find the device manual for free HMS 12 B2LDW Hertz in PDF.

| Brand | Hertz |
| Model | HMS 12 B2LDW |
| Product Type | Passive subwoofer |
| Speaker diameter | 12 inches (30 cm) |
| Power handling (RMS) | 300 W (estimated) |
| Impedance | 4 ohms |
| Sensitivity | 90 dB (estimated) |
| Frequency response | 30 Hz – 200 Hz (estimated) |
| Cone material | Polypropylene |
| Enclosure material | MDF |
| Dimensions (W x H x D) | 400 x 300 x 350 mm (estimated) |
| Weight | 12 kg (estimated) |
| Power supply | Not applicable (passive) |
| Main functions | Low-frequency reproduction, vehicle installation, secure mounting |
| Maintenance and cleaning | Clean with a soft, dry cloth; avoid water and chemicals |
| Safety | Wear safety glasses during installation; turn off the head unit before connection; do not expose to water or moisture |
| Included accessories | Protective grille, user manual |
| Warranty | 2 years |
| Country of origin | Italy (Hertz brand) |
| General information | Complies with European WEEE directives; for indoor vehicle use only |
Frequently Asked Questions - HMS 12 B2LDW Hertz
User questions about HMS 12 B2LDW Hertz
0 question about this device. Answer the ones you know or ask your own.
Ask a new question about this device
Download the instructions for your Subwoofer in PDF format for free! Find your manual HMS 12 B2LDW - Hertz and take your electronic device back in hand. On this page are published all the documents necessary for the use of your device. HMS 12 B2LDW by Hertz.
USER MANUAL HMS 12 B2LDW Hertz
text_image
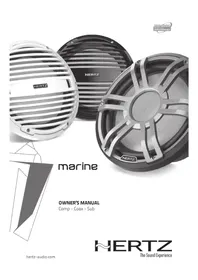
NERTZ NERTZ marine NERTZ Technology International Manufactured in elettromediamarine
OWNER'S MANUAL
Comp - Coax - Sub
Arabic / العربية
Congratulations on purchasing our product. Your satisfaction is the first requirement that our products must meet: the same satisfaction as the one gained by those who long for "The Sound Experience". This manual has been drawn to provide the main instructions required to install and use the system properly. However, the range of possible applications is wide; for further information, please feel free to contact your trusted dealer or our technical support at the email support@elettromedia.it Before installing the components, please carefully read all of the instructions contained in this manual. Failure to respect these instructions may cause unintentional harm or damage to the product.
-
All components must be firmly secured to the vehicle/vessel structure. Do the same when installing any custom structures you may have built. Confirm your installation is solid and safe. A component coming loose while driving may cause serious damage to the passengers, as well as to other vehicles/vessels.
-
Always wear protective eyewear when using tools, as splints or product residue may become airborne.
-
In order to avoid incidental damage, keep the product in the original packaging until you are ready for the final installation.
-
Do not carry out any installation inside the engine compartment.
-
Before starting with the installation turn the head unit and all other audio system devices off, avoiding any possible damage.
-
Make sure that the location you choose to install the components does not interfere with the normal operation of any mechanical or electrical devices of the vehicle/vessel.
-
Do not install loudspeakers where they may be exposed to excessive water, humidity, dust, dirt or immersion.
-
Do not install the tweeter without the protective grille.
-
Do not install the components or make cable run close to electronic or mechanical devices of the vehicle/vessel.
-
Be very cautious when drilling or cutting into the vehicle/vessel chassis, making sure there are no cables or structural elements essential to the vehicle/vessel underneath or in the selected area.
-
When routing cables, make sure that the cable does not come in contact with sharp edges or near moving mechanical devices. Make sure that it is firmly attached and protected along its entire length and its insulation is self-extinguishing.
-
Only use cables with the proper section (AWG) indicated herein.
-
When running the cable through a hole in the vehicle/vessel chassis, protect the cable with a rubber ring (grommet). Be sure to provide proper protection for cables running close to heat-generating devices.
-
Do not run the wires outside of the vehicle/vessel.
-
Use top quality cables, connectors and accessories such as found in the Connection catalogue.
-
Warranty certificate: For more information visit the Hertz website.
Information on electrical and electronic equipment waste (for those European countries which organize the separate collection of waste). Products which are marked with a wheeled bin with an X through it can not be disposed of together with ordinary domestic waste. These electrical and electronic products must be recycled in proper facilities, capable of managing the disposal of these products and components. In order to know where and how to deliver these products to the nearest recycling/disposal site please contact your local municipal office. Recycling and disposing of waste in a proper way contributes to the protection of the environment and to prevent harmful effects on health.
Eesti / Estonian
These speakers are designed to be water and spray resistant, but they are not designed to be submerged or to withstand high-pressure water spray. Please exercise care when washing your boat to avoid damaging the speakers. Do not install on submersibles, personal watercraft or any other vessel likely to be under water for even a short time.
Installation and Use
When installing speakers in your vessel, it is extremely important that the speakers and their supporting structures are firmly secured to avoid causing harm to persons or property in case of collision. Please review the mounting information carefully and use the supplied accessories to mount this product. Unless otherwise specified these products are developed for infinite-baffle applications, which means installed without box. Installing these components in a box or in small enclosures may compromise their low frequency performance.
Tweeter and lighting
The tweeters and lighting circuit (when this is available) are permanently fixed to the grille. Do not use the product without the grille unless otherwise specified. Do not attempt to remove the tweeter and/or the lighting LEDs from the grille. Any damages caused by the attempt to remove the grille and/or tweeter/lighting LEDs will not be covered under warranty.
Tweeter Protection
The crossover is equipped with an electronic tweeter protection circuit designed to minimize the risk of damages to the tweeter. This electronic device monitors the current going to the tweeter and disconnects the tweeter from the signal when it senses an overload. Should this occur while listening to the audio system, simply reduce the volume for a few seconds to reset the protection circuit.
ATTENZIONE
HMX 6.5 / HMX 6.5-C / HMX 6.5-LD / HMX 6.5-LD-C / HMX 6.5-TC / HMX 6.5-TW / HMX 6.5-LD-TC / HMX 6.5-LD-TW
natural_image
Line drawing of a helmet with attached cable and accessories (no text or symbols)HMX 6.5 S / HMX 6.5 S-LD
text_image
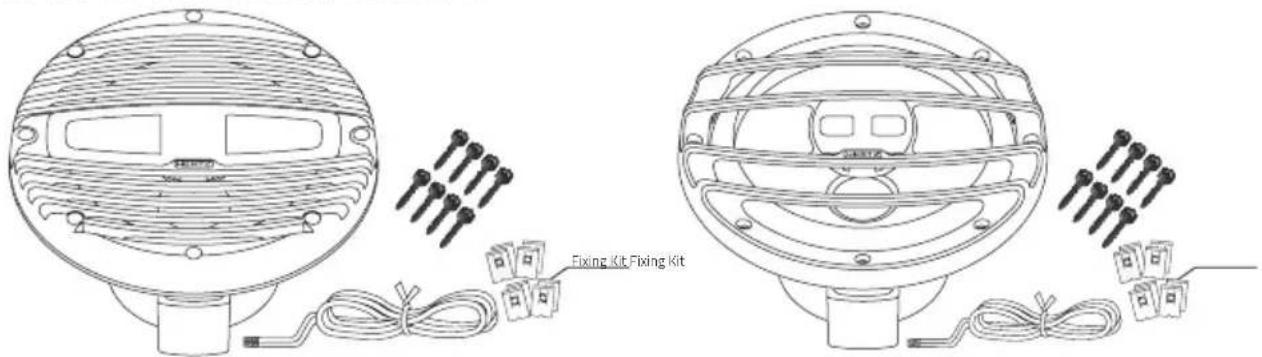
Fixing Kit Fixing KitHMX 8 / HMX 8-C / HMX 8-LD / HMX 8-LD-C / HMX 8-TC / HMX 8-TW / HMX 8-LD-TC / HMX 8-LD-TW HMX 8 S / HMX 8 S-LD
text_image
Fixing Kit Fixing KitHMS 10 B / HMS 10 B-C / HMS 10 B-C2 / HMS 10 B-2
natural_image
Line drawing of a NERTZ air conditioner fan with attached components including a coiled cable and terminal blocks (no text or symbols)HMS 10 S-LD-G / HMS 10 S2-LD-G
text_image
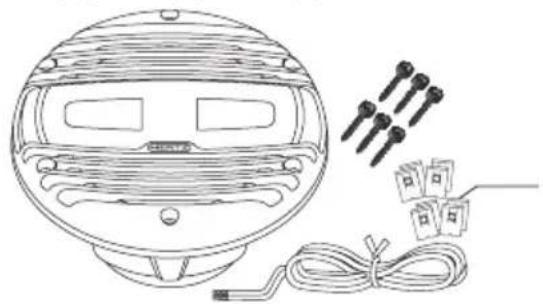
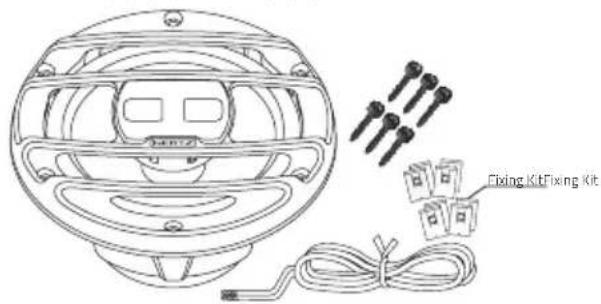
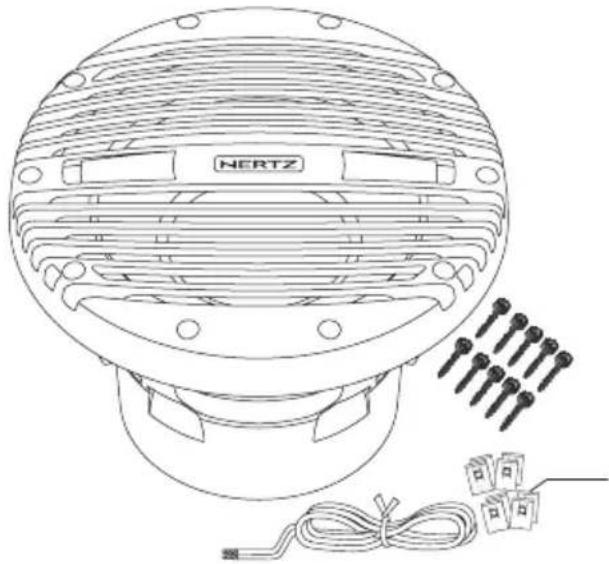
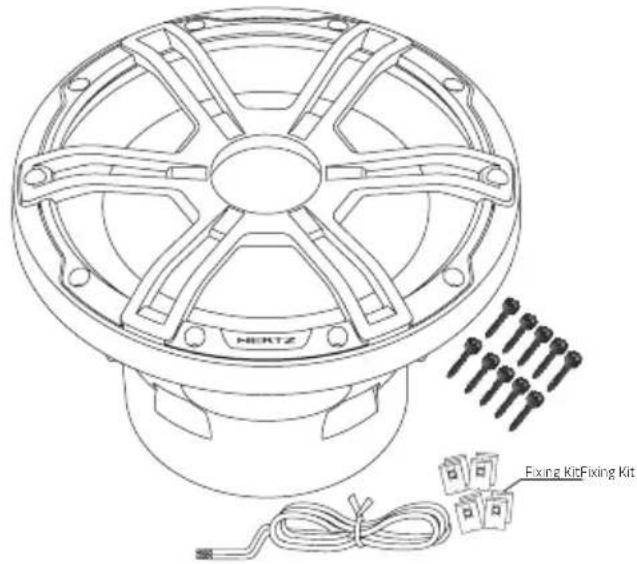
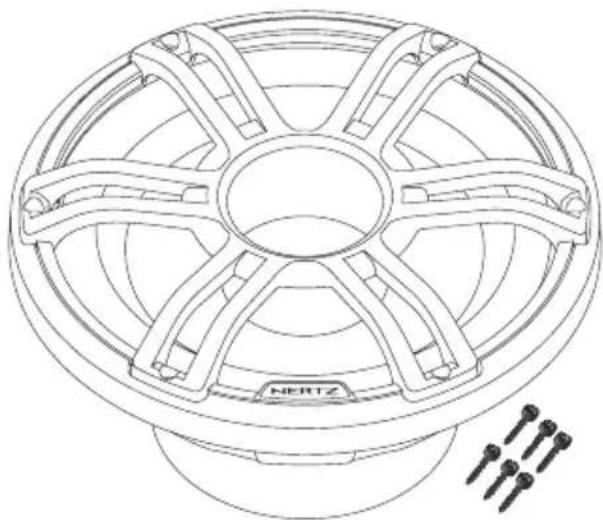
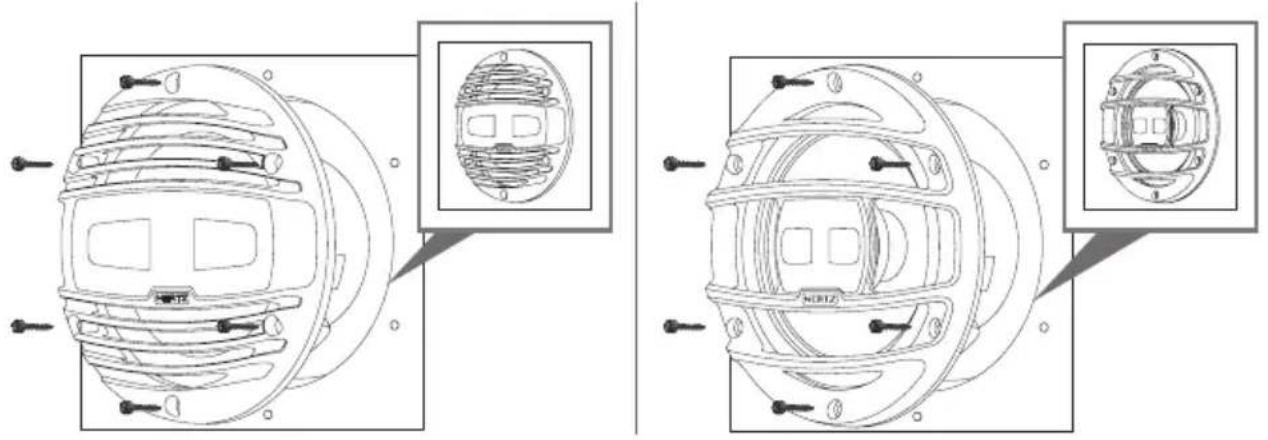
HERTZ Fixing KitFixing KitHMS 12 B2-LD-W / HMS 12 B4-LD-W
HMS 12 B2-LD-C / HMS 12 B4-LD-C

natural_image
Line drawing of a NERTZ-branded fan or connector component with mounting holes and ventilation grilles (no text or symbols)HMS 12 S4-LD-G / HMS 12 S2-LD-G
natural_image
Technical line drawing of a NERTZ wheel rim with six spokes and mounting base (no text or symbols)الحجم / Размер / 尺寸 / 规格 / Veličina / Velikost / Størrelse / Afmetingen / Size / Suurus / Koko / Dimensions / Größe / Διαστάσεις / اندازه / Méretek / Ukuran / Ingombro / サイズ / ヨフ | Izmērs / Dydis / Størrelse / Wielkość / Dimensão / Dimensiuni / Размер / Rozmery / Velikost / Tamaño / Storlek / ขนาด / Ebat
HMX 6.5 / HMX 6.5-C / HMX 6.5-LD / HMX 6.5-LD-C / HMX 6.5-TC / HMX 6.5-TW / HMX 6.5-LD-TC / HMX 6.5-LD-TW / HMX 6.5 S / HMX 6.5 S-LD / HMX 8 / HMX 8-C / HMX 8-LD / HMX 8-LD-C / HMX 8-TC / HMX 8-TW / HMX 8-LD-TC / HMX 8-LD-TW / HMX 8 S / HMX 8 S-LD / HMS 10 B / HMS 10 B-C / HMS 10 B-C2 / HMS 10 B-2 / HMS 10 S-LD-G / HMS 10 S2-LD-G / HMS 12 B2-LD-W / HMS 12 B4-LD-W / HMS 12 B2-LD-C / HMS 12 B4-LD-C / HMS 12 S4-LD-G / HMS 12 S2-LD-G
text_image
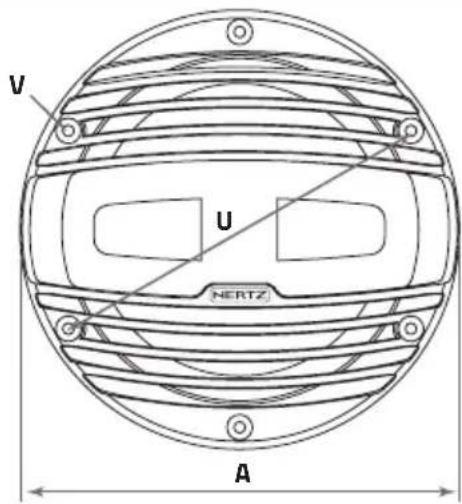
V U NERTZ A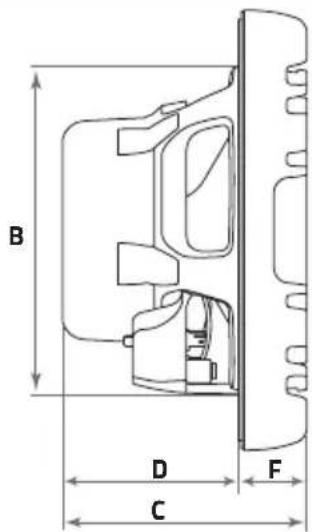
text_image
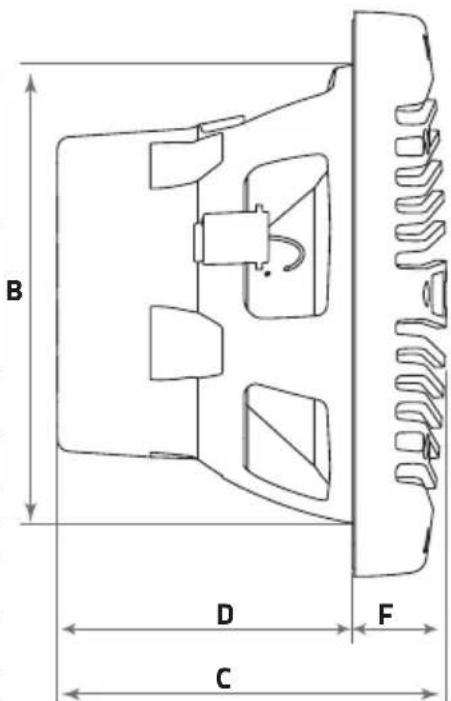
B D C F| A | B | C | D | F | U | V | ||||||
| HMX 6.5HMX 6.5-CHMX 6.5-TCHMX 6.5-TWHMX 6.5-LDHMX 6.5-LD-CHMX 6.5-LD-TCHMX 6.5-LD-TWHMX 6.5 SHMX 6.5 S-LD | 172,2 | 128 | 95,6 | 69 | 26,6 | 155 | 4,5 | mm | ||||
| 6.78 | 5,04 | 3.76 | 2.72 | 1.05 | 6.1 | 0.18 | in. | |||||
| HMX 8HMX 8-CHMX 8-TCHMX 8-TWHMX 8-LDHMX 8-LD-CHMX 8-LD-TCHMX 8-LD-TWHMX 8 SHMX 8 S-LD | 225 | 180 | 123 | 91 | 32 | 205 | 5 mm | |||||
| 8.86 | 7.09 | 4.84 | 3.58 | 1.19 | 8.07 | 0.2 | in. | |||||
| HMS 10 BHMS 10 B-CHMS 10 B-C2HMS 10 B-2 | 277 | 230 | 191 | 145 | 46 | 254 | 5,5 | mm | ||||
| 10.91 | 9.06 | 7.52 | 5.71 | 1.81 | 10 | 0.22 | in. | |||||
| HMS 10 S-LD-GHMS 10 S2-LD-G | 279 | 230 | 186 | 145 | 41 | 254 | 5,5 | mm | ||||
| 10.98 | 9.06 | 7.32 | 5.71 | 1.61 | 10 | 0.22 | in. | |||||
| HMS 12 B2-LD-WHMS 12 B4-LD-WHMS 12 B2-LD-CHMS 12 B4-LD-C | 342,9 | 279,4 | 190,9 | 140,6 | 50,3 | 314 | 5,5 | mm | ||||
| 13.50 | 11 | 7.52 | 5.54 | 1.98 | 12.36 | 0.22 | in. | |||||
| HMS 12 S2-LD-GHMS 12 S4-LD-G | 342,9 | 279,4 | 192,8 | 140,6 | 52,2 | 314 | 5,5 | mm | ||||
| 13.50 | 11 | 7.59 | 5.54 | 2.06 | 12.36 | 0.22 | in. |
text_image
B D C Fالتشmit / Монтаж / 安装 / 安装 / Montaža / Montáž / Montering / Montage / Mounting / Paigaldamine / Kiinnitys / Montage / Montage / Тотоθέτηση / सिप्ति / Beszerelés / Pemasangan / Montaggio / マウント / 마운트 / Uzstādišana / Montavimas / Montering / 4 عَبْمِي / Montaž / Montagem / Montaj / Монтаж / Montáž / Namestitev / Montaje / Montering / مُمْرِّلِسْتَّلِّيُّةٍ / Montaj
HMX 6.5 / HMX 6.5-C / HMX 6.5-LD / HMX 6.5-LD-C / HMX 6.5-TC / HMX 6.5-TW / HMX 6.5-LD-TC / HMX 6.5-LD-TW / HMX 6.5 S / HMX 6.5 S-LD / HMX 8 / HMX 8-C / HMX 8-LD / HMX 8-LD-C / HMX 8-TC / HMX 8-TW / HMX 8-LD-TC / HMX 8-LD-TW / HMX 8 S / HMX 8 S-LD
natural_image
Technical line drawings of a mechanical component with internal structure and two inset views (no text or symbols)Unless otherwise specified these products are developed for infinite-baffle applications, which means installed without box. Installing these components in a box or in small enclosures may compromise their low frequency performance.
natural_image
Technical line drawings of a NERTZ air vent fan assembly, showing internal components and mounting brackets (no text or symbols)HMS 12 B2-LD-W / HMS 12 B4-LD-W / HMS 12 B2-LD-C / HMS 12 B4-LD-C / HMS 12 S4-LD-G / HMS 12 S2-LD-G

natural_image
Technical line drawings of a NERTZ fan assembly with two views (top and side), showing internal structure and mounting hardware (no text or symbols)HMS 10 S-LD-G / HMS 10 S2-LD-G Grille disassembly / assembly
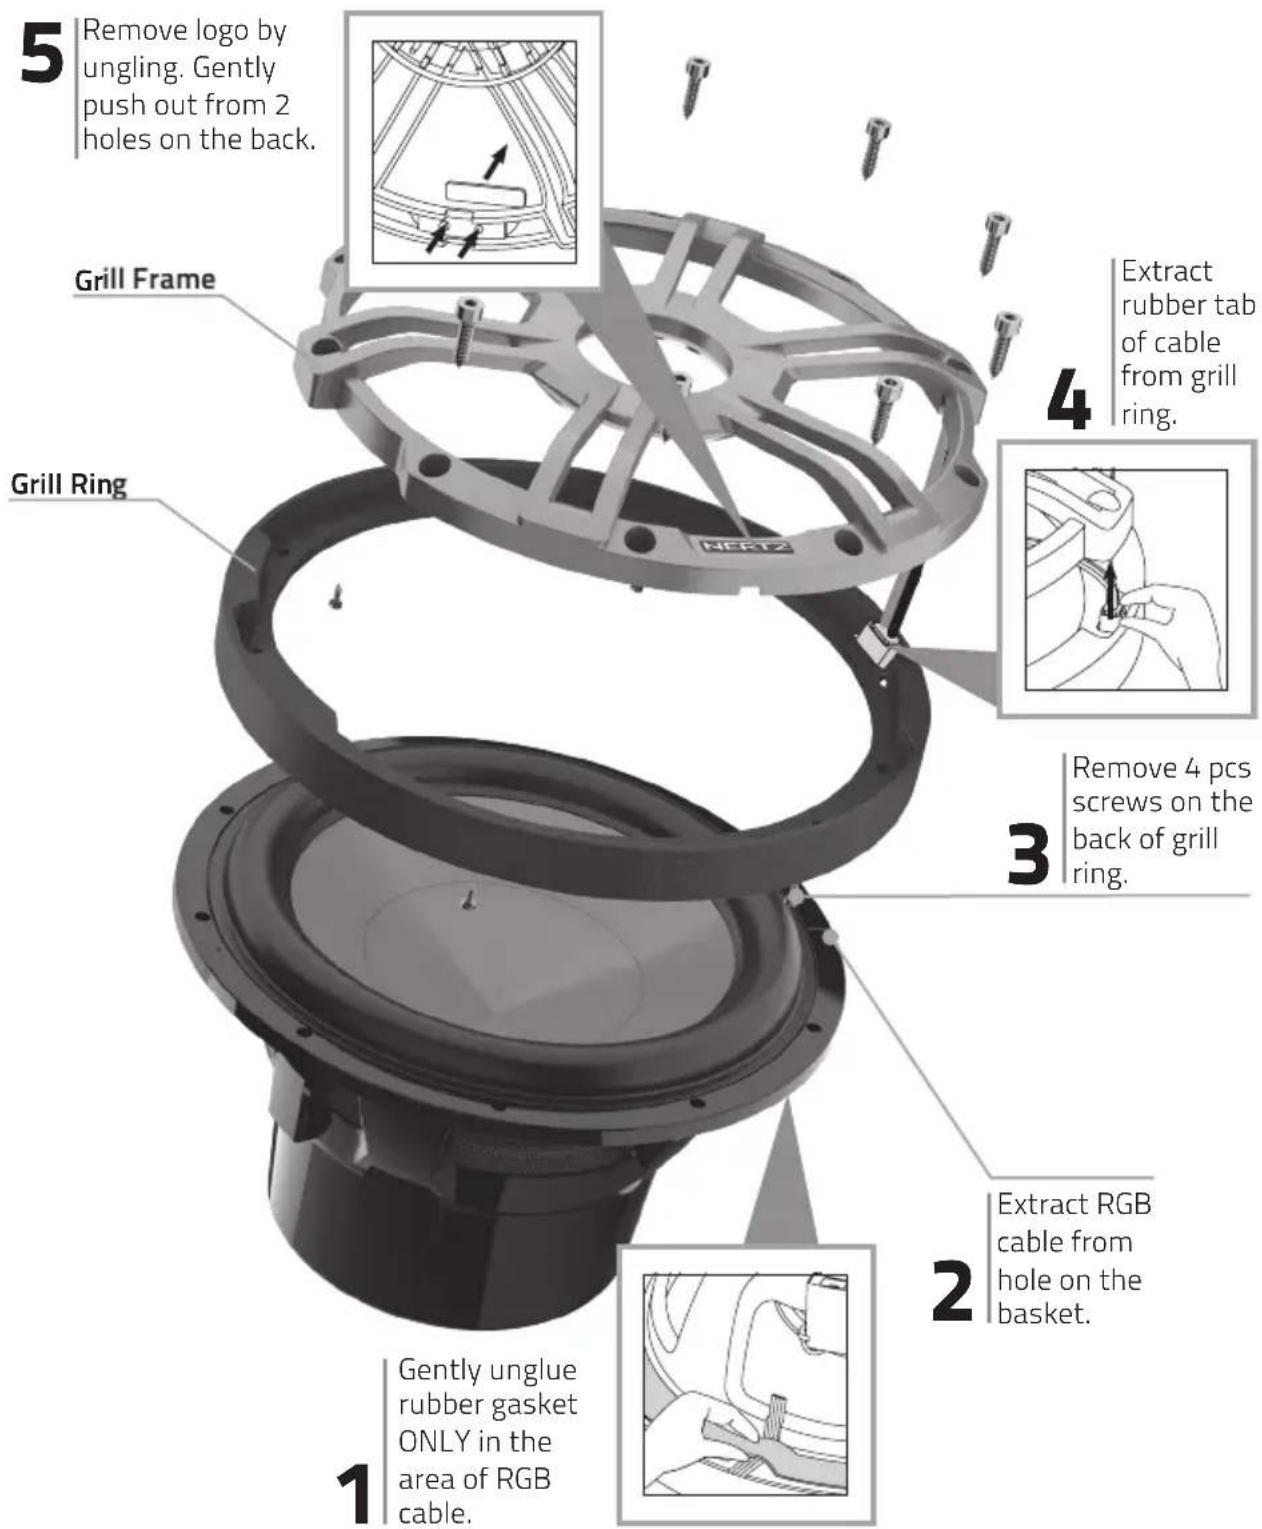
Follow below steps to disassembly the grill. To re-assembly follow the steps back from 5 to 1. Use soft glue to glue back logo (step 5) and gasket (step 1)
text_image
5 Remove logo by ungling. Gently push out from 2 holes on the back. Grill Frame Grill Ring 4 Extract rubber tab of cable from grill ring. 3 Remove 4 pcs screws on the back of grill ring. 2 Extract RGB cable from hole on the basket. 1 Gently unglue rubber gasket ONLY in the area of RGB cable.HMS 12 B2-LD-W / HMS 12 B4-LD-W / HMS 12 B2-LD-C / HMS 12 B4-LD-C Grille disassembly / assembly
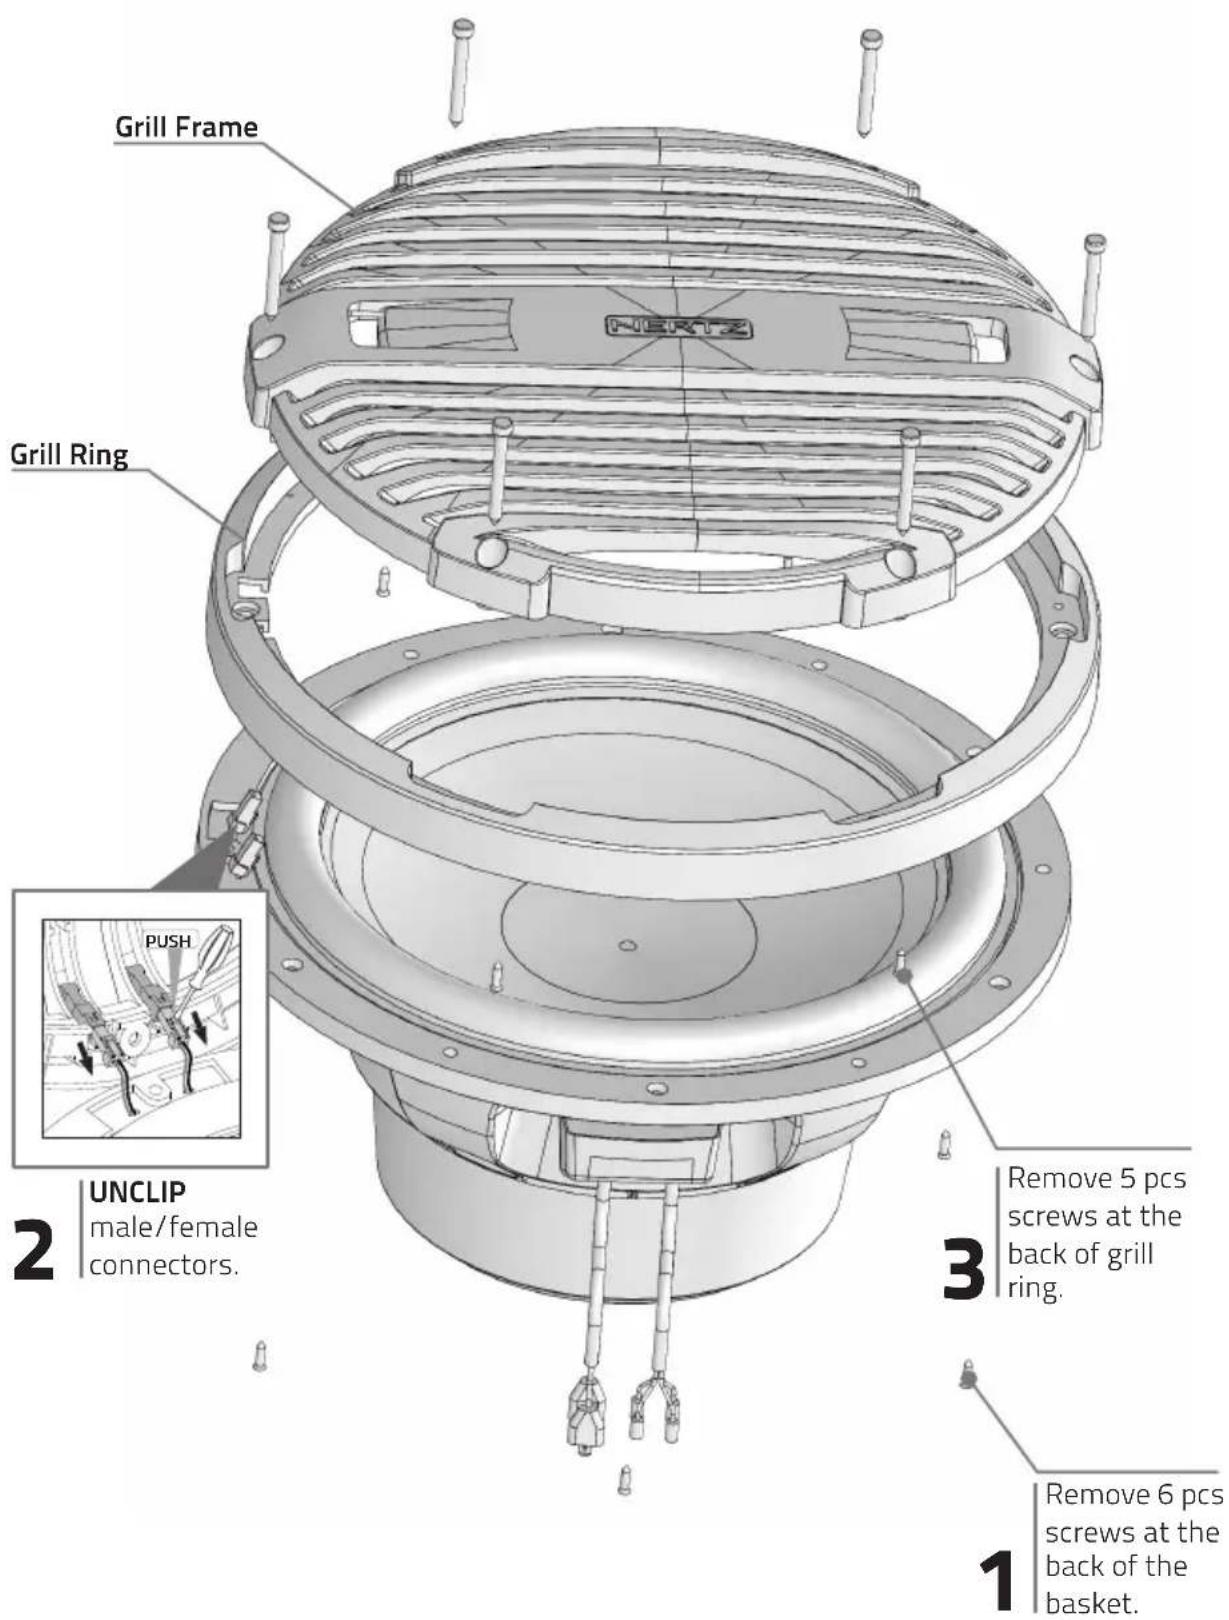
Follow below steps to disassembly the grill. To re-assembly follow the steps back from 3 to 1.
text_image
Grill Frame Grill Ring 2 | UNCLIP male/female connectors. 3 Remove 5 pcs screws at the back of grill ring. 1 Remove 6 pcs screws at the back of the basket.HMS 12 S4-LD-G / HMS 12 S2-LD-G Grille disassembly / assembly
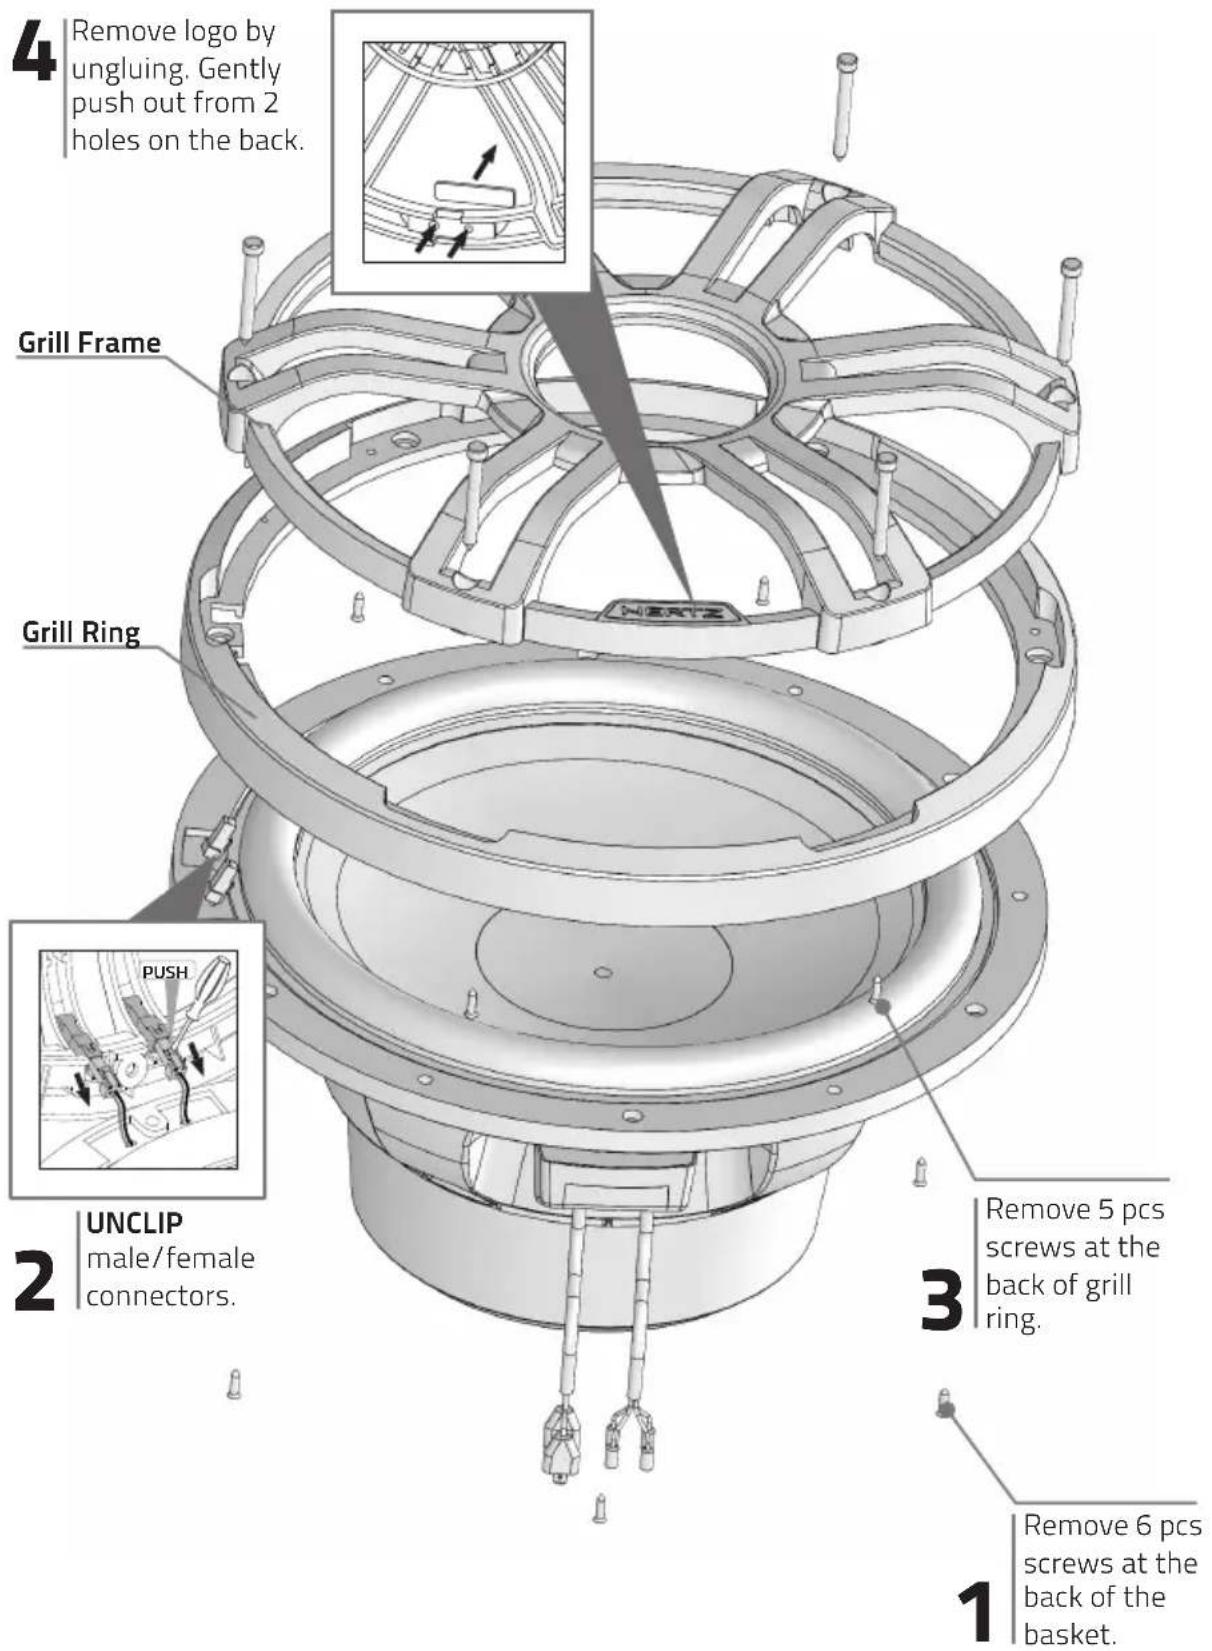
Follow below steps to disassembly the grill. To re-assembly follow the steps back from 4 to 1. Use soft glue to glue back logo (step 4).
text_image
4 Remove logo by ungluing. Gently push out from 2 holes on the back. Grill Frame Grill Ring PUSH 2 UNCLIP male/female connectors. 3 Remove 5 pcs screws at the back of grill ring. 1 Remove 6 pcs screws at the back of the basket.الوصيلات / Свързвания / 連接 / 连接 / Spajanje / Pripojení / Forbindelser / Verbindingen / Connections / Ühendused / Kytkennät / Connexions / Verbindungen / Συνδέσεις / प्रधान / Csatlakozók / Sambungan / Connessioni / 接続 / 연결 / Savienojumi / Jungtys / Tilkoblinger / إتصالات / Połączenia / Ligações / Conectarea / Подключения / Pripojenie / Vezave / Conexiones / Anslutningar / การเชื่อมต่อ / Bağlantılar
text_image
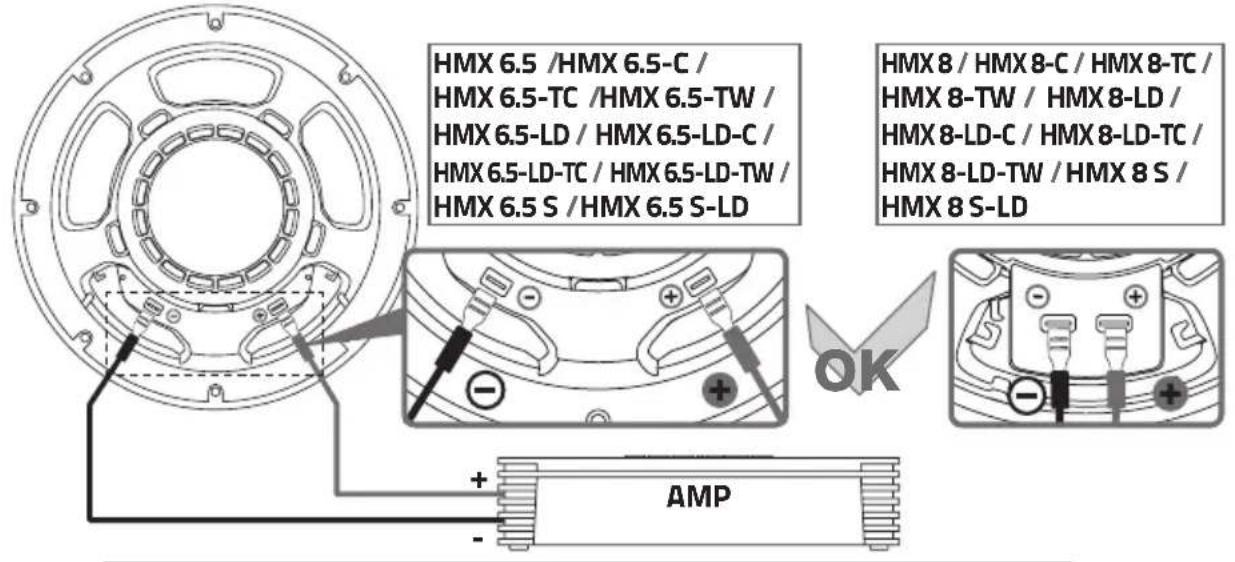
HMX 6.5 /HMX 6.5-C / HMX 6.5-TC /HMX 6.5-TW / HMX 6.5-LD / HMX 6.5-LD-C / HMX 6.5-LD-TC / HMX 6.5-LD-TW / HMX 6.5 S /HMX 6.5 S-LD HMX 8 / HMX 8-C / HMX 8-TC / HMX 8-TW / HMX 8-LD / HMX 8-LD-C / HMX 8-LD-TC / HMX 8-LD-TW / HMX 8 S / HMX 8 S-LD + AMP ok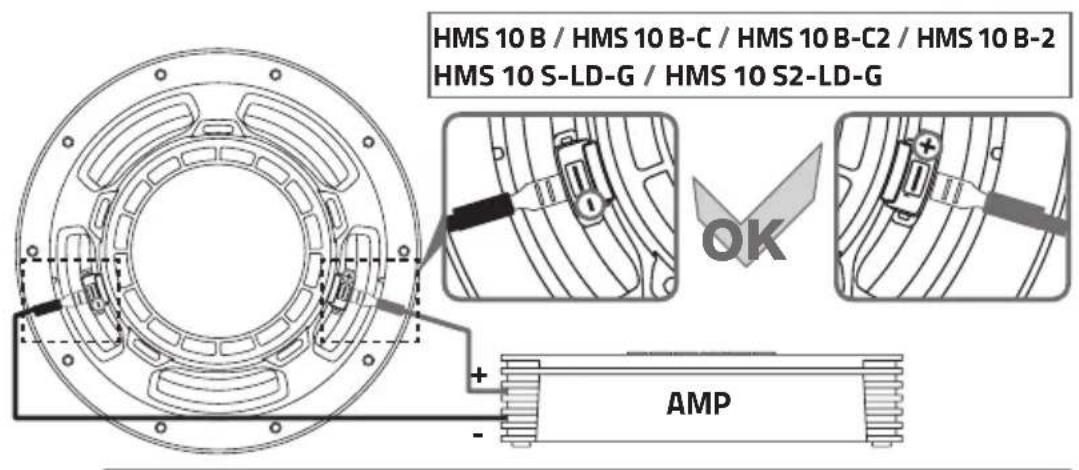
text_image
HMS 10 B / HMS 10 B-C / HMS 10 B-C2 / HMS 10 B-2 HMS 10 S-LD-G / HMS 10 S2-LD-G + AMP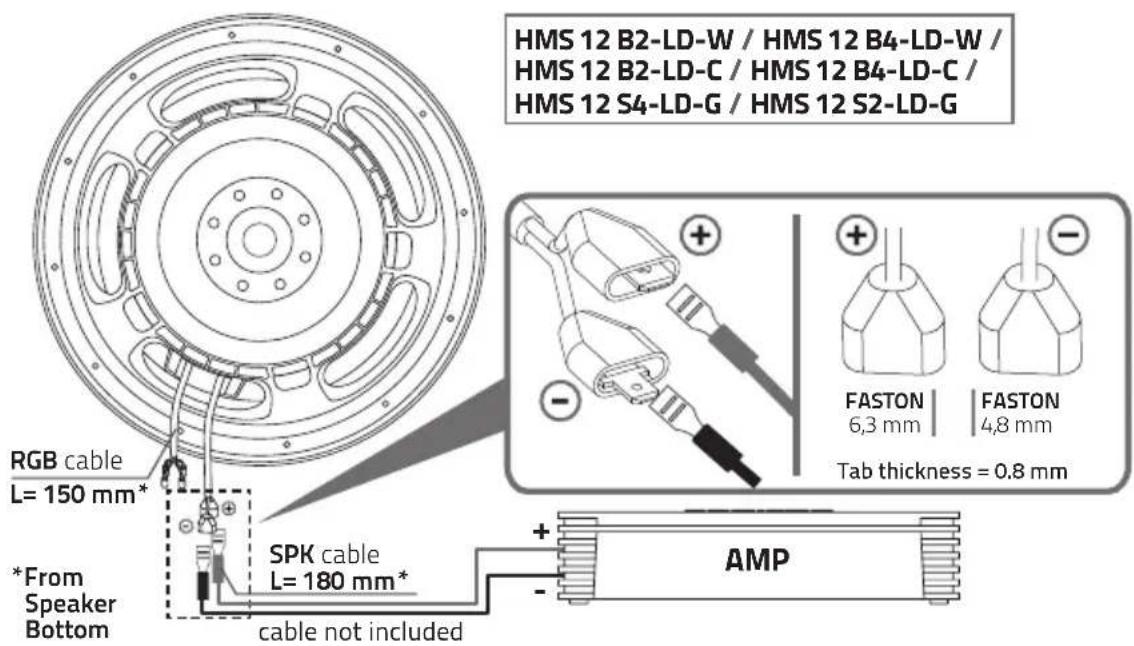
text_image
HMS 12 B2-LD-W / HMS 12 B4-LD-W / HMS 12 B2-LD-C / HMS 12 B4-LD-C / HMS 12 S4-LD-G / HMS 12 S2-LD-G RGB cable L= 150 mm* *From Speaker Bottom SPK cable L= 180 mm* cable not included FASTON 6,3 mm FASTON 4,8 mm Tab thickness = 0.8 mm AMPHMX 6.5-LD / HMX 6.5-LD-C / HMX 6.5-LD-TC / HMX 6.5-LD-TW / HMX 6.5 S-LD / HMX 8-LD / HMX 8-LD-C / HMX 8-LD-TC / HMX 8-LD-TW / HMX 8 S-LD / HMS 10 S-LD-G / HMS 10 S2-LD-G / HMS 12 B2-LD-W / HMS 12 B4-LD-W / HMS 12 B2-LD-C / HMS 12 B4-LD-C / HMS 12 S4-LD-G / HMS 12 S2-LD-G LED direct wiring
HMX 6.5 / HMX8 / HMS 10 series

text_image
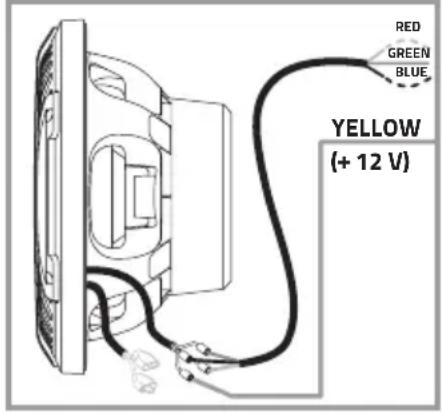
RED GREEN BLUE YELLOW (+ 12 V)SERIES FU\$E VALUE
| HMX 6.5HMX 8 | 100 mA |
| HMS 10 | 250 mA |
| HMS 12 | 250 mA |
| WHITE X X X | ||
| RED X | ||
| GREEN X | ||
| BLUE X | ||
| YELLOW X X | ||
| PURPLE X X | ||
| CYAN X X |
HMS 12 series
text_image
RED GREEN BLUE YELLOW (+ 12 V)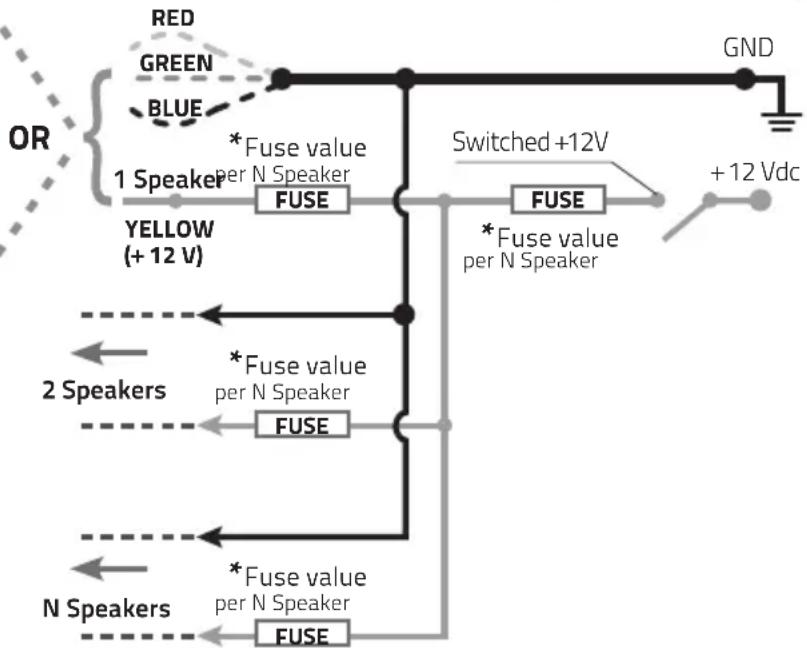
flowchart
graph TD
    A["OR"] --> B["1 Speaker"]
    B --> C["FUSE"]
    C --> D["Switched +12V"]
    D --> E["FUSE"]
    E --> F["+12 Vdc"]
    G["RED GREEN"] --> B
    H["BLUE"] --> B
    I["Yellow (+12 V)"] --> C
    J["2 Speakers"] --> K["FUSE"]
    K --> L["Switched +12V"]
    M["N Speakers"] --> N["FUSE"]
    N --> O["+12 Vdc"]
    P["*Fuse value per N Speaker"] --> Q["FUSE"]
    R["*Fuse value per N Speaker"] --> S["FUSE"]
    T["*Fuse value per N Speaker"] --> U["FUSE"]
LED CIRCUIT WIRING
- Voltage provided to the LED circuit must not exceed +12.5 Vdc referred to the system ground (GND).
- Voltage provided to the LED circuit should be switched by an activation circuit in order to turn-on the LED lighting only when
required and turn it off when vessel is not used or put into storage. - Protect the YELLOW (+12V) wire with a 100mA fuse, then connect the YELLOW (+12V) wires from all the speakers together to the main Switched +12 Vdc.
- Fuse the Switched +12 Vdc according to the total number of speakers connected in parallel. We suggest for the fuse value to be as close as possible to the standard value corresponding to 100mA or 250 mA x N speakers rounded in excess. I.e. 6 speakers (3 pairs) in parallel requires 100mA x 6 = 600mA, for which the closest standard fuse value rounded in excess would be 630mA.
- Connect the R(Red), G(Green), B(Blue) wires from the speaker to the system ground (GND) referring to the below table according to the color desired among the 7 available options.
COLLEGAMENTO DEL CIRCUITO LED
HMX 6.5-LD / HMX 6.5-LD-C / HMX 6.5-LD-TC / HMX 6.5-LD-TW / HMX 6.5 S-LD / HMX 8-LD / HMX 8-LD-C / HMX 8-LD-TC / HMX 8-LD-TW / HMX 8 S-LD / HMS 10 S-LD-G / HMS 10 S2-LD-G / HMS 12 B2-LD-W / HMS 12 B4-LD-W / HMS 12 B2-LD-C / HMS 12 B4-LD-C / HMS 12 S4-LD-G / HMS 12 S2-LD-G LED wiring with HM RGB 1BK
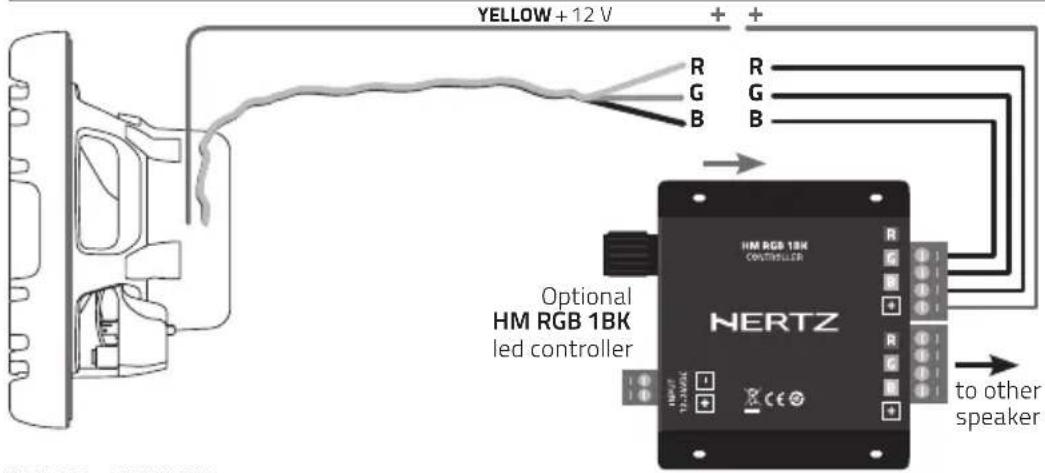
text_image
YELLOW +12 V R G B + + R G B Optional HM RGB 1BK led controller NERTZ HIVTEL to other speakertext_image
LED ASSEMBLY B C A M H W D Pic. 1DAMPING MATERIAL
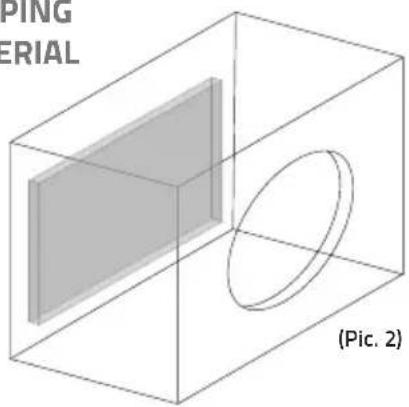
natural_image
3D wireframe diagram of a rectangular prism with an elliptical cutout, labeled 'PING' and '(PIC. 2)' (no text or symbols on the diagram itself)| BOXTECHDATA | Vb | Fb | Qtc | External dimensionsPic. 1 | MountingHole - M | WoodThickness | SuggestedSubsonicfiltercut-off | SuggestedLo-passfiltercut-off | DampingMaterial | ||
| W | H | D | |||||||||
| I(cu. ft.) | Hz | mm(in.) | mm(in.) | mm(in.) | mm(in.) | mm(in.) | |||||
| HMS 10 B / HMS 10 B-CHMS 10 B-C2 / HMS 10 B-2HMS 10 S-LD-G /HMS 10 S2-LD-GCOMPACT | 50(1.77) | 54 | 1,05 | 440(17.32) | 440(17.32) | 365(14.37) | 230(9.06) | 19(0.75) | 20 Hz24dB Oct | 100 Hz12dB Oct | Pic. 2 |
| HMS 10 B / HMS 10 B-CHMS 10 B-C2 / HMS 10 B-2HMS 10 S-LD-G /HMS 10 S2-LD-GPERFORMANCE | 71(2.51) | 51 | 0,99 | 460(18.11) | 460(18.11) | 450(17.72) | 230(9,06) | 19(0.75) | 20 Hz24dB Oct | 150 Hz12dB Oct | Pic. 2 |
| PANELS LAYOUT | B |
| C |  |
B
A
BOX ASSEMBLY AND SHAPE
This manual features the box assemblies and shapes which are easiest to create. However, the bass frequency performance can be noticeably improved with different box shapes, assembly methods and construction materials.
| PANELS CUT LIST | A | Qty | B | Qty | C | Qty |
| mm(in.) | Pcs | mm(in.) | Pcs | mm(in.) | Pcs | |
| HMS 10 B / HMS 10 B-C HMS 10 B-C2 / HMS 10 B-2 HMS 10 S-LD-G / HMS 10 S2-LD-G COMPACT (50lt) | 440 x 440(17.32 x 17.32) | 2 | 440 x 327(17.32 x 12.87) | 2 | 402 x327(15.83 x 12.87) | 2 |
| HMS 10 B / HMS 10 B-C HMS 10 B-C2 / HMS 10 B-2 HMS 10 S-LD-G / HMS 10 S2-LD-G PERFORMANCE (70lt) | 460 x 460(18.11 x 18.11) | 2 | 460 x 412(18.11 x 16.22) | 2 | 422 x 412(16.61 x 16.22) | 2 |
العملات الكهرو صرupsة / Електро-акустични параметри / 電聲参数 / 电声参数 / Elektro-akustički parametri / Elektroakustické parametry / Electro-Acoustic parametre / Elektro-akoestische parameters / Electro-Acoustic parameters / Elektroakustilised parameetrid / Sähköakustiset parametrit / Paramètres électro-acoustiques / Elektro-akustische Parameter / Нлектро-акουστικές παράμετροι / دotted Cyprus - 寸업 Cyprus - 寸업 Cyprus / Elektro-akusztikus paraméterek / Parameter elektro-akustik / Parametri elettroacustici / 電気音響パラメ-タ / 전자 어쿠스틱 파라미터 / Elektro-akustiskie parametri / Elektriniai-akustiniai parametrai / Elektro-akustiske parametre / پارامترهای الكتروانوستيکی / Parametry elektro-akustyczne / Parâmetros electro-acústicos / Specificatii tehnice / Электроакустические параметры / Elektro-akustické parametre / Elektro-akustični parametri / Parâmetros electroacústicos / Elektroakustiska parametrar / อิเล็กโทร-อุตตึก พารามิเตอร / Elektro-aküstik parametreler
| HMX 6.5 / HMX 6.5-C /HMX 6.5-LD / HMX 6.5-LD-C /HMX 6.5-TC / HMX 6.5-TW /HMX 6.5-LD-TC /HMX 6.5-LD-TW /HMX 6.5 S /HMX 6.5 S-LD | HMX 8 / HMX 8-C /HMX 8-LD /HMX 8-LD-C /HMX 8-TC / HMX 8-TW /HMX 8-LD-TC /HMX 8-LD-TW /HMX 8 S / HMX 8 S-LD | HMS 10 B /HMS 10 B-C /HMS 10 S-LD-G | HMS 10 B-C2 /HMS 10 B-2 /HMS 10 S2-LD-G | HMS 12 B2-LD-W /HMS 12 B2-LD-C /HMS 12 S2-LD-G | HMS 12 B4-LD-WHMS 12 B4-LD-CHMS 12 S4-LD-G / | |
| Dmm | 125 174 210 210 | 300 300 | ||||
| Xmaxmm | 3.65 4.5 13.5 12.3 | 19 19 | ||||
| ReΩ | 3.5 3.1 4.5 2,1 1.8 | 3.3 | ||||
| FsHz | 65 50 41 41 30 | 30 | ||||
| LemH | 0.53 | 0.52 | 0.9 | 0,46 | 0.41 | 0.62 |
| Vasil | 8.8 | 29.46 | 37 31 95.4 | 104.7 | ||
| Mmsg | 14 | 27.3 | 69 | 75,6 114 112 | ||
| Cmsmm/N | 0.4 0.37 | 0.22 0,18 | 0.225 | 0.247 | ||
| BLT·m | 5.2 6.6 10.2 | 8,3 | 8 | 8 | ||
| Qts | 0.7 | 0.58 | 0.71 | 0,6 | 1 | 1 |
| Qes | 0.75 | 0.61 | 0.76 | 0,63 | 1.1 | 1.1 |
| Qms | 11.5 | 11 | 11 | 12,3 | 11.1 | 12.9 |
| SpldB | 89 91 88 | 88,5 | 89,5 89,5 |
الموصفات الفنية / Технически спецификации / 技術規格 / 技术規格 / Tehnički podaci / Technické údaje / Tekniske specifikationer / Technische specificaties / Technical specifications / Tehnilised andmed / Tekniset tiedot / Caractéristiques techniques / Technische daten / Τεχνικά χαρακτηριστικά / ∅πο παση / Műszaki adatok / Spesifikasi teknis / Specifiche tecniche / 技術仕様 / 기술 사양 / Tehniskā specifikācija / Techniniai duomenys / Tekniske spesifikasjoner / مشخصات فنى / Szczegóły techniczne / Especificações técnicas / Parametrii elctro-acustici / Технические условия / Technické informácie / Tehnične specifikacije / Especificaciones técnicas / Tekniska specifikationer / ความต้องการทางเทคนิค / Teknik veriler
| Component | Size Power | handling | Impedance | Magnet Size | Voice Coil ∅ | Magnet Cone | Weight | of one component | ||
| Peak | Continuous | |||||||||
| mm(in.) | W W | Ω mm | (in.) | mm(in.) | Kg(lb.) | |||||
| HMX 6.5HMX 6.5-CHMX 6.5-TCHMX 6.5-TWHMX 6.5-LDHMX 6.5-LD-CHMX 6.5-LD-TCHMX 6.5-LD-TWHMX 6.5 SHMX 6.5 S-LD | Two WayCoaxial | Woofer 165 (6.5) | 150 | 75 4 | 78,5 x 32 x 17(3.09x1.26x0.67) | 25 (1) | High density flux ferrite | Polypropylene with UV inhibitors | 1 (2.2) | |
| Tweeter diaphragm 36 (1.4) | 19,7 x 0 x 3(0.78 x 0 x 0.12) | 20 (0.8) | Neodymium | |||||||
| HMX 8HMX 8-CHMX 8-TCHMX 8-TWHMX 8-LDHMX 8-LD-CHMX 8-LD-TCHMX 8-LD-TWHMX 8 SHMX 8 S-LD | Two WayCoaxial | Woofer 200 (8) | 200 | 100 4 | 90 x 40 x 20(3.54x1.57x0.79) | 32 (1,26) | High density flux ferrite | Polypropylene with UV inhibitors | 1,66 (3.66) | |
| Tweeter diaphragm 36 (1.4) | 19,7 x 0 x 3(0.78 x 0 x 0.12) | 20 (0.8) | Neodymium | |||||||
| HMS 10 BHMS 10 B-CHMS 10 S-LD-G | Subwoofer | 250 (10) 500 250 4 | 140 x 60 x 30(5.51 x 2.36 x 1.18) | 50 (2) | High density flux ferrite | Polypropylene with UV inhibitors | 5,1 (11.24) | |||
| HMS 10 B-C2HMS 10 B-2HMS 10 S2-LD-G | Subwoofer | 250 (10) 500 250 2 | 140 x 60 x 30(5.51 x 2.36 x 1.18) | 50 (2) | High density flux ferrite | Polypropylene with UV inhibitors | 5,1 (11.24) | |||
| HMS 12 B2-LD-WHMS 12 B2-LD-CHMS 12 S2-LD-G | Subwoofer | 300 (12) 1000 500 2 | 156 x 80 x 40(6.14 x 3.15 x 1.57) | 65,5 (2.6) | High density flux ferrite | Polypropylene with UV inhibitors | 7,6 (16.8) | |||
| HMS 12 B4-LD-WHMS 12 B4-LD-CHMS 12 S4-LD-G | Subwoofer | 300 (12) 1000 500 4 | 156 x 80 x 40(6.14 x 3.15 x 1.57) | 65,5 (2.6) | High density flux ferrite | Polypropylene with UV inhibitors | 7,6 (16.8) | |||